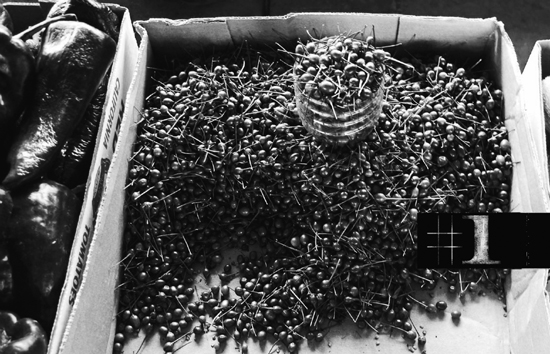
Chile pequíns for sale at the Farmer’s Marketing Association in Houston
Go down Calle 8 and look for the cabritos cooking on spits in the window. That’s the easy way to find Los Norteños, my favorite restaurant in Matamoros, a Mexican border town across the Rio Grande from Brownsville. The last time I was there, I sat at a table near the grill and made cabrito (baby goat) tacos. I started with a layer of loin meat and some thin kidney slices that I showered with salt. Then I added raw onion and a little lettuce and squeezed a lime wedge over it. I topped this with some pico de gallo, being careful not to load the pliant fresh corn tortilla beyond its rolling point. They were magnificent tacos.
It was May 1, Mexico’s Labor Day. There was a big parade in downtown Matamoros, and a lot of people were out celebrating. I had been visiting the busy street vendors’ stalls all day, eating tacos and taking notes about grilling. Now I was glad to sit down and relax at a real dining table in an air-conditioned restaurant.
Cabrito al pastor, cabrito turned on a metal spit over mesquite coals, is a technique so revered in northern Mexico that it has been adapted to fit elegant restaurants. At Los Norteños and many upscale restaurants in Monterrey, the brick fire pit that holds the pungent mesquite coals and the aromatic goats is separated from the dining room by a wall of thick glass.
Founded in 1950, Los Norteños is a restaurant relic. The dozen or so dark wood tables in the downstairs dining room are patrolled by four mustachioed waiters in jackets and ties. The manager is a white-haired guy named Ignacio who everybody calls “Nacho.” He stands up front near the door at an old-fashioned wooden cashier stand that looks like a pulpit decorated with big glass jars full of candy.
I ordered the riñonada portion of the cabrito, which included ribs, some tender loin meat, and the kidney. First I was served a bowl of bean soup and some tortilla chips. Then the waiter brought over a huge stack of hot tortillas in a wicker basket, and a plate with lettuce, tomato, and raw onions. A bowl of hellishly hot pico de gallo with big hunks of raw serrano in it arrived, along with another bowl of a milder cooked salsa. When I finished the soup, my plate of cabrito arrived. The whole spread cost around twelve dollars. The experience was marred only by the unavailability of cerveza on May Day.
Cabrito al pastor roasting over mesquite coals at Los Norteños restaurant, Matamoros
It’s strange that cooking over mesquite has come to be associated with fancy restaurants in both northern Mexico and the United States. The cooking style is a throwback to the early days of the vaqueros, or Mexican cowboys. In fact, I got a chance to eat with some South Texas vaqueros not long ago.
The town of Linn in the Lower Rio Grande Valley is about a five-hour drive from my home in Houston. As soon as I got out of the car at St. Anne’s church, the smell of mesquite smoke enveloped me. “Get used to it,” said Melissa Guerra, “Your clothes will smell like mesquite for weeks.” Guerra had invited me to be a judge at the 26th Annual Linn–San Manuel Vaquero Cook-Off. She had laughingly described the event as a bunch of Tejanos out behind a church in the middle of nowhere and cooking over campfires.
South Texas cookbook author Melissa Guerra was raised on the nearby McAllen Ranch and her ancestors have been raising cattle in South Texas for eight generations. Wherever I looked, there were guys in straw cowboy hats and oversize sombreros building fires on the ground. Guerra’s husband and the rest of the San Vincente Ranch cook-off team were busy making beans and boiling corn on the cob in giant iron pots. They were burning mesquite logs in a campfire set off by a circle of stones. The coals were shoveled into a four-foot-square steel box and a grate was set over the top. A tiny cabrito of about eight pounds was split whole and spread out ribs down over the coals.
When you mention Tex-Mex, most people think of chili con carne and combination plates. That’s the stuff that was first marketed to Anglos under the banner of “Mexican food” in the mid-1800s. In the 1970s, an American obsession with authentic Mexican pushed old-fashioned Tex-Mex aside. And in the 1980s, mesquite-grilled fajitas and frozen margaritas sparked a Tex-Mex revival that also helped to fuel the explosive growth of backyard barbecue.
But mesquite grilling wasn’t new. It’s actually a much older style of Tejano cuisine than cheese enchiladas and combination plates. This kind of cooking had been part of the Spanish cattle culture for centuries. Which is why I was delighted to accept Guerra’s invitation to participate in a real vaquero cooking contest. It was a chance to see Tex-Mex cooking as it was done in the beginning.
MESQUITE
Mesquite grilling was a plot by Texas ranchers to get a bunch of Californians to clear their rangeland for free—or so went the joke that made the rounds in West Texas back when fajitas first popularized the flavor of mesquite smoke.
Southwestern cuisine embellished the border cooking style, and mesquite-grilled steaks and chops became a distinctive part of the menu. Mesquite-burning grills were installed in southwestern restaurants, in Tex-Mex fajita joints, and even in upscale Texas hamburger chains like Becks Prime in Houston. In 1979, Ranchmen’s Manufacturing of Dallas, one of the few places to buy mesquite wood, had around a thousand customers. By 1984, the company had more than twelve thousand clients. Today there are hundreds of places to buy mesquite wood in Texas. In 2005, twelve and half million pounds of mesquite chunks were sold to consumers across the country.
Historically, mesquite grilling wasn’t very common in Texas outside of the Lower Rio Grande Valley. There were very few mesquite trees—or any other kind of trees—in South and West Texas. Before the Civil War, these areas were covered with an ocean of prairie grass. Wildfires and the hooves of millions of buffalo kept the brush under control. The few trees that existed hugged the banks of rivers and streams. And the Comanches scared away any settlers.
Mesquite began its advance when the buffalo were killed off and the Comanches were moved to reservations. During the cattle drive era of the late 1800s, cattlemen flooded into the prairie lands with their herds. Overgrazing destroyed the prairie and before long the sea of grass became a thicket of thorny mesquite.
Today mesquite occupies fifty to sixty million acres in South and West Texas. The tree competes with other vegetation for scarce water; it has a taproot that can extend for over a hundred feet downward to reach the water table. It’s a nuisance, and it’s almost impossible to kill. A mesquite tree can regenerate itself from the smallest piece of root left in the ground.
Mesquite has been transplanted to other places where it has also become a problem. It was introduced to Hawaii in 1828, where it is called the kiawe tree. It’s now one of the most common trees in much of Hawaii, which is why mesquite grilling is also very popular in the islands.
At least you don’t have to feel guilty about grilling with the stuff. Burn all the mesquite you like; no one will fault you for destroying the rain forest.

Competitor in the 2008 Linn–San Manuel Vaquero Cook-Off
Only twenty teams are invited each year to the Linn–San Manuel Vaquero Cook-Off; it’s sort of the Super Bowl of vaquero cook-offs, Guerra told me. But in truth, the annual gathering of Tejano ranchfolk is more of a charity event than a cooking contest. It is the primary fund-raiser for St. Anne’s Catholic Church and the Linn–San Manuel elementary school and fire department.
While the chuck-wagon cook-offs common in other parts of the state celebrate Texas cowboy cooking, the Linn–San Manuel Cook-Off is a celebration of vaquero cooking. The vaqueros, as Mexican cowboys are known, have their own cooking traditions. They make a flatbread called pan de campo in their Dutch ovens instead of the biscuits that Anglo cowboys baked, and the vaqueros grill their meats. It was the kind of fuel they used in the old days that made the biggest difference in cowboy and vaquero cooking techniques.
Cowboys worked with cattle and cooked over campfires, so you’d think they’d be pretty good at grilling steaks. Wrong. “The cowboys didn’t really do much grilling,” chuck-wagon cooking expert Tom Perini told me. There weren’t any trees in the vast prairies of the South Plains when the cattle drives took place. The cowboys made their campfires with dried “buffalo chips.” Imagine the flavor of a steak grilled over burning buffalo dung. That’s why cowboys fried steaks in skillets and cooked chilis, stews, and beans in covered Dutch ovens.
Here in the Lower Rio Grande Valley, a few miles from Mexico, mesquite trees have always been plentiful. As I learned in Matamoros and Monterrey, grilling or slow-cooking meat over mesquite coals is a northern Mexican tradition that goes back to the immigrant Spanish herders. In northern Mexico, a kid goat is classically spread on a steel cross and rotated over the mesquite coals, in a preparation called cabrito al pastor (“in the style of the shepherd”).
Like a lot of backyard barbecuers, I often use mesquite charcoal or mesquite wood for grilling because it imparts a lot of flavor in a short amount of time. But I avoid using it in my barbecue pit because the high level of resin imparts a nasty diesel fuel flavor to long-cooked meats.
The trick, as these vaqueros were demonstrating, is to burn the mesquite wood down and then cook over the hot coals. Using this technique, the flavor of the wood smoke is tamed from overwhelming to pleasantly bold.
Mesquite wood and tiny wild chile pequíns are the two things that make the vaquero cooking of the Lower Rio Grande Valley unique—and both of them are free, a cook-off competitor told me as I strolled around observing the cooking. Some of the competitors used commercial seasoning blends from Bolner’s Fiesta spices. Some said they started with commercial seasoning blends and then doctored them with their own additions. One team had brought along an entire chile pequín bush.
Cabrito is one of the categories I was selected to judge at the Linn–San Manuel Cook-Off. The categories were fajitas, chili, carne guisada (stewed meat), frijoles, pan de campo, beef ribs, pork ribs, cabrito, and an open category. There were a dozen cabrito entries and each of the tiny baby goats had been splayed and cooked over mesquite coals for several hours with various seasonings. It was a difficult contest to judge.
The outer skin of the kid goats was hardened, but underneath the meat was very soft; some of the samples were juicier than others. In the top-ranked entries, the long strings of meat that carved away from the shoulder area were moist and milky white. But it was the meat from the riñonada—the area around the kidney—that melted in your mouth and sent your eyes rolling back in your head before you begged for more. One of the lady judges had wisely brought a large shopping bag, which she filled with leftovers when the judging was over.
In the open category, one contestant studded a whole seven-bone prime rib roast with garlic and slow-cooked it over mesquite coals. There were also quite a few pork rib racks cooking over coals.
In the ranch lands along the border and in the desert of northern Mexico, the grilling tradition has always been strong. Barbecuing over hot coals in open pits with no coverings to retain the smoke was the original technique in the old South and throughout Texas a century ago. It’s the technique that Lyndon Johnson’s barbecue caterer, Walter Jetton, swore by and it’s still used today for whole-hog barbecue in the Carolinas and at such Texas barbecue joints as Cooper’s in Llano. The only difference between mesquite grilling and open-pit barbecue is the duration.
Mesquite grilling in your backyard is easy for small quick-cooking cuts. You start with mesquite wood and burn it down until only coals remain—then start cooking. For larger cuts, you need a fire that’s separate from the grill. When your heat gets low, you burn some more mesquite and then put the coals into the grill; you can use a chimney starter if you’re using a small grill.
Mesquite grilling is the pride of the Tex-Mex tradition, but it’s not the only grilling method in Texas or Mexico. I happened upon one team at the Linn–San Manuel Cook-Off using Kingsford charcoal briquettes instead of mesquite coals. When I asked about it, the guy who was stoking the fire told me with a smile: “Charcoal is a lot easier.”
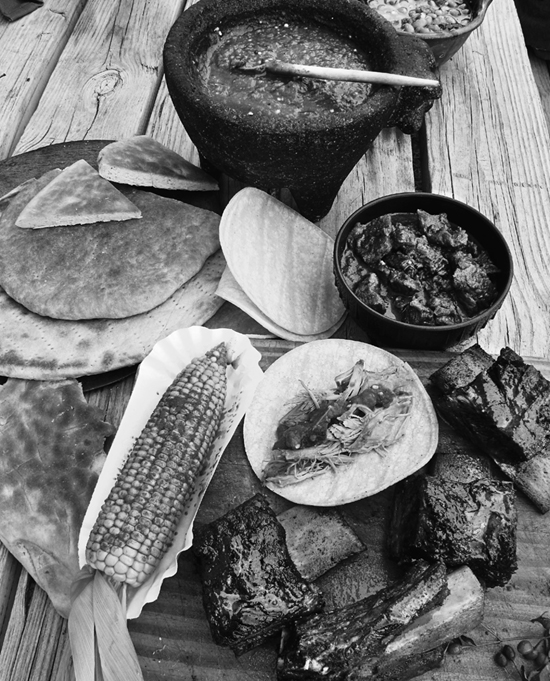
Vaquero cook-off fare: (clockwise) corn on the cob with chile, pan de campo, chile pequín salsa in a molcajete, bowl of carne guisada, cabrito taco, and short ribs
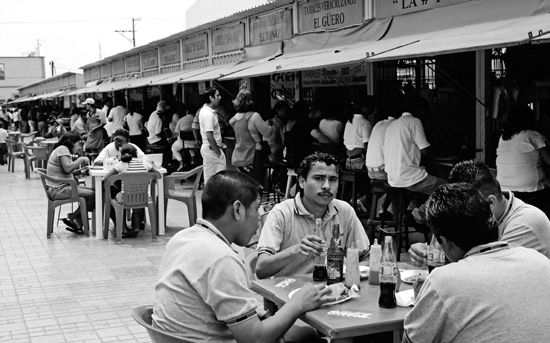
The average citizens of the border region don’t eat a lot of cabrito and they don’t cook with mesquite. Street food is prepared on propane grills and flat tops and it’s the most popular way to grab a quick snack. There’s an incredible array of choices. In Texas, there are taco trucks, taco trailers, carnicerias (butcher shops that sell meals), taquerias, and ostionerias (oyster bars). In northern Mexico, torta shops sell Mexican sandwiches and taco stands are everywhere. Fruit vendors sell paper cones of pineapple or melon chunks sprinkled with powdered chile and cold fruit-flavored aguas frescas.
In Matamoros, I visited the civic-sponsored outdoor food stalls of Plaza Allende. On two sides of the lovely urban square, there were long rows of identical wooden kiosks, each housing a tiny fast-food operation. Inside each, the taquero, as the proprietor of a taco stand is known, cooked on a propane-fueled grill.
Some of the stalls turned out tacos, some made quesadillas, and some specialized in tortas. Others offered tacos al pastor made from the revolving cones of pork topped with pineapple cooking on vertical roasters.
I was especially intrigued by the stalls that had a gas grill and a flat top side by side. The proprietors were grilling meat on the grate of the gas grill and at the same time caramelizing onions and peppers, heating tortillas, and toasting buns on the flat top. It seemed like the ideal combination of cooking surfaces for a modern taquero.
Slow cooking over mesquite is a lovely old-fashioned ideal, but modern Mexican street food is cooked on a gas grill or a propane-fired flat top. I would see the same sort of setup again and again at street vendors’ stalls in Mexico and at taco trucks in the United States.
It seemed like evolution. The easy and convenient gas grill and flat top had replaced the primitive mesquite- and charcoal-burning contraptions and all that labor-intensive shoveling of coals. But eventually I started to realize that while gas grills were ubiquitous, they were often only the last stage in a multipart cooking process.
The guy selling tacos al pastor was a good example. The pork was actually slow-cooking on the vertical roaster. The grill was only used in the final step of making the tacos. It’s the same thing with taco trucks in the United States. The guy selling barbacoa tacos wasn’t slow-cooking cow heads on the flat top where he was making tacos; the barbacoa was prepared in advance as were the asados, guisadas, and many of the other meats.
To test recipes for this book, I bought a gas grill and a “big ugly barrel,” a fifty-five-gallon drum turned on its side and cut in half. I lined these up beside the large offset barbecue smoker I have been using for the last twenty years.
This might sound like a lot of outdoor cooking equipment, but if you can believe statistics, I am probably fairly average. The rise in the sales of gas grills might lead you to believe that they are replacing charcoal grills. But the rise in the sale of charcoal would seem to signal an entirely different picture. More and more Americans own both kinds of grills and use them side by side. And the continued rise in the sales of wood chips and chunks also indicates that lots of people want to get smoky flavors from the grill.
The best taqueros use all kinds of equipment. Every couple of days, they slow-cook meats over mesquite or braise or stew them. And then they use these cooked-in-advance ingredients to make tacos to order on the gas grill. It’s a very clever strategy.
Some of the recipes in this book can be cooked on any kind of grill. Some call for specific equipment. But if you happen to have both a gas grill and a large covered charcoal grill, you can borrow the taqueros’ technique.
Your charcoal grill imparts more flavor to your expensive steaks, roasts, and whole fish. And it’s easier to avoid flare-ups with indirect cooking on a charcoal grill. But you can use your gas grill to make side dishes, caramelize onions and peppers, cook mushrooms, and prepare tacos, quesadillas, and tortas while you cook meat at the same time. And when you’re in a hurry, you can always just use the gas grill to make chops, hot dogs, hamburguesas, shrimp dishes, and other quick fare.
There is no right way or wrong way to grill Tex-Mex style, as long as the food tastes great. No matter if your grill burns mesquite logs, charcoal, or propane, you can find a Tex-Mex recipe that fits the equipment. Here’re a few tips on using some of the most common grills:
Pioneered by weber, this is the great American grill. The cover retains heat and smoke and controls airflow to prevent flare-ups. Many companies make good covered charcoal grills these days, but be sure you get one with vents on the top and bottom to control the heat and with two grates—one for food and one for the coals.
Covered charcoal grills range in size from tiny tabletop models to the enormous Weber Ranch Kettle, a thousand-dollar charcoal grill with a grate that’s three feet across. A medium-size Weber should cost under one hundred dollars, and an Old Smokey can be found for around fifty. The optional hinged grills that you can lift to add more wood or coals during the cooking process are highly recommended. Buy the charcoal containers that confine the coals and keep the fire from spreading, too.
A Barrel smoker is a fifty-five-gallon metal drum turned on its side, sawed in half, and fitted with a chimney, legs, and handles. They sell for under a hundred dollars and can be found outside many grocery stores in Texas. Plans for welding them are also available online.
A barrel smoker gives you lots of grill capacity and enough headroom (vertical clearance) for a turkey or cow head. There is also plenty of room underneath to burn wood, or at least to throw a few logs onto a charcoal fire. If you get two or three years out of a barrel smoker, you’re doing fine; think of it as a disposable grill. The tops never close evenly, the grills burn through, and sooner or later the barrel rusts out or the welds break.
But don’t write them off; some people think the Texas hibachi is the perfect grill. I added an extra grate on the bottom of my barrel to keep the coals off the floor and improve the airflow. You can also drill holes for more air. (There are lots of plans for customizing barrel grills on the Internet, including directions for construction of a “double barrel.”)
The firebox and grill are on one side, and a separate smoke chamber big enough to hold a brisket, five pounds of sausage, and a couple of chickens is on the other side. The smoke chamber has a built-in thermometer on top, and there’s a drain plug for cleaning on the bottom. The drawback for grilling is that the grill area is relatively small. Offset grills start around six hundred fifty dollars.
Gas grills are powered by propane tanks or a natural gas line and they range in price from under two hundred dollars to tens of thousands of dollars. These grills use porcelain or lava rock briquettes or some sort of steel surface to convert gas to radiant heat. They feature electronic ignition for easy lighting. Temperature controls allow heat adjustment from low for roasts and turkeys, to high for steaks, chops, and hamburgers. The cooking surface on gas grills ranges in size from around 150 square inches to more than 500 square inches.
The biggest problems with gas grills come from flare-ups. Cooking fatty food directly over the gas flames causes the food to catch on fire. Some gas grills are designed to cook using indirect heat only, preventing such mishaps, but they don’t sear the meat or give you the desired grill marks. Flavor-wise, there isn’t much difference between cooking with indirect heat on a gas grill and putting the food in the oven.
Gas grills excel for making a quick dinner as long as you keep your eye out for flare-ups. If your steak or burger catches fire, turn down the heat and move the meat to a cooler spot on the grill to finish cooking at a slower rate.
If you are buying a new gas grill, consider getting one that allows you to replace one side of the grill grate with a flat top.
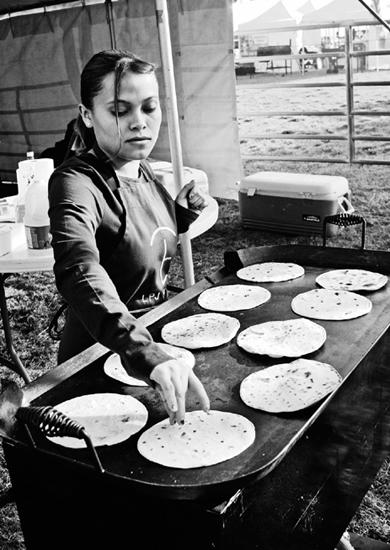
Making flour tortillas on a flat top
The best piece of equipment you can add to your backyard barbecue arsenal is a flat top, comal, or a griddle. It will save you the bother of trying to cook in the backyard and on top of the kitchen stove at the same time.
You can stick a frying pan or a flat Mexican pan called a comal on top of the grate of your gas or charcoal grill. A comal is usually made of black cast iron. It looks like a cast-iron skillet without any sides. The reason it doesn’t have sides is so you can flip a stack of tortillas on it without burning your fingers. A cast-iron skillet or comal will do fine for the recipes in this book—as long as you don’t try to cook too many things at the same time.
Once you begin to enjoy the advantages of having a comal handy, you may start looking at griddle attachments you can buy to fit on your grill. Griddle attachments (or flat tops) will give you a larger surface on which to fry bacon, heat tortillas, and caramelize onions all at the same time. In fact, they will allow you to do anything a short-order cook can do.
The ultimate in outdoor griddles is the kind that replaces one of the grates on a gas grill. Once you have one of these versatile flat tops, it’s hard to remember how you did without it.
Of course, a permanent outdoor smoker made of brick or cinder block is the ultimate in barbecue pits—providing it’s properly designed. If you are going to have somebody build one for you, make sure they start with plans that provide for a controllable airflow and variable grill height.
Consider the Argentine asado hut design. This kind of grill is built into an outbuilding with a roof for inclement weather. The grill grates can be raised and lowered over the fire by use of a mechanical crank. The grill elements are V-shaped metal rods that catch grease and moisture and direct them into a grease receptacle. It may sound complicated, but you can find plans online.

Cooking on a flat top in a Matamoros taqueria
Plaza Allende taquero stalls, Matamoros
Tongs
The long barbecue tongs don’t handle heavy things very well. I like the short, spring-loaded kind you get at restaurant supply houses.
Spatula
Any metal one will do.
Basting Mop
Nylon brushes melt, and basting brushes are too dainty. The best idea is to find a little cotton mop—the kind used for washing dishes.
Wire Brush
No, the black gunk stuck to the grill doesn’t add flavor—not the good kind, anyway. Clean your grill with a wire brush every time you barbecue.
Poker
A stout stick from the yard will do, but you need something to move hot coals.
Heavy-Duty Aluminum Foil
Lots of the recipes in this book call for you to wrap the meat in foil. You’ll need the heavy-gauge, extra-wide variety.
Drip Pans and Water Pans
A drip pan is a container placed under the meat to keep the fat from falling in the fire and flaring up. It is usually filled with water or some other liquid (such as Lone Star beer). A water pan is a pan placed in the smoke chamber between the food and the fire for the purpose of keeping a high level of moisture in the smoke chamber so the meat doesn’t dry out. In a water smoker, a pan filled with water placed between the meat and the fire serves both purposes at once.
If you are cooking a meat that dries out easily, such as turkey, a water pan is a great idea. If you are cooking meat that is fatty, you may need a drip pan to keep the fire from flaring up. You don’t want to use a water pan while you’re trying to get something crisp.
I use a little metal cake pan, but I have accepted the fact that it will never be clean enough to bake a cake in again.
Charcoal Starter Chimney
A charcoal starter chimney is a cylindrical container with a grate in the middle and a fireproof handle on the outside. (Weber makes an extra-large one that suits me perfectly.) You fill the top of the container with charcoal, stuff some newspaper in the bottom, and light the paper. Within ten minutes or so, you have hot coals without using any starter fluid. Some people use paraffin in their chimney along with the newspaper, but you don’t need it.
These chimneys became popular in California after the city of Los Angeles banned the use of charcoal starter fluid because it is an environmental menace. It’s a culinary menace, too. If you’re not careful, you end up with barbecue that smells like an oil refinery.
NOTE: Never put a lit chimney on a picnic table, deck, or other flammable surface.
Thermometers
Most grills have a thermometer that can be read from the outside. If yours doesn’t, you can also stick a candy thermometer through the vent of your smoker to keep track of the temperature inside.
You will also need an instant-read internal temperature thermometer to check the doneness of the meat. I used to use a probe thermometer/timer made by Polder. The probe was inserted into the meat, and a wire connected the probe to a digital readout outside the smoker that displayed the internal temperature of the meat. Unfortunately, I kept burning out the wires.
In gimmick-loving barbecue circles, the ultimate thermometer is the Remote-Check from Maverick. This thermometer comes with two internal temperature probes that have heat-proof wires leading to a transmitter that sits outside the barbecue. Two internal temperatures are beamed to a handheld remote that can be taken indoors so you can monitor both pieces of meat while you watch football. I used to have one, but the transmitter stopped working.
Now I use a portable internal temperature thermometer called a Taylor Weekend Warrior. It has a thin metal probe and a digital readout and sells for under twenty dollars. When I lose it or break it, it won’t be too big an investment to buy another one.
Choose any style you like, but don’t try to do without. An internal-temperature meat thermometer is essential to know when your meat is properly cooked and to ensure food safety.
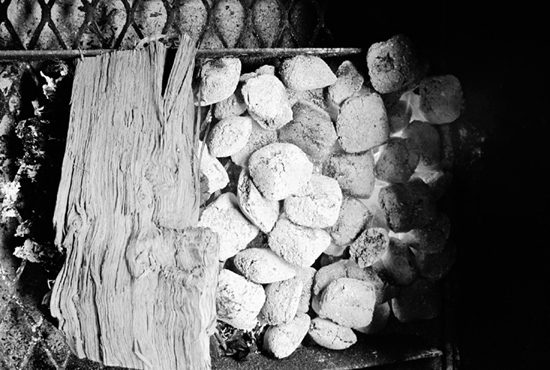
Put the hardwood beside the coals so it smolders
Charcoal
Lump hardwood charcoal is the irregular kind that’s not made into briquettes. It burns hot and is great for steaks and chops. Lump mesquite charcoal imparts a great flavor, but be forewarned about its explosive tendencies: it pops, sparks, and sends hot charcoal pieces flying around as it burns. Don’t try starting it in a chimney starter. You are better off to use Kingsford, or any other standard brand of pure charcoal briquette, to start your fire. Then you can add mesquite wood or mesquite lump charcoal a little at a time. Avoid cheap composite charcoals, including the composite mesquite charcoal, which contain paraffin or petroleum by-products; you’re better off with mesquite wood or mesquite chips or chunks.
Wood
Mesquite is very resinous and burns hot. Grilling steaks, chops, or burgers over a mesquite fire is fine, but longer cooking with mesquite requires some adjustments. Burn the mesquite down first and then cook over the embers.
The flavor of mesquite is not for everyone and even if you love it, it’s nice to use other woods for a change of pace. If you have hickory, maple, alder, cherry, apple, oak, pecan, walnut, or some other hardwood in your yard, you can cut up a few logs or stout sticks and use them for grilling.
Start with twenty-five briquettes. As soon as you see flames coming out of the top of the chimney, dump the charcoal into the firebox or grate of your smoker. (If you forget to dump the charcoal, the chimney will quickly burn up all your fuel, and you’ll have to start over.) You can start adding wood as soon as you dump the coals. If you are using lighter fluid, be sure to wait until the coals are white before you start cooking so you don’t get any lighter fluid taste.
Spread the coals out on the lower grate. One layer is adequate for around an hour of cooking time. For a larger grill or a hotter temperature, add about twenty-five more briquettes once you get the first batch lit. This will bring the temperature up to about 350˚F very quickly. The bigger the pile of charcoal you light, the hotter the fire will burn.
To control the heat level, spread out the coals and close down the dampers to reduce the heat and drop the temperature. Then open the dampers a little at a time to increase the ventilation rate and raise the temperature to the desired level.
When you add wood chunks or logs to a charcoal fire, add them to the side of the fire so that they smolder slowly, rather than on top of the charcoal, where they will burn quickly.
For long-cooking meats, add a second layer of wood or charcoal before the first layer burns out.

To set up a grill for cooking over direct heat, spread hot coals evenly across the firebox, leaving a little area empty. Put the meat on a grill as far as possible above the coals. This is fine for steaks, chops, and burgers, but you will need to be sure to keep them from flaring up. If you get a flare-up, move the flaming meat above the area of the firebox where there aren’t any coals.
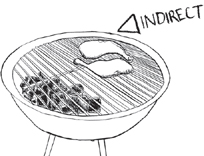
You can set up almost any grill for indirect cooking by putting the fire on one side of the unit and the meat on the other. A drip pan is often positioned under the meat to prevent flare-ups.
If you have split logs, you can lay a piece of wood across the firebox to divide the area in half and then pour hot charcoal briquettes on one side of it. The charcoal will cause the log to smolder, creating plenty of smoke. Then put the meat over the empty half of the grate for indirect cooking.
Covered Grills
Light the charcoal in a starter chimney. Arrange the coals on one side of the fire grate or fire pan or in the two Weber charcoal pans or by using a log as a divider. Use a drip pan filled with water if possible. After browning directly over the coals, slow-cook the meat over the water pan on the side of the grill away from the coals. Control the temperature with the top air vent over the meat and the bottom air vent under the fire, and close the other vents. Refuel as necessary.
You can also use a barrel smoker for direct or indirect cooking. For direct cooking, light a fire in one end of the smoker and spread the coals out as needed. Put the meat over the fire.
When using indirect heat, light a fire in one end of the smoker only. You can move the meat closer or farther away to maintain a good cooking temperature. The part of the meat facing the fire will be the hottest, so rotate it to keep the cooking even. Don’t overload the grill with meat. Control the fire by opening and closing the chimney damper and fuel door to raise and lower the ventilation rate. Stick an oven thermometer inside for accuracy.
The USDA recommends an internal temperature of 185˚F for chicken. Commercial chicken is submerged in a water bath after it is killed to cool it down for processing, and it absorbs some of the water. The water spreads the germs from one chicken to another. To prevent salmonella poisoning, chicken processors recommend you cook their chicken to 185˚F.
In an experiment on my grill, it took more than five and a half hours to get a whole chicken to 185˚F, at which point it was black as a cinder. When I wiggled the leg, the bone came all the way out. When I carved the bird, the breast was dry. For my own tastes, I am willing to take a gamble—but not with commercial chicken.
Instead of burning my chicken to kill salmonella, I buy “smart chickens” — free-range chickens that are given no antibiotics, animal feed, or growth hormones. Instead, they are raised on grains grown without pesticides, herbicides, fungicides, and chemical fertilizers. Most important, these chickens are individually air cooled—not immersed in a germ-laden cold-water bath en masse. I cook this chicken to around 170˚F, at which point it passes the leg-wiggling and knife-point insertion tests (the leg moves freely and the juices run clear when you insert a knife tip in the thickest part of the thigh).
WHAT AM I DOING WRONG?
Here are the four most common mistakes people make while grilling.
TOO HOT You can burn anything if you use too much charcoal. Twenty-five briquettes is plenty for quick-cooking meats like steaks or burgers. For chicken, whole fish, and thicker cuts like pork or tri-tip roast, you need to use a first layer of briquettes spread thin to create a wide area of medium to low heat, followed by a second fueling.
Start with only one layer of coals and spread them so they barely touch each other under the area covered by the meat being grilled. In covered grills, a few coals can be added after an hour of cooking in a second layer. Start the air vents at half open and then adjust to three-fourths to fully open during the latter part of the grilling. On a gas grill, light just one set of burners, adjust to medium, and after browning quickly, cook the meat away from the flame.
TOO FAST When your steak flares up, catches fire, and turns black, you may decide it’s time to take it off the grill. Surely it’s overdone, right? No—not if the internal temperature is still only 120˚F. Steak and chops that are eaten medium-rare take roughly seven minutes a side or fifteen minutes on the grill and should register at least 135˚F. Burgers take fifteen to twenty minutes to reach an internal temperature of 160˚F.
Chicken halves, whole fish, and roasts require a grilling time of at least one and a half hours under perfect conditions. If the fire dies down too much and has to be revived, the cooking time can easily stretch to two hours or more. To avoid bad decisions, use an internal-temperature thermometer—not your hunger level—to determine doneness.
TOO CLOSE Using indirect heat on covered grills, five to ten inches between the fire and grill rack is adequate, because the heat is easier to control. With gas grills and open-top grills, the greater the distance from the fire the better.
TOO BLACK Barbecue sauces contain tomatoes, ketchup, and sweet ingredients that burn and turn black during cooking. Oil and vinegar–based mop sauces are fine for basting during the cooking process, but not barbecue sauce. Wait until the food is nearly done and then apply sweet barbecue sauce or other glazes and cook just until they bubble and set; don’t walk away and let them burn.
I don’t follow all the USDA guidelines for other meats, either. Because of the scandals involving contaminated ground beef a few years ago, Bruce Aidells’ Complete Meat Cookbook explains, the USDA published recommended doneness temperatures for all varieties of meat that were ten to fifteen degrees higher than those used by most restaurants.
In her cookbook Roasting, Barbara Kafka notes, “If I cooked beef and lamb to the recommended temperatures, I would never produce rare meat again.” In this book, I provide both a lower temperature at which to begin testing for doneness when you are willing to risk it, and the higher USDA recommended temperature, for those times when you are concerned with safety.
At Texas A&M, I met a meat scientist who summed up the subject nicely. “When I’m cooking a burger for myself, I start with top-quality meat and cook it medium-rare, maybe 140˚F—but that’s a calculated risk that I choose to take. When I am cooking burgers for children, I cook them to the USDA’s recommended 160˚F. And you can be darn sure I have a thermometer in my hand.”
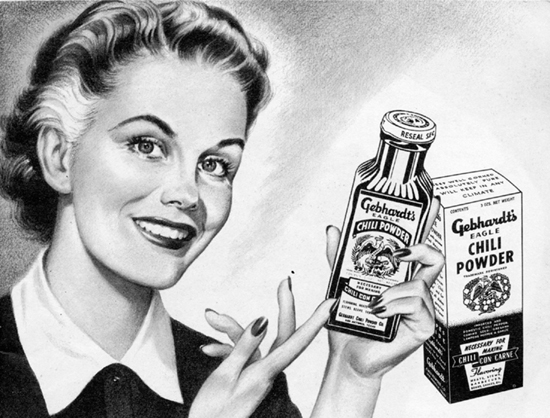
Gebhardt Eagle a Chili Powder was registered as a trademark in 1899
Chile and cumin are the heart of the Tex-Mex flavor signature. The liberal use of cumin came with immigrants from the Canary Islands in the 1700s. The chiles of the Capsicum annum species are indigenous to North America and have been used in cooking here for thousands of years. (For identification, see Chile Peppers.)
Chili powders, such as Gebhardt Chili Powder or Adams Chili Powder, are spice blends containing powdered ancho chiles, cumin, garlic, oregano, and other ingredients. Chili powder is a fine ingredient, but if you want to make your own spice blends, it’s best to start out with pure powdered chiles.
The traditional powdered chile in West Texas and New Mexico is the dried and pulverized New Mexican red chile. You can order it online or buy it in a specialty store. Grinding your own chile powders isn’t very hard with a spice grinder or coffee grinder. (See the instructions.) But several spice companies, including McCormick and Adams, now sell powdered chiles.
The recipes in this book also call for paprika, which is a Central European powdered chile. While both sweet and hot paprikas are available, we’ll assume you’re using sweet paprika. Pimentón, or smoked paprika, is a wonderful product that gives food a smoky barbecued flavor. The imported versions are excellent, but domestic spice companies are now selling smoked paprika as well.
Commercial Blends
Many Tex-Mex grillers start off with a commercial spice blend. Some use them straight and some doctor them up. Here are few favorites:
ADAMS EXTRACT AND SPICE (ADAMSEXTRACT.COM)
Founded as a vanilla extractor in 1888 in Michigan, Adams has been headquartered in Texas since 1905. The company expanded into the spice market in the 1960s with a popular chili powder. Now headquartered in Gonzales, Texas, the company specializes in spice blends for the Tex-Mex market. Pinto Bean Seasoning and Menudo Seasoning are new blends from the oldest spice company in Texas.
Under the new Adams Reserve label, you’ll also find everything you need to make your own blends at home. The line includes ancho chile powder, chipotle powder, whole dried chile pequíns, New Mexican chile powder, New Mexican green chile flakes, granulated jalapeño, and cracked black pepper and mesquite-smoked black pepper.
FIESTA (FIESTASPICES.COM)
Fajita Seasoning and Brisket Rub are categories that were popularized by Bolner’s Fiesta Products in San Antonio, a family-owned company that has been in the business since 1955 and remains a favorite in South Texas. The company’s pork rub, chicken rub, rib rub, and wild game rub are very popular. Fiesta also sells dried chiles and powdered chiles by mail order, in case you can’t find them in your grocery store.
Steak Seasoning and Barbecue Seasoning are the old favorite seasoning blends from TexJoy, the spice division of the Texas Coffee Company, a family-owned company that was founded in Beaumont in 1921. TexJoy now makes their steak seasoning in regular, spicy, and Worcestershire varieties. Their products are found mainly in the Houston and Beaumont area.
TEXAS SPICE COMPANY (TEXAS-SPICE.NET)
A relative newcomer, Texas Spice has been selling powdered chiles and seasoning blends for the barbecue and grill since 1985. The company is located in Round Rock, and its products are best known in the Austin area. Texas Spice Company specializes in custom blending for wholesalers and the many marketers of private-label spice blends.
Homemade Spice Blends
So with all of these spice blends on the market, why bother making your own? Look at the label of the spice blend you’re about to buy. Does it contain anything you’re trying to avoid, like MSG or lots of salt? You’ll notice that most spice blends are dominated by a few cheap ingredients like onion and garlic powder with salt and pepper. If you have those things at home, why pay to get more of them in a jar?
But the best reason to make your own spice blend is because you can use flavorful but expensive herbs you like, such as coriander and thyme, in the quantity you choose. You can also use your own homemade ground chiles to ensure fresh, hot flavors. For more about grinding your own chile powder, see here.
Here are a few recipes to get you started.

4 tablespoons sea salt
3 tablespoons powdered chile of your choice
2 tablespoons dried granulated garlic
2 tablespoons coarsely ground black pepper
1 tablespoon ground thyme
1 teaspoon ground coriander
1 teaspoon ground cumin
1 tablespoon brown sugar
2 tablespoons garlic powder
2 teaspoons sea salt
2 teaspoons cracked black pepper
2 teaspoons powdered ancho chile
1 teaspoon ground thyme
1 teaspoon ground Mexican oregano
Dried chiles, such as anchos, New Mexican red chiles, or dried chipotles
1 dried chile, stemmed, seeded, and softened in hot water
2 cloves garlic, minced
1 cup (2 sticks) butter, softened
Sea salt
Corn on the cob on sale at the vaquero cook-off
2 tablespoons granulated garlic
1 tablespoon powdered red chile
3 tablespoons paprika (or smoked paprika)
1 tablespoon sea salt
1 tablespoon brown sugar
1 tablespoon granulated onion
1 teaspoon ground cumin
½ teaspoon ground cinnamon
2 teaspoons flour
2 teaspoons salt
3 tablespoons coarsely ground black pepper
½ teaspoon ground Mexican oregano
4 teaspoons garlic powder
Combine the ingredients, mixing well. Store in a tightly sealed glass or plastic container. Shake before each use to remix the ingredients. Rub the blend into your steaks, then refrigerate for at least 15 minutes before cooking.
1 tablespoon oil
2 cups diced yellow onion
7 cloves garlic, minced
1 cup ketchup
1 cup chipotle chile paste
½ cup strong coffee
½ cup Worcestershire sauce
⅓ cup packed brown sugar
¼ cup cider vinegar
¼ cup freshly squeezed lemon juice
1½ tablespoons Dijon mustard
2 teaspoons kosher salt
2 cups pineapple juice
¼ cup rice wine vinegar
½ cup soy sauce
½ teaspoon salt
1¼ cups ketchup
1 tablespoon Dijon mustard
1 cup minced onion
½ teaspoon Chinese five-spice powder
1½ tablespoons Sriracha hot sauce
3 tablespoons hoisin sauce
1 lemon, sliced thin and seeded
2 tablespoons garlic-ginger paste (see Note)
3 ancho chiles
3 cups good-quality root beer
1 cup cider vinegar
1 cup brown sugar
½ cup ketchup
1 tablespoon Worcestershire sauce
1 tablespoon salt or to taste
Freshly ground black pepper
8 tablespoons (1 stick) butter
1 onion, chopped
2 cloves garlic, minced