You’ve had a chance to wrap your brain around the guiding framework of the Core 4 program. Now it’s time to take action. Unlike some plans that focus on one element of health (diet or fitness), during each week you’ll dabble in each of the Core 4 pillars. Every day will include a lesson and a challenge.
DAY 0: MEAL-PREP DAY
One of the most common worries about starting the Core 4 isn’t working out, going to bed earlier, or even exercising . . . it’s what to eat! And rightly so, considering that eating is something we do multiple times a day. Maybe you don’t have a lot of experience in the kitchen or you’re a little rusty. Maybe learning this nutrient-dense way of eating means your old standby meals need some tweaking. Whatever it is, I’ve got you.
At the start of each week you’ll see a suggested meal-prep framework that will guide you through the whole program. As written, the meal plan usually feeds one or two people. If you’re new to cooking, these meal plans will help you create some structure and guidance so you’re not rushing at the last minute to prepare every meal fresh.
As I mentioned in the previous chapter, included in each week are two meal-prep days—one large and one small—with recipes from “The Core 4 Recipes” chapter plus a few other simple staples to prepare, like roasting veggies and hard-boiling eggs. I recommend grocery shopping the day before, but do what makes the most sense for you. The idea is that you’ll make a bunch of food ahead of time so all you have to do is reheat and eat. I give most leftovers three to five days in the refrigerator, as long as they’re properly stored in airtight containers—I recommend glass-lock containers with snap-on lids. Not going through the food as fast as you thought? Most dishes are freezable for at least a month, often far longer, so pop the extra servings in cold storage for later.
During this first week try to follow the meal plan as written. In the weeks that follow you’ll naturally figure out ways to tweak the plans to suit you. Take into account your best food prep days, your appetite, your food preferences, and any food restrictions you’re dealing with. The more you can make meal preparation your own, the more likely you are to stick to the program. And remember, any dish can be breakfast!
Week 1 Shopping List
Bacon (16 ounces)
Deli ham, high quality (24 slices)
Eggs (3 dozen) Ground pork (8 ounces)
Ground turkey breast (2 pounds)
Pork shoulder roast (3 to 4 pounds)
Shrimp (8 ounces)
Blueberries (2 cups)
Broccoli (2 pounds)
Butter lettuce (1), optional
Carrots (3 pounds)
Cauliflower (2 pounds)
Cherry tomatoes (12)
Cucumber (1), optional
Dill (1 bunch)
Green cabbage (1), optional
Green onions (2) + Green onion (1), optional
Herbs, fresh (mint, cilantro, Thai basil—for pho meal), optional
Jalapeño pepper (1), optional
Lemon (1)
Lime (1) + Lime (1), optional
Mung bean sprouts (1 4-ounce package), optional
Oranges (2)
Parsley or mint (2 bunches)
Red onion (1)
Shallot (1)
Spinach (2 eight-ounce bags)
Sweet potatoes (3)
Tomato (1), optional
Yellow onion (1)
Zucchini (2 pounds)
Almonds (¼ cup)
Apple cider vinegar (2 tablespoons)
Apple juice, no sugar added (4 cups)
Beef broth, low-sodium (8 cups)
Black olives, pitted (¼ cup)
Butter, grass-fed and unsalted (2 tablespoons)
Cinnamon stick (1)
Cloves, whole (2)
Coconut aminos (1 tablespoon)
Extra-virgin olive oil or ghee
Fish sauce (1 tablespoon plus ¼ teaspoon)
Garlic powder (1 teaspoon)
Ginger, ground (¼ teaspoon)
Oregano, dried (1 teaspoon)
Peanuts, chopped (1 tablespoon), optional
Salsa, prepared (½ cup)
Red pepper flakes (⅛ teaspoon), optional
Rice noodles (1 8-ounce package) or zucchini (1 pound), optional
Salt and pepper
Sesame oil, dark (½ teaspoon)
Sesame seeds (1 teaspoon), optional
Sriracha or chili oil, optional
Star anise (3)
DAY 0: MEAL-PREP DAY
Meals to prep:
» Savory Ham and Egg Cups, double the recipe (save a few in the fridge for tomorrow and freeze the rest)
Other prep:
» 3 sweet potatoes, roast
» 1 bag fresh spinach, steam
» 12 eggs, hard-boil
» 8 ounces bacon, bake
» 2 pounds cauliflower, roast
DAY 1
BREAKFAST: Hard-boiled eggs + bacon + steamed spinach
LUNCH: Greek Turkey Burgers + Chopped Broccoli Salad
DINNER: Shrimp Yum Balls + roasted sweet potato
DAY 2
BREAKFAST: Savory Ham and Egg Cups + roasted cauliflower
LUNCH: Shrimp Yum Balls + steamed spinach
DINNER: Greek Turkey Burgers + Chopped Broccoli Salad
DAY 3
BREAKFAST: Hard-boiled eggs + bacon + roasted sweet potato
LUNCH: Greek Turkey Burgers + Chopped Broccoli Salad
DINNER: Shrimp Yum Balls + roasted cauliflower
DAY 4
BREAKFAST: Hard-boiled eggs + roasted sweet potato + steamed spinach
LUNCH: Savory Ham and Egg Cups + roasted cauliflower
DINNER: Apple Braised Pork Shoulder (prepare today) + Roasted Carrots with Orange Dill Butter (prepare today)
Meals to prep:
» Roasted Carrots with Orange Dill Butter
Other prep:
» 2 pounds zucchini, roast
DAY 5
BREAKFAST: Hard-boiled eggs + bacon + roasted zucchini
LUNCH: Fast Weeknight Pho
DINNER: Apple Braised Pork Shoulder + Roasted Carrots with Orange Dill Butter
DAY 6
BREAKFAST: Savory Ham and Egg Cups + Roasted Carrots with Orange Dill Butter
LUNCH: Apple Braised Pork Shoulder + roasted zucchini
DINNER: Fast Weeknight Pho
DAY 1: MOVEMENT
Welcome to Day 1. Today’s a big day. It’s the beginning of the Core 4 program and the start of a new phase of your life, one in which you’ll start unlearning the shit that’s not serving you and move into a bolder, bigger way of nourishing and strengthening yourself. Hopefully you’re following along with Week 1’s nutrition plan, which means you’ve already prepped meals today like a boss. But we’re not going to talk about food quiiiite yet. Instead, I want to ask you a very important question: How much time do you spend sitting?
Even if you exercise regularly, you may be living a sedentary life. In today’s world, it’s become easier to do less and less—and a body that is not in motion tends to remain not in motion. (Oh, that Isaac Newton. What a guy!)
Movement is more than exercise—it includes all the activity you do throughout a day. And if you’re like most people, you probably spend most of your day sitting. That can have a huge effect on everything from how much energy you use to how stiff and immobile you feel.
While the news is full of headlines like sitting is the new smoking, I don’t want to skip right to sensationalism. And let’s certainly not have a heap of guilt if we sit a lot. Remember, action is what matters most.
It’s very common for someone who works out to still be sedentary the rest of the day. It’s really not our fault: Remember that thing where our environment and our biology are mismatched? It applies here too. We commute to work, sit at our jobs for hours on end (thanks to antiquated corporate culture), commute home, and then collapse exhausted on the couch.
If you took a trip down history lane, you’d find our ancestors hunting and gathering. There was a lot of low-level physical work to be done daily. And certainly, when the hunt was on, there was a big burst of intense activity followed by recovery. Even in more modern agricultural times, there was plenty of labor to be done. You may have a job that demands physical activity—nurse, military worker, or household CEO—but our modern society has phased out a lot of labor. The difference between then and now is that low level of baseline activity. Think chores, walking, taking care of the house, and preparing food.
So if you’re currently pretty sedentary, even if you work out regularly, what can you do about it? The answer isn’t to exercise more; it’s to incorporate more NEPA: non-exercise physical activity—all the other movement you do besides your dedicated workout. (We covered this in detail along with NEAT in the Pillar 2 chapter, so if you need a refresher, head here.)
To put it simply, the more you move each day, the more calories you burn. The rad part about this type of activity is that it’s low-intensity and doesn’t require recovery time. And it doesn’t usually come with the associated increase in appetite that intense workouts do.
NEPA can amount to several hundred calories burned each day! Examples include
- Light housework
- Walking
- Doing errands
- Cooking
- Gardening
- Playing with the kids
- Getting up from your desk frequently . . . every half-hour, for example
- Parking farther away from your destination and walking
- Fidgeting and constantly changing position
- Light stretching
Compare these two stories:
SANDRA A: Sandra wakes up ten minutes before she needs to leave for work and eats an energy bar for breakfast while on her forty-five-minute commute on the train to work. She’s a financial analyst at a big firm and spends most of her day in meetings or at her computer. At lunch, she usually grabs something from the work cafeteria and spends the rest of her break answering emails.
She’s out the door at 5:00 p.m. and spends another forty-five minutes on the train. Once she gets home, she orders dinner in and watches a few hours of TV before bed. Three times a week she goes to a fitness class at a local gym.
SANDRA B: Sandra wakes up forty-five minutes before leaving for work each day. She cooks herself a simple breakfast or warms up leftovers and empties the dishwasher before she heads out. She commutes forty-five minutes on the train to work, but she gets off one stop early to add a few blocks of walking. She’s a financial analyst at a big firm and spends most of her day in meetings or at her computer.
Recently, she switched to a standing desk and has set an alarm to alert her every thirty minutes, when she walks to fill her water bottle or does some simple stretches, like side bends and shoulder rolls. At lunch, she usually walks a few streets away to grab something at a local deli. She’s out the door at 5:00 pm, walks a few blocks to the train, and spends forty-five minutes commuting home. She often stands for short periods.
Once she gets home, Sandra cooks a simple dinner. Sometimes she watches a show, then she does other chores before bed, tidies up, and lays out her clothes for the next day. Three times a week she goes to a fitness class at a local gym.
Clearly, Sandra B has more movement in her day.
Why did I give you a tale of two Sandras? Because I know that you can’t always switch from commuting to your job and working in an office to something else. What you can do is look for more opportunities within your daily structure to move more often.
Move Your Body
This week is all about getting in touch with basic movement, so there won’t be any exercises with weights. Even if you’re conditioned to exercising already, I want you to do these movements without weights. Take your time and move through the sets, listening to your body and resting as needed.
Once you’re past the warm-up, complete all the sets of each movement before moving on to the next. Both levels 1 and 2 should perform this week’s workouts. If you move with intention, the exercises will help pinpoint areas where you may need to work more—like your mobility, stability, or flexibility.
Day 1 Challenge: Work Out
Remember to respect your body! Don’t do anything that causes pain.

WRIST WARM-UP SEQUENCE—2 sets

Stand with your arms in front of you at waist height. Roll your wrists around in circles in both directions, then use your left hand to gently stretch your right hand forward, backward, and from side to side to stretch your wrist. Repeat the actions with the left hand.
CAT COWS—3 sets of 6 reps
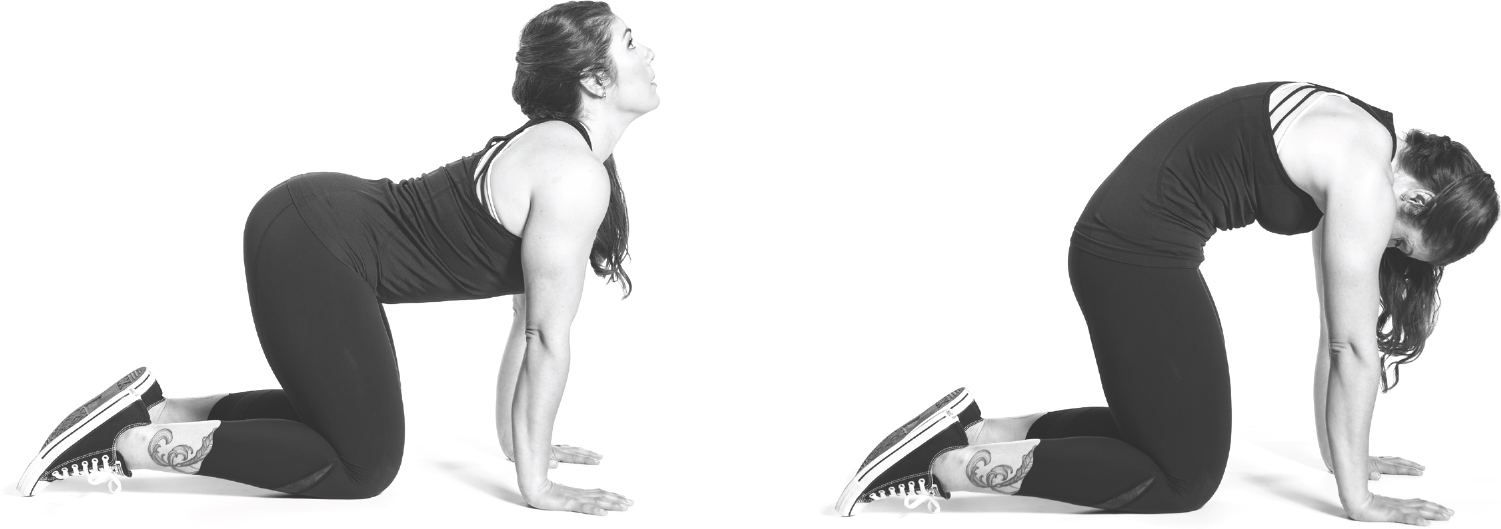
Get on your hands and knees with your hands under your shoulders and knees under your hips. Keep your neck neutral as you look at the floor. Breathe in as you lift your head and let your belly soften. Then exhale as you curl your back up like a cat and lower your head. Repeat, moving slowly and experiencing the stretch through your shoulders and neck.
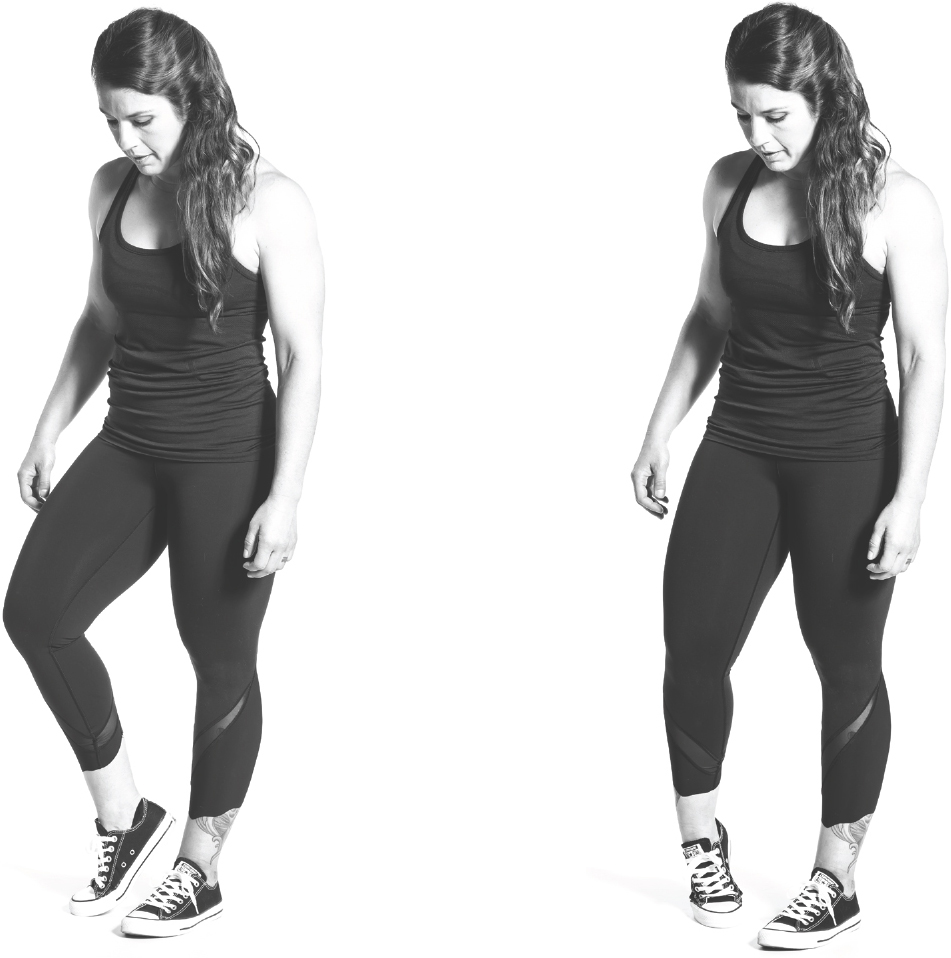
INCHWORMS—2 sets of 50 feet
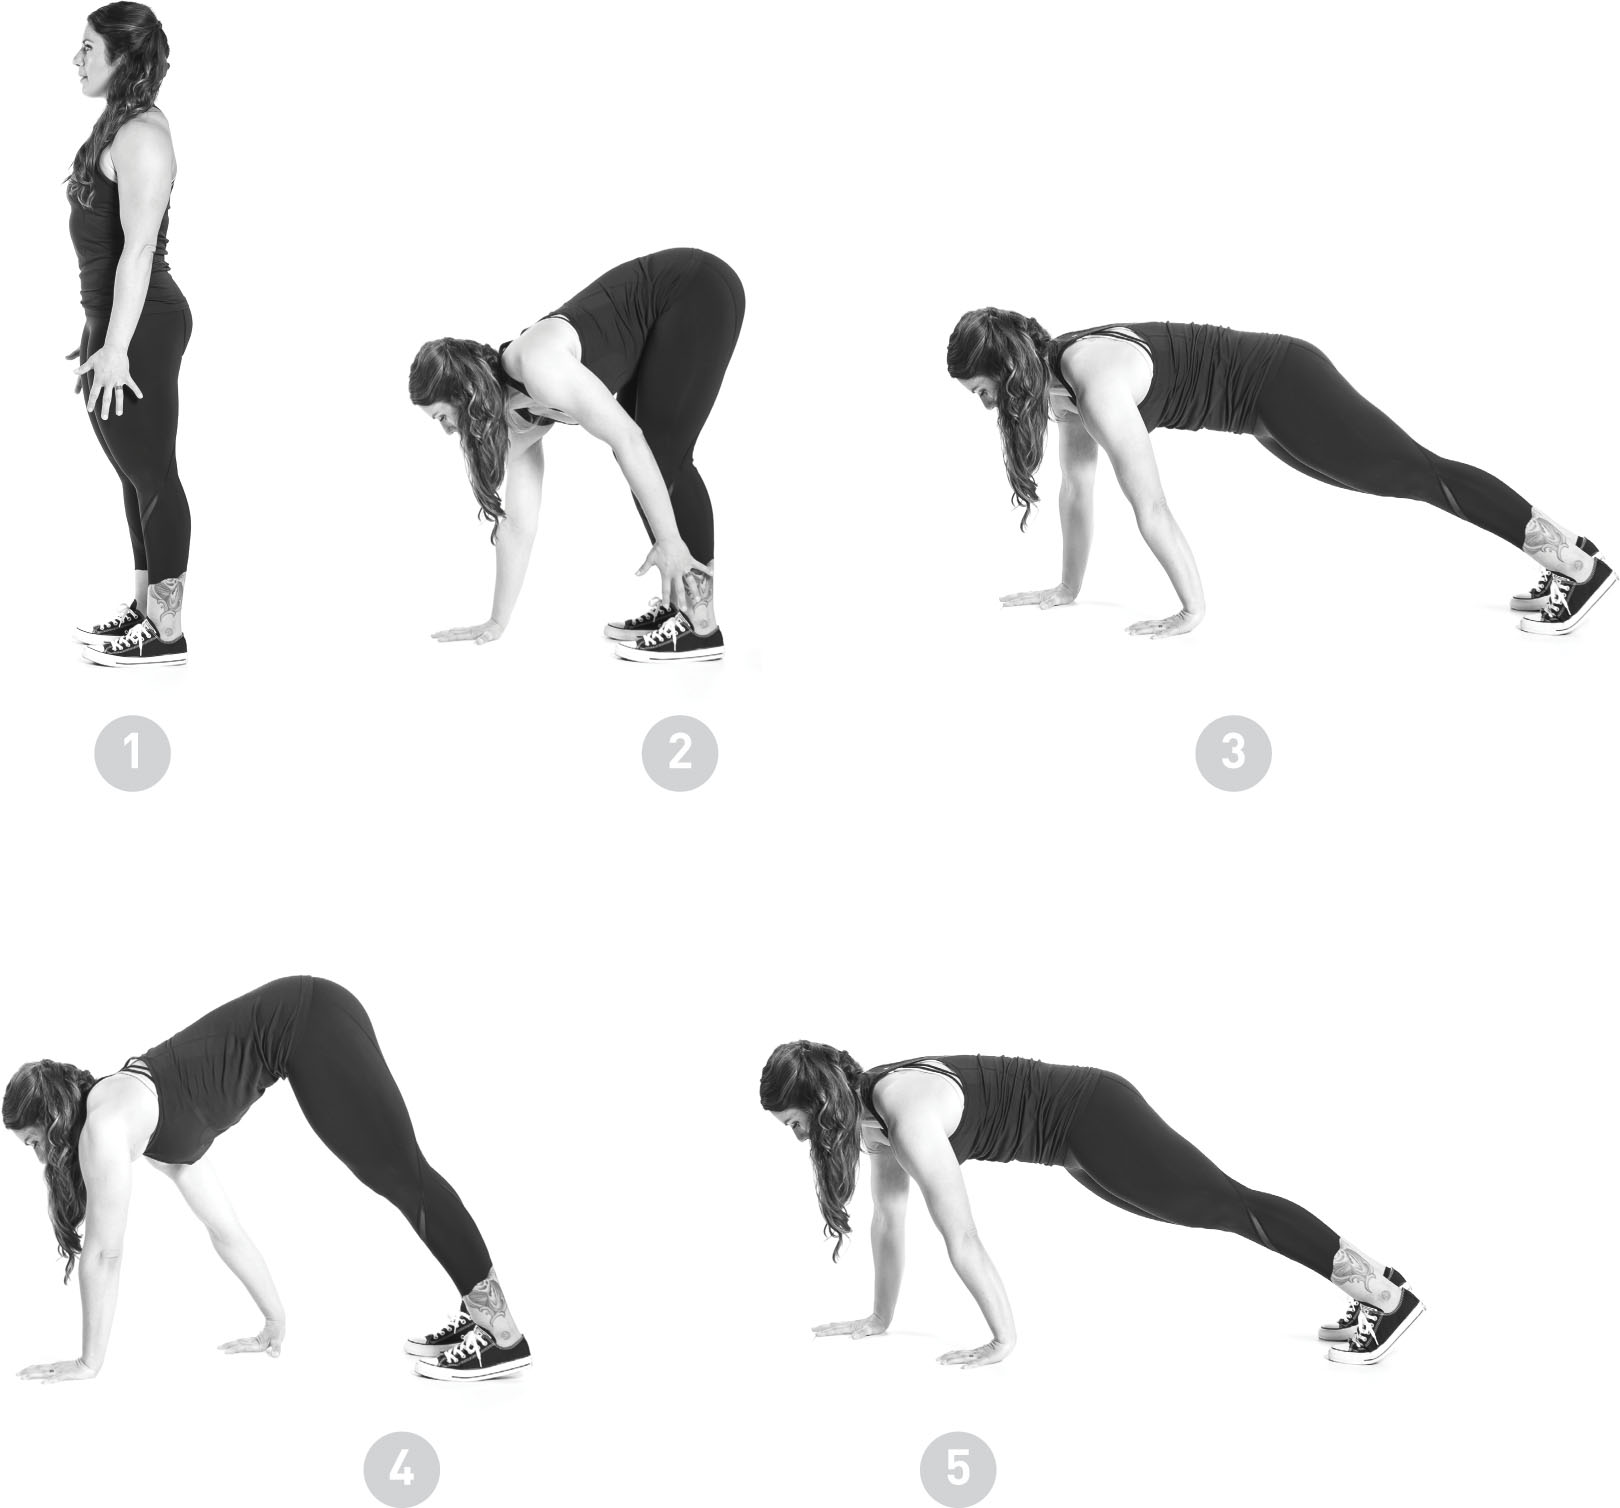
Stand with your feet under your hips. Hinge at the waist and put your hands on the floor in front of you. Engage your core and walk your hands out a few inches, keeping your legs straight. Then walk your feet toward your hands, using small steps. Repeat, “inching” along the floor.
SINGLE-LEG STANDING BALANCES—4 sets on each leg
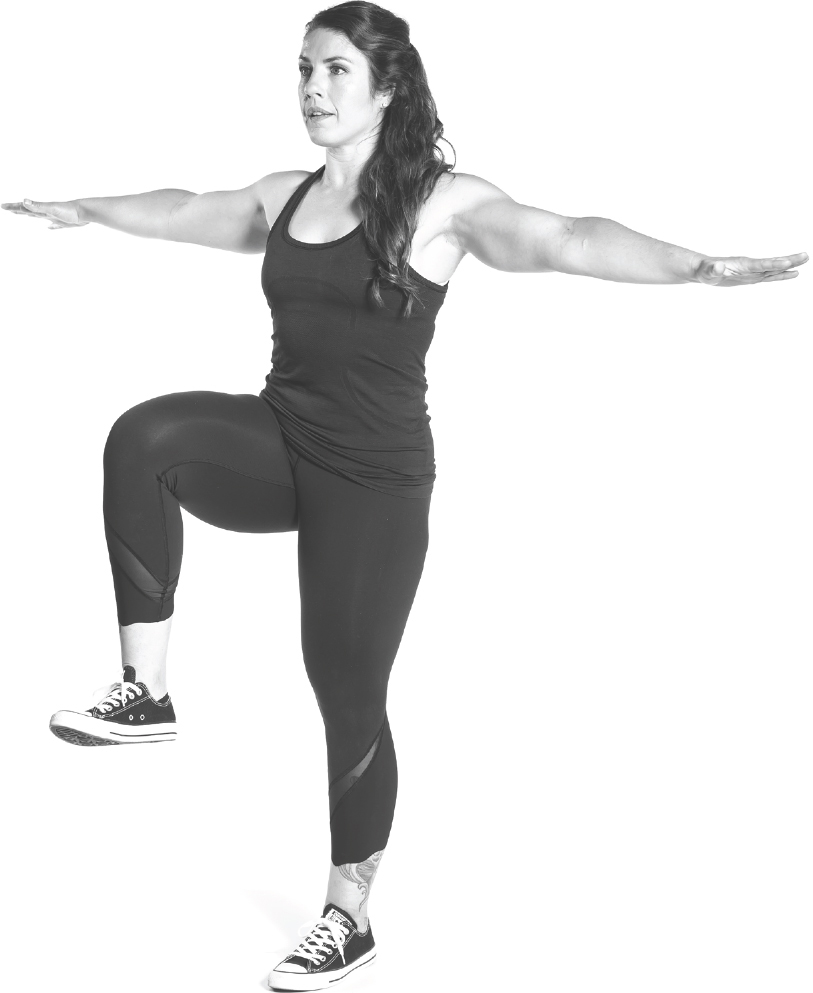
Stand with your feet under your hips. Shift your weight onto your left leg and slowly lift your right foot off the floor until your knee makes a 90-degree angle. Extend your arms for balance. Hold for 10 to 30 seconds, then lower the right foot and repeat on the other side, lifting your left leg. Note that doing this move barefoot will let you grip the floor and balance more easily.
HIP HINGES WITH STICK—3 sets of 8 reps
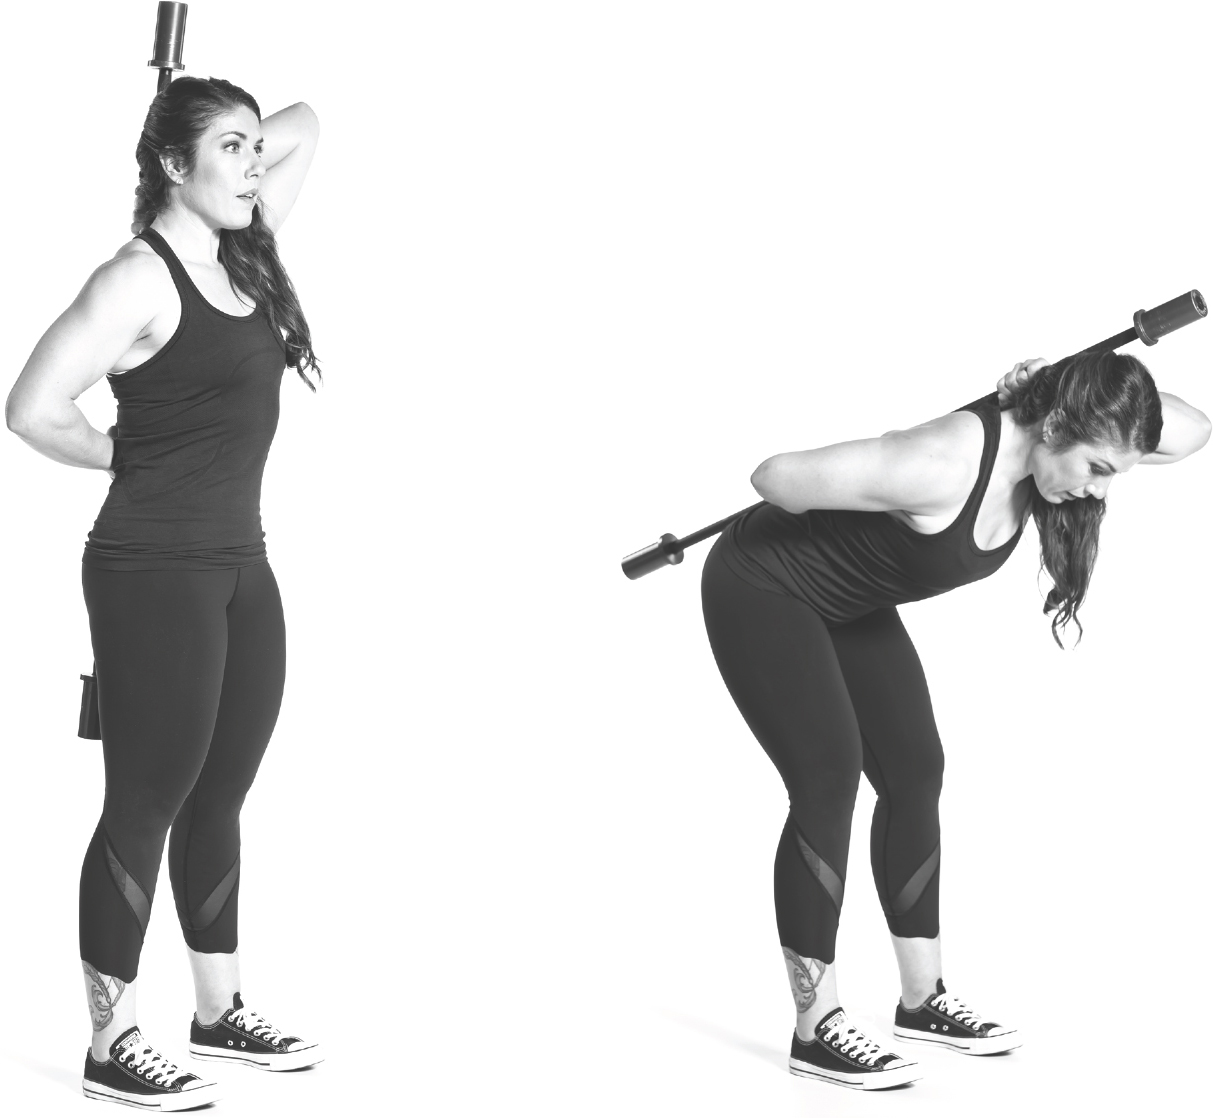
Stand with your feet under your hips while holding a broomstick or PVC pipe against your spine, with one hand at the back of your neck and one hand at your lower back. Keep your legs straight as you slowly shift your weight back and fold at your hips to bring your head toward the floor. Keep the broomstick against the back of your head, upper back, and butt. Then return to a standing position.
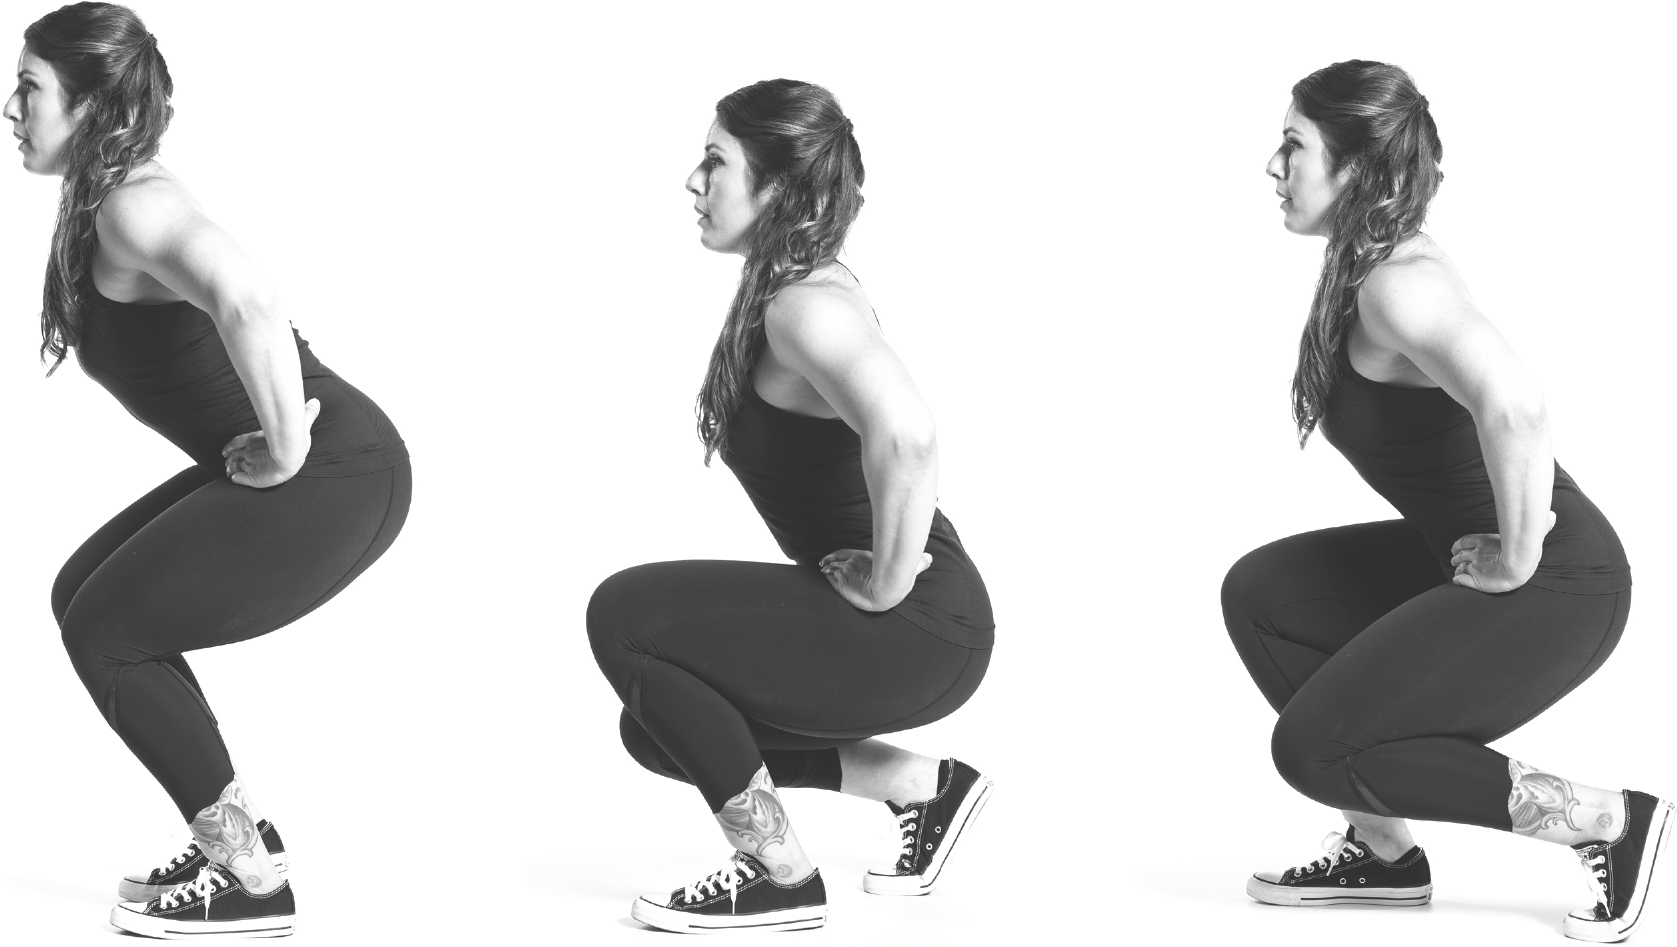
SQUATS—3 sets of 10 reps

Stand with your feet under your hips. Keeping your feet flat on the floor, engage your core as you push your hips back and bend your knees, lowering until your thighs are a little lower than parallel to the floor (or as low as feels comfortable). Go as low as you can while keeping a neutral spine. Your knees should track over your feet, and your chest should remain up. Then return to the starting position.
DAY 2: GUT CHECK
Yesterday you did your first challenge. Frickin’ awesome! Sometimes the hardest part is getting started and creating some forward momentum. Let’s keep it going.
If you’re a little sore, that’s normal. Challenging your muscles to move in new ways shakes things up! Taking a short walk or doing some light yoga can help ease any soreness. With Day 1 and some movement in the books, now you’ll turn your eye inward to matters of the mind.
Your brain is capable of so many amazing feats. Planning, language, movement, and gathering sensory information are mostly tasks of the outermost brain layer, called the cortex. If you use the analogy that your brain is like an onion, the outermost papery skin would be the cortex. But deeper in the brain, in the innermost core of the onion, is another cluster of structures: the limbic brain. I don’t want to turn this into an anatomy lesson, but this will help you understand why you have “gut” feelings.
The limbic brain is a collection of structures that include the hypothalamus and the amygdala, which generates feelings, emotions, and primal urges. Now here’s the kicker: the limbic brain can’t produce language. That’s the reason why we struggle to put our gut feelings or intuition into words. Whether we feel a decision in our gut or our heart, or it feels like intuition, it’s really the limbic brain that’s responsible. In his book Start with Why, Simon Sinek writes:
Our limbic brain is powerful, powerful enough to drive behavior that sometimes contradicts our rational and analytical understanding of a situation. We often trust our gut even if the decision flies in the face of all the facts and figures . . .
When you force people to make decisions with only the rational part of their brain, they almost invariably end up “overthinking” . . . In contrast, decisions made with the limbic brain, gut decisions, tend to be faster, higher-quality decisions.
If you’ve ever taken a multiple-choice test, you probably know this experience well. Often your first instinct—your gut feeling—about the answer is right. If you go back and mull it over, you may talk yourself out of the correct answer as you think harder and harder.
Tuning In to Your Gut
I don’t want you to walk away with the impression that rational decision-making doesn’t have a place in your life. But I do want you to consider times when your gut or intuition was telling you to do one thing and, after a period of agonizing over the decision, you went with the opposite choice.
How did it turn out? How easy was it to make the gut decision versus the rational decision?
More important, how many times have you ignored your gut because you wouldn’t be able to justify your decision to someone else?
My hope is that this lesson will highlight the importance of listening to your gut and tuning in to how your body feels when you make decisions based on intuition. If a gut decision feels light, energetic, and good in your body, that’s something to listen to. It might even feel a little “terrexcitifying” (to quote my friend Allegra).
On the other hand, if a decision feels heavy, dark, or bad in your body, there’s merit in that too . . . even if you can’t explain it in words.
Day 2 Challenge: Get in Touch with Your Gut
On a piece of paper or in a journal, complete the following prompts. It’s important to write these down and get them out of your head:
When I feel stressed or worried, my body feels like . . .
When I go with my gut, my body feels like . . .
Write about a time you listened to your gut. Was the decision easy or hard to make? Why do you think that is?
DAY 3: CORE OF THE MATTER
Hopefully during yesterday’s lesson on gut feelings you gained some clarity around how your body and brain talk to each other and which signs to feel for. Listening to your body isn’t always easy, especially when the whole damn world wants you to be logical 24/7 and accuses women of being too emotional. Intuition is your superpower! Now let’s see how to set the stage for continuing to build your physical strength.
The root of all safe and effective movement is posture and alignment. The clients I coach in the gym often spend half an hour or more each day mobilizing their bodies, rolling out stiff tissue, and trying to improve their flexibility. While these interventions have merit, it’s hard to undo the effects of poor posture.
Think of how much time you spend sitting or standing each day. How you sit or stand outside of workout time can affect your ability to move effectively during your workout and how you move in general. You may slouch, creating rounded shoulders, a tucked pelvis, and a forward head position. All of these may lead to stiffness, discomfort, or even pain.
On the other hand, women are often taught to stick out their chests and bums, which can cause a hyperextension of the upper back and an anterior (forward) pelvic position, leading to back issues and pain. High heels often make that problem worse, putting a lot of pressure on the lumbar region, or lower back.
To correct your posture, stand with your feet under your hips and think about lightly squeezing your glutes, or butt muscles, to stop the pelvis from rolling forward. Then think about tucking your ribs by lightly engaging your upper abs—it’s a bit of a strange sensation at first. This aligns your spine. With your hands at your sides, turn your palms up to the sky, then lower your hands. This keeps your shoulders from rolling forward and putting strain on your neck. The same general rules apply for sitting.
When you stand, it’s also important to point your toes forward instead of in or out. This may take some practice, but again, it helps to better align your skeleton from the feet on up. You can also look for wear patterns on your shoes to see if you tend to stand toes out or in.
Chronic joint pain or muscular tension is often traced back to posture and how the feet are oriented. For example, standing duck-footed, with the toes out, can cause the arches to collapse, which can make your inner knees sag toward each other.
Changing postural habits takes time, but it’s worth the investment to start improving your posture.
Now let’s talk about strengthening your core. Make no mistake: having a strong and stable trunk is just as important as strengthening your arms and legs. And if you plan to lift weights, it’s even more imperative. Your core muscles involve far more than just the rectus abdominus—the abs that make a six-pack. They include the deeper abdominal muscle layers as well as your back muscles, glutes, diaphragm, and pelvic floor.
The good news is that the Core 4 workouts include accessory work to help improve your core stability. Movements like planks may be well known, but others, like rows and waiter walks, will help you build the complete package. Even exercises as simple as squats and deadlifts are excellent for strengthening your core muscles.
Day 3 Challenge: Work Out
Note that levels 1 and 2 both complete this workout. Complete all sets and reps of each movement before moving on to the next.
ANKLE WARM-UP—2 sets
In a standing position, lift your right heel off the floor. Do ten ankle circles clockwise, and ten counterclockwise. Repeat these movements with your left foot.
GLUTE BRIDGES—3 sets of 10 reps

Lie on your back with your knees bent, your feet flat on the floor and close to your hips, and your arms at your sides on the floor. Engage your core and squeeze your butt as you slowly drive your hips up toward the ceiling so that your body is in a straight line from head to knees. Keep your knees parallel to each other; don’t let them collapse in or out. Slowly lower your hips back to the starting position.
Pro Tip
» To make it harder, lift up one leg at a time from the bridge position.
DOWN DOGS—4 sets of holding for 10 seconds
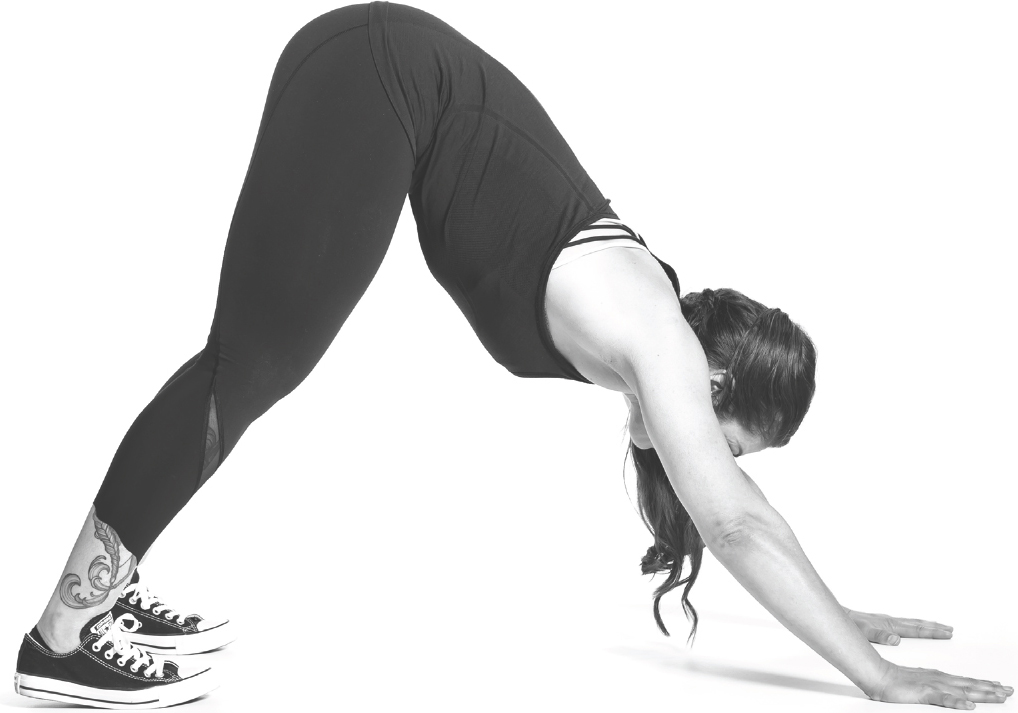
Start on your hands and knees, with your hands under your shoulders and your knees under your hips. Exhale as you straighten your legs and arms and push your hips up toward the ceiling to make an inverted V with your body. Actively drive your palms into the floor, and actively lift your sit bones toward the ceiling. Elongate through your spine, and keep your gaze on the floor ahead of you to maintain a neutral neck. Bend your knees to lower back down to the starting position.
Pro Tip
» Use a yoga mat or carpet so your hands don’t slip.
DUCK WALKS—2 sets of 50 feet
Stand with your feet under your hips, your arms at your sides. Turn your toes out slightly and engage your core. Push your hips back and bend your knees, lowering into a partial squat position. Slowly step forward, maintaining your squat position. Try to keep yourself from bouncing up and down as you walk.
BEAR CRAWLS—2 sets of 50 feet forward, 2 sets of 50 feet backward
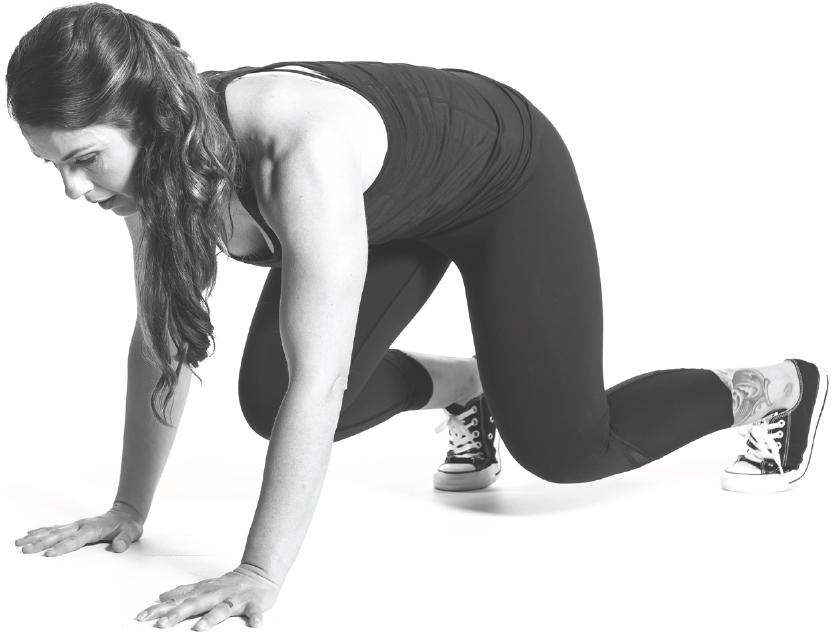
Start on your hands and knees. Slowly crawl forward with your knees off the ground. Keep your butt low instead of letting it stick up in the air, and try to keep from bouncing up and down. If your shoulders or arms tire, rest for a few seconds before continuing.
Pro Tip
» To make it harder, stay lower to the floor by bending your arms.
UPPER BACK TWISTS—3 sets of 6 reps on each side

Get on your hands and knees, with your hands under your shoulders and your knees under your hips. Shift your weight onto your left hand and bring your right arm under and across your body with the palm facing up. Keeping your hand there, slowly twist your upper body toward the ceiling. Then untwist, placing your right hand back on the floor. Repeat the movement with the opposite arm.
DAY 4: SLEEP, PART 1
So far, you’ve dabbled in three of the four pillars. Well done! Small actions add up, and you’re experimenting with some different tools from your new health toolbox. Taking action is where it’s at, so keep the momentum going. Now it’s time to dive into one huge way you recharge your energy: sleep.
If you’re already getting eight hours in a dark room, sleeping through the night, and waking well rested, you deserve my kudos. If I didn’t just describe you, you’ve got some work to do. As you read in the Pillar 3 chapter, a chronic lack of sleep totally messes with your health, your energy levels, and your cravings, among other things.
My sleep habits weren’t always great. I routinely ended the evening by falling asleep in front of the television, got less than six hours in bed, and slept in a room that had lots of ambient light. I was also training hard at the time, and my sleep habits hurt my physical and mental performance. As I mentioned before, somewhere between seven and nine hours of sleep is best, depending on the person.
If you’re eating a pristine diet and working out a perfect amount but your sleep is a wreck, this is a huge area for improvement. It can be hard to change your sleep, but nutrition and moving your body can help. Later in the program, I’ll give you some practical tips to implement so that you fall asleep faster and sleep more soundly. For now, pay attention to how much sleep you’re getting and keep track of sleep disruptions.
Day 4 Challenge: For the Next Seven Days, Track Your Sleep
Note sleep and wake times. If you got up in the night to use the bathroom or couldn’t fall back to sleep, note that too. Write down anything you think may be throwing a monkey wrench in your sleep, like eating a late dinner, reading a stressful email before bed, etc. An app like Sleep Cycle is a great way to get started. Or you can keep a log in the Notes app on your phone or in a journal. Looking at the bigger picture of a week can help you identify trends and patterns. If you can keep it going for more than a week, even better!
DAY 5: LIFT “HEAVY”
Yesterday you were reminded about the importance of sleep. If you’re tempted to sacrifice Zs, remember that rest time isn’t a luxury—it’s a necessity for feeling primed and ready to kick ass every day. And you’ll need that mental and physical energy to tackle today’s challenge.
Getting stronger means (eventually) moving “heavy” shit. Long gone are the days when most of us physically labored from sun up to sun down, tending camp, foraging and hunting for food, and hauling water. Our modern age allows us to work behind desks, sit in offices, and drive in our cars for long commutes. Most of us don’t work the way we used to, and we’re not as robust as our ancestors.
Unless we mimic what they did by moving heavy things.
Remember that you have different types of muscle fibers that respond to different activities. You use mostly slow-twitch fibers for long, low-key slow stuff—like walking, putzing around the house, or even running a half marathon. These activities don’t require much force. It’s the fast-twitch fibers—of which there are a few kinds—that respond with heavier loads. They’re associated with powerful and explosive movements.
But why does it matter? What if you don’t want to do explosive movements? Well, here’s the catch: Not only is using your full catalog of muscles better for balance, strength, and coordination, it’s better for your metabolism. That translates to better hormonal balance. And that means better health overall.
Scary Heavy vs. Effective Dose
What if heavy things scare you?
First, it’s natural to fear what we don’t understand. That’s why I’m here to guide you.
Lifting “heavy” doesn’t mean your eyeballs will pop out of your head while a stupid-massive bar is about to crush you. It does mean pushing yourself out of your comfort zone a little.
Everyone starts somewhere, but even my seventy-five-year-old mother-in-law can lift more than 2-pound dumbbells. Weights shouldn’t be so heavy that you can’t use good form to lift them, but they have to be heavy enough that it’s a challenge. No going through the motions!
Even the level 1 workout includes some weight lifting, though since you’ll be using challenging weights, you may need a little more recovery time.
You don’t need to work out more to see positive changes. When you lift moderate to heavy weights, you don’t need to do long, complicated workouts daily to see results. In our house, we love the “minimum effective dose”—in other words, the minimum we can get away with to build strength without spending all our free time at the gym.
Day 5 Challenge: Work Out
Note that levels 1 and 2 both complete this workout. Complete all sets and reps of each movement before moving on to the next.
Make sure to track your sleep today.
WINDMILLS—3 sets of 6 reps on each side
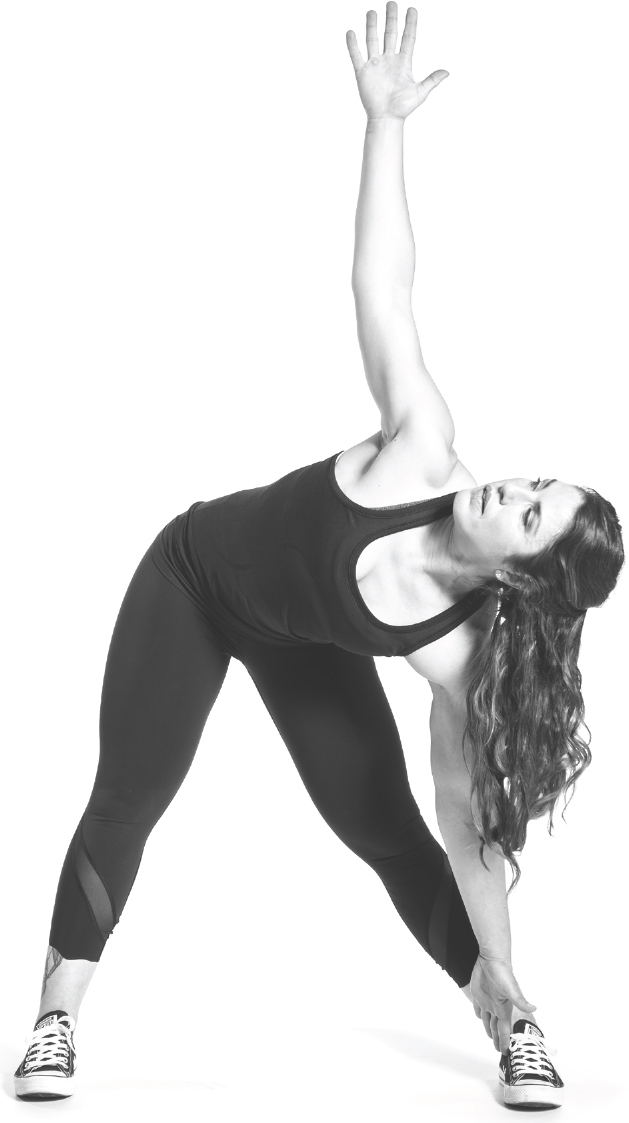
Stand with your feet slightly wider than hip width apart and with your arms extended out to your sides at shoulder height. Engage your core and twist your body to bring your right hand toward your left foot. Return to the starting position, upright, and then twist your body to the left, bringing your left hand toward your right foot. Return again to the starting position and repeat.
Pro Tip
» To make this harder, hold a light dumbbell in the hand that’s overhead. Do all the reps on one side before switching the dumbbell to the other hand and doing the reps on the other side.
SCAPULAR WALL SLIDES—3 sets of 10 reps
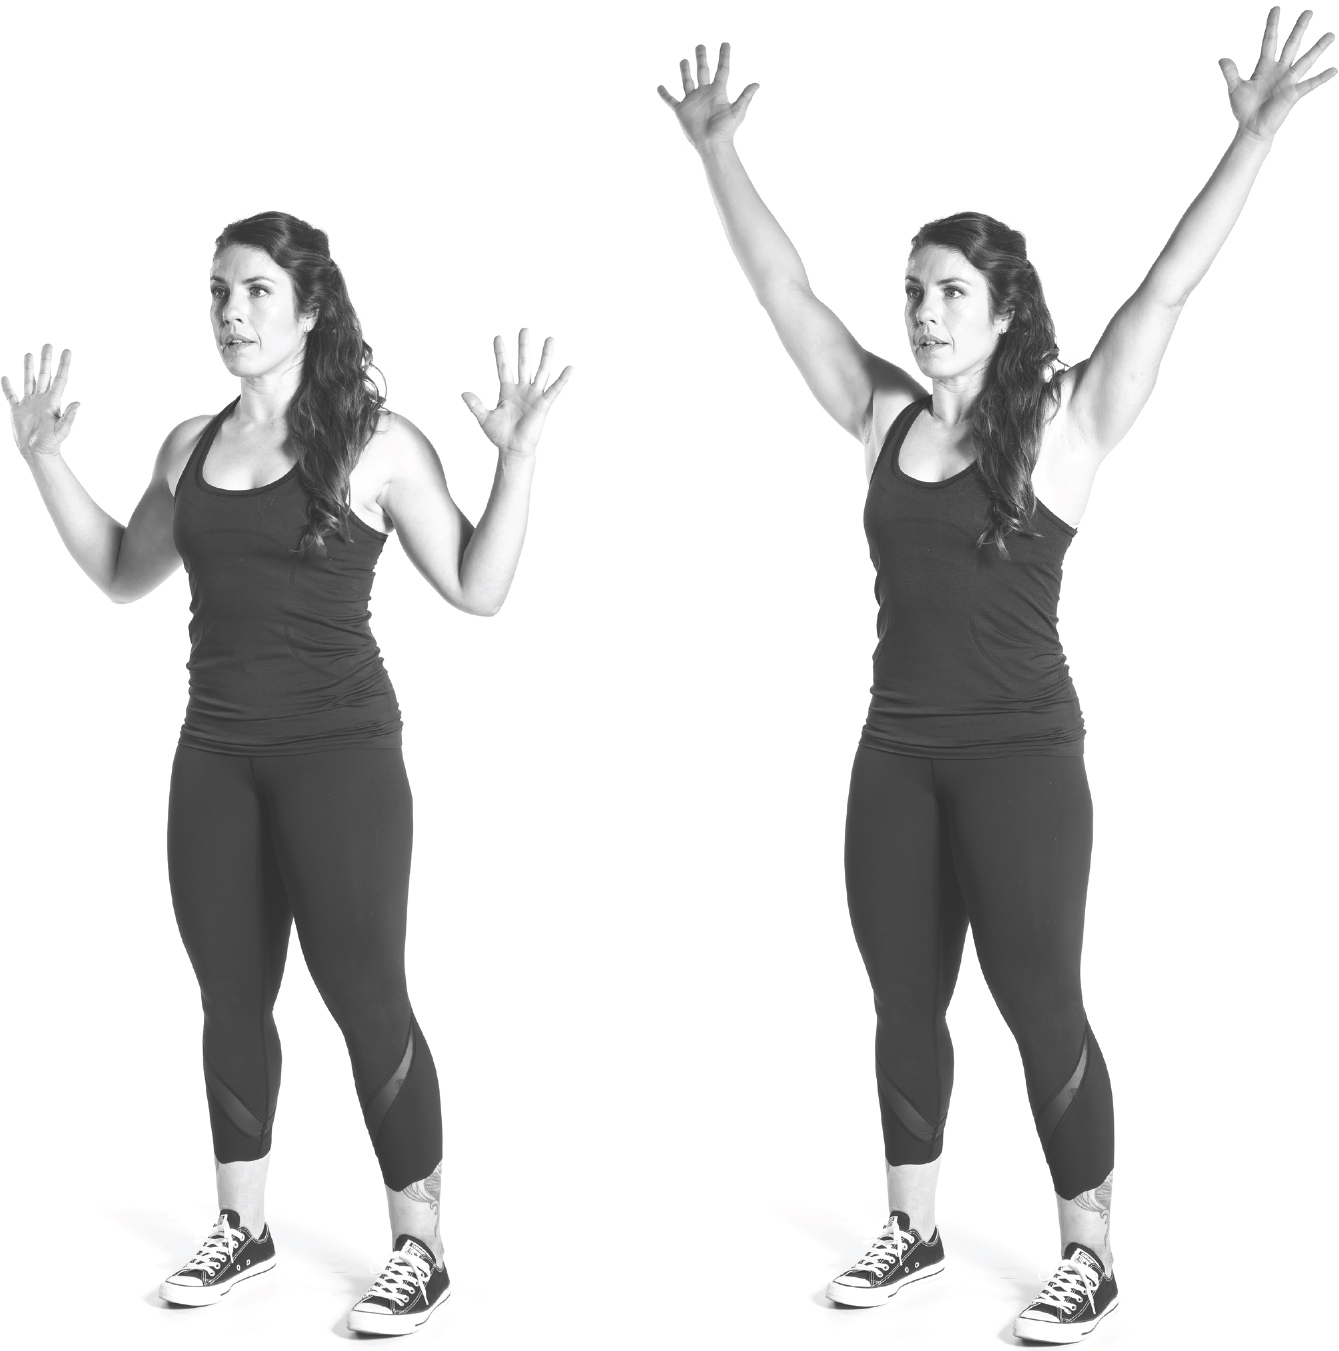
Stand with your back, shoulders, and butt against a wall. Lift your arms so they’re against the wall with your arms bent at about a 45-degree angle, with your knuckles against the wall. Keeping your arms against the wall and your rib cage down, slowly slide your arms up and straighten them into a V shape. Reach as far as you can without pulling away from the wall or flaring at your ribs. Continue to maintain contact with the wall while you slowly slide your arms back to the starting position.
PERFECT STRETCHES—2 sets of 50 feet

Start with feet under your hips and your hands at your sides. Shift your weight onto your right foot and hug your left knee up toward your chest with your hands. Let go of your knee, then step your left foot forward and lower your right knee gently to the floor in a low lunge. Bring your right hand to the floor close to your left foot and lift your left hand up toward the ceiling, rotating your torso as you do so. Then set your left hand down next to your left foot, straighten both legs, and lift your left toe. Lean back to stretch your left hamstring. Raise your torso, step back, and repeat the movements on the other side.
SPIDERMAN CRAWLS—2 sets of 50 feet
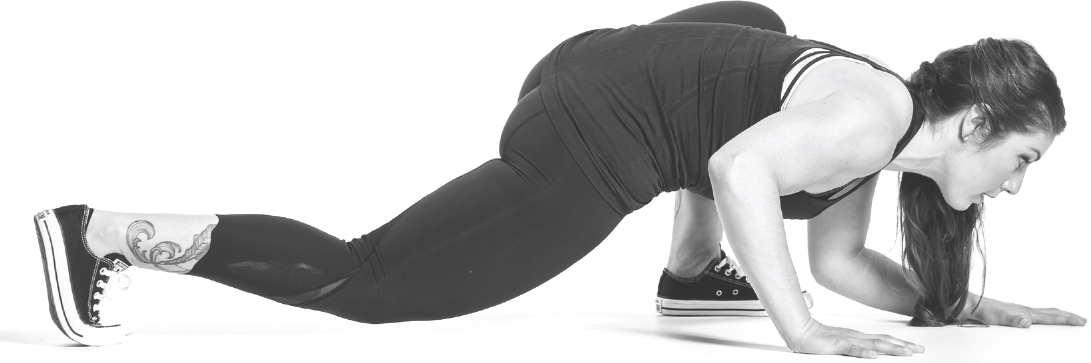
Start on your hands and knees, with your hands under your shoulders and your knees under your hips. Engage your core and reach your left hand forward, then place your left foot outside your left arm, bending your knee into a deep lunge. Keeping your body low, reach your right hand forward, followed by your right foot outside your right arm, bending your right knee. If you get tired, sit down and take a brief break, then resume.
Pro Tip
» To make this harder, take longer steps and stay very close to the floor.
CRAB WALKS—2 sets of 50 feet forward, 2 sets of 50 feet backward

Sit with your knees bent and your feet flat on the floor. Push yourself up onto your hands and feet, with your hands under your shoulders and your feet hip width apart. “Walk” your hands and feet forward, keeping your butt low but off the floor. Try not to bounce your head and torso as you walk. If you get tired, sit down and take a brief break, then resume.
SQUATS—3 sets of 10 reps
Stand with your feet under your hips. Keeping your feet flat on the floor, engage your core as you push your hips back and bend your knees, lowering until your thighs are a little lower than parallel to the floor (or as low as feels comfortable). Go as low as you can while keeping a neutral spine. Your knees should track over your feet, and your chest should remain up. Then return to the starting position.
DAY 6: GOAL DIGGER
A little sore from yesterday’s workout? That’s good! It means you worked your muscles beyond what they’re used to, and today you’ll be repairing and rebuilding (aka getting stronger!) while you shift gears to think about your goals.
Motivational memes are everywhere these days. While it’s great to see and reflect on them, they don’t mean squat unless you have goals. Having goals, whether they’re about eating or fitness or mindset, is key to keeping you working toward something and staying focused.
This is not to say that you have to be obsessed, which is counterproductive. But if you’re drifting like a boat without a sail, it’s time to establish some goals—as long as they’re the right kind.
If your goals are too nebulous (“I want to save the rain forest”) or are way too far from where you’re at right now (“I’m going to squat 300 pounds,” when your current is nowhere near that), they aren’t serving you. Goals should be like little carrots dangling juuuuuuust beyond your grasp. They keep you reaching, striving, moving forward.
But having a goal isn’t enough, even if it’s detailed and specific. Think of the world’s best duos:
Bacon and eggs
Han Solo and Chewbacca
Peanut butter and jelly
Squats and deadlifts
Like all dynamic pairs, your goals must be accompanied by action. If they’re not, they sit on a shelf in your brain collecting cobwebs and dust.
The way to pump up the following goal-setting criteria is to add an action (or two or three) that says what you’re going to do. You may have heard of SMART goals before. I like to make mine SMAART—the extra A stands for the action you’ll take toward that goal.
What Makes a Goal SMAART?
A goal should be
S = specific
M = measurable
A = achievable
A = action driven
R = realistic
T = timely
What do SMAART goals look like? Check out the difference between these vague and SMAART goals:
“I want to be healthier” versus “I’m going to include an extra veggie at each meal”
“I want to get stronger” versus “I’m going to lift three times a week after work”
“I want to be happier” versus “I’m going to take five minutes each day to write what I’m grateful for”
Outcome Focused Versus Process Focused
It’s totally fine to have a final goal, an outcome that you want to reach. But it’s often not the thing that will keep you moving forward and taking action. It can be hard to feel motivated when the target isn’t close to your current reality. It’s also hard to gauge your progress. Sometimes goals are so far away or so huge that your mind calls bullshit on you.
SMAART Goals Worksheet
Accountability matters. Until you write your goals out, they’re just thoughts floating around in your head. Use this worksheet to write three concrete goals about any aspect of being healthy, happy, and more unbreakable. Remember to use the SMAART system:
Specific . . . Think of this like the what, where, when, why, and how of the goal.
Measurable . . . How will you measure your progress?
Achievable . . . Is the goal within reach but still challenging enough to make you stretch for it?
Action driven . . . Exactly which action are you going to take to make this happen?
Realistic . . . Are the goal and the timeframe realistic?
Timely . . . What’s the timeframe? Open-ended goals with no timeframe are low on the motivational scale because there’s no pressure at all.
Revisit your SMAART goals at the end of the program and rewrite them based on what you achieved!
Goal 1 |
Goal 2 |
Goal 3 |
S |
S |
S |
M |
M |
M |
A |
A |
A |
A |
A |
A |
R |
R |
R |
T |
T |
T |
Instead of focusing on the outcome, stay focused on the process.
What does that mean? Let’s say your goal is to do ten pull-ups. If you can’t even do one right now, that goal probably feels a bajillion miles away. There are so many factors that could go into your achieving even your first pull-up, and you can’t predict exactly when everything is going to click.
On the other hand, let’s say you commit every day to loosening up your tight shoulders with ten minutes of shoulder mobility and stretching. And every time you’re in the gym, you practice increasing reps and sets of dumbbell rows and modified pull-ups to strengthen your upper body.
Which goal is going to feel more achievable and actionable? The latter.
You have direct control over doing your mobility and accessory exercises. That’s something you can commit to and carry out. You’ll keep getting stronger and eventually get your first pull-up. That’ll lead to the next and, eventually, ten.
Day 6 Challenge: Complete the SMAART Goals Worksheet
After you complete the SMAART Goals Worksheet here, jot your goals on three separate pieces of paper (sticky notes work well) and post those in three different places you see daily—in your car, on your fridge, in your training log, at work on your desk, etc.
Make sure to track your sleep today.
OPTIONAL WEEKEND WORKOUT. Remember Tabata interval training from the Pillar 2 chapter? It’s fast! For this workout, do twenty seconds of squats, rest ten seconds, and repeat for eight rounds. Then tack on another Tabata set: push-ups for twenty seconds followed by ten seconds of rest, for eight rounds.
DAY 7: CRUSH CRAVINGS
How did you feel about setting your goals yesterday? That activity is often the kick in the pants you need to keep moving because you end up with a road map instead of just getting lost all the time. Today’s challenge will help you crush your food cravings.
I’m going to be straight up here: The root causes of food cravings are diverse. And it isn’t always possible to immediately stop them. But with consistency and healthy habits, you can minimize how often they rear their ugly heads.
Glad we got that out of the way. With that in mind, let’s take a gander at some reasons you might be experiencing food cravings.
YOU’RE F’ING HUNGRY. I’m not trying to be flip here, but if you consistently eat tiny portions, your cravings might be actual hunger. Eat protein, carbs, and fat from real, whole foods at each meal in quantities that satiate your hunger for at least three to four hours. If you’d totally eat steamed fish and veggies right now, you’re probably hungry.
YOUR GUT MICROBIOME NEEDS SUPPORT. Your gut is the site of many important biological functions, from food digestion and nutrient absorption to vitamin production to immunity. Your gut microbiome—the friendly bacteria that primarily live in your large intestine—plays a major role in keeping everything humming along. But sometimes these helpful gut bacteria overgrow in places they shouldn’t or get displaced by harmful microbes. The causes may include poor diet, antibiotic overuse, stress, and incomplete digestion. This shift in the gut microbiome landscape can be associated with increased sugar cravings. Work with a qualified practitioner who can help identify the root issue and help you devise a plan for supporting your gut health.
YOU COULD HAVE LEPTIN RESISTANCE. Leptin is a hormone that communicates with the body about how much body fat you have. Leptin, much like insulin, can spike when you have less-than-optimal habits, like a diet high in processed food and poor sleep. Over time your body can become less capable of hearing the leptin signal. The best way to turn the boat around is to eat protein, carbs, and fat from real, whole foods and sleep eight or more hours a night.
YOUR CRAVINGS ARE STRESS RELATED. Very often cravings happen for completely non-food-related reasons. Stress is a big culprit. If you find yourself reaching for sweet, salty, fatty, or crunchy foods when you’re stressed, create an interrupter habit that takes your mind off food and gets you out of the kitchen. You might decide that when stress-related cravings hit, you go take a walk around the block, fold some clothes, or write in your journal. If you’re still hungry thirty minutes later, eat a healthy snack with protein, carbs, and fat.
IT’S THAT TIME OF THE MONTH. Shifts between estrogen and progesterone can amplify food cravings, specifically when estrogen is lower and progesterone is higher. Normally, estrogen drops after ovulation and progesterone rises; this helps explain why your appetite and cravings may be higher in the second half of your menstrual cycle. If you’re in perimenopause, you may be experiencing wildly fluctuating hormone levels, and if you’re in menopause, you’re likely to be experiencing very low estrogen levels. All can contribute to cravings.
Protein Leverage
Protein leverage is an interesting hypothesis that makes a lot of sense, at least anecdotally. The idea is that if the food people eat is lacking in protein, they’ll continue to eat whatever is around until they’ve reached a natural stopping point of about 15 percent of their calories from protein.
If the food around is low-nutrient, high-calorie (“empty”) carbs and fats from processed food, a person would have to consume far too many calories in order to reach the protein threshold.
While this is still a hypothesis that requires further testing, it does seem to explain what people experience when their diet is low in protein, including a diet heavy in processed foods.
Personally, if I don’t get a good whack of protein at breakfast, I often experience increased hunger and sometimes cravings throughout the day. Plus, if I fall behind on my protein intake at breakfast, it’s hard to “make up” as the day goes on, because as a macronutrient, protein is the most satiating.
What does this mean for you? If you find yourself consistently hungry within one to two hours of eating a meal, check in with your protein intake. Whole food sources of protein from meat, seafood, and eggs are your most nutrient-dense options. You may need to bump up your protein intake slightly to find the level that works for your body. (Hint: It’s often more than you’d think.)
Day 7 Challenge: Prep Meals for Next Week
See the beginning of the next chapter for the upcoming week’s shopping list and what to prep.
Make sure to track your sleep today.