Week 2 is in the books! I’m stoked for your progress. Remember, it’s small, consistent changes that add up to big results over time, so stay with it. Last week you did your first workouts with weights—and learned why a strong body is key to health. Keep up the great work and try to do a little more this week. It’s normal to get scared about adding weight, but here’s where that mindfulness lesson comes in handy: Notice the difference between something that’s challenging and maybe a little outside your comfort zone versus something that’s unsafe. Your body will tell you. Last week you also examined why recharging your batteries is vital to your health, and you learned some indispensable breathing techniques to help introduce a sense of calm . . . at any time!
Straight up, Week 3 is where women commonly lose some steam. It’s seems weird (or is it?) because you’re finally getting into a groove. But that’s exactly the point: we humans get bored so easily. We’re constantly seeking novelty, and the two-week mark is when people often bail from plans, even if those plans are working. It’s just that the dopamine buzz has worn off. Not you, my friend! This week, let your process goals and the power of your new tools carry you through. Now might also be the time to seek out an accountability buddy if you’re sensing the spark wearing off.
Week 3 Shopping List
Bacon (8 ounces plus 4 slices)
Cheddar cheese, shredded full-fat (2 ounces), optional
Chicken wings (2 pounds)
Eggs (16)
Italian pork sausage (1 pound)
Lamb chops (2 pounds)
Sirloin steak (1 pound)
Avocados (2)
Bananas (2)
Carrots (3)
Cherry tomatoes (1 pint)
Cilantro, fresh (1 bunch), optional
Cucumber (1)
Garlic (1 head)
Green cabbage (1)
Green leaf lettuce (1)
Jicama (1)
Kale (1 bunch)
Lemon (1)
Limes (4) + Lime (1), optional
Mint, fresh (1 bunch)
Parsley, fresh (1 bunch)
Rosemary, fresh (4 sprigs)
Sweet potatoes (3)
Spinach (2 8-ounce bags)
Summer squash (2 pounds)
Swiss chard (1 bunch)
Yellow onions (2)
Yukon gold potatoes (2 pounds)
Almond milk (1 cup)
Ancho chili powder (3 teaspoons)
Avocado oil mayonnaise (¼ cup)
Chia seeds (2 tablespoons)
Chicken broth, low sodium (6 cups)
Chipotle pepper, ground (¼ teaspoon)
Cinnamon, ground (2 teaspoons)
Coconut milk (1 tablespoon)
Coconut, shredded and unsweetened (1 cup)
Cumin, ground (½ teaspoon)
Duck fat (2 tablespoons)
Extra-virgin olive oil or ghee
Flaxseed, ground (½ cup)
Garlic powder (¾ teaspoon)
Harissa sauce, mild (2 tablespoons)
Hemp hearts (2 tablespoons)
Honey (2 tablespoons)
Medjool dates (2)
Onion powder (1½ teaspoons)
Oregano, dried (¼ teaspoon)
Parsley, dried (½ teaspoon)
Pasta, gluten-free (8 ounces uncooked)
Rosemary, dried (½ teaspoon)
Salt and pepper
Smoked paprika (1 teaspoon)
Thyme, dried (¼ teaspoon)
Vanilla extract (2 teaspoons)
DAY 14
For this day’s breakfast, lunch, and dinner, eat leftovers from the previous week.
Meals to prep:
» Steak Cobb Salad with Southwestern Ranch Dressing, dressing stored on the side
» Garlic Lamb Chops with Herb Gremolata
Other prep:
» 3 sweet potatoes, roast
» 2 8-ounce bags spinach, steam
DAY 15
BREAKFAST: Banana Cinnamon No-Oatmeal + steamed spinach
LUNCH: Steak Cobb Salad with Southwestern Ranch Dressing + roasted sweet potato
DINNER: Garlic Lamb Chops with Herb Gremolata + Cabbage, Bacon, and Noodles
DAY 16
BREAKFAST: Savory Ham and Egg Cups + steamed spinach
LUNCH: Garlic Lamb Chops with Herb Gremolata + Cabbage, Bacon, and Noodles
DINNER: Steak Cobb Salad with Southwestern Ranch Dressing + roasted sweet potato
DAY 17
BREAKFAST: Banana Cinnamon No-Oatmeal + steamed spinach
LUNCH: Steak Cobb Salad with Southwestern Ranch Dressing + roasted sweet potato
DINNER: Garlic Lamb Chops with Herb Gremolata + Cabbage, Bacon, and Noodles
DAY 18
BREAKFAST: Banana Cinnamon No-Oatmeal + steamed spinach
LUNCH: Steak Cobb Salad with Southwestern Ranch Dressing
DINNER: Hearty Tuscan Kale Soup (prepare today)
Meals to prep:
» Smoky Duck Fat Potato Wedges
Other prep:
» 2 pounds summer squash, roast
» 6 eggs, hard-boil
» 1 bunch swiss chard, steam
DAY 19
BREAKFAST: Hard-boiled eggs + Smoky Duck Fat Potato Wedges + steamed swiss chard
LUNCH: Honey Harissa Chicken Wings + roasted summer squash
DINNER: Hearty Tuscan Kale Soup
DAY 20
BREAKFAST: Hard-boiled eggs + steamed swiss chard
LUNCH: Hearty Tuscan Kale Soup
DINNER: Honey Harissa Chicken Wings + Smoky Duck Fat Potato Wedges + roasted summer squash
DAY 15: RECOVERY
Yesterday’s challenge taught you about the importance of taking frequent breaks—real breaks that reboot your system. Today you’ll learn about the importance of recovery and how to build more of it into your day. When you’re resting, you’re simply not moving. It’s passive. Lying on the couch equals resting. Taking a day off from working out equals resting.
Recovery is a whole other thing, and it’s one way to recharge your energy pillar. It’s an active process of things you can do to improve your body and help it restore from the wear and tear of daily life as well as exercise.
Recovery techniques renew your body and your mind. Examples include things like
Acupuncture
Active release technique, or ART
Chiropractic
Cold therapy, or cryotherapy
Contrast baths or showers
Epsom salt baths
Foam rolling
Massage
Meditation
Restorative yoga
Sauna
Stretching and mobility work
Very light cardio
On days when you don’t exercise, try to do something for active recovery, even if it’s for only five or ten minutes.
Avoid Overtraining
When strength training, the eccentric—lowering—component of a lift is especially taxing on muscle fibers. When you don’t allow enough recovery time between workouts, you’ll feel it. Your coordination tanks. Your endurance slides. Your mental game is off. These are all cues to notice.
In the beginning, these signs of overwork might not seem serious, but if you ignore these signs without proper recovery, you can set yourself up for some serious bother. When lackluster nutrition, physical stress from too much exercise—either amount or intensity—and poor recovery combine, you may wind up in a state called “over-trained.”
Performance dips can be accompanied by hormonal imbalances, particularly within the hypothalamic-pituitary-adrenal (HPA) axis or the hypothalamic-pituitary-thyroid (HPT) axis. Without getting too technical, let’s just say that messing with your cortisol levels and thyroid hormones is not good.
The insidious part is that the dip in performance from overtraining often causes a person to think their problems are a result of too little exercise, so they work out more and the cycle worsens.
So how do you know if you should take a day off from exercise? Check in with your body when you start your workout. If the weights feel heavier than they should or you feel sluggish and uncoordinated, that’s a sign that you need more recovery time. It’s normal to feel some minor muscle soreness and even some mental discomfort when you start strength training because you’re stretching your comfort zone . . . and that’s a good thing! But if your body is too achy or stiff (and that feeling doesn’t go away when you warm up), you can’t maintain good form, or you feel unstable, it’s okay to change up what you’re doing or lower the weights. And it’s totally fine to quit a workout if your intuition is telling you, “Not today.”
Maybe that means you swap your workout for a walk instead or you do some light stretching or you just go home and take a hot bath. The more you listen to your body’s signals, the better you’ll get at recognizing the difference between your brain throwing a fake hissy fit (which you can push through) and overtraining.
I always say “Live to lift another day.” Skipping a session here or there or modifying the workout to honor your body doesn’t mean you lose all of your gains. And sometimes an extra rest day is exactly what you need! Remember, you get stronger when you recover from your workouts.
The takeaway? Working out more won’t always give you better results. Now you have more insight into why the program is designed with three strength days a week and not more!
Day 15 Challenge: Work Out
Note that movements from Week 2 make a dynamic warm-up. Complete all sets and reps of each movement before moving on to the next.
LEVEL 1

SPLIT SQUATS—4 sets of 8 reps with each leg

Stand with your feet under your hips and with dumbbells held at shoulder height. Step forward with your left leg into a lunge stance. Engage your core and gently lower your right knee toward the floor until both legs form 90-degree angles. Return to a standing position, then lower your right knee again. Do all reps on this leg before driving through your front foot, engaging your glutes, and returning to the starting position. Repeat with opposite leg positions.
Pro Tip
» To make it harder, place your back foot up on a bench (to do a Bulgarian split squat).
SUMO DEADLIFTS—4 sets of 10 reps
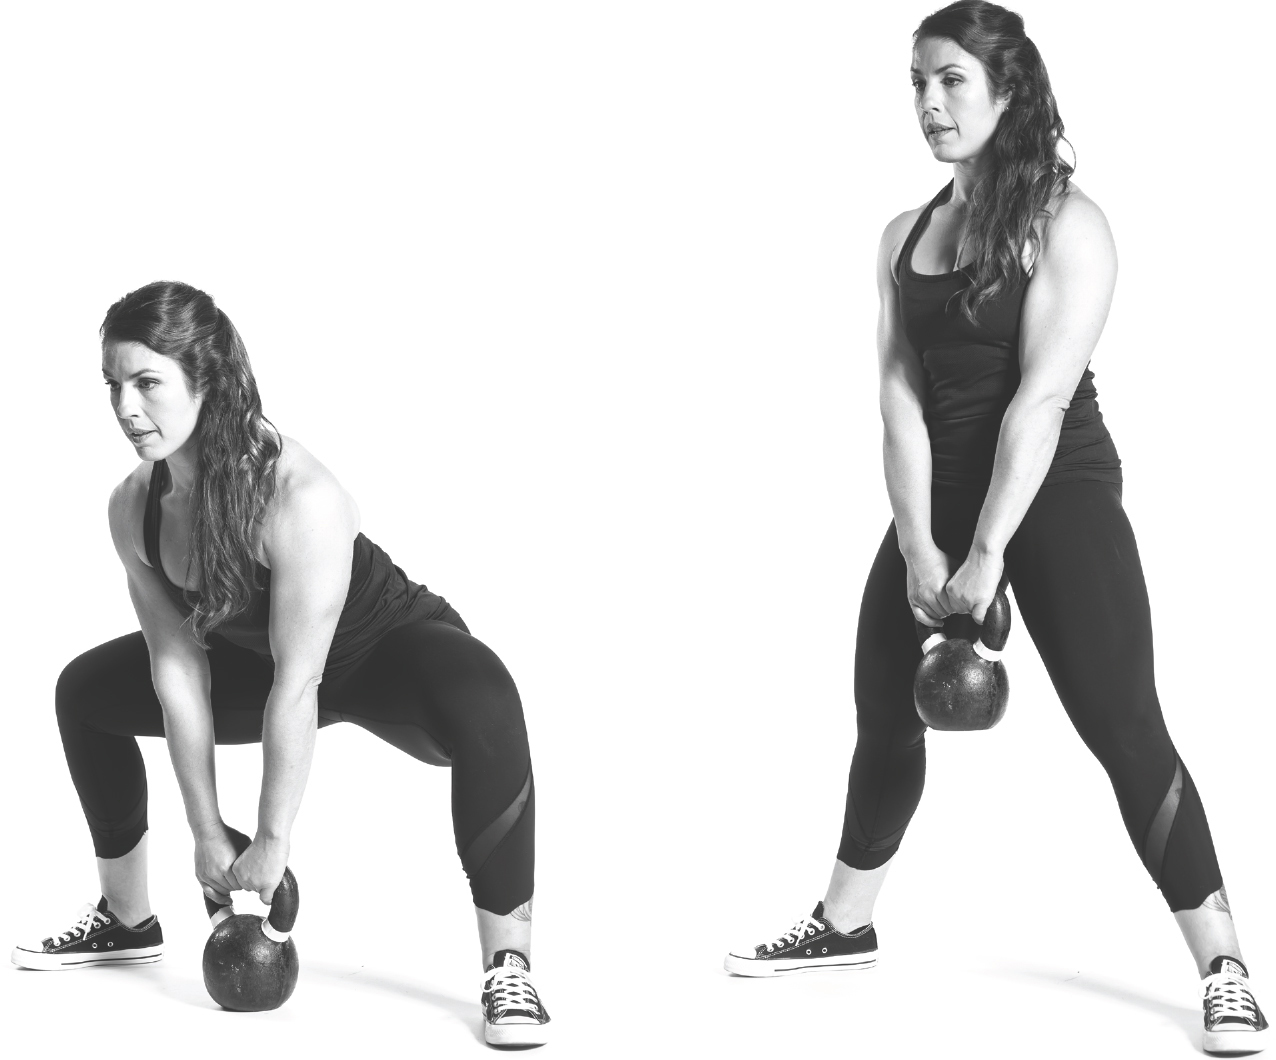
Stand with your feet about six to eight inches outside your hips and hold dumbbells or a kettlebell in front of your thighs with an overhand grip. Engage your core and keep your neck neutral as you hinge forward, bend your knees, and lower the weights until they touch the floor. Remember to push the floor away with your legs instead of lifting with your back. Return to the starting position, keeping the weights close to your body.
BENCH OR FLOOR PRESSES—3 sets of 8 reps
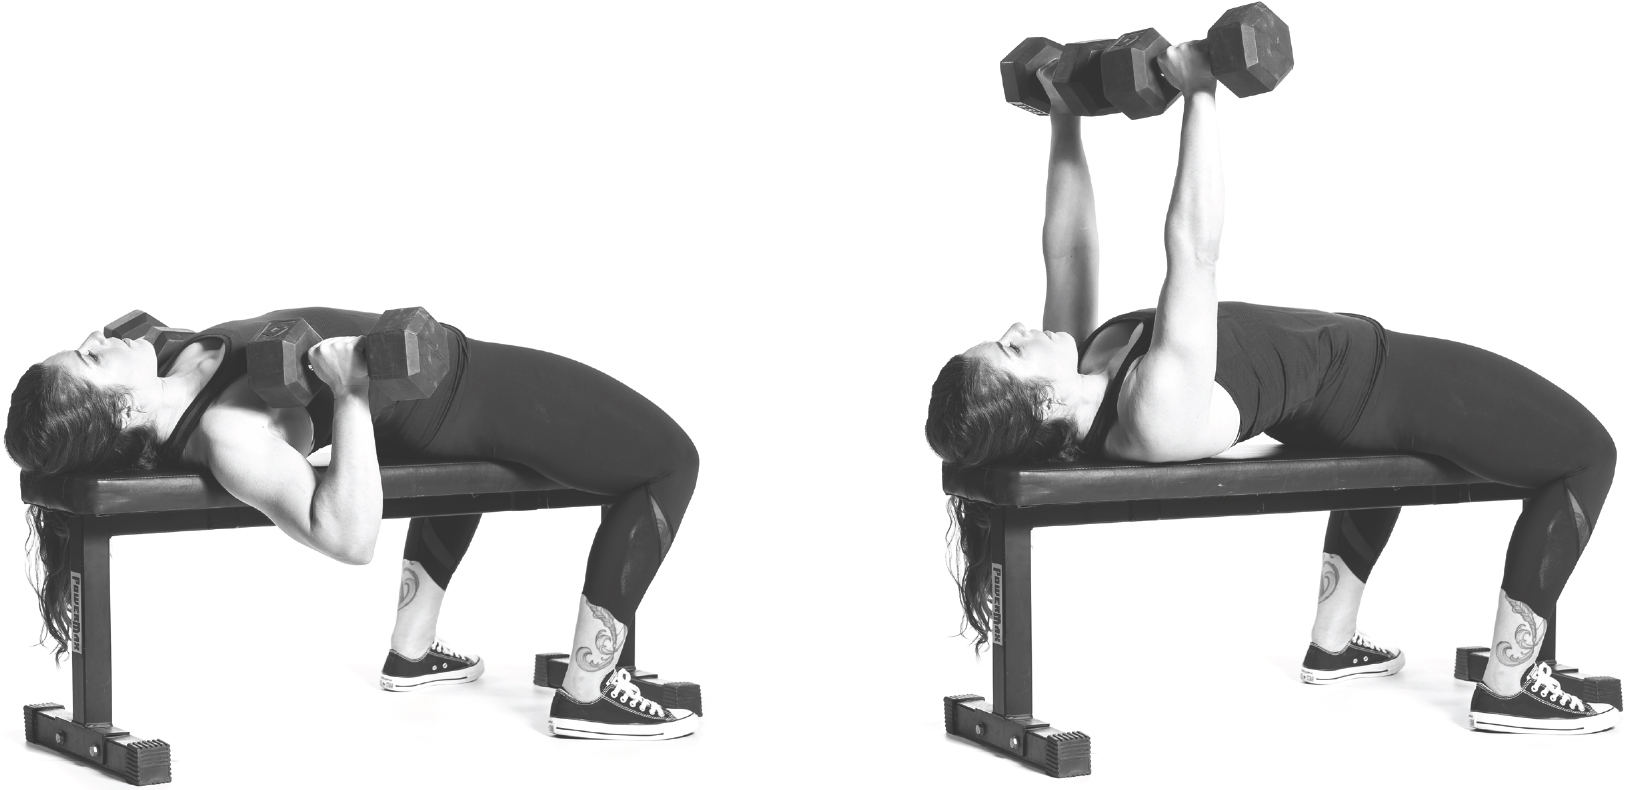
Lie on your back on a weight bench with your feet flat on the floor, or on the floor with your knees bent and your feet flat on the floor. Hold dumbbells in your hands next to your shoulders. Drive your feet into the floor and engage your core as you press the weights toward the ceiling and just outside your shoulder width. Bend your elbows and slowly lower the weights until they touch your shoulders, then press back up, focusing on your chest and triceps. Let your elbows touch the floor if you’re on the floor.
Pro Tip
» To make it harder, do barbell bench presses.
DIPS—3 sets of 6 reps

Sit on a sturdy bench or box with your hands next to you and your feet about twelve inches in front of your hips. Slide your bum off the bench, and keeping your body close to the bench, bend your arms to slowly lower your body a few inches below the bench, then drive back up, using your triceps, to the starting position.
Pro Tips
» To make it easier, set your feet closer to your body.
» To make it harder, set your feet farther from your body.
PLANKS—3 sets of 30 seconds

Lie on the floor facedown with your hands next to your chest and your elbows close to your sides. Take a breath and push your body up onto your toes and hands, engaging your core and keeping your body in a straight line. Don’t stick your butt up in the air or let your hips sag. Hold this position, breathing normally.
Pro Tip
» To make it harder, add weight to your back, or lift one leg off the floor.
LEVEL 2
BARBELL BACK SQUATS—5 sets of 5 reps at RPE 6
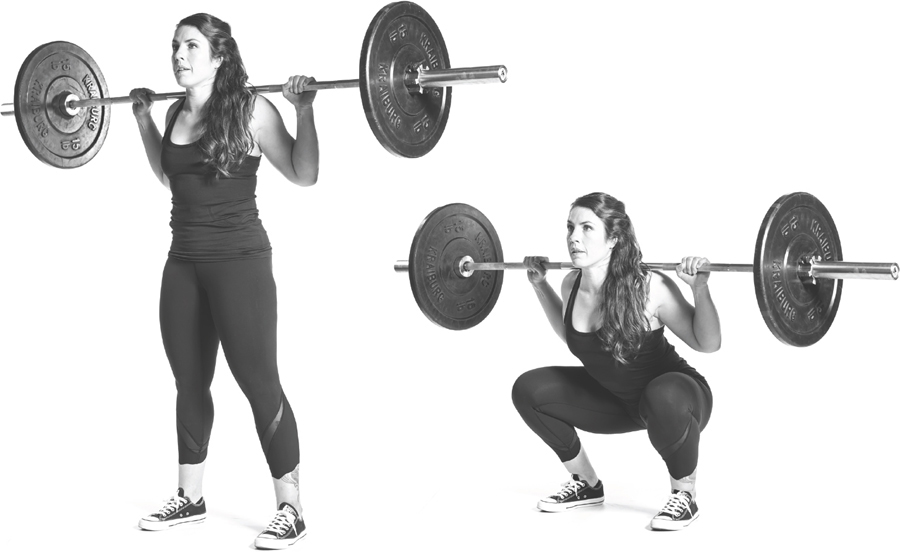
Stand with a barbell resting across the meaty back of your shoulders, called the trapezius muscles, and held in an overhand grip. Don’t let the barbell rest on your neck bones. Inhale, engage your core, squeeze your glutes, and hinge at the hip before bending your knees to lower your butt toward the floor until your thighs are parallel to the floor or slightly lower. Keep your neck neutral and your chest high, then return to the starting position, exhaling on the way up.
BARBELL POWER CLEANS—3 sets of 3 reps at RPE 6
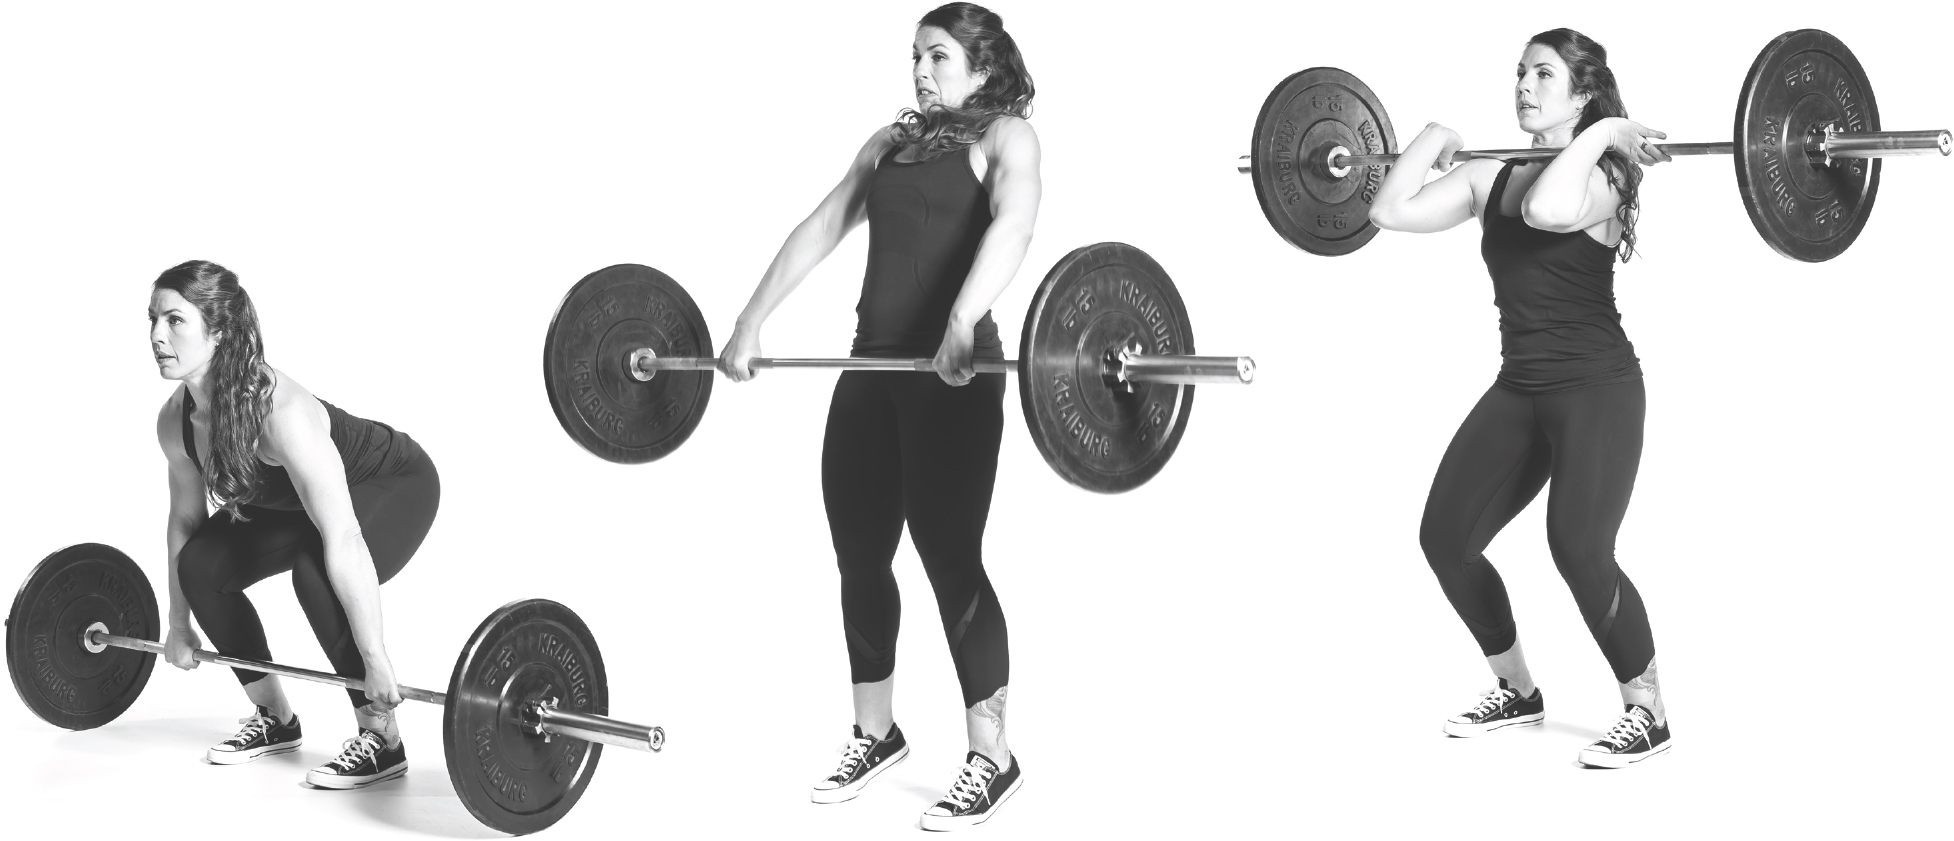
Stand with your feet slightly wider than hip width apart and with a barbell on the floor in front of your feet. Hinge at the hips and grab the barbell overhand with your hands positioned just outside your hips. Lift it to your thighs, then push with your legs and jump as you bend your elbows to flip the bar up and shrug it to your shoulders. The power comes from your legs driving the bar up rather than pulling it with your arms. Stand in a partial squat with your knees slightly bent. Pause briefly, then return the bar to the floor.
Pro Tip
» To make it harder, use an unbalanced object like a sandbag, or receive the weight in a full squat clean.
PUSH-UPS—4 sets of 5 reps

Lie facedown on the floor and place your hands on the floor next to your body at about chest level, with your elbows close to your sides. Your body should look like an arrow if you could view it from above, not the letter T. Push your body up so that you’re on your hands and toes, keeping your body in a straight line. Don’t stick your butt up into the air or drop your butt too low. Bend your elbows to lower your chest toward the floor, and then push back up. As you push up, take a breath and keep your butt and core tight.
Pro Tip
» To make it harder, add weight on your back, or try clapping push-ups.
SEATED SIDE TWISTS—3 sets of 8 reps on each side
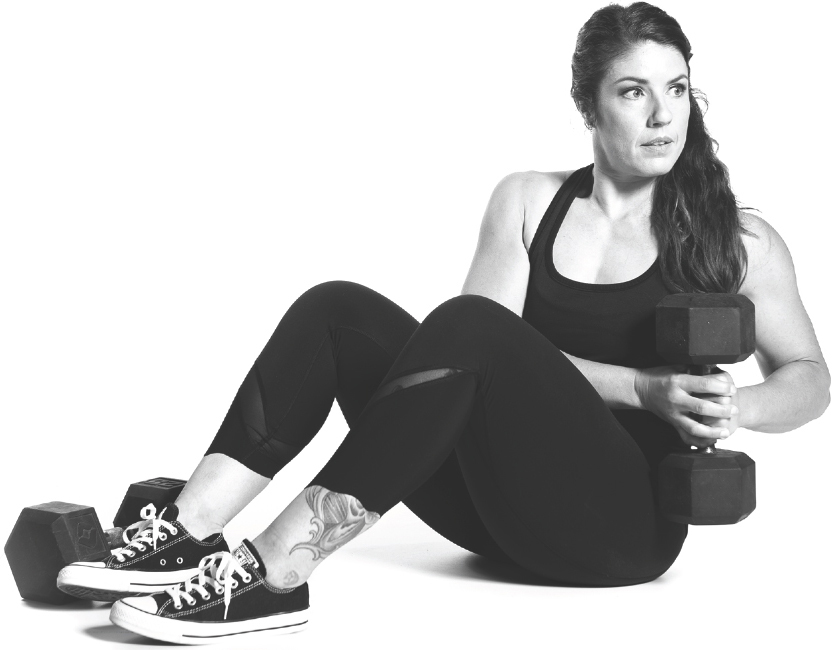
Sit on the floor with your knees bent, your feet flat on the floor, and a dumbbell held in both hands at chest height. Lean back, bringing your feet off the floor, and slowly twist your body to the right as you move the dumbbell toward your right hip. Keep your sit bones on the floor. Then rotate your body slowly to the left, moving the dumbbell toward your left hip. Keep the weight close to your body as you rotate from side to side.
DAY 16: COOL THE FLAMES
Welcome to Day 16! You’re past the halfway point of the Core 4 program, so give yourself a proverbial pat on the back. You got this! Today let’s get out our mental microscopes and look inside the amazing organisms we too often take for granted. Understanding the different types of inflammation in your body can help you tell the difference between what’s normal and what’s not.
First, there are two main types of inflammation: acute and chronic. Acute inflammation is a good thing. For example, if you fall and twist your ankle, it starts to swell and gets red and hot. Another example is when your body is fighting an infection, such as the flu.
Blood flow increases to the area if the injury is localized, and depending on the infection or injury, the body may mount a larger-scale immune system response. (That’s one of the reasons why your whole body aches if you get the flu.) Acute inflammation is part of the body’s natural healing process. Think of it like a fast-burning fire. It may rage and flame up, but soon it’s out.
On the other hand, we can have chronic, systemic inflammation. Chronic inflammation is a longer-term process, and “systemic” means it affects the whole system, or body. If acute inflammation is like a fast-burning fire, chronic is like smoldering ashes. It’s there in the background, heating things up.
The causes of chronic, systemic inflammation may include:
- a damaged gut lining (increased intestinal permeability) that allows foreign particles into the bloodstream
- inflammatory foods, like sugar, alcohol, gluten, and some types of dairy
- insufficient sleep
- insulin resistance
- disrupted gut flora (dysbiosis)
- hormonal imbalances
- environmental toxins
When this type of inflammation goes unchecked, you may experience:
- fatigue
- body aches and injuries that don’t heal well
- infections
- skin or gut issues
- allergies or food sensitivities
- autoimmune disorders
Studies continue to draw links between chronic inflammation and diseases such as diabetes, cardiovascular disease, and cancer.
How to Cool the Flames
Recognizing that inflammation—both acute and chronic—occurs is one thing; knowing how to reduce inflammation on a daily basis is where you want to take action. The good news is that many practices we’ve highlighted in this book reduce inflammation.
Let’s start with food. The most anti-inflammatory foods are real, whole, unprocessed meats, eggs, veggies, fruits, and healthy fats and oils, like avocado, nuts, and seeds. Culinary spices like ginger and turmeric can also help reduce inflammation. However, if you suspect you have specific food sensitivities, I recommend doing a structured thirty-day elimination plan to gain more insight into your system.
The bottom line is that cheap processed junk food usually contains pro-inflammatory ingredients, like sugar and industrial vegetable oils. You can make a massive change in your inflammatory food intake by simply shifting away from processed foods. Substances like caffeine, alcohol, and other drugs can also ramp up inflammation, so consider cutting back if needed.
You can also support a healthy gut by consuming gut-boosting foods, such as bone broth and probiotic-rich fermented foods. And sleep and stress reduction cannot be overlooked; both a lack of sleep and a stressed-out daily life promote inflammation.
Day 16 Challenge: Revisit your Personal Pillar Plan
Take a few minutes to assess where you are. Have any pillars changed? If so, make adjustments to the actions you planned out. Remember, the plan is fluid and can change over time.
DAY 17: PRE- AND POST-WORKOUT EATS
Changing the way you eat is one of the easiest ways to reduce inflammation. It’s simple: put crap food in your body daily and your body will feel like crap. The choices you make food-wise around your workouts can have a big impact on your performance—and the results afterward. The number one question I get from exercisers is “Do I need to eat something before and after I work out?” If I had a dollar for every time this was asked, I’d be sipping frozen kombucha cocktails on a beach somewhere.
Pre-Workout Eats
Take a look at the Pre- and Post-Workout Cheat Sheet later in this section. Pre-workout, or preWO, refers to what you eat fifteen to sixty minutes prior to your workout. Whether you eat depends on a couple of things:
Are you trying to actively gain mass? If yes, eat a preWO. You need to eat more often if you’re on a program to gain lots of extra muscle.
Did you eat within two or three hours of your workout? If yes, you may not feel hungry or want to eat again. That’s fine.
Okay, so if you’re not on a mass-gain program and you’ve eaten a meal less than two or three hours ago, you probably don’t need a preWO. Your last meal is being digested and absorbed. Eating too much food too close to your workout means that it may sit in your stomach and leave you feeling bloated or nauseated.
If you ate properly the day before, your glycogen—that long chain of stored glucose—should be topped off in your muscle and ready to get you through your workout. If you do feel peckish or your stomach is rumbling because you’re so hungry, eat a bit of protein and a bit of fat.
Why Protein?
The preWO’s primary function is to jump-start recovery before a training session by providing the raw materials to repair muscle and to give you a bit of fat to take the edge off. You don’t need a lot of carbohydrates because you want to teach your body to use what you’ve stored. And if you use that up, you want to teach it to rely on your fat stores.
When your diet is heavy in carbohydrates, especially the simple and refined ones like sugars and flours, your body rides that blood sugar roller coaster you learned about in the Pillar 2 chapter. If your body isn’t accustomed to dipping into your fat stores between meals, you’ll tend to feel sluggish. And the only way to get your energy back is to cram a bunch of sugary carbs into your mouth. It becomes a vicious cycle, what’s called a “carb adapted” system, which makes you that much more dependent on a constant flow of carbohydrates to get you through a workout, and without more carbs, you get that crash-and-burn bonk feeling.
Not good.
PreWO carbs can be helpful if you’re in that mass-gain group, and a small amount—10 to 20 grams—can boost testosterone, which is necessary for muscle growth. However, unless you’re a football player or a bodybuilder who’s trying to get huge, preWO carbs aren’t critical.
Recall that protein serves as a source of amino acids for muscle repair. Specifically, the branched-chain amino acids (BCAAs)—leucine, isoleucine, and valine—are most necessary for muscle protein synthesis. The catch is that these amino acids are essential, which means they can’t be manufactured by the body and must be ingested via the food we eat. And while there is protein in plant material, the BCAAs are lacking. Therefore, if you want to repair muscle fibers, you’re best off eating a protein dense in BCAAs, such as meat, poultry, seafood, or eggs.
As far as fat goes, choose one that’s from healthy animal sources or plants: nuts, seeds, coconut, grass-fed butter or ghee, avocado, etc. I like coconut because it’s rich in fast-burning medium-chain triglycerides (MCT), but experiment to find what works best for you.
An example of a preWO would be a hard-boiled egg (super-duper portable!) and a small handful of nuts. Or some leftover meat and a handful of olives or coconut. Or a slice of frittata. Or a protein shake with some coconut milk. Get creative.
Your Post-Workout Meal
The post-workout, or postWO, period is the thirty to sixty minutes after your exercise session ends. Recovery doesn’t just come to a hard stop once an hour has passed; rather, it continues for several hours.
To get the most benefit, especially when your workout is very physically demanding and/or will happen again soon, eat as soon as you can after you finish exercising. Give yourself a chance to come back to a more parasympathetic, rest-and-digest state before trying to force food into your body, but realize that waiting a few hours isn’t ideal either.
What if you’re not working out hard every day? If you’re including some light-to-moderate exercise in your healthy lifestyle and you’re trying to improve your body composition, eating a postWO may not be necessary. You’ve got time between sessions to replenish your energy stores by eating your normal meals.
Pay attention to how you feel, and if you’re not performing or feeling well, consider adding a postWO to the mix. On the other hand, if you’re exercising several times a week or your next training session is less than twenty-four hours later, a post-workout meal matters more. It’s not a substitute for a meal—you’ll eat your postWO in addition to breakfast, lunch, and dinner.
Along with protein, carbohydrates are a key part of the postWO, but for a different reason than protein. Carbs help replenish the glycogen used from your muscle during your workout. If your exercise included HIIT or endurance work, you likely tapped into your glycogen stores.
Post-workout is also when you’re generally more sensitive to insulin. (That’s a good thing!) Eating carbohydrates causes glucose to enter the bloodstream, and then insulin is secreted from the pancreas to store the glucose away in tissues like muscle and the liver. The best type of carbohydrate for post-workout is one that’s rich in glucose or starch. Add protein to your postWO, and you’ll make use of increased insulin sensitivity to transport amino acids into your muscle as well.
Try to keep your postWO lower in fat. Though healthy fats are an important part of a balanced nutrition plan and they’re great for helping you feel fuller longer, they slow gastric (stomach) emptying. That, in turn, slows recovery. Again, this is an important guideline to follow when your workout frequency is high because recovery speed matters more. So if you’re working out hard in the evening and again in the morning, don’t go crazy with fat in your post-workout meal.
If your exercise is very intense, you train back-to-back, or you’ve not quite recovered from your previous workout, add in a postWO and see how you do. A two-to-one ratio of carbs to protein is a good place to begin. For example, if you figure out you do best with 25 grams of protein, double that value and you’ll want about 50 grams of carbohydrates. What does that look like in real food? It’s roughly a chicken breast and a large white potato.
Pre- and Post-Workout Cheat Sheet
Whole sources of animal protein, carbs from starchy veggies, and healthy fats are your best options to eat before and after a workout. But when you eat matters, so use this chart to figure out the timing. Your exact needs for pre-workout will vary depending on when you ate your last meal.
|
Protein |
Carbs |
Fats |
PreWO |
|
|
|
15 to 60 minutes before workout |
10 to 20 grams (1 to 2 ounces protein) |
|
½ to 1 tablespoon |
PostWO |
|
|
|
Within 30 minutes after workout |
20 to 30 grams (3 to 4 ounces protein) |
Double the protein grams (e.g., if 20 grams protein, then 40 grams carbs) |
|
EXAMPLES |
Beef Eggs Fish Game Pork Poultry Protein powder Shellfish Taro Winter squash Yucca |
Fruit Plantains Potato Quinoa Rice Root veggies Sweet potato Tapioca |
Avocado Bacon Butter Coconut products Duck fat Grass-fed butter or ghee Olives or olive oil Nuts or nut butters Seeds Tallow |
Pre-and post-workout nourishment is as much a science as it is an art. There’s quite a bit of nuance to it, and rarely will one exact prescription for grams of this and grams of that work for everyone . . . or even for the same person over time.
Generally speaking, don’t eat a bunch of carbs in the pre-workout period and flood your system with glucose. You should be topped up enough from the last time you trained that you don’t need them. Of course, if this is a race or competition day, you want any advantage you can get, so a healthy dose of carbs before an event can help. In regular training, it’s just not needed. Pre-workout, eat about two ounces protein and one tablespoon fat.
For post-workout, stick to leaner protein and starchy carbohydrates. The starchy veggies give you a lot of bang for the carb buck, but other starches like rice may work well for some people. Fruit also works, but stick to glucose-rich fruits, such as pineapple or banana, if you can. Avoid eating a lot of fat post-workout. It’ll slow down digestion and therefore recovery.
Day 17 Challenge: Work Out
Note that movements from Week 2 make a dynamic warm-up. Complete all sets and reps of each movement before moving on to the next.
LEVEL 1
ALTERNATING LATERAL LUNGES—3 sets of 6 reps with each leg
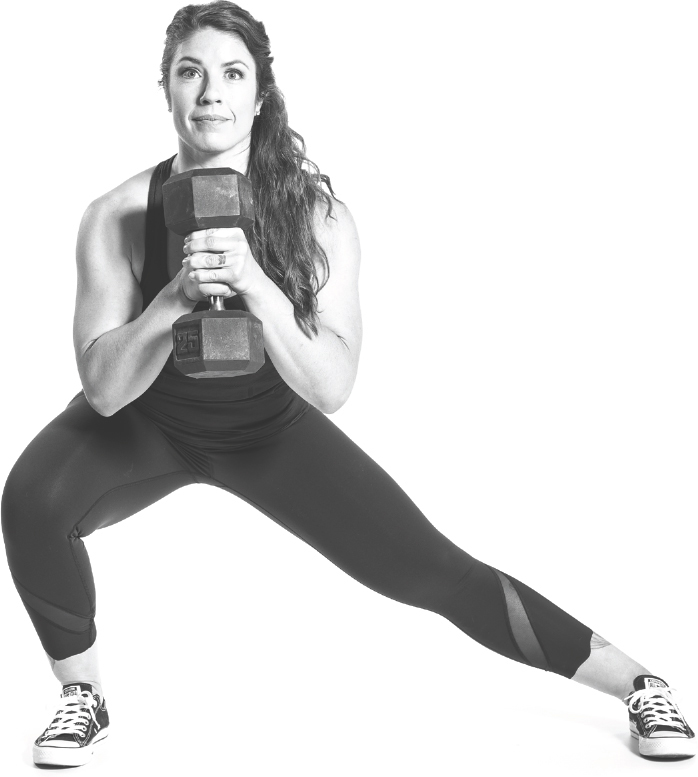
Stand with your feet under your hips and holding a dumbbell with both hands. Step your right leg out to the side as pictured, bending your right knee and pushing your butt back. Think about sitting back into your bum by hinging at the hip instead of putting too much pressure on your knee. Your right foot should be angled slightly out, and your knee should track over your foot. Your left leg should be straight. Drive through your right foot to return to the starting position, and repeat the movement on the opposite leg.
Pro Tip
» To make it harder, slide the straight leg toward the bent leg to return to standing.
ALTERNATING LUNGES—3 sets of 10 reps with each leg
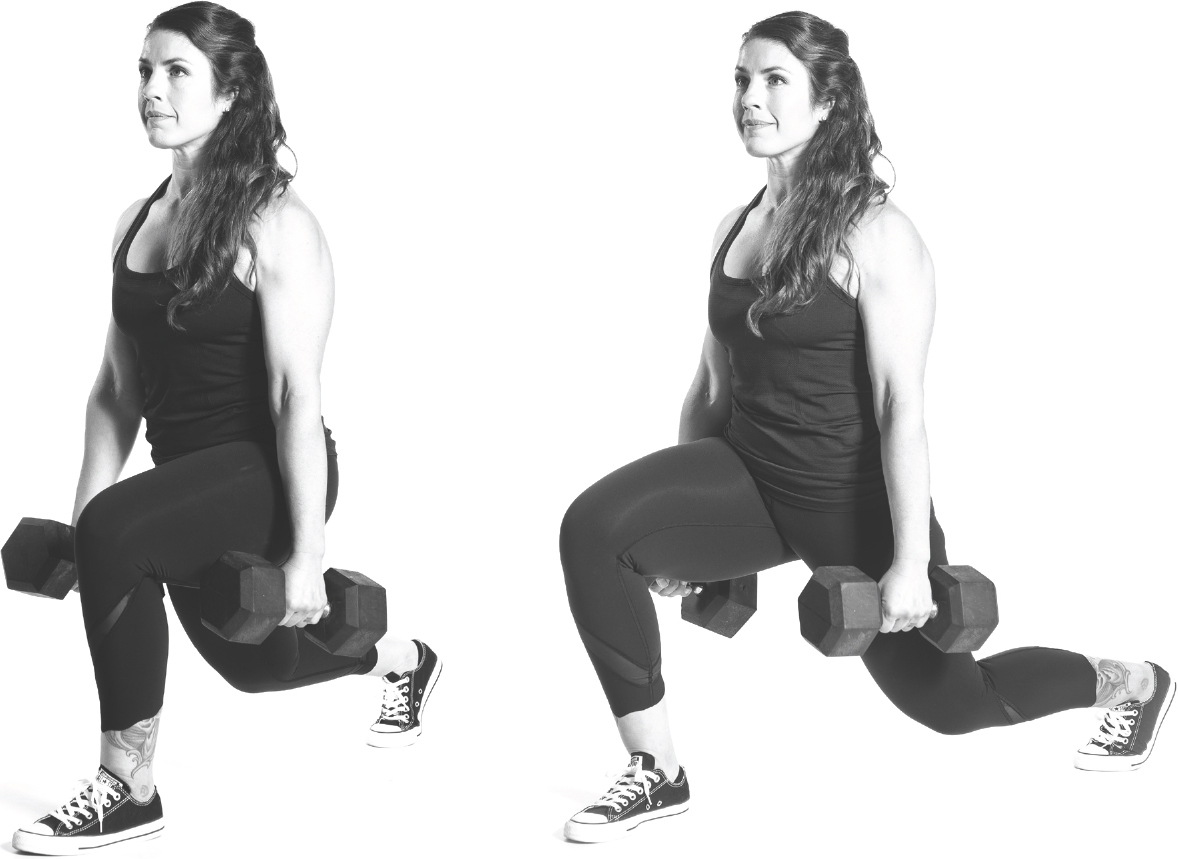
Stand with your feet under your hips, holding dumbbells in both hands. Step forward and bend your right knee to make a 90-degree angle with your right leg as you lower your left knee toward the floor. Drive through your front foot. Step forward with your left leg to bring your feet together. Repeat the movements on the opposite leg.
Pro Tips
» Make your step short enough that you can return to standing without swinging your torso.
» To make it harder, make them walking lunges, or hold the dumbbells over your head while you lunge.
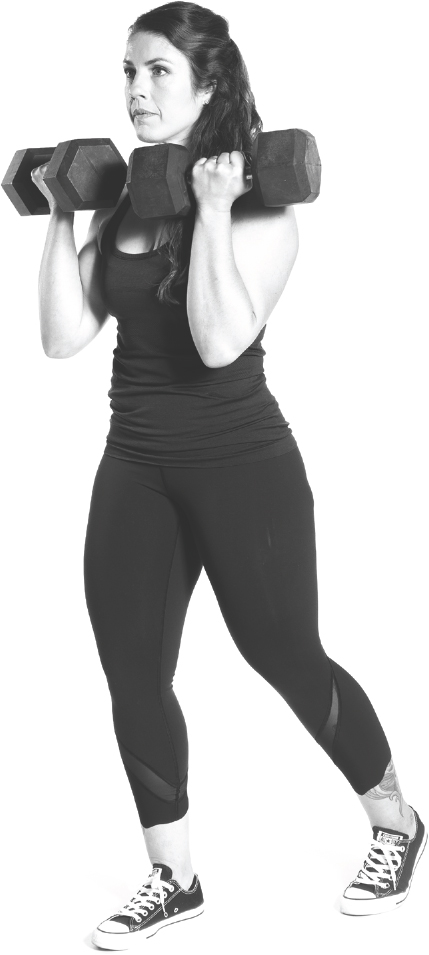
ALTERNATING DUMBBELL SHOULDER PRESSES—3 sets of 8 reps with each arm
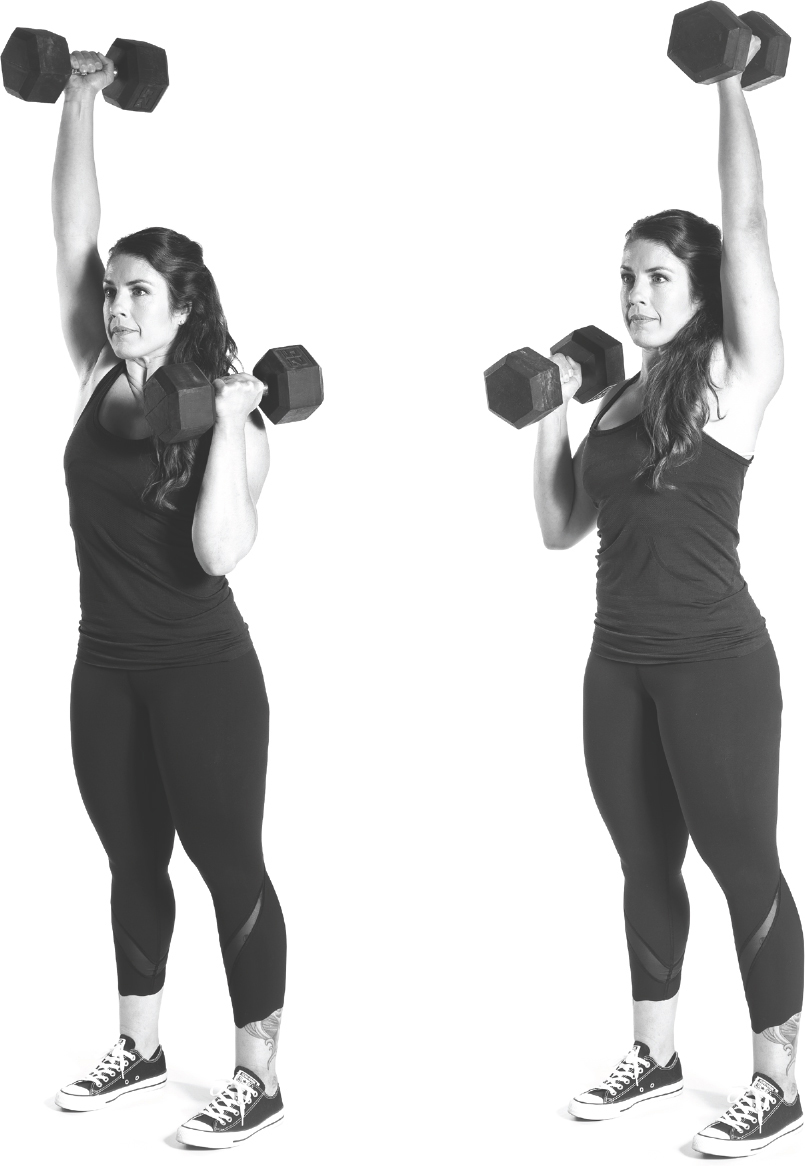
Stand with your feet under your hips and with dumbbells in both hands held at shoulder height, with your knuckles facing your shoulders. Engage your core, squeeze your butt, and keep your neck neutral as you actively push up through the shoulder to raise one dumbbell toward the ceiling. Keep your arm close to your head. Also, pull your ribs down instead of flaring them out. Lower the dumbbell and repeat the movements with the opposite arm.
Pro Tip
» To make it harder, press both dumbbells up at the same time or use a barbell.
FRONT RACK CARRIES—4 sets of 50 feet
Stand with your feet under your hips and hold a pair of dumbbells directly in front of your chest. Engage your core and walk forward, taking normal-size steps and keeping the weights steady and close to your chest with your elbows pinned to your sides.
Pro Tip
» To make it harder, substitute a barbell for the dumbbells.
WALL SITS—3 sets of the maximum time you can do

Stand with your back up against a wall and your feet about a foot away from it. Slide your back down the wall until your knees are bent at 90-degree angles. Squeeze your butt, brace your abdominal muscles, and keep your neck neutral. Hold that position as long as you can, breathing normally.
Pro Tip
» To make it harder, extend your arms out to your sides or overhead, or add a dumbbell to your lap.
LEVEL 2
BARBELL DEADLIFTS—1 set of 5 reps at RPE 6
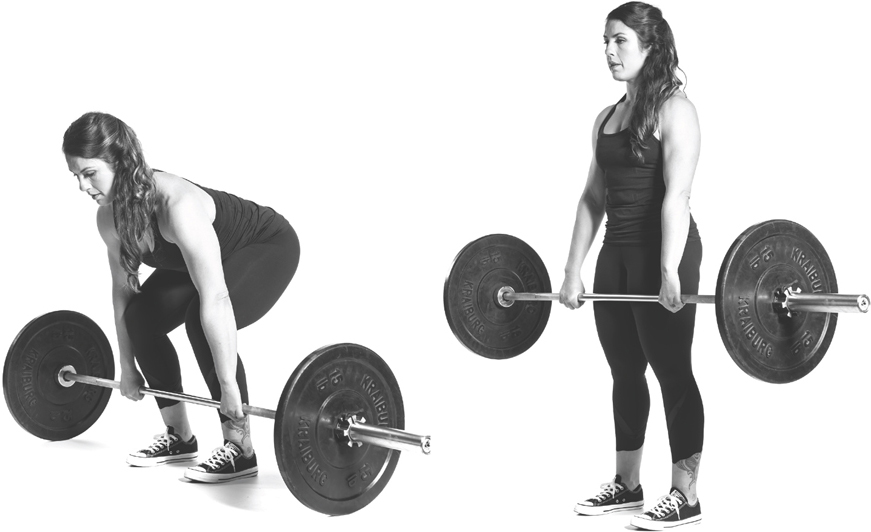
Stand with your feet under your hips with a barbell on the floor close to your shins. Hinge at the hips and grasp the barbell overhand with your hands positioned just outside your hips. Inhale, engage your core, squeeze your glutes, and push the floor away with your legs instead of lifting your back to raise the barbell. Keep your neck neutral and the barbell close to your body as you come to a standing position, exhaling on the way up. Be sure to keep your toes from lifting off the floor throughout the movement. Hinge forward at the hips, lower the weight to the floor, and return to the starting position.
BARBELL SHOULDER PRESSES—3 sets of 5 reps at RPE 6

Stand with your feet under your hips and holding a barbell across the front of your shoulders with an overhand grip. Your hands should be slightly wider than shoulder width apart. Engage your core, press the barbell toward the ceiling. Maintain a neutral posture and pull your ribs down instead of flaring them out. Return to the starting position.
PULL-UPS—4 sets of 5 reps

Stand under a pull-up bar with your hands gripping the bar underhand or overhand (your choice) and shoulder width apart. Your thumbs should be wrapped all the way around the bar. Inhale as you engage your core and pull your body up until your chin clears the bar. Keep your neck neutral—don’t crane your chin over the bar. Then lower back to the starting position with control to protect your shoulders.
Pro Tips
» To make it easier, secure a band around the bar and place your feet in it to reduce the amount of weight you’re pulling up. Or start at the top of the pull-up position and then lower yourself down instead of doing the complete rep.
FRONT RACK CARRIES—4 sets of 50 feet
Stand with your feet under your hips and hold a pair of dumbbells directly in front of your chest. Engage your core and walk forward, taking normal-size steps and keeping the weights steady and close to your chest with your elbows pinned to your sides.
Pro Tip
» To make it harder, substitute a barbell for the dumbbells.
DAY 18: WHAT THE FUCK ARE YOU AFRAID OF?
Now that you know how to eat to fuel your workouts, let’s explore something less concrete—and harder to get a handle on. It’s fear. Merriam-Webster defines fear as “an unpleasant often strong emotion caused by anticipation or awareness of danger.” And many of us walk around in fear daily.
Don’t get me wrong. There are legitimate times to be afraid: when someone is threatening you with immediate harm, when you’re involved in a natural disaster, when you’re being chased by a wild animal. Legit fears.
Spending your time on the rocking chair of worry, though, constantly swaying back and forth in one place and never getting anywhere? Not the best use of your time or energy.
I used to worry about everything—how much fat was on my inner thighs (true story), how good (or not) of an athlete I was, what everyone was thinking about me. Sounds exhausting, right? It was. I spent so much time worrying and being afraid of “what might happen” about everything in life that I didn’t have much energy left over to create and use my unique skill set to help others.
In fact, fear almost kept me from leaving a job that I was unhappy with and working on nutrition coaching full time, which, in turn, led me to develop the Core 4 program . . . and this book! I can’t imagine what I’d be feeling like right now if I’d stayed in that job. But fear nearly chained me.
The thing is, when you’re afraid of “what might happen” and you create fantastical scenarios in your head, you leave little space for the things you know you want to accomplish. That doesn’t mean you need to stick your head in the sand about the realities of what life throws at you or shirk responsibility for what needs to be dealt with. You’ve got to step up when the time comes.
But you know what? Humans are incredibly resourceful. When the real pressure is on, when something you worried about actually happens, you’ll find a way to deal with it. Really. You’re resilient and intelligent.
What Do You Do When You’re Scared or Worried?
Grab a piece of paper and write down the worst thing that could happen if this thing you’re scared of occurs. Be honest. Once you acknowledge the worst case, you can stop worrying about it. You’ve said it. You’ve recognized it.
Now come up with some possible solutions. For example, “I lose my job” may be what you fear. The worst thing that could happen? “I can’t pay my bills.” Actions you could take: “Find a part-time job, do odd jobs, check out Craigslist, sell some things I don’t need for cash, etc.”
That’s it. Remember, this fear you have hasn’t even happened yet. It may never happen. But now you’ve acknowledged it and thought of some things you can do if it happens.
Okay. Now you’ve freed up some mental space, some time and energy that’s so damn precious.
What do you do when you find yourself slipping into that worry mode? Create. Go make something. It doesn’t mean you have to get out the finger paints or coloring books, but do something positive and creative with your energy. You’ll be amazed by what you can come up with.
Day 18 Challenge: Complete the Face Your Fears Worksheet
Face Your Fears Worksheet
Use this worksheet to write down your three biggest fears. Then brainstorm possible solutions. Then fold up those fears and put them away.
Fear 1
How I’d Take Action
Fear 2
How I’d Take Action
Fear 3
How I’d Take Action
How did writing about your fears make you feel? When you name them and brainstorm solutions, it frees up your mind to learn, plan, ponder, and explore.
DAY 19: HOW TO CARDIO
Today’s mission? To get smart about cardio.
Back in the Pillar 2 chapter I explained some of the common pitfalls of overdoing cardio. You may still be wondering why I don’t provide structured cardio workouts as part of the program. Consider the common weight loss advice “Eat less and move more.” It conjures up images of eating bits of lettuce on a plate coupled with long hours of sweating it out on a treadmill. (I’m going to guess you don’t get a great feeling when you visualize that.)
“Eat less and move more” can be misguided advice, because for optimal health, you need to think about the quality of what you eat and how you move, not just the quantity. Also, not everyone needs to eat less—some people already eat too little—and some people don’t need to move more. Some are caught in the trap of chronic overexercising. So you see, that advice doesn’t always work.
Which brings me back to cardio. Back in the 1950s, Ancel Keys’s Seven Countries Study explored the connection between saturated dietary fat, cholesterol, and heart disease. His conclusions—now known to be based on misinterpreted and incomplete data—triggered a worldwide fear of fat and changes in governmental dietary policy that still echo in our society today.
Part of that fatphobia involved a shifting focus within the United States and other Western countries toward cardiovascular-type training. (Eastern countries, on the other hand, continued emphasizing strength training.)
The thing is, too much of any type of exercise is problematic. Too much cardio isn’t health promoting. Too much strength training isn’t either. But in my experience, more people are exposed to cardiovascular exercise than have experience with strength training. This is one reason why cardio isn’t emphasized in this program.
If you love cardio and you do it in healthy doses—a few times a week and paired with strength training—I don’t see a reason to stop. But for some people, too much cardio is stressful on the body. When mitochondria use oxygen to produce energy, free radicals—the nasties that can damage cells and DNA—are produced. Normally, the body has countermeasures—hello, antioxidants!—to neutralize these free radicals. But sometimes the system gets overwhelmed, especially when the body is under lots of stress, like exposure to environmental toxins, too much sugar, and a high level of exercise. When life stress is added, everything continues to compound.
Cardio without strength training can also present problems, especially when energy intake is too low. It results in either muscle loss or, simply, a lack of muscle gain, and metabolism takes a hit.
It’s far easier to overdo long slow distance (LSD) cardio than it is to overdo strength training. If you overdo strength training, you exhaust your muscles and just can’t lift anymore. But with LSD cardio, which uses different muscle fibers, you can keep going and going and going. If you’ve ever had a runner’s high, you’re familiar with the good feelings that can accompany a long or strenuous bout of aerobic exercise. The “high” is the result of endorphins being released and binding to opioid receptors in your brain. When that happens, you feel less pain—and perhaps even euphoria. Endorphins can be released by many activities (like being in nature, eating a delicious meal, and being touched—whether sexually or platonically), but if you’re starved for them, you may seek out ways to get a boost, like overexercise, drugs, or living the “wild” life. I can’t determine what amount of cardio is too much for you here, but if you’re pounding the pavement even when you’re exhausted to get that “high,” that may mean it’s time to dial back or try something different, like a HIIT workout.
It’s important to do what you love—because you’ll keep doing it—but be smart about it at the same time.
Strength Training for Normal Humans
My husband, Z, coined the term “strength training for normal humans,” and his philosophy—one that I share—is that, for optimal health, normal humans (those who don’t aspire to elite levels of performance) can find a healthy way to balance exercise in their lives. The gist is simple: cardiovascular exercise is beneficial but easy to overdo. Too much can have the following effects:
Bone density may suffer, especially if the type of cardio done has little or no impact (like cycling or swimming).
Muscles that aren’t used during cardio may atrophy.
Cortisol may increase.
Testosterone or estrogen may decrease.
It’s harder to overdo strength training when you lift a few times a week. Strength training has the following effects:
There’s a positive benefit to bone density.
Muscle volume and strength go up.
Testosterone and estrogen normalize.
Cortisol rises temporarily, but not to an unhealthy level given adequate recovery.
A few strength-training sessions per week is enough to give you all those benefits. Yet I truly believe you should never do something you hate, even if it’s “healthy.” In fact, research shows that you’re more likely to stick to healthy eating or exercise when you choose foods and activities you enjoy.
If, at the end of the program, you really don’t think strength training has a place in your life, at least you gave it a fair shake. But I hope that if you do return to high-volume cardio, you’ll blend strength training into your routine once or twice a week in order to enjoy some of its benefits.
Day 19 Challenge: Work Out
Note that movements from Week 2 make a great dynamic warm-up. Complete all sets and reps of each movement before moving on to the next.
LEVEL 1
GOBLET SQUATS—4 sets of 10 reps
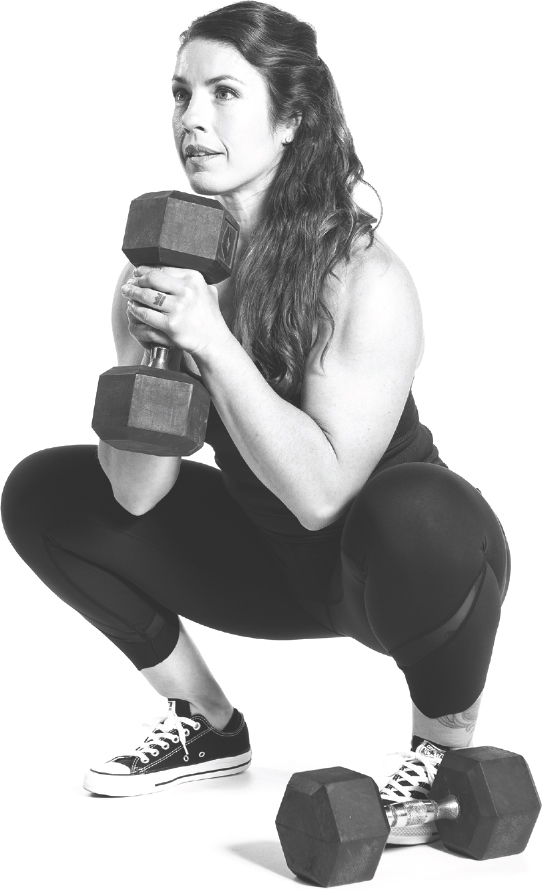
Stand with your feet slightly wider than hip width and hold a dumbbell or kettlebell in front of your chest. Inhale and engage your core as you hinge from your hips and bend your knees to lower your bottom toward the floor, keeping your feet in a comfortable squat stance with your thighs a little lower than parallel. Exhale as you return to the starting position.
SUITCASE DEADLIFTS—4 sets of 10 reps
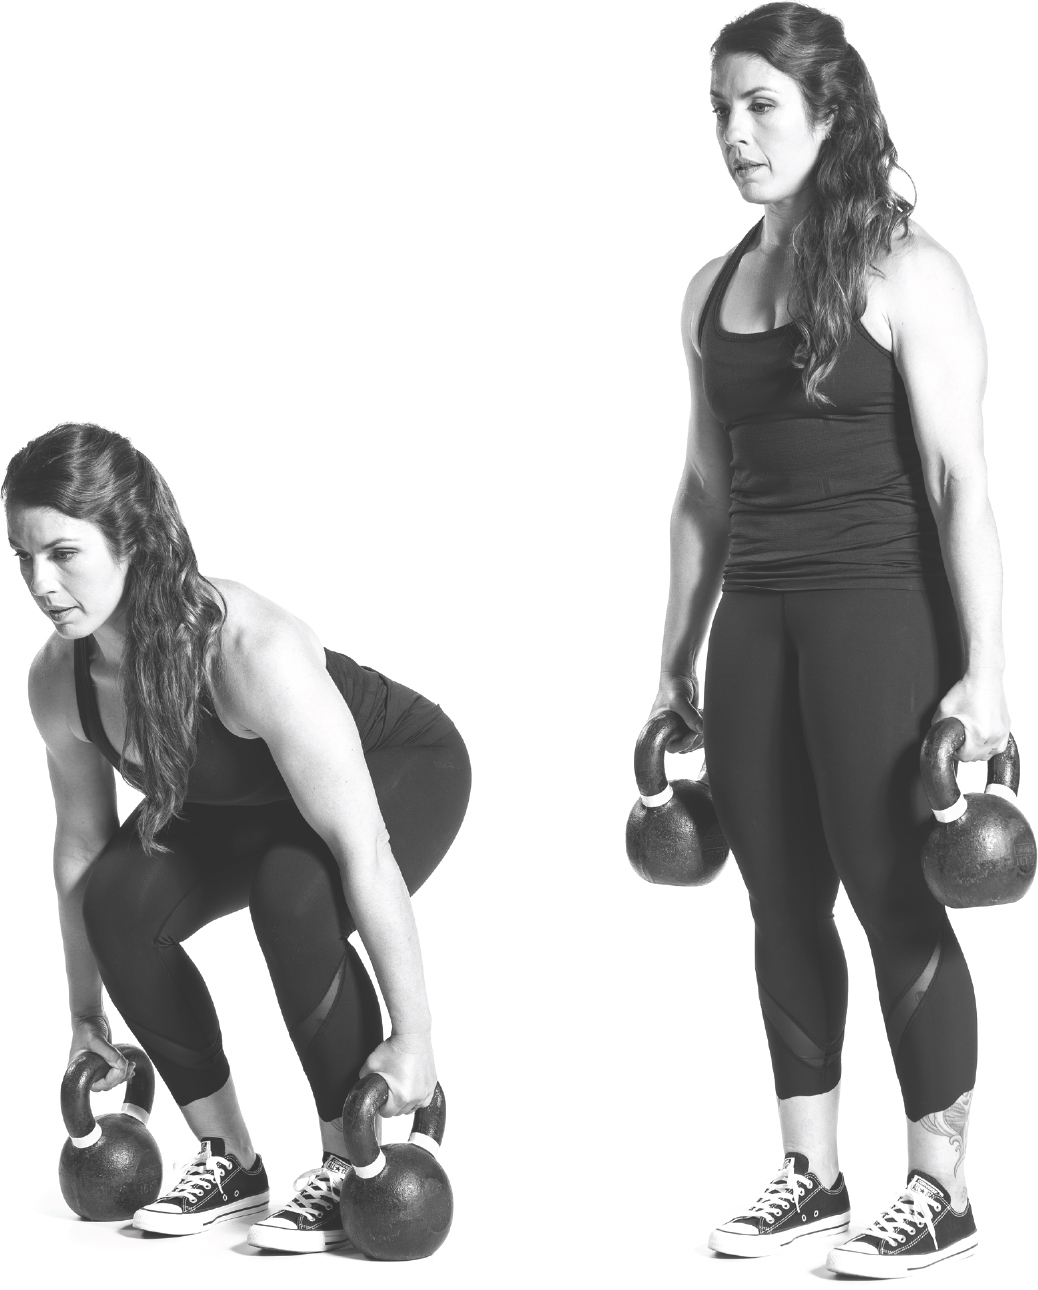
Position your feet hip width apart and hold dumbbells or kettlebells next to your feet. Engage your core, squeeze your glutes, and come to a standing position by trying to push the floor away with your legs instead of lifting with your back. Keep your neck neutral throughout the movement, and keep the weights close to your body. Then hinge forward at the hip and return to the starting position. Be sure to keep your toes from lifting off the floor throughout the movement.
Pro Tip
» To make it harder, use a barbell.
RENEGADE ROWS—3 sets of 10 reps
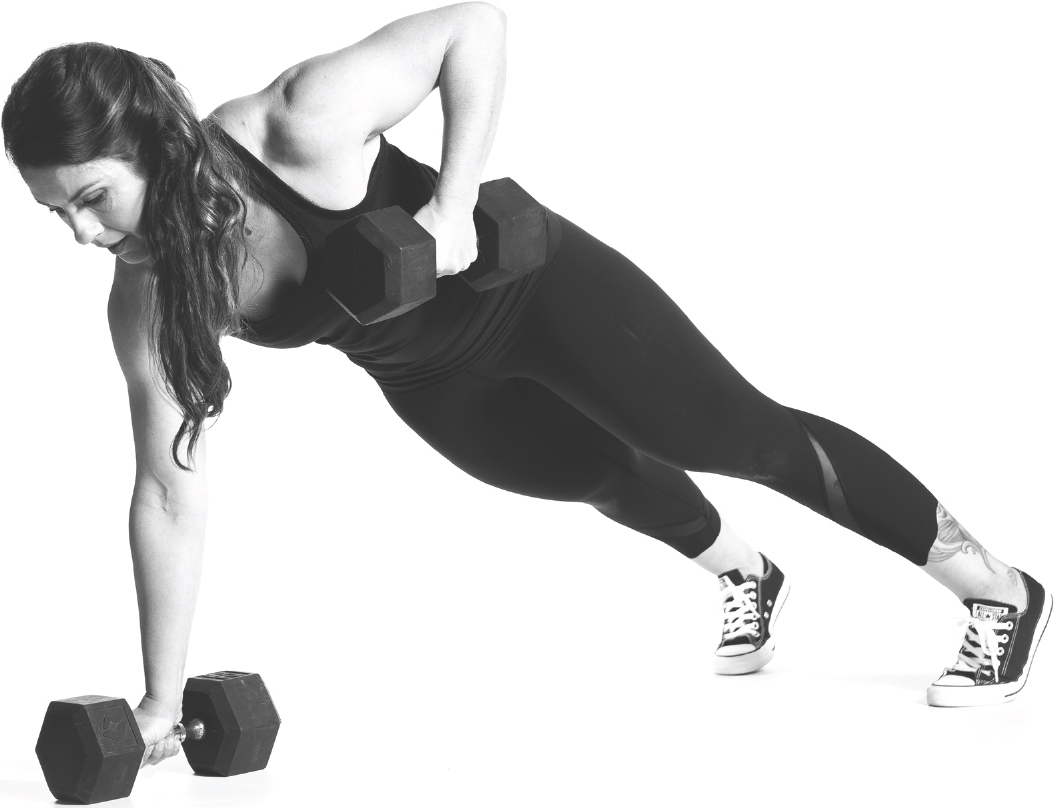
Lie facedown on the floor with dumbbells on either side of your body at about chest level. While grasping the dumbbells, push your body up into a plank position. Shift your weight onto your right arm and bend your left arm to row that dumbbell up to the left side of your rib cage. Actively pull with the upper back into each row, keeping the arm close to your body. Lower the dumbbell to the floor and repeat the movements with the other arm.
PULL-UPS—4 sets of 6 reps
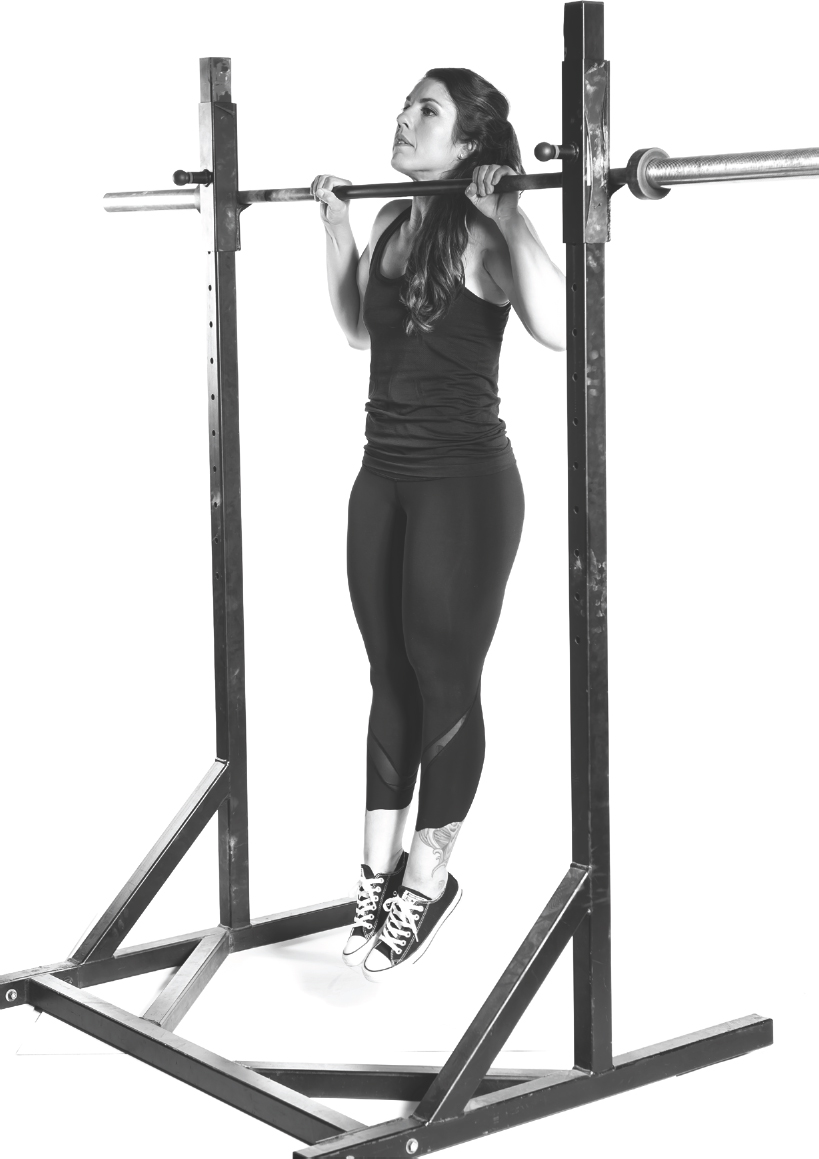
Stand under a pull-up bar with your hands gripping the bar underhand or overhand (your choice) and shoulder width apart. Your thumbs should be wrapped all the way around the bar. Inhale as you engage your core and pull your body up until your chin clears the bar. Keep your neck neutral—don’t crane your chin over the bar. Then lower back to the starting position with control to protect your shoulders.
Pro Tips
» To make it easier, secure a band around the bar and place your feet in it to reduce the amount of weight you’re pulling up. Or start at the top of the pull-up position and then lower yourself down instead of doing the complete rep.
L SITS—3 sets
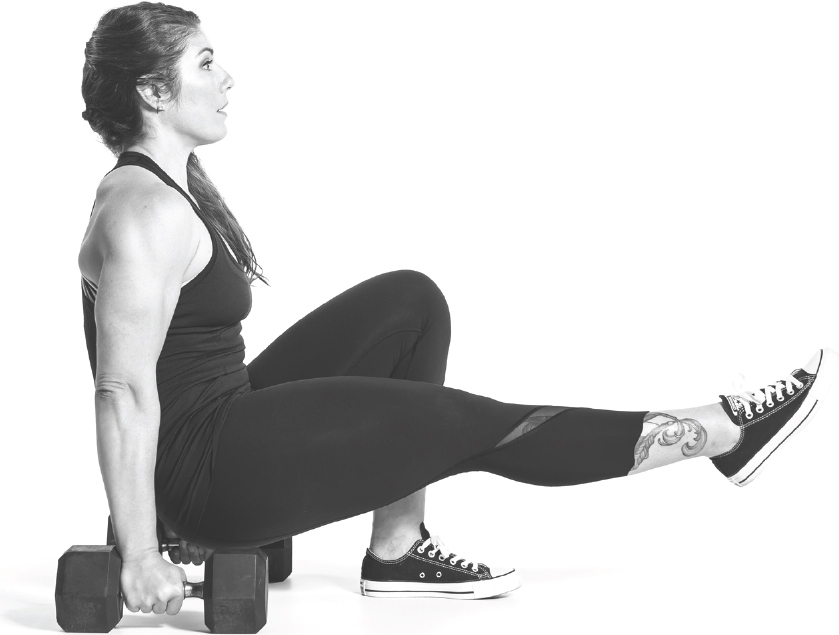
Sit on the floor with your legs extended in front of you and your hands gripping dumbbells on the floor next to your hips. Inhale and engage your core as you lift your butt off the floor, supporting your bodyweight on your hands. Hold for 15 to 30 seconds, then lower to the floor.
Pro Tip
» To make it easier, lift one leg off the floor—it can be either bent or straight.
LEVEL 2
BARBELL BACK SQUATS—5 sets of 3 reps at RPE 6
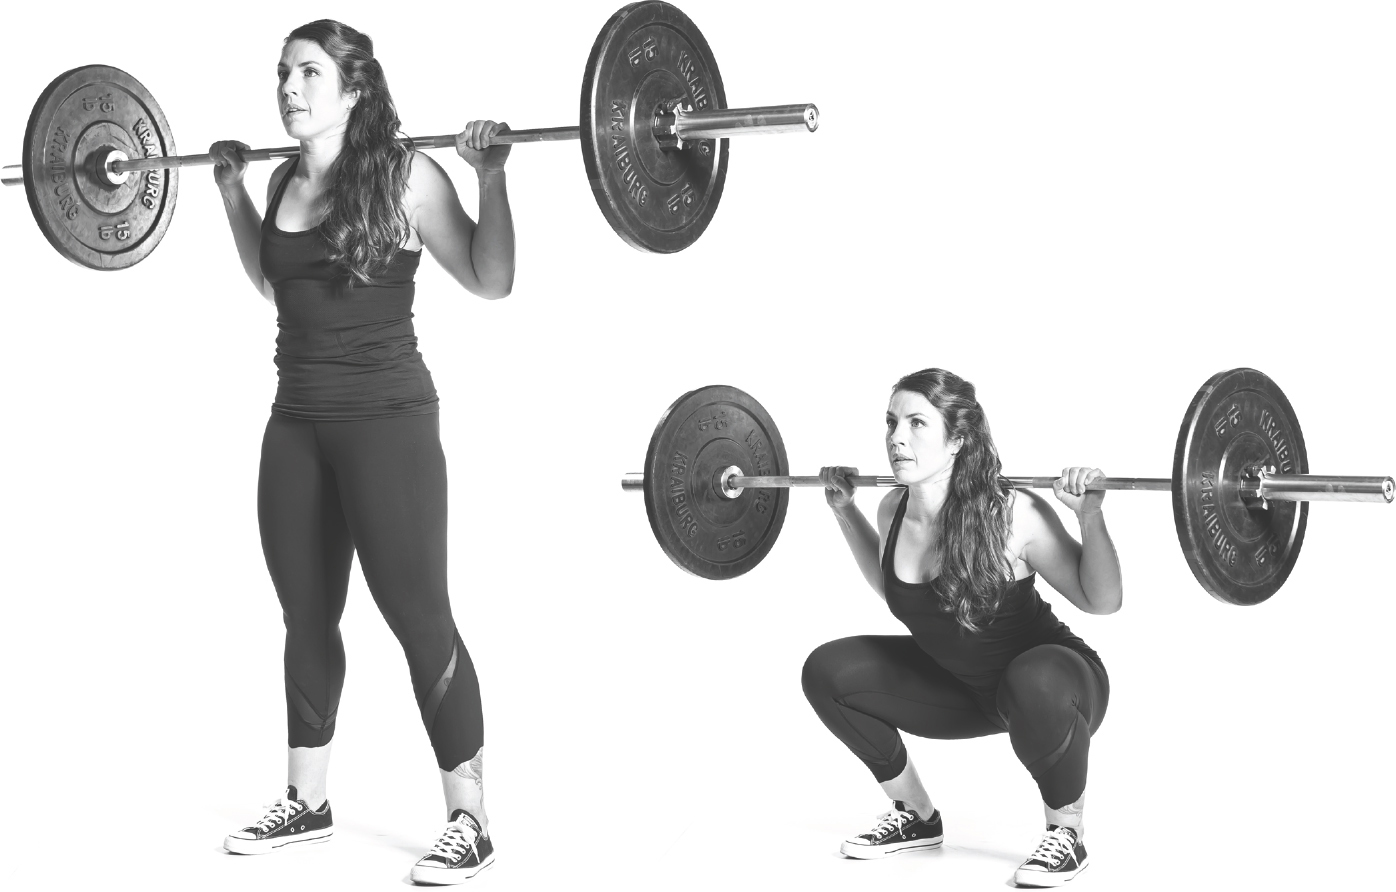
Stand with a barbell resting across the meaty back of your shoulders, called the trapezius muscles, and held in an overhand grip. Don’t let the barbell rest on your neck bones. Inhale, engage your core, squeeze your glutes, and hinge at the hip before bending your knees to lower your butt toward the floor until your thighs are parallel to the floor or slightly lower. Keep your neck neutral and your chest high, then return to the starting position, exhaling on the way up.
BARBELL POWER CLEANS—3 sets of 2 reps at RPE 7

Stand with your feet slightly wider than hip width apart and with a barbell on the floor in front of your feet. Hinge at the hips and grab the barbell overhand with your hands positioned just outside your hips. Lift it to your thighs, then push with your legs and jump as you bend your elbows to flip the bar up and shrug it to your shoulders. The power comes from your legs driving the bar up rather than pulling it with your arms. Stand in a partial squat with your knees slightly bent. Pause briefly, then return the bar to the floor.
Pro Tip
» To make it harder, use an unbalanced object like a sandbag, or receive the weight in a full squat clean.
L SITS—3 sets
Sit on the floor with your legs extended in front of you and your hands gripping dumbbells on the floor next to your hips. Inhale and engage your core as you lift your butt off the floor, supporting your bodyweight on your hands. Hold for 15 to 30 seconds, then lower to the floor.
Pro Tip
» To make it easier, lift one leg off the floor—it can be either bent or straight.
PUSH-UPS—4 sets of 5 reps
Lie facedown on the floor and place your hands on the floor next to your body at about chest level, with your elbows close to your sides. Your body should look like an arrow if you could view it from above, not the letter T. Push your body up so that you’re on your hands and toes, keeping your body in a straight line. Don’t stick your butt up into the air or drop your butt too low. Bend your elbows to lower your chest toward the floor, and then push back up. As you push up, take a breath and keep your butt and core tight.
Pro Tip
» To make it harder, add weight on your back, or try clapping push-ups.
DAY 20: SLEEP, PART 2
Today’s challenge may surprise you, and you aren’t experiencing déjà vu. We’re gonna talk about sleep . . . again. Earlier in the program, you saw why sleep is totes important. You tracked your sleep for a week to get insight and perhaps find patterns. Today, let’s consider how you can fall asleep faster and look at some other practical tips for sleeping better.
Five Ways to Fall Asleep Faster
1. MAKE A BEDTIME ROUTINE.
We create bedtime routines for children, but we tend to shun them as adults. By following the same routines around bedtime, you’re training yourself that it’s time to wind down and sleep.
What does this look like? It’s totally up to you, but make it low-stress and relaxing. Maybe you read for a while, then set out your work clothes for the next day, take a shower, and brush your teeth. Build repetition so you know that at the end of the routine, it’s time to sleep.
Even more important than that is going to sleep and waking at roughly the same time. Erratic bedtimes make it hard to train your body and brain to prepare for sleep.
2. TAKE MAGNESIUM BEFORE BED.
Magnesium is a vital mineral for hundreds of biochemical reactions in the body, including muscle function, electrolyte balance, cellular energy production, and more. Also, it helps with a feeling of relaxation, so it’s great to take before bedtime.
Good dietary sources include dark leafy greens, sea vegetables, and nuts. Interestingly, some minerals, such as calcium, may compete with magnesium for absorption, so avoid having large amounts of calcium-rich foods at the same time.
You might also try a relaxing Epsom salt bath or using magnesium oil on your skin.
Aim to take your magnesium about thirty minutes before bedtime.
3. USE LAVENDER OIL.
Lavender is renowned for its ability to calm and relax the body, and it makes a great addition to your bedtime routine. Here are some ways to use lavender oil for better sleep:
Add lavender oil to your Epsom salt bath (be careful because it can make the bathtub slippery).
Mix a few drops in a spray bottle with water and mist your sheets and bedding.
Put a drop or two on your temples or on the bottoms of your feet.
Diffuse lavender oil while you sleep.
Lavender essential oil is generally safe to apply undiluted, but check for skin sensitivities before using it, especially on large areas of skin. Or dilute it in a carrier oil, such as coconut oil.
4. AVOID NIGHTTIME BLUE LIGHT.
This. Is. Huge.
As you learned in the Pillar 3 chapter, nighttime exposure to light, particularly the blue wavelengths that mimic sunlight, is incredibly disruptive to melatonin, the hormone that helps put you to sleep. Unfortunately, the backlit electronic devices that are so prevalent in our modern world are oozing with blue light.
Daytime exposure to blue wavelengths is important because it helps maintain the “awake” part of your circadian rhythm. However, reducing or avoiding blue light once the sun goes down is key to falling asleep faster.
To cut down on nighttime blue light:
Use screen dimmers such as Night Shift or f.lux on your electronic devices. These programs turn your screens to a yellow-orange hue, mimicking sunset and candlelight. Better yet, avoid screens for an hour or two before bed.
Wear amber glasses, also known as “blue blockers.” They may look nerdy, but these orange-lens glasses filter some of the blue light coming from your screens. At ten dollars a pair for the generic kind, that’s a pretty inexpensive solution to help you feel less stimulated at night. You can get fancy ones for a little more money.
Eliminate light sources in your bedroom, such as digital alarm clocks, electronic devices with glowing power lights, and ambient light coming through your windows. Blackout curtains are a must.
Use salt lamps or incandescent bulbs on a dimmer for soft light sources that don’t throw blue light and aren’t as dangerous as candles.
5. REDUCE STRESS, ESPECIALLY IN THE EVENING.
Okay, it’s hard to eliminate 100 percent of stress from your life. I get that. But nighttime stress can make it particularly hard to fall asleep.
The hormone cortisol is associated with a healthy circadian rhythm; it ramps up as morning approaches and peaks by midmorning, helping you wake up and stay alert. When cortisol rises at night, though, it can make you feel too keyed up to wind down.
Psychological stress is the type we often think of, but physical stress—especially from evening workout sessions—can also make it difficult to fall asleep. If you train in the evening and are having trouble sleeping, you may want to switch your exercise schedule.
To reduce evening stress, also try to
do some light stretching or yoga;
practice deep breathing or meditation;
avoid suspenseful or physiologically thrilling books and TV programs in the evening;
stay off work email and social media so you don’t get stressed out; and/or
read a book or take a warm bath or shower.
In addition to these five strategies, a healthy diet rich in nutrient-dense foods (what you’re eating this month) is the best foundation for balancing the hormones responsible for your circadian rhythm and sleep. Try to implement these suggestions before turning to pharmaceutical intervention. If you continue to suffer from sleep issues, seek the help of a health professional.
Day 20 Challenge: Include Sleep Strategies
Pick one or two of the sleep strategies just mentioned and start doing them tonight.
OPTIONAL WEEKEND WORKOUT. Do some interval training, resting 90 seconds between each interval. You might try one of these:
Run—100 meters, 5 to 7 sets
Row—250 meters, 5 to 7 sets
Stationary bike—30 seconds, 5 to 7 sets
Swim—25 meters, 5 to 7 sets
DAY 21: EATING OUT WITHOUT “CHEATING”
I hope you slept like a proverbial baby last night—a baby who wakes up rested and refreshed and ready to kick ass and take names. Today’s challenge is easy peasy, so get ready: prep your meals for the week ahead. By now it should be getting easier for sure, and you may be ready to make some tweaks. Remember, it’s all about developing habits that will set you up for success each week.
You’ve got this! Go prep your little heart out! And while we’re on the subject of food, let’s talk about dining out.
How to Eat Out—Without Going Crazy
Staying at home for the rest of your life because you’re unsure about how to navigate a restaurant menu is no fun. You’re cultivating better choices for the long term, so after this program, it will be up to you to take the wheel.
One of the areas where you may struggle is how to go out to eat without ordering (and eating) allthefoodsanddrinks. But it’s inevitable that you’ll eat out from time to time. When it becomes a daily thing because “I didn’t meal prep and my fridge is bare and, oh look, how did that giant plate of greasy food end up in front of me again . . .?!” that’s when there could be a problem.
However, many restaurants are becoming more accommodating. A lot of them have healthier options or are willing to make substitutions to dishes if you ask. Every once in a while I run across a place unable to meet my request, but I find it’s rare, as long as it’s a reasonable ask.
I try not to sweat stuff like what kind of oil they used to sauté my veggies in. If you start analyzing everything to that degree, you’re missing out on the joy of having someone else cook your food (and do the damn dishes). Don’t end up with analysis paralysis.
Tips for Eating Out
Here are some tips to help you make healthier choices when eating out:
Ask about a gluten-free menu or items if you’re gluten sensitive.
Skip deep-fried foods.
Tell the waitperson to hold the breadbasket.
Omit the bun or bread from a burger and ask for a lettuce wrap or a side salad instead.
Request to substitute extra veggies or a potato for fries.
Ask for dressing or sauce on the side.
Look for simple dishes, like a meat entrée with veggies on the side, instead of casseroles or fried items that tend to be higher in calories.
Skip the dessert menu. (Some restaurants are so special that it may be worth having dessert, but at a chain restaurant, that’s probably not the case.)
Pass up alcohol. Sparkling water with lemon is a nice fizzy drink instead of booze.
Day 21 Challenge: Prep Meals for Next Week
See the beginning of the next chapter for the upcoming week’s shopping list and what to prep.