Impact sprinklers set up on posts are a good way to water tall crops.
Water is one of the most important factors that determine the success or failure of a crop. Like most living organisms, plants comprise mostly water, and many fruit and vegetable crops contain an even higher percentage of water than other kinds of plants.
The watering requirements of your garden depend on a variety of factors, including the kinds of crops you choose, the structure of your soil, your region’s climate, and the day-to-day variations in your weather. Rainwater is a great source of hydration for your plants, but it doesn’t always arrive at the required time and in the required amount to sustain needy vegetables. In general, crops rarely yield reliable and robust harvests without supplemental watering at some point during their life.
We strongly encourage high-yield vegetable gardeners to include a watering system with a timer in their initial garden plan. Building a watering system into your garden at the outset will save valuable hours as compared to creating an “aftermarket” solution that must be delicately placed around all of your established structures and plants. A watering system with automatic timers will save you countless hours managing hoses or otherwise attempting to keep soil moist by hand. Because a timed system can be set to deliver water regularly and at the best time of day for irrigation, your plants will be healthier and will produce a larger yield.
Even a perfectly built automatic irrigation system will need your ongoing attention. You still must make adjustments to the watering duration and frequency throughout the season; this practice will save water and ensure that your crops get exactly the amount of moisture they need. Additionally, normal wear and tear with some systems will inevitably cause small breaks and leaks that you’ll need to repair. Even with these tasks, though, an automated watering system will reduce your total time spent dealing with water issues by about 90 percent versus hand watering.
Because we strongly believe that hand watering a large, diversified garden site is an inefficient use of time and resources, we won’t even include it as a viable option for garden irrigation. In the peak of the season when irrigation is most commonly needed, spending valuable hours trailing a hose through the garden is, at best, a poor use of your time. With an established irrigation system in place, these hours can be used identifying and managing pests, controlling disease problems, harvesting crops, and succession planting new crops.
The simple act of automating your watering program will completely change the health, yields, and appearance of your garden. Hoses and spray nozzles are still essential tools, however, for spot-watering the garden and watering new crops as you seed or plant them.
There are two principal methods of irrigating a garden: overhead irrigation and drip irrigation.
Some growers prefer the evenness of watering with an overhead sprinkler. They feel that it better mimics the natural effect of rainwater. Overhead watering is especially beneficial for newly seeded crops while they germinate. The complete coverage and delivery to the top layer of soil can help ensure a good germination rate, which avoids having to reseed thin crop stands later. An overhead watering system also has the advantage of being much easier to set up as compared to a drip irrigation system.
Overhead watering systems do have drawbacks. They tend to use considerably more water than a drip system, and they tend to water areas (including pathways) that don’t actually require irrigation. That, in turn, sometimes leads to additional weed growth (which then leads to extra time spent weeding). For certain crops, moreover, watering the entire plant rather than just the soil and root zone can encourage disease problems. Because it is much easier to over-water with a sprinkler system, its use may also lead to faster leaching of nutrients from the soil. Lastly, the large, heavy droplets can compact bare soil.
When using overhead irrigation, plan to water in the morning, as early as possible. This allows the water to soak thoroughly into the soil and gives plants a chance to dry off before the sun is at its most intense. Watering in the middle of the day is less efficient because water is lost to evaporation. Watering in the evening can increase the prevalence of fungal disease because the water sits on the leaves of your crops and the surface of the soil throughout the night.
When purchasing and setting up a sprinkler system, your most important consideration has to do with coverage. You need to have a system that is capable of adequately covering your garden space and able to evenly cover the space.
Oscillating. These are sprinklers that move a fan-shaped spray of water back and forth over an area. They’re very inexpensive and easy to set up, and can be quickly moved around the garden if you feel that you need to water the space in more than one session. However, they usually put out much more water than the soil can absorb, and so are prone to wasting water. If not carefully used, they can also cause erosion and soil compaction.
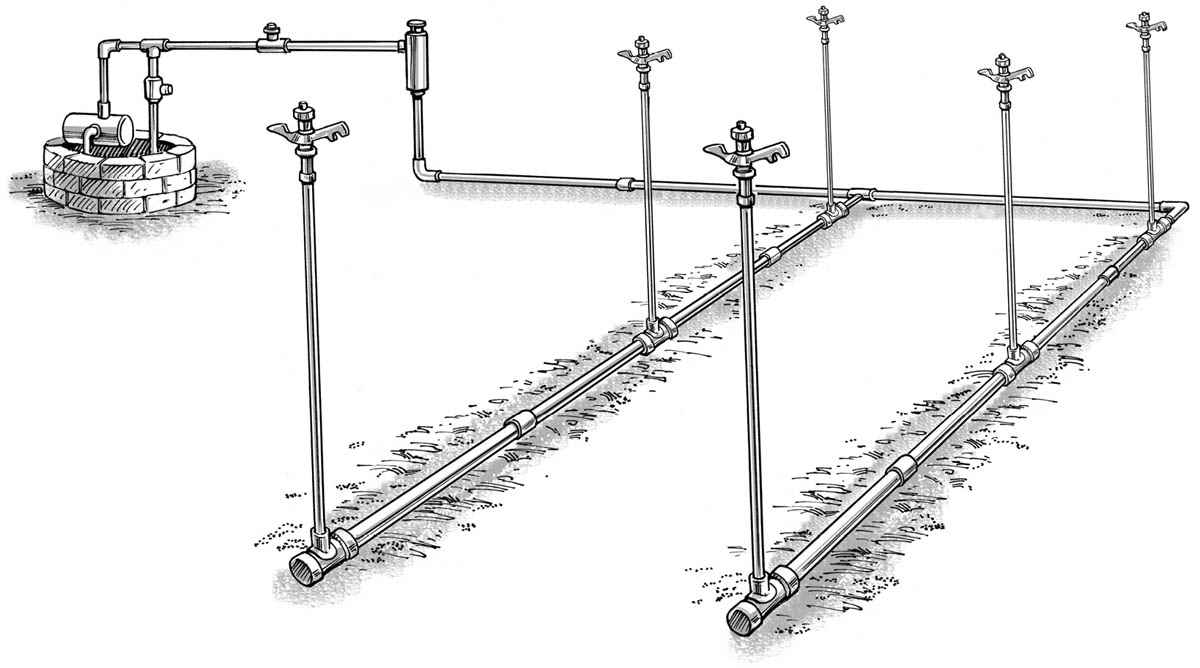
Impact. Most small farmers who use overhead irrigation will choose impact sprinklers — those that shoot a narrow jet of water in a circle. This type of sprinkler is more efficient at using water than oscillating sprinklers, and when placed on a tall post, impact sprinklers can distribute water over your crops in a 360-degree radius. They also have the advantage of generally being easier to adjust to fit specific needs because they can be set to water in specific ranges, from a narrow spray all the way up to a complete circle.
Impact sprinklers set up on posts are a good way to water tall crops.
Attach a hose thread timer to the water spigot that is nearest to your garden, attach a hose to the timer (make sure the hose can reach from the spigot to the farthest reaches of the garden space), and then attach the sprinkler to the business end of the hose.
Find the right location for the sprinkler in the garden. If your garden is an odd shape, you may have to move the sprinkler to a few different locations to determine where you will receive the best coverage. Depending on the strength of the sprinkler, you may have to water the garden in two or three sessions, moving the sprinkler each time to achieve even coverage. Alternatively, consider setting up a few separate sprinklers and setting them to slightly different times so they do not compete for water pressure. Doing so ensures that the whole garden receives its proper dose of water.
Set the time and date on the timer and run a watering session to establish an appropriate duration for your sprinkler to run. Try starting with a 15-minute irrigation session, then finger test the soil to determine if the time should be extended. To perform the finger test, poke your finger into the soil — if it feels moist about an inch down, you’ve watered sufficiently. If it’s wet on the surface but dry below, you need to water for a longer duration. If water is pooling on top of the soil, wait until it has absorbed before watering again. You want the soil to feel moist but not overly saturated.
Plan to adjust the duration and frequency of irrigation sessions throughout the season. There is no way to preset a sprinkler to manage the irrigation timing based on rainfall and soil moisture levels. This means you will be responsible for checking the soil moisture every few days to determine if the system should be adjusted. Remember to turn it off during spells of rain. And don’t forget to take the system apart and store it before freezing weather sets in.
Assuming that all portions of your overhead irrigation system are aboveground, or shallowly buried, shutting the system down for the cold or wet season should be easy. Turn off the water source and remove hoses and timers (also remove the batteries from the timers). In cold climates, turn off the water main leading to the spigot or cover the spigot with a frost-protecting cover. Coil up all hoses and tubing, allowing the water to drain from the low end as you coil. Store all hoses, timers, and sprinklers out of the weather, ideally hanging them up off the ground in a garage or tool shed. Even small amounts of water left in a plastic sprinkler or timer can freeze and crack the tool.
Setting up a system with more than one sprinkler is not hard to do, but does take a little extra setup time and materials. To run multiple sprinklers in the garden, set them to run in succession so that the second starts shortly after the first has finished, the third starts shortly after the second has finished, and so on. In order to do this, you will need either a timer with multiple outputs (so that several hoses can be attached to the source at once) or for the system to branch out in the garden with timers attached at each junction. Some sprinklers have inlet and outlet hose threads and can be set up to run in series; however, this kind of setup is feasible only if your system has enough water pressure. Typical water pressure in a home water line is 40–70 psi (pounds per square inch). The pressure can vary greatly depending on whether or not other applicances (dishwasher, shower, and so forth) are in use. Water pressure might also depend on water use throughout your neighborhood. The simplest way to determine if you are able to run a system in series is simply to set up the sprinklers and test them.
If you have sufficient water pressure, a series of sprinklers is a simple and cost-effective way to irrigate a large garden.
Applying water directly to the soil surface is the most resource-efficient way to irrigate your plants. Drip irrigation reduces weed growth in bed edges and pathways because only the portions of the garden planted in crops receive water. Drip lines also make planting in straight rows easier (you can plant directly along the side of the line), which can make it easier for you to evenly space your plants. For example, a drip system with emitters spaced every 12 inches makes a perfect guide for planting kale or any other crop you might want to space at 12 inches; simply put a transplant right next to each emitter.
A well-functioning automated drip system (meaning there are no leaks) can deliver the appropriate amount of water with very little waste. Although drip irrigation systems typically take longer to set up than overhead systems, and require more tools and materials, they’re much easier to install and manage than you might think. All you need is a free weekend (sometimes just a day), a working water spigot (hose bib), a few tools, and a handful of supplies.
We encourage you to experiment with different watering schedules so that you may find what works best for your climate, soil type, and crop selection. Water crops deeply every few days. Doing so promotes the growth of large root systems; the plants are encouraged to chase the water deep into the subsoil. The most important thing, however, is that the plants appear to be healthy, continue to grow at an appropriate rate, and produce abundant harvests.
Gardeners often compare soil to a sponge. When it dries out completely, it will turn rock hard, and it takes some effort to convince it to absorb water again. If it stays completely saturated with water, then it becomes a funky mess. The goal is to keep soil moisture in the “golden range” for plant growth. This range is comparable to the feel of a damp sponge after you’ve wrung it out. The standard test is to squeeze a handful of soil in your palm: If it holds together in a ball, it has the right amount of moisture. If it falls apart, it is too dry. If you drop the ball of soil from waist height, it should shatter; if it doesn’t, the soil is too wet.
To achieve that golden range, irrigate the soil until it is saturated, and then let it dry out enough so that the habitat for fungus and mold is reduced. When the soil is ready, water it again. You never want to see your crops wilt due to lack of water. A wilting crop is water stressed, and this can lead to low yields and susceptibility to disease. We highly recommend that you develop a feel for your own soil to learn its tendencies: what it looks like when it’s too dry, too wet, and just right. Feel your soil when it’s really dry, after watering, and after a heavy rainstorm. Taking the time to understand your soil will allow you to easily and quickly identify its watering needs and keep the plants in your garden on track.
We like to visualize our irrigation systems from the top down, so let’s look at the various parts you’ll need, starting at the water spigot and working our way into the garden beds. As you identify where a part goes in your system, you can label it on your working irrigation map for future reference (see Making an Irrigation Map). This will help tremendously when you are adding up parts to place an order or heading to the store.
Some irrigation components are designed to be used under constant pressure (with water pressure against them at all times), and some are not. In most cases, the backflow preventer, the Y-valve or manifold, and the timer are the only components that are appropriate for constant pressure. All other components should be placed after the timer (meaning that they are only under pressure when the system is running). Failure to do this can cause the system to leak, which always seems to happen when you’re out of town.
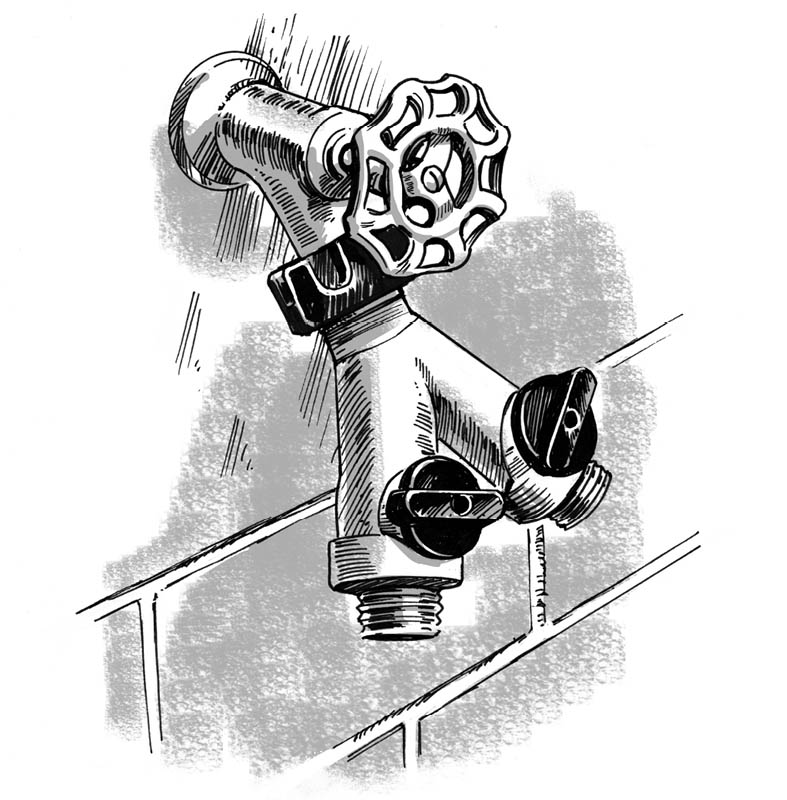
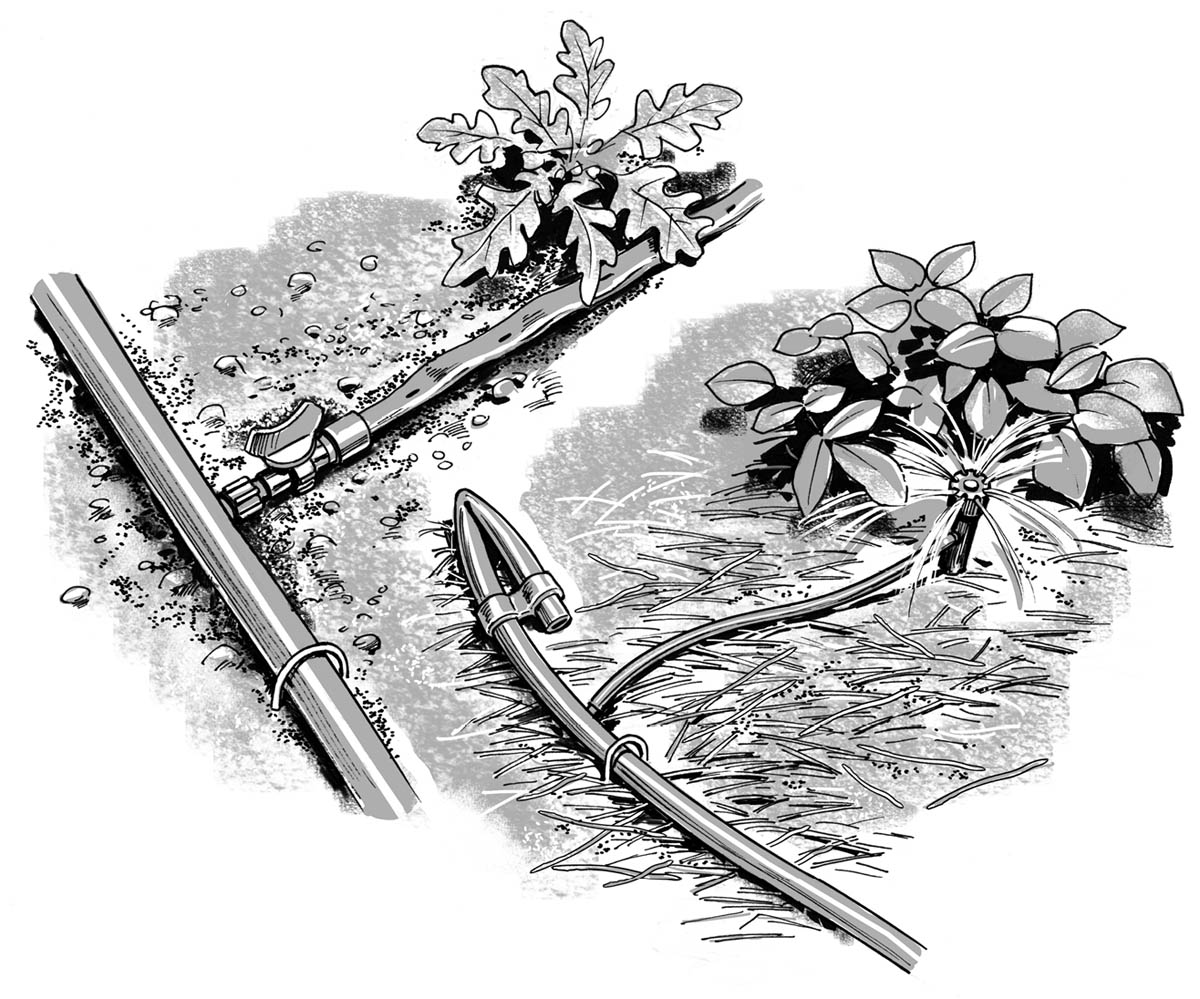
A Y-valve is a great way to run an irrigation system and a garden hose off a single outdoor hose bib.
Backflow preventer/anti-siphon valve. This piece ensures that water will not flow backward through your irrigation system into your home water pipes. To prevent reverse siphoning, this piece also empties out water from the system when the spigot is not in use. Make sure the piece has hose threads on both the inlet and outlet sides; these are labeled FHT or MHT (you do not want a piece with pipe threads, which are labeled FPT or MPT). These threads allow you to screw the piece right onto your spigot. Many newer water spigots have a built-in backflow preventer, meaning that a separate backflow preventer is not needed. A built-in backflow preventer might look like a small cylinder with holes in the side, and will be attached to the outlet of the spigot. It might also look like a plastic or metal “cap” on the top of the spigot. If in doubt, note the model name and number of the spigot and give your local plumber or plumbing supply store a call.
Y-valve or manifold. Using a Y-valve or multiple-line splitter (manifold) will give you the option to attach both a hose and an irrigation system to your water supply at the same time. Because each is independent, you can use the hose as necessary and leave the irrigation system connected all season. Because you won’t have to disconnect the irrigation system to use a hose, you won’t forget to reattach the timer after you finish using the hose.
Timer. For most home vegetable gardens, a battery-operated timer with hose threads is the best option. They are cost effective and easy to set up, and they don’t require that the water source be located near an outlet. Larger, plug-in timers are great if you’re creating a system with multiple irrigation zones (see Setting Up Zones for an Existing System). Installing such a timer and the associated system can be a complicated procedure. (See Resources, for information on books that discuss complex irrigation system design.) If you want to set up multiple zones in your irrigation system, you can get hose thread battery timers with two outlets. You could also use a manifold on the spigot and attach multiple timers to create many zones.
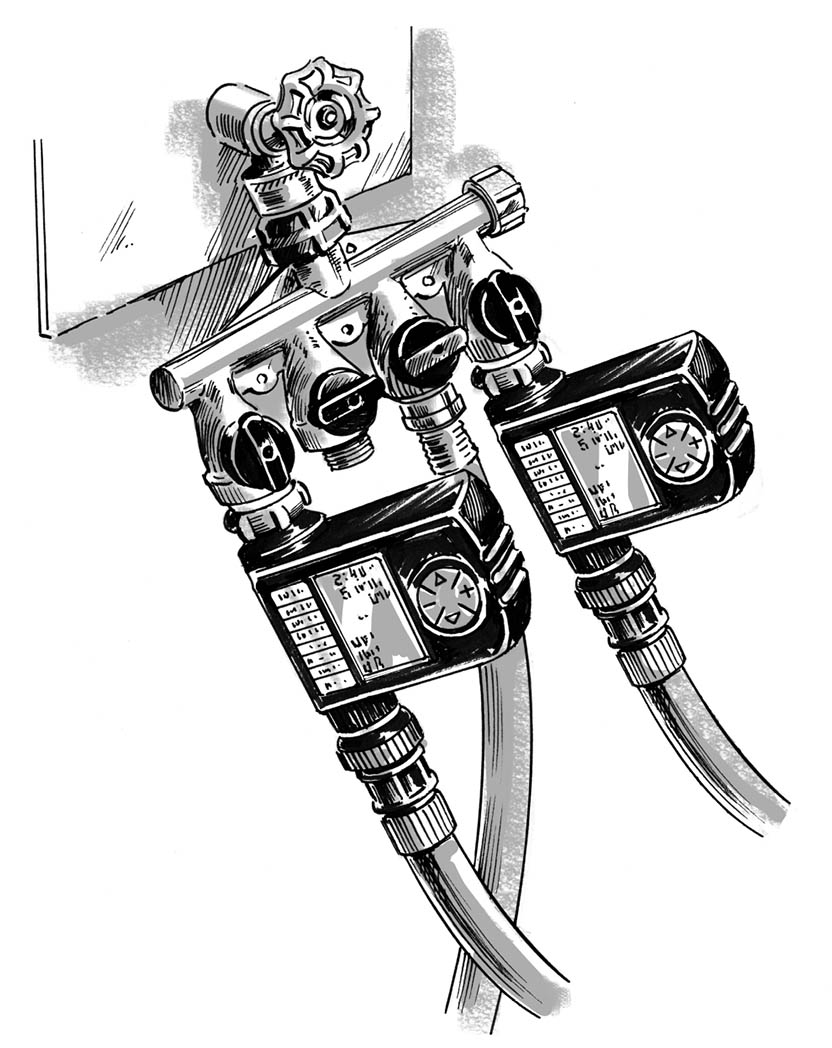
Using a manifold and multiple timers allows you to water different sections of your garden for different amounts of time. By staggering start times, you can get irrigation coverage on large areas if you have low water pressure.
This fitting reduces the water pressure from the water spigot to a level that is appropriate for your drip lines. If the water pressure in the system is too high, the drip lines and fittings can blow out or shoot water up in the air, rather than dripping it slowly into the soil. Be sure to choose a regulator with a psi (pounds per square inch) rating that matches the psi required by your drip lines.
A filter will catch tiny particles that may be present in your water system. This will help prevent the drip lines and emitters from clogging. Choose a filter that’s rated for your drip lines. Filters are usually rated in “mesh” sizes; the higher the number, the finer the screen. Most drip lines need somewhere between 100 and 200 mesh filtration. Remember to clean out the filter screen once or twice a season.
The mainline is a solid tube that brings water from the spigot to the garden beds. Most systems use 1/2-inch polyethylene tubing for the mainline. In an irrigation system, header tubing is superior to a regular hose because it is inexpensive, lightweight, and easy to cut to fit your spaces.
It’s important for the brand of your fittings to match that of the tubing. Even if two brands are labeled the same diameter, the true size of the pieces will vary by fractions of an inch, making them impossible to adapt. You’ll need an assortment of fittings for your system, the type and number of which will be indicated in your irrigation map. Here are a few essential pieces:
If your garden is very large, you might not have enough flow coming out of your hose bib (faucet) to water the entire space at once. Splitting the garden into different zones — areas that are watered on individual schedules — will solve this problem. Having different zones can be useful for other reasons, as well. For example, one area of your garden might get more sun, and so will need more water than less sunny sections. You might also want to put annual and perennial crops on different watering schedules.
If you’re a wiz at irrigation and you have an existing underground irrigation system for your property, you may be able to adapt one or more of those zones into an effective drip irrigation system for your garden. Using this existing resource will eliminate the need to run a system off the water spigot and can save time and energy. If you have a zone that can be completely redirected to the garden, you are in luck.
Keep in mind that drip irrigation and pop-up lawn sprinklers are not compatible (the pop-ups take too much water pressure for the drip to work properly, and drip irrigation and sprinklers usually require very different run times). If you decide to use part of an existing lawn system, try to isolate the garden from the rest of the system or change the entire zone you’re using to drip lines.
Stakes are incredibly helpful for holding any tubing in place. If needed, look for irrigation stakes or any type of landscaping pins that will fit with your system.
Not all drip lines and emitters are pressure compensating, but we recommend you use parts that are pressure compensating whenever possible. Pressure compensating means that the emitters maintain a constant rate of flow at varying pressures. This allows for longer runs of drip line (pressure in the line is lower the farther it is from the water source), and allows the system to water the entire garden evenly. All drip lines (whether or not they’re pressure compensating) do have a limited length they can be run from the mainline. Be sure to follow the guidelines for your chosen drip lines to prevent dry spots at the far reaches of the system.
Drip irrigation comes in a few forms, the most common being drip tubing, tapes, and bubblers. Drip lines come with the water emitters already built in at regular intervals, and bubblers (which are also called emitters) are meant to be manually inserted into the system wherever you want them. The advantage of drip lines is the simplicity of setup and evenness of watering throughout the system. The advantage of using bubblers is the ability to highly customize the system to place water only where you want it. A watering system can be built using both of these materials. Generally speaking, drip lines with set emitter spacing are the best choice for annual vegetable gardens.
Each type of drip line or emitter system will have its own complement of fittings. This includes fittings to connect drip lines and emitters to the mainline, end fittings, tees, elbows, crosses, couplers, and valves. As you fill in your irrigation map, the locations for these pieces should become clear.
Emitter spacing. Drip lines are available with many different emitter spacings (6, 8, 12, and 24 inches are common). Six-inch spacing works well for germinating direct-seeded crops, but this spacing uses more water than necessary for established and widely spaced crops. Emitters spaced 24 inches apart are good for perennials, but this is not ideal for annual vegetable gardens. We find that 8-inch spacing works well for most gardeners. Emitters spaced 12 inches apart are also effective, provided that closely spaced and direct-seeded crops are given a little extra care with the hose.
Drip tapes. These are flat, straight drip lines that are very cost effective and quick to set up. They are not particularly flexible, so they’ll work only for setting up straight rows. Drip tapes are relatively easy to damage while gardening, but also very easy to repair if minor leaks do occur. They may come in variations with different flow rates. Lower flow rates will allow you to set up a larger system without the need to break it into zones (this is not usually an issue except in very large gardens); higher flow rates will deliver the desired amount of water in a shorter period of time.
Quarter-inch emitter tubing. These small hoses are very useful for container irrigation and beds with non-linear shapes (circles, ovals, and so on). This tubing is relatively easy to set up, although the small fittings can be challenging to put together. It is more durable than drip tape, but is not typically pressure compensating. Even so, it works great as long as the specified run length from the mainline is not exceeded.
Half-inch emitter tubing. This is a very burly and long-lasting drip line. The heavier tubing is more expensive than other options and can be somewhat awkward to work with, but once in place it will last virtually forever. We really like it for perennial crops that will be in place for a few years.
Bubblers. It is possible to set up solid tubing and insert your own bubbler emitters at the spacing and locations that you prefer. This customized type of system requires more setup time and can be more expensive, but some gardeners find the effort and cost to be worth it. A bubbler system can be especially useful when setting up a perennial bed with crops at different spacings that will be in place for a few years.
Black porous soaker hose. If at all possible, avoid using black porous soaker hoses. They are notorious for watering unevenly. Their quality degrades quickly, and they are easy to break.
Drip tapes (far left) are great for long, straight rows of annual crops. Bubblers (near left) work well for perennials, which stay in the same place from year to year.
We highly recommend that you draw your drip system from the outset of your garden project. This is a good opportunity to make a photocopy or traced copy of your site plan. You can use it to sketch out the path of the drip system. Drawing the whole system on paper gives you the opportunity to think through design choices and make sure you are taking the easiest and least obtrusive path from the water source to the garden. You will refer to this irrigation map when you make a shopping list for your watering system (see Assembling the System).
Start by identifying the nearest usable water source to the garden. You may be lucky enough to have a spigot in the garden area itself or very close nearby, or you may need to connect to a spigot on the house and run the irrigation to the garden. Look for the path of least resistance. The supply line for the system will need to be run in an uninterrupted line from the water spigot all the way to your beds. We find that it is often possible to run the tubing right along the foundation of the house until an opportunity arises to turn the tubing toward the garden. We like to follow the edges of existing structures like patios and decks to keep the tubing out of the way and easy to locate in case repairs are needed.
In regions with mild winters, shallowly burying the mainline is the best way to eliminate the possibility that someone will trip over, mow over, or otherwise be annoyed by the tubing. Light freezes won’t affect the tubing in the winter because most of the water drains out through the drip lines when the system isn’t running. If you live in a region with very harsh winters, consider burying the mainline below frost depth or bringing it indoors in the winter so intense cold will not compromise the longevity of the plastic. Here in the Pacific Northwest (USDA Zone 8), we usually bury mainline about 4 inches deep and leave it in place year after year.
After you have identified a path to the garden, then map out how the system will branch out to reach all of the beds. You can use tees, elbows, and crosses as necessary to get the mainline where it needs to go for the branch line setup. Draw the path of the tubing as it reaches each bed. You’ll make your installation job easier if you take the shortest path to each bed and keep the branching to a minimum. Consider including a valve on each line that enters a bed so that you can shut off the water as necessary on a bed-by-bed basis.
Now draw the arrangement of the drip lines within the beds. Drip lines should be set up to provide even coverage of the entire square footage of each bed. Since you’ll be planting different crops at different spacings over the course of the year, and from year to year, you will want the drip lines to provide water for all crop and spacing placements (you can also add valves to individual drip lines). This way you don’t have to retrofit the system mid-season or from year to year. If you already have crops in place, avoid the temptation to run lines directly to each plant; you’ll only have to redo everything next year when you plant something different in that same space.
We usually space drip lines approximately 12 inches apart. The water dripping from each emitter will spread out to about an 8-to 12-inch circle below the surface of the soil (a larger circle in clay-rich soil, smaller in sandy soil). Emitter spacing on most drip lines is between 8 and 12 inches, so spacing the lines 12 inches apart will provide water to the entire bed. In addition, consider which direction is easiest to orient the lines and how this will influence your planting arrangements and access to the beds. Generally, running the mainline parallel to the short length of the bed and running the drip lines parallel to the longer length is the best way to go.
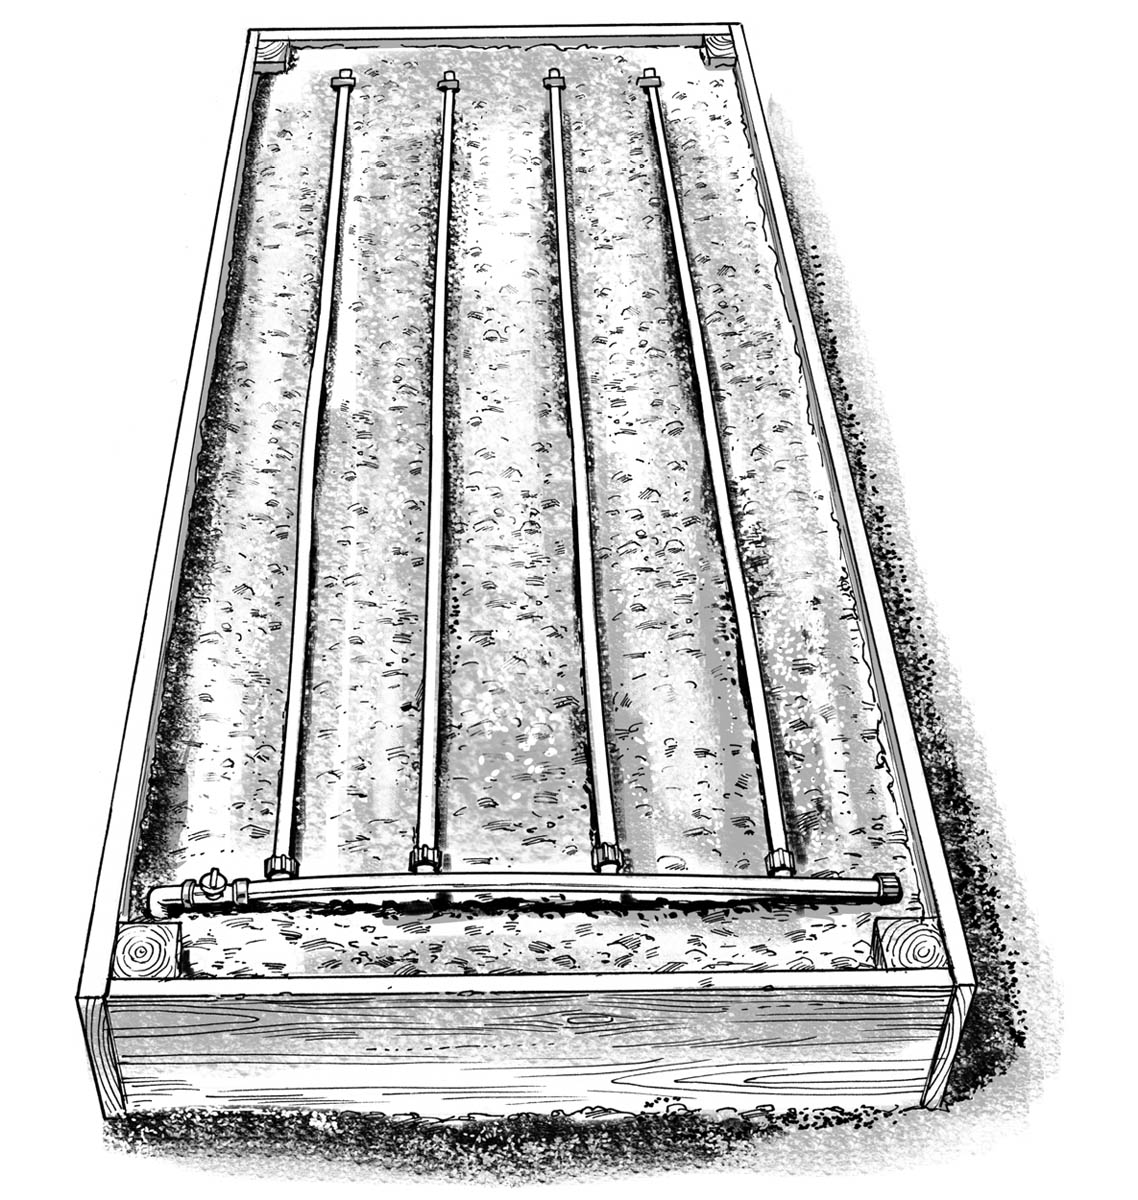
These drip tapes, spaced 12" apart, give even irrigation coverage over the entire square footage of the bed.
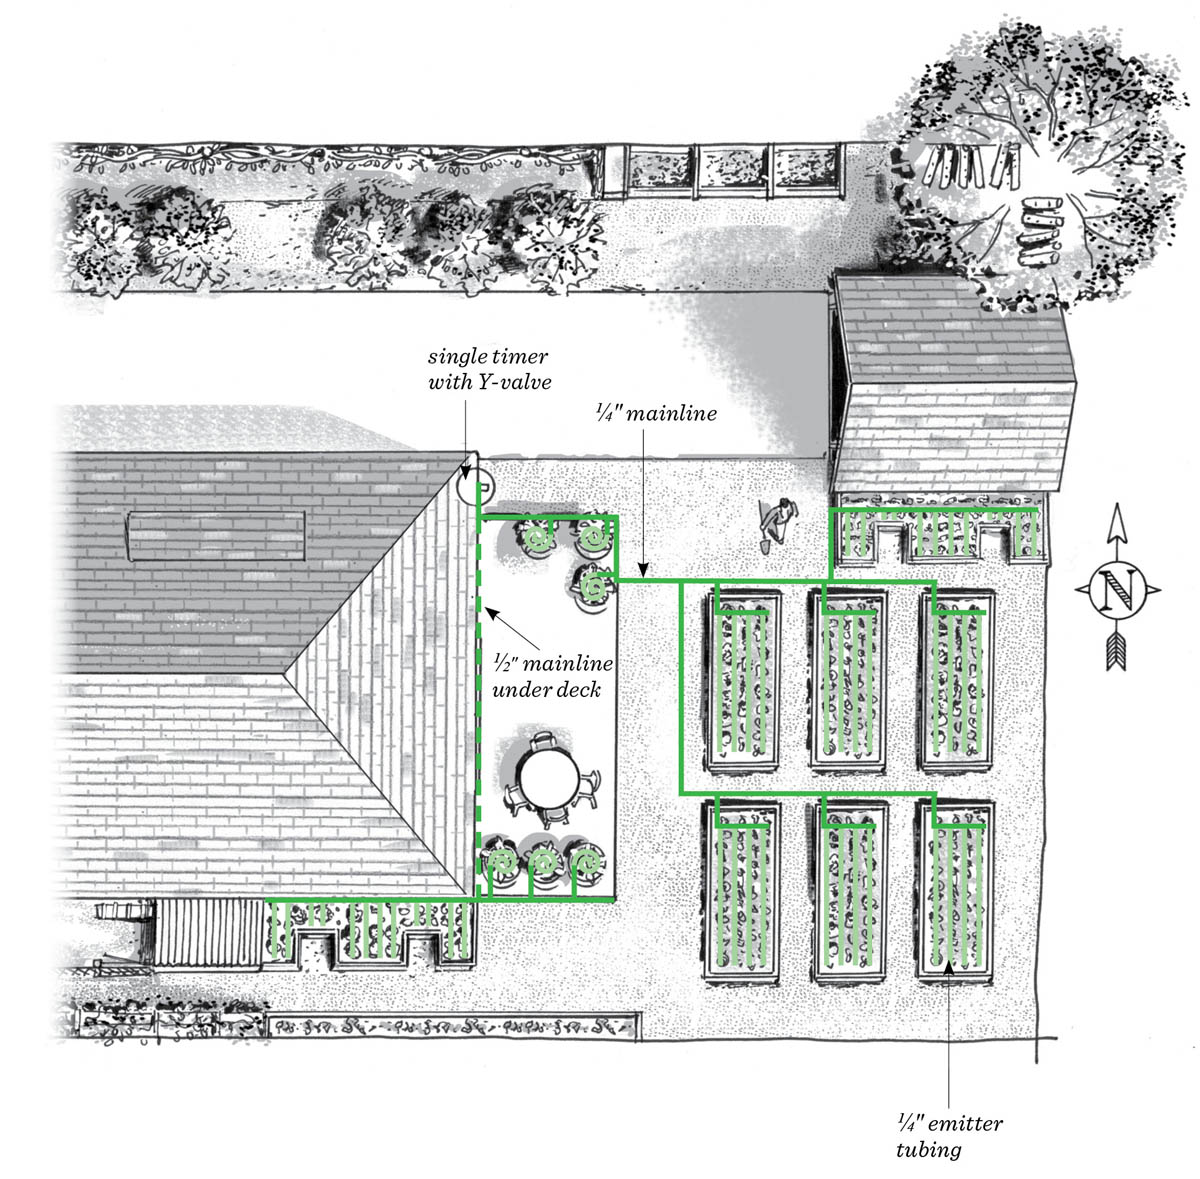
Ryan and Kiwi figured out an easy way to irrigate all of the backyard garden beds from one water source — the hose bib (faucet) located near the northeast corner of their house. The system is set up with a battery-operated timer attached to the hose bib. After installing all of the necessary fittings (such as a pressure regulator, filter, and backflow preventer), they ran a 1⁄2-inch mainline tubing to each garden area. The entire watering system can be run on a single timer. Ryan checks the soil moisture at least once a week and turns the irrigation up or down depending on need. It usually operates for about one hour each day, five days a week, during the summer. He always direct seeds his arugula plantings, so he is mindful to maintain a consistent level of moisture on the surface of the soil to ensure good germination.
The branch of the mainline that irrigates the bed on the south side of the house runs underneath the back deck. Once it reaches the south side of the house, it elbows around the corner. From there, a 15 mil drip tape runs north–south in each keyhole to provide even watering to the bed.
Mainline tubing runs along the north and south side of the deck to provide water to the potted herbs. A short piece of 1⁄4-inch mainline runs to each pot and a spiral of 1⁄4-inch emitter tubing is placed in the top of each container.
The longest section of mainline runs out to the wood-framed raised beds and the bed along the side of the garage. The irrigation to the garage bed mimics the setup for the bed on the south of the house. When the mainline reaches each raised bed, a short branch line tees off and runs underneath the edge of the bed. Once under the bed, that short mainline turns with a 90 degree elbow that brings it to the surface of the bed. The mainline elbows again to run across the short dimension of the bed. Four 15 mil drip tapes are spaced evenly across the bed running north–south. The first tape is 6 inches from the edge of the bed and each subsequent tape is spaced at 12-inch intervals.
The remainder of the landscape is planted with somewhat drought-tolerant perennials that include grapes, horseradish, and lavender. After a few seasons of hand watering, these plantings are pretty much on their own unless a massive heat wave threatens their health. There is always a hose attached to the Y-valve on the backyard spigot. An additional spigot is set on the front of the house for hand watering as necessary.
Double-tap the image to open to fill the screen. Use the two-finger pinch-out method to zoom in. (These features are available on most e-readers.)
Jason’s house has a hose bib on the front and back. He’s set up two independent drip irrigation systems to manage watering in the different parts of the yard. Each hose bib has a Y-valve, so he can always keep a hose hooked up for hand watering. There is an additional hose attached to the rainwater catchment tank on the back porch that he uses to irrigate the perennial herbs and flowers from time to time.
The hose bib on the concrete back patio is located close to the back door, so he ran the 1⁄2-inch mainline tubing along the back of the patio and off the south side of it. After reaching the south edge of the patio, the mainline tubing is buried about 4 inches and runs underground across the rest of the site except where it junctions into beds to connect to drip lines.
The mainline branches off to deliver water to perennial beds and to the greenhouse. For simplicity, he has used the same 15 mil drip tape for all backyard irrigation. The tapes are spaced farther apart in the perennial beds because he knows these plants require less water than the rest of the plants in the garden.
He has included a manual 1⁄2-inch valve at this juncture and at every individual bed because he likes the flexibility to turn off any part of the garden that is fallow or between plantings (he also likes the option of water stressing his tomato plants).
The mainline tubing services each raised bed and continues to run past the end of the garden on the two principal sections. These mainlines end with flush caps that allow Jason to flush out sediment and easily drain the irrigation system each fall. He also likes the fact that it will be easy to add irrigation onto the system from there if he ever decides to add new beds to the garden.
In the front yard, the mainline tubing runs along the front walkway and tucks underneath the front stairs to access the main part of the yard. He had to run another branch up and over the garage door, connecting the tubing to the house with 1⁄2-inch pipe clamps, to reach the north side of the driveway. He also ran a coil of 1⁄4-inch emitter tubing around each blueberry bush and fruit tree, and installed a valve at each plant because he plans to turn off the irrigation to the fruit trees and raspberries after two or three seasons, but will keep the water flowing to the blueberries year after year.


Double-tap the images to open to fill the screen. Use the two-finger pinch-out method to zoom in. (These features are available on most e-readers.)
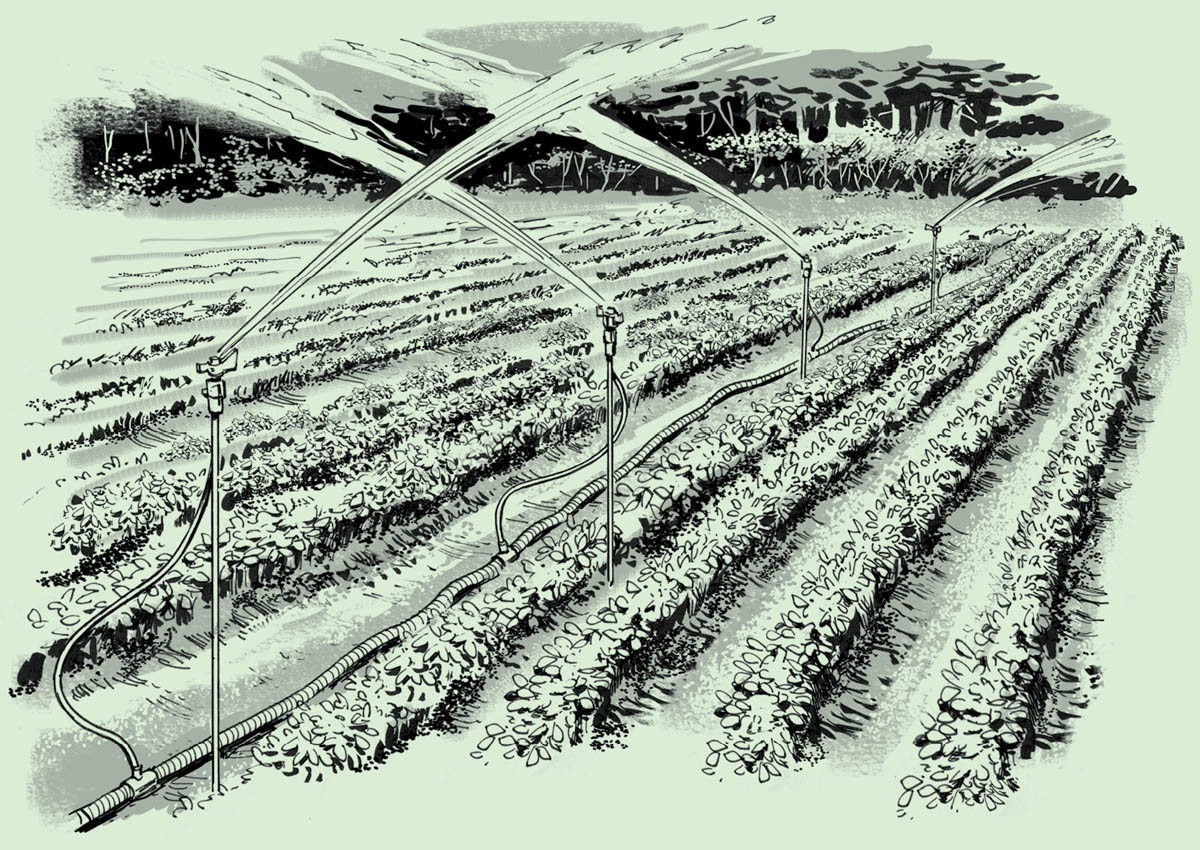
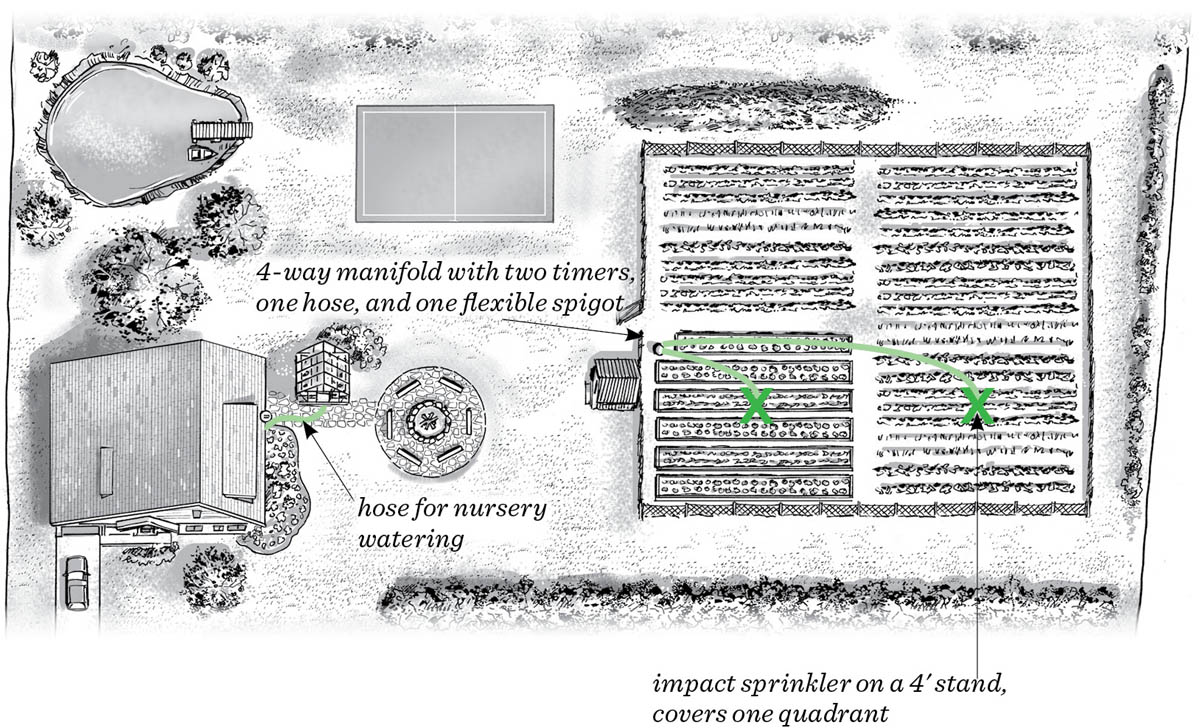
Fortunately Dave and Erin had the foresight to install a hose bib just inside the garden fence when their garden was under construction. This hose bib has a four-way manifold that allows them to keep a garden hose attached, have an open spigot for filling buckets and watering cans, and operate two individual battery timers. Because they move the production area around from season to season, it was important for them to build a system with maximum flexibility. Each timer attaches to a standard garden hose, which then terminates into a powerful impact sprinkler.
At the beginning of each season, they set up one sprinkler in the center of the strawberry bed and one in the center of the vegetable garden. The two sprinklers are set to run at different times so that there is enough water pressure to cover each quadrant.
When a cover crop is first planted and germinating, Erin will occasionally move the strawberry sprinkler into this quadrant to make sure things get a healthy start. After the cover crop is established, they don’t irrigate it for the rest of the season.
At the end of the season, the system is disassembled and stored in the tool shed. In the spring they bring the system out and set it back up in the appropriate production quadrants.
Double-tap the image to open to fill the screen. Use the two-finger pinch-out method to zoom in. (These features are available on most e-readers.)
Consult your irrigation map to create a parts list for your watering system. Drip and overhead watering supplies may be available at local garden centers and nurseries, and are readily available online. Before buying any irrigation supplies, make sure that you can find a full set of compatible materials. Remember: Different brands of irrigation materials may not fit together, even if the diameter of the tubes and fittings are the same on the packages. There is nothing more frustrating than trying to fit two sets of parts together that almost — but not quite — fit.
The following tools will help you quickly and easily set up and maintain your drip irrigation system.
When you have everything on hand, begin assembling the irrigation system at the water spigot. Take your time and fit the pieces together tightly. Take care when cutting lengths of mainline tubing to ensure they fit around the spaces you are working.
When the system is completely installed, remove the end fittings from your drip lines and run water through the system to flush them of dirt or bits of plastic that may have found their way in during setup. After running the system for a few minutes, turn off the water and seal up the ends of every line. Run the system once again, carefully examining every piece, fitting, and drip line for leaks. Take the time to tighten any dripping fittings.
It is a good idea to manually run the irrigation system every week or two while you’re working in the garden. This allows you to check for new leaks, make sure the system is functioning properly, and provide appropriate water for the current weather conditions.
Your garden’s need for irrigation will vary drastically over the course of the season. It may be that watering one day a week is sufficient at certain times of year and that five days a week may be necessary at other times. Once the system is in place, you can simply adjust the settings on the timer and carry on with your other essential garden tasks.
Keeping a few repair pieces in your toolbox can make maintenance of an irrigation system a breeze. We keep a small bag of irrigation fittings with our gardening tools so that we can make minor repairs a cinch. After all, the easiest time to notice leaks is while you are working in the beds, and keeping materials on hand will make it easier for you to keep the system in working order.
If you have a drip irrigation system, you’ll find the following items essential:
Keep in mind that with drip irrigation, your plants and seeds may need a little extra help when they are first planted or are germinating. The roots of seeds and newly transplanted crops are near the soil surface, and can’t easily reach the subsurface moisture the drip system provides unless they’re placed immediately adjacent to an emitter. This is the most sensitive time of their lives and it is essential that they do not dry out.
We suggest always hand watering new transplants and seeds. Depending on the weather and time of year, you may want to hand water a few more times, or at least check soil moisture more frequently during the first week or two after planting to make sure crops get off to a healthy start. If germinating seeds during hot, dry periods, some growers will decrease watering duration and instead run their drip system every day for one to two weeks. This strategy is designed to prevent the seeds from drying out. These little bits of extra effort can pay huge dividends toward improving germination rates and encouraging early plant growth and development.
The length of an irrigation session will vary widely depending on the structure of your soil, flow rate of your drip lines, and the weather. Here is a starting guide for setting a watering system to run at the beginning of the irrigation season:
After your first watering session, finger test the soil. If it seems dry, add 10 to 20 minutes to your watering cycle, and then test again after your next session. As the season progresses, and as necessary, add more time to the sessions, and add extra watering sessions. If your timer allows for it, set up a rain gauge, which will measure precipitation and cause the timer to self-adjust to match weather conditions.
Drip irrigation lines are not under pressure between watering cycles, so the tubing and drip lines tend to empty themselves of water after each session. This makes it possible to leave most types of drip lines in place through the winter. When cold weather is approaching, turn off the water spigot and remove the Y-valve, timer, pressure regulator, and filter, and put them inside for the winter. If possible, turn off the water supply to the spigot (unless it is a frost-free spigot) and/or cover the spigot with a thermal cover. Open up the ends of the mainline tubing to allow excess water to drip out. After leaving the system open for a few minutes, seal the ends back up to prevent dirt or insects from getting inside the system. If you live in a region with extremely cold winters, consider bringing tapes and mainlines into a garage or other protected structure to minimize fatigue of the plastic.
If your irrigation system does have components that don’t drain easily (this is a problem with permanent sprinkler systems), use an air compressor to blow the water out of it at the onset of winter. Water left in small fittings and emitters can cause cracks due to freezing, so taking the time to properly drain your system will pay off in reduced repairs and maintenance in spring.