
Low tunnels (also called floating row covers) protect crops from light frost; they’re a simple way to extend your growing season earlier in the spring and later in the fall.
Season extension is the art and science of using protective covers like cold frames, low tunnels, and high tunnels to grow and harvest crops early in the spring, through hot summer spells, and late into the fall and winter. Along with storage crops and succession planting, season extension is one of the most important tools you can use to maintain a consistent supply of produce from your garden.
You can create very simple or complex systems for extending the growing season. What you build will depend on your needs. We recommend that you start small and scale up over time as you learn what works best in your climate and for your preferred crops.
Although weather patterns and seasonality will dictate when the majority of your growing takes place, it is almost always possible to extend and expand your garden’s productivity so that you can harvest throughout the entire year. Off-season productivity will be limited and plant growth slower, but surprisingly large jumps in yearly harvest totals can be accomplished with some simple technologies, planning, and practices.
In the spring when it’s cool outside, almost any crop will germinate and grow faster when it’s protected by a low or high tunnel. You may be able to set out plantings of cold-tolerant crops such as peas, cooking greens, salad greens, radishes, turnips, and carrots as early as February, and use a row cover as additional protection to help them along through the cold weather. Using this technique, you can even sneak frost-sensitive crops such as tomatoes, cucumbers, and summer squash outside as much as a month before your average last frost date.
In summer, you can stretch the growing season of cool-weather crops and protect summer crops from abnormally hot weather. To help salad greens and brassicas keep cool — and produce tasty harvests even at the peak of summer — swap out your row cover with a shade fabric. Alternatively (or in addition to a shade fabric cover), you can use overhead irrigation on these heat-sensitive crops during hot summer months to help dissipate the heat from their leaves.
In areas with cool summers, tunnels provide the extra heat needed for heat lovers like tomatoes, peppers, basil, and eggplants. In this type of setting, a greenhouse can easily quadruple yields of these crops.
Greenhouses and high tunnels can help increase yields of heat-loving crops even in climates with relatively hot summers. Not only will the covered structure allow you to plant the crops earlier in the spring, it keeps precipitation off the leaves of the plant and the soil around it. This can reduce the risk of many diseases and give you more control of the post-harvest quality of produce.
For example, professional growers all over the country often choose to plant tomatoes in a greenhouse. This allows the plants to mature earlier in the season and produce later into the fall. Because many tomato varieties have indeterminate growth habits, they will continue to produce fruit as long as soil fertility and weather permit. Greenhouse growing can also reduce the incidence of early blight and increase marketable yields by reducing cracking and splitting during rain events.
Other examples of crops that are commonly grown in greenhouses to increase yield and quality are sweet and hot peppers, eggplant, trellised cucumbers, basil, and raspberries. Sprawling crops like melons and sweet potatoes also produce well in greenhouse culture, but are not as commonly grown because they require a large amount of space per plant.
It’s important to remember that although greenhouse culture can reduce some diseases, it will create an environment that favors others. Problematic greenhouse diseases include Botrytis cinerea (gray mold), white and leaf molds, and powdery mildew. The best way to combat disease is to maintain adequate ventilation in your greenhouse and prune your crops to promote air circulation.
The limiting factors to fall and winter cropping are cold temperatures, inclement weather, and lack of light. You can address the temperature and weather issues by selecting crops that grow well (and actually taste better) when grown in cold conditions, and by using protective structures. You can address the light issue by growing crops to maturity before day length begins to decrease.
Depending on your latitude, daylight hours may decrease to the point where plant growth slows down to a crawl. In northern regions, daylight will drop to less than 10 hours sometime in October or November, making it difficult for crops to grow without supplemental lighting. In these situations, then, you’re not really growing crops in the winter; you’re storing them.
You have two methods in this scenario. The first is to grow appropriate crops to a harvestable stage before light levels drop, meaning that you will be able to harvest them throughout the cold months. The other is to germinate seeds in fall, which will go dormant for the winter, and then wait until day length increases for an early-spring harvest. Skilled growers throughout North America, including frigidly cold northern areas in Maine and very low winter sun areas in the Pacific Northwest, use these techniques to harvest through the fall and winter months.
Some studies have shown that greens grown during periods of low temperatures and low light levels can take up nitrates from the soil into their tissues. Consumption of nitrates is believed to carry health risks, so for greens that are grown during late fall and midwinter, a best practice is to harvest them in the afternoon or early evening, and preferably on a moderately sunny day. This is because exposure to even a short period of sunlight drastically reduces the nitrate levels in the plants’ leaves.
Planting cool-loving crops is another great way to extend your growing season. Many crops can tolerate light frost, and some can take temperatures that are much lower. Cool-weather crops are great for growing in the early spring, and for growing in the fall to overwinter (depending on your climate and how much protection you give them).
The temperatures and planting dates we suggest in the following section are very general but should nonetheless give you a good idea of what is possible. We suggest that you read further (see Resources) about this subject, experiment with different crops, and make your own determinations about the best planting dates for your climate.
Our favorite way to take advantage of cool-weather crops is to grow a variety of baby leaf crops and combine them into unique salad mixes. For early-spring production, seed these crops in a high tunnel as early as you can work your soil, or seed them outdoors in a bed covered with a low tunnel or cold frame. For fall production, seed them in late August through September.
In most northern regions, you can maintain a harvest into the winter using a high tunnel or heavy polyester row cover. For overwintering and harvesting in the coldest months, you might need to use polyester row covers over top of crops that are inside of a high tunnel for maximum protection. For more details about tunnels, see Choosing a Structure, below.
Because establishing new plantings is difficult, if not impossible, to do in late fall and winter, using “cut and come again” culture works best for many of these greens. When the baby leaves are ready to harvest, cut them off cleanly about an inch above the soil level (if tiny new leaves are starting to emerge from the base of the plant, cut above them to maintain the quality of the next cutting). After harvesting, the tiny new leaves will slowly grow into a harvestable size (hence, cut and come again). Depending on the crop, soil, and weather conditions, you may get anywhere from two to four cuttings from a single planting.
Carrots are sweetest when grown in cool temperatures and spend some time at close to freezing when mature. Carrot greens can tolerate below-freezing temperatures, but if the roots actually freeze they’ll become fibrous and tough, or turn to mush. To prevent roots from freezing, cover overwintering plantings with 6 to 18 inches of straw or another easily removable protective mulch. To get a constant supply of carrots through the season, for example, we seed them as early as we can work the soil in the spring; and we seed our last outdoor plantings in late June to mid-July (sometimes into early August if we’re using short-day varieties and a row cover or high tunnel).
Radishes tolerate frost well but lose quality if the bulb fully freezes. In the spring, seed as early as you can work the soil; then seed your fall plantings into early September (if using a row cover or high tunnel).
Scallions are extremely cold-tolerant, and in many climates can be grown outdoors without additional protection. Seed as you would radishes.
Baby turnips such as ‘Tokyo Cross’ and ‘Hakurei’ size up quickly in a short period (they’re mature when at golf-ball size). The plants tolerate frost, but the roots should not be allowed to freeze. Seed as you would radishes.
Using protective structures is the key to successfully extending a growing and increasing the high-yield potential of your garden. These structures fall into two general categories: short structures, such as low tunnels and cold frames; and taller structures, such as high tunnels and greenhouses. Short structures have the advantage of being less expensive to make and easier to install than tall structures. By contrast, tall structures allow for easier crop management and can accommodate a wider range of crops.
Baby beet leaves. Add color and flavor to salads; can also be sautéed. Can tolerate temperatures into the low 20s when leaves are young.
Baby chard leaves. Rainbow or ‘Bright Lights’ chard provides beautiful colors in salad mixes. Very cold-tolerant when leaves are young. Full-grown chard tolerates frost well, but not repeated freezing/thawing.
Baby kale. The baby leaf, especially the variety ‘Red Russian’, is excellent in salads. Cold-tolerant into the teens.
Bok choy/tatsoi/other Asian-type greens. These are all brassica family crops, and are excellent in salads as a baby leaf. They can be grown to maturity for cooking, too. Most are very cold-tolerant, but winter and early-spring plantings can bolt quickly when temperatures warm up.
Claytonia. Adds great weight and texture to salad mixes. Maintains its raw eating quality even when flowering. Thin plants to 4 inches apart for best growth. Extremely cold-tolerant (into the teens).
Curly cress/peppercress. Great flavor, good for multiple cuttings, and is easier to grow than watercress. Tolerant of light frosts and hard freezes.
Greens mixes. Many seed companies now sell mixes of different non-lettuce greens (mustard mixes, braising mixes, and so forth). These are great! We tend to avoid mixes that contain lettuce and other green types mixed together because they germinate and grow at different rates, which makes them difficult to harvest at a consistent size and quality.
Mâche. Some people love its unique flavor, and others find it off-putting. It is usually harvested as a whole plant; it doesn’t regrow well for cut and come again. Tolerates temperatures into the teens, but can be a little finicky to grow.
Mizuna. This is a staple winter green for us. Its mild, bok choy–like flavor is excellent in salad mixes, and it can also be grown larger for braising or stir-frying. It recovers well from temperatures into the teens, and has strong regrowth for cut and come again culture.
Mustard greens. Adds a great kick to salad mixes as a baby leaf, and can also be grown full size for sautéing.
Minutina. Interesting flavor and texture. Can get tough and bolt quickly after the first cutting. Very cold tolerant.
Spinach. One of the most cold-tolerant crops (we’ve seen it recover from temperatures close to 10°F). You can use cut and come again culture when leaves are young (for raw eating), or you can pick individual larger leaves to extend the harvest over a longer period (for cooking).
Arugula. This spicy green is mellow and delicious when grown in cooler temperatures. Handles light frosts well, but starts to deteriorate with repeated hard frosts. Can be cut several times, but quality is best at first cutting.
Baby lettuce mix. Lettuce tolerates light frosts well when leaves are at baby size, but it loses quality when temperatures dip into the 20s. Heads of lettuce grow well in cool spring and fall temperatures, but don’t tolerate below-freezing temperatures well.
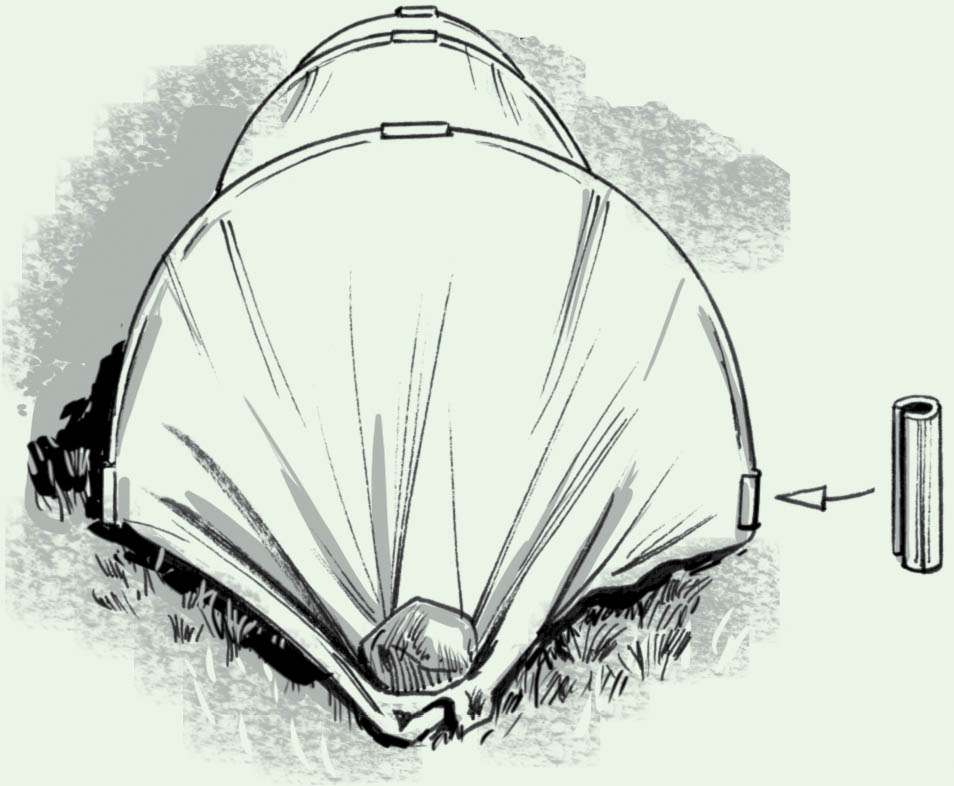
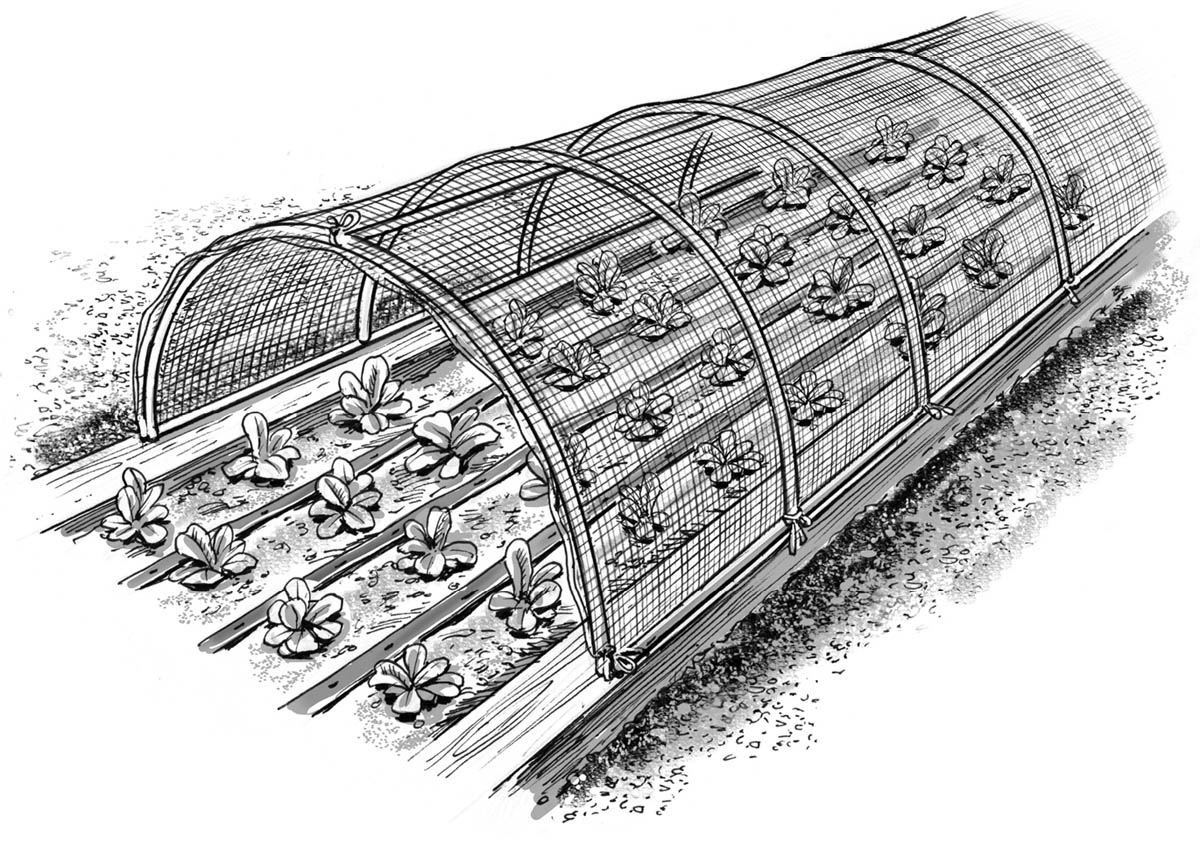
Low tunnels, also known as row covers, are structures that are not tall enough to walk into. They often comprise hoops or arches that support fabric or plastic covers that protect plants. The cover of a low tunnel must be removed to manage and harvest the protected plantings. Low tunnels are inexpensive and easy to set up, but because they’re low, you can’t grow tall crops to maturity under them.
For simplicity of construction and minimal cost, low tunnels are often built 2 to 4 feet tall. A 2-foot high cover will be perfect for salad greens and carrots, but will hamper the growth of maturing kale, peppers, or summer squash. A slightly taller tunnel (3 or 4 feet high) is appropriate for these and other taller crops, such as tomatillos and broccoli. If you feel the structure needs to be any taller than 4 feet, consider upgrading to a high tunnel (see High Tunnels, Hoophouses, and Greenhouses).
Low tunnels (also called floating row covers) protect crops from light frost; they’re a simple way to extend your growing season earlier in the spring and later in the fall.
It’s pretty easy to improvise a structure for a low tunnel. Alternatively, you can purchase materials from a nursery or seed company (see Resources). Common materials for hoops are #9- or #10-gauge wire; or PVC pipe bent over rebar pins that are pounded into the ground. (We like to use 2-foot lengths of 1/2-inch rebar for pins, and 10-foot lengths of electrical conduit that are cut to size to fit over the bed.) Another easy option is to bend a section of wire fencing into a C-shape and attach the covering material to the wire with zip ties, twist ties, twine, or bungee cords. Low tunnel structures, especially taller ones, are more stable if they feature a top purlin (a lengthwise roof support between the hoops).
Low tunnels can be covered with a variety of materials, such as these listed here:
Spun-bonded polyester fabric. This material provides some heat retention and wind resistance but is also breathable and lets precipitation pass through (Reemay and Agribon are common brand names). It doesn’t create the greenhouse effect like clear plastic, so you will not have to remove it when the sun comes out. You can purchase row cover in different weights — heavier weights provide the most protection from the elements; lighter weights are more breathable and are best for pest exclusion (see chapter 11 for more information). Row cover will let anywhere from 30 to 90 percent of the sun’s rays pass through, depending on the weight of the fabric.
Greenhouse or UV-resistant plastic film. Using clear plastic to cover your hoops creates the greenhouse effect, and your garden beds will get maximum temperature gain. However, this material can cause your crops to fry on a sunny day (even in the middle of winter); you need to be prepared to open it partially or remove it for ventilation during sunny periods. It doesn’t breathe and doesn’t allow precipitation to pass through, so you will also need a way to water the crops underneath. Greenhouse plastic lets 80 to 90 percent of sunlight pass through. Avoid using clear plastic tarps or painter’s plastic purchased from a hardware store; light transmission may be poor, and the plastic will break down very quickly because it’s not UV stabilized.
Slitted plastic row cover. This is also a UV-resistant plastic cover but contains slits or holes that are desgined to promote ventilation and reduce temperature spikes in sunny weather. The slits remain closed when the plastic is cool, but when it heats up and expands the slits open and allow air to pass through. You still need to water underneath this type of cover, and open it up to ventilate during long sunny periods, but it’s much more versatile and requires less management than a solid plastic row cover. Because it’s less insulating than solid plastic, slitted plastic is more commonly used to warm up spring crops than to protect overwintering crops.
Cold frames serve the same purpose as row covers, but have a sturdier structure that is built from wood or metal. Because of the sturdy frame, you can use heavier covering materials such as double-wall polycarbonate sheeting or salvaged windows (greenhouse plastic or spun-bonded polyester also work). Try to find plastic or tempered glass windows; old glass panes can break and leave shards in the soil.
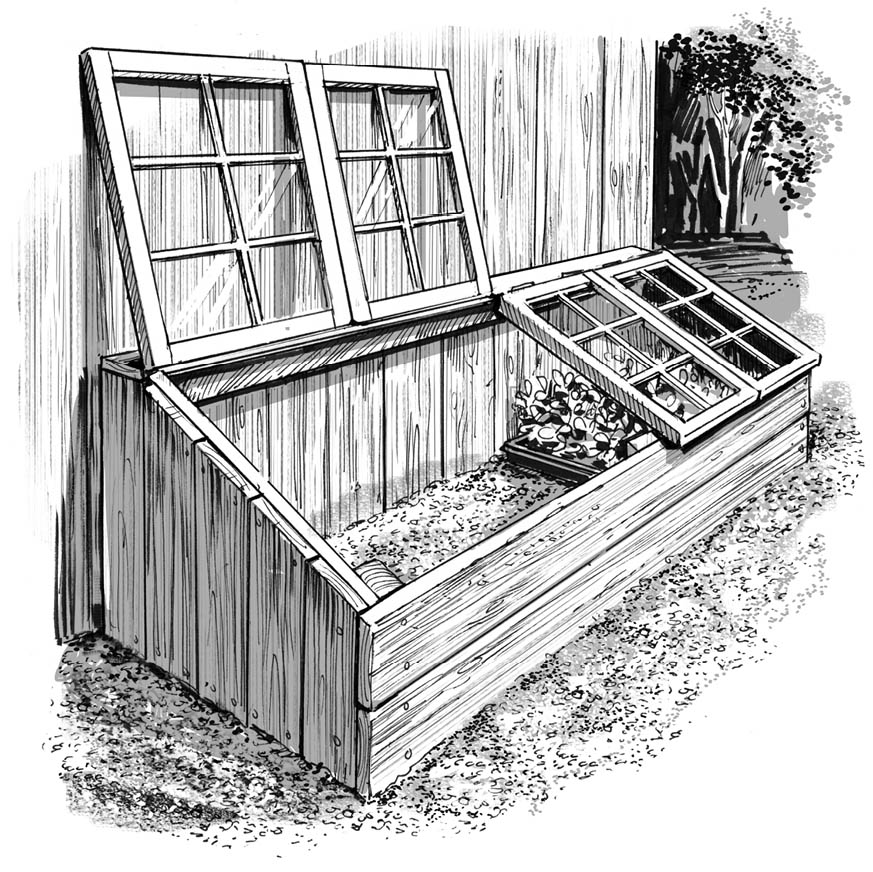
Cold frames are more complicated to assemble than row covers, but are sturdier and provide a bit more protection.
You can use a variety of techniques to hold row covers in place:
Attach the covering to the structure. Purchase clamps or specially made clips to attach sheeting material to your hoops or other row cover structures.
Hold down the bottom edges. Most home growers use sandbags, rocks, or bricks to weigh down the edges of the fabric. This works well, but moving them around involves some labor. If you don’t mind doing some extra digging, you can also use soil to bury the edge of the row cover. This method works particularly well if excluding pests is a priority, because you can effectively seal the entire edge of the cover with soil. Some growers use stakes or landscape staples to hold the covers in place, but this can destroy the fabric very quickly.
Close the ends. Seal the ends of the row covers by bunching the fabric or plastic together, and then holding it in place with weights or soil.
When purchasing materials for a low tunnel, make sure you get hoops and a covering that are wide enough to cover your beds adequately (don’t forget to leave extra fabric to place weights on or secure with soil). An 83-inch wide row cover is just about the right size to span a low hoop over a 4-foot bed.
Snap clamps are handy way to secure row cover to hoops made from conduit. See Resources, for suppliers.
The advantage of cold frames is that they are less likely to blow away than low tunnels and have a higher insulation value. Also, you don’t have to assemble or disassemble them — you can just lift up the whole structure and set it over top of a garden bed. The drawback is that they don’t cover a lot of square footage in the garden relative to the time and expense of building them. Also, they can be difficult to move around (most take two people), and you have to find somewhere to store them when they’re not in use. We find that they’re most useful for protecting small amounts of space-efficient salad greens, or for protecting a few flats of transplants while they’re growing.
Almost any crop can be covered with a low tunnel or cold frame in the spring to enable earlier planting and harvest. For frost-tolerant crops, seed or transplant as soon as you’re able to work the soil. Water in the crop, and then cover with plastic, slitted plastic, or spun-bonded polyester row covers. For frost-sensitive crops, transplant from two weeks to one and a half months earlier than suggested by the Planting Dates chart. The additional thermal and wind protection provided by the cover should accelerate harvest by one to five weeks.
The exact timing of your planting will depend on your local climate/microclimate and your tolerance for risk. We know a skilled professional grower in Pennsylvania who sets out his first planting of tomatoes under row cover on March 15 (two full months earlier than is recommended for his climate). If the spring works in his favor, he’s the first in his market to show up with tomatoes. If it’s unusually cold, he might lose the whole planting and have to set out another one. He feels it’s worth the risk because early tomatoes are prized by his customers.
Closely monitor the temperature under the plastic and slitted plastic covers and be prepared to remove them when necessary. You also need to remove these covers for watering if you don’t have drip irrigation installed underneath. You don’t need to remove spun-bonded polyester covers unless the plants are flowering and need insect pollination, it’s time to harvest, or if the plants need more room to grow (for tall crops like trellised tomatoes).
Transplant or direct seed your fall crops, wait until temperatures and/or light levels start to drop, and then cover each of your crops with a floating row cover of your choice. For example, you might seed spinach on September 1 for fall harvest. If your early September temperatures are still 70°F or above, wait until late September or October to install row cover.
We like to use heavy row cover for this application because our primary concern is protection from wind and cold. We don’t worry about blocking light because once it’s October, there’s not enough daylight for plants to do much growing anyway.
You can also use multiple coverings on your low tunnels. In the early fall, start with a spun-bonded polyester row cover fabric over your low tunnel. In the late fall or early winter, when temperatures and light levels drop, add a greenhouse plastic cover on top of the fabric row cover.
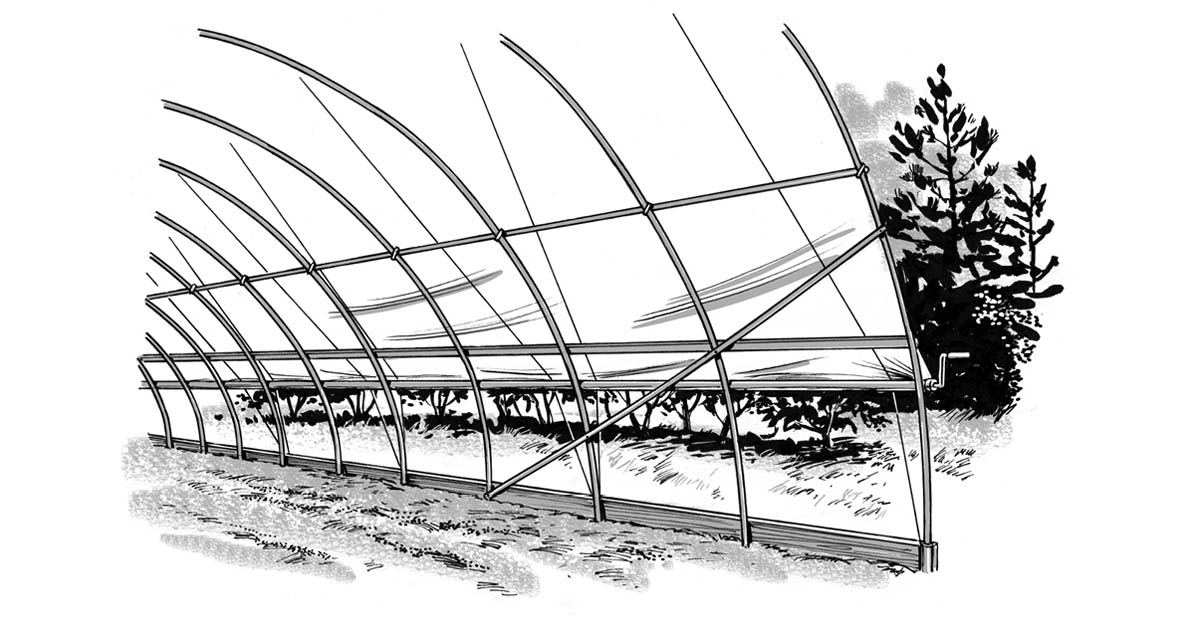
High tunnel, hoophouse, and greenhouse are essentially interchangeable terms — they all describe an arched or gabled structure that is tall enough to walk into. Some growers use the term greenhouse if the structure has a heat source in it and the term high tunnel if it’s unheated (but this distinction isn’t universally adopted).
High tunnels are more complicated and costly to set up than simple row covers, but they’re much easier to work in. They also allow you to grow tall crops, such as tomatoes, to maturity. An added benefit to using a high tunnel is that you can keep precipitation off the leaves of disease-prone crops, which can help extend their season dramatically.

A high tunnel involves some initial expense and labor to set up, but provides an easy-to-work-in structure that can improve your yields year-round.
Usually, high tunnels have doors or windows on the ends for access and ventilation, and are outfitted with some way to open or roll up the sidewalls to provide for maximum ventilation during hot days. If you have access to electricity, greenhouses can be fitted with automatic ventilation shutters, fans, and heaters for further season extensions.
Heating a greenhouse does have a high environmental cost in terms of fuel use and carbon emission, so we recommend doing so only when absolutely necessary (growing transplants is a good example). You can still dramatically extend the seasons and have amazing yield improvements by using an unheated or minimally heated high tunnel.
One issue with permanent high tunnels is that the soil under them is never exposed to precipitation and extreme temperatures. This can lead to nutrient imbalances (high salt levels in particular) and a buildup of pest and disease problems. Careful ventilation, fertilization, and irrigation will help deal with these issues. Some growers are pioneering techniques for using movable greenhouses to expose the soil to weather and allow for longer crop rotations. These movable greenhouses usually move back and forth on skids or tracks with rollers, but some are moved by hand and others with a small tractor. Alternatively, it’s relatively easy to disassemble and move a high tunnel if crop disease problems arise.
The hoops and arches that support a greenhouse are usually made from bent steel pipe. You can purchase these pipes pre-made, or you can bend them yourself. Johnny’s Selected Seeds sells a great bender for small-scale growers. These pipes are often used for the construction of so-called caterpillar tunnels (so called because their segmented structure makes them look like enormous insects). The materials to build these structures are easy to source. In fact, most component pieces are designed for chain-link fencing. (Check with your supplier for more information on appropriate components for your structure.)
Small high tunnels may only have hoops or arches (a “Gothic” arch shape is usually more expensive but is stronger and handles snow loads better). As these structures get larger, purlins, ridgepoles, corner braces, and trusses may become necessary. You can construct greenhouse (tunnel) end walls from steel pipe with customized fittings, or you can make them using standard framing lumber. Smaller greenhouse kits often feature a wooden or metal frame, and some even feature a gabled roof. You can indeed build an elaborate (hence expensive) greenhouse like this, but metal hoops/arches are the more cost-effective method for building larger greenhouses.
You can choose from an astonishing array of brands and materials (and a wide array of specific hardware pieces) to construct your greenhouse. Identify a local or regional supplier and ask them to help you design the structure, if you need guidance (see Resources). If all you need is a 6 × 6 foot or 8 × 8 foot structure, consider buying a kit. Doing so saves you the trouble of figuring out all the fittings and parts needed to assemble a greenhouse using metal hoops. You can even create a greenhouse that moves from place to place in the garden. If you’re interested in movable greenhouses, turn to the Resources for more information.
High tunnels are almost always covered with UV-resistant plastic film or acrylic panels. Greenhouses can be built with glass, but we suggest avoiding glass because it breaks easily and is difficult to repair. Double-wall polycarbonate panels are often used to construct end walls. These panels have more insulating value than plastic sheeting, but are quite expensive.
If you have a high tunnel covered with plastic film, you can increase the insulation value by putting two layers of plastic on it, and inflating the air space in between the layers with a specially designed electric blower.
To provide maximum protection in cold northern climates, you can use low tunnels inside an unheated high tunnel to grow cold-hardy greens year-round (even when outdoor temperatures fall to 10°F and below!).
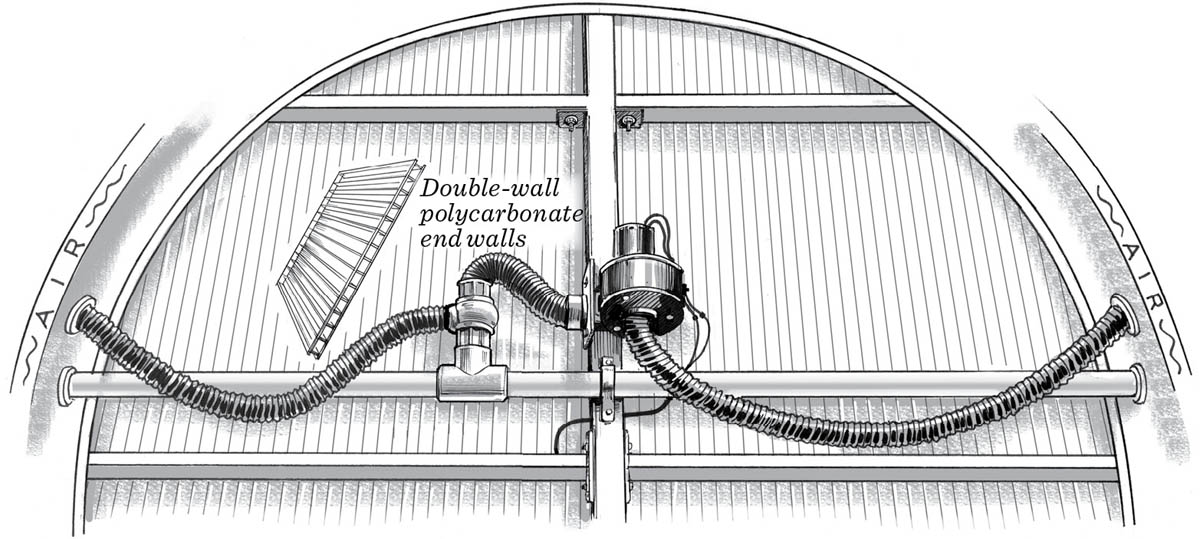
Fitting the ends of high tunnels with double-wall polycarbonate panels will provide a bit more insulation than if you used a single sheet of plastic film. In addition, covering the high tunnel with two layers of plastic film inflated with a small blower will increase its thermal efficiency and minimize condensation on the interior.
When choosing a site for a high tunnel, consider its orientation. For summer production of heat-loving crops, some growers prefer a north–south orientation of the long axis because it theoretically allows for more even light distribution on the plants. In our experience in the northeastern and northwestern United States, we haven’t experienced a big difference between east-west and north–south orientation for summer crops.
For fall and winter production of greens, many growers prefer an east–west orientation for maximum light intensity in the winter. Our experience has found this to be very effective.
For North America, we recommend the following guidelines for greenhouse orientation:
Installing a thermometer so that you can gauge the temperature in your greenhouse is always a good idea, if only to see how much warmer the space is than the outside air. If you don’t have automatic venting in the greenhouse, the thermometer will help you determine when to vent the space whenever inside temperatures get too high.
You have many options to consider when laying out beds in a high tunnel. The simplest option is to set up beds that run the length of the greenhouse, and adjust their width based on the total width of the greenhouse. If you grow trellised crops, such as cucumbers or tomatoes, this layout allows you to hang trellis strings from the purlins — an added benefit.
If your greenhouse features vertical sidewalls, then awkward spaces along the walls may not be an issue. But if you’re using a tunnel with sloping sidewalls, you’ll probably want narrow beds on the outside edges of the greenhouse. This design then places your path down the tall center of the tunnel. If your tunnel is tall enough, you may be able to walk through it without stooping. The perimeter of a high tunnel is usually the coldest space, so there are arguments for putting a path along the outside edge. Our experience with garden design and production growing, however, has taught us that good access is a primary consideration — if it’s hard to access beds because you hit your head on the greenhouse frame, you won’t want to work in that location.
Comb-shaped or keyhole beds maximize plantable square footage in a greenhouse. These are a little more complicated to lay out, and are a little harder to manage if using low tunnels within a high tunnel, but they allow you to plant more of the protected square footage inside the greenhouse.
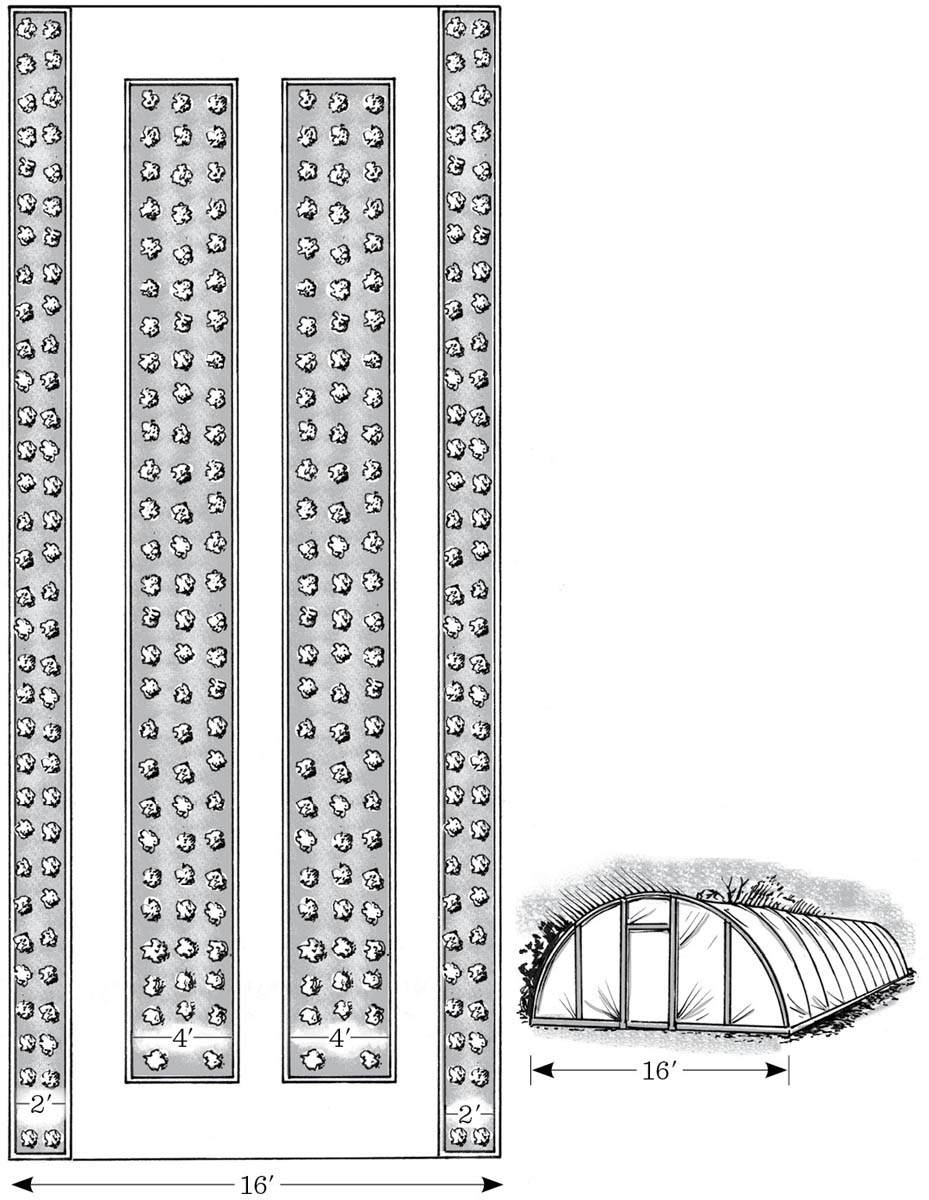
This 16'-wide high tunnel is laid out into rectangular beds for easy planting in straight rows. Note the narrower beds on the outer edges for ease of access.
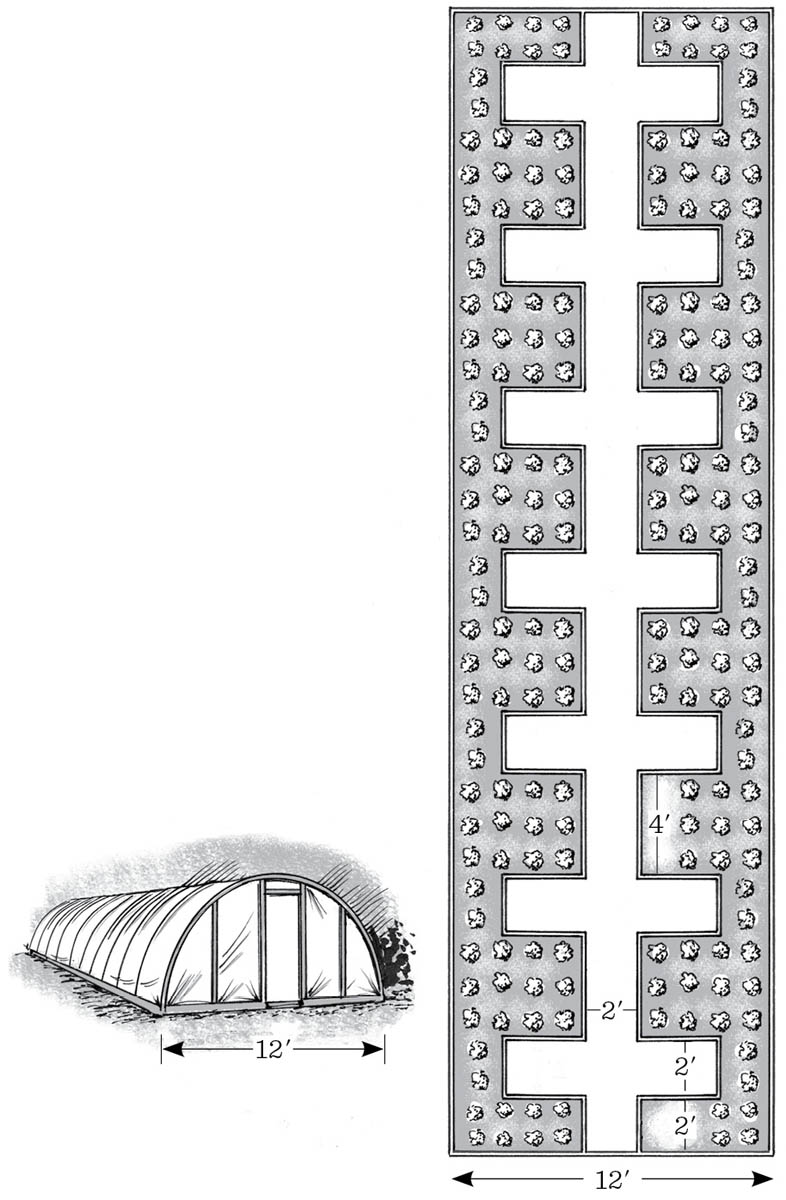
This 12'-wide high tunnel is laid out into keyhole or comb-shaped beds to maximize usable square footage in the space.
For most season-extension purposes, the expense and complication of adding a light and heat source to a greenhouse are prohibitive. However, there are circumstances for which these extra costs and work might be worthwhile, especially for growers who produce young transplants. Please see Outfitting Your Nursery to learn about adding supplemental lighting and heating to your greenhouse.
Some growers who are focused on fall and winter crops may not use their high tunnel for vegetable production in the summer. Instead they might plant a short-season cover crop like buckwheat or mustard greens (see Protect the Soil with Cover Crops for more information on cover cropping). They do so because it is a good way to address soil quality and disease issues. Some growers who are primarily focused on growing warm-season crops in their greenhouse might leave it fallow in winter, or even remove the covering to expose the soil to cold temperatures and precipitation. Because a greenhouse provides such a valuable production space, most growers use high tunnels for growing crops year-round and address issues that arise by way of other organic methods.
For spring and fall planting, high tunnels are managed just like low tunnels. The major difference is that the high tunnel is still standing during the main part of the growing season, so you can use it to grow heat-loving crops such as basil, tomatoes, cucumbers, or peppers.
You can also use your high tunnel to grow crops throughout the year. A typical strategy for doing so is to establish fall crops in late August and September. These crops would be harvested into the late fall–early winter, or perhaps even over the winter (depending on crop choice, climate, and if you use an additional row cover over the crop). In the spring, any overwintered crops would be harvested and cleared as they finish producing or as they bolt. If necessary, warm-season crops could be relay-planted into the tunnel before the overwintered crops are removed.
When the warm-season crops have finished producing in the fall, fall greens could be planted again. Many warm-season crops are typically still producing in early September when fall planting should begin, so part of the greenhouse could be left fallow during the summer to allow for this.
Ventilation is crucial for moderating the temperature in a high tunnel and minimizing any diseases that might arise there. If you don’t have automatic vents and fans in your tunnel, you’ll need to be available on a daily basis to open the tunnel during sunny periods to prevent the temperature from getting high enough to damage your crops.
Regardless, hang a thermometer in your high tunnel so you can easily monitor the interior temperature. Consult the Planting Dates chart for guidance on what temperature is best for each crop. If you’re growing peppers and tomatoes in the spring, you might wait until the temperature is above 75°F before venting the tunnel. If you’re growing spinach or salad greens, you might vent it at 65°F.
To minimize disease, consider opening the greenhouse on cloudy days for a short period at midday, even if interior temperatures are still low. If you have electricity in your tunnel, use fans to circulate the air in the spring and summer (wind can damage crops when it’s cold/below freezing, so we don’t set up fans until temperatures are above 50°F). When temperatures are higher, fully open the ends and sides of the tunnel for maximum air flow (roll-up sides are helpful for this). In the fall and winter, close up the tunnel an hour or so before you lose sunlight to warm the air and soil before outdoor temperatures start to drop.
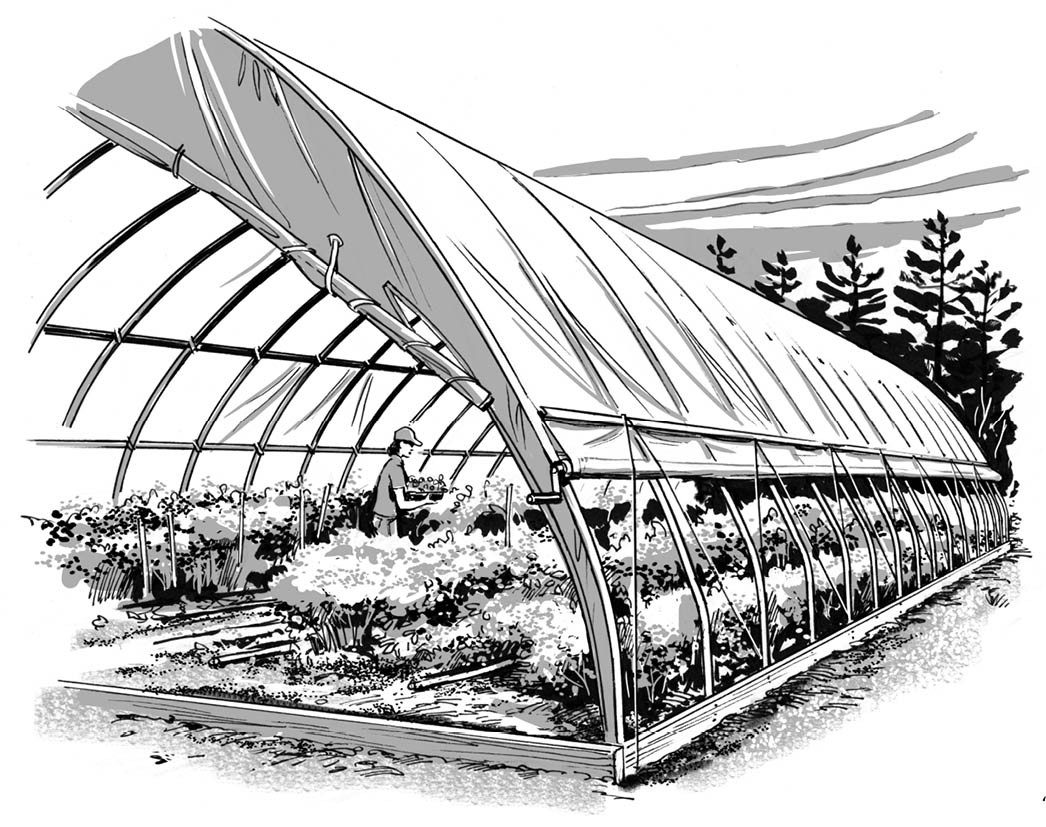
Roll-up sides are a great way to ventilate your high tunnel in hot weather.
If you’re located in a colder climate and are going for winter-long production of greens, plan to use low tunnels (inner covers) inside your high tunnels. Start by establishing the greens in your high tunnel, as previously directed. When outdoor temperatures start dropping below freezing, set up a low tunnel over the greens using a heavy-weight fabric or greenhouse plastic. If it’s sunny, remove the inner cover after the temperature in the high tunnel is above freezing. Replace the inner cover in the late afternoon before the tunnel temperature drops below freezing. If it’s cloudy and the temperature stays below freezing all day in the high tunnel, leave the inner cover on.

For growing greens during the really cold months, use floating row covers inside of your high tunnel to extend the season even further.
In hot climates, and even in temperate climates that are prone to heat waves, protection from very high temperatures may be necessary to keep crops thriving and productive. Most of the cool-season crops mentioned in Cold-Hardy Salad Crops can be grown longer into the hot season when given a bit of shade. Even heat-loving crops can suffer when temperatures jump above 90°F for extended periods of time. High temperatures can result in blossom-end rot and dropped blossoms in many fruiting crops. In extreme heat, tomatoes, peppers, and beans can stop setting fruit altogether. A heat wave that brings temperatures into the triple digits can stress out even the hardiest vegetable crops. If you adapt your irrigation regime to help cool crops, and utilize the semi-shady areas of your site or tunnel, you can stretch your garden seasons to their maximum limits.
Shade cover can reduce sunlight penetration and keep plants and soil cool. With a layer of shade cloth, almost any low tunnel, cold frame, or high tunnel structure can be adapted to help extend the summer growing time for cool-loving crops. Just remove the row cover or plastic from your structure, or build an entirely new structure to support a layer of shade fabric over heat-sensitive crops. If you’re covering a greenhouse or other more permanent structure, you can drape a layer of shade cloth over the top of the structure to provide relief from direct sunlight. In these situations, be extra conscientious about ventilation.
In hot climates, or on abnormally scorching summer days, shade cloth can be worth its weight in lettuce. This cloth is breathable and lets precipitation pass through. Furthermore, you can select different fabric grades to control the amount of shade your plants receive. Very generally, 30 percent shade works well for protecting fruiting crops from sunburn in hot areas and for growing lettuce and salad greens in midsummer in the cooler regions. Fifty percent shade cloth works well in hotter climates for shade-loving plants, such as lettuce and salad greens.
If you live in a particularly hot climate, consider setting up a shade cloth over the entire garden in peak season. Using tall stakes, you can set up a temporary lean-to over the garden to cast shade with minimal investment and time.
Shade cover can help you grow crops that like it cooler during midsummer heat. You can set up shade cover using the same techniques for setting up floating row cover.
Try to use the portions of your garden that receive a little less sunlight for summer plantings of heat-sensitive crops. You may even consider building a special bed in a semi-shady location and dedicate it to summer greens, thus taking advantage of a space where sunlight is ample enough to allow the plants to grow but not so excessive that they become heat stressed. A good location for such a bed is the east side of a house, which allows the plants to receive morning light but provides reprieve by mid-afternoon when the sun is at its peak intensity.
Even if you’ve decided to use drip irrigation for your garden watering needs (which we strongly encourage you to consider), a quick and easy overhead irrigation setup can work wonders for cooling crops in summer. Sprinkling crops from overhead will cool down the leaves, stems, and fruit of the plant, as well as the soil around them. You won’t want to turn on sprinklers in the middle of the day, but in very hot weather you can overhead irrigate in the morning and again in the late afternoon. The afternoon watering will help cool down the plants before night but will be early enough in the day so as to allow some of the moisture to dissipate from their leaves. We have seen growers harvest perfect heads of lettuce in the middle of July by employing a regular schedule of watering in this way.