In this chapter, you will learn how to
• Research and build a standard thick client
• Customize a professional PC
• Build a specialized consumer PC
Now that you’ve learned all about PCs, you have the great joy of being able to build the PC of your desire, choose your favorite video card or motherboard, and assemble, from the ground up, the perfect system for you or your client. People will turn to you for advice, too: Which parts do I need? Where should I buy them? What do you think about this?
There’s nothing wrong with buying a prebuilt system from a local brick-and-mortar or online store. If you want solid warranties, repair agreements, and so on, Dell or HP can help you out. But off-the-shelf computers aren’t for everyone. Your needs or your client’s needs might be too specific. In that case, it’s time for you to do one of the most fun things a PC tech can do: the custom PC build!
For the first time in the history of the CompTIA A+ exams, CompTIA requires you to understand how to build certain types of PCs. This chapter will help you define these PC types, understand the issues involved in building these computers, and, at the same time, have a little fun.
Because this is a first for CompTIA, the creative team at Total Seminars took extra time to understand what CompTIA was trying to say. In general, we agree with the definitions of the custom configurations with the exception of the following two types. From the 220-801 exam objectives:
1.9 Evaluate and select appropriate components for a custom configuration, to meet customer specifications or needs.
• Standard thick client
• Desktop applications
• Meets recommended requirements for running Windows
• Thin client
• Basic applications
• Meets minimum requirements for running Windows
I’m not a fan of the term “client.” It’s outdated. What CompTIA calls a thick client, I’d call a basic desktop, and instead of a thin client, I’d call it a single-purpose machine (because that’s all a thin client can handle). To CompTIA, the only real separation between a thick client and a thin client is meeting the “recommended” or “minimum” requirements for Windows, respectively. It’s oversimplified. Even that might be okay, except Microsoft no longer provides minimum requirements for Windows 7. Oh well. We can only guess what CompTIA was thinking.
This chapter begins by explaining how to find the parts for a custom PC—you’ll be doing a lot of reading, that’s for sure. The rest of the chapter discusses the components you need for each custom build: thick clients, thin clients, virtualization and media workstations, home theater and server PCs, and (best of all) gaming PCs.
There’s almost no better feeling than when you realize you know enough about PCs that you can say: “I think I’m comfortable building my own PC!” If you don’t feel ready, let the information in this chapter be that extra push that takes you over the edge.
Building your first PC is both fun and scary. This is the first time you bring together everything you know about hardware. You’ll make mistakes, and some brand-new piece of equipment you buy won’t work the first time. You’ll mount the CPU wrong and the system won’t boot. That huge tower case with 23 fans will make too much noise and you’ll hate it. But for all these mistakes, don’t lose track of the fact that you’re building your own PC. Your computer … your … precious (see Figure 31-1)!
Figure 31-1 Mike holding “Precious,” his favorite self-built PC
The most difficult (and most fun) part of buying a PC is picking which parts you want. Knowing which parts to buy for each type of PC is the cornerstone of this entire chapter. Let’s take a moment to consider the processes and steps you can use to discover and evaluate the right parts for specific system types.
Every component has a review somewhere. Go to Google, type in the name and model number of a part, and add the word “review” at the end. There are two types of reviews: industry reviews written by professionals, and personal reviews written by people who purchased and use the part. Let the Google search I described show you how to the find the professional reviews. Newegg.com is one of my favorite places to read personal reviews.
Learn everything you can about the part. Take some time to read the technical specifications. Check the return and warranty policy of the manufacturer and the retailer. Make sure you have some recourse if the part breaks or doesn’t function as advertised.
Before you buy a part, see what folks say about the competitors’ parts. Are there other parts that cost less, have better reviews, or use less power?
If you’re lucky enough to live near a big retailer like Fry’s Electronics or Micro Center, get in your car and go check out the part. Look for a display model. Look at the back of the box. See what extra parts are included. Talk to the salespeople about their experiences and the returns they’ve seen; ask about alternatives they like better.
CompTIA wants to call a general-purpose SOHO computer a thick client. Fine—let’s have a laugh at the guy wearing the belt and suspenders, and then come up with some guidelines for building a thick client.
Thick clients are general-purpose machines. That means they don’t have the fastest drives or the best video cards, but, by the same token, they don’t use low-end parts, either. You need to create a platform that will support 90 percent of the folks wanting to use a computer in the home or office.
To begin researching parts for a thick client, look at the recommended hardware requirements for the operating system you intend to use. In this case, I want to install Windows 7 Ultimate 64-bit. I like Ultimate because it gives me the most flexibility, and the extra cost means nothing down the road if I later decide to join a Windows domain.
Here are the recommended system requirements for Windows 7 Ultimate 64-bit edition:
• 1 gigahertz (GHz) or faster 64-bit (x64) processor
• 2 GB RAM
• 20 GB available hard disk space
• DirectX 9 graphics device with WDDM 1.0 or higher driver
See Figure 31-2 for my opinion of the requirements.
Figure 31-2 Mike laughing uncontrollably
You can do a lot better. Here’s my opinion of reasonable and modest hardware for a 64-bit thick client. These values aren’t on the exam, but they should be.
• 2 GHz or faster 64-bit (x64) processor with at least two cores
• 4 GB RAM
• Blank 500-GB hard disk
• DirectX 11 video card
 NOTE You should always go for a 64-bit edition of Windows when building a new PC—why limit yourself?
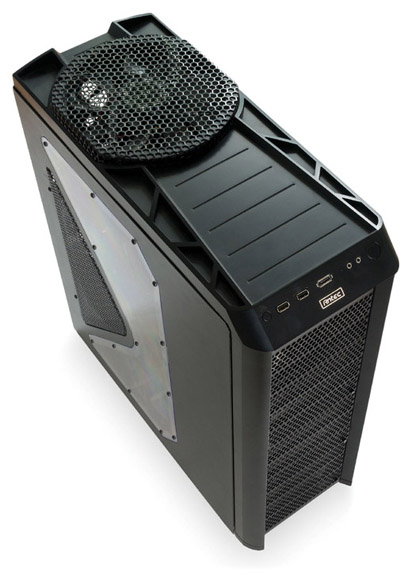
You can get into all kinds of mental confusion trying to decide how large of a case you want to use, but do yourself a favor and just get a mid-tower. Mid-towers have plenty of drive bays for future expansion without being so massive that they get in the way. A mid-tower will also support almost any motherboard you might choose to install. Take your time finding that perfect case. Unlike manufacturers of most other components, case manufacturers tend to keep making the same case model for many years (see Figure 31-3).
Figure 31-3 My Antec 900 mid-tower (because everything’s bigger in Texas)
You begin the system build by deciding on the CPU/motherboard combination for your new system. I’m not going to tell you to buy an Intel or an AMD CPU. Do your own research and draw your own conclusions. I use plenty of both brands. Because this is a thick client and we don’t need the most powerful CPU available, consider the following:
• Get a modern socket. You can get great deals on CPUs that use older sockets, but try to stick to whatever socket is current. This makes it possible to upgrade the CPU in the future.
• Avoid the low end and the high end. Both Intel and AMD make three levels of CPUs. Try to stick to the middle. Avoid the slowest and the fastest. Don’t buy the CPU with the most cores or the fewest cores.
• When it comes to price, the sweet spot should be around $150 to $300. It’s amazing, but CPU price points haven’t changed much in over a decade. You can spend a lot more or a lot less, but either way is a waste of money or cheating yourself on power.
Now that you’ve got a CPU, it’s time to find that magic motherboard. Your first big choice is the chipset. Take some time to learn about current chipsets that support the CPU of your choice and compare features. Consider the following:
• Total RAM support
• RAID support
• USB, including versions and number of ports
• Onboard video
• Onboard wireless
Once you narrow down your choice to a particular chipset, see which motherboards fit your plans:
• Just because a chipset supports certain features, don’t assume the motherboard will as well. Double-check RAM limits, RAID support, USB ports and types, and so on.
• Check the manufacturer’s reputation. Good names like ASUS and Intel are going to be better quality motherboards, but there are plenty of other good manufacturers, too.
• Read reviews of the motherboards you like. What are people saying about them?
• Think about how many expansion slots you need. Your motherboard should have at least one PCIe ×16 slot and a few smaller PCIe slots.
• Do you want to use integrated video? Many folks will think the onboard video is acceptable, and certainly well above Windows 7’s Aero requirements. If not, you’ve always got that PCIe ×16 slot waiting for a new, dedicated video card.
Regardless of whether you choose onboard or a dedicated video card, a thick client isn’t going to push a graphics card very hard. Even lower-end cards include at least 1 GB of GDDR3 (or better) video RAM, solid processors, and plenty of extras like HDMI ports. You probably don’t need to spend any more than about $150. If you spend more money than that, you’re stretching into gaming PC territory.
NOTE Go to www.tomshardware.com and check out their monthly “Best Graphics Cards for the Money” articles. They’re the best source for what’s the best graphics card available.
Be sure to check the reviews on a prospective video card and always be sure to do a Google search for a card’s model number followed by “noise.” Some videos cards are too loud—they’ll drive you bonkers.
Monitors are a personal choice, but remember that a good monitor will outlast several system builds, so don’t be afraid to get a better monitor. A good-quality, widescreen, LED-backlit LCD monitor no smaller than 20 inches diagonally across will serve you well for a long time.
A thick client will do just fine with a single hard drive. Today’s multiple-terabyte drives will store anything you might imagine and then some, and if you actually manage to fill a drive, your mid-tower will easily accept a second or even third drive.
Setting up a RAID array is probably not necessary. Of course, the system needs backup capability, but RAID might be overkill. At the same time, the low cost of drives and the ease of RAID installation makes at least RAID 1 a compelling option for your thick client.
The typical thick client is going to need a Web browser (or two) and some Microsoft Office-type applications. The recommended 4 GB of RAM won’t have any difficulty supporting these types of applications or much more.
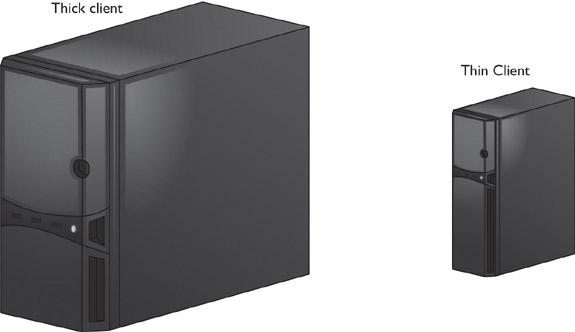
In modern times, people need computers to get work done. The type of computer you need is defined by the work you do and the way that your IT department decides to organize and network. For the most part, the thick client described earlier is the “go to” workstation PC, but CompTIA defines two other workstation types: the thin client and the virtualization workstation.
A thin client is a system designed to handle only very basic applications with an absolute minimum amount of hardware required by the operating system. Thin clients often serve as single-purpose systems, like point-of-sale machines (cash registers). Thin clients can be very small compared to a thick client, which makes them perfect when you want the PC tucked away. Figure 31-4 shows a typical thin client.
Figure 31-4 Thin client (photo courtesy of HP)
Virtualization has taken the world of computing by storm over the past few years. As discussed in the previous chapter, virtualization is a powerful technology that enables you to run more than one operating system at the same time on a single computer. With virtualized servers, you can consolidate multiple, power-hungry machines into one box, saving floor space, electricity, and a lot of running around. With workstations, virtualization is most often used to run a second OS on top of the OS installed on the computer’s hard drive.
For good performance on a virtualization workstation, install lots and lots of RAM. Each virtualization workstation needs enough memory to run the native operating system, the guest operating system, and any applications running in either OS, so RAM is the most important thing in virtualization. A powerful 64-bit CPU that supports hardware virtualization will also help virtual machines run smoothly. Many desktop computers can run virtual machines, but if you want the best possible performance, you want lots of RAM and a good CPU.
 EXAM TIP You’ll need lots of RAM and a fast CPU to get good performance out of a virtualization workstation.
When George Lucas made the first Star Wars movie, he used camera tricks, miniature models, and stop-motion animation to create the illusion of massive spaceships and robots battling it out in a galaxy far, far away. Twenty years later, he filmed the Star Wars prequels in front of massive green screens and used computer-generated imagery (CGI) to transform the bland sets into exotic planets and space stations. I won’t get into an argument about which approach produced better movies, but the fact remains that the act of creating films has changed. It’s not just films, either—computers have changed the way we create all types of media, including movies, television shows, photography, music, and more.
If you want to get involved in this creative revolution, you’re going to need a mighty powerful computer. Workstations for creative professionals are customized for the type of media they create. We’ll start by looking at graphics workstations (by which I mean workstations for editing still images and using computer-aided design/computer-aided manufacturing software), then move on to audio workstations and video workstations.
NOTE Computer-aided design (CAD) and computer-aided manufacturing (CAM) software enable engineers to create and build components in an industrial setting.
Professional photographers and graphic designers first and foremost need to have the clearest view possible of their images and image editing software. Whether you’re editing photos in Adobe Photoshop or drafting mechanical components in SolidWorks, you need to make sure you can see what you’re working on! Because of this, the primary need for a graphics workstation is a large, high-quality monitor. A $200 LCD panel from Best Buy won’t help you here—you need to make sure that the colors you see on the screen are as accurate as possible. Expensive monitors will have higher contrast ratios for more vibrant images and they’ll also give you more control over the image they output.
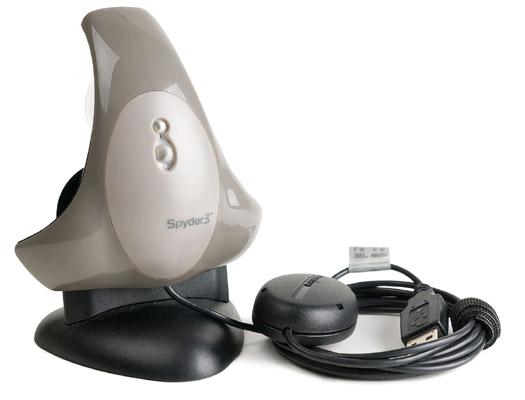
You learned in Chapters 21 and 25 that monitors and video cards use different techniques to display colors. For a workstation to display colors accurately on a monitor, you must properly calibrate the monitor. This is a simple process of using a small sensor, like the tool shown in Figure 31-5, on the screen to create a profile that enables the monitor to display more accurate colors. You can use a similar device with a printer to create a profile for it, too. That way, your printouts will match what you see on the monitor.
Figure 31-5 A monitor calibrator
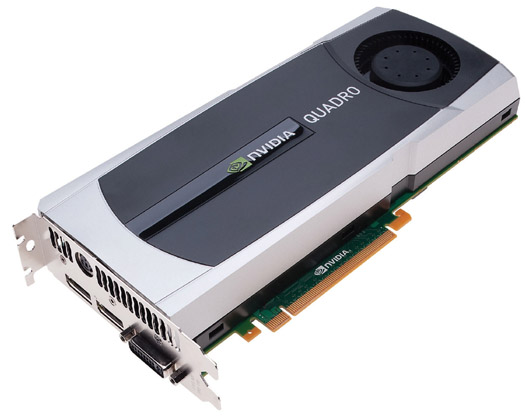
With a good enough monitor, almost any computer can be used as a graphics workstation, but ideally you’ll want a fast, multicore 64-bit CPU and lots of RAM. If the processor is too slow or if the computer doesn’t have enough RAM, it can take a long time to make changes to an image you’re editing. A large hard drive is also a plus, since CAD files and photographs take up a lot of space. You’ll also want to have an external drive to back up your work. If you’re working with CAD/CAM software, you’ll want a professional-level graphics card, such as an NVIDIA Quadro card (see Figure 31-6), though photo editing software won’t see much of an advantage from such a card. Unlike typical graphics cards, these professional cards can cost thousands of dollars.
Figure 31-6 An NVIDIA Quadro graphics card (photo courtesy of NVIDIA)
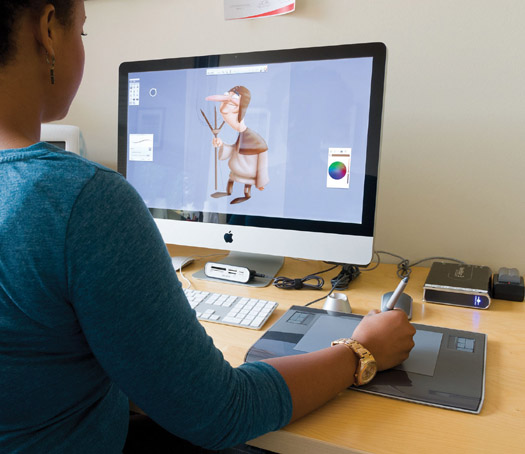
Graphic designers frequently make use of specialized input devices, too, such as digitizer tablets. These tablets enable designers to paint on their computers as if they were painting on a canvas, as shown in Figure 31-7.
Figure 31-7 Painting with a Wacom tablet
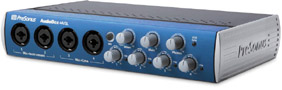
The requirements for audio workstations are very similar to those for graphics workstations—a fast, multicore CPU, gobs of RAM, a large monitor, and a big, high-speed hard drive. The difference is that you’ll also need a high-quality audio interface.
An audio interface is a box that you hook up to your PC with inputs that enable you to connect professional microphones and instruments (see Figure 31-8). Functionally, an audio interface is just a really high-end sound card, though they usually connect to your computer via USB or FireWire rather than plug into the motherboard. Audio interfaces range in size from an interface you can fit in your hand, to one that will take up most of your desk. A more expensive interface includes more inputs and produces higher-quality sound, though you’ll also need some expensive speakers to hear the difference.
Figure 31-8 Audio interface device (photo courtesy of PreSonus)
Just like with graphics workstations, audio workstations frequently make use of specialized input devices. These devices, referred to as control surfaces, mimic the look and feel of older, analog mixing consoles. They have a large number of programmable inputs that make controlling the software much faster and more accurate than with just a mouse and keyboard. These control surfaces range in size from small desktop units, all the way up to room-filling behemoths that are used in recording studios. Some of these boards also contain an audio interface.
Video workstations combine the requirements of a graphics workstation and an audio workstation. Video editors often use two or more color-calibrated monitors so they can view the video stream they’re working on with one monitor and see their video editor open on the other, making multiple monitors very useful. Video workstations require a very powerful CPU paired with as much RAM as possible, since video editing is a far more intensive process than graphics or audio editing. High-speed, high-capacity hard drives are also life-savers, since video files often take up multiple gigabytes of space. Many video workstations have multiple hard drives set up in a RAID for added storage capacity and read/write speed.
Video workstations, like CAD/CAM workstations, benefit enormously from a professional-level graphics card. This is almost as important as the fast CPU and piles of RAM, and you’ll rarely see a video workstation without one.
Because video workstations are frequently used as audio workstations, too, you will often find video workstations with the same audio interfaces and control surfaces as you’d see on an audio workstation. There are also video interfaces that enable editors to connect to various cameras. Additionally, many video editors use custom keyboards that have special labels and controls for popular video editing software.
Once you move away from the office and into the house, your computing needs change. Home is for leisure, and the workplace is for, well, work! The three common types of home systems are home servers that store everything from your music collection to last year’s income tax return, home theater PCs to play your music and your movies, and gaming PCs to play powerful, video-intensive games.
How many computing devices are in your house right now? If you’re like me, the answer is “a lot.” Between multiple smartphones, iPods, tablets, portables, and desktop computers, you might shock yourself with the count.
As more and more computing devices move into the home environment, there’s a need for a centralized storage space, a home server PC to dish out files and folders on demand—a place for all your media to stream to multiple devices. This home server PC has very specialized needs that take it beyond the typical thick client.
A home server PC supplies three discrete functions: media streaming, file sharing, and print sharing. Media streaming often uses specialized software. Just like file and print sharing, though, it works fine through the default tools in Windows and Mac OS X. The home server PC has to have a very fast network connection and gobs of storage. Plus, that storage needs to be fault tolerant. Losing your video collection because of a hard drive crash would make for a very bad day.
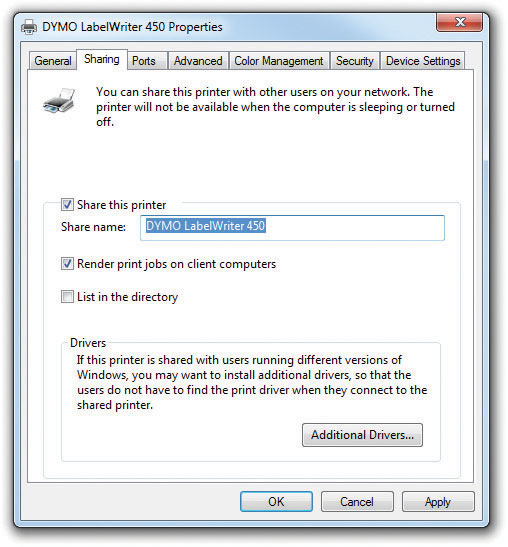
Any modern operating system enables you to share files and folders through standard sharing features. The same is true of sharing a printer. To turn that PC into a print server, open the Devices and Printers applet in the Control Panel, right-click on an installed printer, choose Printer properties, and then check the Share this printer checkbox on the Sharing tab (see Figure 31-9).
Figure 31-9 Sharing a printer
You can easily turn a Windows 7 PC into a media streaming server by selecting that option in the Control Panel. Open the Network and Sharing Center, select the Change advanced sharing settings link from the left Task menu, and then click the Home or Work option to get to the Advanced sharing settings screen (see Figure 31-10).
Figure 31-10 Advanced sharing settings
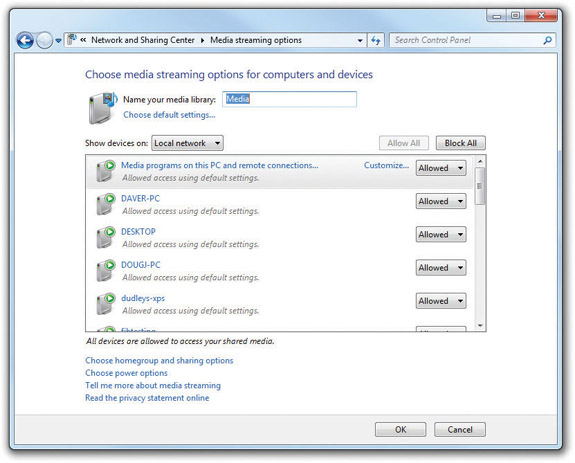
Halfway down the screen you’ll find a link to Choose media streaming options. Click it. Figure 31-11 shows the Media streaming options screen. By default, Windows wants to share everything, though you can customize what’s shared in case you have young children and don’t want them to have access to inappropriate content.
Figure 31-11 Media streaming options
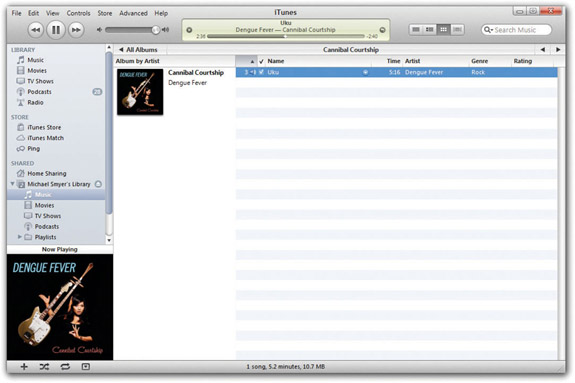
Finally, both Windows Media Player and iTunes have a feature to share media files on a local network. Figure 31-12 shows iTunes sharing via the Bonjour protocol.
Figure 31-12 Streaming with iTunes
EXAM TIP Microsoft makes a perfectly fine server OS called Windows Home Server that you can use to set up a sweet home server machine. You probably won’t find the OS on the CompTIA A+ exams, however.
Hardware needs on a home server apply primarily to the network speed and hard drive capacity, at least according the CompTIA objectives. If you have a very active server, you should also pay attention to the amount of RAM it has and the speed of the CPU. Beefing both up above the standard thick client can help if you start getting some lag.
EXAM TIP You don’t need to care at all about the video card in a server PC. Anything will do because you’re not going to play anything directly on the server.
For the network, a wired Gigabit Ethernet NIC should be standard issue. Although it sounds cool to go wireless, you should limit the use of wireless to the single connection between the WAP and the client. The home server should connect via Ethernet to minimize any lag or dropped frames.
A file server’s hard drives do the heavy and sustained lifting for the PC, so you should not stint on them. At a minimum, get two drives of identical size that have as much capacity as you can afford. No one reduces the amount of media in his or her collection over time, after all, especially if it’s stored electronically. Plus, because you need fault tolerance on the data, you simply must use a RAID 1 configuration at a minimum (and thus the need to get two identical drives). If your budget can afford it and your motherboard supports it, get three identical drives and run in RAID 5.
Instead of building a custom home server box (the fun method), you can also purchase preconfigured devices that contain multiple hard drives and attach them to your network. Referred to as network attached storage (NAS), these devices usually connect via Ethernet. Instead of connecting to the hard drive(s) on a server PC on the network, you connect to the NAS’s hard drives. It plays the same role as a home server without all the fuss.
EXAM TIP The CompTIA 801 objectives list “Ethernet” as a connection type for storage devices. While you won’t find stand-alone external hard drives that support Ethernet connections, home servers and NAS devices can provide your PC with storage attached via Ethernet.
A home theater system enables you to play music and watch movies and television. If done well, the experience can rival that of watching a movie at a fine movie house. When coupled with a home theater PC, the home theater system enables the full computing experience as well.
An optimal home theater has five components:
• A monitor, television, or projector
• Surround sound speakers
• A stereo receiver
• A home theater PC
• Network connectivity (such as a cable box or Ethernet)
NOTE You can certainly build a functional and very good home theater without the stereo receiver. My home theater doesn’t use a stereo, for example, and isn’t hooked up to a cable box either, yet it’s great for watching movies and surfing the Internet.
This section looks at the specific components and issues involved with creating a home theater PC and connecting it to other components.
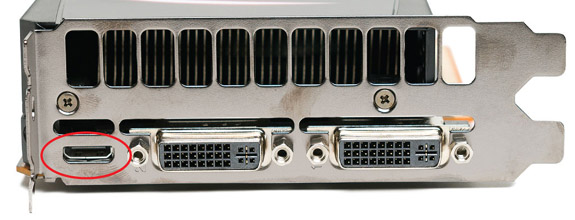
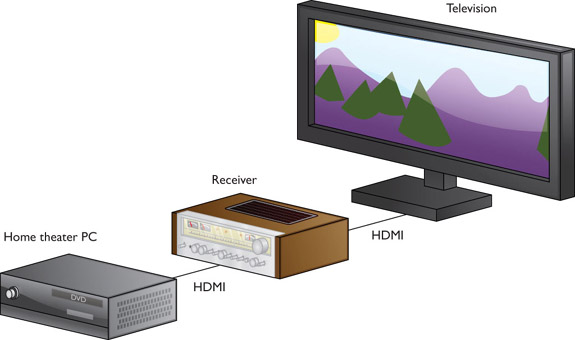
A home theater PC must provide support for large monitors at high resolution, a requirement that usually involves an HDMI connector on the video card (see Figure 31-13). The HDMI cable connects the home theater box to the stereo receiver, which then pushes the signal to the television. Figure 31-14 shows the basic home theater schematic.
Figure 31-13 HDMI output on video card
Figure 31-14 Television, receiver, home theater PC
Both DVI and DisplayPort can support 1080p HDTV resolution, as you’ll recall from Chapter 21. Many televisions today have a DVI port, so this is a viable solution, especially if you don’t have a stereo receiver (see the following section).
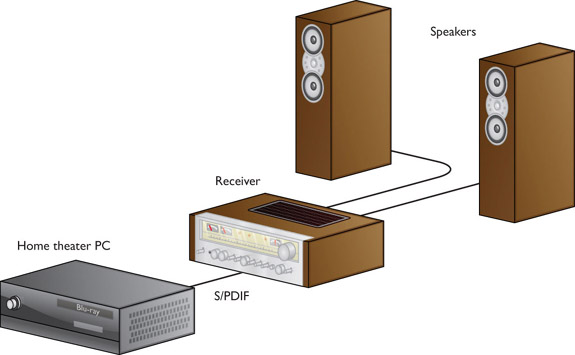
A great home theater system simply must have surround sound and a thumping subwoofer, so the home theater PC needs a sound card or built-in sound processor that supports 5.1 or 7.1 stereo. For the best output, the sound card connects to the stereo receiver via S/PDIF, through either the optical connector or coaxial connector. The speakers then connect to the receiver. Figure 31-15 shows the schematic with speakers added.
Figure 31-15 PC, receiver, speakers
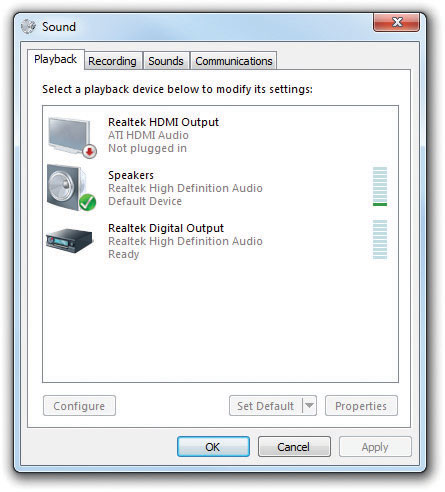
HDMI carries both the video signal and the surround sound audio signal, so if you plug it into the television directly from the PC, the rig will use the television’s speakers by default. If you have the surround sound speakers plugged into the computer rather than a receiver, you need to go into the Sound applet in the Control Panel to select the playback device you prefer (see Figure 31-16).
Figure 31-16 Sound applet for choosing playback device
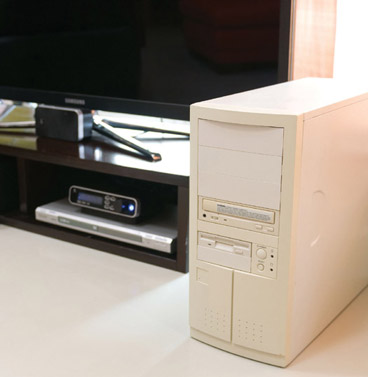
Home theater components look like traditional stacking stereo components, such as a receiver, equalizer, DVD player, and so on. It simply won’t do to put a beige office computer case alongside your sleek, black-clad components (see Figure 31-17).
Figure 31-17 This is not right!
You can get a case for a PC that stacks nicely with other home theater components (see Figure 31-18). CompTIA calls this style of case an HTPC, although that’s not an industry-standard form factor. I assume the letters stand for home theater PC.
Figure 31-18 HTPC case
The home theater PC needs access to content, usually through Gigabit Ethernet to get streaming media through the home server PC you created in the previous section of the chapter. The home theater could use Wi-Fi (802.11n or better), though wired is best, especially for HD content.
The home theater PC wouldn’t normally have anything to do with a signal from the cable company or from a dedicated optical disc player, like a Blu-ray Disc box. Those signals go from the applicable box to the stereo receiver directly.
The only time the home theater PC should receive a television signal directly is through broadcast over the air. For this signal, the PC needs a television tuner, like you learned about in Chapter 25. You would use this to catch local news or sports programs.
Figure 31-19 shows the home theater schematic with all the media access methods included.
Figure 31-19 Final home theater
Before we leave the hardware to look at software, I want to mention one topic that’s outside the scope of the CompTIA A+ exams, but that you might run into in the field.
Digital Living Network Alliance (DLNA) certified devices connect to your home network, discover each other, and share media. In theory, DLNA devices should work with minimal setup or fuss, even if sourced from different manufacturers. If you share media files on a Windows PC, for example, a DLNA-equipped television, PlayStation 3, or other home theater device should be able to view those files. Look for the DLNA logo on devices as diverse as digital cameras, Blu-ray Disc players, network storage boxes, printers, and more.
Once you have the media center hardware set up properly, you need software to access streaming media. Microsoft includes Windows Media Center in some editions of Windows. If you don’t have one of those editions (see Table 31-1), then you need to use a third-party tool, such as the excellent XBMC or Plex.
Table 31-1 Versions of Windows That Include Media Center
Windows Media Center enables you to stream content from a home server and watch content stored locally. You can even access some television shows broadcast over the Internet (see Figure 31-20). Most of the setup happens via wizards that run when you select an option. If you want to add content from networked computers, you’ll need to add it to the appropriate library (in Windows 7) or connect to the shared folder(s) in Windows XP or Windows Vista.
Figure 31-20 Windows Media Center
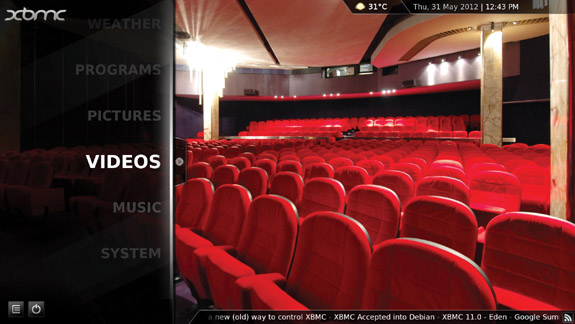
As cool as Windows Media Center is, you can find absolutely beautiful and functional third-party software for free, such as XBMC and Plex. XBMC in particular enables you to customize the look and feel of the interface, and many people have made awesome skins available too. Figure 31-21 shows the default skin for XBMC; Figure 31-22 shows the same content but displayed with a completely different skin. Plex is not flashy but it’s totally functional. There are versions of XBMC and Plex available for Windows, Mac OS X, and Linux. You can download XBMC from xbmc.org. Get Plex at www.plexapp.com.
Figure 31-21 Default XBMC
Figure 31-22 XBMC sporting the Aeon skin
And now for the grand finale, the PC you’ve been waiting for, the system you’ve always wanted to build. As an aspiring PC tech, you probably took your first apprehensive steps into the dark underbelly of PCs with a game: Doom, Quake, Myst, The Sims, World of Warcraft… you’ve played at least one of them. While casual gamers can get by with a standard desktop PC (like the thick client you read about earlier), those who take their gaming seriously want a powerful PC ready to pump out the latest graphics. A gamer goes through a game’s graphics settings and sets everything to the max. And since games aren’t all about how good they look, you’ll also want a good sound card and headphones. (Okay—you also need a good game, but one thing at a time.)
First, I’m going to tell you about the optimal gaming PC—the best bang-for-your-buck gaming PC that will play every game out there without breaking your wallet. (It’s cheaper than you think! You can get a lot for about $1000.) Then I’ll show you how you can take PC gaming from a hobby to a lifestyle—your only lifestyle—with beyond-bleeding-edge components that you don’t need but should buy anyway.
A gaming PC isn’t that different from your run-of-the-mill thick client: all of the components are the same, but taken to the next level. The recommended Windows system requirements no longer cut it. Instead, you might turn your attention to the system requirements for your favorite PC game. Find a game that came out in the last year or two and see what it needs in a PC. You’ll find that most games actually have pretty low system requirements.
A lot of modern PC games are ports or copies of console games (originally created for the for the Xbox 360 or PlayStation 3, for example). Because the consoles were launched so long ago—before Windows Vista!—their old hardware makes it easy for modern PCs to run ported games. Games designed specifically for PCs, however, can take advantage of every core and gigabyte you give them. Take a PC game’s system requirements and bump them up a notch or two to keep your gaming PC future-proof. Future-proofing means building a PC in a way that keeps it relevant for a few years. You don’t want your PC to be out of date a week after you build it. Going beyond the current requirements for a game will make it ready for new games that come out a year or two from now.
The Internals Most of the big improvements over a standard thick client will happen inside the case. Every game is coded differently—just like any other application—so each game will take advantage of your hardware to varying degrees. Some games, for example, are designed to use quad-core CPUs and others are not. If a game can only use one core, those three other cores in a quad-core CPU can’t play along. But you want a quad-core CPU anyway. Why? Future-proofing and price. Why limit yourself now when more and more games can take advantage of multiple cores? And these days, the price is right. Find a quad-core Intel processor with a speed of 3 GHz or more. If you have a tighter budget, get the AMD equivalent.
NOTE Make sure you get a motherboard and CPU that are compatible with one another. I’ll talk more about gaming motherboards later in this section.
For a budget-minded gaming PC, the processor is the first place you want to splurge a little bit. You don’t need a special case or motherboard. You don’t need more than 4 GB of RAM, and you only need enough hard drive space to store all your games. You don’t need an extra monitor. Powering games revolves around two elements, so you’ll spend the most money on these parts. I already told you about CPUs, so now let’s talk about the biggest-ticket item, the graphics card.
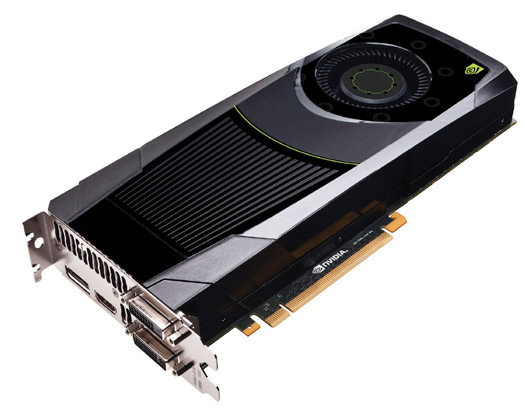
A powerful graphics card (combined with a quality CPU) enables you to do two things: turn up the graphics quality and increase the performance (see Figure 31-23). The graphics-quality of the game depends as much on the graphics card as it does on the designers of the game. A good graphics card can’t make an ugly game look pretty, but it can make a pretty game look gorgeous. At higher settings, all sorts of smoothing and filtering happens that would make weaker systems choke. At the same time, you also want to maximize performance. In games, we measure performance by the number of frames per second (FPS) displayed. Most games are designed to run at about 30 FPS, though the sky’s the limit on the top end. If you’re getting fewer than 20 FPS (everything will look very choppy and it will be difficult to play the game), you’ll probably need to turn down the graphics settings in the game, and no one wants to do that!
Figure 31-23 An NVIDIA 680 graphics card (photo courtesy of NVIDIA)
So what should you look for in a graphics card? This can be a very “you get what you pay for” proposition, but NVIDIA and AMD—the two dominant graphics processing unit (GPU) manufacturers—have helpfully divided their products by number to show you at a glance how powerful they are. Yes, there are buses, cores, shaders, bandwidths, and so on, but it’s all encapsulated into a (slightly random) number. The NVIDIA and AMD numbering systems, however, are entirely different, a little confusing, and sometimes loop back around to the beginning. I owned an NVIDIA GeForce4 MX 460 back in 2002. This is, of course, not the same as the NVIDIA GeForce GTX 460 released in 2010. And the NVIDIA GeForce GTX 460 is more powerful than an AMD Radeon 4850, even though AMD’s number is bigger. Use each GPU manufacturer’s Web site to learn about the latest available graphics processors. When it comes time to buy, look for the third- or fourth-best card available in the latest generation’s lineup. If the best card available is the “690,” look for the “650” or “670” model. You can usually save hundreds of dollars and still get the best graphics and performance with modern games.
NOTE Graphics card model numbers are organized by generations. As of 2012, NVIDIA cards were divided between the 500 and 600 generations, while AMD cards used the 6000 and 7000 series. Within each generation, a lower number means less power (and lower price), while a higher number means more power (and a higher price). The top NVIDIA card, for example, might be the 690 model, while the low-end model would use the 620 name. For the latest model information, check out the NVIDIA and AMD Web sites.
While the CPU and GPU will satisfy your eyes, don’t forget about your ears. More and more games can take advantage of high-end sound cards that produce true surround sound rivaling blockbuster movies. Hear the squeal of your tires, the noise of your jet engine, and the fiery power of a wizard’s spell in 5.1 surround sound! You’ll need to spend a bit of money (almost as much as that graphics card you just found) to hear the difference, but if you’re an audio geek, it’s worth it. Look for sound cards that support extra channels (7.1), more bits (24-bit), and higher sample rates (192 KHz).
All of this power inside your case means it needs to handle a lot of extra heat. A more powerful CPU and GPU will put out more heat, and you’ll need a cooling system that can handle it (see Figure 31-24). For a budget setup, you don’t need to jump straight to liquid cooling (though it’s always an option). Most cases have a few extra spots for fans that you can buy separately. Get some 120-mm fans and go to town. Your case cannot be too cool (and neither can you).
Figure 31-24 Powerful CPU fan and heat sink
EXAM TIP The key components of a great gaming PC include: a high-end processor, a powerful video card, a good sound card, and enough cooling (fans, heat sinks, liquid cooling) to keep all those parts from melting your machine.
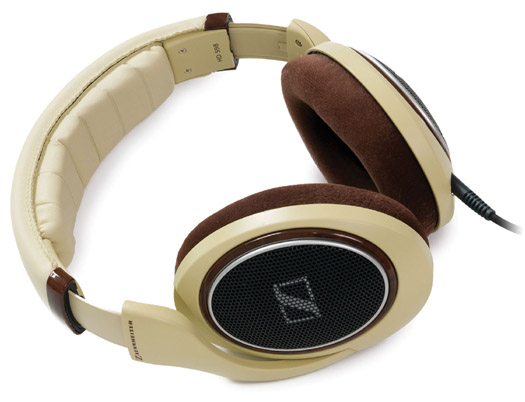
The Externals For a budget gaming PC, there’s not much to improve outside of your case. One monitor will work fine, but make sure it has a resolution of at least 1920 x 1080 and is 24 inches diagonally. That will enable you to easily watch 1080p HD video content and play console ports at or above their intended resolution. Likewise, a basic 2.1 or 5.1 speaker setup will work just fine with your nice sound card. Don’t use cheap headphones, though. Invest in something nice (with a microphone, if you like to voice chat while gaming) that is comfortable and produces sounds that aren’t tinny or hollow (see Figure 31-25).
Figure 31-25 Sennheiser HD 598
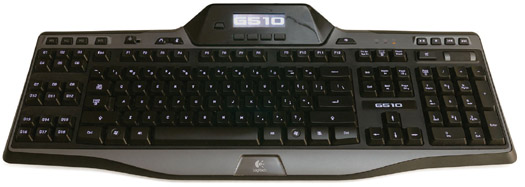
Many gamers like to buy fancy keyboards and mice, covered in extra buttons that can be customized to launch your wizard’s fireball with a single click. Some keyboards even add little LCD screens that show you exactly how your keys have been customized and enable you to adjust your custom keyboard layout on the fly (see Figure 31-26). Keyboards and mice are very personal—get whatever best helps you game.
Figure 31-26 A nice keyboard with built-in LCD screen
NOTE Like keyboards and mice, cases are a very personal choice. Some people like wild colors. Other people want lights and windows showing off their internal devices. Personally, I prefer a plain black case. No lights. No windows. No distractions.
If money is no object, go buy a yacht, and on that yacht, set up your dream gaming PC. Here, no price is too high, no technology too frivolous, and no monitor too big. If it exists, you should have it, even if you’ll never use it. Some of this will sound extreme, and that’s the point. I’ll point out the best places to spend too much money and transform your budget box into the ultimate gaming PC.
The Internals With the budget box, I told you why buying a quad-core processor was a good investment for future games that will take advantage of the technology. Now, quad-core isn’t nearly enough. As of 2012, six-core processors like the Intel Core i7 Extreme Edition sit at the top of the CPU heap and will future-proof your PC for years to come. No game needs it, but at $1000, you can’t afford not to get it.
If that wasn’t extreme enough, get ready for your graphics card purchase, or should I say graphics cards? That’s right: you’ll need more than one high-end graphics card if you want the best of the best PC gaming experience. (And forget about not getting the very best card available—just look for the highest model number available and hand over your credit card.)
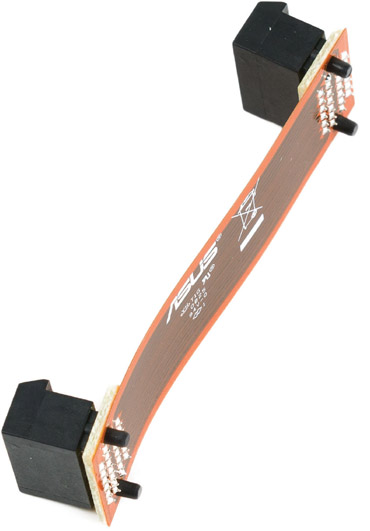
NVIDIA and AMD have both developed their own technology for linking multiple graphics cards. NVIDIA calls their technology Scalable Link Interface (SLI), while AMD calls theirs CrossFire. Using a special cable (that looks sort of like a ribbon cable), the graphics cards can combine their power to increase graphical quality and performance (see Figure 31-27). With either technology, you can link up to four video cards together for more power than any current PC game could use. (But that’s not the point.) Gamers will argue how effective these multicard setups really are—in fact, some games are so poorly optimized that they will run worse with multiple graphics cards. Read up on how each game you play works with multiple graphics cards and proceed accordingly.
Figure 31-27 An SLI cable
NOTE Installing multiple graphics cards requires a motherboard that can handle two or more PCIe cards, a power supply that produces enough wattage, a case it will all fit in, and a cooling system powerful enough to keep your PC from overheating (a liquid-cooling setup sounds nice right about now). Keep these things in mind when upgrading or building your PC.
While you’re at it, you might as well get a bunch of extra RAM (16 GB sounds comfy). A solid-state drive (or two) will help load game levels into RAM that much faster. When you need a break from gaming, a Blu-ray Disc optical drive enables you to watch HD movies. Add to that a 7.1 sound card and Gigabit networking card for high-speed connections to other gamers, and you have the start of an unmatched gaming-performance machine.
The Externals If you have multiple video cards, why not buy multiple monitors? You learned about multiple monitor setups when you read about audio/video workstations earlier in this chapter, and many games can take advantage of this feature. Picture, if you will, three monitors, side by side: the nose of your race car speeds down the track on the center monitor while the crowd whips by on the left and right monitors. With multiple monitors, your field of view doubles, triples, or more!
Instead of expanding your view left and right, you can also improve your display forward and backward with 3-D technology. More and more PC games are including support for 3-D displays. You’ll need the slightly silly glasses to make it work, but for gaming, the effect is amazing. Lots of action games require a good sense of (virtual) depth perception to play. You can’t hit the enemy warlock with your fireball if you can’t aim it properly. With 3-D displays, distant enemies will look and feel distant. Everything becomes much more natural with 3-D technology. To use it, you’ll need a display and video card that supports the technology.
NOTE For the ultimate graphics card/monitor combination, NVIDIA supports four graphics cards connected together via SLI, attached to three side-by-side 3-D monitors. I’ve never seen it in person, but I imagine it’s as close as you can get to standing inside a video game world. (AMD CrossFireX also supports multiple video cards, but not connected to three monitors.)
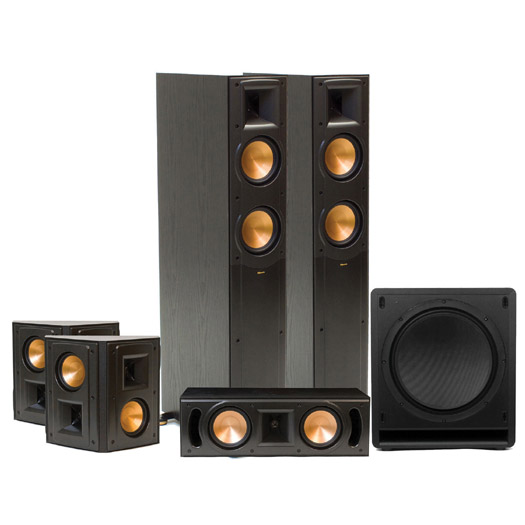
For sound, why stop at puny PC speakers? Jump to big home theater surround sound speakers (see Figure 31-28). Get a gamepad, too (for the PC games that support it). While you’re at it, buy a nice chair with good back support and padding. When you game for hours on end in a good chair, your neck, back, and bottom will thank you.
Figure 31-28 5.1 surround sound speakers (photo courtesy of Klipsch Group, Inc.)
That’s it! Who knew it was so easy to spend $10,000 on a gaming PC? While most gamers will stick with something closer to the budget box, keep in mind that there is so much more power available—more than most games can handle. Whether you spend $100, $1000, or $10,000, don’t forget to look for what you want out of your gaming PC. What games do you play? What do they require? What do you want? When you answer those questions, finding the parts you need becomes easy. Finding the right game, however, is an entirely different challenge.
NOTE If you skipped the other custom PC sections because this is the coolest kind of PC to build, don’t forget to go back and read anything you missed. Who knows? You might decide to become a filmmaker instead of play games all day. (Yeah, right!)
1. What is a thin client?
A. A computer with a 32-bit-wide address bus
B. A portable computer
C. A system designed to handle only very basic applications with the minimum hardware required by the operating system
D. A computer in a narrow, small form-factor case
2. What three functions does a home server PC provide? (Select three.)
A. Media streaming
B. File sharing
C. Web hosting
D. Print sharing
3. What’s a good guide to use when deciding on hardware for a basic thick client?
A. Buy whatever is on sale.
B. Always start with the most expensive hardware.
C. Check the recommended requirements for the OS you want to use.
D. Check the MSDS for the OS you want to use.
4. How can you make sure that your printouts match the colors displayed on your monitor?
A. Calibrate your GPU with a GPU calibrator.
B. Calibrate your monitor and printer to use the same profile.
C. Just buy an expensive monitor and printer; no setup is needed.
D. Use RGB ink in your LaserJet printer.
5. How do you share a printer in Windows 7?
A. Open Device Manager, right-click on the printer, select Properties, and select Share this printer.
B. You have to install special drivers for your printer.
C. Open the Devices and Printers applet in the Control Panel, right-click on the printer, select Printer properties, and then check the Share this printer checkbox on the Sharing tab.
D. You have to have Windows Home Server in order to share printers.
6. What program that comes with some versions of Windows turns your PC into a home theater PC?
A. XBMC
B. Windows Media Center
C. Plex
D. Windows Home Theater
7. What term defines building your PC to run games that aren’t out yet?
A. Future-proofing
B. Next-gen proofing
C. Overbuilding
D. Prebuilding
8. What does CompTIA call a PC case built for a home theater?
A. Media center case
B. XBMC
C. HTPC
D. Stereo case
9. Bob wants to build a new gaming computer, but he doesn’t want to spend a ton of money. What parts should he spend the most money on? (Select two.)
A. CPU
B. Case
C. Power supply
D. Graphics card
10. What is the most important component for building a virtualization workstation?
A. CPU
B. Power supply
C. RAM
D. Large monitor
1. C. Thin clients rely on servers to perform anything beyond the most basic computing tasks.
2. A, B, D. Home servers share files, stream media, and share printers.
3. C. Knowing what hardware your OS requires is a good starting point for determining how powerful a PC you need to build.
4. B. Setting up identical color profiles on your printer and monitor will ensure accurate colors.
5. C. Printer sharing is done through the Devices and Printers applet.
6. B. Windows Media Center, included with some Windows editions, can turn a PC into an HTPC.
7. A. Future-proofing means building a PC that can play games that will come out in the near future.
8. C. HTPC cases blend your PC in with your home theater equipment.
9. A, D. A fast CPU and graphics card will get you the most bang for your buck when building a gaming PC.
10. C. Every virtual machine you run consumes a large share of RAM, so the more RAM you have, the more VMs you can run.