
10.4
“THE NATURAL RESOURCES I SEE AROUND ME SUCK; I WANT BETTER ONES”

 The inventions included in this section are fundamental to any technological society.
Mining is of course necessary if you want access to any resources that don’t happen to be on the surface, and kilns, smelters, and forges not only give you access to new materials but also unlock a host of new technologies, from metalwork to the steam engine, making them linchpins for a huge number of technologies yet to come. And finally, kilns can transform sand into one of the most useful substances humanity has ever produced: glass—a material with the ability to bend light itself. This not only helps the people in your civilization see better so they don’t trip over things all the time, but also opens up whole new areas of science to explore, from microscopic life forms to the light of distant stars.
While other technologies tend to get the spotlight, many of them would not exist without the technologies in this section to support them. By being the one to invent them first, you’re making yourself the most brilliant, influential, and crucially essential person in world history.
Well done on that, by the way.
10.4.1: MINING

My grandfather once told me that there were two kinds of people: those who do the work and those who take the credit. He told me to try to be in the first group; there was much less competition there.
—You (also, Indira Gandhi)
WHAT IT IS
Taking things you think might be useful out of the ground
BEFORE IT WAS INVENTED
Unless the substances you were interested in happened to be on the surface, you were kinda out of luck
ORIGINALLY INVENTED
41,000 BCE (earliest mining: hematite, used for red pigment for painting and makeup)
4500 BCE (fire setting)
100 BCE (hushing)
1050 CE (percussion mining)
1953 CE (landfill mining, in which it was realized that landfill sites capped before recycling became prevalent would have a higher concentration of aluminum—thanks to discarded aluminum cans—than actual aluminum mines)
2009 CE (first asteroid mining company founded)
PREREQUISITES
candles (for seeing underground), metal tools (for mining rocks and percussion mining), animal husbandry (for domestic birds like canaries)
HOW TO INVENT
Unless you get lucky—and people have throughout history*—mining is probably going to involve moving a lot of heavy rocks around, and that’s going to be hard work. There’s no way around it! The silver lining* is that if whatever you’re interested in happens to be near the surface, you can try an open-pit mine: a specialized hole that, unlike most mining, has the advantage of giving miners plenty of sunshine and fresh air. But not everything you’re interested in will be near the surface, and at a certain point you’re going to have to dig down until you find rocks you like, hit those rocks until they break apart, and carry away the pieces.
Here are a few techniques you can use to make that job slightly easier:
Hushing: store water in a reservoir near where you want to mine, then release it all at once. The rushing water acts as instant artificial erosion, carrying away surface rocks and soil for you and leaving the bedrock exposed. If you’re lucky, veins of ore in the bedrock will then be exposed for mining!
Fire setting: light fires in your mine shaft next to rocks, then dump water on the rocks once they’re superheated. This sudden cooling fractures the rocks and makes them easier to break, but this process does involve lighting fires in your mine—a place where oxygen is usually treasured—so it’s not entirely without its dangers.
Wedging: useful on its own, or after fracturing rocks with fire setting; hammer a wedge into a split in a rock, forcing it to break into pieces. If your wedge is made of wood, you can soak it in water after it’s been forced into a split, which causes the wood to expand, putting even more pressure on the rock.
Percussion drilling: set up a heavy rod with a sharp iron or steel tip (see Section 10.10.2), and drop it into the same spot over and over. Levers or pulleys* can be used to raise the heavy rod up again once it’s been dropped, and guide tubes can be made from wood or metal to ensure the rod always hits the same spot. This produces a small well shaft, better suited to extracting liquids (like brine in Section 10.2.6: Salt Production) than solids.
Some of the simplest underground mining involves “bell pits,” named after the shape they take. In these, a shaft is dug (usually vertical, sometimes inclined) to the level of the ore, at which point miners start digging out and around from the shaft, forming a natural bell shape as they go. No supports are used, which means at a certain point the mine is going to start to fall in. At that point (or, ideally, several minutes before the collapse) the mine is abandoned, another one is started nearby, and mining continues.

Figure 17: A bell-pit mine (pictured here before its inevitable collapse).
If you don’t want to go the “dig until it’s too dangerous to dig anymore” route, an alternative is “room and pillar” mining: here you dig horizontally but leave vertical pillars of rock standing to hold up the roofs of the “rooms” you’re extracting material from. The danger of collapse here comes from the fact that if one pillar fails, more stress is added to the remaining pillars, which can cause a chain reaction. Instead of (or in addition to) pillars, you can support mine shafts with timber, making the wood carry the load of the rock above. But even in the modern era it’s very hard to guarantee that roof of rock you’ve exposed is up to the task of carrying its load without collapsing. Mining has an unavoidable element of risk: besides cave-ins, miners also face danger from flooding and toxic gases, the latter of which can result in you suffocating, exploding, or both in rapid succession.
You can mitigate the threat of suffocation by bringing along a pet bird. Many birds have a high metabolism and breathe rapidly, so they succumb to carbon monoxide and other toxic gases before humans do. Specifically, canaries faint in the presence of carbon monoxide about twenty minutes before humans. Bring a canary into the mine and keep an eye on how conscious it is, and you’ll know when otherwise undetectable toxic gases are present while you still have time to escape them! This is a great improvement over the way toxic gases were usually detected for thousands of years, which was by noticing when the people around you started to die. This simple but still fundamentally lifesaving use of animal labor didn’t occur to anyone until the incredibly late date of 1913 CE (late enough that we’d already invented vacuum cleaners, cellophane, and television), so just by bringing a canary or other conveniently sized bird pal into the mines with you during the hundreds of thousands of years before that date, you’ll be doing far, far better than we ever did.
10.4.2: KILNS, SMELTERS, AND FORGES
The original lists were probably carved in stone and represented longer periods of time. They contained things like “Get More Clay. Make Better Oven.”
—You (also, David Viscott)
WHAT THEY ARE
A way to get more heat from your fires, which then lets you use materials in new ways, including giving you the ability to create pottery, ceramics, and glass, and also to forge the very metals themselves. In tastier news, they’re also a way to produce amazing pizzas.
BEFORE THEY WERE INVENTED
No metal forging, no artificial glass, no earthenware, stoneware, or porcelain, and on top of all that, pizza would be way worse!
ORIGINALLY INVENTED
30,000 BCE (campfire bisque figures)
6500 BCE (lead smelting in campfires)
6000 BCE (kilns)
5500 BCE (copper smelting in kilns)
5000 BCE (glazing)
4200 BCE (bronze production)
500 BCE (blast furnaces)
997 CE (delicious pizza)
PREREQUISITES
clay, wood, charcoal for forges, limestone for iron smelting, mortar (for better kilns), mining (for raw materials)
HOW TO INVENT
Everything you’ll invent in this section starts with clay. Clays are fine-grained soils that contain aluminum silicates bound with oxygen, and luckily for you, they’re found all over the world in just about every time period! They’re only hard to find very early on in Earth’s history: after rocks have formed but before they’ve had a few million years to weather into soil.* Clays will generally be under topsoils (so you’ll have to dig) or near seashores or riverbanks, where erosion can expose them. Clay is easy to recognize when it’s wet: it’s a damp, heavy, finely grained, and easily shaped soil, but if it’s dry it can look pretty rocklike. You can distinguish dry clay from rocks by scratching it: if your scratch easily brings away a fine powder, that’s dry clay, and some water will fix that right up!
You may find clay mixed in with other impurities or pebbles, and there are two ways to purify it. One is to dry it out, break it into pieces, and then smash it into dust: clay particles will be the smallest, and you can sift them through a sieve. This takes a lot of energy. An easier solution is to take your dirty clay, put it in a container, and add twice its volume of water. Crush the mud with your hands to remove any large chunks, then let it sit for a few hours to get fully hydrated. Afterward, stir the mixture thoroughly. Let it settle for a few minutes, and the mixture will separate into layers: sediment at the bottom, and a lighter mixture of clay and water at the top. Pour out the “clay water” into a separate container, and let it settle again for longer, this time for a day or so. Now the clay will settle on the bottom, and you can just pour the water off. Repeat this process a few times if there are still impurities. When you’re done, you’ll have a wet clay that you can let dry in the sun for a few days until it’s usable. The easiest way to test your clay for quality is roll it into a snake shape (arguably . . . the easiest shape to make out of clay?), and then wrap it around your finger: if it bends without cracking, you’ve got yourself some good clay.
The problem is that you can’t just make a bowl* out of clay and wait for it to dry, because dried-out clay is brittle and crumbly, and as you just saw, it becomes flexible again when wet. It’s only when clay is heated that the magic happens.* At around 600 to 1000°C (depending on your clay) it transforms into bisque: a stronger material that won’t become clay again no matter how wet it gets.
While bisque is better than dried clay for creating figures or bricks, it’s still suboptimal for bowls: even though it won’t become clay again, it’s porous and readily absorbs water. To fix that, you’ll want to heat your bisque a second time, up to around 950°C. At this point another transformation takes place: the clay itself begins to fuse together while the impurities within it melt, filling any gaps within the clay matrix as it cools. The result is a stronger, denser, watertight material: in other words, my friend, you have just invented earthenware ceramics. Get your bisque even hotter (1200°C) and you’ll produce stoneware: a more chip-resistant ceramic than earthenware. Throw some salt in while you’re firing your clays and you’ll glaze your ceramics in a thin layer of glass: at these temperatures the salt breaks down into sodium gas, which reacts with your bisque to form fresh glass directly on its surface. Adding minerals can produce different colors in your glass: bone ash gives reds and oranges, and copper gives greens.
A regular campfire is hot enough to create bisque—you can get one up to around 850°C—but it’s not hot enough to make earthenware or glazes. For those you need a kiln, which encloses your fire, containing and amplifying its heat. With kilns—which are really just specialized ovens—you unlock not just better pottery but also glassware, metalworking, and more: a world of different and more useful materials is available to you the second you start making fires more intelligently than just throwing wood into a pile and calling it a day.
To build a kiln, you’ll use a regular campfire to make bisque bricks from clay. Bisque holds heat well, doesn’t burn, and has an extremely high melting point, which makes it ideal for your first kiln. And once it’s built, you can then use that kiln to make higher-quality bricks, which you can then use to make better, higher-quality kilns. A simple kiln—really just a rectangular box, with a fire on one side and a chimney on the other—looks like this:

Figure 18: Your new kiln.
The chimney on the far side draws the hot air from the fire across whatever you place inside. Use mortar between any bricks to ensure it’s airtight, leave a few unmortared so you can control airflow and restock your fires easily, and you’ve just made your first kiln. Besides drying pottery, kilns can also be used to cook any thinly rolled dough that has had some tasty toppings placed on it in less than two minutes, which is how you’re going to invent some extremely delicious wood-fired pizza.
A kiln like this can get up to around 1200°C—hot enough to melt copper, as humans eventually discovered when they noticed that some rocks would partially melt when put in a kiln. Adjust your design to collect this runoff and direct it outside your kiln, and you’ll have convenient access to molten metals for the first time. This adjusted kiln is called a “smelter”—a device to extract base metals from ores—and you just invented it. Well—technically, smelters were invented the first time someone threw a tin- or lead-containing rock into a campfire and noticed the next day that there was a hardened metal mixed in with the ashes (tin melts at 231.9°C and lead at 327.5°C, well within campfire heat ranges), but yours is the first one that allows for convenient collection of molten metals.
Smelters can even be used to collect metals they can’t melt. Iron melts at a balmy 1538°C, well beyond the range of these furnaces. But when you add limestone to iron-containing ores*—smash them up and mix them together—the limestone reacts to lower the melting point of the non-iron parts of the rock, and your smelter can work in reverse: melting the non-iron away and leaving pure iron behind, which can then be taken out and shaped in a forge. To build a specialized iron smelter, you’ll build a chimney-shaped kiln with one hole at the top, and some pipes (made of clay initially, and metal later once you’ve got it) to draw air in from the sides. Start a charcoal fire (see Section 10.1.1) in the pit, break your ore into small pieces, and once your fire is hot, add alternating layers of iron ore and charcoal in equal parts through the top. The unmelted iron falls to the bottom and collects in a spongy lump surrounded by molten slag (which is the impurities you don’t want). All that’s left is to drain the slag, collect your iron, and purify it. You’ll do that by hammering your metal flat while it’s still warm, folding it over itself, and repeating. This process presses out any remaining slag and fuses the iron together, but you’re going to need a way to keep your metal hot while you work on it. And for that, you’ll need a forge.
Forges are related to kilns—you’ll want to use the same bricks in their construction—but they’re more open, and like smelters, they use hotter-burning charcoal. Beneath where the fire burns is an air tube that forces air directly into the fire via bellows at the other end: the more air your charcoal gets, the hotter it burns.* Metals placed into the forge can be heated up enough to become flexible, which lets you hammer existing metals into new and more useful shapes before cooling them in water. Look at that: that clay that you first cooked in your campfire has given you access not only to better kilns but also to molten metals and the ability to shape them! It’s brought you from the Stone Age, through the Bronze Age, and all the way into the Iron Age, which is pretty good for some weird dirt that you found down by the river.
Kilns show up around 6000 BCE, but there is nothing preventing you from constructing them at any given point in history, except knowing how to do it. And since you just learned how to do that, you’ve got no excuse for waiting! Do it right now!*
10.4.3: GLASS
Don’t tell me the moon is shining; show me the glint of light on broken glass.
—You (also, Anton Chekhov)
WHAT IT IS
A strong, heat-resistant, nonreactive, infinitely recyclable noncrystalline amorphous solid* that you can see through, which actually makes it one of the most insanely useful substances on the planet
BEFORE IT WAS INVENTED
If you needed corrective lenses, you wouldn’t get them and would instead spend your entire life not seeing things clearly. In addition to literally not seeing well, you’d also spend your entire life figuratively not seeing the benefits of the myriad technologies glass unlocks, including microscopes, test tubes, and lightbulbs.
ORIGINALLY INVENTED
700,000 BCE (natural glass used for tools)
3500 BCE (artificial glass, used mainly to make beads)
27 BCE (glassblowing)
100 CE (clear glass)
1200 CE (windowpanes)
PREREQUISITES
none (for natural glass); kilns, potash or soda ash, quicklime (for artificial glass)
HOW TO INVENT
Glass is one of the most useful substances you can produce, and to underline that, we’ll describe the amazing things you can do with glass before we tell you how to make it. This way, when you do reach instructions for its production, your reaction will be “That sounds easy, I can’t wait to do it!” instead of the alternative reaction of “Oh wow, glass is for losers, I’m gonna skip ahead until I find something that explodes to read about,” observed with earlier editions of this text.*
Here’s a short list of things you can make with glass: glazed pottery, eyeglasses, microscopes, telescopes, beakers and test tubes (useful in science because glass doesn’t react with much, meaning you can even use it to safely store sulfuric acid), vacuum chambers, prisms, lightbulbs, thermometers, barometers, and more. Glass lets you bend light (through refraction), break it (through diffraction), and put it back together (by shining a bunch of lights into the same spot).
What are the uses of bending light? Make an outward curve and you’ll cause light rays to converge, inventing the magnifying glass. Produce the opposite shape and you cause them to expand, which will correct nearsightedness. Like this:
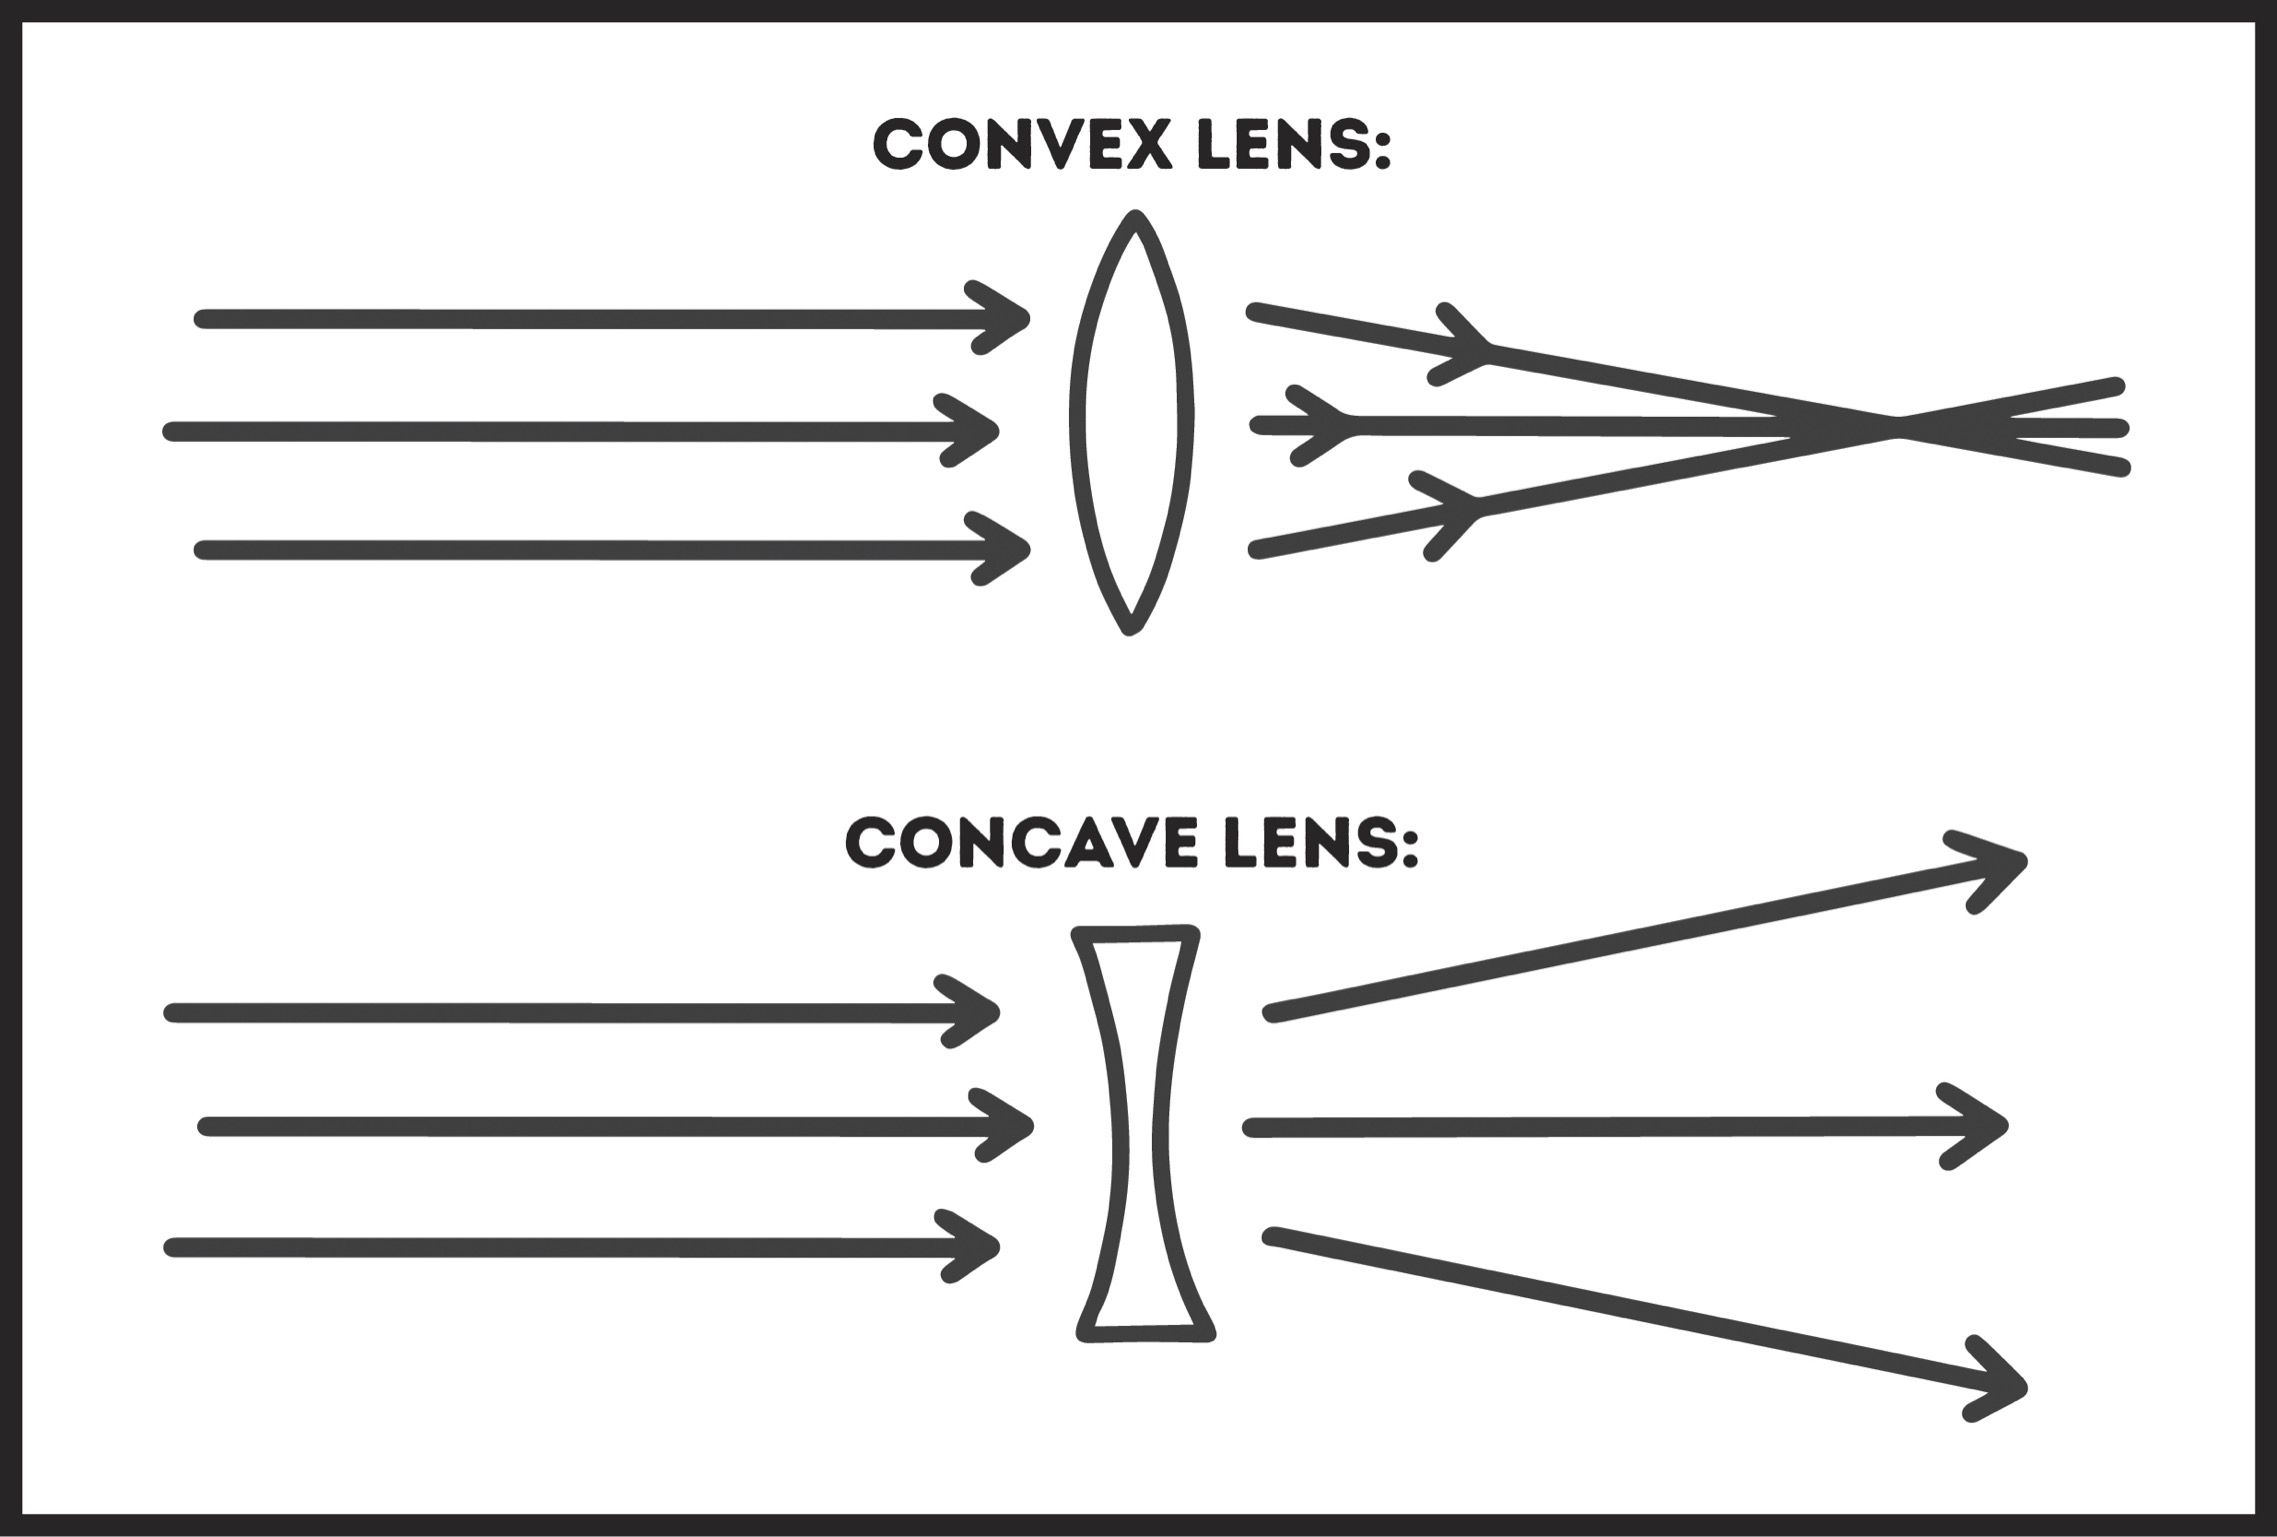
Figure 19: The shapes glass needs to be in to bend light in various useful ways.
Outward-curved lenses (called “convex lenses”) are easier to make than concave lenses—since blowing a glass sphere produces convex shapes by default—so you’ll find farsightedness (not being able to see close things clearly) initially easier to correct than nearsightedness.
Eyeglasses were first invented in the 1200s CE in India and brought to Europe through Italy.27 Around the same time, sunglasses were being invented in China, and were, even then, much cooler than the nerd goggles being discussed here.* However, it took five hundred years—well into the 1700s CE—before anyone suggested that glasses might be conveniently held in place by arms that use our ears as anchors. Before then you’d have to either constantly hold your glasses in place, or pinch them to your nose so hard that they’d stay there themselves. Just by giving your glasses arms, your civilization will already be hundreds of years ahead of the game.
But eyeglasses are just the beginning. By taking two side-by-side convex lenses from eyeglasses and putting them in line with each other—usually held in place by an adjustable hollow cylinder—you can create a microscope, an idea that first occurred to humanity in the early 1600s CE. Combine a convex lens at one end with a concave one at the other and you’ve created telescopes, useful for spotting distant lands, exploring the nature of the cosmos, and spying on your freaky neighbors. Put two telescopes side by side and you’ve invented binoculars. Look at you: we give you a few lenses and already you’re inventing like crazy!
Telescopes and microscopes are terrifically important inventions that lead to the discovery of previously unknown forms of life (bacteria), new understandings of how life exists (cells), how life reproduces (through cellular division, and with sex through microscopic sperm meeting microscopic eggs), how humans defend themselves from disease (white blood cells), not to mention the macroscopic discovery of new planets, new stars, and new galaxies—all of which will fundamentally transform science, medicine, biology, chemistry, theology, and civilization itself. In our timeline these innovations all had to await the invention of lenses, which required clear glass, which required hot kilns, but the instructions in this text give you all you need to invent them at any point in history.*

Figure 20: Schematics for telescopes and microscopes.
To invent mirrors—useful for both advanced science and advanced personal grooming—place a layer of reflective metal like copper, aluminum, or tin on the back of a piece of clear glass.* With the widespread adoption of mirrors comes the invention of the selfie—before the wide availability of mirrors in Europe around the 1400s CE, there was no strong tradition of self-portraits—as well as periscopes, more advanced telescopes, solar cookers that reflect and focus the rays of the sun, and the myriad body-image issues that can be unlocked only through constant, unavoidable reminders of your personal appearance at all times. Shape glass into a triangle and you’ll make a prism, which breaks light out into its constituent parts (i.e., makes pretty rainbows). Put that in a dark box so that the only light that can enter your prism is from a single pinhole source, and you’ve invented the spectroscope. Every element in the universe, when heated, gives off distinctive bands of colored light: an incomplete rainbow that acts as a fingerprint. You can use your spectroscope to identify what’s burning right in front of you, or—when combined with a telescope—determine the elemental makeup of stars thousands and thousands of light-years away.
Not bad for some melted sand.
That’s right: glass is simply melted sand—or more accurately, melted silicon dioxide, also called “silica.” Silica makes up more than 10 percent of the Earth’s crust by mass and is the major constituent of sand in most parts of the world, so it should be very easy to find. It melts around 1700°C—too hot for campfires, but well within the range of the kilns you just invented in Section 10.4.2. The first human-produced glass was made by accident around 3500 BCE in just such a kiln: some sand got in, melted, and cooled into an interesting substance.*28
You can lower the melting point of silica—and thus make glass production easier and more affordable—by adding potash or soda (Appendices C.5 and C.6, respectively) to your sand. The heat causes the potash or soda to dissolve into the sand, lowering its melting point. Include some quicklime (Appendix C.3) to increase your glass’s durability and chemical resistance and to prevent it from being worn down by water, and you’ll have a substance that melts around a much more achievable 580°C. You’re looking for a mixture of about 60 to 75 percent silica,* 5 to 12 percent quicklime, and 12 to 18 percent soda.
When this mixture melts, it’ll make a bubbling, frothy liquid—the bubbles are carbon dioxide escaping—which you’ll want to let “boil” long enough to allow those bubbles to escape, and then you can pour, blow, pull, or mold your glass. Clear glass comes from white sand: brown sand usually has iron oxide in it, which makes a green glass.* To turn green glass clear, add manganese dioxide—which can be produced by burning certain seaweeds to ashes; experiment until you find some that work—into the mixture when molten.*
The hotter glass gets the runnier it gets, and the cooler it gets the thicker it gets. You can exploit this by cooling your molten glass down to different points, where you’ll see it go from behaving like runny syrup to flexible bubblegum to thick taffy. When it’s at the bubblegum point you can put a glob onto the end of an iron pipe and force air into it, and at that instant you have invented glassblowing, which is useful for making all sorts of glassware.
You’ll probably want to make glass windows, an invention that (a) helps make homes feel comfortable and non-cavelike, (b) keeps them insulated, and (c) can really brighten up a room. Making a large pane of glass, however, does take a bit of doing, and there are several different techniques. And here they are, from earliest and simplest to modern and most complicated, so you can decide how fancy you want to get!
-
If you’ve got lots of time and energy, just pour molten glass onto iron (which won’t melt), let it cool, and then polish both sides until they’re transparent. You’ll need to start with a rough sandpaper* and gradually work your way down to a very fine grain. It takes a while.
-
If you blow a balloon shape, then cut off the ends, you’ll be left with a rough cylinder. Cut it in half and flatten it out on an iron plate while it’s still flexible and you’ve invented broad sheet glass, a simple-to-make glass suitable for windows, but one that’s rough and not often transparent. It’s normally invented around the 1000s CE.
-
If you blow a large globe of glass (which takes some skill), and then slowly reheat this glass up to its melting point while spinning it on something like a potter’s wheel, centrifugal force will flatten your glass into a disc. This transparent “crown glass” will be thinner at the edges and thickest in the middle, where a circular “bull’s-eye” will be visible, but it’s largely suitable to be cut into windows. This technique didn’t appear until 1320 CE in France, where it was kept as an extremely lucrative trade secret for hundreds of years. Now you know!
-
If you blow large globes of glass into iron molds, you’ll be able to make identically shaped glass over and over. In particular, if you blow into a cylindrical mold, you can let the glass cool, cut it lengthwise, and then slowly reheat it, and the cylinder will naturally flatten out into a sheet of glass, producing a much more uniform—and transparent—sheet of glass than you can get with the earlier broad sheet glass. This technique for cylinder glass shows up in the early 1900s CE.
-
If you’ve produced liquid tin—a very dense metal—you can form the perfectly flat modern windows you’re used to by pouring molten glass onto the tin, where it will spread across the surface in a uniform thickness before cooling. The glass solidifies around 600°C, well before the tin does, so you can just pick it off when it’s cool. This technology normally shows up around 1950 CE and in less than a decade displaces all previous glass-production methods, but there’s a catch: while tin won’t attach to your glass, tin dioxide will, so you’ll need to do this in a room filled with a gas that isn’t oxygen so your liquid tin won’t rust. If this sounds too hard, then crown or cylinder glass will be fine, we promise. Look, this is a book that in a few sections will go out of its way to explain how buttons work, so maybe you don’t need to be messing around with molten metals just to make a smoother glass right now.