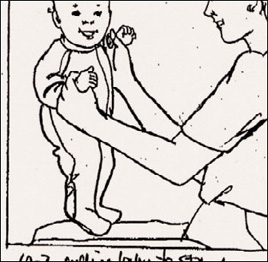
keep head level with body when pulled to sitting
Baby is personality plus these days—and it’s a personality all his or her own. Socializing with mom, dad, and just about anyone who passes by the stroller or carrier is still high on baby’s list of favorite activities, and you’ll find the long sentences of babble, punctuated by giggles and coos, more and more scintillating. Games of peekaboo delight, as does shaking a rattle (or anything else that makes noise). The passion for exploration continues, and extends to your face, which baby will pull at as if it were a favorite toy (your glasses, earrings, and hair aren’t safe for now). At some point this month it’ll be time to break out the bib and high chair (if you haven’t already) for a first encounter with solids. Bon appétit!
All babies reach milestones on their own developmental time line. If your baby seems not to have reached one or more of these milestones, rest assured, he or she probably will very soon. Your baby’s rate of development is normal for your baby. Keep in mind, too, that skills babies perform from the tummy position can be mastered only if there’s an opportunity to practice. So make sure your baby spends supervised playtime on his or her belly. If you have concerns about your baby’s development (because you’ve noticed a missed milestone or what you think might be a developmental delay), don’t hesitate to check it out with the doctor at the next well-baby visit—even if he or she doesn’t bring it up. Parents often notice nuances in a baby’s development that doctors don’t. Premature infants generally reach milestones later than others of the same birth age, often achieving them closer to their adjusted age (the age they would be if they had been born at term), and sometimes later.
By six months, your baby … should be able to:
keep head level with body when pulled to sitting
say “ah-goo” or similar vowel-consonant combinations
Some babies can pick up small and possibly dangerous objects with their fists—so be careful not to leave such things within reach.
… will probably be able to:
bear some weight on legs when held upright
sit without support
turn in the direction of a voice
razz (make a wet razzing sound)
… may possibly be able to:
stand holding on to someone or something
object if you try to take a toy away
work to get a toy that’s out of reach
pass a cube or other object from one hand to the other
look for dropped object
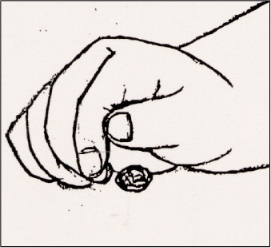
rake with fingers a tiny object and pick it up in fist (keep all dangerous objects out of baby’s reach)
babble, combining vowels and consonants such as ga-ga-ga, ba-ba-ba, ma-ma-ma, da-da-da
feed self cracker or other finger food
… may even be able to:
creep or crawl1
pull up to standing position from sitting
get into a sitting position from stomach
pick up tiny object with any part of thumb and finger (keep all dangerous objects out of baby’s reach)
say “mama” or “dada,” indiscriminately
Each practitioner will have a personal approach to well-baby checkups. The overall organization of the physical exam, as well as the number and type of assessment techniques used and procedures performed, will also vary with the individual needs of the child. But, in general, you can expect the following at a checkup when your baby is about six months old:
Questions about how you and baby and the rest of the family are doing at home, and about baby’s eating, sleeping, and general progress, and about child care, if you are working.
Measurement of baby’s weight, length, and head circumference, and plotting of progress since birth.
Physical exam, including a recheck of any previous problems. Mouth will probably be checked now and at future visits for the arrival, or imminent arrival, of teeth.
Developmental assessment. The examiner may rely on observation plus your reports on what baby is doing, or may actually put baby through a series of evaluation “tests,” such as head control when pulled to sitting; vision; hearing; ability to reach for and grasp objects, to rake at tiny objects, to roll over and bear some weight on legs; and social interaction and vocalization.
Third round of immunizations, if baby is in good health and there are no other contraindications. See page 231 for a recommended schedule, which may vary depending on the situation. Be sure to discuss any reactions to previous immunizations beforehand.
Possibly, a hemoglobin or hematocrit test to check for anemia (usually by means of a pinprick on the finger), particularly for low-birthweight babies.
Guidance about what to expect in the next month in relation to such topics as feeding, sleeping, development, and safety.
Questions you may want to ask, if the doctor hasn’t already answered them:
What reactions can you expect baby to have on the third round of immunizations? How should you treat them? Which reactions should you call about?
What foods can be introduced to baby now?
Also raise concerns that have come up over the past month. Jot down information and instructions from the doctor. Record all pertinent information (baby’s weight, length, head circumference, immunizations, illnesses, medications given, foods that can now be introduced, and so on) in a permanent health record.
Before commercial baby food found its way onto supermarket shelves, there was no other choice: Feeding your baby meant making your own baby food. Today, parents can still opt to do it themselves (something that food processors and blenders have made about as easy as pushing a pulse button), or select from the now vast variety of ready-to-feed foods.
Will the spoon you’ll be piloting into baby’s mouth be filled with jarred or heaped with homemade? The choice is yours.
Convenience may come with a nutritional compromise in other parts of the supermarket (where ready-to-serve items are often overprocessed, oversugared, and oversalted), but not in the baby food aisle. The convenience that was always a plus still is; foods come in ready-to-feed baby-portion jars, reclosable for refrigerated storage of leftovers. But today’s baby foods come with other pluses as well. Most varieties contain no added salt; sugar and fillers are rarely added to single-ingredient foods. Since the fruits and vegetables are cooked and packed soon after picking, they retain a reliably high proportion of their nutrients. The foods are consistent in texture and taste, and because they’re prepared under strictly sanitary conditions (conditions that would be difficult to duplicate in your home), you can trust their safety. They’re also relatively economical, particularly if the time you save by using them is valuable to you, and when you consider that less food is likely to be wasted than when you prepare large batches of food for baby.
Could the food that’s filling your baby’s tummy also be used to build his or her brain? That’s the idea behind commercial baby foods that are enriched with DHA and ARA, those brain-boosting fatty acids that are naturally occurring in breast milk and are added to some formulas. The fatty acids come from eggs (only the yolks are used to avoid the risk of allergic reaction) laid by chickens who are fed a diet of DHAand ARA-rich flaxseed and soybeans. The research jury’s still out on how effective these foods are in increasing a child’s brain power, but since such fatty acids are also purported to be heart-healthy, there’s certainly no harm—and potentially plenty of benefits—in choosing them for your baby. The only downside: These foods, like the specially fortified formulas, come with a steeper price tag. Keep in mind, too, that you’ll have to wait until egg yolks are introduced before serving them to baby.
The advantages of using commercial baby foods are greatest in the early months of feeding solids. The strained varieties are the perfect consistency for beginners, and single-ingredient starter foods make it easy to screen for allergies. Although major manufacturers do offer graduated textures for use as babies are ready for them, many families dispense with commercially prepared foods as soon as their offspring are able to handle softly cooked, mashed, coarsely chopped, or flaked foods from the family menu. That’s because offering table foods earlier on—rather than sticking with baby foods—is more likely to produce a more amenable eater (in other words, one who eats what the rest of the family is eating). Even so, ready-to-eat foods for older babies and toddlers may continue to provide convenience when the family’s on the road, visiting friends, or eating out, or when the family menu’s not appropriate or baby-friendly.
While most baby foods geared to beginning eaters are completely wholesome, it’s always smart to check the label just to be sure (especially when baby graduates to “toddler” foods, which may not be as reliably wholesome). Look out for ingredients your baby doesn’t need, such as sugar or corn syrup, salt, and modified food starch or other thickeners. Screen, too, for ingredients that your baby hasn’t been introduced to yet, such as eggs (which can turn up in unlikely places). Keep in mind, also, that infants—whose taste buds are still unspoiled—are completely content with unsweetened cereals, fruits, and other desserts; the sugar that’s often added to such products is not only unnecessary, but can undermine a baby’s taste for the more delicate flavor of natural sweetness. The same is true of foods that have salt added. Adults who are accustomed to foods that are heavily seasoned with these may find unsweetened, unsalted baby foods bland; babies, on the other hand, will find them just right.
Organic baby foods, once very expensive and not widely available, are now multiplying in the marketplace. Choose these when you can, but be reassured that commercial products—even those that aren’t certified organic—are usually free of additives and pesticide residues.
Not pressed for time? Feeling motivated? Like the idea of doing it yourself? While commercial baby foods are better than ever, preparing your baby’s meals from scratch—some or all of the time—is a wonderful option. Just be sure to follow these guidelines:
When introducing a new food, prepare and serve it without any added ingredients, including sugar, salt, or other seasonings. If you’re cooking for the whole family, remove baby’s portion before adding these.
Cook and serve baby’s food without added fat.
Steam, pressure-cook, or waterless-cook vegetables, exposing them to a minimum of light, air, heat, and water.
To preserve vitamins, boil, microwave, or bake potatoes in their skins, then peel after cooking.
Don’t cook in copper pots, as this may destroy vitamin C.
Don’t cook acidic foods (such as tomatoes, once they’re introduced) in aluminum, since they can cause small quantities of aluminum to dissolve and be absorbed into the food.
Don’t add baking soda; it may preserve color, but it depletes vitamins and minerals.
Soak dried legumes (peas or beans) overnight; or for a quicker method, boil them for two minutes, then let them stand for an hour, and cook in the soaking water.
Follow the principles of safe food preparation in Feeding Baby Safely on page 328.
For the first several weeks of feeding solids, or at least until baby is seven months old, the food you serve should be finely pureed, and strained or sieved (though you can mash bananas and thin with liquid). For convenience, you can prepare a batch of carrots, peas, or other vegetables, then freeze in ice cube trays. Once they’re frozen, keep individual cubes stored in airtight freezer bags. Before using, thaw in the refrigerator, in a double boiler, in a microwave (at “defrost,” not “cook,” setting), or under cold water (still in the plastic bag)—not at room temperature.
Feel like giving your food processor a workout? Preparing homemade baby foods is easier than ever. Turn to page 748 for recipe ideas.
“My baby’s still getting up twice a night, and she won’t go back to sleep without nursing. Will we ever get any sleep?”
Your baby will continue to awaken several times a night for the rest of her life, as we all do. But until she learns how to fall back to sleep on her own, neither you nor she will be able to get a good night’s sleep.
Helping her to fall back to sleep—with a breast, a bottle, a pacifier, rocking, patting, rubbing, singing, sleep tapes—will only postpone her learning how to do it herself. The moment will eventually come when it will no longer be practical or possible for you to be her sandman. If you make that moment now, not only will you get more sleep, so will she.
Before you begin, you’ll need to take a close look at baby’s sleep habits, including whether she’s napping too much during the day. Another important first step will be weaning baby off all middle-of-the-night feedings (see page 258). If baby’s been falling asleep at the breast or bottle, try to establish a bedtime routine that puts the bedtime feeding before the bath and other rituals. That way, you’ll be able to put her in the crib awake, which will help her begin the process of learning how to fall asleep on her own.
Then you’ll need to decide which approach you’ll want to take to get your baby on the road to sleeping independence. Keep in mind that, as always, the same route won’t work for every parent and every baby. Read about them all before you decide which is more likely to lead to a better night’s sleep for your family. Then stay flexible; if the method you opt for doesn’t end up working for you and your baby (once you’ve given it a fair shot), you’ll need to move on to Plan B.
Cold turkey. For those parents desperate and determined to get that good night’s sleep sooner rather than later, letting a baby cry it out almost always works. Though some recommend utilizing this method as early as three months, it’s best to wait until baby’s closer to six months. By that point, most babies no longer require nighttime nutrition breaks—unless they were born prematurely and are still catching up. And while a younger infant cries to communicate basic needs, older babies are becoming more sophisticated in their motivations. As long as crying results in being picked up, rocked, fed, they’ll keep it up. When they find it no longer works, most will give up on nighttime crying, usually within three or four nights. (See below for ways of making the crying easier to cope with for you.)
If you’re philosophically opposed to this approach, don’t try it. Parenting that goes against parental instincts is rarely successful. Instead, provide your baby with a back-to-sleep crutch, such as sleep-inducing music, a pacifier, a nursing—or anything else you choose—for as long as necessary, or move on to the plan below.
Gradual withdrawal. If you’re uncomfortable with cold-turkey tactics, there are other “conditioning” methods that work in much the same way but allow you and your baby to move more slowly. Here’s a sampling of different approaches:
“Ferberizing,” named for Dr. Richard Ferber, the author of Solving Your Child’s Sleep Problems, works like this: The first night, put your baby down awake, provide a gentle pat and a whispered “Good night. I love you,” and then leave the room. Don’t stay with her long enough for her to fall asleep, and don’t pick her up. If she begins to cry, as she almost certainly will, let her cry for five minutes, then go back in and pat and reassure her again. (If mom is associated with feedings, it may be better for dad to provide this soothing.) Repeat this as long as she cries, stretching the periods you leave her alone by five minutes or so each time, until she falls asleep. Extend the periods she spends by herself by a few more minutes each night.
The crying will be somewhat easier to tolerate if you block some of it out. Try earplugs, the white-noise whir of a fan, background Muzak, lowvolume TV or radio, or anything else that can take the edge off the crying without blocking it out entirely. If you have an intercom to baby’s room, lower the volume so the crying won’t be such an earful. If at any time your baby’s crying changes, however, do check to be sure she hasn’t pulled herself up and become stranded, unable to get down or has gotten into some other kind of trouble. If she does have a problem, make her comfortable again, give her a loving pat and a few gentle words, and leave.
Generally, the period of crying diminishes nightly over three nights. And somewhere between the fourth and seventh night—if you’re lucky, and most parents will be—you may hear just a little fussing or a few minutes of crying (don’t go in) and then blessed silence.
Another variation on the same concept, which works better for some older babies and is more comfortable for some parents, is to reassure your baby from a chair near her crib until she falls asleep each evening (again, without picking her up). Move the chair a little farther away each night, until you’re at the doorway. Finally, move out the door—at which point, baby should be able to fall asleep without you present. Keep in mind, however, that for some babies, parents won’t be out of mind unless they’re out of sight; in that case, this approach will definitely not work.
A program called “systematic awakening” may work as well as “Ferberizing,” though perhaps a bit more slowly, and allows you to skip the potentially long bouts of crying. Keep a diary of your baby’s nighttime awakenings for a week so you will have an idea of the usual times. Then, set your alarm clock for about half an hour before you expect the first howl. At the alarm, get up, wake the baby, and proceed with what you usually do when the waking is spontaneous (diaper, feed, rock, or whatever). Anticipate each usual waking in the same way. Gradually expand the time between these systematic wakings and then begin to eliminate them. Within a few weeks, according to proponents of this program, you should be able to begin phasing them out entirely.
One major change or stress in your baby’s life at a time is plenty. If your baby’s already dealing with one such disruption—whether it’s teething, mom going back to work, a new baby-sitter, or a bout with an ear infection—wait until he or she is feeling settled again before launching any sleep-through-the-night campaigns. It makes sense to wait, also, if you’re planning a family trip in the near future (travel is almost certain to derail your efforts). Keep in mind that even babies who have mastered sleeping through the night may begin waking anew during times of change or stress (it would be smart to offer comfort again only for as long as the issue continues, otherwise baby will continue waking long after it has ended). Night waking may also start up again when a baby has just passed a major developmental milestone—such as learning to crawl or walk—since baby’s compulsion to practice the new skill may interfere temporarily with sleep.
It’s hard enough for you to listen to your baby crying in the middle of the night—but what about the neighbors? If you live in an apartment or otherwise in earshot of the folks next door, letting your baby cry for any amount of time during the night may seem decidedly unneighborly. Here’s how to make a sleeper out of your baby without making enemies out of your neighbors:
Give fair warning. Let your neighbors know what’s in store ahead of time (rather than at 3 A.M., when they call to complain). Tell them your plan (to teach baby how to sleep through the night by letting her cry for short periods each night) and how long you think it will take (hopefully, not more than a week).
Apologize in advance (and if that doesn’t work, buy their forgiveness). Chances are, they won’t be thrilled at the prospect of broken sleep (after all, broken sleep comes with your territory as new parents—not theirs). Neighbors who have children of their own (and have done their own share of walking the floor with sobbing infants) may be empathetic—and may even offer some coping suggestions. Childless neighbors may be less understanding. Apologies may be accepted more graciously if accompanied by a small disturbing-the-peace offering (a bottle of wine, a basket of fruit and cheese, a box of imported truffles—or, in tough cases, all three). If your neighbors have a sense of humor (which they hopefully do), you might offer up a set of earplugs or a pair of earmuffs.
Close the windows. Make sure baby’s cries can’t travel out an open window and down the street.
Take some muffling measures. Hang blankets on the wall in baby’s room, or over any windows that are adjacent to the neighbor’s. If possible, put baby’s crib in a carpeted room (which will offer better sound insulation than a room with bare floors).
Don’t feel too bad. Some amount of noise comes with apartment living—chances are you’ve put up with your share of yapping dogs, slamming doors, midnight footsteps, blaring music, and crack-of-dawn vacuum cleaners. A good neighbor (hopefully the kind you have) will be just as tolerant of your crying baby.
The method of reinforcing sleep rhythms involves never letting your baby become overtired. Being exhausted is the root of all sleep problems, according to this view. If you anticipate your infant’s natural sleepiness (both at naptime and bedtime) and put her down accordingly (in the crib—not in the stroller on the run), your baby will fall asleep easily (because she’ll be tired, but not overtired) and will sleep well. Sleep begets sleep, and as long as you never wake your sleepy baby (over four months), even during naptime, your baby will sleep well through the night. If there are night wakings, briefly respond to your baby to provide reassurance, but let her fall asleep on her own.
Don’t feel the need to push the independent sleep agenda at this early age? Dislike the idea of letting your baby cry or of trying to manipulate her natural sleep patterns? Prefer to be there for your baby whenever he or she wakes, rather than having to drag yourself out of bed to dispense comfort? Believe that happiness (in the middle of the night) is a warm baby? Then co-sleeping may be for you.
Sharing a bed with your baby doesn’t mean that you’re giving up on the idea of independent sleeping entirely (all kids eventually learn to sleep on their own, and some do so voluntarily by the time they’re three), just that you’re shelving it until you and baby feel ready to tackle it. Fans of bed sharing say that babies who sleep with their parents have positive feelings about sleep (though those who don’t bed-share can also have these feelings). The presence of parents—their touch, smell, and sound—gives babies a reassuring message that falling asleep or resettling back into deep sleep after awaking from a light sleep is safe. When the time comes for them to move into their own beds, they’re not fearful of sleep or of the dark (though some may ultimately have difficulty weaning themselves off the company).
Co-sleeping, part of the attachment parenting philosophy, also encourages nighttime nursing for as long as baby requests it, which can be well into toddler-hood or even the preschool years. (Do keep in mind, though, that frequent night feedings, once teeth appear, can contribute to tooth decay.) It’s also important—for the sake of family harmony—that both parents are onboard with co-sleeping; otherwise a baby can literally come between you. For more on co-sleeping, see page 264.
Wean baby off bedtime sleep aids, so middle-of-the-night wake-ups won’t be so challenging to her. This approach (which has been referred to as “kinder, gentler Ferberizing”) calls for helping baby kick those parent-assisted habits (that bottle, that breast, that twenty-minute rocking) that have helped her to fall asleep up until now. While some babies can drift off at the bottle or breast or in mom’s or dad’s arms at naptime and bedtime and still manage to go back to sleep without these aids in the middle of the night, others can’t. If your child is one of these, you will have to change her going-to-bed patterns. Give feedings well before an intended nap or bedtime and then, later, when she seems sleepy, put her into her crib drowsy but awake—after a relaxing bedtime routine. Most babies will have trouble getting to sleep this way at first, but almost all will succeed after a few chances to learn self-soothing techniques. As long as your child is falling asleep on her own, it’s okay to respond to her during night wakings, but not by picking her up or feeding her. Your voice and presence, plus perhaps a rub, should reassure your child to the point of calm, but not sleep. Leave your baby so that she can actually fall asleep on her own, a skill that will come in handy in the wee hours.
Whichever getting-baby-to-sleep-through-the-night method you choose, remember that they all share two very important rules: Be consistent with the method, and give it a chance to work. If you don’t stick with it long enough to see a difference, you’ll never know whether the failure lies with the method or your follow-through. Use each technique faithfully for a solid two weeks before you give up on it. Skip from method to method, or enforce the method of choice only sporadically, and your baby’s confusion will only compound her sleep issues.
Another point to keep in mind as nightfall approaches: Even if you’re opposed to letting your baby cry herself to sleep, you shouldn’t make a habit of leaping to her side at her first whimper. Doing so may actually wake her up. Babies often cry out during light sleep, and sometimes fall back into a deep sleep without any help. Or they wake momentarily before settling themselves back down on their own. Some babies always cry for a few minutes before falling asleep (as a means of self-comfort) and also when waking at night. Unless your baby’s launched into full-fledged screaming, wait a few minutes to see if the whimpers subside before going in to offer comfort.
“At first we were grateful that our son was sleeping through the night. But with him waking up like clockwork at five every morning, we almost wish he’d wake up in the middle of the night instead.”
With a night waker, at least there’s the promise of another few hours of sleep once baby beds down again. But with a baby who greets his parents alert and energetic, ready and eager to start every day when even the roosters are still snoozing, there’s no hope of further rest until night falls once more. And yet this rude awakening is faced daily by countless parents.
It probably isn’t realistic to expect your early riser to sleep in past six or seven (at least not until he’s a teenager, at which point you’ll probably have to drag him out of bed each morning just to get him to school on time). But it may be possible to reset your little alarm clock at least a bit later:
Keep out the dawn’s early light. Some babies (like some adults) are particularly sensitive to light when they’re sleeping. Especially when the days are longer, keeping baby’s room dark can buy a little extra sleep for everyone. Invest in room-darkening shades or lined draperies, to prevent the dawn’s early light from waking baby.
Keep the traffic out. If your baby’s window faces a street that carries a lot of traffic in the early morning hours, the noise could be waking him prematurely. Try keeping his window closed, hanging a heavy blanket or curtains at the window to help muffle sound, or moving him, if possible, to an off-street room. Or use a fan or a white-noise machine to drown out street noises.
Keep baby up later at night. Early to bed often means early to rise. So try putting your baby to bed ten minutes later each night, until you’ve gradually postponed his bedtime an hour or more. To make this work, it will probably help to move his naps and meals forward simultaneously and at the same pace.
Keep baby up later during the day. Some early risers are ready to go back to sleep in an hour or two. Early naps lead to early bedtime, which inevitably continues the cycle of early waking. To break the cycle, postpone baby’s return to the crib by ten minutes more each morning until he’s napping an hour or so later, which may eventually help him to extend his night’s sleep.
Keep daytime sleeping down. A baby needs only so much total sleep—an average of 14½ hours at this age, with wide variations in individual babies. Maybe yours is getting too much sleep during the day and thus needs less at night. Limit daytime naps, cutting one out or shortening all of them. But don’t cut out so much daytime sleep that your baby’s actually overtired (and less likely to sleep well) by bedtime.
Keep him waiting. Don’t rush to greet him at the first call from the crib. Wait five minutes first. If you’re lucky, he may cuddle up and go back to sleep, or at least amuse himself while you catch a few more moments of rest.
Have entertainment standing by. If keeping the room dark doesn’t help, try letting a little light seep through so that he can play while he waits for you. An activity center and/or a crib mirror can keep him busy for a few minutes. If you leave any toys in his crib, make sure they’re safe for him to be left alone with (no plushes, no sharp edges, no small pieces).
Keep him waiting for breakfast. If he’s used to eating at five-thirty, hunger will regularly come to call at that time. Even if you’re getting up with him then, don’t feed him right away. Gradually postpone breakfast, so that he’s less likely to wake up early for it.
All these efforts may, unfortunately, be fairly futile. Some babies just need less total sleep; some are early-morning people from early on. If yours turns out to be one of these, you may have no choice but to rise and shine early until he’s old enough to get up and make his own breakfast. Until then, turning in earlier yourselves, and sharing the predawn burden by taking turns getting up with your baby (this will work only if mommy’s presence isn’t required for nursing), may be your best survival technique.
“I always put my baby on her back to sleep. But now that she knows how to roll over, she flips over and sleeps on her stomach. I’m worried about the risk of SIDS.”
Once babies learn to flip, there’s just no keeping them on their backs if they prefer their bellies. And not only is there no point in trying to keep your baby on her belly, there’s no point in worrying if you can’t. Experts agree that a baby who is able to change positions easily is at a significantly decreased risk for SIDS. That’s for two reasons: One, because the high-risk period for SIDS is generally passed by the time a baby can turn over; two, because a baby who can flip is better equipped to protect herself from whatever it is about tummy sleeping that increases SIDS risk.
You can—and according to experts, you should—keep putting your baby to bed on her back until her first birthday. But don’t lose any sleep over her position if it changes during the night. Be sure, however, that her crib is safe; continue to follow the tips for preventing SIDS on page 261, such as using only a firm mattress and avoiding pillows, blankets, comforters, and plush toys.
“Our baby is far too big now for his infant tub. But I’m terrified of washing him in our bathtub—and he seems to be, too. The one time I tried it, he screamed so much, I had to take him out. How am I supposed to bathe him?”
Taking the plunge into the family bathtub may seem a frightening prospect for both baby and you; he is, after all, still such a little—and slippery—fish for such a big pond. But if care is taken both to prevent accidents (see box, next page) and to alleviate baby’s fears, the big tub can turn into a veritable water wonderland for the five- or six-month-old, and bathtime into a favorite (if wet) family ritual. To ensure a happy water baby, see the basic tips on bathtub bathing in the Baby-Care Primer, page 135, and try the following:
Let your baby test the waters in a familiar boat. For a few nights before he graduates from it, bathe him in his baby tub placed in the empty grownup tub. This way the new tub won’t seem quite so formidable when it’s filled with water—and him.
Take a dry run. If he’s willing, put him in the tub (on a large bath towel or a bath seat to minimize slipping) without water and with a pile of toys. That way he can become accustomed to the scenery while it’s dry—and hopefully discover how much fun the tub can be. If the room is nice and warm and he’s a baby who’s comfortable being naked, let him play in there undressed. Otherwise, keep his clothes on. As in any bathtub situation, don’t leave his side for a moment.
Use a stand-in. While someone else holds baby, give a demonstration bath to a washable doll or stuffed animal in the bathtub, with a comforting running commentary each step of the way. Make it look as if everybody involved is having a good time.
Avoid the big chill. Babies dislike being cold, and if they associate being chilled with being bathed, they may rebel against bathing. So be sure that the bathroom is comfortably warm. If your bathroom isn’t adequately heated, you might want to warm the room by running a hot shower first. Don’t remove baby’s clothes until the tub is filled and you are ready to slip him into it. Have a large, soft towel, preferably with a hood, ready to wrap him in as soon as you lift him from the water. Dry baby thoroughly, being sure to get into the creases, before unwrapping and dressing him.
Keep entertainment on hand. Make the tub a floating playground for your baby so that he’ll be diverted while you take care of bathing business. Specially designed tub toys (particularly those that bob atop the water) and plastic books are great, but so are plastic containers of all shapes and sizes. To avoid mildew buildup on tub toys, towel off after use and store in a dry container or a mesh bag. Clean water-retaining bath toys at least once a week with a mixture of one part chlorine bleach to fifteen parts water (be sure to rinse well) to reduce any buildup of bacteria that can cause infections.
Let baby make a splash. But don’t make one yourself. For most babies, splashing is a large part of bathtime fun, and the wetter a baby can make you, the happier he’ll be. But while he almost certainly will like to make a splash, he may not like to be the target of one. Many a baby has been turned off to the tub with a single playful splash.
Use the buddy system. Some babies are more amenable to a bath if they’ve got company. Try bathing with your baby, but at bath temperatures geared to his comfort. Once he becomes adjusted to these duet baths, you can try him solo.
No swimming after eating. Whether your mother’s ubiquitous summer chant was medically sound is debatable. But it may make sense not to bathe your baby directly after meals, because the increase in handling and activity could cause spitting up.
To make sure tubby time is not only fun but safe, follow these important tips.
Wait until baby’s a sitting duck. You’ll both be more comfortable with big-tub bathing if your baby’s capable of sitting alone, or with only minimal support.
Take a safe seat. A wet baby is a slippery baby, and even a solid sitter can take a slide in the tub. And though a momentary slip under the water wouldn’t be physically harmful, it could generate a long-term fear of baths. (Of course, if he slips and you’re not there, the consequences could be much more serious.)
A bath seat can provide an alternative to the old one-hand-on-baby-at-all-times maneuver, but many experts feel they don’t keep baby safe enough and recommend waiting until the Consumer Product Safety Commission (CPSC) comes out with their new safety standards for baby bath seats (now in the works). If you do choose to use a bath seat currently on the market, be sure the one you use comes with rubber suction cups that attach it securely to the bottom of the tub and be sure never to use the seat as a substitute for your complete and constant supervision. Some seats have foam pads to place under baby so he or she won’t slide around during bath time. If yours doesn’t, put a clean washcloth or small towel under baby’s bottom to achieve the same effect. Rinse, squeeze, and hang the cloth to dry, or use a fresh one each bath time to prevent the multiplication of germs in the damp material. If the seat has a foam pad, dry it in the dryer between uses for the same reason. If you’re not using a bath seat, be sure the tub bottom is lined with a rubber tub mat or skidproof stick-ons to prevent slipping.
Be prepared. Towel, washcloth, soap, shampoo, tub toys, and anything else you’ll need for baby’s bath should be on hand before you put baby in the tub. If you do forget something and you have to get it yourself, bundle baby in a towel and take him or her with you. Also prepare by removing everything from tubside that’s potentially dangerous in baby’s curious hands, such as soap, razors, and shampoo.
Be there. Your baby needs adult supervision every moment of every bath—and will continue to for the first five years of bathing. Never leave him in the tub unattended, even in a baby seat (he or she could slip out or climb out), even for a second. Keep this startling statistic in mind when the phone or doorbell rings, a pot boils over on the stove, or anything else threatens to take your attention away from your baby: 55 percent of accidental infant drownings take place in the bathtub.
Do the elbow test. Your hands are much more tolerant of heat than a baby’s sensitive skin. Test the water with your elbow or wrist or a bath thermometer before dunking baby. While it should be comfortably warm, it should not be hot. Turn the hot water tap off first, so that any drips from the faucet will be cold and baby won’t be scalded. Setting the hot water tank at 120°F or below will also prevent scalds. A safety cover on the tub spout will protect baby from burns and bumps.
Don’t pull the stopper until baby is out of the tub. Not only can it be a physically chilling experience to be in an emptying tub, it can be a psychologically chilling one, too. The gurgling sound can frighten even a young infant, and an older baby or toddler who sees the water rushing down the drain may fear that he’s going down next.
Be patient. Eventually, your baby will take to the tub. But he’ll do it faster if he’s allowed to do it at his own pace, and without parental pressure.
“I’d like to give my baby an occasional bottle of expressed milk to free me up a little, but she refuses to drink it. What can I do?”
Your baby wasn’t born yesterday. And unlike a relative newcomer, she’s developed a strong sense of what she wants, what she doesn’t want, and how she can best go about getting things her way. What she wants: your nice, soft, warm breasts. What she doesn’t want: a fabricated rubber or plastic nipple. How she can best go about getting things her way: crying for the former, and rejecting the latter.
Waiting this long to introduce a bottle into your baby’s life has turned the odds against you; the introduction is better made no later than six weeks (see page 217). But it’s still possible that you’ll be able to win her over by following these tips:
Feed her on an empty stomach. Many babies will be more receptive to the bottle as a source of nourishment when they’re in the market for something nourishing. So try offering the bottle when your baby is really hungry.
Or feed her on a full stomach. With some babies, offering a bottle when they are looking for a breast makes them feel hostile toward the impostor and perhaps a little betrayed by the bottle giver. If this is the case with your baby (and you’ll find out only through trial and rejection), don’t offer the bottle when she’s at her hungriest; instead, offer it casually between nursings. She may be more in the mood to experiment and be ready for a snack.
Feign indifference. Instead of acting as though there’s a lot at stake (even if there is), act as if the bottle issue is no biggie, no matter what her response.
Let her play before she eats. Before attempting to get down to business with the bottle, get her hands on it. If she’s had a chance to explore it on her own, she may be more likely to let it into her life and, hopefully, into her mouth. She may even put it there herself—as she does everything else.
Banish your breast. And the rest of you, when the bottle is launched. A breastfed baby is more likely to accept a bottle given by father, grandma, or another care provider when mother is well out of smelling distance. At least until bottle feeding is well established, even the sound of your voice may spoil baby’s appetite for a bottle.
Try a favorite fluid. It’s possible that baby’s objecting not to the bottle, but the fluid inside it. Some infants will take to a bottle better if it’s filled with familiar breast milk, but others, reminded of breast milk’s original source, are more comfortable with another drink. Try formula or diluted apple or white grape juice instead.
Sneak it in during sleep. Have your bottle giver pick up your sleeping baby and try to offer the bottle then. In a few weeks the bottle may be accepted awake.
Know when to surrender—temporarily. Don’t let the bottle become the object of a battle, or your side doesn’t stand a chance of winning. As soon as your baby raises objections to the bottle, take it away and try again another day. Perseverance—while retaining your nonchalant attitude—may be all that’s necessary. Try the bottle once every few days for at least a couple of weeks before you consider admitting defeat.
Should defeat become a reality, however, don’t give up hope. There’s another alternative to your breasts: the cup. Most babies can master a cup, even at five or six months, and happily take supplementary feedings from it (see page 326); many become proficient enough cup drinkers by the end of the first year (sometimes as early as eight or nine months) to be weaned directly from the breast to the cup—which saves their parents the extra step of weaning from the bottle.
“Since I started my breastfed baby on solids last week, his bowel movements have been more solid—which I would expect—but they are also darker and smellier. Is this normal?”
Alas, the time when everything that passed through your baby came out sweet and innocent is past. For the parent of a breastfeeding baby, the change from soft, mustardy, nonoffensive stools to thick, dark, smelly ones can be something of a shock. But, though the change may not be aesthetically pleasing, it is normal. Expect your baby’s stools to become increasingly adultlike as his diet does—though a breastfed baby’s may remain somewhat softer than a bottle-fed’s up until weaning.
“I just gave my baby carrots for the first time, and his next bowel movement was bright orange.”
What goes in must come out. And in babies, with their immature digestive systems, it sometimes doesn’t change very much in the process. Once they start solids, stools seem to vary movement to movement, often reflecting the most recent meal in color or texture. Later, foods not chewed thoroughly—especially those that are harder to digest—may come out whole or nearly so. As long as bowel movements don’t also contain mucus and aren’t unusually loose, which might signal gastrointestinal irritation (and the need to withhold the offending food for a few weeks), you can continue his newly varied diet without concern.
“My daughter just got her first tooth. The doctor said I should start brushing it now, but that seems silly.”
Those tiny pearls that bring so much pain before they arrive and so much excitement when they first break through the gums are destined for extinction. They can all be expected to fall out during the early and mid school years, to be replaced by permanent teeth. So why take good care of them now?
There are several reasons: First of all, since they hold a place for the permanent teeth, decay and loss of these first teeth can deform the mouth permanently. Then, too, your baby will need these primary teeth for biting and chewing for many years; bad teeth could interfere with good nutrition. And healthy teeth are also important for the development of normal speech and appearance—both important to a child’s self-confidence. The child who can’t speak clearly because of faulty teeth, or who keeps her mouth shut to hide decayed or missing teeth, doesn’t feel good about herself. Finally, if you start your child brushing early, good dental habits are likely to be second nature by the time that second set of teeth comes in.
When it comes to choosing a toothbrush for your baby, looks aren’t everything—though favorite characters and bright colors are always a plus. Quality counts, too. Bristles should be soft so they don’t injure tender gums; once they become rough around the edges (which will happen pretty quickly if baby likes to chomp down on them), it’s time for a change. Even a toothbrush that still looks new should be changed after two to four months; that’s because, over time, bacteria from the mouth accumulate on the brush.
The first teeth can be wiped with a clean damp gauze pad, washcloth, or disposable finger brush designed for the purpose, or brushed with a very soft, tiny infant toothbrush (with no more than three rows of bristles) moistened with water. A dentist (you’ll need to secure one for your baby soon anyway) or a pharmacist can recommend a brush and help you locate the finger brushes. Wiping will probably do a more thorough job until the molars come in, but brushing will get baby into an important habit she’ll need for a lifetime of good dental hygiene, so a combination of the two is probably best. Wipe or brush after meals and at bedtime. But be gentle—baby teeth are soft. Lightly brush or wipe the tongue, too, since it harbors germs (but brush only the front of the tongue; going too far back can trigger gagging).
No toothpaste is necessary for baby’s teeth, though you can flavor the brush with a tiny bit of toothpaste (use one that’s formulated for infants and toddlers and that doesn’t contain fluoride) if it makes her more interested in brushing. If you’re using fluoridated toothpaste, add only a pea-size dab to the brush. Many babies love the taste of toothpaste, and since they swallow instead of spitting it out once the brushing’s done, they could end up taking in too much fluoride.
Most older babies and toddlers are eager to “do it themselves.” Once she has the dexterity, which won’t be for many months yet, you can let your baby brush on her own after meals, adding a more thorough cleaning with a gauze pad or finger brush yourself as part of the bedtime ritual. Also let her watch you care for your own teeth. If mommy and daddy set a good dental-care example, she’s more likely to be a more conscientious brusher and, later, flosser.
Though brushing and flossing will continue to be important throughout your baby’s life, proper nutrition will have equal impact on her dental health, starting now (actually, it started before she was born). Ensuring the adequate intake of calcium, phosphorus, fluoride, and other minerals and vitamins (particularly vitamin C, which helps to maintain the health of gums) and limiting foods high in refined sugars (including commercial teething biscuits) or sticky natural sugar (such as dried fruit, even raisins) can help prevent the miseries that accompany a mouthful of cavities and bleeding gums. Ideally, limit sweets (even healthy ones) to once or twice a day, since the more sugar intake is spread out over the day, the greater the risk to the teeth. Serve them with meals, when they do less damage to the teeth, rather than between meals. Or brush baby’s teeth right after the sweets are eaten.
When your baby does have sweets or snacks high in carbohydrates between meals and a brush isn’t available, follow them with a piece of cheese (such as Swiss or Cheddar, once introduced), which seems to be able to block the action of tooth-decaying acids produced by the bacteria in plaque. For further tooth insurance, get your baby used to drinking juice only from a cup now (serve it watered down and only with meals and snacks, not in between), and never let her go to sleep with a bottle. Limit sippy cup use, too (see page 327).
In addition to good home care and good nutrition, your baby will need good professional dental care to ensure healthy teeth in healthy gums. Now, before an emergency arises, ask your baby’s doctor to recommend a reliable pediatric dentist or a general dentist who treats a lot of children and is good with them. If you have a question about your baby’s teeth, call or make an appointment as soon as it comes up.
According to the American Academy of Pediatrics, that first routine checkup should take place between the first and second birthday (between age six months and one year for infants at high risk for tooth decay—such as those babies who habitually fall asleep with a bottle of juice or formula, who do a lot of nighttime or naptime nipping, or who spend much of the day with a bottle in their mouths). The earlier the dental visit, the better the chance of preventing dental problems (and dentist-office phobias common in older toddlers visiting a dentist for the first time). Widely spaced teeth, which usually move closer later, are rarely a cause for early intervention.
“I have a friend whose baby’s front teeth had to be pulled because of baby-bottle mouth. How can I prevent this from happening to my little boy?”
There’s nothing cuter than a first-grader whose grin reveals a charming space where his two front teeth used to be. But losing teeth to baby-bottle mouth—long before they’re scheduled to fall out—isn’t as cute.
Fortunately, baby-bottle mouth is completely preventable. It occurs most often in the first two years of life, when teeth are most vulnerable, and most frequently as a result of a baby’s falling asleep regularly with a bottle (or breast) in his mouth. The sugars in whatever beverage he’s imbibing (breast milk, formula, fruit juice, cow’s milk, or sugar drinks) combine with bacteria in his mouth to decay the teeth. The dirty work is abetted during sleep when the production of saliva, which ordinarily dilutes food and drink and promotes the swallowing reflex, slows dramatically. With little swallowing occurring, the last sips baby takes before falling asleep pool in his mouth and remain in contact with his teeth for hours.
To avoid baby-bottle mouth:
Never give glucose (sugar) water, even before baby’s teeth come in, so that he won’t become accustomed to the sweet taste. The same applies to such sugary drinks as cranberry juice cocktail, fruit punches, fruit drinks, or fruit-juice drinks. Dilute even 100 percent fruit juices with water. If possible, serve juice only in a cup; that way, baby won’t get into the juice bottle habit at all.
Once your baby’s teeth come in, don’t put him to bed for the night or down for a nap with a bottle of formula, breast milk or juice. An occasional lapse won’t cause a problem, but repeated lapses will. If you must give him a bottle to take to bed, make it a bottle of plain water, which will not harm the teeth (and if it’s fluoridated, will help strengthen them).
Don’t let your baby use a bottle of milk or juice as a pacifier, to crawl or lie around with and suck on at will. Allday nipping can be as harmful to the teeth as nighttime sucking. Bottles should be considered part of a meal or snack and like these should routinely be given in the appropriate setting (your arms, a baby seat, a high chair or other feeding chair) and at appropriate times. The same rules should apply to sippy cups (see page 327).
Don’t allow a baby who sleeps in your bed to remain at your breast all night, nursing on and off throughout the evening. Breast milk can cause decay as well if the milk is allowed to pool in baby’s mouth, as it could during constant night nursing.
Eliminate the bottle at twelve months, as recommended by the American Academy of Pediatrics.
“I’m breastfeeding, and want to wean my baby. I don’t want to start with formula—can I give him cow’s milk?”
Cow’s milk shouldn’t be served up until the first birthday. The American Academy of Pediatrics recommends that when possible, breastfeeding should continue for at least the first year (and then as long as mutually desirable). When that isn’t possible, an iron-fortified infant formula should be the beverage of choice for a baby. (See page 106 for the many reasons why.) Though there are formulas on the market specifically designed for older babies, many doctors don’t feel they’re necessary. Check with your baby’s doctor before deciding which formula to wean to.
When you switch to cow’s milk at a year, be sure you use whole milk, rather than skim (nonfat) or low-fat. Whole milk is usually recommended until age two, though some doctors okay using 2 percent milk after eighteen months.
“I’m pretty careful about how much salt my husband and I get. But how careful do I have to be about the salt in my daughter’s diet?”
Infants, like all of us, do need some salt. But also like the rest of us, they don’t need a lot of it. In fact, their kidneys can’t handle large amounts of sodium, which is probably why Mother Nature made breast milk a very low-sodium drink (with only 5 milligrams of sodium per cup, as compared to 120 milligrams per cup of cow’s milk). And there is some evidence that too much salt too soon, especially when there is a family history of hypertension, can set the stage for high blood pressure in adulthood. A highsodium diet early in life can also nurture a lifelong taste for the salty stuff.
Because too much sodium isn’t good for babies, major manufacturers have eliminated salt from their baby food recipes. Parents who prepare their own baby foods should do likewise. Don’t assume that string beans or mashed potatoes won’t appeal to your child unless they’ve been sprinkled with salt just because you like them that way. Give her taste buds a chance to learn what foods taste like unsalted, and she’ll develop a healthy preference that’ll last a lifetime.
To be sure that your baby doesn’t pick up the high-salt habit and to help the rest of the family reduce salt intake, read labels routinely. You’ll find large amounts of sodium in the most unlikely products, including breads and breakfast cereals, cakes and cookies. Since a baby between the ages of six months and one year requires no more than 250 to 750 milligrams of sodium a day, foods that contain 300 or more milligrams per serving will quickly push the intake over this level. When buying for baby, opt for foods with under 50 milligrams per serving most of the time.
“We started our baby on rice cereal, the way you’re supposed to, but he didn’t seem to like it. So we moved on to vegetables and fruits—which he laps up. Does he need to eat cereal?”
It’s not the cereal that babies need, it’s the iron it’s fortified with. For the formula-fed set, cereal snubbing isn’t an issue, since these babies fill their requirement for this vital mineral every time they drink a bottle. Nursing babies, however, need another source of iron once they’ve reached the six-month mark. Fortunately, while fortified baby cereals are a very popular alternative source of iron (at least, among the majority of beginning eaters and their parents), they’re not the only one. Breastfed cereal spurners can easily fill their requirement with an iron supplement. Ask the doctor for a recommendation.
And before you close the pantry door on all cereal, you might want to try offering baby another variety—barley, perhaps, or oat. It’s possible that his more adventurous taste buds naturally prefer a slightly stronger taste (rice is definitely the blandest of the bunch). Or consider mixing a small amount of cereal with one of the fruits he enjoys (while that’s not recommended for babies who already like their cereal “straight up,” there’s no harm in trying such a combo on a baby who has embraced fruit but rejected cereal.)
“We’re strict vegetarians and plan to raise our daughter the same way. Can our diet provide enough nutrition for her?”
What’s good for the vegan goose and gander can be good for their gosling, too. Millions of parents who shun animal products raise perfectly healthy offspring without putting milk, meat, or fish on the family table. And in the long run, a vegan lifestyle can have positive health benefits—reducing the risk of heart disease, cancer, and other illnesses linked to a high-fat, low-fiber, meat-heavy diet. Still, there are potential pitfalls to feeding a vegan diet to a child; to avoid these, take these precautions:
Breastfeed your baby. Continuing to breastfeed for at least a year, if possible, will ensure that your infant will get all the nutrients she needs for the first six months and most of what she needs for the first year—assuming you’re getting all the nutrients you need (including folic acid and vitamin B12 in a supplement) to produce high-quality breast milk.
If you can’t breastfeed, be certain that the soy formula you choose is one recommended by your baby’s doctor.
Got milk, other dairy products, and eggs in your vegetarian diet? Then ensuring good nutrition for your baby should be a piece of (cheese) cake. Calcium’s certainly not an issue; dairy products have that covered (while also providing plenty of vitamins A, B12, and D). Protein’s not a problem; dairy products do the trick there, too. (Pesco-vegetarians, those who eat fish but not meat, will have an even easier time on the protein front.) Egg yolks, once they’re allowed, offer additional protein, as well as iron; using DHA-rich eggs will serve up essential omega-3 fatty acids, along with their many benefits.
Supplement, if needed. Discuss with your baby’s doctor whether your breastfed baby should be receiving an infant vitamin-mineral supplement that contains iron, vitamin D, folic acid, and vitamin B12 (found only in animal products). (See page 173 for more on vitamin supplements.) A supplement will definitely be necessary when your baby is weaned from formula or breast milk.
Be selective. Serve only whole-grain cereals and breads once your baby has graduated from beginner baby cereals. These will provide more of the vitamins, minerals, and protein ordinarily obtained from animal products than would their refined-white-flour counterparts.
Turn to tofu. Use tofu and other soy-based products to provide added protein when your baby moves on to solids. Near the end of the first year, brown rice cooked fairly soft, mashed chickpeas or other legumes (beans and peas), and high-protein or whole-grain pastas can also be added to the diet as sources of protein. And don’t forget to bring on the edamame, mommy (and daddy). Cooked until very soft and shelled, served pureed at first, mashed later, these soybeans are tasty and full of protein.
Concentrate on calories. Growing babies need plenty of calories to grow on, and getting enough fuel is more difficult on a diet that’s limited to plant food. Keep an eye on baby’s weight gain to make sure enough calories are being taken; if it seems to be slacking, boost her breast milk intake and focus on higher-calorie plant foods, such as avocados.
Keep the calcium coming. Once you wean your baby, making sure she gets the calcium she needs for strong and healthy bones and teeth will be a little trickier for you than it is for parents who dish out dairy to their children. Good vegetarian sources of this vital mineral include juice that’s fortified with calcium, tofu prepared with calcium (but watch out for the many soybean beverages and frozen desserts that contain little or no calcium), as well as broccoli and other green leafies. Since those and many other nondairy calcium foods are not standard favorites with the high chair set, you may also have to add a calcium supplement to your daughter’s diet if you prefer not to feed her milk. Check with her doctor.
Don’t forget the fat—the good fat, that is. Foods like salmon and other fish, as well as DHA-rich eggs, will provide essential omega-3 fatty acids. Vegans who eat no animal products at all have to look elsewhere for these good fats. Because vegetables provide no preformed DHA, talk to the doctor about DHA supplements (such as those added to infant formulas).
“I don’t understand why the doctor wants to test my son for anemia at the next visit. He was premature, but is very healthy and active now.”
Thanks to iron-fortified formula and baby cereals, anemia is rare in well-fed babies these days (only 2 or 3 in 100 middle-class infants become anemic). Consequently, routine screening for anemia (a low supply of protein in the red blood cells) is no longer considered absolutely necessary. But because babies with mild anemia typically don’t display the trademark symptoms of the condition (paleness, weakness, and/or irritability)—and, in fact, most are apparently healthy and active—the only way to diagnose it is with a blood test. Which is why many physicians continue to perform the test (between six and nine months for low-birthweight infants and between nine and twelve months for others), just to be on the safe side.
The most common cause of anemia in babies is iron deficiency—usually occurring in babies born with poor iron stores, such as premature infants who didn’t have time before birth to lay down sufficient reserves and those whose mothers didn’t get enough iron during pregnancy. Full-term babies are generally born with stores of iron built up during the last few months of pregnancy that carry them for the first few months of life. After that, as babies continue to require the mineral in large quantities to help expand their blood volume to meet the demands of rapid growth, they need a source of iron in the diet, such as iron-fortified formula (for bottle-fed babies) or iron-fortified baby cereal. And though breastfeeding exclusively for the first four to six months is considered the best way to nourish your baby, and the iron in breast milk is very well absorbed, Breastfeeding alone does not ensure adequate iron intake after six months.
Typically, the full-term baby who develops iron-deficiency anemia is one who depends mainly on breast milk (after six months), cow’s milk, or a low-iron formula for nourishment, and takes very few solids. Because the anemia tends to slacken his appetite for solids, his sole source of iron, a cycle of less iron/less food/less iron/less food is set up, making the situation worse. Prescribed iron drops usually quickly correct the condition.
To help prevent iron-deficiency anemia in your baby, try the following:
Be sure that if your baby is bottle-fed, he’s getting a formula fortified with iron.
Be sure that if your baby is breastfed, he is getting iron in some supplementary form (such as an iron-fortified cereal or vitamin drops containing iron, if recommended by the pediatrician) after six months. And feed a vitamin C food at the same time, when possible, to improve iron absorption.
As your baby increases his intake of solids, be sure to include foods rich in iron (see page 318).
Avoid feeding too much bran to your baby (in bran muffins or bran cereal, for instance), since it can interfere with iron absorption.
“My baby’s not walking yet, of course, but I don’t feel she’s completely dressed without shoes.”
Although socks or booties or, weather permitting, bare feet are best for your baby at this stage of development, there’s nothing wrong with outfitting her little tootsies in snappy footwear on special occasions—as long as it’s the right kind. Since your baby’s feet aren’t made for walking (at least not yet), the shoes you buy shouldn’t be, either. Shoes for infants should be lightweight, made of a breathable material (leather or cloth, but not plastic), with soles so flexible that you can feel baby’s toes through them (hard soles are absolutely out). Shoes with stiff ankle support (high-tops) are not only unnecessary and unhealthy for feet now, but will be when baby starts walking, too. And considering how quickly first shoes will be outgrown, it makes sense that they also be inexpensive.
For tips on choosing shoes once baby is walking, see page 448.
If stimulating a baby in the first few months of life takes ingenuity, stimulating a baby who’s approaching the half-year mark takes sophistication. No longer is baby physical, emotional, and intellectual putty in your hands. Now he or she is ready and able to take an active role in the learning process and to coordinate the senses—seeing what’s being touched, looking for what’s being heard, touching what’s being tasted.
The same basic guidelines discussed in Stimulating Your Baby in the Early Months (see page 242) will continue to apply as you approach the second half of baby’s first year, but the kinds of activities you can provide are greatly expanded. Basically, they will be directed at these areas of development:
Large motor skills. The best way to help baby develop the large motor strength and coordination necessary for sitting, crawling, walking, throwing a ball, and riding a tricycle is to provide plenty of opportunity. Frequently change your baby’s position—from back to tummy, from propped-up to prone, from the crib to the floor—to provide the chance to practice feats of physical prowess. As your baby seems ready (which you may not know until you try), provide the opportunity to do the following:
Stand on your lap and bounce
Pull to sitting
Sit in a “frog” position (like a tripod)
Sit upright, propped with pillows if necessary
Pull to standing, holding on to your fingers
Pull to standing in a crib or play yard, or on other furniture
Lift up on all fours
Small motor skills. Developing the dexterity of baby’s little fingers and hands will eventually lead to the mastering of many essential skills, such as self-feeding, drawing, writing, brushing teeth, tying shoelaces, buttoning a shirt, turning a key in a lock, and so much more. Proficiency develops more quickly if babies are given ample chance to use their hands, to manipulate objects of all kinds, to touch, explore, and experiment. The following will help hone small motor skills:
Babies love a lap to stand on. Pulling baby up to this position not only entertains but also helps develop the leg muscles baby will need to pull up, and later stand, unassisted.
Activity boards—a variety of activities give baby plenty of practice with small motor skills, though it will be months before most babies can conquer them all.
Blocks—simple cubes of wood, plastic, or cloth, large or small, are appropriate at this age.
Soft dolls and stuffed animals—handling them builds dexterity.
Real or toy household objects—babies usually love real or toy telephones (with cords removed), mixing spoons, measuring cups, strainers, pots and pans, paper cups, empty boxes.
Balls—of varying sizes and textures, to hold, to squeeze; they are especially fun once baby is able to sit up and roll them or crawl after them.
Finger games—at first you’ll be the one to play clap hands, patty-cake, the itsy-bitsy spider, and similar games, but before you know it, baby will be playing along. After you do a demonstration or two, assist baby with the finger game while you sing along.
Social skills. The middle of the first year is a very sociable time for most babies. They smile, laugh, squeal, and communicate in a variety of other ways and are willing to share their friendliness with all comers—most haven’t yet developed “stranger anxiety.” So this is a perfect time to encourage socialization, to expose your child to a variety of people of different ages—from other babies to the elderly. You can do this while shopping, when having friends over or while visiting them, by joining a baby group, even by having baby fraternize with his or her image in the mirror. Teach through example a simple greeting like “hi” and some of the other basic social graces, such as waving bye-bye, blowing a kiss, and saying thank you.
Intellectual and language skills. Comprehension is beginning to dawn. Names (mommy’s, daddy’s, sibling’s) are recognized first, followed by basic words (“no,” “bottle,” “bye-bye,” for example), and soon thereafter, simple, often heard sentences (“Do you want to nurse?” or “Make nice to the doggy”). This receptive language (understanding what they hear) will come before spoken language. Other types of intellectual development are also on the horizon. Though it won’t seem so at first, your baby is taking the first steps toward acquiring the skills of rudimentary problem solving, observation, and memorization. You can help by doing the following:
Play games that stimulate the intellect (see page 432), that help baby observe cause and effect (fill a cup with water in the tub and let baby turn it over—“See, the water falls out”), that explain object permanence (cover a favorite toy with a cloth and then have baby look for it—“Where did the choo-choo go?”—or play peekaboo behind your hands, a book, a menu).
Continue sharpening baby’s auditory perception. When a plane goes by overhead or a fire engine speeds down the street, sirens screaming, point them out to baby: “Is that an airplane?” or “Do you hear the fire engine?” will help tune your child in to the world of sounds. Emphasizing and repeating the key words (“airplane,” “fire engine”) will also help with word recognition. Do the same when you turn on the vacuum or the water in the bathtub, when the teakettle whistles or the doorbell or phone rings. And don’t overlook those favorite funny noises—razzes on baby’s belly or arm, clicks with your tongue, and whistles are all educational, too, encouraging imitation, which in turn encourages language development.
Now that your baby hovers on the brink of learning your language, what you say to him or her takes on new meaning. You can help your baby’s language skills along in the following ways:
Slow down. When baby is starting to try to decode your jargon, fast talk will slow those efforts. To give your baby the chance to begin picking out words, you must speak more slowly, more clearly, and more simply.
Focus on single words. Continue your running commentaries, but begin emphasizing individual words and simple phrases commonly used in baby’s everyday life. At feeding time, when you say, “I’m putting juice in the cup,” hold up the juice and add, “Juice, here is the juice,” and the cup, and say, “Cup.” Always pause to give baby plenty of time to decipher your words before going on to say more.
Continue to downplay pronouns. Pronouns are still confusing for your baby, so stick to “This is Mommy’s book,” and “That is Jordan’s doll.”
Emphasize imitation. Now that the number of sounds your baby makes is growing, so is the fun you can have imitating each other. Whole conversations can be built around a few consonants and vowels. Baby says, “Ba-ba-ba-ba,” and you come back with an animated “Ba-ba-ba-ba.” Baby replies, “Da-da-da-da,” and you respond, “Da-da-da-da.” If baby seems receptive, you can try offering some new syllables (“Ga-ga-ga-ga,” for example), encouraging imitation. But if the role reversal seems to turn baby off, switch back again. In not too many months, you’ll find your baby will begin trying to imitate your words—without prompting.
Talk it up. Talk to your baby about everything—and anything—as you go about your day together. Be natural in your conversation, but with a baby-friendly inflection (not to be confused with “baby talk”). See box on pages 220–221 for more on talking to your baby.
Build a repertoire of songs and rhymes. You may find it tedious having to repeat the same nursery rhyme or little ditty a dozen times a day every day. Your baby, however, will not only love the repetition, but learn from it. Whether you lean on Mother Goose, Dr. Seuss, or your own creativity matters not; what counts is consistency.
Use books. Baby’s not ready for listening to stories yet, but simple rhymes in books with vivid pictures often catch even a young infant’s attention. Do plenty of pointing out of single objects, animals, or people. Start asking, “Where is the dog?” and eventually baby will surprise you by placing a pudgy finger right on Spot.
Wait for a response. Though baby may not be talking yet, he or she is starting to process information, and often will have a response to what you say—even if it’s just an excited squeal (when you’ve proposed a walk in the stroller) or a pouty whimper (when you’ve announced it’s time to come off the swing).
Be commanding. In time, your baby will learn to follow simple commands such as “Kiss Grandma,” or “Wave bye-bye,” or “Give Mommy the dolly” (add “please” if you want the word to eventually come naturally to baby). But keep in mind that baby won’t follow through on your requests for months to come, and even when he or she begins to, the response won’t be consistent or immediate (baby may wave bye-bye, but not until five minutes after your friend has left the building). Don’t show disappointment when baby doesn’t perform. Instead, help your child to act out your request (waving bye-bye yourself), and eventually he or she will catch on. Once that happens, try not to treat your baby like a trained seal, asking for performances of the latest “trick” whenever there’s an audience (as tempting as it will be to show baby off).
Introduce concepts. Point out: This teddy is soft, that coffee is hot, the car goes fast, you got up early, the ball is under the table. While using objects, describe what they’re for: This broom is for sweeping, this water is for washing and drinking, this towel is for drying, this soap is for washing. At first your words will be meaningless to baby, but eventually, with lots of repetition, the concepts will start to crystallize.
Encourage curiosity and creativity. If your child wants to use a toy in an unusual way, don’t be discouraging or try to redirect him or her. Give your child a chance to experiment and explore—whether that means pulling up tufts of grass in the garden or squeezing out a wet sponge in the tub. A baby will learn volumes more through experience than through instruction, and this kind of play and exploration is absolutely free.
Encourage a love of learning. Though teaching specific facts and concepts to your child is important, equally important is teaching how to learn and imparting a love of learning. Remember that learning is always more effective when it’s interactive and when it’s fun.

1. Babies who spend little time on their stomachs during playtime may reach this milestone later, and that’s not cause for concern (see page 210).