25
Create an LED Brooch
CASEY MCCOY / STEAM LIBRARIAN
San Jose Public Library
Type of Library Best Suited for: Any
Cost Estimate: About $0.75 per brooch if buying supplies in bulk
Makerspace Necessary? No
PROJECT DESCRIPTION
Hop on the newest fashion trend by creating your own wearable tech accessory! Learn how a simple electric circuit works while using multiple tools and materials to create a brooch that lights up.
OVERVIEW
Whether you’re looking for a unique craft project or a hands-on circuit learning lesson, creating an LED brooch with kids ages eight years and up has it all. This project is suited for all types of libraries.
Wearable technology has grown in the maker world over the years with designs ranging from a simple LED binder clip ring to designing a “sparkle skirt” that lights up when you move (both projects can be found at http://makezine.com), expanding our understanding of both technology and fashion. This LED brooch project fuses technology and fashion together, and you will learn how a simple electric circuit works while using multiple tools and materials to design a fun new accessory.
MATERIALS LIST
- ◦ One large (5mm) or two or more small (2mm) LEDs1
- ◦ 3-volt button cell lithium battery (CR2032)
- ◦ Pinback
- ◦ Felt material in multiple colors
- ◦ Glue sticks
- ◦ Scotch tape
NECESSARY EQUIPMENT
- ◦ Scissors
- ◦ Embroidery needle
- ◦ Hot glue gun
No more equipment is necessary to complete this project, but the following are recommended to expand on the basics:
- ◦ Computer and printer: Search online for pattern ideas and print them out to trace on the felt
- ◦ Snap circuits: Extend the learning opportunity by adding on more hands-on projects like creating and testing circuits on a Snap Circuits board
STEP-BY-STEP INSTRUCTIONS
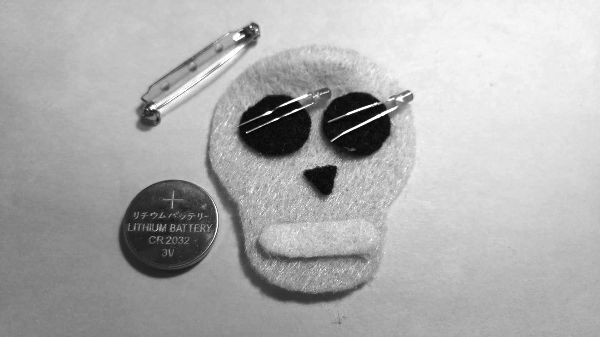
- 1. Trace a pattern or draw your own design onto a piece of felt. If you’re layering pieces, trace these on the desired colored felt as well. Cut these out and use the hot glue gun to piece them together. Here are the beginning stages of a spooky glowing eyed skeleton:
Beginning the skull brooch
- 2. Once the glue is dry and cooled off, flip your design over to the back and hot glue a pinback about ½ inch from the top of the main felt piece. This is how you’ll attach the brooch to your clothing.
- 3. To attach the LED(s), first take a pen or fine point marker to mark where the holes should be made to allow the leads (the LED legs) through the felt. Place the LED (leads still straight) over where you want it placed and make two dots where the leads meet the felt. If your design uses two or more LEDs, the pair of holes for the leads of the second LED must be close enough to the first LED so the leads can attach to the same 3-volt button cell battery you will attach in step 10. Smaller LEDs (2mm) are best for adding multiple LEDs to the design because they draw less power from the battery.
Teachable moment: Notice how one LED lead is shorter than the other? Typically, the shorter lead is called the cathode and represents a negative charge, while the longer lead is an anode and represents a positive charge.
- 4. Now it’s time to make two holes in the location where you want to place each lead using an embroidery needle or other fine point tool. Put the two leads through the two holes from the front side. Repeat for each LED you want on the brooch.
- 5. Bend the two LED leads so they are flat against the back of the felt piece. Now place the 3-volt cell battery flat against the back of the felt piece near the leads. Bend the leads so the negative lead (cathode) is against the negative side of the battery (look for the “–” sign) and the positive lead (anode) is against the positive side of the battery (with the “+” sign). It should look similar to the back of the skull brooch in the photo.
- 6. When both leads are touching the battery the LED should light up. If it does not light up, play with the placement of the battery and LEDs, make sure the leads aren’t touching each other or overlapping, flip over the battery, and so on.
- 7. With the battery and leads still touching, place a piece of tape across your battery to the back of the felt piece.
- 8. Attach the brooch to your favorite jacket, backpack, or hat to show off your new wearable tech brooch!
Extra credit: Explore what types of things you can do or add to make the circuit (LED light) turn off and on.
Battery held on back of the skull brooch

LEARNING OUTCOMES
- ◦ Participants gain a basic understanding of how a simple electric circuit works and the negative/positive polarity of batteries.
- ◦ Participants use tools and/or materials to design and/or build a device that solves a specific problem or a solution to a specific problem.
- ◦ This project also fits within Next Generation Science Standards: Science and Engineering Practices—Constructing Explanations and Designing Solutions.1
RECOMMENDED NEXT PROJECTS
The Instructables website has step-by-step instructions for a more involved LED flower brooch online.2 More wearable tech projects can be found in “Make: Wearable Electronics” by Kate Hartman3 or on Make’s website4 by searching “wearables” in projects.
Notes
1. EBay has a large variety of small electronics like LEDs and 3-volt batteries, especially if you want to buy in bulk. These items can also typically be found at your local hardware or electronics store.
2. Next Generation Science Standards, Web, www.nextgenscience.org.
3. “Wearable LED Flower Brooch,” Instructables, Web, www.instructables.com/id/Wearable-LED-Flower-Brooch.
4. Kate Hartman, Make: Wearable Electronics (Maker Media, 2014). “Make,” Web, http://makezine.com.