
Photo 1: The small oak boards used to make this candle box were riven directly from the log.
A lot has been written over the past decade about working green wood, especially about the techniques for turning this material. Green wood is unseasoned wood, direct from the log. It still contains much of the water and sap that sustained the living tree.
Today’s woodworkers usually buy their material directly from a lumber dealer. The first time they see it, the boards are already finished, complete with planed surfaces and square edges. However, all the wood you use in your woodworking started out green, and had to be processed through a number of stages by a number of different people. First, the living trees were cut down, and their trunks sawed. Then the wood was dried either through natural evaporation (called seasoning), or was forced-dried. Finally it was graded, dimensioned, bundled, and shipped to your lumber dealer, who sold it to you.
Working green wood is a very different experience from that just described in that it requires you to become involved with the earliest stages of processing wood into usable stock. The sawyer, wholesaler and retailer no longer stand between you and the freshly cut log. Because you do most of this work yourself, your association with the wood is much more intimate, and, as a result, you come to think about the material in very different ways. You also learn a lot more about wood.
Photo 1: The small oak boards used to make this candle box were riven directly from the log.
When bowl turners use green wood, they often use a chain saw to cut the blocks they need. However, there is a better method for obtaining turning blanks that are useful for making furniture and building parts. It is called riving. Riving is a process of controlled splitting. It is an ancient technique, and for millennia was used by woodworkers to obtain lathe blanks and even short boards. Until the late 17th century, when water-driven saw mills became common, most plank was hand-sawn by teams of pit sawyers. Hand sawing was a labor-intensive process, and the lumber made this way was very expensive. To avoid this cost, much of the wood used in furniture and in building construction was riven directly from the log (Photo 1).
As late as the mid-19th century, chairmakers in the United States still rived the wood they used for chair parts (Photo 2). Well into this century, British badgers (itinerant turners) moved from forest to forest, cutting down trees, bucking the trunks into billets, and riving the billets into turning blanks.

Photo 2: The blemishes on the cylinders and beads of this “sausage and ring” ladder-back chair are tearout that occured when the wood was rived. The blank was not thick enough for a complete leg, but the chairmaker turned it anyway.
Many woodworkers still rive their turning stock, in part to save money. Riven wood is the least costly wood you will ever use. After all, you provide all the labor and equipment needed to make the turning blanks.
The money saved from using riven blanks is especially important to craftsmen who do a lot of turning. For example, sixty percent of the parts in a Windsor chair are turned. The chairmaker who uses riven blanks rather than sawn turning squares saves the difference in the cost of the materials.
Using riven wood is most easy for people who own a wood lot, or who have access to one. If you live in a large city where you cannot readily cut down a tree or easily purchase a freshly fallen log, there are alternatives. Perhaps you can buy your logs directly from loggers, or buy them from saw mills. Both businesses can be located through the telephone directory. However, you may have to drive out into the country to pick up your log, as they may not want to deliver it.
Even though I live in a city, logs are always readily available to me, and are dropped off in my driveway. I buy them from the same fellow who sells me my stove wood. He is always delighted to sell me whole logs, as he charges me the same amount as for wood he has had to cut and split.
Even if you are not a chairmaker and want to only occasionally use turnings in your work, you can still find suitable material in the pile of firewood you use to heat your stove or fireplace. Examine your cordwood (I am assuming that it is unseasoned) as you stack it. You will always find straight-grained pieces that can be rived into turning blanks. You will also find wood with exotic figures, such as curly maple. The only problem with cutting turning stock from stove wood is that, depending on the length of wood you burn, you are limited to 16" to 24" blanks.
There are reasons other than saving money that make it worthwhile to use riven wood. Riven wood is usually stronger than sawn turning squares. A saw will cut across the grain as easily as along it.
If the grain runs out of the turning square, the part you make from it will be weak at the point of run out (Photo 3). Just consider how many times you have had to glue a chair part that has broken at an angle. It broke at the area where the grain ran out of the part (Photo 4).

Photo 3: If the grain runs out of a turning square, the part you make from it will be weak.

Photo 4: A part is weak where the grain runs out of it. When it breaks, the split will follow the grain.
This type of break does not happen to parts made from riven wood. The splitting process follows the woods grain, so that most of the fibres in a riven blank run continuously from one end to the other. In fact, in many species you can pull off a uniform strip of wood that’s the thickness of a toothpick and as long as the blank (Photo 5). Because the grain runs continuously from one end of the turning to the other, the wood is stronger and more flexible. It can only fail by breaking at a right angle across the fibres. This is called shearing across the grain (Photo 6). This extra strength is important in many applications. Once again, take the example of turned chairmaking. Riven wood allows you to make parts that are more delicate without worrying that they are too weak to support a sitter’s weight.

Photo 5: The grain in a riven blank runs uninterrupted from one end to the other. It is possible to pull off strips as thin as a toothpick and as long as the blank.
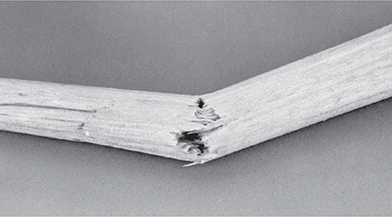
Photo 6: Because of its continuous grain, riven wood is generally much stronger than that which is sawn. When a riven part breaks, it will shear across the grain.
Also, riven wood is much more stable than sawn blanks. It is less prone to check cracks, warping and twisting. These qualities are also partially attributable to the straight grain. However, they can also be attributed to the fact that a riven turning blank represents a radial section. A radial section results when a pie-shaped piece is cut from a log. Radially sawn clapboards (prized by carpenters for their stability) are the most commonly known example of this type of cut. Photo 7 shows the unique grain pattern that occurs in a radially sawn clapboard and gives it its legendary stability.

Photo 7: The end grain of a riven, birch turning blank and a pine clapboard show that they both contain a radial section. This makes them very stable.
To better understand why a riven blank is a radial section, consider how the splitting is done. The log is halved and quartered. Each quarter is then split into eighths, resulting in a wedge-shaped cross section just like that of a slice of pie. Depending on the diameter of the log, each eighth will render three blanks, as shown in Photo 8. Note how the end grain runs almost in straight lines through each blank, just as it does in clapboard. If you were to turn a part from a blank while it is still green, it will not warp or check as it dries. Instead, it will become oval in cross section.

Photo 8: When the three turning blanks are laid out like this, you can usually rive them from 1⁄8 of a billet.
All of the recent emphasis on working green wood might lead you to think that your goal is to obtain unseasoned wood. However, if you consider all the reasons that have been given for using riven turning blanks, you will notice that none of them have anything to do with the wood being green. Logs are riven because this process yields inexpensive wood that is stronger and more stable than sawn turning squares. You have to start with a freshly cut log, not so you can obtain green wood, but for the same reason that boards are sawn from green logs – if left in the log, the wood will decay. The log has to be sawn or rived so the wood can dry without rotting.
For most turning applications, riven wood has to be seasoned before it can be used. (Methods of seasoning riven turning blanks are discussed below.) While it is possible to turn freshly rived wood, it is so wet it “spits.” The sap causes rust spots on both the lathe and your tools. Although very sharp turning tools will cut green wood like a hot knife cuts butter, it is impossible to create glassy, smooth surfaces in the soft, wet wood. It is equally difficult to make crisp details.
As was discussed in Chapter 6, different species of woods have different properties that make some more suitable for making turned parts than others. So, some species of wood rive better than do others. The wood you are using should cleave cleanly – that is, separate after only several blows, resulting in a split with smooth sides. You do not want to use a stringy wood, because one side will tear strands of wood out of the other. In a worst case scenario, the tearing will be so bad that you will have to reach into the split with a hatchet and snip the wood pulled from the two sides. This type of damage to the sides of a split will require you to rive larger blanks, to ensure that the blank contains sufficient undamaged wood to yield a turning. On the other hand, woods that rive cleanly allow you to split blanks very near the dimension of the intended turning.
I do not have a working knowledge of all American woods, and cannot advise you as to which rive well. It’s recommended that you experiment with the specific species you are interested in. I can relate my experiences with American eastern hard woods. Red and silver maple, American beech, and white (paper) birch are evenly textured woods that split very well. Hard (sugar) maple, and black (sweet) and yellow birch are all evenly textured, but tear. Black cherry tears the most. Of the ring porous woods, red oak, white ash, and hickory split very easily. White oak is stringy, and tears.
When riving, you can feel and hear the difference between wood that splits cleanly and one that tears. Species that rive well make a distinct “pop” when they release. Stringy woods that pull strands from each side of the split make a tearing sound.
Though a particular species of wood can be riven easily, the quality should not supersede the concerns described in Chapter 6. You still need to choose a wood for its turning properties, not for its riving qualities. For example, if you are making baluster turnings that have crisp elements that are distinctly defined and differentiated, do not use red oak simply because it rives well.
Though some species of wood rive better than others, not every log of that particular species is suitable for riving. The log you choose should not contain any live knots (knots that were living limbs when the tree was felled) or any encased knots (dead limbs that broke off and have since been covered by later growth). Wherever either of the two flaws occur in a log, the grain will be deflected around them. Not only will the wood be very hard to rive (for the same reason, it is hard to split stove wood with knots), the blanks you obtain will usually be too twisted and bent to make a turning. For this reason, be selective when choosing a log. Carefully examine it for defects. Other flaws you should look for include wind shakes, twisted or spiral growth and decay.

Photo 9: A collection of riving tools. Counterclock wise from top, they are: a wooden maul (sometimes called a beetle), a Kent hatchet, a six-pound splitting maul, a peavey (not essential, but handy for moving logs), and a pair of wedges.
A collection of tools is needed for riving (Photo 9). Unfortunately, they are not tools you are likely to use in the woodworking you do at the bench. You should have a six-pound splitting maul (eight pounds is too heavy), a pair of steel wedges, a wooden club called a beetle (this tool can itself be made on a lathe), and a froe or a Kent hatchet (one with a wide, thin blade). A tape measure is also needed.
A chain saw will quickly buck the log into lengths, which are called billets. You can also do this by hand, using either a bucksaw or a large (36") tubular metal brush saw. Both of these saws take more work to use than a chain saw, and require more time. However, if you rive infrequently, they are a less-expensive alternative.
Using the metal splitting wedges by driving them in with the metal maul, first halve and then quarter the billets. Split the blanks from the billets with either a froe or a Kent hatchet. Always drive both of these splitting tools with a beetle. Never use the splitting maul, because the force of metal against metal will eventually destroy the froe or the Kent hatchet.
Before bucking a log, examine it for blemishes such as live or encased knots. If possible, cut the billets from between the blemishes. Buck the billets a couple of inches longer than the finished blanks you need for turning. As the blank seasons, its end grain will collapse, case-harden, and perhaps develop small checks. Thus, the ends of the blank have to be trimmed before it can be safely turned. Before placing a seasoned blank in the lathe, cut at least 1⁄2" off either end with a small (21") brush saw.
Before riving the billets into turning blanks, remember that it is a controlled process. It is not like splitting firewood, where the blow has to be strong, but not necessarily well placed. Instead, work more slowly and more deliberately. After every few blows, stop to determine your progress.
Turn the billet on one end and halve it using two splitting wedges and the maul. Set the wedges on either side of the pith so that the wedges and pith form a straight line. Also use the maul and wedges to quarter and eighth the halves (Photo 10).
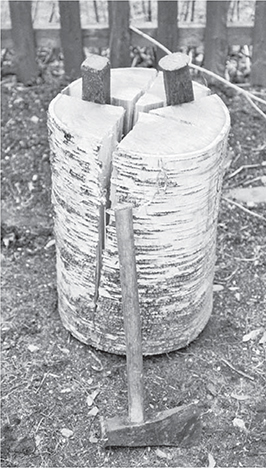
Photo 10: This white birch billet has been halved, quartered and eighthed with splitting wedges driven by a maul.
Next, use a soft lead pencil or a piece of chalk to sketch out the finished blanks on the end grain. (After some experience, you will be able to skip this step.) Use either a froe or a Kent hatchet to rive out the rough blanks (Photo 11).

Photo 11: The eighths are rived into turning blanks with a Kent hatchet driven with an oak maul. The oak maul was itself turned from a large, riven blank.
After all the billets have been rived into rough blanks, take them into the shop. Use a large drawknife to peel off the bark and shave the green blanks to their rough-round dimensions (Photo 12). Do not try to shave the blanks to their final diameter. Instead, they should be left slightly large for reasons that will be explained below.

Photo 12: The blanks are rough-rounded with a drawknife and stacked to dry.
Stack the blanks where they can dry. They should be raised off the ground (or floor) on a platform such as a pallet. The blanks should also be exposed on both ends, as that is where most of the evaporation takes place. If they are stored outside, they should be protected from rain.
Depending on the drying conditions, the blanks will season sufficiently so they can be turned into furniture or building parts in about 6-12 months. You can use them sooner than that, but you risk encountering problems such as joints loosening due to tenon shrinkage. When I made Windsor chairs, I avoided any such difficulties by leaving the newly turned parts in a warm (175°F) oven for most of a day. This temperature dries the wood completely, but is low enough that it does not cause honeycombing (internal checking).
Because riven turning blanks are irregular(merely rough-rounded with a drawknife) they are best used for parts that do not have square sections. That is why riven wood is most commonly used in turned chairmaking (Windsors and ladder-backs).
Still, it is possible to make riven blanks into turning squares. Plane a flat surface on the blank with a handplane, and hold this face against the fence of a jointer. This will allow you to joint a second surface that is square with the first. Turn the blank end-over-end and square the third and fourth sides. However, unless for some reason you need the superior strength of riven wood, it is a lot easier to saw turning squares from plank.
Chucking a riven blank in the lathe is not as easy to do as with turning squares. You cannot locate the center of the blank by merely making an X on the end grain. If the piece is perfectly straight and of a uniform thickness, try locating the center points by eye. When the piece is chucked, turn on the lathe. You will see an image with blurred outer edges and a solid center. This solid area should be of a uniform width from one end to the other. So should the blurred edges. Also, the lathe should not be vibrating much more than if you had chucked up a turning square. If it is, look to see where the unevenness is occurring. You should be able to see the eccentricity in both the blurred edge and the solid center. Shut off the lathe and loosen the tail center so that the billet will spin freely on the two center points (so that the spurs are not engaging the end). Gravity will pull the off-center mass downward. To better balance the billet, relocate one (or both) centers so the billet spins more smoothly and evenly.
When rough-rounding green wood, you will not hear the uniform staccato knock a square edge makes against the roughing gouge. Instead, as the gouge passes along the blank, it cuts through an irregular surface, so that some places along the length will strike against the tool with more force than others. However, all you have to do is make several passes back and forth along the blank to quickly bring the surface close to round. From this point on, the techniques for turning green wood are the same as for turning squares.