Chapter 7
Getting Word’s Help with Office Chores
IN THIS CHAPTER
 Commenting on others’ work
 Tracking revisions to documents
 Printing envelopes and labels
 Mail merging for form letters and bulk mailing
This chapter is dedicated to the proposition that everyone should get his or her work done sooner. It explains how Word can be a help in the office, especially when it comes to working on team projects. This chapter explains comments, using revision marks to record edits, and mail merging, Microsoft’s term for generating form letters, labels, and envelopes for mass mailings.
Book 10 explains another way to collaborate on team projects — by collaborating online with OneDrive.
Highlighting Parts of a Document
In my work, I often use the Highlight command to mark paragraphs and text that need reviewing later. And on rainy days, I use it to splash color on my documents and keep myself amused. Whatever your reasons for highlighting text in a document, go to the Home tab and use one of these techniques to do it:
- Select text and then choose a highlighter. Select the text you want to highlight, and then either click the Text Highlight Color button (if it’s displaying your color choice) or open the drop-down list on the button and choose a color.
- Choose a highlighter and then select text. Either click the Text Highlight Color button (if it’s already displaying your color choice) or open the drop-down list on the button and choose a color. The pointer changes into a crayon. Drag across the text you want to highlight. When you finish highlighting, click the Text Highlight Color button again or press Esc.
To remove highlights, select the highlighted text, open the drop-down list on the Text Highlight Color button, and choose No Color. Select the entire document (press Ctrl+A) and choose No Color to remove all highlights from a document.
Commenting on a Document
People collaborating on a document can write comments and in so doing prove that two heads are better than one. Comments give you the opportunity to suggest improvements, plead with your collaborators, debate your editor, and praise others, all in the interest of turning out a better document.
To enter and read comments, go to the Review tab, as shown in Figure 7-1. These pages explain how to enter comments, examine comments, hide and display comments, and do all else that pertains to commenting on a document.
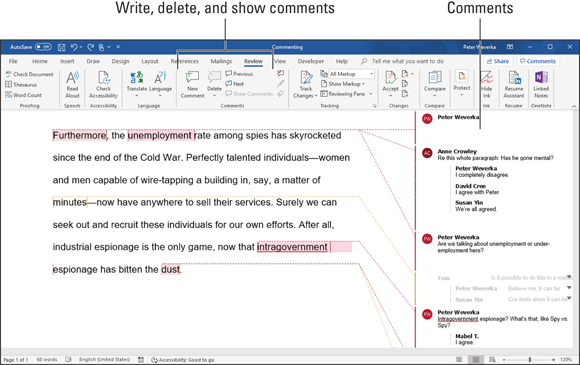
FIGURE 7-1: Comments in All Markup view.
Entering comments
In my experience, Print Layout view is the best view for entering and reading comments. Comments are marked with the writer’s name, the writer’s initials, and the date on which the comment was made. Follow these steps to write comments in Print Layout view:
- Select the word or sentence that you want to comment on.
Choose a Comment command.
Word offers two ways to do it:
- Click the Comments button in the upper-right corner of the screen and choose New Comment on the drop-down list that appears.
- On the Review tab, click the New Comment button.
Either the Revisions pane appears on the left side of the screen or a balloon for entering a comment appears on the right side. See “Viewing and displaying comments,” later in this chapter, for details.
- Enter your comment.
Replying to and resolving comments
To reply to and resolve comments, display comments in balloons on the right side of the screen. Each balloon comments offers a Reply and Resolve link.
- Replying to a comment: Click the Reply link. Space (and your name) appears in the balloon so that you can reply to a comment. Collaborators can discuss topics in this way.
- Resolving a comment: Click the Resolve link. The comment is grayed out. To resume the discussion around a comment, click the Reopen link.
Viewing and displaying comments
The makers of Word want you to be able to view comments when necessary but shunt them aside when comments get in the way. To tell Word how to display comments, go to the Review tab and choose an option on the Display for Review drop-down list:
- Simple Markup: Choose Simple Markup to keep comments from crowding the screen. Then click the Show Comments button if necessary:
- Show Comments button clicked. Comments appear in balloons on the right side of the screen. Move the pointer over a comment to see what it refers to on the page.
- Show Comments button not clicked. Comments are marked by icons on the right side of the page. Click an icon to read a comment in a balloon.
- All Markup: Choose All Markup to see where all the comments are (refer to Figure 7-1). Then click the Show Markup button and choose an option on the drop-down list to display comments:
- Choose Balloons ⇒ Show Revisions in Balloons (or Show Only Comments and Formatting in Balloons) to show comments in balloons on the right side of the screen.
- Choose Balloons ⇒ Show All Revisions Inline to show commenters’ initials in the text. You can move the pointer over a commenter’s initials to read his or her comment in a pop-up box.
- No Markup: Choose No Markup to cease displaying comment icons or comments.
- Original: You can also choose Original to stop displaying icons and comments.
Caring for and feeding comments
Starting on the Review tab, here is a handful of tasks that deserve comment (if you’ll pardon my little pun):
- Editing a comment: Display the comment and edit its text.
- Going from comment to comment: Click the Previous or Next button on the Revision tab. You can also click the Comments button in the upper-right corner of the Word screen and choose Previous or Next on the drop-down list.
- Displaying comments by a specific reviewer: Click the Show Markup button, choose Specific People, and deselect All Reviewers on the submenu. Then click the button again, choose Specific People, and choose the name of a reviewer. To see all comments again, click the Show Markup button and choose Specific People ⇒ All Reviewers.
- Deleting comments: Delete one, all, or some comments:
- Deleting a comment: Select a comment and click the Delete button. You can also right-click and choose Delete Comment.
- Deleting all the comments in the document: Open the drop-down list on the Delete button and choose Delete All Comments in Document.
- Deleting comments made by one or two people: First, isolate comments made by people whose comments you want to delete (see “Displaying comments by a specific reviewer,” earlier in this list). Then open the drop-down list on the Delete button and choose Delete All Comments Shown.
Tracking Changes to Documents
When many hands go into revising a document, figuring out who made changes to what is impossible. What’s more, it’s impossible to tell what the first draft looked like. Sometimes it’s hard to tell whether the changes were for good or ill. To help you keep track of changes to documents, Word offers the Track Changes command. When this command is in effect:
- Changes to a document are recorded in a different color, with one color for each reviewer.
- New text is underlined; deleted text is crossed out.
By moving the pointer over a change, you can read the name of the person who made it as well as the words that were inserted or deleted. You can see changes as well in the Reviewing pane. As you review changes, you can accept or reject each change. You can also see the original document, a copy with revisions, or the final copy simply by making a choice from the Display for Review drop-down list on the Review tab.
To give you an idea of what tracking marks look like, Figure 7-2 shows the first two sentences of Vladimir Nabokov’s autobiography Speak, Memory with marks showing where the author made additions and deletions to the original draft.
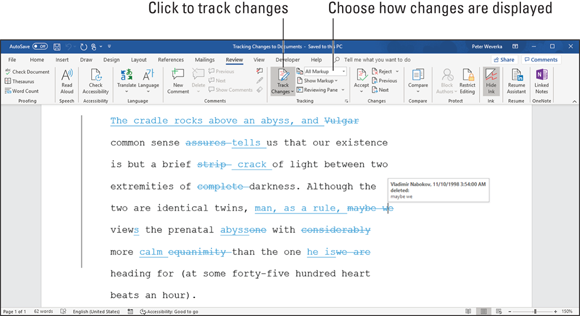
FIGURE 7-2: A document with revision marks and changes showing.
Telling Word to start marking changes
To start tracking where editorial changes are made to a document, turn Track Changes on. You can do that with one of these techniques:
- On the Review tab, click the Track Changes button (or open its drop-down list and choose Track Changes).
- Press Ctrl+Shift+E.
- On the status bar, click the words Track Changes so that the status bar reads “Track Changes: On.” If you don’t see the words Track Changes on the status bar and you want to see them there, right-click the status bar and select Track Changes on the pop-up menu.
To stop tracking changes to a document, click the Track Changes button again, press Ctrl+Shift+E again, or click the words Track Changes on the status bar so that the words read “Track Changes: Off.”
Reading and reviewing a document with revision marks
Reading and reviewing a document with revision marks isn’t easy. The marks can get in the way. Fortunately, Word offers the Display for Review menu on the Review tab for dealing with documents that have been scarred by revision marks. Choose options on the Display for Review drop-down list to get a better idea of how your changes are taking shape:
- Get an idea where changes were made. Choose Simple Markup. A vertical line appears on the left side of the page to show where changes were made. (This line doesn’t appear in Draft and Outline view.)
- See where additions and deletions were made. Choose All Markup (refer to Figure 7-2). Additions are underlined and deleted text is crossed through.
- See what the document would look like if you accepted all changes. Choose No Markup. All revision marks are stripped away and you see what your document would look like if you accepted all changes made to it.
- See what the document would look like if you rejected all changes. Choose Original. You get the original, pristine document back.
Marking changes when you forgot to turn on revision marks
Suppose that you write the first draft of a document and someone revises it but that someone doesn’t track changes. How can you tell where changes were made? For that matter, suppose that you get hold of a document, you change it around without tracking changes, and now you want to see what your editorial changes did to the original copy. I have good news: You can compare documents to see the editorial changes that were made to them. Word offers a command for comparing the original document to a revised edition and another for comparing two different revised editions of the same document.
After you make the comparison, Word creates a third document similar to the one shown in Figure 7-3. In the Source Document pane on the right side of the window, you can see the documents you’re comparing. The Compared Document pane, meanwhile, shows who made changes and what those changes are.
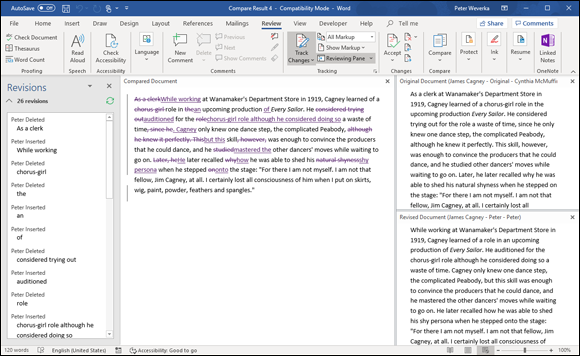
FIGURE 7-3: Comparing documents to see where editorial changes were made.
Follow these steps to compare an original document to its revised copy or two revised copies:
On the Review tab, click the Compare button.
You see a drop-down list (depending on the size of your screen, you may have to choose Compare more than once to get to the drop-down list).
On the drop-down list, choose Compare to compare the original document to its revised edition; choose Combine to compare two editions of the same document that were revised separately.
You see the Compare Documents dialog box or the Combine Documents dialog box, as shown in Figure 7-4. These dialog boxes work the same way.
- On the Original Document drop-down list, choose the original or a revised edition of the document; if its name isn’t there, click the Browse button and select it in the Open dialog box.
- On the Revised Document drop-down list, choose a revised copy, or else click the Browse button and select it in the Open dialog box.
Click the More button.
You see more options for comparing or combining documents.
- If you so desire, deselect Comparison Settings check boxes to tell Word what you want to compare.
Click OK.
Word creates a new document that shows where changes were made to the original copy or where the revised copies differ (refer to Figure 7-3). You can save this document if you want to.
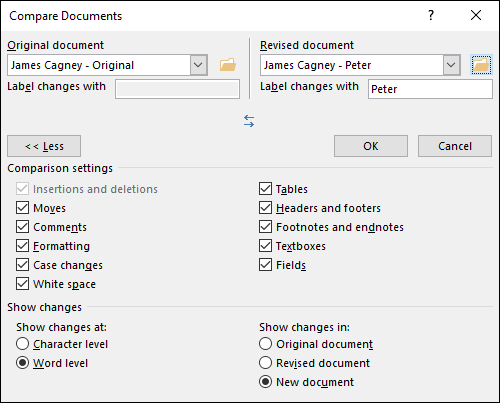
FIGURE 7-4: Choosing which documents to compare.
Accepting and rejecting changes to a document
Whatever your preference for accepting or rejecting changes, start by selecting a change. To do so, either click it or click the Previous or Next button on the Review tab to locate it in your document. With the change selected, do one of the following:
- Accept a change. Click the Accept button or open the drop-down list on the Accept button and choose Accept This Change or Accept and Move to Next. You can also right-click and choose Accept.
- Reject a change. Click the Reject button or open the drop-down list on the Reject button and choose Reject Change or Reject and Move to Next. You can also right-click and choose Reject.
- Accept all changes. Open the drop-down list on the Accept button and choose Accept All Changes.
- Reject all changes. Open the drop-down list on the Reject button and choose Reject All Changes.
Printing an Address on an Envelope
Printing addresses gives correspondence a formal, official look. It makes you look like a big shot. (Later in this chapter, “Churning Out Letters, Envelopes, and Labels for Mass Mailings” explains how to print more than one envelope at a time). Here’s how to print an address and a return address on an envelope:
To save a bit of time, open the document that holds the letter you want to send; then select the name and address of the person you want to send the letter to.
By doing so, you save yourself from having to type the address. However, you don’t have to open a document to start with.
On the Mailings tab, click the Envelopes button (you may have to click the Create button first, depending on the size of your screen).
The Envelopes tab of the Envelopes and Labels dialog box appears, as shown in Figure 7-5.
- Enter a name and address in the Delivery Address box (the address is already there if you selected it in Step 1).
- Enter your return address in the Return Address box, if you want.
- Click the Omit check box if you don’t want your return address to appear on the envelope.
Click the Options button, and in the Envelope Options dialog box, tell Word what size your envelopes are and how your printer handles envelopes.
Tell Word about your envelopes on the Envelope Options and Printing Options tabs, and click OK:
- Envelope Options tab: Choose an envelope size, a font for printing the delivery and return address, and a position for the addresses. The sample envelope in the Preview shows you what your position settings do when the envelope is printed.
- Printing Options tab: Choose a technique for feeding envelopes to your printer. Consult the manual that came with your printer, select one of the Feed Method boxes, click the Face Up or Face Down option button, and open the Feed From drop-down list to tell Word which printer tray the envelope is in or how you intend to stick the envelope in your printer.
Click the Print button.
All that trouble just to print an address on an envelope!
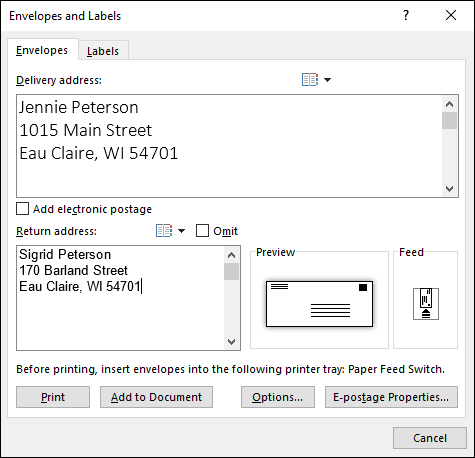
FIGURE 7-5: Printing on an envelope.
Printing a Single Address Label (or a Page of the Same Label)
If you need to print a single label or a sheet of labels that are all the same, you can do it. Before you start printing, however, take note of the label’s brand name and product number. You are asked about brand names and product numbers when you print labels. (Later in this chapter, “Churning Out Letters, Envelopes, and Labels for Mass Mailings” explains how to print multiple labels as part of a mass mailing.)
Follow these steps to print a single label or a sheet full of identical labels:
On the Mailings tab, click the Labels button (you may have to click the Create button first, depending on the size of your screen).
You see the Labels tab of the Envelopes and Labels dialog box, as shown in Figure 7-6.
- Enter the label — the name and address — in the Address box.
- Either click the Options button or click the label icon in the Label box to open the Label Options dialog box.
- In the Printer Information area, select either Continuous-Feed Printers or Page Printers to declare which kind of printer you have; on the Tray drop-down list, choose the option that describes how you will feed labels to your printer.
Open the Label Vendors drop-down list and choose the brand or type of labels that you have.
If your brand is not on the list, click the Details button, and describe your labels in the extremely confusing Information dialog box. A better way, however, is to measure your labels and see whether you can find a label of the same size by experimenting with Product Number and Label Information combinations.
In the Product Number menu, select the product number listed on the box that your labels came in.
Look in the Label Information box on the right to make sure that the Height, Width, and Page Size measurements match those of the labels you have.
- Click OK to return to the Envelopes and Labels dialog box.
Choose a Print option.
Tell Word to print a single label or a sheet full of labels:
- Full Page of the Same Label: Select this option button if you want to print a pageful of the same label. Likely, you’d choose this option to print a pageful of your own return addresses. Click the New Document button after you make this choice. Word creates a new document with a pageful of labels. Save and print this document on a sheet of labels.
- Single Label: Select this option button to print one label. Then enter the row and column where the label is located and click the Print button.
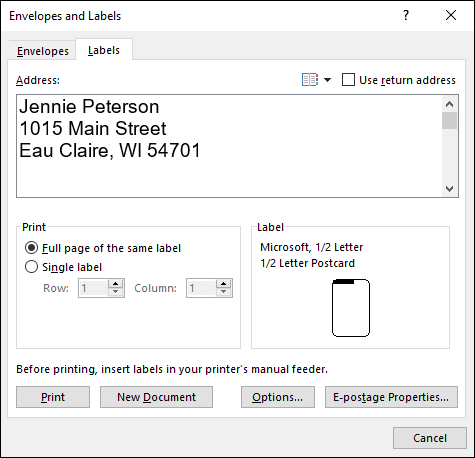
FIGURE 7-6: Printing labels.
Churning Out Letters, Envelopes, and Labels for Mass Mailings
Thanks to the miracle of computing, you can churn out form letters, labels, and envelopes for a mass mailing in the privacy of your home or office, just as the big companies do. Churning out form letters, envelopes, and labels is easy, as long as you take the time to prepare the source file. The source file is the file that the names and addresses come from. A Word table, an Excel worksheet, a Microsoft Access database table or query, or an Outlook Contacts list can serve as the source file. (Book 5 explains Outlook; Book 3 explains Excel; Book 6 explains Access.)
To generate form letters, envelopes, or labels, you merge the form letter, envelope, or label document with a source file. Word calls this process merging. During the merge, names and addresses from the source file are plugged into the appropriate places in the form letter, envelope, or label document. When the merge is complete, you can either save the form letters, envelopes, or labels in a new file or start printing right away.
The following pages explain how to prepare the source file and merge addresses from the source file with a document to create form letters, labels, or envelopes. Then you discover how to print the form letters, labels, or envelopes after you have generated them.
Preparing the source file
If you intend to get addresses for your form letters, labels, or envelopes from an Outlook Contact List on your computer, you’re ready to go. However, if you haven’t entered the addresses yet or you are keeping them in a Word table, Excel worksheet, Access database table, or Access query, make sure that the data is in good working order:
- Word table: Save the table in its own file and enter a descriptive heading at the top of each column. In the merge, when you tell Word where to plug in address and other data, you will do so by choosing a heading name from the top of a column. In Figure 7-7, for example, the column headings are Last Name, First Name, Street, and so on. (Chapter 4 of this minibook explains how to construct a Word table.)
- Excel worksheet: Arrange the worksheet in table format with a descriptive heading atop each column and no blank cells in any columns. Word will plug in addresses and other data by choosing heading names.
- Access database table or query: Make sure that you know the field names in the database table or query where you keep the addresses. During the merge, you will be asked for field names. By the way, if you’re comfortable in Access, query a database table for the records you will need. As you find out shortly, Word offers a technique for choosing only the records you want for your form letters, labels, or envelopes. However, by querying first in Access, you can start off with the records you need and spare yourself from having to choose records in Word.
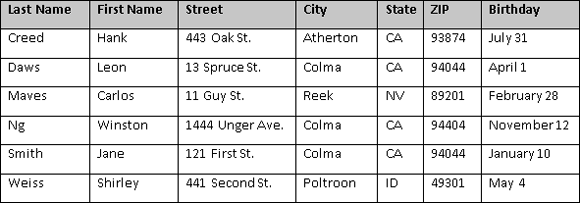
FIGURE 7-7: A Word source table for a mail merge.
A Word table, Excel worksheet, or Access table or query can include more than address information. Don’t worry about deleting information that isn’t required for your form letters, labels, and envelopes. As you find out soon, you get to decide which information to take from the Word table, Excel worksheet, or Access table or query.
Merging the document with the source file
After you prepare the source file, the next step in generating form letters, labels, or envelopes for a mass mailing is to merge the document with the source file. Follow these general steps to do so:
- Create or open a document.
- Form letters: Either create a new document and write your form letter, being careful to leave out the parts of the letter that differ from recipient to recipient, or open a letter you have already written and delete the addressee’s name, the address, and other parts of the letter that are particular to each recipient.
- Envelopes: Create a new document.
- Labels: Create a new document.
- On the Mailings tab, click the Start Mail Merge button.
- Choose Letters, Envelopes, or Labels on the drop-down list.
Prepare the groundwork for creating form letters, envelopes, or labels for a mass mailing.
What you do next depends on what kind of mass mailing you want to attempt:
- Form letters: You’re ready to go. The text of your form letter already appears onscreen if you followed the directions for creating and writing it in Step 1.
- Envelopes: You see the Envelope Options dialog box, where, on the Envelope Options and Printing Options tabs, you tell Word what size envelope you will print on. See “Printing an Address on an Envelope,” earlier in this chapter, for instructions about filling out these tabs (see Step 6). A sample envelope appears onscreen.
- Labels: You see the Label Options dialog box, where you tell Word what size labels to print on. See “Printing a Single Address Label (or a Page of the Same Label),” earlier in this chapter, if you need advice for filling out this dialog box (refer to Steps 4 through 7).
Click the Select Recipients button and choose an option on the drop-down list to direct Word to your source file or the source of your address and data information.
Earlier in this chapter, “Preparing the source file” explains what a source file is. Your options are as follows:
Addresses from a Word table, Excel worksheet, Access database table, or Access query: Choose Use an Existing List. You see the Select Data Source dialog box. Locate the Word file, the Excel worksheet, or the Access database, select it, and click Open.
If you select an Excel worksheet or Access database, you see the Select Table dialog box. Select the worksheet, table, or query you want and click the OK button.
- Addresses from Microsoft Outlook: Choose Choose from Outlook Contacts (Outlook must be your default email program to get addresses from Outlook). Then, in the Select Contacts dialog box, choose Contacts and click OK. The Mail Merge Recipients dialog box appears (skip to Step 7).
Click the Edit Recipient List button.
The Mail Merge Recipients dialog box appears, as shown in Figure 7-8.
In the Mail Merge Recipients dialog box, select the names of people to whom you will send mail; then click OK.
To select recipients’ names, check or uncheck the boxes on the left side of the dialog box.
Enter the address block on your form letters, envelopes, or labels.
The address block is the address, including the recipient’s name, company, title, street address, city, and ZIP code. If you’re creating form letters, click in the sample letter where the address block will go. If you’re printing on envelopes, click in the middle of the envelope where the delivery address will go. Then follow these steps to enter the address block:
- Click the Address Block button. The Insert Address Block dialog box appears, as shown in Figure 7-9.
- Choose a format for entering the recipient’s name in the address block. As you do so, watch the Preview window; it shows the actual names and addresses that you selected in Step 7.
- Click the Match Fields button. You see the Match Fields dialog box, shown in Figure 7-9.
- Using the drop-down lists on the right side of the dialog box, match the fields in your source file with the address block fields on the left side of the dialog box. In Figure 7-9, for example, the Street field is the equivalent of the Address 1 field on the left side of the dialog box, so Street is chosen from the drop-down list to match Address 1.
- Click OK in the Match Fields dialog box and the Insert Address Block dialog box. The
<<AddressBlock>>field appears in the document where the address will go. Later, when you merge your document with the data source, real data will appear where the field is now. Think of a field as a kind of placeholder for data.
Click the Preview Results button on the Mailings tab to see real data rather than fields.
Now you can see clearly whether you entered the address block correctly. If you didn’t enter it correctly, click the Match Fields button (it’s in the Write & Insert Fields group) to open the Match Fields dialog box and make new choices.
- Put the finishing touches on your form letters, labels, or envelopes:
Form letters: Click where the salutation (“Dear John”) will go and then click the Greeting Line button. You see the Insert Greeting Line dialog box, shown in Figure 7-10. Make choices in this dialog box to determine how the letters’ salutations will read.
The body of your form letter may well include other variable information such as names and birthdays. To enter that stuff, click in your letter where variable information goes, click the Insert Merge Field button. The Insert Merge Field dialog box appears and lists fields from the source file. Select a field, click the Insert button, and click the Close button. (You can also open the drop-down list on the Insert Merge Field button and choose a field from the source file.)
If you’re editing your form letter and you need to see precisely where the variable information you entered is located, click the Highlight Merge Fields button. The variable information is highlighted in your document.
Envelopes: To position the address block correctly, you may have to press the Enter key and tab keys to move it to the center of envelope. If you don’t like the fonts or font sizes on the envelope, select an address, go to the Home tab, and change fonts and font sizes there.
To enter a return address, click in the upper-left corner of the envelope and enter it there.
- Labels: Click the Update Labels button to enter all recipients’ labels in the sample document.
Make sure the Preview Results button is selected and then click the Next Record and Previous Record buttons on the Mailings tab to skip from recipient to recipient to see whether you have entered information correctly.
The Next Record and Previous Record buttons are located in the Preview Results group. The items you see onscreen are the same form letters, envelopes, or labels you will see when you have finished printing.
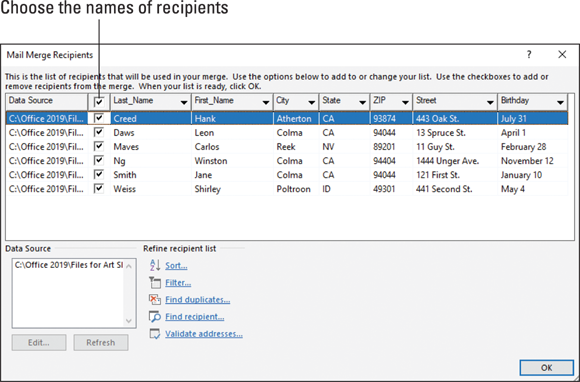
FIGURE 7-8: Choosing who gets mail.
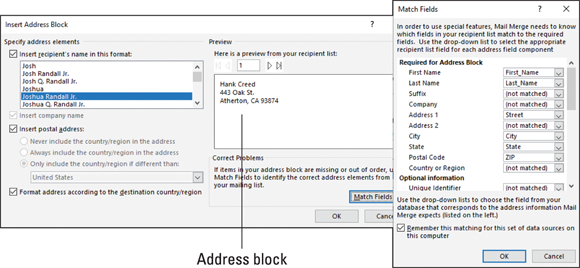
FIGURE 7-9: Creating the address block (left) and linking it with address fields (right).
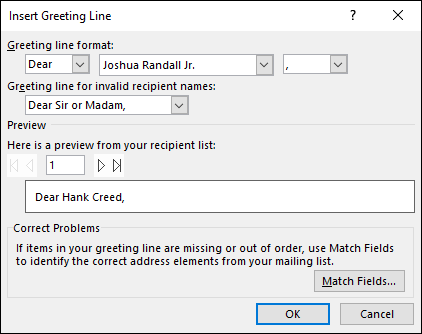
FIGURE 7-10: Entering the greeting.
If an item is incorrect, open the source file and correct it there. When you save the source file, the correction is made in the sample document.
At last — you’re ready to print the form letters, envelopes, or labels. Take a deep breath and keep reading.
Printing form letters, envelopes, and labels
After you have gone to the trouble to prepare the data file and merge it with the document, you’re ready to print your form letters, envelopes, or labels. Start by loading paper, envelopes, or sheets of labels in your printer:
- Form letters: Form letters are easiest to print. Just put the paper in the printer.
- Envelopes: Not all printers are capable of printing envelopes one after the other. Sorry, but you probably have to consult the dreary manual that came with your printer to find out the correct way to load envelopes.
- Labels: Load the label sheets in your printer.
Now, to print the form letters, envelopes, or labels, save the material in a new document or send it straight to the printer:
- Saving in a new document: Click the Finish & Merge button and choose Edit Individual Documents (or press Alt+Shift+N). You see the Merge to New Document dialog box. Click OK. After Word creates the document, save it and print it. You can go into the document and make changes here and there before printing. In form letters, for example, you can write a sentence or two in different letters to personalize them.
- Printing right away: Click the Finish & Merge button and choose Print Documents (or press Alt+Shift+M) to print the form letters, envelopes, or labels without saving them in a document. Click OK in the Merge to Printer dialog box and then negotiate the Print dialog box.
 Highlight marks are printed along with the text. To keep highlights from being printed, go to the File tab, choose Options, visit the Display category in the Word Options dialog box, and deselect the Show Highlighter Marks check box.
 Comments appear in the Revisions pane on the left side of the screen or balloons on the right side (refer to