Chapter 5
Tasks, Reminders, and Notes
IN THIS CHAPTER
 Creating, handling, and managing tasks
 Being reminded when deadlines and activities are forthcoming
 Jotting down digital notes
This short chapter describes some Outlook goodies that were neglected in the other chapters of this minibook. It explains how the Tasks window can help you meet your deadlines and how to be alerted when an activity is looming, a task deadline is arriving, an email message needs a reply, or someone in your Contacts folder needs love and attention. Finally, it explains Outlook’s digital stick ’em notes.
Tasks: Seeing What Needs to Get Done
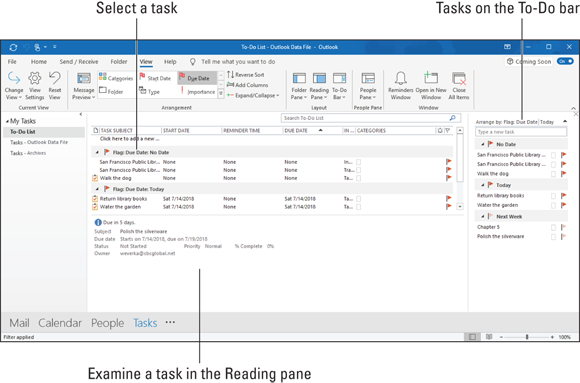
As shown in Figure 5-1, use the Tasks window to see what needs to be done, when it’s due, and whether it’s overdue. On this list, due dates clearly show how smartly the whip is being cracked and how close you are to meeting or missing deadlines. A gray line appears across tasks that are done. Tasks that are overdue appear in red. Read on if you want to find out how to enter a task, attach a file to a task, and manage tasks in the Tasks window.

FIGURE 5-1: The Tasks window shows what has been done and what needs doing.
Entering a task in the Tasks window
Outlook offers two ways to enter a task in the Tasks window:
- The fast way: Click at the top of the window where it says “Type a new Task,” type a few words to describe the task, and press the Enter key. Outlook makes the current date the task’s start and end date.
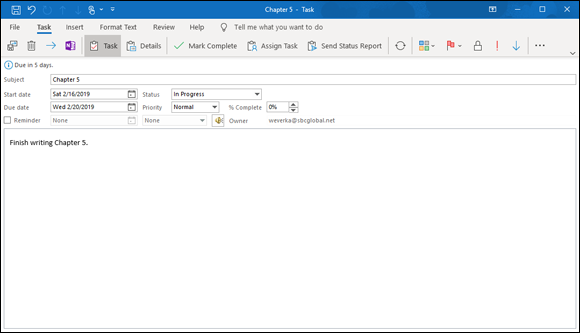
- The slow but thorough way: On the Home tab, click the New Task button (or press Ctrl+N). You see the Task window, as shown in Figure 5-2. In this window are places for describing the task, entering start and due dates, describing the task’s status, prioritizing the task, and jotting down notes about it. Click the Save & Close button when you finish describing the task.

FIGURE 5-2: Describing a task.
By clicking the Recurrence button in the Task window, you can enter a Sisyphean task that gets repeated over and over again. In the Task Recurrence dialog box, describe how often the task recurs. Recurring tasks are marked in the Tasks window with a special recurring icon.
Click the Details button in the Task window to track the hours you worked on a project, the companies you worked for, and how many miles you logged going to and fro in your work.
Examining tasks in the Tasks window
Juggling many different tasks is a high art, and to help you get better at it, the Tasks window offers these techniques for examining tasks that need doing:
- Choose To-Do List or Tasks in the Folder pane. Under My Tasks at the top of the Folder pane, choose To-Do List to examine all tasks, including those you fashioned from email messages and Calendar appointments; choose Tasks to see only the tasks you set for yourself in the Tasks folder.
- Arrange tasks. On the View tab, click the Arrange By button and choose an option on the drop-down list to arrange tasks by Categories, Start Date, Due Date, or one of the other options.
- Change views. On the View tab, click the Change View button and choose a View option. For example, choose Overdue or Next 7 Days to focus on the tasks that really need doing.
Handling and managing tasks
When the time comes to manage the tasks in the Tasks window, I hope you are a stern taskmaster. Here’s advice for handling and managing tasks:
- Marking a task as complete: Right-click a task and choose Mark Complete. Outlook draws a line through completed tasks.
- Deleting a task: Select the task and click the Delete button (it’s on the Home tab) or press the Delete key.
- Editing a task: Double-click a task in the Tasks window to open the Task window and change the particulars there.
Reminders for Being Alerted to Activities and Tasks
Outlook offers the Reminder message box to alert you when an appointment or event from the Calendar is about to take place (see Chapter 4 of this minibook), when a task deadline is looming (see the preceding topic in this chapter), when an email message needs a reply (see Chapter 3 of this minibook), or when someone whose name is in your Contacts folder needs attention (see Chapter 2 of this minibook).
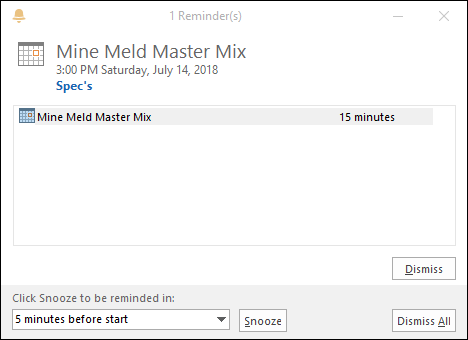
Figure 5-3 shows the Reminder message box. When Outlook is running and you least expect it, a Reminder message box similar to the one in the figure may appear to keep you on your toes. These pages explain how to handle reminder messages, schedule messages, and make the messages appear when you want them to appear.

FIGURE 5-3: The Reminder message box.
Handling reminder messages
Select a reminder in the Reminder message box and do the following to handle a reminder:
- Dismiss it. Click the Dismiss button to shelve the reminder notice. If more than one notice appears in the Reminder message box and you want to erase them all, click the Dismiss All button.
- Be reminded later. Click the Snooze button. At the bottom of the dialog box, the Click Snooze to Be Reminded Again In text box tells you when the next reminder message will arrive. To change this setting, open the drop-down list and choose a different time period.
- Open the item. Double-click the reminder to examine the appointment, task, email message, or contact to which the reminder pertains.
- Procrastinate. Click the Close button (the X) in the Reminder message box to make it disappear. To open the message box later, go to the View tab, click the More Commands button (the three dots on the right side of the Ribbon), and choose the Reminders Window on the drop-down list.
Scheduling a reminder message
Follow these instructions to schedule a reminder message:
- Calendar appointment or event: In the Appointment window, open the Reminder drop-down list and choose how many minutes, hours, or weeks in advance of the appointment or event to make the reminder appear.
- Task deadline: In the Task window (refer to Figure 5-2), select the Reminder check box and choose a day and time to be reminded in the drop-down menus.
- Contacts name: Select a contact in the Contacts window, click the Follow Up button, and choose Add Reminder on the drop-down list. The Custom dialog box opens. Treat this dialog box the same way you treat the one for email messages (see the preceding item in this list).
Making reminders work your way
You can do two or three things to make reminders work your way. On the File tab, choose Options to open the Options dialog box. Then follow these instructions to have your way with reminder notices:
- Changing the reminder time for appointments and events: By default, the Reminder message box appears 15 minutes before appointments and events start. To change this setting, go to the Calendar category and enter a new setting in the Default Reminders drop-down list (look under “Calendar Options”).
- Changing the default time for task reminders: When a task’s deadline arrives, the Reminders dialog box lets you know at 8:00 a.m. (or when you start Outlook, if you start the application after 8:00 a.m.). To change this default setting, go to the Tasks category and choose a new time from the Default Reminder Time drop-down list.
- Playing a different sound (or no sound): By default, you hear a little chime when the Reminder message box appears onscreen. To hear a different sound or no sound at all, go to the Advanced category of the Options dialog box. To play no sound, deselect the Play Reminder Sound check box. To play a different sound, click the Browse button and then select a .wav sound file in the Reminder Sound File dialog box.
Making Notes to Yourself
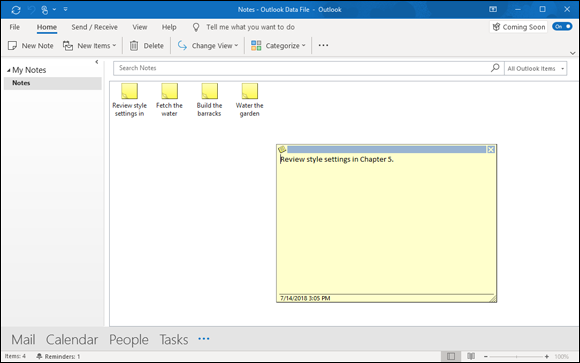
As shown in Figure 5-4, notes resemble the yellow stick ’em notes that you often see affixed to manuscripts and refrigerator doors. Click the Notes button in the Navigation pane to go to the Notes window (you likely have to click the three dots on the Navigation pane to see the Notes button). Write a note to mark down a deadline, for example, or remind yourself to take out the cat. Here are instructions for doing all and sundry with notes:
- Creating a note: Click the New Note button (or press Ctrl+N) and type the note in the Note window. Then click outside the window. You can create a note when you’re not in the Notes window by pressing Ctrl+Shift+N.
- Opening a note: Double-click a note to read it in its Note window.
- Forwarding a note: To forward a note to someone in an email message, right-click the note and choose Forward. A Message window opens so that you can address the message. The note arrives in the form of a file attachment, and the recipient must have Outlook in order to read it.
- Deleting a note: Select the note and click the Delete button, press the Delete key, or right-click and choose Delete.

FIGURE 5-4: Notes, notes, and more notes.
 The best way to examine tasks is to display the Reading pane. This way, you can select a task and read notes you’ve made about it, as shown in
  Reminders work only for items that are stored in these folders: Tasks, Calendar, Inbox, and Contacts. Store an item in another folder or a subfolder of one of the folders I just named, and you won’t see the Reminder message box when the reminder is due. To make sure you get reminded, store items in these folders: Tasks, Calendar, Inbox, or Contacts.