Chapter 1
Outlook Basics
IN THIS CHAPTER
 Getting around in Outlook
 Searching in folders
 Deleting items
 Archiving old-and-in-the-way items
This chapter pulls back the curtain and gives you a first glimpse of Outlook, the emailer, calendar, and personal organizer in the Office 365 suite of applications. Read on to find out once and for all what Outlook does, how to get from folder to folder, and the different ways to view the stuff in folders. You can find advice about keeping folders well organized, deleting stuff, and cleaning out items in folders that you no longer need.
What Is Outlook, Anyway?
Outlook isn’t in character with the rest of the Office programs. It’s a little different in that what you see onscreen changes when you click a Navigation button on the bottom of the window. Click a Navigation button — Mail, Calendar, People, Tasks, Notes, Folders, or Shortcuts — and you go to a different Outlook window altogether.
Outlook serves many purposes. To wit, Outlook is all this:
- An email program: You can use it to send and receive email messages and files, as well as organize email messages in different folders so that you can keep track of them. (See Chapter 3 of this minibook.)
- An appointment scheduler: Outlook is a calendar for scheduling appointments and meetings. You can tell at a glance when and where you’re expected, be alerted to upcoming appointments and meetings, and invite coworkers to meetings. (See Chapter 4 of this minibook.)
- An address book: The application can store the addresses, phone numbers, and email addresses of friends, foes, clients, and family members. Looking up this information in the Contacts folder is easy. (See Chapter 2 of this minibook.)
- A task reminder: Outlook is a means of planning projects. You can tell when deadlines fall and plan your workload accordingly. (See Chapter 5 of this minibook.)
- A notes receptacle: This part of the program is a place to jot down notes and reminders. (See Chapter 5 of this minibook.)
Navigating the Outlook Folders
The first thing you should know about Outlook is this: All items are kept in folders, as shown in Figure 1-1. Recently arrived email messages are kept in the Inbox folder. Calendar items are kept in the Calendar folder. Contact information is kept in the People folder.
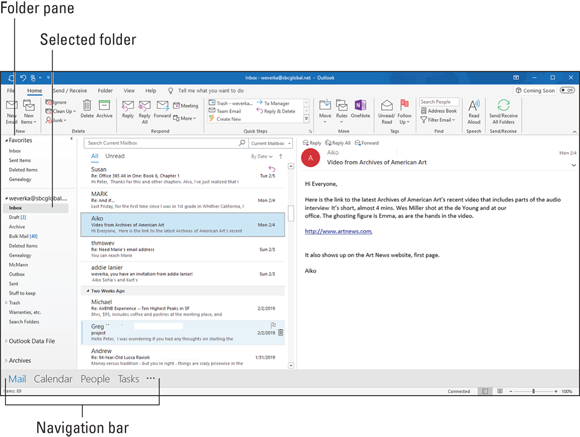
FIGURE 1-1: Mail window with the Inbox folder selected.
When you want to undertake a new task, you go to a different folder:
Folder pane: Select a folder in the Folder pane (refer to Figure 1-1). For example, click the Inbox folder to read incoming mail.
 If you don’t see the Folder pane, go to the View tab, click the Folder Pane button, and choose Normal on the drop-down list.
- Navigation bar: Click a button on the Navigation bar — Mail, Calendar, People, and so on (refer to Figure 1-1). Clicking one of these buttons displays folders that have to do, respectively, with the Mail, the Calendar, Contacts, and so on.
Categorizing Items
One of your biggest tasks in Outlook, if you choose to accept it, is to categorize items in folders so that you can find and deal with them. Finding items can be a chore in a folder with a lot of items, but by categorizing items, you can find the ones you’re looking for. Categories are color-coded to make identifying them easier. After you assign a category to an item, you can arrange items in folders by category, and in so doing, find items. Categorizing is a great way to stay on top of all the chores you have to do.
Creating a category
Follow these steps to create a category for organizing folder items:
Select an item in a folder to which you want to assign your new category.
For example, select a contact or an email message.
On the Home tab, click the Categorize button and choose All Categories on the drop-down list.
You see the Color Categories dialog box, as shown in Figure 1-2. At this point, you can create a category from scratch or revamp one of Outlook’s color-named categories:
- Creating your own category: Click the New button to open the Add New Category dialog box, as shown in Figure 1-2. Then enter a name for your category and choose a color on the drop-down list. While you’re at it, you can open the Shortcut Key drop-down list and choose a shortcut key combination for assigning your new category to items. Click the OK button in the Color Categories dialog box.
- Renaming a category: In the Color Categories dialog box (see Figure 1-2), select a color category and click the Rename button. Then enter a new name in place of the old one. You can choose a different color for your category by choosing a color in the Color drop-down list. To assign it a shortcut key, open the Shortcut Key drop-down list and choose a shortcut key combination.
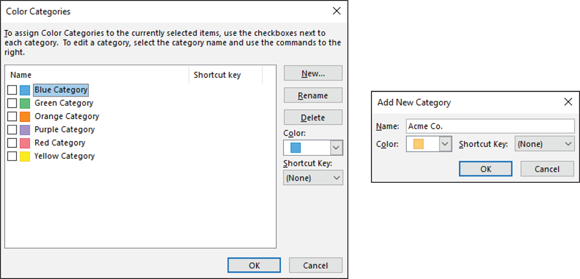
FIGURE 1-2: Click the New button or Rename button to create a new category.
To delete a category, return to the Color Categories dialog box, select the category’s name, and click the Delete button. Although the category is deceased, items to which you assigned the category keep their category assignments.
Assigning items to categories
Follow these steps to assign a category to a folder item:
- Select the item.
On the Home tab, click the Categorize button and choose a category on the drop-down list.
You can also right-click, choose Categorize, and select a category on the shortcut menu, or press a Ctrl+key combination if you assigned one to the category. An item can be assigned more than one category.
To remove a category assignment, select the item, click the Categorize button, and choose Clear All Categories.
Arranging items by category in folders
To arrange items by category in a folder, select the folder in the Folder pane and use one of these techniques:
- On the View tab, choose Categories in the Arrangement gallery.
- In a list, click the Categories column heading to sort items by category.
You can also click the Categorized button on the (Search Tools) Search tab to organize the results of a search by category.
Searching for Stray Folder Items
If you can’t locate an item in a folder by scrolling, changing views, or any other means, run a search. To start a search, go to the folder you want to search and click in the Search box (or press Ctrl+E). You can find the Search box below the Ribbon. As soon as you click in the Search box, Outlook opens the (Search Tools) Search tab so that you can describe what you’re seeking, as shown in Figure 1-3.
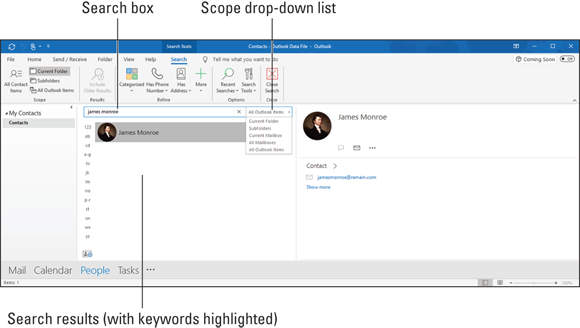
FIGURE 1-3: Describe what you’re searching for on the (Search Tools) Search tab.
As the following pages explain, you can conduct an instant search, narrow your search by choosing Refine options, or conduct an advanced search starting from the (Search Tools) Search tab. Search results appear in the window below the Search box. To close the search and go back to seeing the contents of your folder, click the Close Search button (the X on the right side of the Search box).
Conducting an instant search
What Microsoft calls an “instant search” is a keyword search of the folder you’re viewing. If a keyword you enter in the Search box is found in an email message, calendar appointment, contact, or other item, the item appears in the search results and the keyword is highlighted (refer to Figure 1-3). Search results begin appearing as soon as you start to type. You don’t have to press the Enter key to begin the search.
Refining a search
Refine a search when an instant search brings up too many or too few search results. Starting on the (Search Tools) Search tab, refine your search by changing its scope and choosing Refine options.
Changing the scope of a search
How wide the scope of a search is determines how many results are found in the search. Use these techniques to narrow or widen searches:
- Click a button in the Scope group on the (Search Tools) Search tab.
- Open the Scope drop-down list to the right of the Search box and choose an option (refer to Figure 1-3).
The options for changing the scope for searches are the following:
- Current Folder: Searches the folder you selected on the Folder pane. You can also press Ctrl+Alt+K.
- Subfolders: Expands the search to include the folder you selected on the Folder pane as well as its subfolders. You can also press Ctrl+Alt+Z.
- Current Mailbox (for email searching only): Expands a search for email to include all folders that contain email, including the Drafts and Sent Items folders. You can also press Ctrl+Alt+A.
- All Outlook Items: Expands the search to all Outlook folders. Move the pointer over the search results to see a pop-up box that lists which folder an item is stored in.
Choosing Refine options
To narrow a search, click buttons in the Refine group on the (Search Tools) Search tab. After you click a button, Outlook provides a place in the Search box for you to enter a keyword. Which buttons appear in the Refine group depends on which folder you search.
In a folder that contains email, for example, you can click the From button and enter a sender name in the Search box to search for emails you received from a particular person. You can click the Subject button and enter a keyword to search the subject descriptions in email you received.
Conducting an advanced search
If, woe is me, you can’t find what you’re looking for with an instant search or a refined search, you can try your luck with an advanced search.
On the (Search Tools) Search tab, click the Search Tools button and choose Advanced Find on the drop-down list. You see the Advanced Find dialog box, as shown in Figure 1-4. In the Look drop-down list, choose what you want to search for. Click the Browse button to open the Select Folder(s) dialog box, where you can select more than one folder to search in. Then choose options in the three tabs to formulate your search. Which options are available depends on which folder you’re searching.
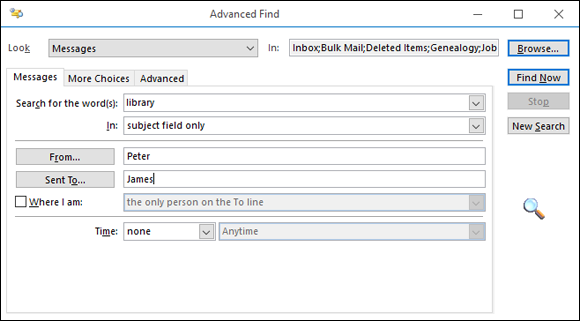
FIGURE 1-4: Pinpoint what you’re searching for in the Advanced Find dialog box.
Deleting Email Messages, Contacts, Tasks, and Other Items
Outlook folders are notorious for filling quickly. Email messages, contacts, and tasks soon clog the folders if you spend any time in Outlook. From time to time, go through the email folders, Contacts window, Task window, and Calendar to delete items you no longer need. To delete items, select them and do one of the following:
- On the Home tab, click the Delete button.
- Press the Delete key.
- Right-click and choose Delete.
To empty the Delete Items folder altogether, right-click the folder and choose Empty Folder. You can also visit the File tab, choose Info, click the Tools button, and choose Empty Deleted Items Folder on the drop-down list.
Be sure to check out “Running the Mailbox Cleanup command” at the end of this chapter. It explains a quick way to delete unwanted Inbox messages.
Cleaning Out Your Folders
Getting rid of unneeded items in folders is essential for good mental health. All that clutter can be distressing. Earlier in this chapter, “Deleting Email Messages, Contacts, Tasks, and Other Items” explains how to muck out folders by emptying them. These pages explain two more techniques for removing detritus from folders — archiving and the Mailbox Cleanup command.
Archiving the old stuff
In some cases, Outlook puts email messages, tasks, and appointments older than six months in the Archive folder, a special folder for items that Outlook thinks are stale and not worth keeping anymore. Outlook calls sending these items to the Archive folder “autoarchiving.” Items that have been archived aren’t lost forever. You can visit them by opening the Archive Folders folder and its subfolders on the Folder pane. These folders and subfolders are created automatically the first time you archive items.
Archiving is a way of stripping your mail folders, tasks lists, and calendar of items that don’t matter anymore. How and when items are archived is up to you. To archive items, you can archive them on your own, establish a default set of archiving rules that apply to all folders, or, if a folder needs individual attention and shouldn’t be subject to the default archiving rules, establish special rules for that folder. Each folder can have its own set of archiving rules or be subject to the default rules.
To tell Outlook how to archive old stuff:
- Establishing default archiving rules: On the File tab, choose Options to open the Outlook Options dialog box. Then, on the Advanced tab, click the AutoArchive Settings button. You see the AutoArchive dialog box shown in Figure 1-5. See the upcoming section “Default archiving rules.”
- Establishing rules for a specific folder: Select the folder, go to the Folder tab, and click the AutoArchive Settings button. You see the AutoArchive tab of the Properties dialog box, as shown in Figure 1-5. See “Archiving rules for a folder.”
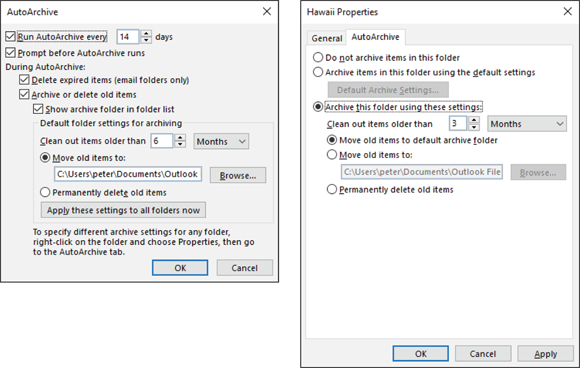
FIGURE 1-5: Making the default archiving rules (left) and rules for a folder (right).
Default archiving rules
Negotiate these options in the AutoArchive dialog box to establish default archiving rules (see Figure 1-5):
- Run AutoArchive Every: Enter a number to tell Outlook how often to archive items.
- Prompt Before Archive Runs: If this check box is selected, you see a message box before archiving begins, and you can decline to archive if you want by selecting No in the message box.
- Delete Expired Items (Email Folders Only): Select this check box to delete all email messages when the time period has expired.
- Archive or Delete Old Items: Deselect this option if you don’t want to archive items.
- Show Archive Folder in Folder List: Select this option if you want to keep the archived version of the folder in the Folder pane. Archived items are kept in this folder so that you can review them.
- Clean Out Items Older Than: Choose a cut-off time period after which to archive items.
- Move Old Items To: Click the Browse button and select a folder if you want to store the Archive file in a certain location.
- Permanently Delete Old Items: Select this option if you want to delete, not archive, old items.
Archiving rules for a folder
Choose among these options in the Properties dialog box to establish archiving rules for a specific folder (refer to Figure 1-5):
- Do Not Archive Items in This Folder: Select this option if items in the folder aren’t worth archiving.
- Archive Items in This Folder Using the Default Settings: Select this option to defer to the default archiving rules for the folder.
- Archive This Folder Using These Settings: Select this option to establish archiving rules for the folder.
- Clean Out Items Older Than: Choose a cut-off time period after which to archive the items in the folder.
- Move Old Items to the Default Archive Folder: Select this option to move items to the folder you selected as the default.
- Move Old Items To: Click the Browse button and select a folder if you want to store the archived items in a specific location.
- Permanently Delete Old Items: Select this option if you want to delete, not archive, items in this folder.
Running the Mailbox Cleanup command
The Mailbox Cleanup command is an all-purpose command for finding email messages, archiving items, deleting items, and deleting alternate versions of items. To use the command, go to the File tab, choose Info, click the Tools button, and choose Mailbox Cleanup. You see the Mailbox Cleanup dialog box, shown in Figure 1-6. The dialog box offers a speedy entrée into these different Outlook tasks:
- Seeing how much disk space folders occupy: Click the View Mailbox Size button and then take note of folder sizes in the Folder Size dialog box.
- Finding items: Select an option button to find items older than a certain number of days or larger than a certain number of kilobytes, enter a days or kilobytes number, and click the Find button. You land in the Advanced Find dialog box. Earlier in this chapter, “Conducting an advanced search” explains this dialog box. Use it to select items and delete them.
- Archiving items: Click the AutoArchive button to archive items in your folders. See “Archiving the old stuff,” earlier in this chapter, for details.
- Emptying the deleted items folder: Click the Empty button to empty the Deleted Items folder. See “Deleting Email Messages, Contacts, Tasks, and Other Items,” earlier in this chapter.
- Delete all alternative versions of items: Click Delete if you conduct emailing through an Exchange Server account and you want to delete alternative versions of items that were created during synchronization.
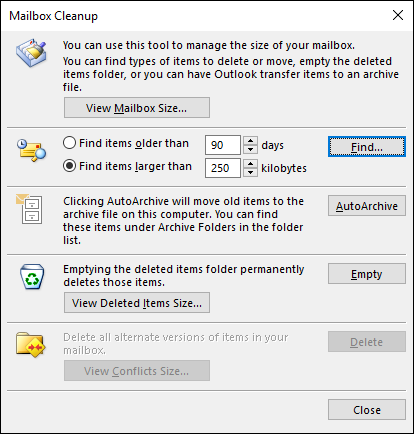
FIGURE 1-6: Mucking out the mail boxes.
 You can open a folder in a new window. To do so, right-click a Navigation button or folder name and choose Open in New Window.