Chapter 2
Building Your Database Tables
IN THIS CHAPTER
 Creating database tables
 Using field properties to make data entries more accurate
 Indexing fields in a table
 Forming relationships among tables
Database tables are the building blocks of a database. They hold the raw data. Relationships among the tables permit you to query and generate reports from several different tables. How well your database tables are put together and how accurately data is entered in the tables determine whether your database is a thing of beauty or a wilted flower.
This chapter explains how to create database tables and fields for the tables. It explains what primary key fields are and how primary key fields and indexed fields make it easier for Access to sort, search, and query a database. This chapter describes how to forge relationships among tables. Fasten your seatbelts. In this chapter, you find numerous tips and tricks for making sure that data is entered accurately in your database tables.
Creating a Database Table
Raw data is stored in database tables (or in a single table, if you decide to keep all the data in one place). The first and most important part of setting up a database is creating the tables and entering the data. After you enter the data, you can harass your database for information about the things and people your database keeps track of. If you haven’t done so already, read the sections in Chapter 1 of this minibook that pertain to storing information and designing a database before you create a database table. Chapter 1 of this minibook explains what database tables are and how to fashion a splendid one.
The business of creating a database table starts on the Create tab. As I explain in detail in the next few pages, Access offers three ways to create a database table:
- Create the database table from scratch: Enter and format the fields one at a time on your own.
- Get the help of a template: Get prefabricated fields assembled in a table. This is the way to go if you know Access well and you can modify database tables and table fields.
- Import the database table from another database: This technique can be an enormous timesaver if you can recycle data that has already been entered in a database table in another Access database.
Creating a database table from scratch
Creating a table from scratch entails creating the table and then entering the fields one by one. After you open a database file, follow these steps to create a database table from scratch:
- Go to the Create tab.
Click the Table Design button.
The Design window appears. From here, you enter fields for your database table. I hate to be like a City Hall bureaucrat who gives everybody the runaround, but I can’t help myself. Turn to “Entering and Altering Table Fields,” later in this chapter, to find out how to enter fields in a database table.
Click the Save button on the Quick Access toolbar.
The Save As dialog box appears.
Enter a descriptive name for your table and click OK.
Return to the Navigation pane and you see the name of the table you created. If you don’t believe me, click the Tables group to see the names of tables in your database.
Creating a database table from a template
If you know your way around Access and know how to modify database tables, you can do worse than create a database table with a template. Access offers four template types: Contacts (for storing contact addresses and phone numbers); Issues (for prioritizing issues); Tasks (for tracking projects, their status, and when they are due); and Users (for storing email addresses). As well as creating a table, Access creates ready-made queries, forms, and reports to go along with the table. After you create a table with a template, you can remove fields that you don’t want. Deleting fields is always easier than adding new ones.
Follow these steps to use a template to create a table (and accompanying queries, forms, and reports):
Close all objects if any objects are open.
To close an object, click its Close button or right-click its tab and choose Close on the shortcut menu.
On the Create tab, click the Application Parts button.
A drop-down list with options for creating forms and tables appears. (The tables are listed under “Quick Start.”)
Choose Contacts, Issues, Tasks, or Users.
If you have other tables in your database, a dialog box asks whether you want to create a relationship between the table you’re creating and another table.
Select the There Is No Relationship option button and click Create.
Later in this chapter, “Establishing Relationships among Database Tables” explains how to create relationships on your own. If you want to create these relationships now and you have the wherewithal to do it, select an option besides There Is No Relationship, choose a table on the drop-down list, and click the Next button to choose which field to forge the relationship with.
On the Navigation pane, right-click the name of the table you created and choose Design View (or click the Design View button in the lower-right corner of the screen).
In Design view, you can see the names of the fields in the table. If the table contains fields you don't want or you want to change the names of the fields, turn to “Entering and Altering Table Fields,” later in this chapter.
Importing a table from another database
Few things are more tedious than entering records in a database table. If the records you need were already entered elsewhere, more power to you. Follow these steps to get a database table from another Access database:
- Go to the External Data tab.
Click the New Data Source button, choose From Database on the drop-down list, and choose Access on the sublist.
The Get External Data – Access Database dialog box opens.
Click the Browse button, and in the File Open dialog box, select the Access database with the table you need and click Open.
You return to the Get External Data – Access Database dialog box.
Select the first option button (Import Tables, Queries, Forms, Reports, Macros, and Modules into the Current Database) and click OK.
You see the Import Objects dialog box, as shown in Figure 2-1.
On the Tables tab, select the database table you want.
You can import more than one database table by clicking several table names or clicking the Select All button.
 You can import a table structure — its field names and formats — without importing the data in the table. To do so, click the Options button in the Import Objects dialog box, and under Import Tables, select the Definition Only option button (refer to Figure 2-1).
- Click OK.
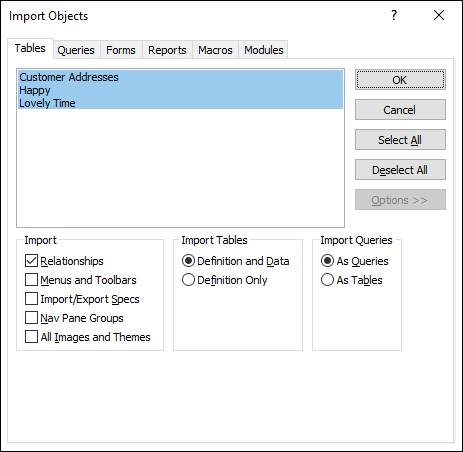
FIGURE 2-1: Fetching a table from another database.
Opening and Viewing Tables
To open a table, start in the Navigation pane and select the Tables group to view the names of database tables you created. How you open a table depends on whether you want to open it in Datasheet view or Design view. Here's the difference between these views (see Figure 2-2):
- Datasheet view is for entering and examining data in a table.
- Design view is for creating fields and describing their parameters.
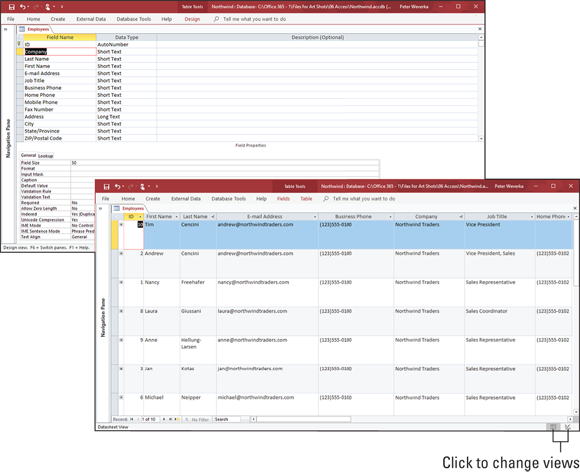
FIGURE 2-2: A table in Design view (top) and Datasheet view (bottom).
Select a table on the Navigation pane and use one of these techniques to open and view it:
- Opening in Design view: Right-click the table’s name in the Navigation pane and choose Design View on the shortcut menu.
- Opening in Datasheet view: On the Navigation pane, double-click the table’s name or right-click its name and choose Open on the shortcut menu.
- Switching between views with the View button: On the Home tab, click the View button and choose Datasheet View or Design View.
- Switching between views on the status bar: Click the Datasheet View or Design View button on the right side of the status bar (refer to Figure 2-2).
- Switching between views by right-clicking: Right-click the table’s tab and choose Datasheet View or Design View.
Entering and Altering Table Fields
After you create a database table, the next task is to enter the fields, or if Access created the table for you, alter the fields to your liking. As Chapter 1 of this minibook explains, fields represent categories of information in a database table. They are the equivalent of columns in a conventional table. Fields determine what kind of information is stored in a database table.
These pages explain how to create a field, choose the right data type, display data in fields, and designate the primary key field in a table. While I’m on the subject of fields, W.C. Fields said, “Horse sense is the thing a horse has which keeps it from betting on people.”
Creating a field
Create a field on your own or get Access’s help and create a ready-made field. Both techniques are described here. Ready-made fields include fields designed especially for storing currency data, hyperlinks, and date information.
Creating a field on your own
To create a field on your own, open the table that needs a new field and follow these steps on the (Table Tools) Design tab:
Switch to Design view if you aren’t already there.
To switch to Design view, click the Design View button on the status bar.
If necessary, insert a new row for the field.
To do so, click in the field that is to go after the new field, and then click the Insert Rows button on the (Table Tools) Design tab.
Enter a name in the Field Name column.
Names can’t include periods or be longer than 64 letters, but you don’t want to enter a long name anyway because it won’t fit very well along the top of the table.
 Some database programs don’t permit spaces in field names. If you intend to export Access data to other database programs, don’t include spaces in field names. Instead, run the words together or separate words with an underscore character, like this: underscore_character.
Press the Tab key or click in the Data Type column, and choose a data type from the drop-down list, as shown in Figure 2-3.
Data types classify what kind of information is kept in the field. The next topic in this chapter, “All about data types,” explains data types.
If you want, enter a description in the Description column.
These descriptions can be very helpful when you need to reacquaint yourself with a field and find out what it’s meant to do.
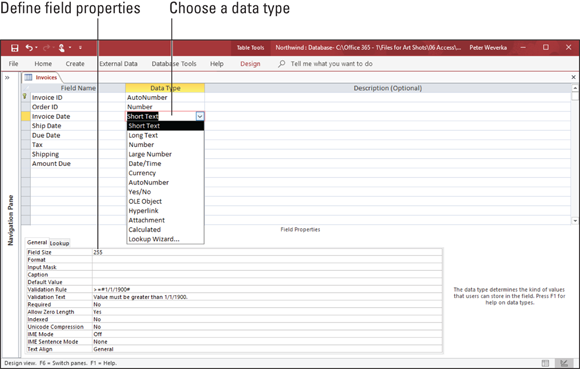
FIGURE 2-3: Choosing a data type.
Later in this chapter, “Field Properties for Making Sure That Data Entries Are Accurate” demonstrates how to define field properties in the Design view window to make it easier for data-entry clerks to enter the data.
Taking advantage of ready-made fields
You can get a head start creating a field by using a ready-made field and then modifying it, if necessary. To create a ready-made field, switch to Datasheet view and select the field that you want your new field to go after. Then, on the (Table Tools) Fields tab, click a field button or click the More Fields button and choose the name of a field on the drop-down list.
Look for field buttons in the Add & Delete group. Field buttons include Short Text, Number, and Currency. After you create your new field, switch to Design view and examine its field properties. Some of these properties may need modifying. See “Field Properties for Making Sure That Data Entries Are Accurate” for information about field properties.
All about data types
To choose a data type for a field, open the Data Type drop-down list in the Design view window and choose a data type (refer to Figure 2-3). Data types are the first line of defense in making sure that data is entered correctly in a table. Try to enter text in a field assigned the Currency or Number data type, and Access tells you that your entry is invalid. You get the chance to fix your mistake as soon as you make it.
Table 2-1 explains the options on the Data Type drop-down list. Choose data types carefully because how you classify the data that is entered in a field determines how you can query the field for information. Querying for a number range is impossible, for example, if the field you’re querying isn’t classified as a Number or Currency field on the Data Type drop-down list.
TABLE 2-1 Data Types for Fields
Data Type |
What It’s For |
Short Text |
For storing text (city names, for example), combinations of text and numbers (street addresses, for example), and numbers that won’t be calculated or used in expressions (telephone numbers, ZIP codes, and social security numbers, for example). A Short Text field can be no longer than 255 characters. |
Long Text |
For storing long descriptions. Fields assigned this data type can hold 65,535 characters, not that anyone needs that many. |
Number |
For storing numbers to be used in calculations or sorting. (If you’re dealing with monetary figures, choose the Currency data type.) |
Large Number |
For importing and linking to BigInt (big integer) data. This data type is for working with calculations involving extremely large numbers. |
Date/Time |
For storing dates and times and being able to sort data chronologically or use dates and times in calculations. |
Currency |
For storing monetary figures for use in calculations and sorting. |
AutoNumber |
For entering numbers in sequence that will be different from record to record. Use the AutoNumber data type for the primary key field if no other field stores unique, one-of-a-kind data. |
Yes/No |
For storing True/False, Yes/No, On/Off type data. Choose this data type to enter data with a check box in the field. When the box is selected, the data in the field is True, Yes, or On, for example. |
OLE Object |
For embedding an OLE link in your Access table to another object — an Excel worksheet or Word document. (Consider the using the Attachment data type as well.) |
Hyperlink |
For storing hyperlinks to other locations on the Internet or on the company intranet. |
Attachment |
For storing an image, spreadsheet, document, chart, or other file. Attaching a file to a database table is similar to attaching a file to an email message. Attachments do not require as much disk space as OLE objects because they don’t require Access to store a bitmap image of the original file. |
Calculated |
For entering a mathematical expression that uses data from other fields in the database table. |
Lookup Wizard |
For creating a drop-down list with choices that a data-entry clerk can choose from when entering data. See “Creating a lookup data-entry list,” later in this chapter. |
Designating the primary key field
As I explain in Chapter 1 of this minibook, no database table is complete without a primary key field. The primary key field identifies which field in the table is unique and contains data that differs from record to record. Duplicate values and null values can’t be entered in the primary key field. (A null value indicates a missing or unknown value.) Choosing a primary key field is so important that Access doesn’t let you close a table unless you choose one.
- The AutoNumber data type: Create a new field, give it a name, choose AutoNumber from the Data Type drop-down list (refer to Figure 2-3), and make your new field the primary key field. This way, when you enter data, Access enters a unique number to identify each record in the field. (To generate random numbers instead of sequential numbers in an AutoNumber field, go the General tab of the Design view window, open the New Values drop-down list, and choose Random instead of Increment.)
- A multiple-field primary key: Combine two or more fields and designate them as the primary key. For example, if you’re absolutely certain that no two people whose names will be entered in your database table have the same name, you can make the First Name and Last Name fields the primary key. The problem with multiple-field primary keys, however, is that it takes Access longer to process them, and you run the risk of entering duplicate records.
Follow these steps on the (Table Tools) Design tab to designate a field in a database table as the primary key field:
In Design view, select the field or fields you want to be the primary key.
To select a field, click its row selector, the small box to its left; Ctrl+click row selectors to select more than one field.
Click the Primary Key button.
A small key symbol appears on the row selector to let you know which field or fields are the primary key fields.
To remove a primary key, click its row selector and then click the Primary Key button all over again.
Moving, renaming, and deleting fields
Suppose that you need to move, rename, or delete a field. To do so, switch to Design view and follow these instructions:
- Moving a field: Select the field’s row selector (the box to its left) and release the mouse button. Then click again and drag the selector up or down to a new location.
- Renaming a field: Click in the Field Name box where the name is, delete the name that’s there, and type a new name.
- Deleting a field: Click in the Field Name box, go to the (Table Tools) Design tab, and click the Delete Rows button. You can also right-click the field and choose Delete Rows on the shortcut menu.
Field Properties for Making Sure That Data Entries Are Accurate
Unfortunately, entering the data in a database table is one of the most tedious activities known to humankind. And because the activity is so dull, people are prone to make mistakes when they enter data in a database table. One way to cut down on mistakes is to take advantage of the Field Properties settings on the General tab in the Design view window. Figure 2-4 shows the General tab.

FIGURE 2-4: Establishing field properties.
These properties determine what can and can’t be entered in the different fields of a database table. Some of the settings are invaluable. The Field Size property, for example, determines how many characters can be entered in a field. In a State field where two-letter state abbreviations are to be entered, make the Field Size property 2 to be certain that no one enters more than two characters. If the majority of people you’re tracking in an address database live in New York, enter NY in the Default Value property. That way, you spare data-entry clerks from having to enter NY the majority of the time. They won’t have to enter it because NY is already there.
The Lookup tab in the Field Properties part of the Design view window is for creating a data-entry drop-down list. It, too, is invaluable. If you happen to know that only four items can be entered in a field, create a drop-down list with the four items. That way, data-entry clerks can choose from a list of four valid items instead of having to enter the data themselves and perhaps enter it incorrectly. (See “Creating a lookup data-entry list,” later in this chapter.)
A look at the Field Properties settings
Especially if yours is a large database, you’re encouraged to study the field properties carefully and make liberal use of them. The Field Properties settings safeguard data from being entered incorrectly. Following is a description of the different properties (listed here in the order in which they appear in the Design view window) and instructions for using them wisely. Which properties you can assign to a field depends on which data type the field was assigned.
Field Size
In the Field Size box for Text fields, enter the maximum number of characters that can be entered in the field. Suppose that the field you’re dealing with is ZIP code, and you want to enter five-number ZIP codes. By entering 5 in the Field Size text box, only five characters can be entered in the field. A sleepy data-entry clerk couldn’t enter a six-character ZIP code by accident.
For Number fields, select a value for the field size from the drop-down list. Table 2-2 describes these field sizes.
TABLE 2-2 Numeric Field Sizes
Field Size |
Description |
Byte |
An integer that holds values from 0–255. |
Integer |
An integer that holds values from –32,768– +32,767. |
Long Integer |
An integer that holds values from –2,147,483,648– +2,147,483,647. |
Single |
A floating point number that holds large values up to 7 significant digits. |
Double |
A floating point number that holds large values up to 15 significant digits. |
Replication ID* |
A globally unique identifier (GUID) required for replication; this number is generated randomly. |
Decimal |
A number with defined decimal precision. The default precision is 0, but you can set the scale up to 28. |
* Not supported by the .accdb file format.
Format
Earlier in this chapter, “Deciding how the data in fields is displayed” (a sidebar) explains the Format property. Click the drop-down list and choose the format in which text, numbers, and dates and times are displayed.
Decimal Places
For a field that holds numbers, open the Decimal Places drop-down list and choose how many numbers can appear to the right of the decimal point. This property affects how numbers and currency values are displayed, not their real value. Numbers are rounded to the nearest decimal point. The Auto option displays the number of decimal places permitted by the format you chose on the Format drop-down list.
Input Mask
For Text and Date field types, this feature provides a template with punctuation marks to make entering the data easier. Telephone numbers, social security numbers, and other numbers that typically are entered along with dashes and parentheses are ideal candidates for an input mask (another ridiculous database term!). On the datasheet, blank spaces appear where the numbers go, and the punctuation marks stand at the ready to receive numbers, as shown in Figure 2-5.

FIGURE 2-5: Input masks make data entry easier.
In the Input Mask text box, enter a 0 where numbers go and enter the punctuation marks where they go. For example, enter (000) 000-0000 or 000/000-0000 to enter an input mask for a telephone number like the one shown in Figure 2-5. You can also create input masks by clicking the three dots beside the Input Mask text box. Doing so opens the Input Mask Wizard dialog box, where you can fashion a very sophisticated input mask.
Caption
If the field you're working on has a cryptic or hard-to-understand name, enter a more descriptive name in the Caption text box. The value in the Caption property appears as the column heading in Datasheet view, as a label on forms, and on reports in place of the field name. People entering data understand what to enter after reading the descriptive caption.
Default Value
When you know that the majority of records require a certain value, number, or abbreviation, enter it in the Default Value text box. That way, you save yourself the trouble of entering the value, number, or abbreviation most of the time because the default value appears already in each record when you enter it. You can always override the default value by entering something different.
Validation Rule
As long as you know your way around operators and Boolean expressions, you can establish a rule for entering data in a field. For example, you can enter an expression that requires dates to be entered in a certain time frame. Or you can require currency figures to be above or below a certain value. To establish a validation rule, enter an expression in the Validation Rule text box. To use dates in an expression, the dates must be enclosed by number signs (#). Here are some examples of validation rules:
>1000 |
The value you enter must be over 1,000. |
<1000 |
The value you enter must be less than 1,000. |
>=10 |
The value you enter must be greater than or equal to ten. |
<>0 |
The value you enter cannot be zero. |
>=#1/1/2019# |
The date you enter must be January 1, 2019, or later. |
>=#1/1/2019# And <#1/1/2020# |
The date you enter must be in the year 2019. |
To get help forming expressions, click the three dots beside the Validation Rule text box to open the Expression Builder, as shown in Figure 2-6, and build an expression there. Try clicking the Help button in the Expression Builder dialog box. Doing so opens the Access Help program, where you can get advice about building expressions.
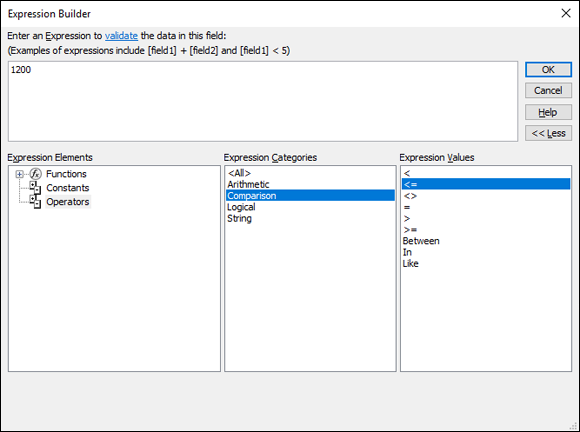
FIGURE 2-6: Creating a validation rule.
Validation Text
If someone enters data that violates a validation rule that you enter in the Validation Rule text box, Access displays a standard error message. The message reads, “One or more values are prohibited by the validation rule set for [this field]. Enter a value that the expression for this field can accept.” If this message is too cold and impersonal for you, you can create a message of your own for the error message dialog box. Enter your friendly message in the Validation Text text box.
Required
By default, no entry has to be made in a field, but if you choose Yes instead of No in the Required box and you fail to make an entry in the field, a message box tells you to be sure to make an entry.
Allow Zero Length
This property allows you to enter zero-length strings in a field. A zero-length string — two quotation marks with no text or spaces between them (“”) — indicates that no value exists for a field. To see how zero-length strings work, suppose that your database table calls for entering email addresses. If you didn’t know whether one person has an email address, you would leave the E-Mail Address field blank. If, however, you knew that the person didn’t have an email address, you could indicate as much by entering a zero-length string. Choose Yes on the drop-down list to permit zero-length strings to be entered in the field.
Indexed
This property indicates whether the field has been indexed. As “Indexing for Faster Sorts, Searches, and Queries” explains, later in this chapter, indexes make sorting a field and searching through a field go faster. The word No appears in this text box if the field has not been indexed.
Unicode Expression
Choose Yes from the Unicode Expression drop-down list if you want to compress data that is now stored in Unicode format, which is a standardized encoding scheme. Storing data this way saves on disk space, and you probably don't want to change this property.
Smart Tags
If you intend to enter Smart Tags in the field, indicate which kind you enter by clicking the three dots next to the Smart Tags box and choosing an option in the Action Tags dialog box.
Text Align
This property determines how the text is aligned in a column or on a form or report. Select General to let Access determine the alignment, or select Left, Right, Center, or Distribute.
Text Format
Available on Long Text fields, this drop-down list lets you choose to allow rich text in the field. With this property set to Rich Text, you can make different words bold, italic, underline, and change font sizes and colors. Set it to Plain Text for plain, boring text with no formatting. I wonder why that isn’t the setting’s name.
Append Only
Available on Long Text fields, this property lets you add data only to a Long Text field to collect a history of comments.
Show Date Picker
This property is available on Date/Time fields. Choose For Dates to place a button next to the column that data-entry clerks can click to open a calendar and select a date instead of typing numbers.
IME Mode/IME Sentence mode
These options are for converting characters and sentences from East Asian versions of Access.
Creating a lookup data-entry list
Perhaps the best way to make sure that data is entered correctly is to create a data-entry drop-down list. That way, anyone entering the data in your database table can do so by choosing an item from the list, not by typing it in, as shown in Figure 2-7. This method saves time and prevents invalid data from being entered. Access offers two ways to create the drop-down list:
- Create the list by entering the items yourself: Go this route when you’re dealing with a finite list of items that never change.
- Get the items from another database table: Go this route to get items from a column in another database table. This way, you can choose from an ever-expanding list of items. When the number of items in the other database table changes, so does the number of items in the drop-down list because the items come from the other database table. This is a great way to get items from a primary key field in another table.
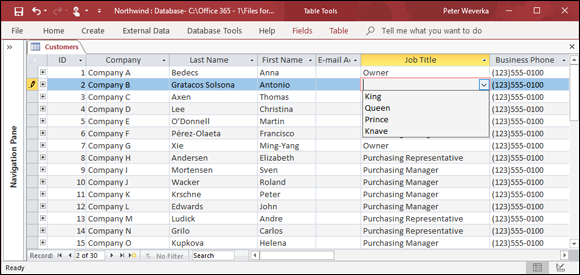
FIGURE 2-7: A so-called lookup list.
Creating a drop-down list on your own
Follow these steps to create a drop-down, or lookup, list with entries you type:
- In Design view, click the field that needs a drop-down list.
Open the Data Type drop-down list and choose Lookup Wizard, the last option in the list.
The Lookup Wizard dialog box appears.
- Select the second option, I Will Type in the Values That I Want, and click the Next button.
Under Col1 in the next dialog box, enter each item you want to appear in the drop-down list; then click the Next button.
You can create a multicolumn list by entering a number in the Number of Columns text box and then entering items for the list.
Enter a name for the field, if necessary, and click the Finish button.
Switch to Datasheet view and open the drop-down list in the field to make sure that it displays properly.
To remove a lookup list from a field, select the field, go to the Lookup tab in the Design view window, open the Display Control drop-down list, and choose Text Box.
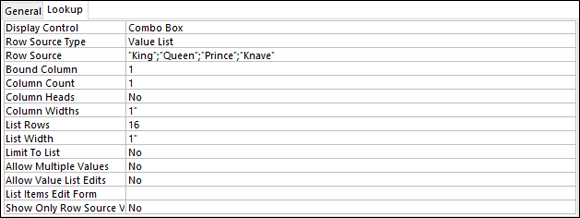
FIGURE 2-8: Lookup field properties.
Getting list items from a database table
Before you can get list items from another database table, you might want to define a relationship between the tables; it’s not required, but it’s recommended. Later in this chapter, “Establishing Relationships among Database Tables” explains how to do that. Follow these steps to get items in a drop-down list from another database table:
In Design view, click the field that needs a list, open the Data Type drop-down list, and choose Lookup Wizard.
The Lookup Wizard dialog box appears.
Select the first option, I Want the Lookup Field to Get the Values from Another Table or Query, and click Next.
You see a list of tables in your database.
Select the table with the data you need and click the Next button.
The dialog box shows you a list of available fields in the table.
- Select the field where the data for your list is stored.
Click the > button.
The name of the list appears on the right side of the dialog box, under Selected Fields.
Click the Next button.
Normally, lists are displayed in ascending order, but you can select a field and click the Ascending button to reverse the order of the list. (Note that the button turns into the Descending button.)
Click the Finish button.
If you’re so inclined, you can change the width of the list before clicking Finish, but you can always do that on the datasheet, as Chapter 3 of this minibook explains.
Indexing for Faster Sorts, Searches, and Queries
Indexing means to instruct Access to keep information about the data in a field or combination of fields. Because Access keeps this information on hand, it doesn’t have to actually search through every record in a database table to sort data, search for data, or run a query. In a large database table, indexes make sorting, searching, and querying go considerably faster because Access looks through its own data rather than the data in tables. The performance difference between querying a database table that has and has not been indexed is astonishing. That’s the good news. The bad news is that indexes inflate the size of Access files.
Indexing a field
To index a field, switch to Design view, select the field you want to index, and on the General tab of the Field Properties part of the Design window, open the Indexed drop-down list and choose one of these options:
- Yes (Duplicates OK): Indexes the field and allows duplicate values to be entered in the field.
- Yes (No Duplicates): Indexes the field and disallows duplicate values. If you choose this option, the field works something like a primary key field in that Access does not permit you to enter the same value in two different records.
Indexing based on more than one field
An index created on more than one field is called a multifield index. Multifield indexes make sorting, querying, and searching the database table go faster. They are especially valuable in sorting operations where records in one field are usually the same but records in a companion field are different. In a large database table that stores names and addresses, for example, many names in the Last Name field are the same, so indexing on the Last Name field isn’t worthwhile, but indexing the First Name and Last Name fields helps Access distinguish records from one another.
Follow these steps to generate a multifield index:
Switch to Design view, and on the (Table Tools) Design tab, click the Indexes button.
You see the Indexes dialog box, as shown in Figure 2-9. The dialog box lists the primary key field already because it’s indexed by default. You also see any fields to which you set the Indexed property to Yes.
- On a blank line in the dialog box, enter a name for the index in the Index Name column.
In the Field Name column, open the drop-down list and choose the first field you want for the multifield index.
Access sorts the records first on this field and then on the second field you choose.
In the next row, leave the Index Name blank and choose another field name from the drop-down list.
This field is the second field in the index. You can use as many as ten different fields in a multifield index. In Figure 2-9, two fields are in a multifield index: First Name and Last Name.
Choose Descending in the Sort Order column if you want the field sorted in descending order.
Most of the time, you want leave the Sort Order set to Ascending because most people read from A to Z.
Click the Close button.
Click the Indexes button in Design view if you need to return to the Indexes dialog box and change how fields are indexed.
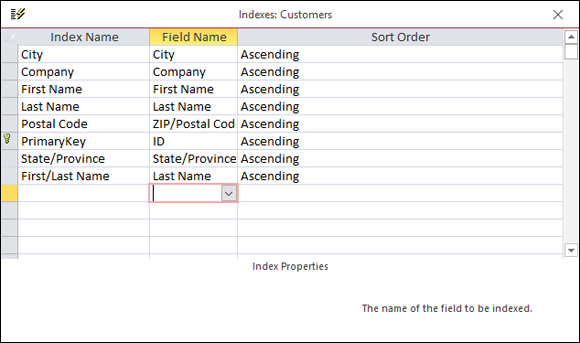
FIGURE 2-9: The Indexes dialog box.
Establishing Relationships among Database Tables
As Chapter 1 of this minibook explains, you have to establish relationships among tables if you want to query or generate reports with data from more than one database table. Relationships define the field that two different tables have in common. To understand why relationships between tables are necessary, consider the query shown in Figure 2-10. The purpose of this query is to list all companies that ordered items in 2019, list the companies by name, and list the city where each company is located.
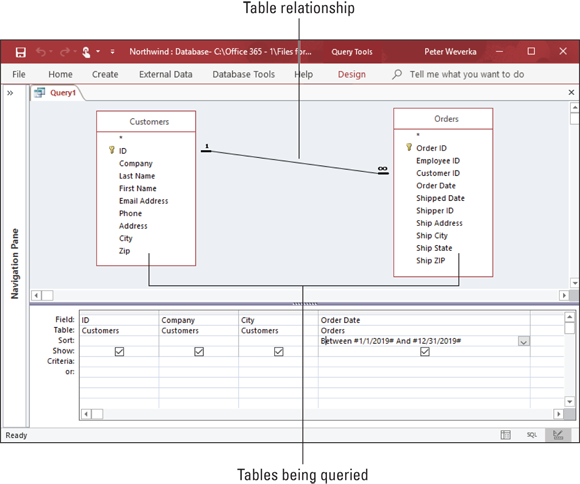
FIGURE 2-10: To conduct a query with more than one table, the tables must have a relationship.
Consider what Access does to run this query:
- Access deals with two database tables, Customers and Orders.
- In the Orders table, Access looks in the Order Date field to isolate all records that describe orders made in the year 2019. The expression for finding these records is shown on the Criteria line in Figure 2-10:
Between #1/1/2019# And #12/31/2019#. - Because a relationship exists between the ID field in the Customers table and the Customer ID field in the Orders table — that is, the two fields hold the same type of information — Access can match the 2019 records it finds in the Orders table with corresponding records in the Customers table. Where the Customer ID of a 2019 record in the Orders table and an ID in the Customers table match, Access assembles a new record and places it in the query results.
- Data for determining which records appear in the query results is found in the Order Date field in the Orders table. But the information compiled in the query results — customer IDs, company names, and cities — comes from fields in the Customers table. Thanks to the relationship between the ID and Customer ID fields in these tables, Access can draw upon information from both tables.
Types of relationships
The vast majority of relationships between tables are one-to-many relationships between the primary key field in one database table and a field in another. Table relationships fall in these categories:
- One-to-many relationship: Each record in one table is linked to many records in another table. The relationship in Figure 2-10 is a one-to-many relationship. Each ID number appears only once in the ID field of the Customers table, but in the Orders table, the same Customer ID number can appear in many records because the same customer can order many different products. When you link tables, Access creates a one-to-many relationship when one of the fields being linked is either a primary key field or an indexed field that has been assigned the No (No Duplicates) setting. (See “Indexing for Faster Sorts, Searches, and Queries,” earlier in this chapter.)
- One-to-one relationship: Two fields are linked. This relationship is rare and is sometimes used for security purposes.
- Many-to-many relationship: This complex relationship actually describes crisscrossing relationships in which the linking field is not the primary key field in either table. To create a many-to-many relationship, an intermediary table called a junction table is needed. This relationship is rare.
Handling tables in the Relationships window
To display the tables in a database and link tables to one another or see how they’re related to each other, go to the Database Tools tab and click the Relationships button. You see the Relationships window, as shown in Figure 2-11. Notice the field names in each table. The primary key field is shown with a picture of a key next to it. Lines in the window show how relationships have been established between tables.
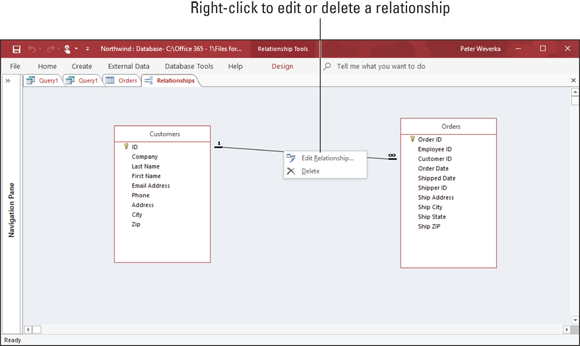
FIGURE 2-11: The Relationships window.
Apart from linking tables in the Relationships window (a subject I explain shortly), use these techniques on the (Relationship Tools) Design tab to handle tables:
- Repositioning and resizing the tables: Each table appears in its own window. Drag tables from place to place, drag a border to change a window’s size, and scroll to see field names.
- Removing a table from the window: Select the table and click the Hide Table button.
- Removing all tables from the window: Click the Clear Layout button and choose Yes in the confirmation box.
- Placing tables back on the window: Click the Show Table button, and in the Show Table dialog box, select the tables and click the Add button.
- Placing all tables back in the window: To put all the tables with relationships back in the window, click the All Relationships button.
- Studying a table’s relationships: Click the Clear Layout button to remove all tables from the window; then place the table back in the window, select it, and click the Direct Relationships button. All tables that are related to the selected table are added to the layout.
Forging relationships between tables
On the (Relationship Tools) Design tab (refer to Figure 2-11), make sure that both tables are on display and then follow these steps to forge a relationship between them:
Click to select the field in one table; then hold down the mouse button, drag the pointer to the field in the other table where you want to forge the link, and release the mouse button.
You see the Edit Relationships dialog box, as shown in Figure 2-12. This dragging between table fields is probably the most awkward thing you undertake in Office 365! If you do it right, a bar appears where the pointer is while you move it over the second table, and the names of the two fields appear in the Edit Relationships dialog box.
Notice the Relationship Type at the bottom of the dialog box. If you accidentally create a link to the wrong field, choose the correct field from the drop-down list in the dialog box.
Select the Enforce Referential Integrity check box.
If you don’t select this box, the relationship between the tables is indeterminate, instead of being a one-to-many relationship. Referential integrity (another hideous database term!) has to do with whether values in the two different fields corroborate each other.
Select Cascade options if you so choose.
One of these options is excellent; the other is dangerous:
- Cascade Update Related Fields: If you change a value on the “one” side of the relationship, a matching value on the “many” side changes as well to preserve referential integrity. For example, if you create a multifield primary key of First Name and Last Name and then change the name of someone, the related fields in the other table change automatically to preserve referential integrity. This is a great way to make sure that information is up to date.
- Cascade Delete Related Records: If you delete a record in the “one” table, all records in the “many” table to which the deleted record is linked are also deleted. For example, if you delete an employee from the “one” table, all records in the “many” table that include that employee are deleted! Access warns you before making the deletion, but still! This option is dangerous, and I don’t recommend selecting it.
Click the Create button to forge the relationship.
In the Relationships window (refer to Figure 2-11), a line is drawn between the table fields. The number 1 appears on the “one” side of the relationship and the infinity symbol (∞) appears on the “many” side.
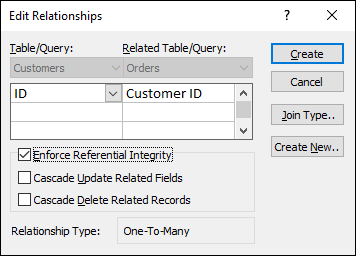
FIGURE 2-12: Creating a table relationship.
Editing table relationships
In the Relationships window (refer to Figure 2-11), select the line that represents the relationship between two database tables and follow these instructions to edit or remove the relationship:
- Editing the relationship: Click the Edit Relationships button or right-click and choose Edit Relationship. You see the Edit Relationships dialog box, where you can overhaul the relationship. (The previous topic in this chapter explains how.)
- Deleting the relationship: Press the Delete key or right-click and choose Delete. Then select Yes in the confirmation box.
 The Single, Double, and Decimal field size options hold different ranges of numbers. For now, if you need to store numbers after the decimal point, choose the Double field size so that you cover most situations.
 Sometimes, fields in separate tables that hold the same data also have the same name, but that isn’t necessary. For example, a field called ZIP Code in one table might be called Postal Code in another. What matters is that fields that are linked have the same data type. For example, you can’t create a relationship between a text field and a number field.