Chapter 1
Up and Running on OneDrive
IN THIS CHAPTER
 Getting into OneDrive
 Creating, navigating, renaming, and deleting folders
 Uploading and downloading files to and from OneDrive
 Managing files at OneDrive
This chapter introduces you to OneDrive, the Office 365 online facility for storing files, sharing files, and co-editing files with other people. It describes how to sign in and out of OneDrive so that you can get to your OneDrive folders. You also discover how to navigate in OneDrive, manage folders, and upload and download files from your computer to OneDrive. Finally, this chapter shows how to open, delete, and move a file you store at OneDrive.
This chapter describes how to store and share files with OneDrive, a Microsoft website, but you can also store and share files using a software product called SharePoint. With SharePoint, files are maintained on a local network. They are kept on a server that is owned and operated by a company. Chapters 3 and 4 of this minibook describe how to share files with SharePoint.
Signing in to OneDrive
OneDrive is a component of Office 365. Before you can store, share, or co-edit files in OneDrive, you have to sign in to OneDrive. Open a web browser and follow these steps to sign in to Office 365:
- Go to this web address:
onedrive.live.com. Click the Sign In button.
The Sign In window opens.
Enter the email address of your Office 365 account and click Next.
The OneDrive window opens.
Enter your password and click Sign In.
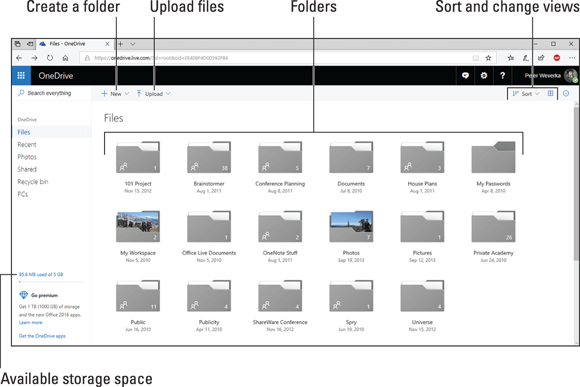
The OneDrive window opens in your browser, as shown in Figure 1-1. The first time you open OneDrive, you see two folders only.

FIGURE 1-1: OneDrive in a web browser.
To sign out of Office 365 in a web browser, click your username or picture in the upper-right corner of the screen and choose Sign Out in the My Accounts pane.
Exploring the OneDrive Window
To start with, OneDrive gives you two folders — Documents and Pictures — for storing files, and you can create additional folders as well. OneDrive can store up to 1TB (that’s 1000 GB) of files. The lower-left corner of the browser window tells you how much storage space you have for storing files.
You can tell how many files are stored in each folder because folders list how many files they hold. To open a folder and view its contents, click a folder name.
Glance back at Figure 1-1 and take note of these tools in the OneDrive window for managing files:
- Create folders: Click the New button and choose Folder to create a folder for storing files. See “Creating a folder,” later in this chapter, for details.
- Upload files: Click the Upload button to upload files from your desktop or laptop computer to OneDrive. See “Uploading Files to a Folder on OneDrive,” later in this chapter.
- Arranging folders and files in the window: Use the tools in the upper-right corner of the screen to arrange and locate folders and files. See “Viewing and locating folders in the OneDrive window,” later in this chapter.
Managing Your OneDrive Folders
All folders you create for storing files are kept in OneDrive. OneDrive gives you two folders — Documents and Pictures — for storing files, and you can create folders of your own, as well as subfolders. These pages explain how to create folders, get from folder to folder in OneDrive, and do folder-management tasks such as renaming, deleting, and moving folders.
Creating a folder
Create folders to store and organize your files on OneDrive. Sign in to OneDrive with your web browser and follow these steps to create a folder:
If you want to create a subfolder (a folder inside another folder), open the folder that your new folder will go into.
To open a folder, click its name.
Click the New button and choose Folder on the drop-down list.
A dialog box appears.
- Enter a name for the folder.
Click Create.
Later in this chapter, “Uploading Files to a Folder on OneDrive” explains how to upload files from your computer to a folder in OneDrive.
Viewing and locating folders in the OneDrive window
Use the OneDrive window to store and locate folders, subfolders, and files in OneDrive. The OneDrive window offers these tools for managing folders:
- Searching: Enter a search term in the Search Everything box to search for a folder or file. The Search Everything box is located in the upper-left corner of the window.
- Sorting: Click the Sort button and choose an option to rearrange folders and files in the OneDrive window. Sorting is helpful for finding a folder or file in a long list.
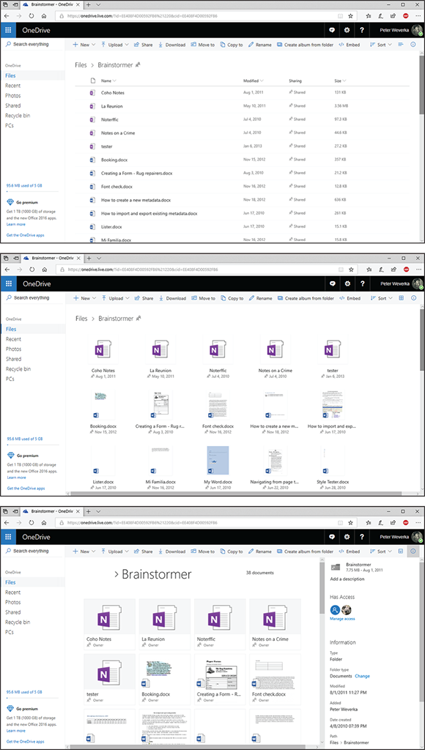
- Viewing: Click the View Options button to switch views, as shown in Figure 1-2:
- List and Compact List views present detailed information about folders and files — when they were last modified, whether they are shared, and file sizes.
- Tiles view presents folders and files in thumbnail form.
- Photo view presents large-size images of folders and files.
- Displaying the Information pane: Select a folder or file and click the Information button to open the Information pane (see Figure 1-2). You can also display the Information pane by right-clicking a folder or file and choosing Details.

FIGURE 1-2: The OneDrive window in List view (top), Tiles view (middle), and Photo view with the Information pane showing (bottom).
Selecting folders and files
- Click the check box (looks like a circle, actually) on a folder or file. The check box appears when you move the pointer over a folder or file.
- In List view or Compact List view, click anywhere on a list entry apart from a folder’s name or file’s name. Clicking a name opens a folder or file.
You can select more than one folder or file by Ctrl+clicking. To deselect folders and files, press Esc.
Going from folder to folder in OneDrive
After you accumulate a few folders on OneDrive, getting to the folder you want to open can be an arduous, interminable journey. To help you on your way, OneDrive offers different techniques for going to a folder:
- The drill-down method: Starting in the OneDrive window, click a top-level folder to display its subfolders. If necessary, keep drilling down this way until you reach the folder you want to open.
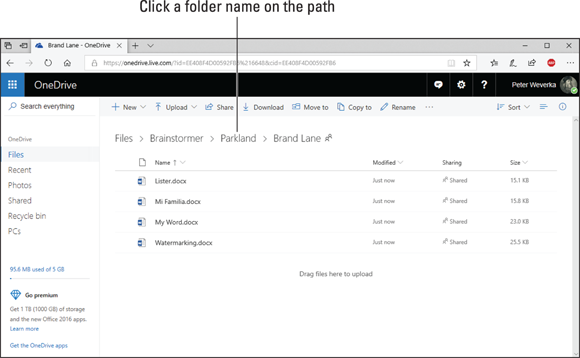
- The OneDrive Navigation bar method: The OneDrive Navigation bar — located beside the folder name — lists the path to the folder that is currently open. To backtrack, click the name of a folder on the path, as shown in Figure 1-3.
- The browser button method: Click the Back or Forward button in your browser to open a folder you previously opened.

FIGURE 1-3: Click a folder name on the Navigation bar to open a folder.
To return to the top-level OneDrive window, click Files in the OneDrive Navigation pane or the word OneDrive in the upper-left corner of the screen.
Deleting, moving, and renaming folders
To delete, move, or rename a folder, start by selecting it in the OneDrive window (see “Selecting folders and files,” earlier in this chapter). Then use these techniques:
- Moving a folder: Click the Move To button. The Move Item To task pane opens. It lists your folders on OneDrive. Select a folder in the list and click the Move button at the top of the task pane. You can also right-click a folder and choose Move To.
- Deleting a folder: Click the Delete button. You can also right-click and choose Delete.
- Renaming a folder: Click the Rename button and enter a name. You can also right-click and choose Rename.
Uploading Files to a Folder on OneDrive
Upload a file from your computer to OneDrive so that you can share the file with others or be able to access it when you are not at the computer you normally use. Sign in to OneDrive with your web browser and follow these steps to upload files from your computer to a folder you keep on OneDrive:
- On OneDrive, open the folder where you want to store the files.
Click the Upload button and choose Files on the drop-down list.
The Open dialog box appears.
- Select the files.
Click the Open button.
The file or files are uploaded to the folder you selected in OneDrive.
You can also upload an Excel, Word, or PowerPoint file by opening it in an Office 365 program and saving it to a OneDrive folder. See “Saving a File from Office 365 to OneDrive,” the next topic in this chapter.
Saving a File from Office 365 to OneDrive
Starting in Word, Excel, or PowerPoint, you can save a file to a folder on OneDrive. In effect, saving a file this way is the same as uploading it to OneDrive.
Follow these steps to save an Office file on your computer to a OneDrive folder:
- In Word, Excel, or PowerPoint, open the file on your computer that you want to save to a OneDrive folder.
On the File tab, choose Save As.
The Save As window opens.
Choose OneDrive.
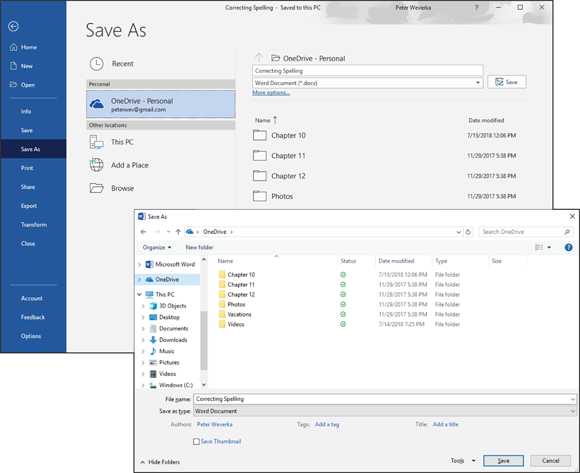
As shown in Figure 1-4, the Recent Folders list shows the names of folders on OneDrive (if you recently opened folders on OneDrive).
Select the OneDrive folder where you want to save the file.
Select the folder from the Recent Folders list or browse for the folder.
- Recent folder: Click the name of the folder on the Recent Folders list. The Save As dialog box lists the path to the folder on OneDrive.
- Click the Browse button: The Save As dialog box appears. On the left side of the dialog box, scroll to and select OneDrive. Then select the OneDrive folder where you want to save the file.
Click the Save button in the Save As window or the Save As dialog box.
 Take a look at the Save button on the Quick Access toolbar after you save your file. It looks a little different from the conventional Save button. Those circular lines on the Save button tell you that the file is stored at OneDrive. When you click the Save button, you save your work as well as refresh the file with work done by people who share the file with you.

FIGURE 1-4: Choose OneDrive in the Save As window to save a file from your computer to a OneDrive folder.
Opening a File from OneDrive
Read on to find out the different ways to open a file that you keep on OneDrive.
Starting in an Office desktop application
Starting in an Office desktop application, follow these steps to open an Office file that you keep on OneDrive:
On the File tab, choose Open.
You see the Open window. If the file you want to open is on the Recent files list, select it there and be done with it.
Choose OneDrive.
You see your OneDrive folders.
- Select the folder where the file you want to open is stored.
Select the file you want to open.
The file opens in your Office 365 application.
Starting in OneDrive
To open a file you keep on OneDrive in an Office desktop application, start by selecting the file. Then use these techniques to open it:
- Open the drop-down list on the Open button and choose an Open option (Open in Word, Open in Excel, or Open in PowerPoint).
- Right-click the file and choose an Open option.
Downloading Files from OneDrive to Your Computer
Follow these instructions to download files to your computer from OneDrive:
- Downloading a file: Select the file you want to download and click the Download button. You see the standard dialog box for downloading files from the Internet. Choose to open or save the file after you download it to your computer.
- Downloading several files or all the files in a folder: Select several files or, to download all the files in a folder, select the folder. Then click the Download button. The standard dialog box for downloading files appears. Click the Save option button and click OK to download the files in a zip file.
 By bookmarking a folder in your browser, you can go straight to a folder without having to navigate to it in OneDrive. After you choose the bookmark (and enter your ID and password if you haven’t yet signed in), the folder opens.
 When you save an Excel, Word, or PowerPoint from your computer in a OneDrive folder, you create a second copy of the file. Be careful not to get the two copies mixed up — the one on your computer and the one on OneDrive.