Plain tiles have been available in one form or another for hundreds of years and have proved to be an effective roof covering. At one time, when the range of materials was more limited, plain tiles were very common, but as new and cheaper tiles have entered the market (in particular, concrete interlocking tiles) their market share has gradually shrunk. Most plain tile work is now restricted to small works such as porches, bays and in vertical tiling, but they do appear on prestige developments, in conservation areas and on special curved and swept roofs where their small size makes them ideal. It should be remembered that the standard recommended (minimum) batten size for plain tiles is 38mm × 25mm for all rafter centres up to 600mm.
All the cutting in this chapter has been done deliberately with hand tools only to demonstrate the techniques involved. Disc cutters are marvellous machines, but they can break down (a classic instance occurs when pulling the cord out), and there are situations where disc cutting is not appropriate (as in the presence of hazards, dust and noise, for instance). In some situations hand cutting is actually quicker once you get used to it. When you hand-cut roof tiles, the edges will be slightly more jagged than the clean edge you get with a disc cutter (especially on concrete tiles), but viewed from ground level this is not normally an issue.

First tile measured nib to tail.

Under-eave measured nib to tail.
SETTING OUT
Battens, Fixed Points and Gauges
Finding the First Fix Point
- Turn the roof tile over and measure from the underside of the nib to the tail. Repeat this for the under-eaves tile and note both measurements (in this case 240 and 175mm, respectively).
- Take your tape or rule and extend the end of it 50mm over the fascia board (or halfway into the gutter, whichever is smaller).
- Mark the points at both ends of the roof and strike lines between them.
- Fix the battens with the top edge to the line (just a few nails for the present, not driven).
- The top edges of the battens are the first fixed points for the double course at eaves. Try a tile and an under-eaves tile on at each end to make sure that they overhang correctly and that the tails are in line before continuing.
The Maximum Gauge
The maximum gauge of a plain tile can be found in the trade literature or from the supplier’s web site, but it is widely accepted as 100mm for pitched roofs; this is based on the formula:
[length – minimum headlap] ÷ 2 = maximum gauge example: [265mm – 65mm] = 200mm ÷ 2 = 100mm
Battening Up
Unlike interlocking tiles, where you need to start working the gauge out almost immediately, the procedure with plain tiles is to batten the roof up at the maximum gauge and to make any the adjustments in the gauge in the last metre or so before you reach the ridge.
Finishing at the Ridge
At one time, most manufacturers of plain tiles used to produce special ‘tops’ tiles which were longer than a standard under-eaves tile. The extra length meant that the tops tile could be fixed to a batten above the last tile and retain the margin (100mm), and therefore the minimum headlap could be maintained. Now most manufacturers produce only one tile to do both jobs (an eaves/tops tile) and this has led to some debate on how best to finish off at the top of the roof. When produced in clay, most eaves/tops still have just about enough hanging length to be fixed on a batten, but if you finish like this with concrete the eaves/tops tile is normally too short, so you may lose some of the headlap. On the other hand, if you simply hang the tops tile (as many do) then you maintain the minimum headlap, but you normally do so at the expense of a secure fixing. Some manufacturers do produce special clips which offer a solution to this problem although, in my experience, they are not commonly used nor available from most merchants.

Check that tiles are in line and overhang correctly.
So, is the solution to hang the tops tiles or fix them to a batten? Apart from contacting the manufacturer in the hope that he makes the special clips, this is one situation where the procedure to follow is not clear. Personally, I think that it is better to fix the tops tiles to a batten and to lose a few millimetres of headlap in what is a low-risk area to leaks rather than hang the tops loosely and rely on the ridge tiles to hold them on. Where possible, the batten used to fix the tops tile should be thicker (that is, deeper) than the other battens, so that it stands high enough for the nibs of the tops tiles to catch properly. You may find it handy to have some longer nails with you (normally 75mm will suffice, but the actual length will depend on the depth of the timber you use) if you decide to finish in this way. The ideal size for a tops batten should be approximately 25mm wide and about 35mm deep. It is no wonder then, perhaps, that many roofers commit another small sin in the interest of common sense and use a batten on edge (technically, it is incorrect to nail across the grain in timber). To avoid splitting the timber, drill and screw the batten on edge or ‘blunt’ the nail heads by tapping them with a hammer before nailing them in. If you are going to use a batten on edge, install it tightly behind the last course of tiles after they are fixed in place.

Typical pitch-finder in use.

Tops tiles ‘hung’.

Tops tiles fixed to batten on edge.
But, whichever finish you have decided on, it is the top edge of the batten that carries the full tiles (not the tops) that gives you your fixed point at the ridge. You should make sure that the top batten is set down enough for the tiles, tops and a batten (if used) to fit in at the ridge with a few millimetres of clearance. Depending on the type of tiles you are using, the top batten normally finishes about 50mm down from the ridge for a ‘hung’ top and about 80mm down for a ‘batten on edge’ finish.
Dropping the Gauge at the Ridge
All you need to do to drop the gauge at the ridge is to reduce the last few gauges as evenly as possible. You should restrict your adjustments to a maximum of 6mm to make sure that the drop in gauge is not too obvious. Normally there are several possibilities to choose from. For example, if you need to lose 30mm then you have the choice of dropping the last ten courses by 3mm each, the last five by 6mm each or the last six courses by 5mm each.
Battening for Hip and Valley Tiles
There is a range of hip and valley tiles (for instance, bonnet hips and purpose-made valley tiles) that are designed to carry the courses around from one side of the hip or valley to the other, and so it is important that the batten positions correspond on both sides. If the roof is of the same pitch on both sides, then there should be no problem with the battening, provided, of course, that it is marked and fixed accurately.
The easiest way to check the pitch is with a pitch finder, these may be obtained from most tile manufacturers, specialist merchants and now even large DIY stores. If there is a slight difference in pitch (up to 5 degrees) the batten positions can be brought into line by dropping the gauges evenly by a few millimetres each on the shallower (longer) side of the roof. If you do not have a pitch finder, then you can normally tell whether the roof is suitable by comparing the rafter lengths on either side of the hip or valley. Measure from the apex down to the eaves and, if they are within 5 per cent of each other (which equates to 50mm in 1m) then it is within 5 degrees.
The basic method for adjusting gauges where the pitch varies slightly is as follows:
- Measure from the top edge of the first batten to the top fixed point on both sides of the roof and record the two measurements.
- Work out the number of courses; this is dictated by shallowest/longest side (for example, if one side is 4500mm and the other 4350mm for a 100mm gauge there will be forty-five courses).
- Next, divide the shorter measurement by the number of courses (thus, 4350mm ÷ 45 = 96.6mm)
- Round up or down to the nearest millimetre (in this case 97mm) and, by using your tape or rule, put this ‘awkward’ measurement on to a length of batten and mark off 97, 194, 291, 388, 485mm … ).
- Batten the two roofs up at different gauges (100 and 97mm, respectively) but keep an eye on how the battens are lining up either side of the hip or valley. It is quite acceptable to adjust a gauge here and there as required, if you feel the need to do so.
Sometimes, when the pitch is not the same on the two sides, this means that one tile hangs down further than the other, causing a slight loss of alignment at the tails. If you are matching up the battens, this is unavoidable and the loss of alignment is often so small that it is not detectable from ground level. If you must line up the tails, this can be achieved by setting the battens slightly higher on one side of the roof than on the other.
With regard to the hip details, if the hip rafter is wide enough or there are noggins to secure the batten ends to, then begin by fixing a batten centrally down the hip rafter. This will not only provide a continuous fixing point for the hip tiles, it will also help to keep them straight. Cut the incoming batten ends to angle and butt them up to the side of the hip-batten. Make sure that each batten end is supported and nailed to either the hip rafter or a noggin.
It is now more common to find that you have neither a wide hip rafter nor noggins, so the only alternative is to cut the batten ends to an angle and nail them to the centre of the hip rafter. If you are faced with this situation, then you will need some longer nails (75mm or more) for fixing the hip tiles.
The valley detail is slightly different because of the area’s vulnerability to leaks. The main thing to ensure is that the underlay is not punctured by the batten ends and that as few penetrations occur as is possible near the centre of the valley. It is probably wise therefore just to bring the batten ends straight into the valley but to stop them short by a few millimetres. If possible, get the joiner to include some noggins about 100 to 150mm back from the centre of the valley so that you can secure the batten ends properly.

Battens into the valley set back slightly to avoid punctures.

Cutting in at the verges.

Working out the overhang to a full or half-tile start.
Setting or Marking Out (Across the Roof )
General
Traditionally, plain tiled roofs were not marked out. The procedure for a standard verge-to-verge roof was to start at one end at a set overhang (say 50mm over), lay the tiles together without gaps and then make any adjustments to the other end by cutting the second or the third tile in from the verge.
If you use this traditional method rather than mark the roof out, be prepared to do a lot of cutting; a typical roof might be 5 or 6m long, which equates to fifty or sixty cuts on each side of the roof.
Overhangs
As with all slates and tiles, the undercloak for a plain tile roof should preferably extend between 38 and 50mm over the verge to comply with good practice guidance and the manufacturer’s own technical information. It is rarely a problem with plain tiles to comply with this, and normally it can be achieved without cutting. What you are looking for is a situation where the tiles fall naturally over the verges at between 38 and 50mm. For small roofs, such as porches or lean-tos, just trying the tiles across will suffice. If a row of full tiles does not give you the overhang you are looking for, then try starting with a tile-and-a-half instead.
Normally, one of these two formations will produce the overhang you need or at least will come very close to it. You may need to space some of the tiles slightly to get the desired overhang; if this is the case do it evenly across a number of tiles (spacing with a trowel blade is recommended).
Marking-Out for Plain Tiles
Plain tiles may be marked out in much the same way as interlocking tiles, the only real difference is in how you make the marking lath. Remember that plain tiles are half-bonded so you will need a second set of marks. You can do this by going to any of the marks you have already made, marking a half-tile width to either side (normally tiles are 165mm wide, giving a half-bond of 83mm when rounded up) and then applying a second set of marks to the top and the bottom batten ready for striking.
Follow this method to create a marking lath for any plain roof tile:
- Lay six tiles tightly together on any batten and mark both ends, leaving a small gap of (just a millimetre or two) at one end to avoid getting the tiles too tight. The idea is not to space the tiles, it is too lay them naturally without force while still allowing some room for movement or slight spacing later on if it is required.
- Find a straight and fairly smooth batten (full length) and transfer the marks to the marking batten.
- Cross out the part that is spare, to avoid confusion later on.
Fixing Details
Laying Tiles
The basic laying technique involves four stages.
- Positioning – lay the tiles on the batten and pull or knock down to ensure that the nibs are properly located.
- Shunting – open slightly or gently knock together the tiles in the direction they need to go in relation to your marks or to the verge; if it is small roof, do this gradually and without force.
- Fixing – fixing is by double nailing to all perimeters and every fifth course as a minimum or as required by the specification.
- Bonding – plain tiles lay broken bonded to the course below. In most cases this bond is created by starting every other course with a tile-and-a-half (creating a half-bond of approximately 82 or 83mm). In situations where it is not possible to retain a full half-bond the minimum sidelap for weathering purposes should not be less than 55mm.
Cutting Tiles (by Hand)
Unlike interlocking tiles, plain tiles (especially clay ones) are relatively easy to cut with hand tools. There are several methods of doing this and which one you use is a matter of your preference and, to some degree, of regional differences. In each case I would recommend that the tile is scored first with a scribe and that then any nibs which interfere with the cut are carefully removed with a hammer (always knock down, not up). From there you can either use a nibbler, pincers or two hammers.

Scribing the tiles.

Nibbler in use.
Nibbler method: keep the jaws moving up and down at a steady, constant pace, bringing the tile through towards you as you cut, taking about 15 to 20mm off each time until you get to within about 10mm of the cut line. Sometimes, just as you are about to complete your perfectly straight cut, a small section will break off on the edge of the tile, often with the very last ‘chomp’ of the blades. Now, this can become frustrating, so to help in preventing this from happening it often pays to make sure to scribe a little deeper at the bottom edge of the tile and to trim to the corner before making the final cut.

Cutting into the corners.
If you are just cutting a tile to width (as opposed to a valley cut), then, if you take it off the right-hand side rather than the left, this means you will be cutting towards the top of the tile and, if a small corner does break off, then the tile can still be used because the blemish is covered by the next course. If you find that the nibbler is not cutting cleanly, the blades may need to be adjusted for height or to be changed if they have become worn.
Pincers: if you are using this method make sure the tile is scored a little deeper to increase your chances of success. It also helps to have strong hands. In reality, this is just a matter of snapping off pieces of the tile, larger ones at first and smaller ones as you get nearer to the cut line.

Laying and fixing the under-eaves.

Laying and fixing the first course.
Eaves
When using plain tiles there should always be a double course at the eaves; this consists of full tiles laid at half-bond over the shorter, under-eaves tiles. If you start with full-width under-eaves, then your next course up will start with a tile-and-a-half; if you start with half an under-eaves (or tile-and-a-half down to size), then the next course will start with a full tile. If you are working towards a verge, try the last few tiles through to the end, just in case they need to be spaced out slightly. I would recommend that you take the double course at the eaves all the way through to check that everything fits before tiling the rest of the roof. Note that in some cases it may be acceptable to dispense with the under-eaves tiles provided that an appropriate plastic eaves course (similar to felt support trays) is installed in their place and that this has been agreed beforehand.

Bedding the under-eaves.

Bedding the first course.
Verges
Plain tile verges are formed by laying tiles and tiles-and-a-half on alternate courses normally, with at least one or two tiles next to them for stability. The key to good plain tile verges is in the mortar work. The pointing method shown here is the traditional way to finish a plain tile verge and is known in some parts as ‘herring bone’ pointing because it resembles a fish bone when completed. Flush pointing or ‘parging’ on plain tiles should be avoided because, unless it is a style specific to a region, it ruins what could have been an attractive roofing feature. Follow this method and, with a little care and practice, you will soon master this traditional skill.
- Begin by bedding up the verge so that the bed is high enough to be compressed by the tiles when laid.
- Run the blade of the trowel along the verge mortar at a slight angle so that the edge of the undercloak is visible; this will help to keep the verge straight when tiling.
- Press the first under-eaves tile into place so that it is straight with the verge and is pulled down square on to the batten. Lay several more under-eaves next to it and double-nail them all. Carefully place a thin bed of mortar on top of the first under-eaves tile, making sure that the mortar dies away near the tail.
- Press the first tile (or tile-and-a-half ) into place and check that it is straight with the verge and is pulled down square on to the batten. Lay several tiles next to this and double-nail them all.
- Cut a long, triangle-shaped bed of mortar (about 25mm wide to almost nothing) and place this on to the first tile, as shown. If you are using a standard gauging trowel, the distance from the back edge of the trowel to the part where it starts to curve is a good guide for the length of bed required. Double-nail the verge tile and lay three or four tiles next to it.
- From here repeat the process, alternating with tiles and tiles-and-a-half on every other course. Keep an eye on the mortar to make sure that it is being compressed, and, if it is not, then add some height where needed. Also, keep an eye on the mortar that is oozing out too much when you press the verge tiles; trim this off with the trowel as you go to avoid its staining the tile edges. Double nail all perimeter tiles plus every fifth course as a minimum or greater if the specification requires it.
- At the top of the verge, the end tops tiles will be either a full tile or a half. If it does finish with a half then you have a choice of cutting an eaves/top in half or cutting a tile-and-a-half down to size. The former retains the proper machine edge finish, while the latter gives a little more stability, but you are normally left with an unsightly cut. Both methods are acceptable, but, given the choice, I would tend to go with the half tile, especially for low-level work which will be seen.
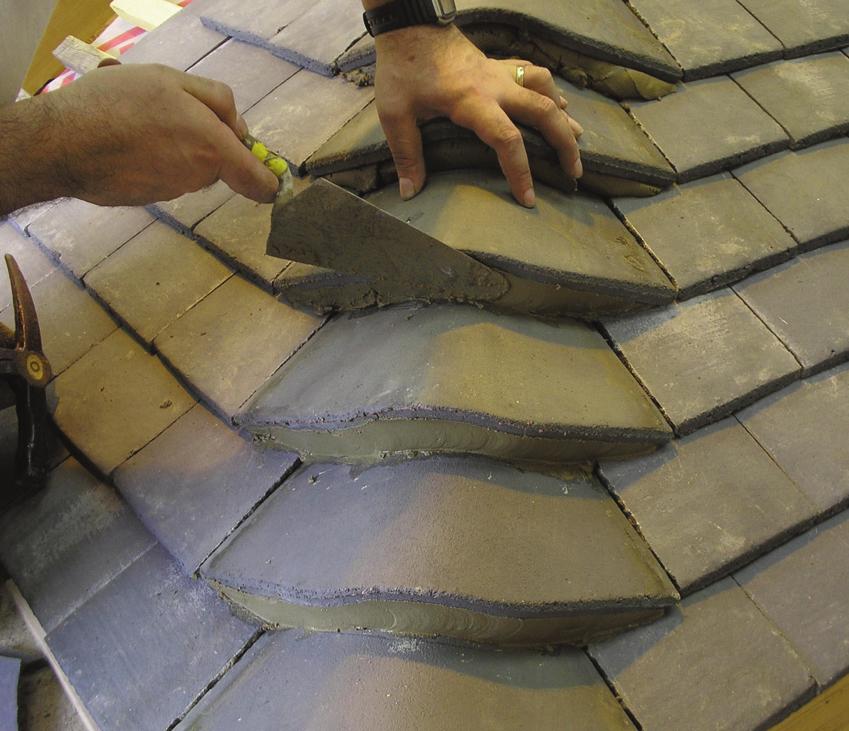
- Pointing the verge is easy if you have bedded it correctly. The verge should be full of slightly compacted mortar with few (if any) gaps and with minimal (if any) mortar stains on the tile edges. If you need to add mortar, do so carefully and in small amounts so as not to stain the tiles. Simply run the trowel underneath the edges of the tiles at a slight angle (2 or 3mm) in a steady, upwards motion, slowing slightly to move up and behind head of the next course. Periodically, stop to point between the tiles by running the blade down at a slight angle from the head of the tiles down to the tails.

Progression up the verge.

Pointing to plain tile verge.
Chimneys and Abutments
Below
Where possible, try to finish as you would at the ridge (that is, with a topper), but, if the tiles do not fit in below the penetration and you need to cut them, do so at the heads, not the tails, and re-hole them with a drill.
Sides
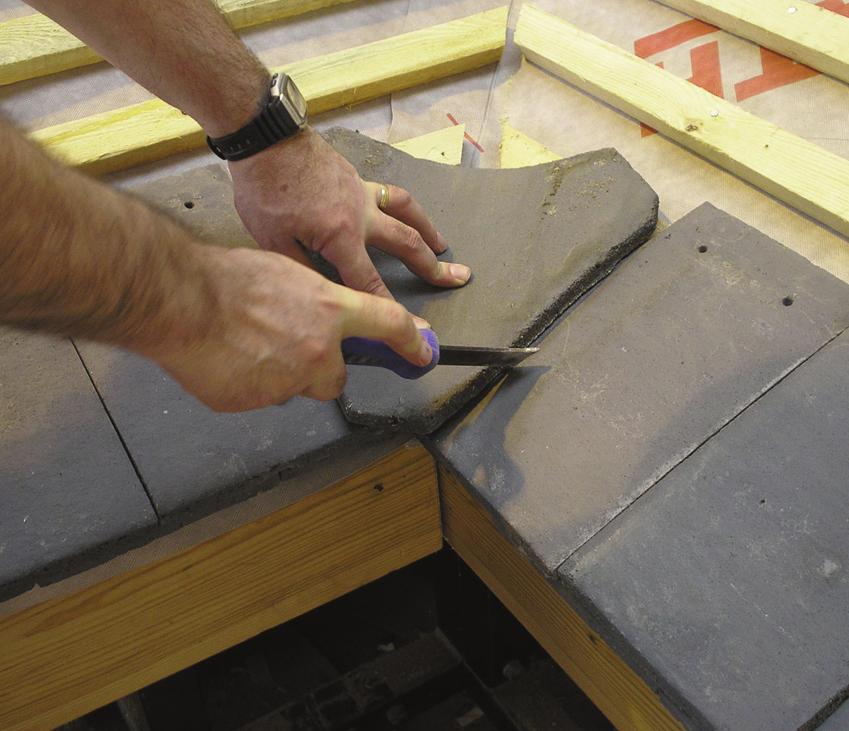
When you are cutting to the sides of a chimney or an abutment in plain tiles, make sure that you have some tiles-and-a-half available to avoid small cuts. The basic procedure is to lay the tile (or tile-and-a-half ) you need to cut one tile back from the wall, overlap it with a full tile and mark the cut. Once cut, switch the cut tile and the full tile around to leave a tight, neat finish against the wall. This switching technique is one that can also be used at other details covered later in this chapter, such as bonnet hips, purpose-made valley tiles and vertical angle tiles.

Marking the cut tiles (or tile-and-a-half ).

Switching the tiles – cut edge now tight to abutment.
Soakers
Although not all roofers do their own lead work (the work is shared between plumbers, lead workers and roofers who tend to do more re-roofing work than new build), all roofers should at least know how to cut and install soakers. These are small, rectangular flashings, normally made from code 3 lead, which sit between each course of tiles where they come to a wall.
The length of a soaker is determined by adding the gauge to the headlap, plus 25mm. For plain tiles this means the soaker needs to be 190mm (100 + 65 + 25) in length for pitched roofs and 175mm (113.5 + 37.5 + 25) for vertical tiling. The width should be 175mm, with the soaker folded at right angles to give an upstand of 75mm and a lap on to the tiles of 100mm.

First course installed over soaker.
Soakers installed to under-eaves course.
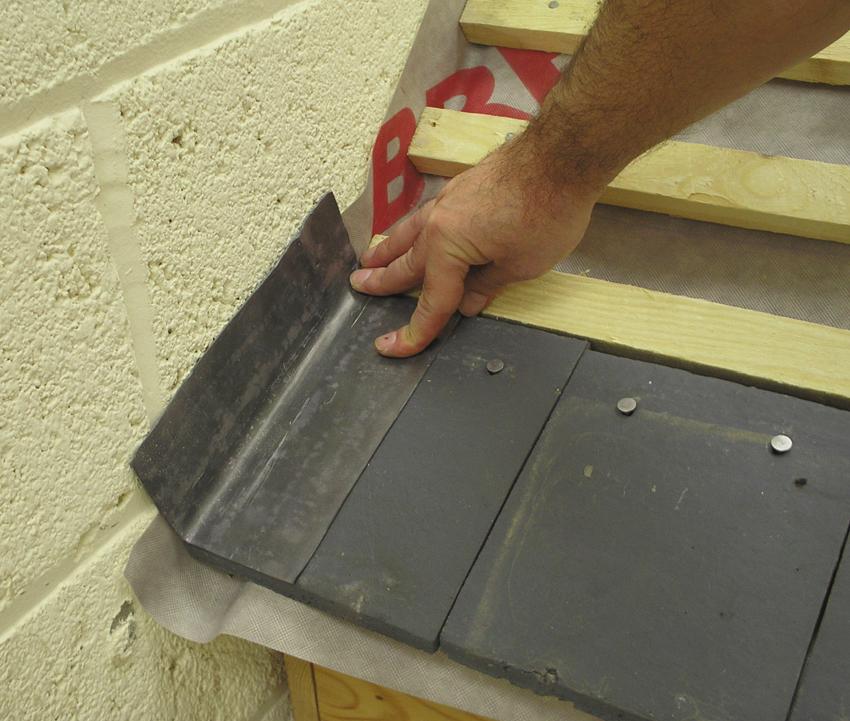
The correct way to install a soaker is to place it on top of the tile and bend the top 25mm over to form a nib, which sits over the back of the batten. Normally, the bottom edge of the soaker is set a few millimetres up from the bottom edge of the tiles to avoid lifting them and so that the lead is not seen. If the detail starts with an under-eaves tile, then this should be fixed first before the soaker. This first soaker will need to be slightly longer to cover the under-eaves tile plus the 25mm-fold at the top edge (normally 225–235mm).

Soaker installation in progress.

Under-eaves cut to mitre.

Use of soaker to protect joints and nail holes.
Back
As you have a course of tiles every 100mm, this is usually just a case of deciding which is the most suitable to carry the tiles behind the chimney. What you are looking for is a course that gives you sufficient lap on to the back gutter lead flashing (see chapter 10), while still leaving a decent gap behind the chimney so that blockages are avoided. This section should be treated like the eaves, so you will still need a course of under-eaves tiles.

Traditional clay-capped hip/ridge tiles.
Bedded Ridge and Hip Tiles
There is nothing really to add on installing ridge and hip tiles that was not covered in the previous chapter, other than to say that ridging on to plain tiles is actually much easier because you do not get the rolls and pans associated with most interlocking tiles; the surface is flat, and so the bedding and pointing are straightforward.

Marking the seam positions for the first hip tile.
Bonnet Hips
To begin, position the bonnet hip tile in the approximate position where it will eventually be fixed and mark the seams with a pencil.
Fix the under-eaves tiles in place so that they provide at least 55mm of sidelap to the bonnet, and use a wide tile (a tile-and-a-half cut down to size or a tile on edge) to cut into the centre of the hip. If a tile on edge is used, take the nibs off first and drill new nail holes for the fixings. It may be necessary to round off the tips of the tiles if they are not quite long enough to form a full mitre. If sidelap or nail holes are still of concern, then apply a code 3 lead soaker across the affected area.
- Once the eaves course has been established, lay a full tile on the first course on either side of the hip. Lay a tile next to them to make sure that they are square and pulled down on to the battens. You may need to take the top corners of the tiles off for them to avoid their clashing at the hip.
- Position the first bonnet hip tile over the tiles, making sure that it is central to the hip and the bottom edges are in line with the corners of the tiles. Run a pencil down either side of the bonnet to leave cut marks on the tiles.
- Cut the tiles and reposition them and the bonnet hip tile to check for accuracy.
- Once you are happy with the cuts and the alignment of the bonnet, then take the bonnet off and place a bed of mortar underneath it, taking care not to get any in the seams of the tiles. It is normally a good idea to insert one or more tile slips to cover the open joint at the eaves and to act as a bridge for a second bed of mortar. The shape of the bed is quite important; try to copy the shape of the bonnet and, as always, put enough in so it compresses when the tile is laid.
- Nail the first bonnet hip tile and the tiles adjacent to it. Fix several under-eaves and full tiles on both sides of the hip.
- Set the next course of tiles to half-bond and tile back into the hip from both sides. Position and cut tiles (or tiles-and-a-half, if the gap has widened) to fit between the last full tile and the bonnets, using the same method as before with the first course. Mark on where the bonnet will come to before bedding it slightly back from the line and nailing it in place, always checking that it is central and is in line with the bottom corners of the tiles.
- Depending on the pitch of the roof, the cut tile ‘fitter’ that sits next to the bonnets may vary in size as the hip progresses. Where necessary, use tiles-and-a-half to avoid small cuts. In general, it is not a good idea to let the cut tiles become smaller than 125mm wide and, in some cases, this means that two cuts may be needed. If you do have to double-cut then, for bonding purposes and aesthetic reasons, it is normally better to keep the cuts a similar size. The important factor is that the minimum sidelap does not fall below 55mm.
- Carry on bedding and fixing the bonnets all the way to the top of the hip. The last bonnets, which fall on the tops course, may need to be cut at the head and drilled to create a new nail hole. The junction at the apex may get a little cramped, so you may need to improvise with regards to cutting tiles and bonnets and use soakers on any joints where sidelap has been lost.
- Point the bonnets carefully to leave the edges clean of mortar.

Marking the tiles for the first bonnet hip tile.

Checking the cuts ‘dry’ for accuracy.

Bedding the first bonnet.

Fixing the first bonnet and adjacent tiles.

Courses set at half-bond and tiled back into the hip.

Setting and marking the bonnets.

Bonnets in progress.
Pointing to bonnet hips.

Arris hip tiles.
Arris Hips
Arris hip tiles are similar to bonnets but are more angled and are designed to fit close to the tiles so that you do not have to bed and point them. They are available for several different roof pitches and if you get the right ones there should be no need to cut the tiles at the sides. In clay, arris hip tiles are normally available at 35, 40, 45 and 50 degrees and in concrete at 35 and 40 degrees only.
If for any reason you are losing or gaining sidelap and need to cut the adjacent tiles then follow the method described in the section on bonnet hips.
You may find that, if there is a sprocket or slight kick at the eaves, then this alters the pitch of the roof in the lower courses and so there may be some angled cutting to do on the adjacent tiles until you are on the roof pitch proper.

Marking the first under-eaves tile for purpose-made valley tiles.

Cutting and placing the mitred undereaves.

Checking the first valley tile for sidelap.
Valleys
Purpose-Made Valley Tiles (Concrete)
In concrete, valley tiles are normally available in just one ‘universal’ fitting, so, unless you are very fortunate, you will have to cut the adjacent tiles to fit and will lose or gain sidelap on each course. To maintain the minimal sidelap you cut tiles or tiles-and-a-half down, while avoiding narrow cuts (minimum cut size 125mm), exactly the same as for bonnet hips.
- To begin, position one of the under-eaves tiles into the valley and slide it along until it can go no further. Make a mark from the centre of the valley through to the bottom edge of the under-eaves tile. After cutting this tile, turn it over and use it as a template to mark the opposite under-eaves tile; cut this as well and nail them into place. Check that there is at least 55mm sidelap either side of the valley tile and make any amendments before continuing.
- Once the under-eaves course has been established, take off the purpose-made valley tile and lay two full tiles on both sides, making sure they are pulled down squarely on to the battens. Position the first valley tile over the tiles, making sure that it is central to the valley and the bottom edges are in line with the corners of the tiles. Assuming that the roof pitch is equal on both sides, the cutting angle (if any) should be about the same each side. Score down either side of the valley tile with the scribe to leave cut marks on the tiles below.
- Cut the tiles and reposition them alongside the valley tile to check for accuracy. Once you are happy with this, nail the adjacent tiles. Fix several under-eaves and full tiles on both sides of the valley. Note that there are no nail holes in the valley tiles, this is deliberate to avoid leaks so do not be tempted to drill and fix them.
- Set the next course of tiles to half-bond and tile back into the valley from both sides. Position and cut tiles or tiles-and-a-half to fit between the last full tile and the valley tile, using the same method as for the first course. Always check that the valley tile is central and is in line with the bottom corners of the tiles. Continue up the valley marking, cutting and fitting the tiles in the same way for subsequent courses.

Position full tiles for first course.
Scribing the tiles.

Checking the cutting angles.

Fixing the first course.

Setting the next course to half-bond.

Tiling back into the valley.
Depending on the pitch of the roof, the cut tile ‘fitter’ may vary in size as the valley progresses. If the gap grows then use tiles-and-a-half, if it gets smaller continue cutting out of a full tile but keep an eye on the sidelap in relation to the valley tile as the fitting tile narrows. In general, it is not a good idea to let the cut tiles get smaller than 125mm, and so, where the gap from tiles to valley tile leaves a cut smaller than this, you may need to trim something off the next tile back as well.

Purpose-made valley in progress.
Purpose-Made Valley Tiles (Clay)
In clay, purpose-made valley tiles are normally available at 35, 40, 45 and 50 degrees. If you can get the right ones for the roof pitch you are working on, or are prepared to pay for them to be made, then they should give you half-bond and there should be no cutting to do at the sides. If, for any reason, you are losing some sidelap and need to cut the adjacent tiles, then follow the method described in the previous section.
You may find that, if there is a sprocket or slight kick at the eaves, this alters the pitch of the roof in the lower courses and so there may be some angled cutting to do on the adjacent tiles until you are on the roof pitch proper.
Open or ‘Cut’ Valleys
The correct formation for a lead-lined valley requires that the valley boards are installed to the same level as the rafters. This involves cutting and dropping the valley boards down between the rafters on noggins, and it may also be necessary to top this off with 6mm plywood boards to ensure a smooth base for the lead. The tilting fillet is then installed to the same height as the incoming battens so that the edges of the cut tiles are supported (see the picture on page 39).
There is a significant amount of work in forming this detail properly, so expect to find that the valley boards are fixed straight on top of the rafters. When this became common practice I am not sure, perhaps it always has been so, but what I do know is that, although it might be technically incorrect, the vast majority of valleys I have seen were and still are formed with the boards on top. When the boards are on top the code 4 or 5 lead lining is just welted (folded) inwards at the edges by about 25mm, with the tiling carried over the welted edge by about 50mm.

Cut tiles should retain some tail width and end well above the margin.
Whether using a lead-lined valley or a pre-formed GRP valley liner, it should be noted that plain tile valleys should not be blocked with mortar (that is, pointed) on their cut edges. Plain tiles shed water by allowing it in at the seams and then disbursing it via the tile underneath. Blocking the ends with mortar can trap the water in the roof, allowing it to back up and enter the roof space. I think this poor practice has crept in from interlocking tiling; often people ask for it because they think that all valleys need to be pointed, but this is a mistake. Open valleys in plain tiles have been formed quite successfully without any mortar for a great many years, but, if you must use mortar, make sure the tiles are just back bedded, well away from the cut edges.
Plain tiles should not be cut to a point in the valley, which means that they must retain some width at the tail (as much as possible, but in practice no less than 25mm). The cut line should extend well above the margin to ensure the correct lap on to the valley liner and to maintain the sidelap on the course above.
Where necessary, use tiles-and-a-half to avoid small cuts or to extend the head of the tile further into valley.

Tiles-and-a-half used to avoid small pieces and extend into valleys.

Adjacent tile cut back to retain tail width.
At times, you may be faced with a situation where a tile-and-a-half is not quite wide enough, but the alternative is a tile cut to a point. The way around this is to trim back the next tile sufficiently so that the valley cut is no longer to a point.

Installing the under-eaves.
The conventional method for tiling an open valley in plain tiles is:
- Strike or mark a line on the valley liner where you want the tiles to be cut to. Normally this is a minimum of 50mm over the edge of the tilt fillet for a lead-lined valley, and about the same for GRP valley liners. Begin by marking and cutting the first under-eaves tile to the line and lay two or three more next to it. Double nail the under-eaves.
- Lay the first course of tiles so that they are at half bond with the under-eaves and mark the first tile or tile-and-a-half in the valley along the cut line.
- Cut and nail the tile in place, and set further courses to half bond. (Note that, if the valley is lead-lined with the boards on top of the rafters, you may need to take the tile nibs off where they fall on the lead to help them to sit properly. If this is the case, take the nibs off before cutting the tiles.)
- Continue to set each course at half-bond to the one below and tile back into the valley, cutting the tiles and/or tiles-and-a-half to the line. Instead of marking exactly to the line, try marking from the line at the top part of the tile to a point about 3 to 5mm back on to the tile below. This might look a little odd up close, but is a good way to keep the valley looking dead straight when viewed from a normal angle.

Marking the first valley cut.

Installing the first cut and setting tiles to half-bond.

Marking and cutting tiles (slightly on to the tile below).

Open valley in progress (note how tiles line up).
Vertical Tiling
The first thing to say about vertical tiling is that you do not need as much headlap and you can therefore increase the battening gauge if you wish. The maximum gauge for vertical plain tiling is either 114mm or, more commonly, 115mm, depending on the manufacturer. The only real significance of the greater gauge is that you need fewer courses to do the job, and therefore fewer tiles.
Bottom Edges
When tiling above an opening window, check that the tiles do not catch and, if they do, then reduce the overhang. In pitched roofing the tiles normally need to extend 50mm over the fascia board so that water runs into the gutter properly, but in vertical tiling you only need about 25mm to form a drip (an edge that water gathers on and drops from).

Traditional-shaped flashing under sill.
Top Edges
How you finish at the top edge depends on whether or not you need to protect the topper course from water ingress or not. If the top course falls below a window frame, then you need a lead flashing (which should preferably be installed before the window). Traditionally, the lead is cut to a pattern and in many cases painted as well.
If the top edge is protected by a deep, overhanging soffit, the chances of water ingress are very low so you could probably do without a flashing, unless, of course, you want to for aesthetic reasons.

External angle tiles, bottom course.
Internal and External Angles
These fittings come left- and right-handed with two holes on one side and one on the other, but are normally nibless. To start off, mark the edges of the first angle tile and proceed to install the under-eaves at half-bond.
From here it just a case of fitting left- and right-handed fittings on alternate courses and the adjacent tiles. All fittings and tiles must be twice nailed. If there is a kick at the bottom edge this will make the angle for one or more courses more shallow, so you may need to cut some of the tiles adjacent to the fittings to a slight angle for a better fit.
If you need to cut a vertical angle tile down to match in with the topper course, cut the top of the tile off rather than the bottom, and drill new fixing points.
If you are tiling to another internal or external angle then you mark and cut the tiles adjacent to the fittings, similarly to the way you would to a wall (see chimneys and abutments covered earlier in this chapter).

External angles tiles in progress.
Gable End Details
Winchester Cut
The first thing to note is that Winchester cuts are not recommended where the roof pitch above the gable end is less than 40 degrees. This style of finish involves the angled cutting of tiles-and-a-half and the adjacent tiles at the end of each course (to create a 50p-piece like effect). The process starts by cutting a tile-and-half from one of the bottom corners to a point approximately 100mm wide at the head, so that at least one nail hole is retained. Take this to the appropriate end of the roof and position a full tile loosely on one of the battens, overhang the cut-tile-and-a-half and mark the tile. It is important that at least one nail hole and one nib are retained for this second cut.

Establishing the templates for a Winchester cut.

Winchester cut in progress.
If you are happy with the size and the angle of the cuts then mark the tile-and-a-half with a ‘T’ for template and use it to mark cuts for both sides, turning over the template to mark those for the opposite end.
The best way to start tiling is to strike a line down the centre of the gable end (on to the battens) and work away from it so that you are creating on one side a mirror image of the other. As you approach the end of each course, mark and cut the tiles (or tiles-and-a-half ) with a template and nail all the tiles in place. While the minimum sidelap for vertical tiling is still 55mm, as it is for pitched roofs, in practice this is sometimes difficult to adhere to on a Winchester cut. However, you should avoid any straight seams (one in line with the other directly above) and try to ensure that there is as much sidelap as possible, even if this means taking a course back off and re-cutting it to suit the next one.

‘Sussex’ cut or soldier course.
Sussex Cut (Soldier Course)
This detail is used on gable ends where the roof pitch is too shallow to take a Winchester cut. To form this detail fix two or more raking (that is, at an angle) battens to run parallel to the underside of the verge before you being tiling. The top corners of the main tiles or tiles-and-a-halfs are cut to the underside of the raking battens before being covered.