Use HTML tags to turn a drab block of text into an interesting, attractive, and effective sales tool.
As a seller on eBay, you're expected to wear a lot of hats: diplomat, market researcher, salesperson, and yes, even web designer. Since eBay auctions are web pages, your description area can be decorated with the same fonts, colors, images, links, and tables found on any other web site.
Tip
If you're already familiar with HTML, you'll probably want to skip this primer or perhaps just use it as a quick reference as the rest of the hacks in this chapter contain more meaty HTML code.
Now, if you're using Internet Explorer, the Sell Your Item form [Hack #43] includes a rudimentary HTML editor (below the Standard tab on the Describe Your Item page), as shown in Figure 4-10. (You'll see only an ordinary text box here if you're using Mozilla or Firefox.)
Here, you can select a font from among four standard Windows typefaces, a font size, and even a color. You can bold, italicize, or underline your text, change the justification, indent, and format bulleted and numbered lists. And at any time, you can click the "Enter your own HTML" tab to view the code for the text you've typed so far. (You'll see something similar if you're building your listings with Turbo Lister [Hack #93] .)
But if you want to include images, tables, JavaScript, or any of the other advanced tags used throughout this book, you'll have to type the HTML by hand or import it from another program [Hack #53] .
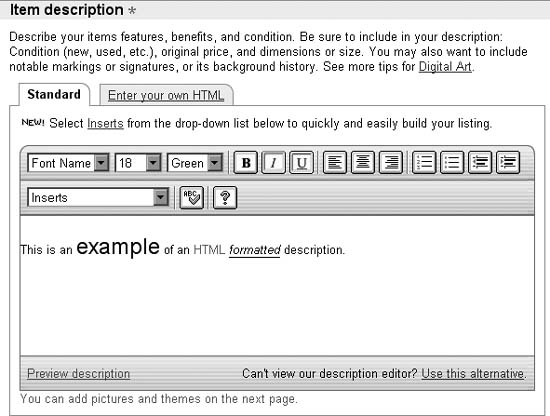
Figure 4-10. Use eBay's standard description editor (IE only) if you're not comfortable entering your own HTML code
For many sellers, the introduction to HTML comes in the disappointment of seeing a carefully arranged description seemingly mutilated by eBay. For example, this text:
    Antique steam shovel toy:
         real working treads
         working shovel, turn crank to raise
         glossy red lacquer
    in immaculate condition!
will look like this when viewed on an eBay auction page:
    Antique steam shovel toy: real working treads working shovel, turn crank to
    raise glossy red lacquer in immaculate condition!
The fault lies not with eBay, but with the way web browsers interpret plain text. All spacing, alignment, and line breaks are effectively ignored in favor of the HTML code that is the basis of formatting in all web pages.
HTML (HyperText Markup Language) consists of plain text
interspersed with markup tags. A tag is a special
formatting keyword enclosed in pointy brackets (also known as carets
or greater-than and less-than symbols). For instance, simply place the
<br> tag in your text to
insert a line break, or <p>
to insert a paragraph break. For example:
    real working treads<br>working shovel, turn crank to raise<br>glossy red
    lacquer
Tags that modify text actually require two parts: a tag to turn
the formatting on and another to turn it off. For example, the
<center> tag, used to center
justify text and images, requires a corresponding </center> tag later on to stop center
justification and restore the default left justification. Other tags
that work like this include <b>bold</b>, <i>italics</i>, and the <table></table> structure, all
described in the next few sections.
Table 4-2 shows some more of the tags [2] you'll use in your auction descriptions, and how they'll appear on the auction page.
Table 4-2. HTML tags that affect spacing and alignment
Goal | HTML code | What it will look like |
|---|---|---|
Line break | | First Line Second Line |
Paragraph break | | First Line Second Line |
No break | | My red steam shovel |
Horizontal line, centered | | First section ––––––––––––– Second section |
Center-justify | | In the middle |
Right-justify | | way over |
Indent | | See the next table |
Bulleted list (unordered list) | |
|
Numbered list (ordered list) | |
|
Display preformatted text with all line breaks and spacing | | Color: Red Size: Small Age: Really old |
Display text in a scrolling marquee | | w! Bid No |
Using some of these tags, you can fully reproduce the steam shovel description as intended:
Table 4-3.
What it will look like | ||||
|---|---|---|---|---|
Antique steam shovel toy: | Antique steam shovel toy: | |||
<blockquote>real working treads<br>working shovel, turn crank to raise<br>glossy red lacquer</blockquote> |
| |||
in immaculate condition! | in immaculate condition! |
Better yet, use bullets:
Table 4-4.
HTML code | What it will look like |
|---|---|
Antique steam shovel toy: | Antique steam shovel toy: |
<ul><li>real working treads<li>working shovel, turn crank to raise<li>glossy red lacquer</ul> |
|
in immaculate condition! | in immaculate condition! |
Note that the individual tags don't have to be on separate lines, but it sure makes the code easier to read. Table 4-3 shows the commonly used HTML tags that affect the appearance of text.
Table 4-5. HTML tags that affect fonts and appearance
Goal | HTML code | Preview |
|---|---|---|
Bold | | Shipping is Free |
Italics | | it's really important |
Subscript | | Drink H2O |
Superscript | | Turn 180o |
Set the font | | |
Set the font size | | Big or small |
Set the font color | It's <font style="color:white">invisible</font>! | It's ! |
Tags can be combined to achieve just about any effect. Take care when nesting HTML tags, however, so that structures do not improperly overlap. For example, this is wrong:
The <i>coldest <b>winter</i></b> I ever spent
But this is correct:
was <i>a summer in <b>San Francisco</b></i>
Essentially, tags that are opened first should be closed last.
An image of any size, from a tiny icon to a full-size photo of
what you're selling, can be inserted anywhere in your text using the
<img> tag, like this:
<img src="http://pics.ebay.com/aw/pics/navbar/ebay_logo_home.gif">
In this case, the image URL points to a GIF file on eBay's pics.ebay.com server that happens to be the eBay logo itself. If you want to put your own photos in your listing, you'll need to host them yourself [Hack #76] .
By default, the image will appear inline with the text, which typically doesn't look very professional. Instead, you can left justify or right justify the image, and the text will wrap around it:
    <img src="http://pics.ebay.com/aw/pics/navbar/ebay_logo_home.gif"
    align=right hspace=4 vpsace=7 border=1>
Also shown in this example are the hspace and vspace parameters, which specify invisible
horizontal and vertical margins in pixels, and the border parameter, which places a black line
around the image with the thickness also specified in pixels.
Hyperlinks are created by placing the <a> (anchor) structure around ordinary
text, like this:
<a href="http://www.ebayhacks.com/">click here</a>
Here, the text "click here" will automatically appear blue and
underlined in your auction; anyone who clicks it will be taken to the
URL http://www.ebayhacks.com/. Make sure to
include the closing </a> tag
that ends the hyperlink.
Warning
Always test each and every one of your links before placing them into your auction descriptions. The last thing you want is 20 confused bidders emailing you because you mistyped a URL in one of your links.
Because you don't want your bidders to click a link and leave
your auction, never to return, just have the link open in a new
window, leaving your auction description window intact. Include the
target="_blank" parameter:
<a href="http://www.ebayhacks.com/" target="_blank">click here</a>
Of course, you can also place an <img> tag inside of a <a> structure to make clickable images [Hack
#77] .
Tables are easy to create and are a great way to organize
information in your auction descriptions. A table is defined with a
single <table></table>
structure with one or more <tr></tr> and <td></td> structures contained
therein. For instance, this code defines a simple table with two rows
and two columns:
    <table width=90% border=1>
      <tr>
        <td>Color:</td>
        <td>red lacquer with chrome trim</td>
      </tr>
      <tr>
        <td>Dimensions:</td>
        <td>3 inches high, 4 inches long</td>
      </tr>
    </table>
Each <tr></tr>
structure defines a row in the table, and each <td></td> structure defines a
single table cell inside that row. Once a row is complete, another row
begins. The resulting table looks like this:
Better yet, add align=right
inside the first <td> tag in
each row to align the colons in the left column:
Note that text and images in tables should never be placed
outside the <td> tags. Use
indents, like in the example above, to make the code more readable and
to help you keep track of your rows and columns.
Using nested tables, you can create a nice-looking box to highlight important information:
    <table border=0 cellspacing=0 cellpadding=0 width=40% bgcolor=#2D775D>
      <tr><td>
        <table width=100% border=0 cellspacing=1 cellpadding=3>
          <tr><td bgcolor=#BAF9DB align=center>

            <b>Condition of this item</b>
          </td></tr>
          <tr><td bgcolor=white>
            Brand new in the original box with all original paperwork.
            <br>Batteries are not included.
          </td></tr>
        </table>
      </td></tr>
    </table>
which should look something like this:
Table 4-8.
Condition of this item |
|---|
Brand new in the original box, with all original paperwork. Batteries are not included. |
The bgcolor parameter in the
<td> tag sets the background
color using a six-digit code [Hack
#55] . Boxes like this are particularly useful for
highlighting payment and shipping
terms [Hack #54] .
Tables are also often used to make simple bars and stripes. For example, to include section headers that match those on eBay auction pages, use this code:
    <table width=100% border=0 cellpadding=0 cellspacing=0>
    <tr><td bgcolor=#9999CC>
      <img src="http://pics.ebay.com/aw/pics/x.gif" width=1 height=1>
    </td></tr>
    <tr><td bgcolor=#EEEEF8 nowrap>
      <img src="http://pics.ebay.com/aw/pics/x.gif" width=6 height=1>
      <font face="Arial" size=3><b>
        Your Title Goes Here...
      </b></font>
    </td></tr>
    </table>
Table cells with background colors set with the bgcolor parameter can be fine-tuned with
transparent, single-pixel images (like x.gif
here) used as spacers.
Another use for tables is to add whitespace to text, making it easier to read and more pleasant to look at. For example, enclose your description with this simple table:
    <center>
    <table width=85% border=0>
    <tr><td>
      Your description goes here...
    </td></tr>
    </table>
    </center>
Your text will appear in a stylish column, centered on the page, with 7.5% of the window's width devoted to whitespace on either side. Or, if whitespace is too plain for your tastes, you can use a decorative table to frame your description [Hack #56] without having to resort to eBay's listing designer.
[2] For a complete listing of HTML tags, consult an HTML reference such as www.w3.org or HTML & XHTML: The Definitive Guide (O'Reilly).