Chapter 14
Working with Your iCloud Account
You can get a free iCloud account, which is a web-based service that gives you e-mail, an address book, and a calendar. You can also use iCloud to automatically synchronize data between iCloud and your Mac (as well as your iPhone, iPad, or iPod touch).

Manage Your Schedule with iCloud
Locate and Lock a Lost Mac, iPod, iPhone, or iPad
Create an Apple ID
To use iCloud, you need to create a free Apple ID, which you use to sign in to iCloud on the web and to synchronize your Mac and other devices. An Apple ID is an e-mail address. You can use an existing e-mail address for your Apple ID, or you can sign up for a new iCloud e-mail address, which uses the icloud.com domain name. If you use an existing e-mail address, you are required to verify via e-mail that the address is legitimate.
Create an Apple ID
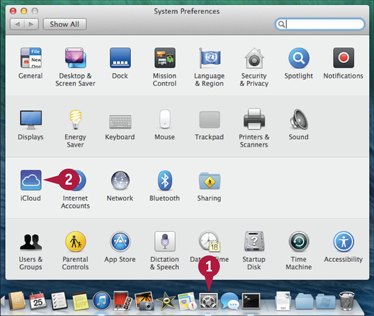
 Click System Preferences (
 ).
).
The System Preferences window appears.
 Click iCloud.
The iCloud preferences appear.
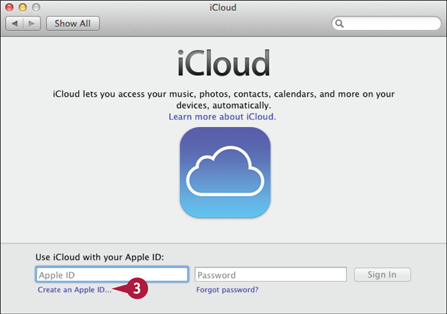
 Click Create an Apple ID.
The Create an Apple ID dialog appears.
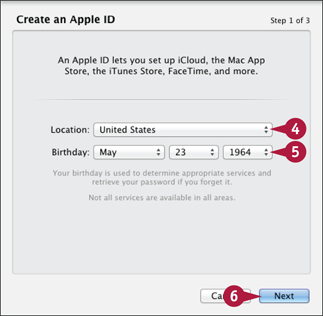
 Click the Location pop-up menu and choose your country.
 Click the three Birthday pop-up menus and choose your month, day, and year of birth.
 Click Next.

 Select Get a free iCloud email address (
 changes to
  ).
).
A If you prefer to use an existing address, select Use an existing email address ( changes to ) instead.
 Type the address.
 Type your name.
 Type the password.
 Click Next.
Create an Apple ID
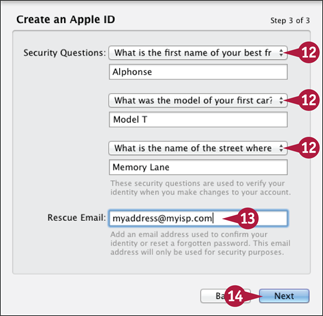
 For each security question, click
  to select a question and then type an answer.
 If you want to supply Apple with an emergency e-mail address, type it in the Rescue Email box.
 Click Next.
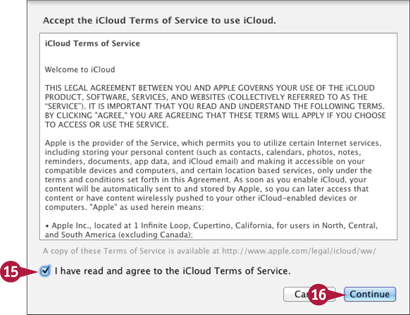
 Select the I have read and agree to the iCloud Terms of Service check box (
 changes to
  ).
).
 Click Continue.
OS X prompts you to choose which iCloud services you want to use.
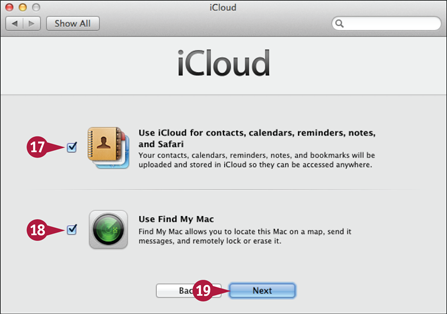
 If you do not want to sync your data to iCloud, click Use iCloud for contacts, calendars, and bookmarks ( changes to ).
 If you do not want to use iCloud to locate your Mac, click Use Find My Mac ( changes to ).
 Click Next.
If you elected to use Find My Mac, OS X asks you to confirm.
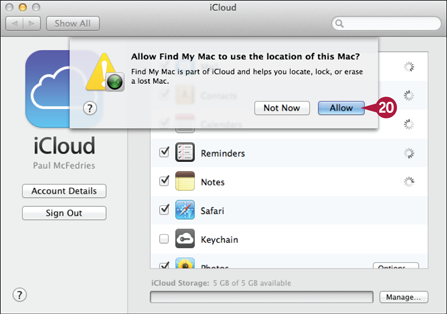
 Click Allow.
OS X sets up your iCloud account on your Mac.
Note: If you have trouble enabling Find My Mac, see the Tip in the section Locate a Lost Mac, iPod, iPhone, or iPad.
Sign In to iCloud
Before you can use the features associated with your iCloud account, you must sign in to the service. iCloud is a web-based service, so you access it using a web browser. Most modern browsers should work fine with iCloud, but Apple recommends that you use at least Safari 6, Firefox 16, Internet Explorer 9, or Chrome 23.
You can also sign in to iCloud using a Mac, and for that you must be using OS X Lion 10.7.5 or later. You can also access iCloud using a Windows PC, and in this case the PC must be running Windows 8, Windows 7, or Windows Vista with Service Pack 2 or later.
Sign In to iCloud
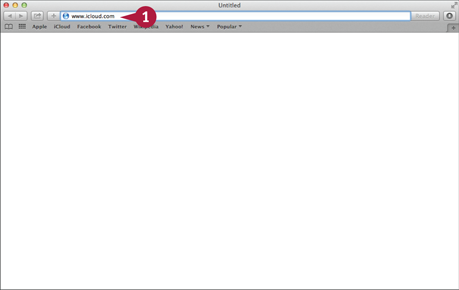
In your web browser, type www.icloud.com.
Press  .
.
The iCloud Login page appears.
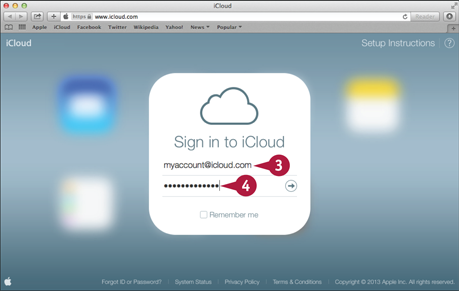
Use the Apple ID text box to type your Apple ID.
Use the Password text box to type the password for your Apple ID.

A If you want iCloud to sign you in automatically in the future, click Remember me in ( changes to ).
Click Sign In ( ).
).
The first time you sign in, iCloud prompts you to configure some settings.
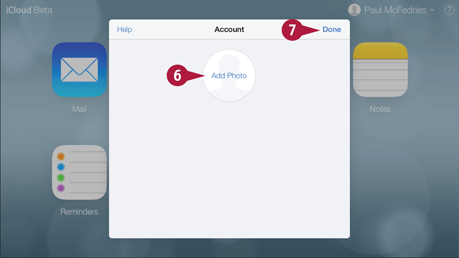
Click Add Photo, drop a photo on the dialog that appears, and then click Done.
Click Done.
TIPs
Can I sign in from my Mac?
Yes. Click System Preferences () in the Dock (or click  and then click System Preferences) and then click iCloud. Type your Apple ID and password and then click Sign In.
How do I sign out from iCloud?
When you are done working with your iCloud account, if you prefer not to remain signed in to your account, click the Sign Out link beside your account name in the upper-right corner of the iCloud page.
Set Up iCloud Synchronization
You can ensure that your Mac and your iCloud account have the same data by synchronizing the two. The main items you will want to synchronize are Mail e-mail accounts, contacts, calendars, reminders, and notes. However, there are many other types of data you may want to synchronize to iCloud, including Safari bookmarks, photos, and documents. If you have a second Mac, a Windows PC, or an iPhone, iPad, or iPod touch, you can also synchronize it with the same iCloud account, which ensures that your Mac and the device use the same data.
Set Up iCloud Synchronization
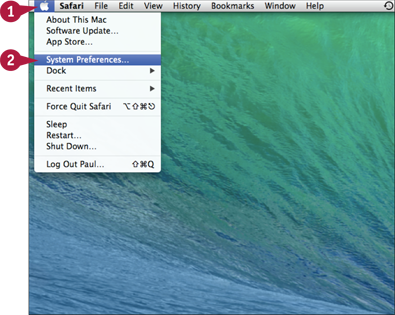
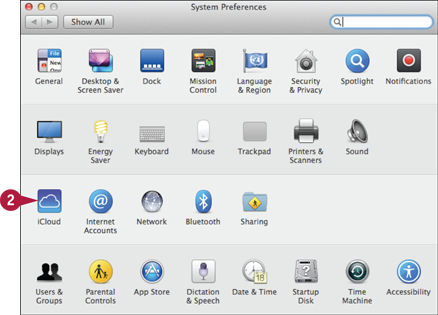
Click the Apple icon ().
Click System Preferences.
Note: You can also open System Preferences by clicking its icon () on the Dock.
The System Preferences window appears.
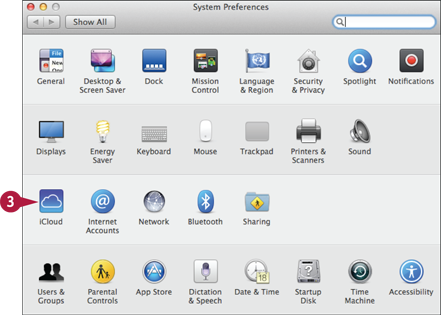
Click iCloud.
The iCloud preferences appear.
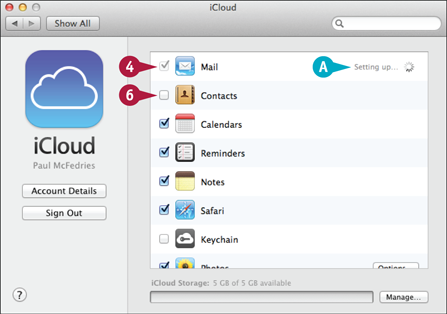
Select the check box beside a type of data you want to sync ( changes to ).
A OS X sets up the sync.
Repeat step 4 for each type of data you want to sync.
If you do not want to sync a type of data, click its check box ( changes to ).
OS X asks if you want to keep or delete the iCloud data that you are no longer syncing.
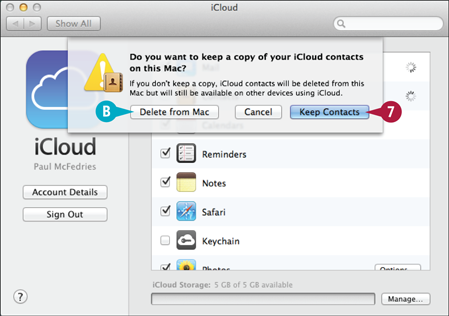
Click here to keep the data on your Mac.
B If you do not want to keep the data, click Delete from Mac.
Your Mac synchronizes the data with your iCloud account.
Generate a Website Password
You can make it easier and faster to navigate many websites by using Safari to generate, and iCloud to store, passwords for those sites that require you to log in. Many websites require you to set up an account, which means you must log in with a username and password. Good security practices dictate using a unique and hard-to-guess password for each site, but this requires memorizing a large number of passwords. To enhance security and ease Web navigation, you can use Safari to automatically generate for each site a unique and secure password that is stored safely with your iCloud account.
Generate a Website Password
Turn on iCloud Keychain
Click System Preferences ().
The System Preferences window appears.
Click iCloud.
The iCloud preferences appear.

Select the Keychain check box ( changes to ).
OS X prompts you for your Apple ID password.
Type your password.
Click OK.
OS X activates iCloud Keychain.
Generate a Website Password
In Safari, navigate to a web page that requires a new password.

Click inside the password field.
A Safari displays its suggested password.
Click the password.
OS X asks if you want to keep or delete the iCloud data that you are no longer syncing.
Use a Generated Website Password
In Safari, navigate to a web page that requires you to log in using a previously generated password.

Begin typing the username.
B Safari displays the full username.
Click Use password from “website”, where website is the name of the site.
Safari fills in the website password.
Send and Receive iCloud Mail
You can use the iCloud Mail feature to work with your iCloud e-mail account online. Using either your Mac or any computer or device with web access, you can access iCloud using a web browser and then perform your e-mail tasks. These include checking for incoming messages, replying to messages you receive, forwarding a received message, and composing and sending a new message. You can also configure iCloud Mail to send blind courtesy copies and to automatically send vacation messages.
Send and Receive iCloud Mail
Display iCloud Mail
Sign in to your iCloud account.
Note: See the section Sign In to iCloud earlier in this chapter.
If you are using another section of iCloud, click iCloud (not shown).
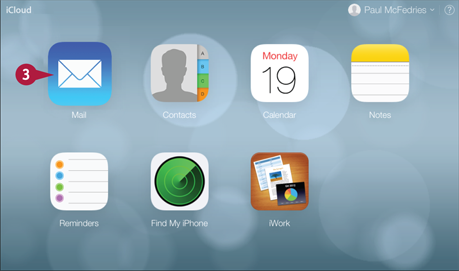
Click Mail ( ).
).
Get Incoming Messages
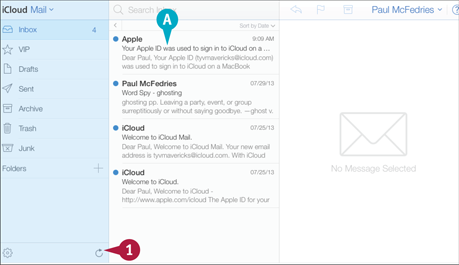
Click Get Mail ( ).
).
A iCloud Mail checks for incoming messages and, if there are any, displays them in the Inbox folder.
Reply to a Message
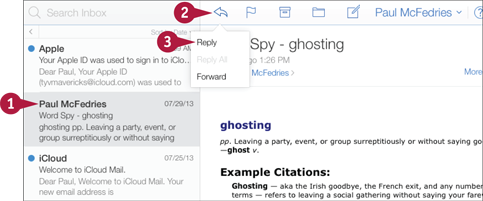
Click the message.
Click Reply, Reply All, Forward ( ).
).
Click Reply.
In the message window that appears (not shown), type your message and then click Send.
Send a New Message
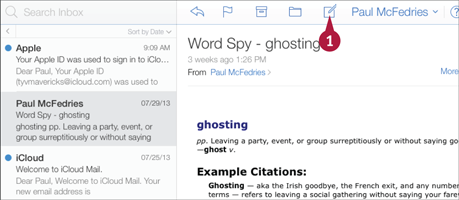
Click Compose new message ( ).
).
The New Message window appears.

Click the To text box and type the recipient’s e-mail address.
Click the Subject text box and type the subject of the message.
Type your message.
Click Send.
TIP
Can I use iCloud to send a message to a person without other recipients knowing?
Yes, you can send that person a blind courtesy copy (Bcc), which means that he or she receives a copy of the message, but the other message recipients do not see that person’s name or address in the recipient fields. To activate this feature, open iCloud Mail, click Actions ( ), click Preferences, and then click the Composing tab. Click Show Bcc field ( changes to ) and then click Done.
Work with iCloud Contacts
You can use iCloud to store information about your friends, family, colleagues, and clients. Using the Contacts app, you can store data such as the person’s name, company name, phone numbers, e-mail address, and street address.
The Contacts app also enables you to write notes about a contact, store extra data such as the person’s job title and birthday, and assign a picture to a contact. If you already have contacts in your Mac’s Contacts app, you can synchronize them with iCloud. See the section Set Up iCloud Synchronization earlier in this chapter.
Work with iCloud Contacts
Display iCloud Contacts
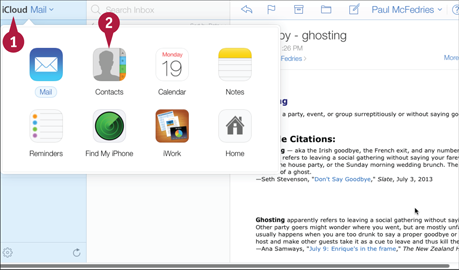
Click iCloud.
Click Contacts ( ).
).
Create a Contact
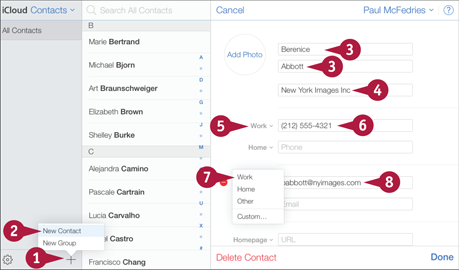
Click Create a new contact ( ).
).
Click New Contact
Type the person’s first name and last name.
Type the person’s company’s name.
Click here and then click a phone number category.
Type the phone number.
Click an e-mail category.
Type the person’s e-mail address.
Click Add new address (not shown).

Click a street address category.
Use the text boxes in this section to type the person’s street address.
Click Done.
iCloud saves the contact.
Display a Contact
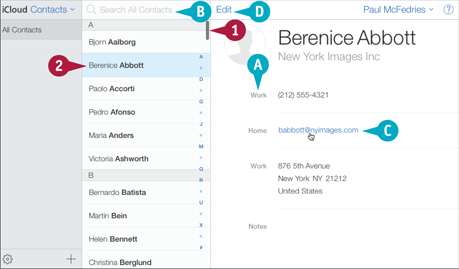
Use the scroll bar to locate the contact.
Click the contact.
A iCloud displays the contact’s details.
B You can also type part of the contact’s name in the Search box.
C To e-mail the contact, click the address.
D To make changes to the contact, click Edit.
To remove the contact, click Edit and then click Delete Contact.
Manage Your Schedule with iCloud
You can use iCloud to manage your schedule. Using the Calendar application, you can add events (appointments and all-day activities) and reminders. For events, you can specify the date and time they occur, the event name and location, and notes related to the event.
You can also use the Calendar application to display your schedule by day, by week, or by month. If you already have events in your OS X Calendar application, you can synchronize them with iCloud. See the section Set Up iCloud Synchronization earlier in this chapter.
Manage Your Schedule with iCloud
Display iCloud Calendar
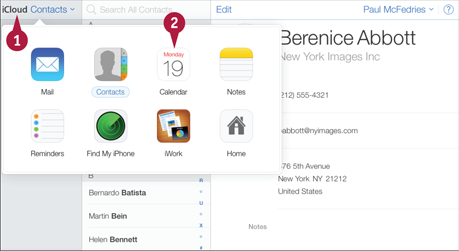
Click iCloud.
Click Calendar ( ).
).
Navigate Calendar

Click Month.
Click Next Month ( ) and Previous Month (
 ) to select the month you want.
Click the date.
A To see just that date, click Day.
B To see the date in the context of its week, click Week.
C To return to today’s date, click Go to today.
Create an Event
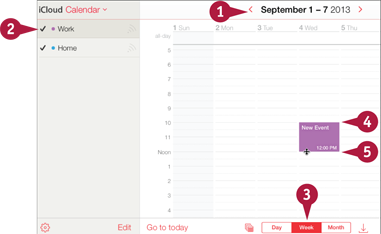
Navigate to the date when the event occurs.
Click the calendar you want to use.
Click Week.
Position the  at the time when the event starts.
Click and drag the down to the time when the event ends.
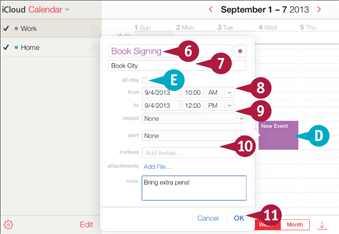
D Calendar adds the event.
Type the event name.
Type the event location.
E If the event lasts all day, click all-day ( changes to ).
Adjust the start time, if necessary.
Adjust the end time, if necessary.
Fill in the other event details as needed.
Click OK.
Note: To edit the event, double-click it.
TIP
How do I create a reminder?
Click iCloud.
Click Reminders ( ).
).
Click New Item.

Type the reminder name.
Click Details.
Fill in the rest of the reminder details as needed.
Click Done.
Locate and Lock a Lost Mac, iPod, iPhone, or iPad
You can use iCloud to locate a lost or stolen Mac, iPod touch, iPhone, or iPad. Depending on how you use your Mac, iPod touch, iPhone, or iPad, you can end up with many details of your life residing on the device. That is generally a good thing, but if you happen to lose your device, you have also lost those details, plus you have created a large privacy problem because anyone can now see your data. You can locate your device and even remotely lock the device using an iCloud feature called Find My iPhone, which also works for Macs, iPod touches, and iPads.
Locate and Lock a Lost Mac, iPod, iPhone, or iPad
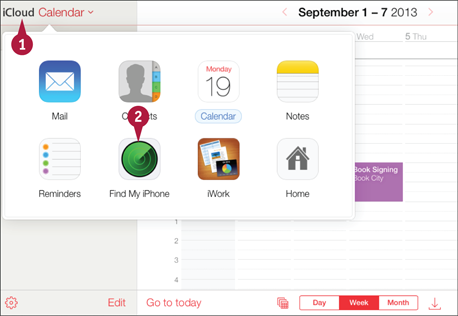
Click iCloud.
Click Find My iPhone ( ).
).
Note: If iCloud asks you to sign in to your account, type your password and click Sign In.

Click All Devices.
Click the device you want to locate.
A iCloud displays the device location on a map.
Click Lost Mode.
The Lost Mode dialog appears.
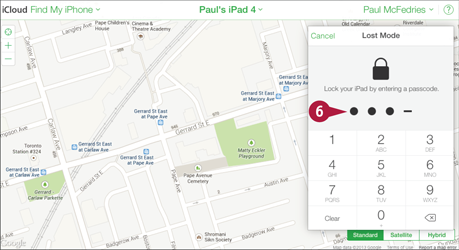
Click a four-digit lock code.
Enter the lock code again to confirm (not shown).
iCloud prompts you to enter a phone number where you can be contacted.

Type the phone number.
Click Next.
iCloud prompts you to enter a message to display on the device.
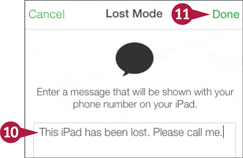
Type your message.
Click Done.
iCloud locks the device and sends the message, which then appears on the device screen.
TIP
I tried to enable Find My Mac, but OS X would not allow it. How can I enable Find My Mac?
You first need to enable location services. To do this, click System Preferences () in the Dock. Click Security & Privacy, click the Lock icon ( ), type your OS X administrator password, and then click OK ( changes to
  ). Click Privacy, click Location Services, and then click Enable Location Services ( changes to ).