Wintertime really brings out the hostess in me. The cold weather and short days mean there is so much less going out and about, so much more gathering in and cozying up. It’s a great time for dinner parties, with hearty comforting foods and lingering hours of conversation at the table, eventually making way for some decadent little desserts.
Then there’s the special family time that winter brings, which I have treasured since I was a little girl. Fond memories of building igloos and snowmen with my little sister, Rosie, and my big brothers Ralph, Joe, and Anthony (they’re not on the show but I do have them—my eldest brother Ralph is almost a decade older than I am, so Rosie and I kinda grew up like a little second generation of girls) always warm my heart when I see the snow start to fall.
Christmastime in my house has always been so special. From as far back as I can remember, my mom and I would start planning which cookies to make early on. There were the traditional staples we always made (sprinkle cookies, sugar cookies, struffoli, etc.) and then new varieties we’d play with from year to year (jam thumb-prints, biscotti, pignoli cookies). Being who I am, when I started baking on my own I took it to another level, adding decadent things like cheesecake, tiramisu, fruit tarts, pecan pie, and so on. And the leftovers I had! Once I started doing individual portion-sized treats, it made it easier to freeze some of everything to serve throughout the season—plus it made everything pretty enough to share (unlike a whole pie or cake once a slice has been cut out of it).
Holidays aside, just in the day-to-day course of things, the cold weather keeps us inside together so much more. As a child my winters were full of indoor projects and hobbies and crafts with my mom and my sister. A lot of my early learning in the kitchen with my mom happened in the wintertime. A weekend afternoon of baking treats and playing endless games of rummy 500—that was the best. And one of the great joys of being a mom has been baking projects with my daughter, Victoria, and my son, Joseph (who is crazy for sweets like his mom and has always loved baking with me). They are just about all grown up now, but we still do a lot of baking together in the winter and love to settle in with our sweet treats, piling onto the couch with Rich to watch movies. These days even though our movie preferences are so different we can always agree on a great suspense-filled drama.
Cheesecake was my gateway recipe—the first serious dessert I learned to make and then made my own. I don’t remember what exactly inspired me to make a project out of cracking the cheesecake code, I just know that I spent a whole lot of my free time during freshman year in high school in my mom’s kitchen baking cheesecake after cheesecake after cheesecake. I tried out every cheesecake recipe I could get my hands on—off of cream cheese, ricotta, and graham cracker packages, and from old issues of Ladies’ Home Journal that I’d page through on slow days at the hair salon where I worked as a shampoo girl, plus recipes I would get from clients.
There were a lot of mediocre cheesecakes along the way, and a few flat-out fails. In those days I relied on my big brothers for cheesecake critiques. (It’s funny how all four of my siblings worked in restaurants but none of them ever took much of an interest in baking. Maybe I cornered that market in my family. Anyhow, they sure did enjoy the sweets I made—and still do! Especially Ralph and Anthony, who both inherited our dad’s sweet tooth.)
Eventually I got the cheesecake fundamentals just right: the perfect balance of creamy yet ethereal, sweet with the faintest whisper of tanginess. That is the origin of the classic cheesecake I make to this day, and the basis for the many spinoffs I’ve created over the years (three of my faves are included here).
If you think you don’t like cheesecake, I am willing to bet it’s because you’ve never had it the way it ought to be. And if you have had the good fortune to experience great cheesecake but don’t make it yourself because it has a reputation for being complicated, forget that. Either way, try these recipes—they take some time and close attention but are so worth it!
Many traditional recipes call for cooking cheesecake in a water bath to keep the filling moist and prevent the tops from cracking. For mini cheesecakes I’ve found that it is a whole lot easier and just as effective to put a pan of water in the bottom of the oven when you preheat.
MAKES 2 DOZEN
CRUST
1¼ cups graham cracker crumbs
4 tablespoons (½ stick) unsalted butter, melted
TOPPING
½ cup sour cream
3 tablespoons granulated sugar
1 teaspoon vanilla extract
FILLING
Two 8-ounce packages cream cheese, at room temperature
½ cup granulated sugar
1 tablespoon all-purpose flour
3 large eggs
3 tablespoons heavy cream
3 tablespoons sour cream
1 tablespoon vanilla extract
Fresh fruit, for serving
equipment
Two 12-cavity mini cheesecake pans
Small pastry tamper, optional
Electric mixer
Two large rimmed baking sheets
Preheat the oven to 350°F with one rack positioned in the center of the oven and another rack positioned at the bottom of the oven. Fill a broiler pan or roasting pan with about 2 inches of water and set it on the bottom rack.
To make the crust, combine the graham cracker crumbs and melted butter in a medium bowl, mixing until the ingredients are combined and the crumbs are thoroughly moistened with the butter. Scoop about 1 tablespoon of the crumb mixture into each cavity in the mini cheesecake pan and use a pastry tamper, a small spoon, or the back of a small melon ball scoop to spread the mixture evenly and press it firmly into place. Transfer the pans to the refrigerator to chill the crust while you prepare the topping and the filling.
To make the topping, combine the sour cream, sugar, and vanilla in a small bowl and mix thoroughly. Reserve in the refrigerator.
To make the filling, in a large bowl beat together the cream cheese, sugar, and flour with a mixer at medium speed until smooth and creamy. Beat in each egg separately and scrape down the bowl after each addition. Continue mixing at medium speed and add the heavy cream, sour cream, and vanilla.
Set the cheesecake pans on rimmed baking sheets (this will make it easier to get them in and out of the oven). Transfer the filling to a large measuring cup with a spout and pour enough filling into each cavity of the pans to fill a bit more than three-quarters of the way up to the rim.
Bake for 7 minutes at 350°F, then lower the temperature to 250°F and bake 10 to 12 more minutes, or just until the surfaces of the cuties are set at the outer edges but still wobbly in the center. (Keep a close eye on them!)
Take the pans out of the oven and divide the sour cream topping among the cakes, spooning an even layer onto each and smoothing out the tops with the back of the spoon. Return the pans to the oven and bake for an additional 7 minutes. (They’ll still look wet, but they will set as they cool.)
Let the cakes cool in the pans for 3 to 5 minutes, then run the tip of a very sharp knife around the top edge of each cake (this will unstick any topping that has adhered to the side of the pan and help the cake come out of the pan easily and flawlessly once they are cool.) Don’t try to unmold the cakes while they are still warm!
Let the cuties cool in the pans all the way to room temperature, at least 30 minutes. Carefully unmold the cooled cuties by pressing the little round disk beneath each cake upward to raise the cake so that its bottom is level with the pan rim, then slide a small spatula underneath the cake and transfer the cake to a storage container or serving dish. Cover and refrigerate at least 6 hours before serving.
Serve cold, topped with your favorite fresh fruit, or Raspberry Drizzle.
These can be kept refrigerated in an airtight container for 3 to 5 days, or frozen for up to 3 months (thaw overnight in the refrigerator or for 1 hour at room temperature before serving).
Lusciously lemon-dreamy from top to bottom, these cuties have buttery pine nuts in the crust. Chop the pine nuts finely, almost but not quite to a paste (once ground they will be quite oily.) Also among the many charms of these citrusy cuties are the pockets of sweet-tart lemon in the centers. I always make the lemon curd ahead of time to simplify the process of preparing the cheesecakes.
MAKES 2 DOZEN
CRUST
1¼ cups vanilla wafer crumbs (approximately 1½ cups mini vanilla wafers)
¼ cup pine nuts, lightly toasted and finely chopped (preferably in a food processor)
1 teaspoon finely grated lemon zest
4 tablespoons (½ stick) unsalted butter, melted
TOPPING
½ cup sour cream
3 tablespoons granulated sugar
1 teaspoon vanilla extract
1 teaspoon lemon extract
FILLING
Two 8-ounce packages cream cheese, at room temperature
½ cup granulated sugar
3 large eggs
3 tablespoons heavy cream
3 tablespoons sour cream
1 teaspoon vanilla extract
1 teaspoon lemon extract
1 teaspoon finely grated lemon zest
1 recipe Lemon Curd
Freshly whipped heavy cream, for garnish
Fresh mint sprigs, for garnish
Long thin strips of lemon zest, for garnish
equipment
Two 12-cavity mini cheesecake pans
Small pastry tamper, optional
Electric mixer
Two large rimmed baking sheets
Preheat the oven to 350°F with one rack positioned in the center of the oven and another rack positioned at the bottom of the oven. Fill a broiler pan or roasting pan with about 2 inches of water and set it on the bottom rack.
To make the crust, combine the cookie crumbs, pine nuts, lemon zest, and melted butter in a medium bowl, mixing until the ingredients are combined and the crumbs are thoroughly moistened with the butter.
Scoop about 1 tablespoon of the crumb mixture into each cavity in the mini cheesecake pan and use a pastry tamper, small spoon, or the back of a small melon ball scoop to spread the mixture evenly and press firmly into place. Transfer the pans to the refrigerator to chill the crusts while you prepare the topping and the filling.
To make the topping, combine the sour cream, sugar, and the vanilla and lemon extracts in a small bowl and mix thoroughly. Reserve in the refrigerator.
To make the filling, in a large bowl beat together the cream cheese and sugar with an electric mixer at medium speed until smooth. Beat in each egg separately and scrape down the bowl after each addition. Continue to mix at medium speed and add the heavy cream, sour cream, vanilla and lemon extracts, and lemon zest.
Set the cheesecake pans on rimmed baking sheets (this will make it easier to get them in and out of the oven). Center a small dollop (a rounded teaspoon) of lemon curd on each crust, taking care that the curd does not touch the sides of the pan, Transfer the filling to a large measuring cup with a spout and pour enough filling into the cavity of each pan to fill about three-quarters of the way up the rim.
Bake for 7 minutes at 350°F, then lower the temperature to 250°F and bake 10 to 12 more minutes, or just until the surfaces of the cuties are set at the outer edges but still wobbly in the center. (Keep a close eye on them!)
Take the pans out of the oven and divide the sour cream topping among the cakes, spooning an even layer onto each and smoothing out the tops with the back of the spoon. Return the pans to the oven and bake for an additional 7 minutes. (They’ll still look wet, but they will set as they cool.)
Let the cakes cool in the pans for 3 to 5 minutes, then run the tip of a very sharp knife around the top edge of each cake (this will unstick any topping that has adhered to the side of the pan and help the cake come out of the pan easily and flawlessly once they are cool.) Don’t try to unmold the cakes while they are still warm!
Let the cuties cool in the pans all the way to room temperature, at least 30 minutes. Carefully unmold the cooled cuties by pressing the little round disk beneath each cake upward to raise the cake so that its bottom is level with the pan rim, then slide a small spatula underneath the cake and transfer the cake to a storage container or serving dish. Cover and refrigerate at least 6 hours before serving. Top each cutie with a small dollop of freshly whipped cream, a little sprig of fresh mint, and a curlicue of lemon zest.
These can be kept refrigerated in an airtight container for 3 to 5 days, or frozen for up to 3 months (thaw overnight in the refrigerator or for 1 hour at room temperature before serving).
With a chocolate wafer crust, rich chocolate filling, and silky cocoa-cream topping, these are a chocolate lover’s delight—one that can easily be made gluten-free by using gluten-free chocolate wafers. Top with whatever kind of nuts you like—I happen to love walnuts with this.
MAKES 2 DOZEN
CRUST
1½ cups chocolate wafer cookie crumbs (approximately 28 wafers)
4 tablespoons unsalted butter, melted
TOPPING
½ cup sour cream
3 tablespoons granulated sugar
3 tablespoons unsweetened cocoa powder
1 teaspoon vanilla extract
FILLING
One 4-ounce bar semisweet chocolate, finely chopped
3 tablespoons heavy cream
Two 8-ounce packages cream cheese, at room temperature
½ cup granulated sugar
2 large eggs
3 tablespoons sour cream
1 tablespoon vanilla extract
Chopped toasted nuts, for garnish
Chantilly Cream, for garnish
Chocolate shavings, for garnish
equipment
Two 12-cavity mini cheesecake pans
Small pastry tamper, optional
Electric mixer
Two large rimmed baking sheets
Preheat the oven to 350°F with one rack positioned in the center of the oven and another rack positioned at the bottom of the oven. Fill a broiler pan or roasting pan with about 2 inches of water and set it on the bottom rack.
To make the crust, combine the cookie crumbs and melted butter in a medium bowl, gently mixing until the crumbs are thoroughly moistened with the butter. Scoop about 1 tablespoon of the crumb mixture into each cavity in the mini cheesecake pan and use a pastry tamper, small spoon, or the back of a small melon ball scoop to spread evenly and press firmly into place. Transfer the pans to the refrigerator to chill the crust while you prepare the topping and the filling.
To make the cocoa topping, combine the sour cream, sugar, cocoa powder, and vanilla in a small bowl and mix thoroughly. Reserve in the refrigerator.
To make the filling, combine the chopped chocolate and the cream in a small heatproof bowl and set over a small saucepan of simmering water. Stir often until the chocolate is melted and the mixture is combined and very smooth. Set aside to cool completely to room temperature.
In a separate bowl, beat together the cream cheese and sugar with an electric mixer at medium speed until smooth and creamy. Beat in each egg separately and scrape down the bowl after each addition. Continue to mix at medium speed and add the sour cream and the vanilla. Add the cooled chocolate and blend well, using a flexible spatula to scrape down the sides and bottom of the bowl so that all the chocolate gets incorporated uniformly.
Set the cheesecake pans on rimmed baking sheets (this will make it easier to get them in and out of the oven). Transfer the filling to a large measuring cup with a spout and pour enough filling into each cavity of the pans to fill a bit more than three-quarters of the way up to the rim.
Bake for 7 minutes at 350°F, then lower the temperature to 250°F and bake 10 to 12 more minutes, or just until the surfaces of the cuties are set at the outer edges but still wobbly in the center. (Keep a close eye on them!)
Take the pans out of the oven and divide the cocoa topping among the cuties, spooning an even layer onto each and smoothing out the tops with the back of the spoon. Return the pans to the oven and bake for an additional 7 minutes. (They’ll still look wet, but they will set as they cool.)
Let the cakes cool in the pans for 3 to 5 minutes, then run the tip of a very sharp knife around the top edge of each cake (this will unstick any topping that has adhered to the side of the pan and help the cuties come out of the pan easily and flawlessly once they are cool.) Don’t try to unmold the cakes while they are still warm!
Let the cuties cool in the pans all the way to room temperature, at least 30 minutes, then transfer them to the refrigerator and chill thoroughly, at least 1 hour. Carefully unmold the chilled cuties by pressing the little round disk beneath each cake upward to raise the cake so that its bottom is level with the pan rim, then slide a small spatula underneath the cake and transfer to a storage container or serving dish. Cover and refrigerate at least 6 hours before serving.
Serve cold, topped with chopped nuts and/or a dollop of fresh whipped cream and some chocolate shavings.
These can be kept refrigerated in an airtight container for 3 to 5 days, or frozen for up to 3 months (thaw overnight in the refrigerator or for 1 hour at room temperature before serving).
Be sure to chill the cakes in the pan for at least 1 hour before unmolding.
Almond Joyous Cheesecake Cuties
Inspired by the candy bar I loved as a kid (and still do), these superdecadent confections are one of my favorite desserts to share with friends and family who have to steer clear of gluten. (So yummy and totally gluten-free—believe it!) The ganache can be spread all over the top and sides of the cakes or simply drizzled over the top so that it drips down the sides.
MAKES 2 DOZEN
CRUST
2 large egg whites
¼ cup granulated sugar
2 cups sweetened flaked coconut
TOPPING
½ cup sour cream
3 tablespoons sugar
1 teaspoon almond extract
FILLING
Two 8-ounce packages cream cheese, at room temperature
½ cup granulated sugar
3 large eggs
3 tablespoons sour cream
3 tablespoons heavy cream
1 teaspoon almond extract
2 teaspoons coconut extract
¼ cup almonds, toasted and finely chopped
Sliced almonds, for garnish
equipment
Two 12-cavity mini cheesecake pans
Food processor
Electric mixer
Small pastry tamper, optional
2 large rimmed baking sheets
Preheat the oven to 350°F with one rack positioned in the center of the oven and another rack positioned at the bottom of the oven. Fill a broiler pan or roasting pan with about 2 inches of water and set it on the bottom rack.
To make the crust, combine the egg whites with the sugar in a medium bowl and use an electric mixer to beat to very stiff peaks. Use a rubber spatula to fold in the coconut until well combined. Scoop about 1 tablespoon of the mixture into each cavity in the mini cheesecake pan and use the back of the measuring spoon to firmly compress the mixture into an even layer about ¼ inch thick. Set aside.
To make the almond topping, in a small bowl stir together the sour cream, sugar, and almond extract. Set aside.
To make the filling, in a separate bowl beat together the cream cheese and sugar with an electric mixer at medium speed until smooth and creamy. Beat in each egg separately and scrape down the bowl after each addition. Continue to mix at medium speed and add the sour cream, heavy cream, almond extract, and coconut extract.
Set the cheesecake pans on rimmed baking sheets (this will make it easier to get them in and out of the oven). Press the crust down again to ensure that it is well packed.
Transfer the filling to a large measuring cup with a spout and pour enough filling into each cavity of the pans to fill a bit more than three-quarters of the way up to the rim.
Bake for 7 minutes at 350°F then lower the temperature to 250°F and bake 10 to 12 more minutes, or just until the surfaces of the cuties are set at the outer edges but still wobbly in the center. (Keep a close eye on them!)
Take the pans out of the oven and divide the almond topping among the cakes, spooning an even layer onto each and smoothing the tops with the back of the spoon. Top with the chopped almonds, then return the pans to the oven and bake for an additional 7 minutes. (They’ll still look wet, but they will set as they cool.)
Let the cakes cool in the pans for 3 to 5 minutes, then run the tip of a very sharp knife around the top edge of each cake (this will unstick any topping that has adhered to the side of the pan and help the cake come out of the pan easily and flawlessly once they are cool.) Don’t try to add the chocolate ganache or unmold the cakes while they are still warm!
Let the cuties cool in the pans all the way to room temperature, at least 30 minutes. Then chill in pans for 2 hours before unmolding and topping with ganache.
Carefully unmold the cuties by pressing the little round disk underneath each cake upward to raise the cake so that its bottom is level with the pan rim, then slide a small spatula underneath the cake.
To cover the cuties with ganache, arrange the unmolded cheesecake on a wire rack that’s sitting on a parchment-lined baking sheet. Use an offset spatula or butter knife to carefully apply a thin layer of ganache to the tops and sides of each cutie. Let dry, then go over the cheesecakes again to smooth out any spots you may have missed, working from the top first and then down around the sides (dipping the spatula or knife in hot water and wiping dry periodically will also help keep the ganache smooth).
Garnish with sliced almonds and refrigerate 6 hours or overnight before serving. (You could chill the cuties overnight before adding ganache, then chill more briefly just to set the ganache. The cuties can be kept in the refrigerator for 3 days and are also freezable.)
My cuties: Victoria and Joseph

Back in grade school, I yearned for peanut butter and jelly on squishy white Wonder bread. That’s what all the other kids had, and who doesn’t want to be like all the other kids? Instead, I always had something conspicuous and unmanageable, like leftover asparagus frittata on crusty Italian bread or salami and cheese but with a big slice of roasted eggplant on it that was impossible to bite through. Now that I’m all grownup it turns out I don’t especially like the sandwich I thought I wanted—but I absolutely love using the elements in desserts. It’s such fun to create a sophisticated take on the homey and humble components of something I once felt so deprived of. These PB&J–inspired desserts are kind of a double tribute—honoring the feelings I had as a child and celebrating the self-acceptance I found as an adult. As a kid, I thought I wanted to fit in. Now I know better, and these standout desserts celebrate that. Enjoy!
Inspired by the humble lunchbox staple, these are absolutely adorable, extremely delicious, and certainly not just for kids. I recommend using unsweetened grape jelly because the tartness contrasts perfectly with the sweetness of the cake and the peanut butter buttercream (which is off-the-charts yummy and seriously addictive—I’ve been told it oughta be served with a warning label).
MAKES 4 DOZEN
WONDER CAKE
1¾ cups cake flour
2 teaspoons baking powder
¼ teaspoon fine sea salt
4 ounces (1 stick) unsalted butter, softened
1 cup granulated sugar
½ cup whole milk, at room temperature
½ teaspoon vanilla
4 large egg whites, at room temperature
FILLING
½ cup Concord grape jelly, preferably all-fruit with no added sugar
1 cup Peanut Butter Buttercream at room temperature
equipment
Two nonstick 12-cavity brownie pans (each cavity should be 2½ inches square)
Electric mixer
Preheat the oven to 350°F with a rack positioned in the center. Lightly grease the baking pans.
Sift together the flour, baking powder, and salt. Set aside.
Use a handheld electric mixer or stand mixer fitted with the paddle attachment to cream the butter until airy, 1 to 2 minutes. Gradually add the sugar and continue beating until fluffy and pale, 1 to 2 minutes more.
Add the flour mixture to the butter mixture in thirds, alternating with thirds of the milk and mixing just until smooth after each addition. Add the vanilla and mix briefly on low speed to combine.
In a clean, dry bowl beat the egg whites to stiff peaks.
Gently fold the egg whites into the batter. Divide the batter among the 24 square wells in the pans. Bake 8 to 10 minutes, or just until the centers spring back when gently pressed, rotating the pans halfway through the baking time. (You don’t want to let the cakes brown much at all—only very slightly at the edges.)
Set the pans to cool on wire racks for 10 minutes before carefully turning out the cakes, then cool the cakes to room temperature. (The cakes can be made ahead, layered with parchment or wax paper in airtight containers or zip-top bags and refrigerated overnight or frozen. Thaw for 1 to 2 hours at room temperature before cutting and filling.)
Use a bread knife to cut the cakes in half to form 2 square layers (see photo). On the bottom halves spread a thin even layer of grape jelly, then spread on about ¼ inch of peanut butter buttercream. Top with the top halves and press gently with a flat spatula to affix securely. Chill 1 hour to set. Cut each chilled cake in half on the diagonal (to make 2 triangles). Let sit 15 minutes at room temperature before serving (to soften buttercream). The cakes can be kept covered and refrigerated for 2 to 3 days.
tip: Using pasteurized egg whites in both the cake and the buttercream saves time and doesn’t leave you with lots of egg yolks (although you could use those for a curd or a custard…).
You will have a half cup or more of both drizzles left over after filling and decorating the PB&J Baby Bundts. Of course there are endless other uses—from froyo to French toast. You won’t have any trouble finding enjoyable ways to dispose of the surplus. Both drizzles keep in the fridge for at least a week.
MAKES 2 DOZEN
PEANUT BUTTER CAKES
1¾ cups cake flour
2 teaspoons baking powder
¼ teaspoon fine sea salt
4 tablespoons (½ stick) butter, softened
1 cup granulated sugar
4 tablespoons creamy, unsweetened natural peanut butter
½ cup whole milk, at room temperature
½ teaspoon vanilla
4 large egg whites
FILLING
equipment
Two heavyweight nonstick 12-cavity mini Bundt pans
Electric mixer
Preheat the oven to 350°F with racks positioned in the upper third and bottom third of the oven. Lightly grease the Bundt pans.
Sift together the flour, baking powder, and salt in a large bowl. Set aside.
Use a handheld electric mixer or stand mixer fitted with the paddle attachment to cream the butter until airy, 1 to 2 minutes. Gradually add the sugar and continue beating until fluffy and pale, 1 to 2 minutes more. Then gradually add the peanut butter, 1 tablespoon at a time, and beat another 1 to 2 minutes.
Add the flour mixture to the butter mixture in thirds, alternating with thirds of the milk and mixing just until smooth after each addition. Add the vanilla and mix briefly on low speed to combine.
In a clean, dry bowl beat the egg whites to stiff peaks.
Gently fold the egg whites into the batter.
Spoon 1 tablespoon of batter into each Bundt, spreading evenly. Top the center of each with 1 scant teaspoon of the raspberry filling followed by just enough batter to fill no more than two-thirds full (otherwise they will overflow during baking).
Bake 10 to 12 minutes, or until the tops of the cakes are evenly browned and spring back when gently pressed with a finger, rotating the pans front to back and top to bottom halfway through the baking time. Leave the cakes in the pans and cool to room temperature on wire racks.
Turn the cooled cakes out of the pans and set them on a baking sheet lined with parchment paper. Decorate with raspberry drizzle and white chocolate drizzle (I like to make lines of drizzle going down the ridges of the little cakes) and leave at room temperature (or refrigerate briefly) until the glaze is set. (Or cover and refrigerate up to 3 days. Bring to room temperature before serving.)
tip: If you don’t already own mini Bundt pans, they are definitely worth buying. It is so easy to use them for all sorts of recipes—cakes, breads, muffins, and even mousses. Just be sure to under- rather than overfill, especially the first time you are trying out a batter which you usually make in a regular pan. That way you will find out how much the batter rises in the small Bundt cavities without having an overflowed mess—or even cakes that have bulbous rather than flat bottoms.
Nutter Butter Finger Cakewiches
There is a certain packaged cookie that I have always loved, and there is a particular candy bar that I adore. One day I had a both on my mind and got to baking. This recipe is what happened. Crazy delicious!
MAKES 4 DOZEN
CAKE
1 recipe Peanut Butter Cake batter
FILLING
1 cup Peanut Butter Buttercream
½ cup finely chopped honey-roasted peanuts
equipment
Rimmed baking pan measuring 18 × 13 × 1 inches
Electric mixer
Preheat the oven to 350°F with a rack positioned in the center. Butter the rimmed baking pan then line with parchment, and butter and lightly flour the parchment, tapping out any excess flour.
Pour the batter into the prepared pan and bake just until springy in the center and barely beginning to brown at the edges (which will pull away from the pan), 10 to 15 minutes, rotating halfway through the baking time.
Set the buttercream out to soften while the cake bakes. Add the peanuts and mix thoroughly to combine.
Cool the cake in the pan on a wire rack for 5 minutes, then line the rack with parchment before turning out the cake so the wire won’t cut into the surface. Let the cake cool completely before carefully peeling away the buttered parchment (set aside the parchment and baking sheet—you will use them again when you glaze the cake). (Cake can be double-wrapped and refrigerated overnight or frozen for 2 weeks. Thaw for 1 to 2 hours at room temperature before filling, glazing, and cutting.)
Transfer the cake to a flat work surface and use a large sharp knife and a ruler or other straight edge to cut in half crosswise. This will give you 2 rectangles, each roughly 8 by 12 inches.
Spread one half of the cake with the peanut butter buttercream. Carefully top with the other cake half. Chill for 30 minutes or until cream filling is firm. (Can be wrapped tightly in plastic and refrigerated overnight.)
To cut the cakes: Use a large sharp knife and a ruler or other straight edge to slice the cake crosswise into equal thirds. Then slice lengthwise into equal eighths. This will give you 24 little cakes, each about 1 inch wide and 2 inches long. Line up the cakes, spaced slightly apart, on the parchment and rimmed baking pan you used for baking.
Spoon chocolate glaze over each cake, covering the top and letting it drip down the sides.
Chill until glaze is set, about 2 hours (or overnight if covered).
Keep covered and refrigerated for up to 3 days. Set out at room temperature for 15 to 30 minutes before serving.
tip: I always make the components for this recipe ahead. Then, the night before I’m planning to serve, I fill the cake and wrap it and leave it to set in the fridge overnight. The next morning, I cut and glaze the cakewiches and chill to set the glaze. I know from completing them days ahead that the glazed cakewiches keep well in the fridge for a few days, but I can’t say there ever have been leftovers (when I make them ahead, I have to keep them in the basement fridge, unbeknownst to Rich and the kids!).
My mom and I love Elvis Presley—when I was growing up, we never missed any Elvis movies that played on Sunday afternoons. This rockin’ dessert is inspired by the combo I’ve always heard he loved: peanut butter, bananas, and Fluff.
MAKES 18
4 overripe bananas
½ cup packed light brown sugar
½ cup granulated sugar
4 ounces (1 stick) unsalted butter, at room temperature
2 large eggs, at room temperature
½ teaspoon vanilla extract
1½ cups all-purpose flour
½ teaspoon fine sea salt
FILLING
½ cup Peanut Butter Buttercream
TOPPING
1 cup Marshmallow Cream
equipment
Creme snack cake baking molds (aka cream canoes or Twinkie pans), with a total of 18 cavities and ⅓-cup capacity
Electric mixer with a whisk attachment
Two pastry bags with large star tips
Preheat the oven to 375°F. Grease the baking pans.
Peel the bananas and drop them into a large mixing bowl. Beat on high speed with an electric mixer fitted with a whisk attachment until light and creamy, 2 to 3 minutes.
Scrape down the sides of the bowl, add the sugars, and whip the mixture for 2 minutes.
Scrape down the sides of the bowl again, then add the butter and whip for another 2 minutes.
Scrape down the sides of the bowl once more and on medium speed beat in the eggs and the vanilla.
In a separate bowl, whisk together the flour and salt.
Add the dry ingredients to the wet ingredients and stir to combine. Do not overmix.
Drop about 3 tablespoons of the batter into each mold, filling each mold about halfway. Bake 15 to 20 minutes or until the tops are firm, springy, and lightly browned, rotating the pans halfway through the baking time. Set the pans on wire racks to cool completely to room temperature before turning out the cakes.
To fill the hound dogs, slice each cake in half lengthwise and use a piping bag fitted with a large star tip to pipe a thin layer of buttercream onto the bottom halves. Pipe a thin layer of marshmallow cream (not too much or it will overflow when you put the tops on). Replace the tops. Chill 15 to 30 inutes to set, then serve.
note: If you’d rather make these treats more conventional sandwich style, by all means go right ahead. Here’s how: divide the batter between two 5¾-inch mini loaf pans; bake 45 to 50 minutes or until the tops are springy and a tester comes out clean; cool in the pans for about 15 minutes before turning out and setting on wire racks to cool to room temperature. Cut each loaf into about 12 slices, spread half of the slices with peanut butter buttercream and marshmallow cream, top each with another slice, and serve. Or just slice and let everyone make their own. Also, the banana bread recipe multiplies perfectly and freezes well, so there’s no reason not to make extra.


Chocolate—That’s a Food Group, Right?
When Rosie and I were little, if we were well behaved in church—didn’t laugh too much during prayer and hymns and got through the whole Mass without embarrassing my mother too much and having to be separated—then chances were good that along the walk back home Mom would stop at Cozy’s Sweet Shop, just up the street from Saint James, and send us in with a quarter to buy a treat. This was a major highlight of my week. It was also a big dilemma: Almond Joy or Reese’s? Red Twizzlers or the black licorice my mom liked? Starburst or Hot Tamales? It was so hard to choose! But I almost always ended up going for chocolate. Rosie, meanwhile, wasn’t and still isn’t into any kind of candy. She would have been fine with skipping the sweet shop and getting a calzone. I was the one with the crazy sweet tooth.
Obviously, I have never outgrown my sweet tooth. I still have a hard time choosing one dessert over another (that’s why mini is the way to go—so you can have a little of this and a little of that, not just one big anything!). But when it comes down to it, the ultimate sweet for me is and will always be chocolate. There’s just nothing like it—intoxicatingly rich, pure pleasure. It’s a perfect base for mini desserts, because a small amount can deliver supreme satisfaction. And when it comes to romance, never ever underestimate the power of chocolate.
These fudgy cakelets are very simple to make, but not to be rushed, and the details are important: eggs at room temperature, chocolate mixture cooled before adding, sifted cake flour, chocolate and then flour folded in by hand and not overmixed. As much room as there can be in baking for fun improvisation, this recipe is a good example of one of those times when rules need to be strict. Play by the rules on this one and you will have tender, moist cakes that are incredibly versatile—see the Chocolate-Tangerine Baby Bundts. Don’t, and your cakes will be dry and heavy.
MAKES 4 DOZEN
BABYCAKES
4 ounces (1 stick) unsalted butter, cut into tablespoons
4 ounces unsweetened baking chocolate
4 eggs, at room temperature, separated
½ teaspoon fine sea salt
1 cup granulated sugar
1 teaspoon vanilla extract
1 cup cake flour (sifted then measured)
TOPPING
¼ cup toasted, chopped hazelnuts
¼ cup chocolate shavings
equipment
Electric mixer
Two heavyweight nonstick 24-cavity mini muffin pans
Pastry bag and large star tip
Preheat the oven to 350°F with a rack positioned in the center. Lightly grease the baking pan(s).
Combine the butter and the chocolate in a small heatproof bowl and set over a saucepan of barely simmering water. Cook, stirring frequently, until completely melted, thoroughly combined, and very smooth. Set aside to cool completely to room temperature.
In a large bowl combine the egg yolks and the salt and beat with an electric mixer at medium-high speed for 1 minute. Gradually add the sugar and continue beating at medium-high speed until fluffy. Mix in the vanilla. Use a flexible rubber spatula to gently fold in the cooled chocolate mixture by hand, mixing until not quite uniformly incorporated (it should still look swirly). Fold in the flour with as few strokes as possible, again mixing only until the batter is not quite uniformly colored.
In a clean dry bowl whip the egg whites to stiff peaks. Fold gently into the batter (it will become uniform in color but not in consistency, which will be lumpy—not to worry.)
Divide the batter among the mini muffin cups (about 1 tablespoon per cup).
Bake just until centers of the cakes are set, 8 to 10 minutes. Set the pan on a wire rack and let cool 5 to 10 minutes. (The cooled cakes can be wrapped and refrigerated for up to 3 days, or double-wrapped and frozen for up to 1 month.)
Line the wire rack with parchment and use a butter knife to gently turn the cakes out of the pans, setting the cakes upside down (narrower ends up—these will be the tops of the cakes; if the ends that will now be the bottoms have puffed you can trim them flat) and leaving to cool completely to room temperature.
To fill and top the cakes with hazelnut cream, fill a pastry bag fitted with a star tip halfway with the cream. Insert the tip into the flat top of each cake and pipe in cream, swirling as the cream begins to overflow to decorate the top of the cake. Add a sprinkling of hazelnuts and chocolate shavings to each cake
Chill the filled babycakes to set, about 1 hour. Let sit at room temperature 15 to 20 minutes before serving. (The cakes become firmer and brownie-like when they are refrigerated, so if you opt to make them ahead, be sure to bring them to room temperature if you want a lighter texture.)
Chocolate-Tangerine Baby Bundts
Rich, fudgy chocolate cake with a lavish layer of white chocolate that’s spiked with the bright flavor of tangerine … pure magic. This recipe is an easy way to make that magic happen: prepare a variation on the batter for Chocolate Babycakes, switch the baking pan to a mini Bundt pan, layer the batter with citrusy white chocolate, and finish with tangerine-white chocolate drizzle.
MAKES 1 DOZEN
TANGERINE-WHITE CHOCOLATE DRIZZLE
1 small tangerine or clementine
2 tablespoons heavy cream
½ cup white chocolate chips
BABY BUNDTS
4 ounces (1 stick) unsalted butter, cut into tablespoons
4 ounces unsweetened baking chocolate
4 eggs, at room temperature, separated
½ teaspoon fine sea salt
1 cup granulated sugar
1 cup cake flour
TANGERINE-WHITE CHOCOLATE RIPPLE
1 small tangerine or clementine
½ cup white chocolate chips
equipment
Heavyweight nonstick 12-cavity mini Bundt pan
Microplane
Small squeeze bottle
Electric mixer
Preheat the oven to 350°F. Lightly coat the baking pan with nonstick cooking spray or vegetable oil from a misting bottle.
To make the drizzle, use a microplane to finely grate the zest from the tangerine. Transfer the zest to a small bowl. Squeeze the juice from the zested fruit into another small bowl. Add 1 tablespoon of the juice to the bowl with the zest. Reserve the remaining juice separately.
Combine the white chocolate and the cream in a small heatproof bowl and set over a small saucepan of barely simmering water. Heat, stirring occasionally, until completely melted and very smooth. Cool slightly, then stir in the reserved zest mixture. Transfer to a small squeeze bottle and set aside at room temperature.
To make the cake batter, in a small, heatproof bowl combine the butter and the chocolate and set over a saucepan of barely simmering water. Cook, stirring frequently, until completely melted, thoroughly combined, and very smooth. Cool completely to room temperature.
Combine the egg yolks and the salt in a large bowl and beat with an electric mixer at medium-high speed for 1 minute. Gradually add the granulated sugar and continue beating at medium-high speed until fluffy. Mix in the reserved tangerine juice.
Use a flexible rubber spatula to gently fold in the cooled chocolate mixture by hand, mixing until not quite uniformly incorporated (it should still look swirly). Fold in the flour with as few strokes as possible, again mixing only until the batter is not quite uniformly colored.
In a clean dry bowl whip the egg whites to stiff peaks. Fold gently into the batter (it will become uniform in color but not in consistency, which will be lumpy—not to worry).
To make the tangerine–white chocolate ripple, use the microplane to zest the tangerine; set aside the zest. Squeeze the zested tangerine into the bowl of reserved tangerine juice. Measure out 1 tablespoon of the juice and combine it in a small bowl with the zest and the white chocolate chips, stirring to coat the chips with the juice and zest. (If you have more juice left over, reserve for another use, or just knock it back—it’s delish!).
Use a measuring spoon to scoop 1 tablespoon of the batter into each cavity in the baking pan. Top the center of each with 1 teaspoon of the white chocolate chip mixture. Cover the chips evenly with the remaining batter, filling each cavity no more than three-quarters of the way to the rim.
Bake about 15 minutes, or just until the tops of the cakes are puffed and dry. Leave the cakes in the pan and cool to room temperature on a wire rack. (The cooled cakes can be wrapped and refrigerated for up to 3 days, or double wrapped and frozen for up to 1 month.)
Turn the cooled cakes out of the pan and set them on a parchment-lined baking sheet. Decorate the tops of the Bundts with the drizzle (I like to make lines of drizzle down the sides of the Bundts, between the ridges). If the drizzle has thickened too much as it has cooled, stand the squeeze bottle in hot water for 1 to 2 minutes to soften to a squirtable consistency, then shake well before dispensing. Leave the drizzled cakes to set at room temperature for at least 1 hour before serving. (Or cover and refrigerate up to 3 days. Bring to room temperature before serving.)
The cakes are best made a day or two ahead.
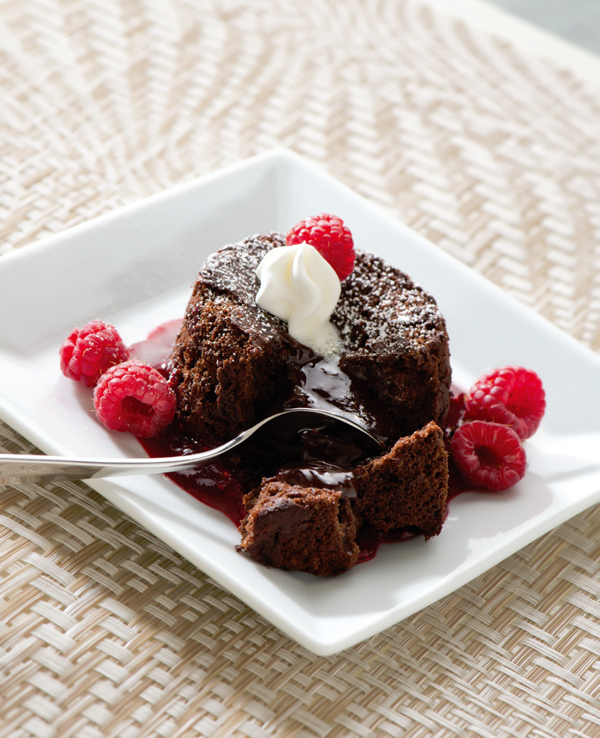
Look no further if a lavish dessert is what you’re after. And romantic? These are intensely chocolatey, with oozing molten centers. Hello!
MAKES SIX (3-OUNCE) CAKES OR FOUR (4-OUNCE) CAKES
1 tablespoon butter, softened, for greasing ramekins
1 tablespoon unsweetened cocoa, for dusting ramekins
1 tablespoon granulated sugar, for dusting ramekins
2 large eggs
2 large egg yolks
¼ cup granulated sugar
1½ ounces bittersweet chocolate (60% cacao), chopped (¼ cup)
1½ ounces unsweetened baking chocolate, chopped (¼ cup)
4 tablespoons (½ stick) unsalted butter, cut into small pieces
2 tablespoons plus 2 teaspoons all-purpose flour
Confectioners’ sugar, for dusting, optional
equipment
Six 3-ounce ramekins, or four 4-ounce ramekins
Stand mixer
Rimmed baking sheet
Preheat the oven to 425°F with a rack positioned in the center. Generously coat the ramekins with the softened butter. Whisk the cocoa and sugar together in a small bowl, then use the mixture to dust the ramekins, tapping out excess. Chill the ramekins while you prepare the batter.
Combine the eggs, yolks, and sugar in the bowl of a stand mixer fitted with the whisk and beat on medium-high until nearly tripled in volume and holds a ribbon when drizzled over itself, about 10 minutes.
Meanwhile, combine the chocolates and the butter in a small heatproof bowl set over a saucepan of barely simmering water. Cook, stirring frequently, until very smooth. Pour the hot chocolate mixture into the whipped egg mixture and fold gently until almost completely incorporated. Sprinkle the flour over the mixture and fold just until the flour is incorporated and the batter is uniformly blended.
Set the chilled prepared ramekins on a rimmed baking sheet. Divide the batter among the ramekins, filling almost to the top. (The unbaked cakes can be kept at room temperature for 1 to 2 hours; wrapped tightly in plastic and refrigerated for up to 2 days; or individually wrapped in plastic and frozen for 1 month.)
Bake just until the edges are set, about 6 minutes for 3-ounce, 8 minutes for 4-ounce; if frozen, add about 2 minutes.
Give the baked cakes 1 minute to settle. Then run the tip of a small sharp knife around the outer edge of each cake. Set a small plate serving-side down on top of each ramekin, then invert to unmold. Dust with confectioners’ sugar, decorate with raspberry drizzle, and serve immediately.
note: For a gluten-free version, replace the all-purpose flour with rice flour.
Fudgy, brownie-like, heart-shaped cakes sandwiching lusciously peanut-buttery buttercream—what better way to say Happy Valentine’s Day? Or Happy Any Day?
MAKES 1 DOZEN
CAKES
1 recipe Chocolate Babycakes batter
FILLING
1 recipe Peanut Butter Buttercream
½ cup finely chopped honey-roasted peanuts, divided
Chocolate shavings, for sprinkling
equipment
Twelve 2-inch, heart-shaped baking molds
Electric mixer
Pastry bag and large star tip
Preheat the oven to 350°F with a rack positioned in the center. Grease and lightly flour the baking molds, tapping out any excess flour.
Prepare the batter as instructed here.
Set the molds on a baking sheet and divide the batter among the molds, filling each mold about halfway. Bake about 15 minutes, or just until the tops of the cakes are puffed and dry (not cracked). Transfer the baking sheet to a wire rack and let the cakes cool to room temperature. Carefully ease the cooled cakes out of the molds. (The cooled cakes can be wrapped and refrigerated for up to 3 days, or double wrapped and frozen for up to 1 month. Thaw for 1 to 2 hours at room temperature before cutting and filling.)
Transfer the cakes to a flat work surface and use a bread knife to slice each in half to create 2 heart-shaped layers.
Fold half of the honey-roasted peanuts into the peanut butter buttercream.
To fill the cakes with peanut butter buttercream, fill a pastry bag fitted with a star tip halfway with the frosting. Pipe the buttercream onto the bottom layer of each cake and top with the top layer. Pipe a star of buttercream on the top and sprinkle generously with chopped peanuts and chocolate shavings.
Chill to set, about 1 hour. Let sit at room temperature for 15 to 20 minutes before serving.
Coffee was the very first thing I ever learned how to make all by myself in the kitchen, when I was seven or eight years old. Because I was a daddy’s girl–adored and idolized him and was in awe of him—learning how to make coffee for him was a big deal for me. My dad was a man who always had to have coffee on demand. He and I were the two members of the family with a crazy sweet tooth; it was something special that we shared. Out of all my siblings, my brothers Ralph and Anthony share the Pierri sweet tooth as well, and they help critique my dessert recipes when I’m working on new ones, like for this book. Even if I don’t get to deliver the treats myself, I’ll send them home with my mom–since my brothers are always popping in on her I know I can count on getting their great feedback. You know how brothers are … brutally honest!! Just so you know, most of the recipes in this book have officially passed the brothers’ test!
Turn the page for a great coffeecake recipe, one of my favorites that also happens to be one of Richie’s favorites. I’ve made it for years now, and it’s the perfect combination of all the things Daddy loved in sweets: fruit, nuts, and crumbly sugary streusel. (Technically, streusel is made with flour. Mine’s not, but there’s no better word for it than “streusel,” so that’s what I call it.)
Blueberry Streusel Baby Bundts
MAKES 2 DOZEN
CAKE
1⅔ cups flour
¾ teaspoon baking powder
¾ teaspoon baking soda
½ teaspoon fine sea salt
4 ounces (1 stick) unsalted butter, at room temperature
½ cup granulated sugar
2 large eggs
1 teaspoon vanilla extract
1 cup sour cream
STREUSEL
½ cup light brown sugar
½ cup chopped walnuts
1 teaspoon cinnamon
1 cup fresh blueberries
equipment
Mini Bundt pan
Electric mixer
Pastry bag and large star tip
Preheat the oven to 375°F with two racks positioned in the upper and lower thirds of the oven. Lightly coat the baking pans with nonstick cooking spray or vegetable oil from an oil mister, then dust with flour, tapping out the excess.
In a large bowl, whisk together the flour, baking powder, baking soda, and salt. Set aside.
In a separate large bowl, use a mixer to cream the butter and sugar until light and fluffy. Add the eggs one at a time, beating well after each addition. Add the vanilla and blend, then add the flour mixture in thirds, alternating with the sour cream.
To make the streusel, stir together the brown sugar, walnuts, and cinnamon. Measure out and set aside ⅓ cup of the mixture. Toss the remaining streusel with the blueberries.
Divide ⅓ cup reserved streusel mixture among the wells of the Bundt pans (about ½ teaspoon each), then use a pastry bag to pipe in thin layers of the batter, alternating with layers of the blueberry mixture, filling each well no more than two-thirds full and finishing with a batter layer.
Bake 15 to 20 minutes, or until the tops of the cakes are evenly browned and spring back when gently pressed with a finger, rotating the pans halfway through the baking time.
Cool the cakes in the pans for 10 minutes before turning them out. Serve warm or at room temperature. (Can be double-wrapped and frozen for up to 3 months; thaw and gently reheat before serving.)