
1. Mark point A at 60 times the rope’s diameter (at least 24cm for a 4mm rope).
The principle of a Dyneema eye is a core-to-core splice, in which a length of at least 60 times the diameter of the rope is taken back into itself. Several sources recommend using 50–70 times the diameter for coated Dyneema. DSM advises using 60 times the diameter for coated Dyneema, and 100 times the diameter for uncoated Dyneema. For a 6mm coated rope that would mean 36cm.
If you want to splice in a stainless steel thimble with Dyneema, you need a thimble that is closed on the narrow side. It is not possible to crush this thimble so it can withstand much higher forces.
This is the basic splice for Dyneema. Under tension the rope will pull into itself tightly, which produces a strong eye. You can pull out the eye when the rope is not under tension. Use the lock splice method on Lock Splice if you want to fix the eye in place. The methods for single braid Dyneema can also be used for single braid polyester ropes, such as those used for lazy jacks.

2. Determine the size of the eye and mark point B.

4. Pull the short end of the rope through so that it disappears completely.

5. Pull the end of the line and remove some strands from the short end.

6. Cut the loose strands so that the rope becomes thinner (‘tapering’).

8. Add a whipping to prevent the eye from moving.

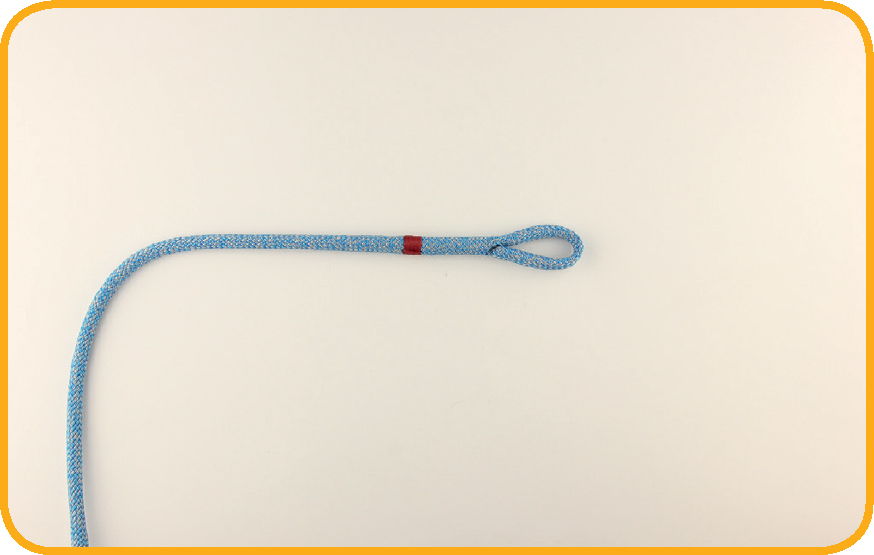
9. This completes the basic method to make an eye splice in single braid Dyneema rope.
Method for hollow braid with a grip fibre
A rope made up of a hollow braid with a non-slip fibre (such as Swiftcord) is spliced just as in the basic method above. The only difference is that you taper the rope before you take it back into itself, because this rope is more tightly braided than single braid Dyneema and therefore has less space inside.
Follow steps 1 and 2 of the basic method above, then:

3. Taper two thirds of the length between A and the end of the rope.
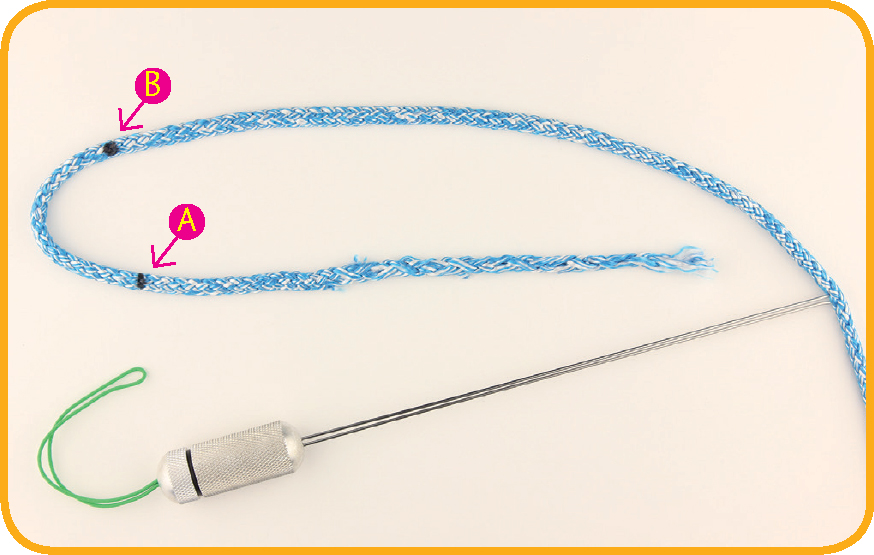
4. Fold the rope and insert the pulling needle as shown, about a third further from B than the distance between A and the end of the rope (30cm for a 4mm rope).

5. Take the tapered end back through. Follow steps 7 and 8 of the basic method above.
If possible, lock the size of the eye with a so-called lock splice (or Brummel splice), as is explained below. This lock is not needed to strengthen the splice. There are two methods, one for a rope with two loose ends and one for a rope with one end free and one that’s attached.
Two loose ends

1. Mark point A at 60 times the rope diameter (30cm for a 5mm rope).

2. Determine the size of the eye and mark point B.
3. Push a fid right through the core at point B. Make sure you have the same number of strands on either side.

4. Pull the short end through until points A and B meet.

5. Insert a fid behind the eye at point A as shown.

6. Take the longer end of the rope through point A completely. If this longer end is fixed, continue with step 5 on here.

8. Insert the fid just behind the eye. Pull the short end of the rope through so that it disappears completely.

8A. It is often easier to use a pulling needle here, particularly for thin ropes.

9. Pull out the fid with the rope to expose more of the inner rope.

11. Cut the strands to taper the end.

12. Hold the eye and slide the outer rope back over the inner one.

13. This creates a lock splice in single braid Dyneema.
If you want a lock splice in a rope that is attached on one side, follow these instructions:

1. Mark point A at 60 times the rope’s diameter (30cm for a 5mm rope).

2. Determine the size of the eye and mark point B.

3. Insert a fid right through the core at point B. Make sure you have the same number of strands on either side of the fid.

5. Insert a thicker fid in the short end at A.

6. Now pull the eye through point A.

7.
8. If you pull the eye through tightly you’ll get a twist in the rope at point A. If you want to leave it this way, continue with step 12.

9. Remove the twist by turning back the loose end at point A.

10. Pull the rope through completely.

11. The twist is now gone and the lock is in place.
12. Insert the fid just behind the eye. Pull the short end of the rope through until it disappears completely (use a pulling needle for thin ropes, as in step 8A on here.

13. Pull out the fid with the rope to expose more of the inner rope.

14. Unlay some strands from the tail.

15. Cut the loose strands to taper the end.

17. This creates a lock splice in single braid Dyneema where one side of the rope is attached.
Dyneema is very UV resistant and the polyester cover does not contribute to the strength of the rope. You therefore splice only the core so the techniques described below are very similar to those for single braid Dyneema. If the rope has an aramid fibre core, such as Kevlar, then you do need to splice the cover as well to protect against UV (see Using the cover).
There are two methods for this, both of which create equally strong splices. In both, the core is spliced in the same way as the core of single braid Dyneema (see here and One end attached). The easiest method, where the cover is kept in place with a whipping, is explained first. The second method requires a little bit more work; the cover is laid around the eye.
Method 1: cover attached with a whipping (easy)

1. Pull out the core from the cover and secure it with a thin fid.

2. Create a lock splice. Depending on your preference and the situation, you can choose the lock splice for two loose ends (see Lock Splice) or the one with one end attached (see One end attached).

4. Secure the cover with a double stitched whipping.

5. Cut the spare cover.

6. Milk the spare cover to the other side.
Method 2: cover taken back over the eye splice
This splice is as strong as the previous one but has a slightly nicer finish.

1. Pull out the core 5–10cm from the cover to create more room. Mark point A at a minimum of 60 times the core diameter from the end (36cm for a 6mm core). A–B determines the size of the eye.

2. Take out the core from the cover at B and mark it B*. Secure the core at the point where it comes out of the cover with a small fid.

3. Create a lock splice. Depending on your preference and situation, choose either the lock splice for two loose ends (see Lock Splice) or the one with one end attached (see One end attached).
4. Insert a pulling needle about 5cm through the cover next to the core. You could taper the end of the cover before it is taken back into itself.

5. Take the end of the cover through the eye and pull it back into itself. Do that at the point where there is only a single core because this is where you will have space for it. Make sure the cover is not twisted.
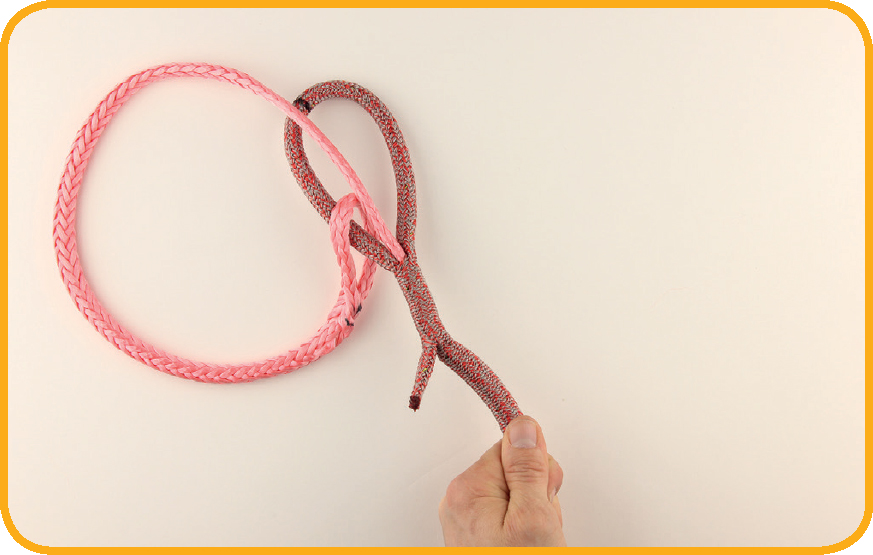
6. Milk the core back into the cover.

7. This step can be hard; if needed use a hammer to loosen the fibres.
8. When milking the cover over the thicker part of the core, simultaneously pull on the loop and slide over the cover. If necessary, attach a shackle to the eye and apply a bit of tension with a winch.
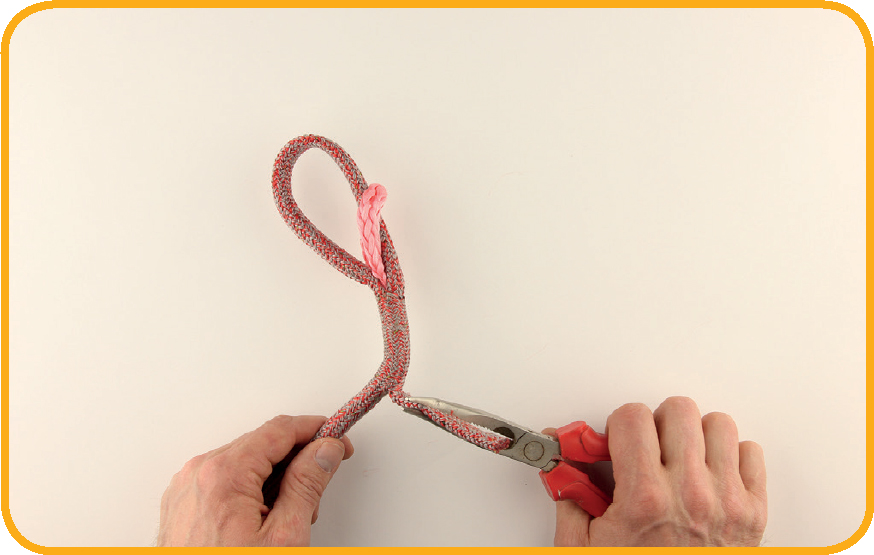
9. Pull the cover through around the core until you see only the Dyneema eye.
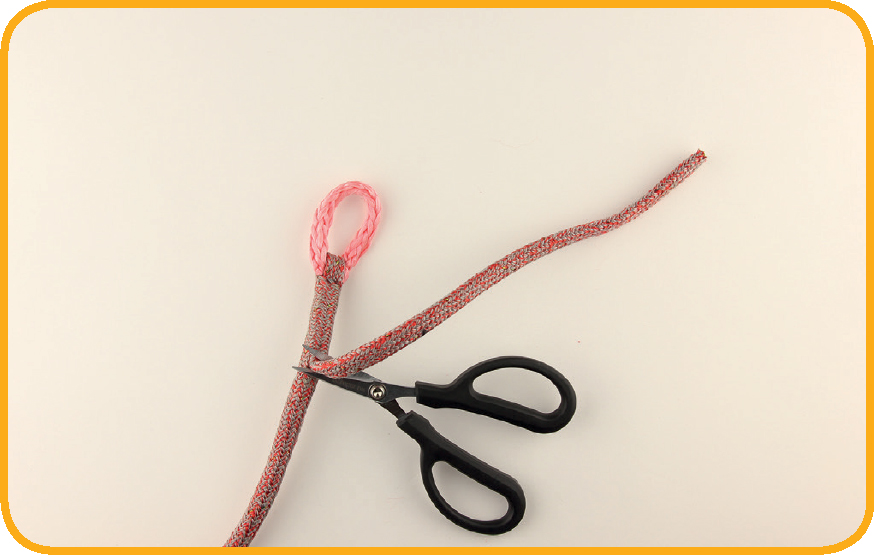
10. Cut the cover and put tension on the eye again to make the end disappear into the cover.

11. Secure with a whipping to prevent the cover from slipping off.
12. This creates an eye splice in double braid Dyneema rope, with the cover taken back around the eye.
While you don’t need to use the cover with Dyneema, you should also splice the cover if the core is made of aramid or Vectran fibres, to protect against UV damage. This splice is fairly difficult because the cover will get very tight and you’ll need a lot of force. Beginners are advised to use one of the lock splice methods described above if they are splicing a Dyneema rope.

1. Mark point A at 60 times the core’s diameter (36cm for a 6mm core). Mark point B; the distance from A to B determines the size of the eye.

2. Take the core out of the cover at point A and mark it.

4. Insert a fid into point A* and let it emerge about 12cm further down.

5. Pull the cover through.

6. Mark the cover where it emerges.

8. Taper the cover by cutting it off diagonally.

9. Slide the core over the tapered cover.

10. Take the core out of the cover at point B.

12. Stretch the cover tightly around the core.

13. Insert a fid upwards into the core at point B.

14. Take the end of the core back into itself.

16. Optional: secure the core and cover in place with a few stitches to prevent them from moving.

17. Taper the core by cutting it diagonally.

18. Slide the core back around itself to create an even loop.

20. This step can be difficult; use a hammer to loosen the fibres.

21. When milking the thicker part of the core, simultaneously pull on the loop and slide over the cover. If necessary, attach a shackle to the eye and apply a bit of tension with a winch.

22. This creates an eye splice including the cover in double braid ropes with high-performance fibres.
This splice will be the same as the one for double braid Dyneema above, from step 7 onwards. The only difference is that the inner cover needs to be removed. This provides more room in the cover, which means you need less force and the area with the core taken back into itself stays flexible. You determine the length of inner cover you need to remove in steps 1–3.

1. Cut a piece off the end and take out the core with the inner cover. Mark point A at 60 times the core diameter.

2. Mark point B, depending on the size of eye you want.
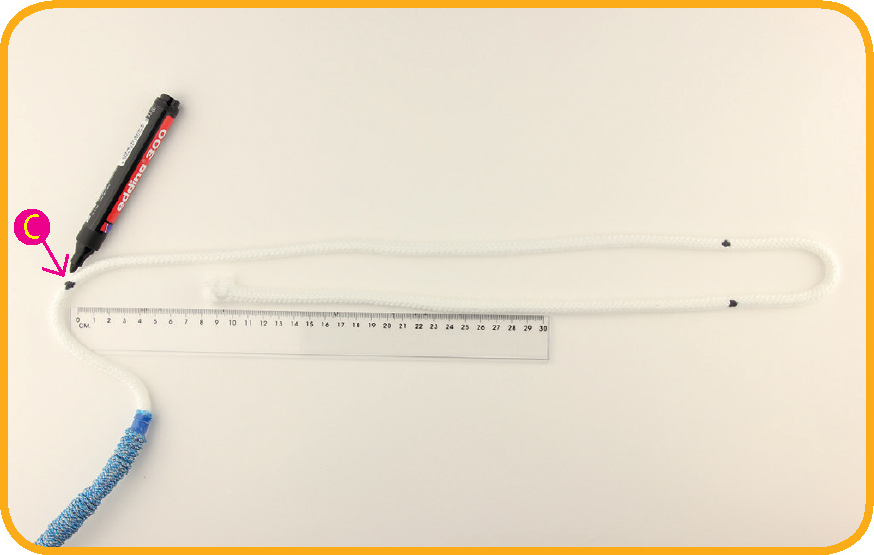
3. Fold the rope and mark point C on the longer end, 10cm past the shorter end.
4. Remove the inner cover at point C. This is much easier if you bunch it up as much as possible. Make sure you don’t damage the core when cutting.

5. The inner cover is now removed.

6. Slide the cover completely back over the core.
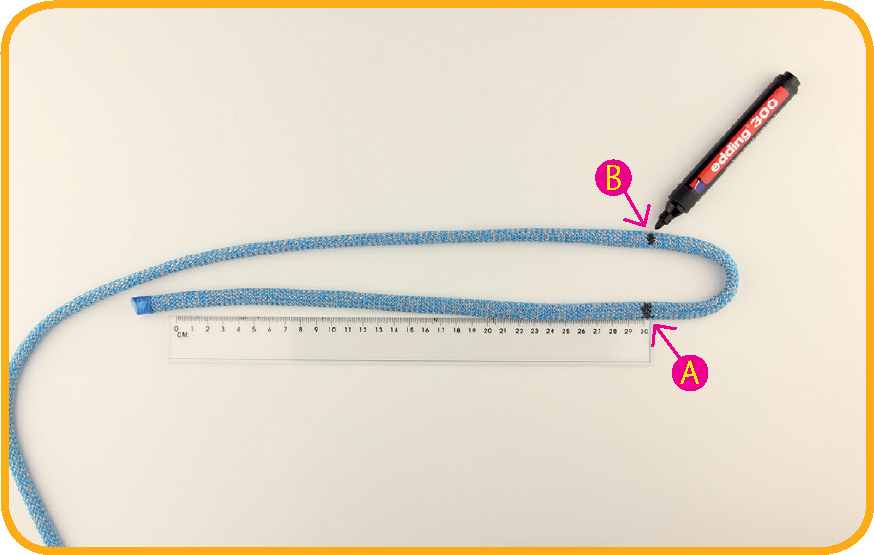
7. You marked points A and B earlier in step 1 and 2 to know at which point to remove the inner cover. Mark the same points A and B on the cover.
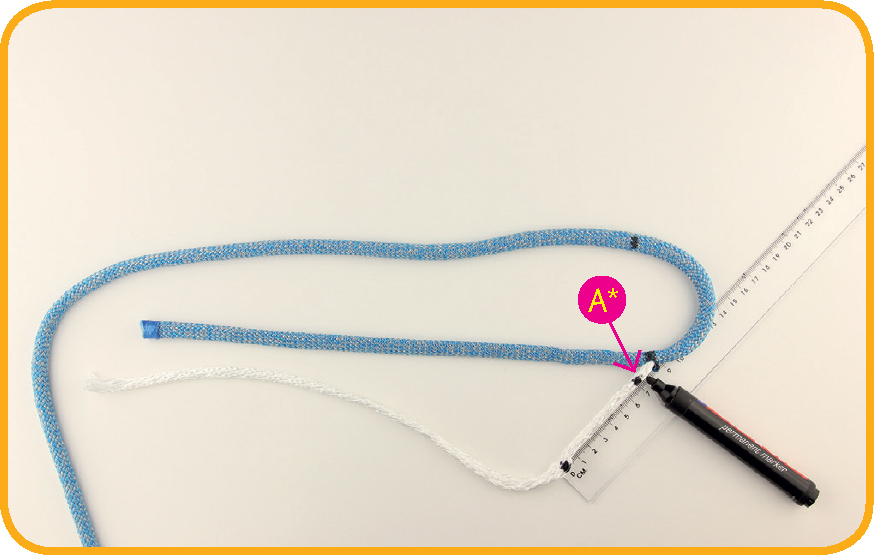
9. Create more room in the cover by taking out 5–10cm of the core. Mark this point A*.

10. Insert a fid into point A* and let it emerge out about 12cm further down.

11. Pull through the cover.

13. Cut the cover at the mark.

14. Taper the cover by cutting it diagonally.

15. Slide the core back over the tapered cover.

17. Make a big loop by pulling the core out. Pull the cover tight around the core from point A to point B.

18. Insert a fid upwards into the core at point B.
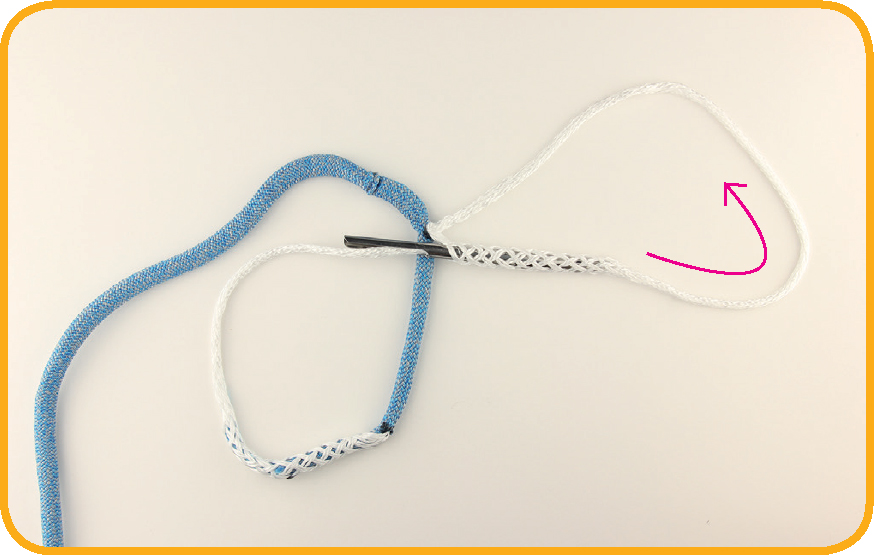
19. Take the end of the core through the core.
20. Let the fid emerge from the core at such a distance that the core can disappear inside itself completely.

21. Optional: secure the core and cover in place with a few stitches so that they can’t move.

22. Taper the core by cutting it diagonally.

23. Slide the core from the loop to cover the tapered part.
24. Milk the cover over the core (towards the edge). Add a double-stitched whipping below the eye if you like.
25. This creates an eye splice in double braid Dyneema with a double-layered cover.