THE RECIPES
Here’s the real heart of the matter: food. With thousands of recipes in our archive, we decided to give you some perennial favorites of our readers, and then develop a bunch more that would help round out a collection of recipes that will get you cooking any meal of the day, any time of the year. After all, we see recipes as road maps to a surefire dish, gentle suggestions of something to cook, and everything in between. One simple recipe will serve all levels of cooks.
If you’ve never cooked before, here are more than 100 recipes that you can follow step-by-step and find success. There’s nothing too esoteric here, and nothing that will set you back financially.
If you are an experienced cook, think of these as a hint that might inspire you. The point is, use this section with gusto. Stain it, splatter it, mark it up. No matter what type of cook you are, this is your playground.
A recipe can be everything from a few thoughts scrawled on a scrap of paper to a very formal list of ingredients and step-by-step directions. It can be spoken or written, memorized or consulted in a book. It can even be made up as you go along, an improvisation, a spontaneous whipping up of this or that.
Depending on who we are, some of us love recipes for their guidance and reassurance, and some of us hate them for their restrictions and bossiness. Some of us prefer just to read them but not actually cook them, and others like nothing more than to tinker around and put our own unique stamp on them. Some will share their recipes with abandon, and (sadly) others will guard them closely, changing an important herb or omitting a step before they finally pass them on.
Like road maps, we need recipes to help guide us and to offer us assurance. They remind us that someone has been here before us and this is how they made it work. In that sense, a recipe is a communication, a conversation even. Recipes are written records of the time and place in which we live, the food and ingredients available to us, and what we value.
But in the end, it’s not the recipe that will make the cake, or the soup, or the casserole. It’s you, and all that you bring to that endeavor. If you’re distracted and sloppy, the recipe will not save you, nor can you give the recipe credit the time it turned out even better than ever. That was you. And it’s you who will slice the cake and serve it, clean up after making it, and send the neighbors home with a piece. It’s you who will eat what’s left for breakfast the next morning and who will, it is hoped, enjoy that indulgence without too much guilt.
Just as sheet music doesn’t sing and a map doesn’t make a left turn at the intersection, a recipe is only an idea, a suggestion, until you pick it up and make it yours.

TWO-EGG FRENCH OMELET
MAKES 1 OMELET
“Don’t let yourself be frightened at the prospect of making an omelet,” said Judith Jones, when Sara Kate interviewed her in her home kitchen. This is good advice coming from the person who edited Julia Child’s cookbooks and who is a fantastic cook in her own right. When you’re cooking for just yourself, a simple two-egg omelet is the perfect meal: minimum fuss, ready in a flash, and easily filled with any tasty scraps of vegetables or cheese.
We describe in some detail here the basic technique of an omelet, but mastery comes with practice as you learn how to control the heat of your particular stove. The basic idea of an omelet is to cook eggs into a flat pancake so you can fold it over your filling. It shouldn’t take more than 2 minutes, tops. A nonstick skillet does help, and this is one of the few times we recommend using one. If your pan is larger than 8 inches, double the recipe, which will make an omelet large enough to feed you and a friend.
2 large eggs
Salt and freshly ground black pepper
2 to 3 tablespoons shredded cheese (optional)
¼ to ½ cup cooked filling, warmed (optional, see variations)
2 teaspoons unsalted butter
Whisk together the eggs in a small bowl with a pinch of salt and pepper, if desired, until the whites and yolks are completely combined and slightly frothy. Place the bowl of whisked eggs together with the shredded cheese, warmed filling, and a plate for serving next to the stove.
Melt the butter in an 8-inch nonstick skillet over medium-high heat. Swirl the pan to completely coat the bottom. When the butter is no longer sizzling, the pan is hot enough to cook the omelet.
Pour the eggs into the center of the skillet and immediately tilt the pan in all directions to completely cover the bottom. The eggs should sizzle gently (if they don’t, warm your pan a little longer next time). With a heatproof spatula, gently drag and push the cooked portions of the eggs from the edges toward the middle of the pan to form waves in the omelet as it sets, and to create space around the edges of the pan. Tilt the skillet so that the uncooked egg flows from the top of the omelet toward the edges and under the omelet.
The omelet is finished when there is no more liquid egg. The top will look very uncooked and wet, but no longer runny (residual heat will continue cooking the omelet after it is folded). The bottom should be set and the edges should look crisp. From the time you pour in the eggs, the whole process should take about 1 to 2 minutes.
Take the pan off the heat. Sprinkle the cheese down the center of the omelet and top with the filling, then fold the omelet in thirds. With your spatula, lift the edge of the omelet furthest from you (opposite the skillet’s handle) over the filling. Fold the other edge over the top. Tilt the skillet to slide the omelet toward the edge and carefully transfer the omelet to your plate. Eat immediately.
EGGS EN COCOTTE WITH BASIL
SERVES 4
For such an elegant little dish, eggs en cocotte is remarkably simple to make. You can do it half-awake on a Saturday morning while waiting for the coffee to brew. We like to eat our eggs en cocotte with a plateful of buttered toast strips, perfect for dipping into the yolk and scooping up the egg whites. Dipping that first piece of buttered toast into the warm yolk is an absolute luxury.
The addition of basil is just a suggestion. Also try putting a bit of crumbled bacon on the bottom of the ramekin. In the summer, try chopped fresh tomatoes. For something sweet and earthy, try caramelized onions and sautéed mushrooms.
1 tablespoon unsalted butter
½ cup grated Gruyère cheese
Flaked sea salt
Freshly ground black pepper
8 large eggs
1 ounce fresh basil, chopped (about ½ cup, packed)
¼ cup cream
Preheat the oven to 375°F.
Line a 9 × 13-inch baking dish or a large roasting pan with a dishtowel or a piece of parchment paper (to keep the ramekins from sliding around when you carry the baking dish). Rub the insides of four 5- to 6-ounce ramekins with butter. Place 1 tablespoon Gruyère in the bottom of each ramekin and sprinkle with salt and pepper.
Crack two eggs into each ramekin, being careful not to break the yolk; distribute the basil equally among the ramekins and add 1 tablespoon of cream to each. Top each with an additional 1 tablespoon of the Gruyère and sprinkle again with salt and pepper.
Arrange the ramekins in the baking dish. Pour enough hot water into the baking dish to reach halfway up the sides of the ramekins.
Transfer the baking dish to the middle rack of the oven. Bake until the whites are almost set, but still a little wiggly and the yolks are still runny, about 20 to 25 minutes. The eggs will continue to cook after you remove them from the oven. Remove the ramekins with oven mitts and serve immediately with toast for dipping.
Tip from The Kitchn
To bake this recipe in a toaster oven: Use the same temperature and baking time, but check the eggs after 15 minutes. Nix the water bath and bake the ramekins directly on the rack in the toaster oven. Using the toaster oven tray can make it easier to transfer them in and out of the toaster oven.
Morning Egg Bake with Turkey, Red Peppers, and Spinach
MORNING EGG BAKE WITH TURKEY, RED PEPPERS, AND SPINACH
SERVES 6
This is a favorite in Faith’s house, since it takes barely 10 minutes to assemble before baking and leftovers make excellent meals on the go. It’s morning protein, the easy way. Consider this recipe a template, and then experiment with the ingredients you have on hand. No turkey? Diced ham works just as well. Want to go meat-free? No problem. Add an extra cup or two of vegetables—any fresh greens or cooked leftovers will play nicely here.
Olive oil
10 large eggs
1 cup whole or 2% milk
1 teaspoon salt
Freshly ground black pepper
1¼ cups finely grated Parmesan cheese
4 ounces goat cheese, crumbled (about 1 cup)
6 ounces baby spinach, roughly chopped (about 4 cups)
1 12-ounce jar roasted red peppers in oil, drained and chopped (about 1½ cups)
10 ounces roasted turkey breast, chopped (about 2 cups)
Preheat the oven to 350°F. Lightly grease a 9 × 13-inch baking dish with olive oil.
In a large bowl beat the eggs thoroughly, then whisk in the milk, salt, and a generous quantity of black pepper. Whisk in 1 cup of Parmesan cheese and the goat cheese.
Spread the spinach in the prepared baking dish and distribute the red peppers and turkey breast on top. Pour in the egg mixture and sprinkle with the remaining ¼ cup Parmesan cheese and drizzle lightly with olive oil. (At this point the egg bake may be covered and refrigerated overnight, if desired.)
Bake for 45 minutes, or until the top is puffed and slightly golden and a knife inserted in the middle comes out clean. Let cool for 10 minutes before serving. Serve with fresh fruit and toast.
KALE AND GRUYÈRE BREAKFAST STRATA WITH SMOKY TOMATO SAUCE
SERVES 6
In 2012 we published a few holiday brunch recipes from Southern cookbook author Sheri Castle. All of her recipes were spectacularly enticing (check out her recipe for Fresh Grape Cake on our site), but Faith’s imagination was spiked by Sheri’s recipe for savory bread pudding with a smoky red pepper sauce. Here’s a twist on that recipe, a hearty, somewhat lighter strata made of good bread, eggs, garlicky kale, and Gruyère, with a smoky tomato sauce to drizzle on top. Whether served on Christmas morning or when hosting the in-laws for brunch, this savory bread pudding will rise to the occasion.
Olive oil or butter, for greasing the pan, and more oil if needed
6 large eggs
1½ cups whole milk
1 cup heavy cream
1½ teaspoons salt
1 teaspoon smoked paprika
½ teaspoon ground black pepper
12 ounces day-old Italian or French bread, cut into 1-inch cubes (about 6 to 8 cups)
4 ounces (about 3 slices) bacon or turkey bacon, chopped
6 garlic cloves, minced
6 to 8 ounces curly kale, ribs removed and leaves chopped (about 8 cups)
¼ cup white wine
4 ounces Gruyère cheese, finely grated (2 to 2½ cups)
Smoky Tomato Sauce, for serving
Heat the oven to 350°F. Lightly grease a 9 × 13-inch baking dish with olive oil or butter.
Beat the eggs in a large bowl, then whisk in the milk, cream, salt, paprika, and black pepper. Stir the bread cubes into the egg and milk mixture and set aside.
Cook the bacon in a wide, deep skillet over medium heat for about 10 minutes or until the fat has rendered and the bacon is beginning to turn crispy. Add the garlic and cook for 2 to 3 minutes, or until it turns golden. Add the kale in handfuls, stirring to coat with the bacon and garlic. (If you use low-fat turkey bacon, you may find the pan is too dry. Add a drizzle of olive oil to help coat the greens.) When the kale has been incorporated and is slightly wilted, pour in the white wine and scrape up any dark brown bits on the bottom of the pan. Cook for about 2 minutes, or until the kale is wilted.
Fold the cooked kale, bacon, and garlic into the bread and egg mixture. Fold in about three-quarters of the grated Gruyère. Spread the bread and egg mixture in the prepared baking dish and sprinkle the remaining cheese over the top. At this point the strata can be covered and refrigerated overnight.
Bake for 50 minutes or until the pudding is slightly puffed and golden. It should be firm and dry in the center and browned around the edges. Cool for 10 minutes before serving. Serve topped with warm
Smoky Tomato Sauce.
Smoky Tomato Sauce
MAKES ABOUT 2 CUPS
This smoky sauce is tangy, sweet, and piquant. It takes this breakfast casserole from simply delicious to utterly memorable.
¼ cup unsalted butter
1 tablespoon tomato paste
1 large yellow onion, diced
4 garlic cloves, minced
1 14.5-ounce can plum tomatoes, drained
2 teaspoons smoked paprika
Juice of 1 lemon (about 3 tablespoons)
1 tablespoon (packed) dark brown sugar
½ cup (loosely packed) chopped fresh flat-leaf parsley
Salt and freshly ground black pepper, to taste
Heat the butter in a 2-quart saucepan over medium heat. When it is melted, add the tomato paste, onion, and garlic and cook, stirring often, until the onion and garlic are soft and golden, about 10 minutes. Add the tomatoes and cook for another 15 minutes or until the tomatoes soften and release their juices. Turn off the heat and stir in the paprika, lemon juice, sugar, and parsley.
Transfer the sauce to a blender and puree until smooth. Be careful when blending hot liquids: Hold the lid down firmly with a folded towel, because the hot liquid will try to shoot out the top! You may also puree the sauce directly in the pan using an immersion blender. Taste the sauce and season with salt and pepper.
Serve slightly warm or at room temperature. Store covered and refrigerated for up to one week.
MINI QUICHES in PROSCIUTTO CUPS
MAKES 12 MINI QUICHES
Egg cups are another excellent make-ahead breakfast, hearty with protein. A lining of prosciutto helps hold the quiches together and allows them to slide right out. (Prosciutto just happens to be awfully tasty, too.) Make these quiches ahead of time and grab them in the morning for a quick and satisfying breakfast. They are good cold, but they can also be warmed in a few seconds in the microwave.
1 tablespoon olive oil, plus more to grease the pan
6 ounces thinly sliced prosciutto, at least 12 slices
2 garlic cloves, minced
2 cups chopped Swiss chard leaves
8 large eggs
¼ cup cream
½ cup finely grated Parmesan cheese
¼ teaspoon smoked paprika
¼ teaspoon salt
Freshly ground black pepper
Preheat the oven to 375°F. Lightly grease the 12 wells of a muffin pan with olive oil. Cut each slice of prosciutto crosswise, and press each half into a muffin cup so it completely lines the cup. Repeat for each cup.
Heat the olive oil over medium heat in a wide sauté pan. Add the garlic and cook for 2 to 3 minutes or until golden and fragrant. Add the Swiss chard and cook for 3 to 4 minutes or until wilted. Remove from the heat.
Beat the eggs thoroughly in a large bowl, and whisk in the cream, Parmesan cheese, paprika, salt, and a generous amount of black pepper. Fold in the chard. Divide the egg batter evenly among the prosciutto-lined muffin pan cups.
Bake for 25 minutes or until the quiches are puffed and golden brown and the edges are pulling away from the muffin cups. Let cool for 10 minutes on a cooling rack then remove the egg cups by tugging gently on the edge of the prosciutto.
Serve warm or refrigerate in a covered container for up to 5 days. To reheat, warm on low in the microwave, or for 5 to 7 minutes in a 325°F oven.
Breakfast Tacos
BREAKFAST TACOS
MAKES 4 TACOS
Ask a Texan about breakfast tacos and you’ll get a real earful. The fact is, a fresh tortilla wrapped around some excellent eggs, with perhaps some potatoes and roasted salsa, pretty much hits the spot every time. If you decide you’re going to become one of those breakfast taco people—Texan or not—make the extra effort to find great tortillas, bright and fresh eggs, and then leave the rest to the condiments.
6 large eggs
½ teaspoon coarse kosher salt
2 tablespoons corn oil
1 12-ounce russet potato, peeled and cut into ¼-inch to ½-inch dice
¼ cup chopped onion, from about ½ medium onion
¼ teaspoon freshly cracked black pepper
4 8-inch flour tortillas
FOR SERVING
Sliced green onions
Sliced avocado
Pickled jalapeño peppers
Guacamole
Roasted Tomatillo Salsa
In a small mixing bowl, beat the eggs with ¼ teaspoon of the salt.
In a large skillet, heat the oil over medium heat. Add the potatoes with the remaining ¼ teaspoon salt. Sauté the potato chunks, stirring occasionally to prevent burning, but browning them on all sides. After 5 minutes, add the onion and continue to sauté, stirring occasionally. Sprinkle with the pepper and sauté for 3 to 4 more minutes, or until the potatoes are tender.
Pour the beaten eggs into the pan and allow them to coat the bottom of the pan. Turn the mixture a few times until the eggs are almost set, about 1 minute.
Heat the tortillas in a clean, dry skillet over medium heat, about 30 seconds on each side. Place warm tortillas on plates and divide the egg and potato mixture among the four tortillas. Serve immediately with accompaniments.
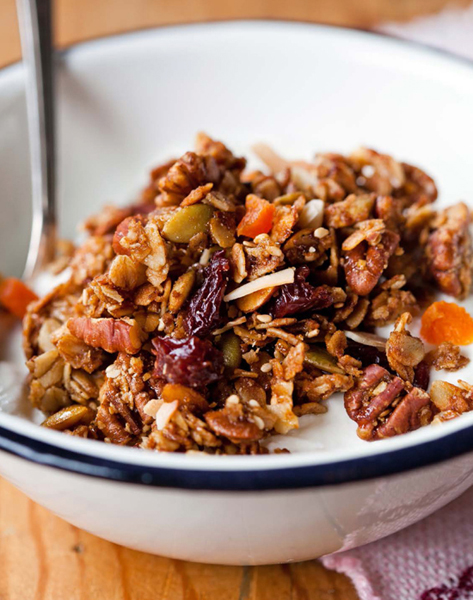
Everyday Granola
EVERYDAY GRANOLA
MAKES ABOUT 6 CUPS
If you know how to make a fine batch of granola, you will bring joy and light to everyone around you. You’ll have an easy backup when the holiday shopping list doesn’t quite match your budget, a great gift for your pals who invite you to their weekend houses, and a totally hippy-tastic breakfast to offer your family each morning. Serve it drowned in milk, rained over yogurt, mixed with chopped fresh peaches in the summer, or baked on top of apples and pears in the dark months.
3 cups old-fashioned rolled oats (not instant)
1 cup chopped nuts, such as almonds, walnuts, or pecans
1 cup dried, shredded, unsweetened coconut
½ cup seeds, such as sesame or pumpkin
½ cup (lightly packed) light brown sugar
1½ teaspoons salt
¼ teaspoon ground cinnamon
½ cup oil, such as olive or walnut
½ cup liquid sweetener, such as honey or maple syrup
¾ teaspoon pure vanilla extract
2 egg whites, lightly beaten
¾ cup chopped dried fruits, such as cherries or apricots, or whole currants or blueberries
Preheat the oven to 300°F.
In a large bowl, mix the oats, nuts, coconut, seeds, sugar, salt, and cinnamon.
In a small bowl, whisk together the oil, liquid sweetener, and vanilla. Pour the liquid mixture into the dry mixture and stir to combine. Add the egg whites and combine thoroughly.
Scrape the mixture out onto a half sheet pan (18 × 13 inches) and bake for about 45 to 50 minutes, or until the mixture is light brown and toasty. Stir after 20 minutes, moving the crispy bits from the perimeter into the center and distributing the granola in the center out toward the edge of the pan.
Remove the pan from the oven and add the dried fruit. Using a spatula, stir to combine the mixture and let the granola cool. The mixture may be sticky, but it will harden as it cools. Transfer to an airtight container.
Granola will stay fresh for 7 to 10 days. For a longer shelf life, store in an airtight container in the refrigerator for up to two weeks.
NUTTY COCONUT GRANOLA BARS
MAKES EIGHT 2 × 2-INCH BARS
If this is your first time making granola bars you’ll have a hard time quitting after today. Once you get the hang of our formula, there’s no telling how many variations you’ll try. Remember, you don’t have to be hiking through the Alps or putting a kindergartener on the school bus to pack a homemade granola bar. It’s the perfect snack for anyone, any time of day, from breakfast to midnight.
Nonstick cooking spray or butter for coating the parchment paper
½ to 1 cup dried fruits like cranberries, raisins, or cherries
1½ cups old-fashioned rolled oats (not instant)
1 cup crispy cereal, such as crispy rice cereal, puffed millet, or another high-fiber cereal mix
½ cup chopped nuts, such as walnuts, peanuts, almonds, or pecans
½ cup flaked or shredded unsweetened coconut
½ cup brown rice syrup
3 tablespoons peanut or almond butter
1 teaspoon pure vanilla extract or pure almond extract
¼ teaspoon salt
1 teaspoon ground cinnamon
½ teaspoon ground spices, such as nutmeg, cloves, or pumpkin pie spice
Preheat the oven to 325°F.
Line an 8 × 8-inch baking pan with parchment paper, allowing extra parchment to hang over the sides. Lightly coat the parchment with nonstick cooking spray or butter. For softer dried fruit pieces, soak the dried fruit in very hot water for 10 minutes and drain well before using.
In a large mixing bowl, combine the oats, cereal, nuts, dried fruit, and coconut.
Heat the rice syrup and peanut butter in a small saucepan over medium heat, or in a small bowl in the microwave at medium power for 10-second intervals, stirring constantly until creamy. Mix in the vanilla, salt, cinnamon, and spices. Using a rubber spatula, scrape the rice syrup mixture out of the saucepan or bowl and add it to the dry ingredients.
Stir until the dry ingredients are completely coated and start to stick together in clumps.
Scrape the mixture into the prepared pan. Using wet or lightly oiled hands, firmly press the mixture into the pan. Bake the bars for 25 to 30 minutes, or until crispy on top. For crunchy bars, bake for an extra 5 minutes. Remove the pan from the oven and immediately press down on the mixture with the back of a lightly oiled spatula.
Let the mixture cool completely in the pan. It will firm up as it cools. Once it has cooled, lift the mixture out by pulling up the flaps of parchment paper. Place on a cutting board and cut into 8 bars with a very sharp knife.
Store at room temperature between layers of wax paper in an airtight container for up to 2 weeks. To make them easier to slip into backpacks and lunchboxes, you can also wrap each bar individually in wax paper or plastic wrap.
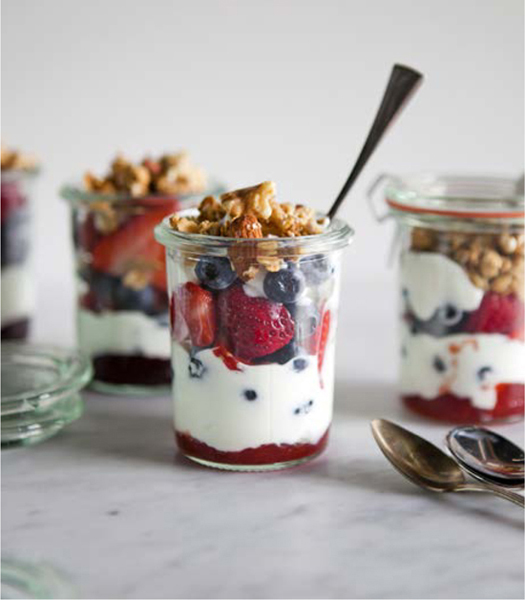
Fruit-on-the-Bottom Yogurt Cups
FRUIT-ON-THE-BOTTOM YOGURT CUPS
SERVES 6
Ever since the very beginning at The Kitchn we’ve been all about figuring out fun DIY projects for traditionally store-bought foods. Yogurt cups are one easy project, and they are the winner hands-down compared to their store-bought counterparts. They are inexpensive, since a big tub of plain yogurt is cheaper (and less processed) than the equivalent number of individual fruit-on-the-bottom yogurt cups. They can also be lower in sugar and more tailored to your tastes. If you take a few minutes at the beginning of the week you can put together a batch of these cups in Mason jars, and you’ll have scrumptious yogurts to take to work or to tuck into your child’s lunchbox.
¾ to 1 cup fruit jam, slightly warmed
3 cups plain whole-milk, Greek, or low-fat yogurt
3 cups fresh fruit, such as blueberries, sliced strawberries, bananas, or kiwi fruit
1 to 1¼ cups toasted nuts or granola
Add 2 tablespoons of fruit jam to the bottom of a half-pint jar. Spoon in ¼ cup yogurt and top with ½ cup fresh fruit. Spoon in another ¼ cup yogurt, and top with 2 to 3 tablespoons of nuts or granola. Screw the jar lid on and repeat with five more half-pint jars. Refrigerate until ready to eat. The cups are best eaten within one week.
FIG AND ALMOND QUINOA BREAKFAST PORRIDGE
SERVES 4
We’ve seen a meteoric rise in the popularity of quinoa over the last several years, and we’re not surprised. It has a fluffy texture, an appealingly nutty taste, and its high protein content is satisfying. We’ve been throwing it into our lunchboxes and onto the dinner plate, but it also has a place in the breakfast bowl. This warm, dairy-free quinoa porridge was inspired by reader luvthesnow who told us: “I made breakfast quinoa with a touch of brown sugar, figs, orange zest, and cinnamon. It was supposed to last for 3 days, but it’s already gone!”
1 cup golden quinoa
2½ cups almond milk, plus extra for serving
¼ cup maple syrup, plus extra for serving
½ teaspoon ground ginger
¼ teaspoon ground cinnamon
Zest and juice of 1 small orange (about ¼ cup orange juice)
½ cup finely chopped dried figs
1 teaspoon pure vanilla extract
½ teaspoon salt
½ cup sliced roasted almonds
Toasted coconut, for serving
Place the quinoa in a fine-mesh strainer and rinse for 2 to 3 minutes under running water. Drain. Stir the quinoa together with the almond milk, maple syrup, ginger, cinnamon, and orange zest in a 2-quart saucepan. Bring to a boil over medium-high heat, then lower to a simmer and cook, stirring frequently, for 20 minutes, or until the quinoa is tender and the porridge has reduced slightly and is creamy. You will notice that the germ will spring out from the quinoa seed, like a tiny curl. This is a good way to tell by sight if the quinoa is fully cooked.
Meanwhile, heat the orange juice to boiling in a small saucepan or in the microwave and stir in the dried figs. Remove from the heat and set aside.
When the quinoa is cooked, stir in the vanilla, salt, and plumped-up figs with the juice. Stir in the sliced almonds and serve with additional maple syrup and almond milk if desired.
The porridge can be refrigerated for up to 3 days and reheated in the microwave or on the stovetop. Stir in extra almond milk to thin it when reheating, since the quinoa will thicken considerably after it cools.
Sweet Green Smoothie
SWEET GREEN SMOOTHIE
MAKES 2 CUPS
We like to encourage you to sit down and savor every one of your meals. We founded The Kitchn on that premise. But we know that some mornings you have to hop on your feet quickly and get out the door, and we’d rather you “cook” than grab a doughnut on the corner. That’s where smoothies come in. This formula, using greens and nut-based protein, is what Sara Kate drinks to get through an intense period of work. Now go on, fill the blender with hot soapy water and get out the door. You can wash up when you get home.
1 large handful roughly chopped kale, spinach, collards, or a combination
2 tablespoons natural (unsweetened) almond or peanut butter
1 cup pure unsweetened coconut water
1 tablespoon flax oil (optional)
1 frozen peeled banana, cut into several pieces
⅛ teaspoon ground cinnamon
Place all ingredients in a blender and puree until completely uniform in color and all the bits of green are pulverized. Serve immediately.
CREAMY BAKED OATMEAL WITH SEASONAL TOPPINGS
SERVES 4
There are several ways to cook delicious oatmeal in the morning, but we’re especially fond of this hands-off oven method. No need to worry about scorching the bottom of the pot, or the pot boiling over for that matter. Just slide the pot into the oven, and in a little while you’ll have perfectly creamy oatmeal, with tender, chewy grains of oats. It’s a great make-ahead breakfast, too. We like to divide freshly cooked oatmeal among several containers, add a seasonal topping, and stash it away for a week of busy mornings.
1 cup steel-cut oats
1 cup 2% milk
¼ teaspoon salt
Preheat the oven to 375°F. Mix the oats, milk, and salt in a 3-quart ovenproof saucepan or Dutch oven. Pour in 2 cups boiling water and cover with a lid.
Bake for 40 minutes, covered. Take the pan out of the oven and carefully remove the lid. Stir once, then cover again and let it sit for 5 minutes. The oatmeal may look soupy, but it will thicken as it cools.
Stir the oatmeal once more and serve hot. Refrigerate leftovers for up to 5 days, covered, and warm in the microwave or gently in a saucepan on the stovetop, adding a little more liquid if necessary.
SPRING TOPPINGS
Chopped strawberries, finely minced fresh mint, and a drizzle of cream
SUMMER TOPPINGS
Quartered apricots and a sprinkle of freshly grated nutmeg
AUTUMN TOPPINGS
Chopped pears or apples and a dusting of ground cinnamon
WINTER TOPPINGS
Golden raisins and quartered prunes
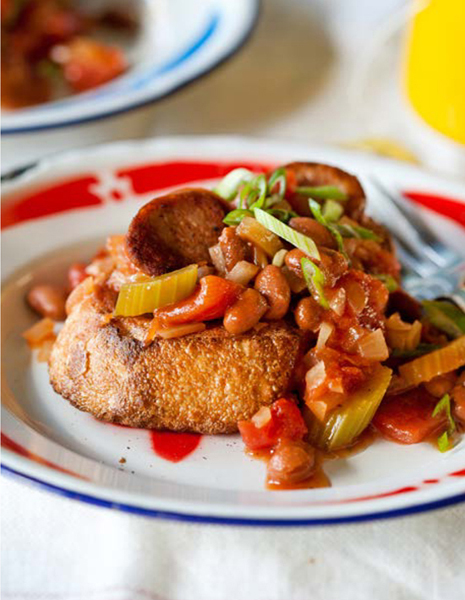
Saucy Bean and Sausage Skillet
SAUCY BEAN AND SAUSAGE SKILLET
SERVES 4
Some breakfast dishes neatly straddle the divide between morning and evening, breakfast and dinner. This is one of those meals, a skillet full of smoky sausage cooked with tangy tomatoes and tender beans. Crack an egg on top for yet one more layer of morning cheer.
12 ounces smoked andouille or spicy chicken sausage, sliced into ½-inch coins
2 stalks celery, diced
1 large onion, diced
2 garlic cloves, minced
1 14.5-ounce can roasted diced tomatoes, with juices
1 15-ounce can pinto beans, with their liquid
1 bay leaf
1 packed tablespoon dark brown sugar
1 tablespoon sherry vinegar
1 teaspoon ground cumin
Salt and freshly ground black pepper
4 scallions (green tops only), finely chopped
4 large eggs (optional)
Crisp toast, for serving
Heat a deep, 10-inch, heavy skillet over medium-high heat and sear the sausage until browned and beginning to crisp, flipping after a few minutes. Stir in the celery, onion, and garlic and turn the heat down to medium. Cook, stirring frequently, for about 5 minutes, or until the vegetables are soft and fragrant. By this point there will probably be a dark brown crust forming.
Stir in the diced tomatoes, and bring to a simmer, stirring and scraping up the brown bits on the bottom of the pan. Stir in the beans with their liquid. Add the bay leaf, brown sugar, sherry vinegar, and cumin. Bring to a boil and lower the heat. Simmer gently until the liquid is
slightly reduced and the mixture is hot, about 10 minutes. Taste and season, if necessary, with salt and pepper. (At this point the mixture can be cooled and refrigerated for up to 3 days. Before serving, reheat in a skillet.) Sprinkle with the scallions when serving.
If you would like to serve this dish with eggs, make 4 wells in the beans with the back of a spoon and crack one egg into each. Season with salt and pepper. Put a lid on the pan and cook over medium-low heat until the whites are set. Remove and serve immediately, piled on crisp toast, if desired.
Sweet Potato and Caramelized Onion Hash with Baked Eggs
SWEET POTATO AND CARAMELIZED ONION HASH WITH BAKED EGGS
SERVES 4 TO 6
We take a particular pleasure in helping you conquer breakfast, as the accomplishment of a hot breakfast on a busy morning ranks up there with achieving an empty e-mail inbox. The best breakfasts are the ones you make ahead of time, like this one. There’s some labor involved in putting together the savory, garlicky hash of sweet potatoes and caramelized onions, but once you’ve done that, it’s there, waiting for you in the fridge. Plop a poached or baked egg on top for a healthy, substantial meal that will carry you through the whole morning.
2 tablespoons unsalted butter
2 to 3 large yellow onions (about 2 pounds), halved, thinly sliced, then halved again
Coarse kosher salt and freshly ground black pepper
3 large sweet potatoes (about 3 pounds), skin intact, chopped into ¼- to ½-inch cubes
¼ cup olive oil
1½ teaspoons salt
1½ teaspoons smoked paprika
Freshly ground black pepper
2 tablespoons (packed) finely minced fresh rosemary or oregano leaves
4 to 6 large eggs
Parmesan cheese, for serving (optional)
Move an oven rack to the middle of the oven. Preheat the oven to 450°F. Line a large baking sheet with foil or parchment paper.
Melt the butter in a cast-iron or other heavy skillet over medium-high heat. When it foams up, add the onions and sprinkle lightly with salt and pepper. (Don’t worry if they are crammed into the pan; they will rapidly cook down.) Lower the heat slightly and cook the onions, stirring occasionally, and lowering the heat if they seem to be burning. Cook the onions until they are dark brown, about 20 to 30 minutes.
While the onions are caramelizing, toss the sweet potatoes in a large bowl with the olive oil, 1½ teaspoons salt, smoked paprika, a generous helping of black pepper, and the minced rosemary or oregano. When the caramelized onions are done, stir them into the sweet potatoes.
Spread the mixture in one layer on the prepared baking sheet and roast for 25 to 40 minutes, stirring every 10 to 15 minutes, until the sweet potatoes are soft and browned. Let the hash cool and store it in a covered container in the refrigerator for up to 5 days.
To serve, heat the oven to 425°F. Spread a relatively thin layer of the cooked sweet potato hash in a baking dish, such as a cast-iron skillet or a 9 × 13-inch baking dish. You can also bake the hash in individual ramekins. Make small wells in the sweet potatoes and crack in the eggs. Sprinkle lightly with salt and pepper.
Bake for 10 to 20 minutes, or until the sweet potatoes are hot and the eggs are baked to your preference. (Test the eggs by prodding them with a fork to check the firmness of the white and to see how runny the yolk is; baked eggs are deceptive in that the white often looks much less cooked than it really is.)
Serve immediately, with shavings of Parmesan cheese, if desired.
VARIATIONS
Before roasting, fold in smoked turkey, roasted chicken, or cooked breakfast sausage, if desired.
Breakfast Pizza
BREAKFAST PIZZA
MAKES TWO 10-INCH PIZZAS
Here’s the ultimate upgrade on your early adulthood bad habit: pizza for breakfast. Serve it proudly, instead of eating it with shame at the open fridge. Throw together the dough on Saturday night and serve pizza for brunch on Sunday.
2 rounds Pizza Dough
1 cup Fresh Tomato Pizza Sauce
1 cup whole-milk ricotta
⅔ cup freshly grated Parmesan cheese
Toppings of your choice (see suggestions that follow)
Flaked sea salt and freshly ground black pepper
4 to 6 large eggs
SUGGESTED TOPPINGS
Prosciutto, salami, thinly sliced parboiled potatoes, chopped fresh herbs, fresh spinach (sprinkled on after baking)
Place a pizza stone or an upside-down baking sheet on the bottom rack of the oven. Heat the oven as high as it will go, at least 500°F.
Using the heel of your hand, gently press and stretch the first ball of dough on a well-floured surface into an 11- to 12-inch circle, about ¼ inch thick, and lay it on a sheet of parchment.
Using the back of a ladle, spread out ½ cup of pizza sauce to within ½ inch of the edges of the dough. Dot the pizza with 6 to 8 rounded tablespoons of ricotta, sprinkle with ⅓ cup Parmesan, and scatter any other toppings (except the eggs) evenly across the top of the pizza.
Crack each egg into an individual ramekin. Pull the rack out halfway and slide the pizza onto the stone. Carefully slip 2 to 3 eggs out of their cups and onto the pizza. Sprinkle on a little salt and pepper. Carefully slide the rack into the oven and bake for 5 to 7 minutes or until the whites and yolk are just barely set.
Take the pizza out of the oven and sprinkle more Parmesan on top. Let cool for five minutes before serving.
Repeat with the second ball of dough and the remaining toppings.
Fresh Tomato Pizza Sauce
MAKES ABOUT 1 CUP, ENOUGH FOR TWO 10-INCH PIZZAS
1 cup canned whole, diced, or crushed tomatoes with juices
2 garlic cloves, roughly chopped
½ teaspoon balsamic vinegar
1 teaspoon olive oil
1 teaspoon freshly grated lemon zest
A few leaves of fresh basil
Salt and freshly ground black pepper to taste
Combine all of the ingredients in the bowl of a blender or food processor and process until they have reached the desired consistency.
The sauce will keep for up to a week in the fridge, or 2 months frozen. Freeze the sauce in individual bags in portions of ½ cup each. When you want to use the sauce, defrost it overnight, snip off a corner of the bag, and squeeze out the sauce.
RICOTTA-STUFFED FRENCH TOAST
SERVES 4
Here’s the decadent brunch recipe you’ve been looking for. Like a sweet grilled cheese, this double-layered French toast boasts a gooey center of ricotta and preserves. The cherry jam is a sweet treat; if you would prefer something more sophisticated, orange marmalade offers a slightly bitter complement to the honey-infused ricotta.
8½-inch slices bread (brioche, challah, sourdough, etc.)
¾ cup ricotta cheese
½ cup cherry jam, marmalade, or other fruit preserves
1 tablespoon honey
Pinch of salt
4 large eggs
½ cup whole milk
4 tablespoons unsalted butter, plus more for serving
Maple syrup, for serving
Preheat the oven to 300°F.
Arrange the slices of bread on a baking sheet large enough to hold them all in one layer. Toast on a top rack directly under the heating element until brown around the edges. Flip and toast the other side, about 10 minutes total.
To make the filling, mix the ricotta, jam, honey, and salt in a medium bowl. Set aside. In a shallow pan, such as a lasagna dish, beat the eggs and milk. Set aside.
Arrange four pieces of toast on a platter and spread with equal amounts of the filling. Lay another piece of toast on top of each slice and gently press down to form a sandwich.
Dip each sandwich into the egg mixture, letting each side of the sandwich sit in the liquid for about 10 seconds.
When all of the sandwiches are well-coated, place them on a large plate and heat a large skillet over medium heat. Melt 2 tablespoons of butter to coat the bottom of the pan. Gently transfer two of the sandwiches to the hot pan and fry on each side until golden brown or until the egg is cooked, about 4 minutes total.
Transfer the cooked French toast to a platter and wipe out the skillet before adding the remaining butter and frying the other two sandwiches.
Serve hot with butter and maple syrup.
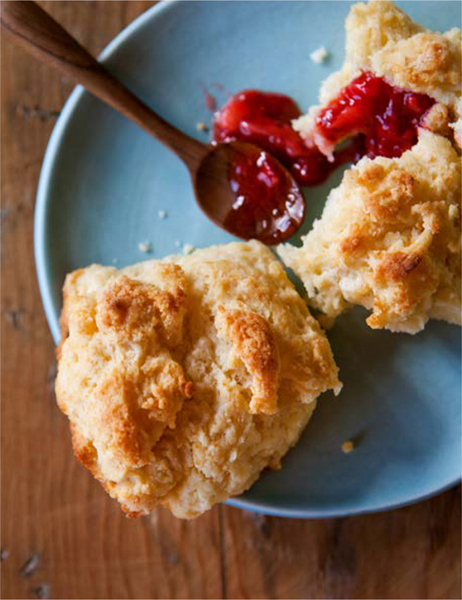
Quick Drop Biscuits with Quick Berry Jam
QUICK DROP BISCUITS WITH QUICK BERRY JAM
MAKES 9 BISCUITS
This recipe comes from a strong memory Sara Kate has of her parents making breakfast. Mom would make Bisquick drop biscuits in her family’s cast-iron skillet, and her dad would make a “special drink,” a very 1970s blender creation involving raw eggs and instant coffee. She has lived to tell the tale, but she has decided to share only the biscuits with you, in a from-scratch version. To evoke Mama Gillingham’s touch, dust the tops with cinnamon sugar just before popping them in the oven. While you’re waiting, make yourself a batch of the quickest berry jam ever.
8 tablespoons (1 stick) cold unsalted butter, plus 1 tablespoon
2 cups unbleached all-purpose flour
1 tablespoon baking powder
1 teaspoon salt
¾ to 1 cup whole milk
BISCUIT TOPPINGS
4 tablespoons (½ stick) unsalted butter, melted (optional)
½ teaspoon sugar (optional)
¼ teaspoon ground cinnamon (optional)
Quick Berry Jam
Salted butter, for serving
Heat the oven to 450°F. Grease a cast-iron skillet or round cake pan with 1 tablespoon of the unsalted butter.
Sift the flour, baking powder, and salt into a large mixing bowl. Transfer to the bowl of a food processor and pulse in the remaining ½ cup of cold butter, or in the same mixing bowl cut in the butter using a pastry cutter or two knives. Add the milk and mix gently until a soft dough forms.
Drop the dough by large spoonfuls into the greased pan, nestling the biscuits close together. If desired, pour the melted butter over the top, mix together the sugar and cinnamon, and sprinkle it over the butter.
Bake for about 12 minutes, or until the tops are lightly browned. Serve hot with butter and jam. These biscuits will keep in an airtight container for 2 days. To reheat, wrap biscuits in foil and heat in a 300°F oven or toaster oven for 5 minutes.
Quick Berry Jam
MAKES 1 CUP
1 pint berries, sliced (about 2½ cups)
¾ cup sugar
1 teaspoon lemon juice
Combine the berries, sugar, and lemon juice in a heavy saucepan. Cook over medium heat, mashing down the fruit with the back of a wooden spoon. Bring the mixture to a rolling boil then lower the heat to medium and cook, stirring often, for 15 minutes more, occasionally skimming any foam from the surface with a metal spoon.
Carefully transfer the jam into clean jars and let cool. Screw on the lids and refrigerate. The jam will keep for 2 to 3 weeks.
SAVORY IRISH SCONES
MAKES 8 TO 10
When Sara Kate toured County Kerry in Ireland as a guest of the Irish Dairy Board, it was clear to her that Irish butter and Cheddar were something special. What wasn’t so clear was what made Irish scones so astonishingly good. Yes, good ingredients like Irish dairy from grass-fed cows can help, but the secret she learned from several chefs is to work the dough as little as possible, and to keep it wet. A batch of these scones is a close second to a trip to the dairy fields of County Kerry.
2 cups unbleached all-purpose flour
1 tablespoon baking powder
2 teaspoons sugar
1 teaspoon fine salt
1 tablespoon chopped fresh herbs (rosemary, thyme, sage, or chives)
¾ cup grated Cheddar cheese
5 tablespoons unsalted butter, at room temperature
¾ cup buttermilk, plus more as needed
1 large egg, beaten
Preheat the oven to 425°F. Line a baking sheet with parchment paper.
Into a large mixing bowl, sift the flour, baking powder, sugar, and salt. Stir in the herbs and about half the cheese. Using your fingertips, work the butter into the dry ingredients until the mixture just holds together.
Working the mixture as little as possible, add the buttermilk and mix until the dough forms into a soft, slightly sticky ball. If needed, add more buttermilk, 1 tablespoon at a time, to reach the desired consistency. The dough should be slightly wet.
Place the dough on a very lightly floured work surface. Using a floured rolling pin, gently roll out the dough into a ¾-inch-thick slab. Dip a 1- to 2-inch biscuit cutter in flour and cut out the individual scones, or cut the dough with a knife or the blade of a bench scraper into wedge shapes. Arrange the scones on the pan and glaze the tops with the beaten egg.
Place the pan in the freezer for 10 minutes, then glaze the scones again with the beaten egg. Sprinkle the remaining cheese on top of the scones.
Bake for 12 to 15 minutes, until the scones are just barely brown and make a hollow sound when tapped. Remove the pan from the oven and place the scones on a wire rack to cool slightly.
Serve with butter. Reheat leftovers at 350°F for 2 to 3 minutes, or until warmed through. Or freeze by wrapping completely cooled scones in plastic wrap, then placing them in a zippered bag or freezer-safe storage container. To reheat, thaw at room temperature in the plastic wrap, then unwrap and reheat for a few minutes in a 350°F oven.
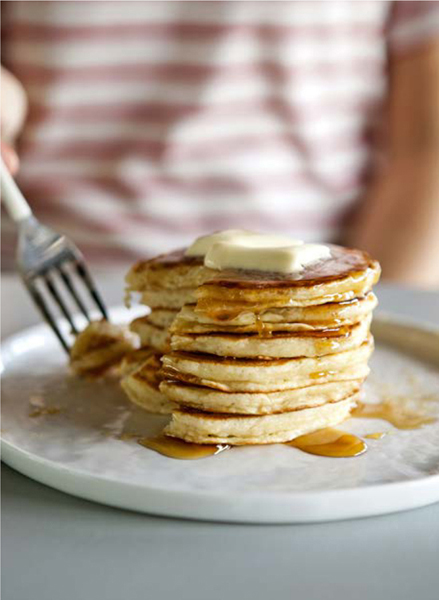
Lofty Buttermilk Pancakes
LOFTY BUTTERMILK PANCAKES
MAKES 18 TO 24 THREE-INCH PANCAKES
We are fervently grateful to Dana Velden for introducing us to these practically perfect pancakes. They are golden and crisp on the outside, and tender and tangy inside, thanks to buttermilk and a trick with the eggs. Stirring in the egg whites separately gives these pancakes their superb texture, and the buttermilk adds airiness and zip.
If you don’t have buttermilk on hand, you still have options! Thin ⅔ cup plain yogurt with milk until it reaches the 1 cup mark. Or substitute 1 cup milk for 1 cup buttermilk, adding 1 tablespoon white vinegar to the milk and letting it stand for 5 minutes until thick and foamy.
2½ cups all-purpose flour
2 tablespoons sugar
1½ teaspoons salt
1 teaspoon baking powder
1 teaspoon baking soda
2 large eggs, separated
2 cups buttermilk
½ cup milk
10 tablespoons unsalted butter, melted and cooled
Neutral oil with a high smoke point, such as canola or peanut oil, for frying
Heat the oven to 225ºF and prepare a large baking sheet by setting a steel cooling rack inside. Place the baking sheet in the oven.
Whisk the flour, sugar, salt, baking powder, and baking soda together in a large bowl. In a separate, smaller bowl, whisk together the egg yolks, buttermilk, and milk. Add the melted butter and whisk until well combined.
Pour the milk mixture into the flour mixture and stir with a wooden spoon until barely combined. Add the egg whites and stir just until a thick batter is formed. Set aside for 5 minutes.
Heat a large skillet over medium-high heat. When hot, coat the skillet with ½ teaspoon of oil. After about 30 seconds, when the oil shimmers but is not smoking, lower the heat to medium-low, and using a ¼ cup measure, drop the pancake batter onto the skillet. The batter will spread into a pancake about 3 inches wide. Cook for about 2½ minutes. (If the pancake scorches or the oil smokes, lower the heat.)
When the bubbles that form on the edges of the pancakes look dry and airy, use a thin spatula to gently lift one side of each pancake and peek underneath. If the pancake is golden brown, flip it and cook on the other side for 2 to 2½ minutes, or until the bottom of the pancake is golden brown.
Remove the pancakes from the skillet and transfer them onto the baking sheet in the oven. Scrape any stray crumbs or scraps out of the skillet, add a little more oil, and cook the remaining batter in batches.
Serve as soon as possible, with butter and warm maple syrup.
VARIATIONS
Oatmeal Pancakes
Substitute 1½ cups rolled oats for 1 cup of the flour. Cook as directed above, but expect the recipe to yield fewer pancakes.
Blueberry Pancakes
Add 2 additional tablespoons of sugar to the pancake batter. Put 2½ cups fresh or thawed and drained frozen blueberries in a separate bowl.
Pour a large soup spoon of batter onto the skillet for each pancake. These pancakes should be made smaller than those in the original recipe so that the pancakes will cook through before the blueberries scorch. Immediately sprinkle the top of the pancake with a handful of blueberries. Cook the pancakes for a full 3 minutes on medium-low heat, then flip the pancakes and turn the heat down to low. Cook just long enough to set the pancakes but not burn the blueberries.
Cinnamon Crisp Pancakes
Add ½ teaspoon of ground cinnamon to the pancake batter. In a small separate bowl, stir together ½ cup (packed) dark brown sugar, ¼ cup flour, and 1 tablespoon ground cinnamon. Using a pastry blender or your fingers, blend in 4 tablespoons unsalted butter until the entire mixture resembles fine crumbs.
Pour a large soup spoon of batter on the skillet for each pancake. These pancakes should be made smaller than those in the original recipe so that the pancakes cook through before the cinnamon sugar scorches. Immediately sprinkle the top of the pancake with a thin layer of the cinnamon-sugar crumbles. Cook for a full 3 minutes on medium-low heat, then flip the pancakes and turn the heat down to low. Cook just long enough to set the pancakes but not burn the cinnamon sugar.
SPICED APPLE CRANBERRY MUFFINS
MAKES 1 DOZEN JUMBO MUFFINS OR 1½ DOZEN REGULAR-SIZE MUFFINS
Everything about these muffins is right: They’re sweet but not too sweet; they’ll clear out those frozen cranberries languishing in your freezer; they’re great warmed up and slathered with butter and tucked into your weekend morning when you are lazing about; and, best of all, you can make them on Saturday night and reheat them the next morning while reading the Sunday paper.
3 cups all-purpose flour
1 cup sugar
1 tablespoon baking powder
1 teaspoon ground cinnamon
½ teaspoon baking soda
½ teaspoon salt
2 large eggs, at room temperature
1½ cups whole or low-fat plain yogurt
8 tablespoons (1 stick) unsalted butter, melted and cooled, plus additional for greasing the pan
1 teaspoon pure vanilla extract
1 medium tart apple (such as Granny Smith), cored (not peeled) and cut into ¼-inch cubes
1 cup (4 ounces) fresh or frozen cranberries
Place an oven rack at the center position. Preheat the oven to 350°F. Grease or insert liners into 12 jumbo muffin cups or 18 regular muffin cups.
Into a medium mixing bowl, sift the flour, sugar, baking powder, cinnamon, baking soda, and salt.
In a large mixing bowl, whisk the eggs to break up the yolks. Use the whisk to stir in the yogurt, melted butter, and vanilla.
Gradually add the dry ingredients to the wet, stirring gently with a wooden spoon until the batter is barely combined. Add the apple and cranberries and stir gently until there is no trace of flour left.
Scoop the batter into the muffin tin cups, filling them almost to the top. Divide the batter evenly among the muffin cups.
Place the muffin tin in the oven and bake the muffins for 30 to 35 minutes, rotating the pan about halfway through the baking time. The muffins are done when they are golden brown and a toothpick inserted into the center of a muffin comes out clean.
Remove the muffin pan from the oven and place it on a wire rack. Allow the muffins to rest for a few minutes in the tin, until they’re cool enough to touch, then remove them from the tin and serve warm. The muffins will stay fresh in an airtight zippered plastic bag in the refrigerator for up to 3 days. They may also be wrapped individually in plastic wrap, placed in an airtight zippered plastic bag, and frozen for up to two months. To serve leftover muffins, wrap them in foil and reheat in a 350°F oven for 5 minutes; if the muffins are frozen, reheat for 15 minutes.
COCONUT BANANA BREAD
MAKES ONE 9-INCH LOAF
What exactly do you do with all those brown bananas that inevitably pile up? Sure, you can make smoothies, Magic One-Ingredient Ice Cream, or food for the baby in the house. But without a banana bread recipe in your back pocket, admit it, you’re a little lost. Here’s one that gives a nod to the tropics with shredded coconut, coconut oil, rum, and Jamaican allspice.
Nonstick cooking spray or butter, for greasing
⅓ cup dried, shredded, unsweetened coconut
3 tablespoons dark rum or orange juice
2 cups unbleached all-purpose flour
1 teaspoon baking soda
1 teaspoon Jamaican allspice
½ teaspoon fine salt
4 ripe bananas, mashed (about 1½ cups)
1 teaspoon pure vanilla extract
2 large eggs, lightly beaten
½ cup coconut oil (liquefied)
⅔ cup (lightly packed) dark brown sugar
⅓ cup roughly chopped and lightly toasted walnuts
Preheat the oven to 350°F. Grease a 9 × 5-inch loaf pan then line it with parchment paper on the bottom and up the long sides, overhanging the top of the pan by 1 inch on each side. Grease the parchment paper.
On a baking sheet, arrange the coconut in an even layer. Toast it in the oven for 2 to 3 minutes, shaking the pan occasionally. Be sure to keep an eye on your coconut because it can burn quickly. Remove from the oven and set aside.
Place the rum in a small saucepan set over medium heat. Bring to a simmer then toss in the coconut flakes and turn off the heat. Cover the pot and set aside.
In a medium mixing bowl, sift together the flour, baking soda, allspice, and salt. In a large mixing bowl, mash the bananas with the vanilla, using the back of a fork, leaving the mixture slightly chunky. Stir in the eggs, coconut oil, and brown sugar. Add the dry ingredients to the banana mixture, then add the coconut and rum. Stir until just combined. Gently fold in the nuts.
Pour the mixture into the prepared pan and bake for about 45 minutes, until a cake tester or wooden skewer comes out clean. Set the pan on a wire rack, and turn out the loaf onto a rack when the pan is cool enough to handle.
The bread will keep in the freezer wrapped tightly in plastic wrap for up to a month.
Tip from The Kitchn
For a more tropical banana bread, add ⅓ cup finely chopped dried pineapple to the rum and coconut mixture and replace the walnuts with an equal amount of chopped and toasted macadamia nuts.
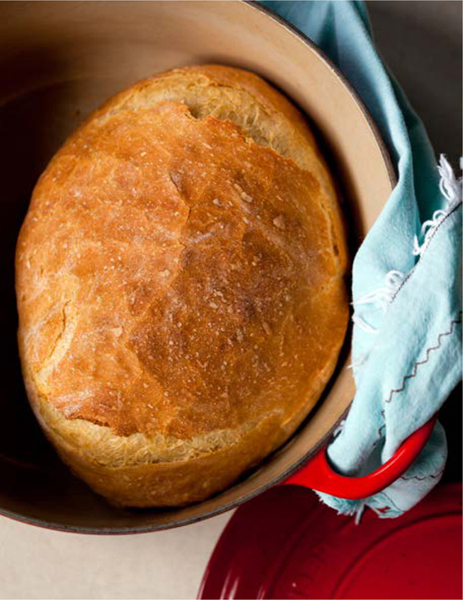
Overnight (No-Knead) Bread
OVERNIGHT (NO-KNEAD) BREAD
MAKES 1 LOAF
In this riff on Jim Lahey’s incredible no-knead bread, we incorporate all the tips and tricks we’ve picked up in the years since we first made it. If you’re pressed for time, add a little more yeast to cut the rising time in half. Or follow the recipe as it is, but throw the dough in the fridge until you’re ready to bake it.
This recipe is truly versatile and has become a staple for us. Ingredients such as minced herbs, ground spices, chopped olives, shredded cheese, and toasted nuts also make great mix-ins.
1½ cups water
¼ teaspoon active dry or instant yeast
3 cups all-purpose flour
1¼ teaspoons salt
Mix the water and yeast in a large bowl and allow to stand until the yeast is dissolved, about 5 minutes. Add the flour and salt. Stir to form a very wet, shaggy dough. Make sure all the flour has been incorporated; the dough should feel sticky to the touch.
Cover the bowl and set it somewhere warm and away from kitchen traffic for 12 to 18 hours. At this point, the dough can be refrigerated for up to three days if you don’t have time to bake it right away.
Turn the dough out onto a lightly floured surface. Dust your hands with flour. Starting with the edge nearest you, lift up the dough and fold it over on itself. Next, pick up the edge farthest from you and fold it over the dough as well. Repeat with the edges to the left and right. The dough should hold together in a neat package. Sprinkle the top generously with flour and cover with a clean cotton dishtowel. Let the dough rise until doubled, about 2 hours (slightly longer if chilled from the fridge).
When you see that the dough has almost finished rising, place a 3½-quart (or larger) Dutch oven or heavy pot with an ovenproof lid in the oven and heat the oven to 475°F.
To bake the bread, remove the pot from the oven and remove the lid. Dust your hands with flour and scoop the dough from the counter. It’s okay if it sticks; a bench
scraper can be used to transfer the dough. Drop the dough, seam side down, into the Dutch oven.
Cover the pot and return it to the oven. Bake the loaf for 30 minutes. Remove the lid and continue baking for another 15 to 30 minutes, until the loaf turns a deep golden brown. Don’t be afraid to let it get really deep brown in spots. If you’re unsure if it has finished baking, you can check that the internal temperature is 200°F using an instant read thermometer.
Remove the loaf from the Dutch oven with heatproof spatulas and potholders. Transfer to a wire rack to finish cooling. Wait until the loaf has cooled to room temperature before slicing it.
VARIATIONS
For a whole-wheat version of this recipe, replace 1 cup of all-purpose flour with 1 cup whole wheat flour or other whole-grain flour.
BASIC WHOLE-WHEAT TOASTING BREAD
MAKES 2 LOAVES
If you’ve wanted to attempt homemade bread, this is a good recipe to start with. This bread has a nutty, slightly sweet flavor and a chewy texture, and it is equally good for a morning slice of toast with jam or a tuna fish sandwich. We didn’t go totally whole wheat with this recipe—all-purpose flour gives the loaves the structure they need to rise and become fluffy. If you’re looking for a higher proportion of whole wheat, start with this recipe first and then gradually shift the ratio of flours in the direction of whole wheat.
1 cup lukewarm water
2 teaspoons active dry yeast
1 cup whole, 2%, or skim milk
¼ cup honey
2 tablespoons canola oil, plus more for greasing the bowl and the bread pans
2¾ cups all-purpose flour, plus extra for kneading
1 tablespoon salt
2¾ cups whole-wheat flour
Pour the water into a large bowl or the bowl of a stand mixer and sprinkle the yeast over it. Let stand for a few minutes until the yeast has dissolved. Stir in the milk, honey, and oil.
Add 2 cups of all-purpose flour and the salt. Stir to combine the ingredients. Add the rest of the all-purpose and whole-wheat flours. Stir to form a shaggy dough. Let it stand for 20 minutes to give the flour time to absorb the liquid.
Using the dough hook attachment on the stand mixer, knead the dough for 8 to 9 minutes. Alternatively, knead the dough by hand on the counter. If the dough sticks to the sides of the bowl or the counter, like bubble gum, add extra flour 1 tablespoon at a time until the dough is no longer sticky. The dough is thoroughly kneaded when it is smooth, feels slightly tacky, forms a ball without sagging, and springs back when poked.
Clean out the mixing bowl then lightly grease it with oil. Form the dough into a ball and turn it around in the bowl to coat it all over with oil. Cover the bowl and let the dough rise in a warm spot for 1 to 1½ hours, or until nearly doubled in bulk. This dough won’t double quite as dramatically as the dough in other bread recipes, but it should look noticeably puffed.
Grease two 8 × 4-inch loaf pans or spray them with nonstick cooking spray. Turn the dough out onto a lightly floured countertop. Divide the dough in two. Working with one piece of dough at a time, flatten the dough slightly to shape it into a rectangle. Fold it like a letter: fold the top third down and the bottom third up. It’s important to stretch the surface of the loaves taut; doing so helps them rise and prevents an overly dense interior.
Transfer the loaf to a prepared loaf pan, seam side down. Repeat with the second piece of dough. Cover the loaves and let them rise a second time, for 30 to 40 minutes. They are ready to bake when the dough starts to dome over the edges of the pans and a dent pressed into the tops with your finger does not immediately spring back.
About halfway through the second rising time, preheat the oven to 425°F.
Place the loaves in the oven and immediately turn down the heat to 375°F. Bake the loaves for 30 to 35 minutes. Finished loaves will be dark golden brown, sound hollow when tapped on the bottom, and register 190°F in the middle with an instant read thermometer. After taking the pans out of the oven, remove the loaves from the pans and let them cool completely before slicing.
This bread will keep, sealed in an airtight bag, at room temperature for several days. The loaves can also be wrapped in foil and plastic and frozen for up to 3 months.
STICKY LEMON ROLLS WITH LEMON CREAM CHEESE GLAZE
MAKES 12 LARGE BREAKFAST ROLLS
One of the pleasures of writing for an Internet audience is getting nearly instant feedback on the things that satisfy our readers, and we’ve heard loud and clear that this recipe has made many folks happy. These rolls are what you turn to when you graduate from cinnamon rolls; they’re fresh yet gooey, yeasty and tender, oozing with lemon sugar and a creamy glaze. A happy morning all round.
3 large lemons, at room temperature
¾ cup milk, warmed to about 100°F (warm but not hot on your wrist)
2½ teaspoons active dry yeast
½ cup unsalted butter, very soft
¼ cup sugar
2 teaspoons pure vanilla extract
4 to 4½ cups all-purpose flour
½ teaspoon salt
½ teaspoon freshly grated nutmeg
2 large eggs
FOR THE STICKY LEMON FILLING
1 cup sugar
¼ teaspoon freshly grated nutmeg
3 tablespoons unsalted butter, very soft
FOR THE LEMON CREAM CHEESE GLAZE
4 ounces cream cheese, softened
1 cup confectioners’ sugar
Zest and juice the lemons. Divide the zest into three equal parts and set aside. Set the juice aside.
Pour the warmed milk into the bowl of a stand mixer. Sprinkle the yeast over it and let the mixture sit for a few minutes or until foamy. Using the mixer paddle, stir the softened butter, sugar, vanilla, and 1 cup of the flour into the milk and yeast mixture. Stir in the salt, nutmeg, and ⅓ of the lemon zest. Stir in the eggs. Slowly add enough of the remaining flour until a soft yet sticky dough forms. Switch to the dough hook and knead for about 5 minutes, or until the dough is elastic and pliable.
If you do not have a stand mixer, stir together the ingredients by hand, then turn the soft dough out onto a lightly floured countertop. Knead the dough by hand for 5 to 7 minutes, or until the dough is smooth, pliable, and stretchy.
Clean out the mixing bowl then lightly grease it with oil. Form the dough into a ball and turn it around in the bowl to coat it all over with oil. Cover the bowl with a towel and let the dough rise in a warm place (75–80°F is ideal) for 1 hour or until puffy and doubled in size.
While the dough is rising, make the filling. In a small bowl, mix the sugar with the nutmeg, then work in the second third of the lemon zest with the tips of your fingers until the sugar resembles soft sand. Slowly drizzle in a few tablespoons of the lemon juice, stirring. Stop when the sugar and lemon juice form a thick, clumpy mixture like wet sand. (You may use as much as half of the lemon juice, but you will probably stop before adding that much, depending on how much juice you got from your lemons.) Set the filling aside.
To assemble the rolls, lightly grease a 9 × 13-inch baking dish with baking spray or butter.
On a floured surface pat the dough out into a large yet still thick rectangle—about 10 by 15 inches. Spread the dough evenly with the 3 tablespoons of butter, then spread the lemon-sugar mixture over the top. Roll the dough up tightly, starting from the top and rolling toward you. Stretch and pull the dough taut as you roll, to keep the lemon sugar firmly inside. Pinch the roll tightly shut. Cut the rolled up dough into 12 rolls. Pinch the cut side on the bottom of each roll closed to help keep the lemon sugar inside, and place each roll, one of the cut sides up, in the prepared baking dish.
Cover the rolls with a towel and let them rise for 1 hour or until puffy and nearly doubled in size. (You can also refrigerate the rolls at this point. Cover the pan tightly with plastic wrap or a towel, and place it in the refrigerator for up to 24 hours. When you are ready to bake the rolls, remove the pan from the fridge, and let the rolls rise for 60 to 90 minutes before proceeding with baking.)
Heat the oven to 350°F. Place the rolls in the oven and bake for 35 minutes, or until firm and golden on top.
While the rolls are baking, prepare the glaze. In a small food processor (or with a mixer or a sturdy whisk), whip the cream cheese until light and fluffy. Add ¼ cup of the remaining lemon juice and blend until well combined. Add the confectioners’ sugar and blend until smooth and creamy.
When the rolls finish baking, smear them with the cream cheese glaze, and sprinkle the final third of lemon zest over the top of each roll to garnish. Let the rolls cool for at least 10 minutes before serving, but serve while still warm.
Monkey Bread with Bourbon Crème Anglaise
MONKEY BREAD WITH BOURBON CRÈME ANGLAISE
SERVES 8 TO 10
This recipe comes from our resident Southern writer, Nealey Dozier. We buzzed over how something so decadent could get slipped so slickly into the site’s breakfast category. Nealey originally fell for a monkey bread with a creamy peach glaze in Atlanta, but her recipe called for a bourbon dipping sauce, “because bourbon is always in season.” This is a recipe for when you want jaws to drop and those around you to insist, for years to come, that you make your famous Monkey Bread.
FOR THE DOUGH
¼ cup warm water (105–110°F)
1 envelope (2¼ teaspoons) active dry yeast
1¼ cups whole milk
2 tablespoons (¼ stick) unsalted butter, plus more for greasing the bowl and Bundt pan
1 large egg, lightly beaten
¼ cup granulated sugar
1 teaspoon salt
4½ cups all-purpose flour, plus more as needed
FOR THE CARAMEL COATING
1 cup (lightly packed) dark brown sugar
2 teaspoons ground cinnamon
½ cup (1 stick) unsalted butter, melted
FOR THE BOURBON CRÈME ANGLAISE
1 cup heavy cream
1 cup whole milk
6 large egg yolks
⅓ cup granulated sugar
Pinch of kosher salt
½ teaspoon pure vanilla extract
2 tablespoons bourbon
To make the dough: Pour the warm water into a small bowl or measuring cup. Sprinkle the yeast and a pinch of sugar over the warm water and let the mixture sit until it becomes foamy, about 10 minutes.
Meanwhile, in a deep and heavy saucepan, heat the milk and butter over medium-low heat until the butter is just melted. Turn off the heat and cool the mixture (to approximately 105°F–110°F). Stir in the egg, sugar, and salt, followed by the yeast mixture.
In the bowl of a stand mixer fitted with a dough hook, or directly in the saucepan, add 2 cups of flour to the milk mixture and mix until the flour is absorbed and the dough is sticky. Add another 2 cups of flour and continue to mix on medium-low speed until the dough is shiny and smooth, about 6 to 8 minutes. (If you’re making the dough by hand, stir in the 2 cups of flour using a wooden spoon and then knead the dough on a floured countertop for 6 minutes.) Add more flour, tablespoon by tablespoon, if the dough is too sticky. The dough should remove easily from the sides of the bowl, or be stretchy and tacky yet smooth if you’re kneading it by hand.
Transfer the dough to a large, well-greased mixing bowl, cover with plastic wrap, and let it rest in a warm, draft-free place for 1 hour, or until it has doubled in size.
Turn out the dough onto a lightly floured surface and pat into a rough, flat square, about ½ inch thick. Using a pastry cutter or knife, cut the dough into small pieces, about 1 inch in size, and roll each one in the palm of your hands to form a smooth ball.
TO MAKE THE CARAMEL COATING
Combine the sugar and cinnamon in a medium bowl. Have the melted butter ready in a separate bowl. Dunk each ball of dough into melted butter, then roll it in the cinnamon-sugar mixture until coated evenly.
Layer the balls in a well-greased Bundt pan, staggering the rows as you build. Cover the pan tightly with plastic wrap and set it in a warm, dry place for 1 hour until doubled in size, or refrigerate it overnight then bring to room temperature and let it rise until doubled in size.
TO PREPARE THE BOURBON CRÈME ANGLAISE
Heat the cream in a heavy saucepan over medium-low heat until a ring of bubbles begins to form around the edges. In a separate bowl, whisk together the milk, eggs, sugar, and salt.
Pour about ¼ of the hot cream into the egg mixture, whisking vigorously to prevent the eggs from scrambling. Slowly pour the warmed egg mixture into the remaining cream in the saucepan, whisking constantly. Cook over medium-low heat, stirring constantly, until the sauce thickens and coats the back of a wooden spoon (about 10 minutes).
Whisk in the vanilla and bourbon. Strain the sauce through a fine mesh sieve and chill, covered, until ready to serve.
Preheat the oven to 350°F. Remove the plastic wrap from the Bundt pan and bake the monkey bread for 30 to 35 minutes, until the top is a deep golden brown and the caramel is bubbling. Cool the bread in the pan for 5 minutes, then turn it out onto a serving platter. Serve immediately with bourbon crème anglaise dipping sauce.
BAKED CHIPS, TOMATILLO SALSA, AND GUACAMOLE
SERVES 4 TO 6
Put out homemade tortilla chips, guacamole, and salsa and we promise, guests will swoon. Perhaps nowhere else does the value of homemade offerings shine through more than with chips and dips. Do a side-by-side comparison with the store-bought stuff and see for yourself. This salsa’s unique flavor comes from the smoky chipotle pepper. If you are unable to find chipotle, try dried ancho, guajillo, or pasilla chiles. A comal is a round, flat, griddle much like a cast-iron griddle, and a molcajete is a type of Mexican mortar and pestle, so if you don’t have these traditional Mexican kitchen tools, you can toast your chilies on a griddle and mash your guacamole using a mortar and pestle, or a bowl and a fork.
Oven-Baked Tortilla Chips
MAKES 60 CHIPS
10 6-inch corn tortillas (fresh and handmade, if possible)
2 tablespoons neutral vegetable oil, such as grapeseed oil
1 teaspoon flaked sea salt
Preheat the oven to 350°F.
Brush both sides of each tortilla with oil. Make two stacks of five tortillas. Using a large, sharp knife, cut the first tortilla stack in half using one firm chop, if possible. Cut each of the halves in thirds, forming 6 stacks of 5 wedges. Repeat with the second stack of 5 whole tortillas.
Arrange the tortilla wedges in a single layer on two half sheet pans (18 × 13 inches). Sprinkle salt evenly over the tortilla wedges.
Place the trays in the oven and bake the tortilla chips until they are golden brown and crisp, about 12 to 15 minutes, rotating the pans after 7 minutes. The chips will still be slightly flexible in the middle, but will crisp further as they cool.
Remove the trays from the oven and let cool slightly. As they cool, the tortilla chips will continue to crisp all the way through. Test one and if it isn’t as crisp as you would like, return the trays to the oven for another 2 or 3 minutes.
Once the tortilla chips are fairly cool, remove them from the tray and serve. Store in an airtight plastic bag or container if you won’t be eating them right away. Homemade tortilla chips are especially susceptible to getting stale, so be sure to bag them up as soon as possible.
The tortilla chips can be stored at room temperature in an airtight container for up to 5 days.
MAKES 1 CUP
1 pound tomatillos (10 to 12), husked and rinsed
½ yellow onion, quartered
4 dried chipotle chilies, stemmed
10 to 12 garlic cloves, peeled
1 teaspoon kosher salt
Position the broiler rack about 8 inches from the heat source and set the oven to broil. Line a baking sheet with foil.
Arrange the tomatillos and onion wedges on the pan and roast, turning them over once halfway through, for 20 to 30 minutes, until their tops and bottoms have blackened and the tomatillos are a khaki-green color. Remove the pan from the oven and cool the vegetables to room temperature.
Meanwhile, heat a comal, griddle, or heavy skillet over medium-low heat and toast the chilies and roast the garlic on the comal until the chipotle peppers have puffed up and are blistered in spots, 3 to 5 minutes. Remove the peppers and continue roasting the garlic cloves for 8 to 10 minutes, turning them over frequently, until they are tender and golden brown with some blackened spots.
Blend the roasted tomatillos, onions, chilies, garlic, and salt in a blender or food processor until smooth.
The salsa will keep in the refrigerator, covered tightly, for up to 5 days.
MAKES 1½ TO 2 CUPS
3 ripe avocados
¼ cup finely chopped red onion (about ½ an onion)
½ jalapeño pepper, minced (more or less, to taste)
¼ cup chopped cilantro leaves and upper stems
Pinch of flaked sea salt, or to taste
Juice of 1 lime (about 1½ to 2 tablespoons)
Cut the avocados in half and remove the pit. Spoon the flesh of the avocados into a molcajete, a Mexican mortar and pestle, or a mixing bowl. Add the onion, jalapeño, cilantro, and salt and combine. Add the lime juice and stir gently, so as not to crush the ingredients too aggressively. The guacamole will be slightly chunky.
Serve immediately, or place one of the avocado pits in the mixture, cover the container tightly with plastic wrap pressed directly on the surface of the guacamole, and store in the refrigerator for up to 2 days. To serve, add a squirt of lime and stir.
POTATO CHIPS TWO WAYS: DEEP-FRIED AND BAKED
Everyone should try frying their own potato chips at least once in their life. Transforming raw potatoes into actual, honest-to-goodness potato chips feels like nothing short of a culinary miracle. Don’t be intimidated by the idea of heating a pot of oil on your stove—you actually need only about an inch of oil to make potato chips, and an instant read thermometer will help you keep track of the temperature. Do it. It’s worth it.
That said, the baked potato chip also deserves some love. Brushed with olive oil and sprinkled with salt, the thin slices of potatoes become crisp and very snackable in the heat of the oven. Baked chips have a more toasted flavor than their deep-fried cousins, but they perform just as well when scooping up dip at a party.
Deep-Fried Potato Chips
SERVES 4 TO 6
1 to 2 large russet or yellow potatoes (about 6 ounces each)
Peanut oil or any cooking oil with a smoke point higher than 375°F
Coarse kosher salt
Scrub the potatoes clean and slice them into 1/ 16- to ⅛-inch-thick rounds on a mandoline. Place them in a bowl and cover with cold water. Drain and refill the bowl several times until the water is clear of starch. Lay the slices in a single layer on a clean dishcloth and pat them completely dry with a second dishcloth.
Preheat the oven to 200°F. Line a large baking sheet with paper towels and set aside.
Set a large skillet over medium-high heat and fill it with about an inch of oil. Heat the oil to 350°F, checking the temperature frequently with an instant read thermometer.
When the oil is hot, lower slices of potatoes into the hot oil in a single layer. Use two metal dinner forks to flip the slices occasionally. Fry the slices until they just start to turn golden brown and the edges begin to curl, roughly 2 to 5 minutes. The slices will cook at different rates depending on size, thickness, moisture content, and potato variety; as they finish cooking, simply lift the cooked potatoes from the oil with your forks and set them aside on the prepared baking sheet. Sprinkle the fried chips with salt while they’re still warm.
Allow the oil to come back up to temperature between batches and repeat until all the chips are cooked. Monitor the temperature with your thermometer and lower the heat if the oil starts to become too hot (the temperature will dip when you first add the potatoes). Remove the pan from heat if you see or smell smoke at any time.
When finished, let the oil cool, then strain it to remove any food particles, and use a funnel to pour it back into a storage container. Frying oil can be reused a few times; strain out any debris before reusing, and discard it once it turns dark or smells off.
Fried potato chips are best eaten the same day, but will last in an airtight container for up to a week.
SERVES 4 TO 6
1 to 2 large russet or yellow potatoes (about 6 ounces each)
½ cup olive oil
Kosher salt
Heat the oven to 450°F. Arrange two racks in the oven, spaced evenly apart, dividing the oven into thirds. Line several dinner plates with paper towels and set them near the oven.
Scrub the potatoes clean and slice them into 1/16- to ⅛-inch-thick rounds on a mandoline. Place them in a bowl and cover with cold water. Drain and refill the bowl several times until the water is clear of starch. Lay the slices in a single layer on a clean dishcloth and pat them completely dry with a second dishcloth.
Line two baking sheets with parchment and brush the parchment with olive oil. Arrange the potato slices in a single layer in the pan. Do not let the chips touch or overlap or they will stick while baking; bake in batches if necessary. Brush the tops of the chips with olive oil and sprinkle evenly with salt.
Bake for 10 minutes. Flip the potato slices and rotate the pans in the oven. Reduce the oven temperature to 350°F, and bake for another 5 minutes. Flip the chips and rotate the pans again. Remove any chips that have turned golden brown and place them on the prepared dinner plates. Sprinkle the chips with a second dose of salt while they are still warm from the oven.
Continue baking and flipping the chips every 5 minutes, removing the potatoes that are done, until all the chips have finished baking. This will take 15 to 20 minutes total for thinner chips and 20 to 25 minutes total for thicker chips. Repeat with any remaining potato slices.
Baked chips are best eaten within a day or two but will keep in an airtight container for up to a week.
Cheese Savories and Seeded Semolina Crackers
CHEESE SAVORIES
MAKES ABOUT 80 CRACKERS
Homemade crackers come together quickly in the food processor and can be made days ahead, so when it’s time to serve the crackers, all you need to do is bake them for 15 minutes. These cookie-like crackers are the perfect partner to your cheese plate, or you can stuff a handful in your pocket for an afternoon hike.
½ cup almond flour (almond meal)
1¼ cups unbleached all-purpose flour
1¼ teaspoons kosher salt
¾ teaspoon freshly ground black pepper
4 tablespoons (½ stick) cold unsalted butter
1½ cups Gruyère cheese, grated (about 6 ounces)
1 large egg, at room temperature
2 tablespoons heavy cream
Flaked sea salt
In a food processor fitted with the metal blade, pulse the flours, kosher salt, and pepper. Add the butter and cheese; pulse until fully blended. Add the egg and cream and blend for about 20 seconds, until ingredients are fully mixed, evenly moist, and form a cohesive ball.
Divide the dough in half. Using plastic wrap, form each half into a log, about 5 inches long and 1½ inches wide. Freeze the logs for 45 minutes to an hour, or until thoroughly chilled. The logs of dough will keep frozen for up to two months. Thaw the dough slightly before slicing.
Preheat the oven to 375°F. Line a baking sheet with parchment paper.
Using a sharp knife and even, downward pressure, slice the dough into circles, about ⅛ inch thick. If the dough breaks when you try to slice it, let it warm up a bit more. Turn the log one quarter turn after each cut so that it keeps its shape. Place the cut circles on the baking sheet. Using a pastry brush, lightly brush each circle with water and sprinkle with sea salt.
Bake for 15 to 18 minutes, until crisp and golden around the edges. Remove the pan from the oven, let the crackers cool for a minute in the pan, then transfer them to cool completely on a wire rack. The crackers will keep in an airtight container for up to 4 days.
SEEDED SEMOLINA CRACKERS
MAKES ABOUT 3 DOZEN CRACKERS
Making your own crackers isn’t about saving the $2 or $8 or whatever it is that you might spend on them. Take a little time and find out how much pleasure you can find in an evening spent with some dough, a rolling pin, and some seeds. Learn the method and then elaborate; swap out the seeds for chopped rosemary and freshly grated Parmesan cheese, or go for the cracker version of an everything bagel and add dried onion and garlic flakes.
2 teaspoons sesame seeds
2 teaspoons poppy seeds
1 teaspoons fennel seeds
½ teaspoon flaked sea salt
1 cup semolina flour or unbleached all-purpose flour, plus more for rolling
⅓ cup whole-wheat flour
1 teaspoon sugar
1 teaspoon kosher salt
2 tablespoons extra-virgin olive oil
¼ cup water, plus more for brushing
Position a rack in the lower third of the oven and preheat the oven to 450°F. Lightly flour two baking sheets.
In a small bowl, combine the sesame seeds, poppy seeds, fennel seeds, and sea salt. Fill a separate small bowl with water.
In a large bowl, whisk the semolina flour, whole-wheat flour, sugar, and kosher salt. Add the olive oil and ¼ cup water to the flour mixture and stir gently until a soft ball of dough forms. If needed, add more water 1 tablespoon at a time to reach the desired consistency.
Set the dough on a lightly floured work surface and divide it in half. Pat each half into a square. Set one square aside and cover with a clean, slightly damp towel. Using a rolling pin, roll out the first square of dough on the floured surface into a rectangle about 1/16 inch thick.
With a pastry brush, brush the dough lightly with water and sprinkle half of the seed mix evenly over the surface. With a dough scraper, pizza cutter, or sharp knife, cut the dough into 1 × 2-inch rectangles, or any shape you wish.
Using a metal spatula, transfer enough crackers to fill one of the prepared baking sheets, leaving ½ inch of space in between. Poke each cracker with the tines of a fork to prevent puffing. Repeat with the remaining dough. Bake the crackers for 10 to 12 minutes, until they are nicely browned.
Transfer the crackers onto a cooling rack and let the crackers cool completely. They will crisp up as they cool. Store the cooled crackers in a zippered plastic bag or other tightly sealed container. The crackers will keep for up to a week at room temperature.
Quick Sweet and Spicy Pickles
QUICK SWEET AND SPICY PICKLES
MAKES TWO 1-PINT JARS
These pickles come together quickly and are a great thing to stash in the fridge for a week’s worth of snacks or to put out at a party. For the brine, it really depends on what flavors you like and how sweet you like your pickle juice. Sara Kate has fond memories of her grandparents always having bread and butter pickles in their fridge. In this recipe, we trigger that memory, but turn down the sweetness just a bit and add some spice.
1 pound kirby cucumbers, sliced into ¼-inch-thick rounds (about 4 cups)
½ large yellow onion, thinly sliced (about 1 cup)
2 garlic cloves, minced
2 tablespoons kosher salt
1¼ cups cider vinegar
⅓ cup sugar
2 teaspoons whole mustard seeds
1 teaspoon ground turmeric
½ teaspoon crushed red pepper flakes
½ teaspoon celery seeds
Pinch teaspoon ground cloves
In a large bowl, mix together the cucumbers, onion, garlic, and salt. Lay plastic wrap over the surface of the vegetables and weigh them down with another bowl (preferably a heavier or weighted bowl). Let them rest for approximately 3 hours and then drain off the liquid.
In a large saucepan, combine the vinegar, sugar, mustard seeds, turmeric, crushed red pepper flakes, celery seeds, and ground cloves. Bring the mixture to a boil.
Stir the drained cucumber mixture into the boiling vinegar mixture. Remove the pan from the heat. Using a slotted spoon, transfer the pickles to sterile containers, and then divide the remaining liquid among the containers. Seal and chill in the refrigerator.
The pickles will keep in the refrigerator in a tightly sealed container for 2 weeks.
The Essential Kale Chip
THE ESSENTIAL KALE CHIP
SERVES 4 TO 6 AS A SNACK
Sara Kate once joked on The Kitchn that making a batch of kale chips meant she could consume an entire bunch of kale in one sitting. It’s true. These chips are the perfect snack to serve while dinner is on the stove, or to get you through a movie marathon. Experiment with different oils such as sesame and coconut, or just go with olive oil and a simple sprinkle of sea salt. These days it is easy to find many varieties of kale, such as lacinato (dinosaur kale), curly, and Red Russian. We prefer lacinato because of its more uniform texture, but all varieties will be delicious!
1 bunch (about 8 ounces) kale
2 to 3 tablespoons sesame oil, coconut oil (liquefied), or other flavored oils
Sea salt, to taste
Preheat the oven to 275°F. Rinse and dry the kale, then remove the stems and tough center ribs. Cut the leaves into large bite-size pieces, toss them in a bowl with 2 tablespoons of oil, and rub the oil into the leaves. If, after you toss it well, the kale still seems dry in spots, add another tablespoon of oil and massage it into the leaves. Sprinkle the kale with salt.
Arrange the leaves in a single layer on a large baking sheet or two 9 × 13-inch sheets. The baking time can vary widely depending on the variety of kale, the size of the spine, the moisture level, and the size of the chips, but in general, bake the chips for 15 to 20 minutes, or until crisp but not browned. Place the baking sheet on a rack to cool. Serve within one day.
BABA GHANOUSH (SMOKY EGGPLANT DIP)
MAKES 1 TO 1½ CUPS
Baba ghanoush was Faith’s gateway eggplant dish—the first thing that really showed her how silky and delicious eggplant can be. This creamy (yet vegan!) dip is made from eggplant that is roasted until very soft and charred. The more roasted the eggplant, the smokier (and tastier) the dip will be. Try grilling it over a medium flame on a covered grill. Baba ghanoush is also delicious in pita wraps with fresh vegetables, or in a grilled cheese sandwich made with fresh mozzarella and basil.
1 large eggplant (1¼ to 1½ pounds)
Extra-virgin olive oil
Kosher salt
2 garlic cloves, smashed
Juice of 1 lemon (about 3 tablespoons)
¼ cup tahini
Freshly ground black pepper
Ground sumac, for garnish
Preheat the oven to 425ºF. Cut the eggplant in half lengthwise. Rub the cut side lightly with olive oil and sprinkle generously with kosher salt. Roast, cut side up, for 50 to 60 minutes, or until very soft and blackened around the edges. The eggplant halves will be puffy and expanded but will collapse as they cool. Let the eggplant cool for 1 hour.
Scoop the flesh from the skin, place it in a colander, and press out and drain any juice. Discard the skin. Transfer the eggplant to a mortar or food processor. Add the garlic, lemon juice, tahini, and black pepper and blend thoroughly until very smooth. Taste and add additional olive oil, lemon juice, salt, and pepper as needed.
Refrigerate for at least 1 hour to let the flavors blend. Before serving, dust lightly with ground sumac. Serve with warm pita bread, baked pita chips, or chopped raw vegetables.
Refrigerate any leftovers in a covered container for up to 5 days.
WHITE BEAN DIP WITH FIG, WALNUT, AND OLIVE TAPENADE
SERVES 6
This recipe is a bargain, a two-for-one: white bean dip and tapenade, together. Make just one or both. We’re partial to layering them in one serving dish, which lets you scoop up a bite of the juicy sweet and salty tapenade together with a swirl of creamy beans.
Creamy White Bean Dip with Garlic
MAKES 1 CUP
1 15.5-ounce can Great Northern beans, drained
¼ cup slivered raw almonds
Zest of 1 lemon
1 large garlic clove, peeled and smashed
1 tablespoon capers
¼ to ½ teaspoon salt
⅓ cup extra-virgin olive oil
Roughly blend the beans, almonds, lemon zest, garlic, capers, and ¼ teaspoon salt in short bursts in a small food processor. (You can mash the ingredients together in a food mill, mortar and pestle, or a blender, but a food processor will give the best results.) With the food processor running, or while mashing the dip vigorously with one hand, slowly drizzle in the olive oil until it is thoroughly mixed in and the dip is mostly smooth. Taste and add more salt if desired.
Serve immediately, spread in a wide shallow bowl and topped with tapenade, or refrigerate. The dip will last for up to 3 days in a covered container in the refrigerator.
Fig, Walnut, and Olive Tapenade
MAKES ¾ CUP
¼ cup dried figs, stemmed
¼ cup pitted green olives, drained
¼ cup pitted kalamata olives, drained
¼ cup raw walnuts
1 tablespoon capers, drained
2 tablespoons extra-virgin olive oil
1 tablespoon balsamic vinegar
Salt and freshly ground black pepper
Red pepper flakes (optional)
Leaves of 2 sprigs fresh thyme, for garnish
Pulse the figs, olives, walnuts, and capers briefly in a small food processor or chopper (or finely chop by hand). Add the olive oil, vinegar, a sprinkle of salt and pepper, and a pinch of red pepper flakes (if desired). Pulse just until mixed and finely chopped, but not yet a paste.
This tapenade is best when refrigerated for at least an hour before serving, to let the flavors meld. Refrigerate it until your're ready to serve or spread immediately on top of the creamy white bean dip in a wide, shallow bowl, garnished with thyme. Tapenade and bean dip can be refrigerated together in a covered container for up to 2 days.
ROASTED GARLIC AND LEMON HUMMUS
MAKES ABOUT 2½ CUPS
If there’s one thing to start making at home instead of buying it at the store, it’s hummus. It’s incredibly easy to make, and it tastes far better than the grocery-store version. This recipe takes a little extra time because of roasting the garlic, but it’s worth the effort. Make a double batch to keep in the fridge all week or as a please-all appetizer (it’s vegan, lactose-free, and gluten-free!) for a party.
8 large garlic cloves, peel intact
3 tablespoons extra-virgin olive oil, plus more for garnish
1 15-ounce can chickpeas
¼ cup tahini
¼ cup freshly squeezed lemon juice (from 1 to 1½ lemons)
½ teaspoon salt
¼ teaspoon paprika, plus more for garnish
⅛ teaspoon ground cumin
Preheat the oven to 400°F.
In a small bowl, toss the garlic cloves with 1 tablespoon of the olive oil. Place the garlic in a piece of foil and loosely seal. Roast for 30 minutes or until the garlic is soft. Allow the garlic to cool then squeeze the pulp out of the skins into a small bowl.
Drain and rinse the chickpeas thoroughly.
Place the remaining olive oil, roasted garlic pulp, chickpeas, tahini, lemon juice, salt, paprika, and cumin in a food processor or blender and puree until very smooth. Add more lemon juice or some warm water if the hummus is too stiff.
Serve in a bowl, garnished with a drizzle of olive oil and a sprinkle of paprika. The hummus will keep in a tightly sealed container in the refrigerator for up to 5 days.
Roasted Chickpeas with Dukkah
ROASTED CHICKPEAS WITH DUKKAH
MAKES ABOUT 1¼ CUPS
When you want to sneak something with more protein onto the snack table, mine the secret snack power of chickpeas. When you roast garbanzo beans in the oven, they morph into crunchy, toasty little nuggets, like popcorn or wasabi peas—tiny and easy to eat by the handful. Flavor them in any way you like; we like our roasted chickpeas simply seasoned with olive oil and salt, or tossed with aromatic spice mixes such as garam masala. Here we offer them with a healthy shake of dukkah (DOO-kah), the Egyptian blend of nuts and spices that is practically a snack in its own right (try it sprinkled on dips, homemade pita chips, flatbreads, and meat).
2 15-ounce cans chickpeas
2 tablespoons extra-virgin olive oil
½ cup dukkah
1 teaspoon flaked sea salt, or to taste
Rinse and drain the chickpeas and dry them thoroughly in a salad spinner. Or spread them in a single layer in a baking dish and air-dry them overnight in a cold oven. The drier the chickpeas, the more effective the roasting process will be.
Preheat the oven to 425°F. Spread the chickpeas in a single layer on a large rimmed baking sheet. Roast for 10 minutes and then stir. Roast for an additional 10 minutes and check for doneness. The chickpeas will not completely crisp while warm; they will be firm on the outside but still a little soft inside. Don’t let them turn dark brown, which means they have scorched.
Remove the chickpeas from the oven and toss them with the olive oil, dukkah, and salt in a large bowl. Return them to the baking sheet and bake for an additional 5 minutes, then remove them from the oven and let them cool for 15 minutes. Serve warm, or let them cool completely and store them in an airtight container. The roasted chickpeas are best served within 3 days, but they can be stored for up to 2 weeks.
Dukkah (Egyptian Nut and Spice Blend)
MAKES ABOUT ½ CUP
¼ cup toasted nuts, such as almonds or hazelnuts
2 tablespoons toasted sesame seeds
2 tablespoons toasted coriander seeds
1 tablespoon toasted cumin seeds
½ teaspoon sea salt
Freshly ground black pepper
Combine all ingredients in a food processor and pulse briefly, or grind together in a food chopper or mortar and pestle. Grind until the mixture is coarsely chopped but stop before it becomes a paste.
Store in an airtight container in the refrigerator for up to 2 weeks.
Sriracha-Honey Popcorn Clusters
SRIRACHA-HONEY POPCORN CLUSTERS
MAKES 10 TO 16 CUPS DEPENDING ON VARIETY; SERVES 8 TO 12
Party appetizer? Afternoon snack? Clandestine midnight nibble? All we know is that when a batch of this crunchy spicy-sweet popcorn is around, we’re completely unable to stop eating it. There’s just enough spice that you don’t notice it until you’re about two handfuls in, but even then, the slow and steady burn is the perfect counterpoint to the sweetness of the honey. Other hot sauces also work well in this recipe, although Sriracha’s tangy heat makes it our pick here (not to mention a cult favorite). For a spiced-up version of Cracker Jacks, throw in a few handfuls of cashews or peanuts.
½ cup unpopped corn kernels
1 tablespoon vegetable oil
¾ cup (1½ sticks) unsalted butter
¾ cup honey
2 to 3 tablespoons Sriracha hot sauce
1 teaspoon kosher salt
1 teaspoon pure vanilla extract
¼ teaspoon baking soda
Preheat the oven to 250°F. Line two baking sheets with parchment or aluminum foil and set aside.
Warm 3 corn kernels and the oil in a 4-quart or larger heavy pot over medium heat. When the kernels pop, add the rest of the corn kernels to the pan, shake to coat with oil, and put a lid on the pot. Pop the corn, shaking the pan occasionally, until the popping slows. Empty the popped corn immediately into a large heatproof bowl.
Melt the butter in a 2-quart saucepan over medium heat. Add the honey and increase the heat to medium-high. Bring to a rolling boil and cook for 4 minutes, stirring constantly as the mixture foams. Remove the pan from the heat.
Add the Sriracha (2 tablespoons for mild; 3 tablespoons for spicy), salt, vanilla, and baking soda to the pan of honey-butter sauce. Stir to combine; the syrup will bubble and foam. Pour the hot syrup over the popcorn immediately, stirring the popcorn as you slowly pour. Once you’ve poured all the syrup over the popcorn, continue stirring until the popcorn is evenly coated.
Divide the popcorn between the baking sheets and spread into an even layer. Place the baking sheets in the oven. Bake for one hour, stirring the popcorn every 15 minutes. The finished popcorn will be a slightly darker shade, and will turn dry and crunchy once completely cooled.
Wait a few minutes until the popcorn is cool enough to handle and then quickly press the popcorn into clusters with your hands. If the popcorn cools too much and won’t stick, put the pan back in the oven for a few minutes until the popcorn is warm again. Let the clusters cool completely. (The popcorn can also be cooled as is, without clustering, and eaten by the handful like regular popcorn.)
These popcorn clusters are best eaten within a day or two but will keep well in a sealed container at room temperature for up to a week.
Smoked Salmon Deviled Eggs with Crispy Capers
SMOKED SALMON DEVILED EGGS WITH CRISPY CAPERS
MAKES 2 DOZEN
Deviled eggs may seem like a 1950s housewife convention, but the fact is everybody loves them, so you may as well learn how to make them. Whether it’s your first time or you’re already an expert, try this fresh combination of flavors. This recipe features everything that’s good about an egg bagel with smoked salmon and capers, and you won’t have to fill up on bread. If medium eggs aren’t available, go for the standard large size. The advantage with the medium eggs is that they’re easier to get down in one gulp.
12 medium eggs
1 tablespoon olive oil
2 tablespoons drained and roughly chopped capers, patted dry
2 ounces sliced smoked salmon, chopped very fine (about ½ cup)
⅓ cup plus 2 tablespoons crème fraîche or sour cream
1 tablespoon Dijon mustard
1 tablespoon freshly squeezed lemon juice (from about ½ lemon)
½ teaspoon freshly grated lemon zest
¼ teaspoon freshly ground black pepper
Pinch of fine sea salt
1 teaspoon chopped fresh flat-leaf parsley, for garnish
Hard-boil the eggs (see Tip). Peel each egg and slice it in half lengthwise.
Heat a small skillet over medium heat and add the olive oil. Add the capers and fry until crispy, about 2 minutes. Remove the capers from the pan and drain on paper towels.
Scoop out the egg yolks and place them in a mixing bowl. Add all of the salmon but 2 tablespoons, and also add the crème fraîche, mustard, lemon juice, lemon zest, pepper, and salt. Mash the yolks with a fork, and spoon the mixture back into the egg whites.
Top each egg with some fried capers, a pinch of chopped parsley, and a few pieces of the remaining salmon.
Tip from The Kitchn
The fresher the egg, the harder it is to peel. Try to plan for hard-boiled eggs well in advance. We like to use eggs that are at least a week old.
THREE TUSCAN CROSTINI
EACH VARIATION SERVES 8 TO 10
It goes without saying that you can slather just about anything on a little piece of toasted baguette, but a few Italian toppings wouldn’t hurt. Here are a few crostini toppings we have cobbled together from our various trips to the heart of Italy. Start with a fresh baguette and toast it just barely with a smear of olive oil. Then pick the freshest ingredients for the toppings. A platter of these three crostini will more than wow your dinner guests.
FOR THE CROSTINI
1 small (14- to 16-inch-long) baguette, cut crosswise into ½-inch-thick slices
Olive oil
Preheat the oven to 375°F.
Brush the baguette slices with olive oil. Arrange on a rimmed baking sheet. Toast in the oven until golden, about 7 minutes. Cool. At this point the crostini are ready for the toppings that follow. (The crostini can be prepared a day ahead and stored in an airtight container at room temperature.)
Mushrooms with Thyme and Ricotta
MAKES 1 CUP; TO TOP ABOUT 24 CROSTINI
1 tablespoon olive oil
2 shallots, finely chopped (about ¼ cup)
½ teaspoon salt, plus more to taste
8 ounces mixed wild mushrooms, chopped fine (about 3 cups)
2 garlic cloves, minced
1 teaspoon chopped fresh thyme
½ teaspoon freshly grated lemon zest
Freshly ground black pepper
1 cup ricotta cheese
Chopped fresh flat-leaf parsley, for garnish
Heat the oil in a large skillet over medium-high heat. Add the shallots and salt; sauté for 1 minute. Add the mushrooms; sauté until they begin to brown, about 6 minutes. Stir in the garlic; sauté for 1 minute. Remove from the heat. Stir in the thyme and lemon zest. Season with additional salt and pepper to taste. Cool. Can be made 2 days ahead of time. Cover and refrigerate.
To serve, spread a spoonful of ricotta on each crostini, top with a spoonful of mushrooms, and garnish with parsley. Serve.
Olive Tapenade with Orange Zest
MAKES ABOUT 1 CUP; TO TOP ABOUT 24 CROSTINI
8 ounces pitted kalamata olives, drained, halved, and rinsed
1 anchovy fillet
1 garlic clove, minced
2 tablespoons finely chopped toasted pine nuts
2 tablespoons chopped fresh flat-leaf parsley leaves
1 tablespoon freshly squeezed lemon juice (from about ½ lemon)
1 tablespoon extra-virgin olive oil
1 tablespoon orange zest
Freshly ground black pepper to taste
Place all ingredients in a food processor. Pulse several times until the mixture is combined and the olives appear very finely minced, but the mixture is not blended into a paste. To serve, smear on crostini rounds. The tapenade will keep well in the refrigerator for up to 5 days.
Fig, Mint, and Prosciutto
MAKES ABOUT 1 CUP, TO TOP ABOUT 24 CROSTINI
12 slices prosciutto, sliced in half crosswise (about ½ pound)
12 ripe figs, halved
2 tablespoons balsamic vinegar
3 tablespoons fresh mint leaves, cut in chiffonade
2 tablespoons flaked sea salt
Arrange a piece of prosciutto on each crostini so that the meat doesn’t hang over. Place a smashed fig half on top. Top with a few drops of balsamic vinegar, a small pinch of mint, and a few flakes of sea salt. Serve immediately.
CHICKEN LIVER PÂTÉ WITH SAGE, APPLE, AND THYME
MAKES ABOUT 2½ CUPS
We are always on the lookout for make-ahead appetizers that are a little different from the usual spread of cheeses, meats, and crudités. Chicken liver pâté doesn’t enjoy the popularity it had when Julia Child was culinary queen, but this elegant yet economical hors d’oeuvre is due for a comeback. In this recipe, our editor Anjali Prasertong cooks apple, shallots, fresh herbs, and brandy with the lowly liver, transforming it into an umami-rich spread that can be made up to one week ahead and will tempt even the most liver-hesitant to reach for more.
1 pound chicken livers
6 tablespoons unsalted butter, at room temperature
2 slices bacon, chopped
1 cup chopped shallots (about 4 shallots)
1 garlic clove, chopped
1 large Granny Smith apple, peeled, cored, and chopped into ½-inch cubes
1 tablespoon chopped fresh sage leaves
1½ teaspoons fresh thyme leaves
¼ cup apple brandy or bourbon
1 teaspoon salt
Freshly ground black pepper to taste
2 tablespoons to ¼ cup clarified butter, melted (optional)
Fresh thyme and sage sprigs (optional)
Sliced baguette, crackers, or mini toasts, for serving
Trim the livers of any excess fat and tough connective tissue; set aside.
In a large skillet over medium heat, melt 2 tablespoons of the butter. Add the bacon and cook, stirring occasionally, until the edges are just beginning to brown. Add the shallots and garlic and cook, stirring occasionally, until the shallots are soft and browning at the edges. Add the livers, apple, sage, and thyme and cook, stirring occasionally, until the livers are just barely pink inside when cut and the apple pieces are soft.
Transfer the liver mixture to the bowl of a food processor. Pour the brandy into the skillet and bring to a boil over low heat, while scraping up the browned bits from the bottom of the pan. Boil for about 1 minute to reduce slightly, and then pour over the liver mixture. Add the salt. Process until the mixture is very smooth, scraping down the sides of the bowl as needed.
Transfer the mixture to a bowl and mix thoroughly with the remaining 4 tablespoons of softened butter. Add pepper to taste. Pack into small ramekins or jars and smooth the top of the pâté with a spatula or knife. Cover with plastic wrap, pressing the wrap against the surface of the pâté.
For longer storage, pour in enough clarified butter to cover the top of the pâté in each ramekin or jar and add a decorative herb sprig. Chill until the butter is firm and cover with another thin layer of melted clarified butter, then cover with plastic wrap or a lid. For the best flavor, refrigerate at least overnight before serving.
To serve, let the pâté soften at room temperature for about 30 minutes and set out some crackers or baguette slices. Pâté will keep refrigerated for up to 1 week, or up to 2 weeks if sealed with clarified butter.
Clarified Butter
MAKES ABOUT ¼ CUP
6 tablespoons unsalted butter
Melt the butter in a heavy saucepan over very low heat. Simmer it gently until the foam rises to the top. Once the foam stops rising to the surface, after about 5 to 8 minutes, remove the pan from the heat and skim off the foam with a spoon. (Don’t worry about skimming every last bit of foam; the remaining foam can be strained later.) You may notice some solids at the bottom of the pan.
Place a strainer over a heatproof bowl and line the strainer with cheesecloth or a coffee filter. Carefully pour the warm butter through the cheesecloth-lined strainer and into the bowl, leaving any solids in the bottom of the pan.
Once the butter has cooled a bit, pour it into a jar. Clarified butter will keep for up to 3 months in the refrigerator or 6 months in the freezer.
THREE-CHEESE TOMATO TART
SERVES 6 TO 8
Here’s a simple summer recipe that comes together in a snap. Puff pastry makes a delicious base for summer’s gorgeous garden gems. Try using a variety of tomatoes, such as dark and striped heirlooms, or a mixture of cherry tomatoes such as Sungolds and grape tomatoes.
1 sheet frozen puff pastry, slightly softened
2 medium tomatoes or 1 pint cherry tomatoes, cut into ¼-inch slices
½ cup shredded fontina cheese
½ cup goat cheese
Flaked sea salt and freshly ground black pepper
Freshly grated Parmesan cheese, to taste
1 teaspoon freshly grated lemon zest
2 tablespoons finely chopped fresh basil
Preheat the oven to 425°F. Line a rectangular baking sheet with parchment paper.
Unfold the puff pastry onto the baking sheet, pinching any holes in the seams closed. Using a fork, prick the dough all over to prevent it from puffing up during baking. Return it to the refrigerator.
Lay out the tomato slices on a large sheet of paper towel. Cover with more paper towels and allow to drain for approximately 30 minutes (this is crucial to avoiding a watery tart).
Remove the pastry from the refrigerator and sprinkle it evenly with shredded fontina and small spoonfuls of goat cheese. Arrange the tomato slices over the cheese. Season generously with salt and pepper. Sprinkle a generous amount of Parmesan cheese on top and distribute the lemon zest over the tart.
Bake for 20 to 25 minutes, until the pastry is golden brown and the cheese is melted. Remove the pastry from the baking sheet and let it cool on a wire rack for 5 minutes. Garnish with basil.
Cut into desired square or rectangle pieces and serve immediately.
Baked Brie with Blackberries and Sage
BAKED BRIE WITH BLACKBERRIES AND SAGE
SERVES 4
We like appetizers that draw guests into the kitchen, around a delicious plate of food meant to be shared. Baked Brie is such a dish: a crowd-pleasing starter that never fails to prompt requests for the recipe. The secret is that it couldn’t be easier; it’s just a wheel of cheese baked until it’s hot and gooey, with a heap of sweet fruit on top.
8 ounces fresh blackberries (about 1½ cups)
8 small fresh sage leaves, finely chopped (about 1 tablespoon)
3 tablespoons (packed) dark brown sugar
1 8-ounce wheel Brie cheese
Freshly ground black pepper
Preheat the oven to 450°F. Toss the blackberries, sage, and brown sugar in a shallow pie plate. Roast for 10 minutes, or until the blackberries are soft and the juices are bubbling.
Meanwhile, slice away the very top of the Brie wheel, removing just the rind. Place the Brie in a small ovenproof dish or another pie plate. Spoon the hot blackberries on top of the Brie, and pour the syrup over it. Bake for 8 to 12 minutes, or until the Brie is very hot and soft but has not collapsed.
Remove from the oven; season with black pepper. If desired, carefully use a broad spatula to move the Brie from the baking dish to a plate. Serve immediately with rye or whole-wheat crackers.
Bacon-Wrapped Potato Bites with Spicy Sour Cream Dipping Sauce
BACON-WRAPPED POTATO BITES WITH SPICY SOUR CREAM DIPPING SAUCE
MAKES ABOUT 3 DOZEN
This recipe falls into the category of knock-it-out-of-the-park crowd pleaser! Elizabeth Passarella’s Bacon-Wrapped Potato Bites have enjoyed massive popularity—especially during football tailgating season. These hot, tender potatoes wrapped in crispy bacon can make a casual appetizer spread more robust and filling. Once you’ve mastered the recipe, try using other firm and colorful vegetables, such as sweet potatoes and butternut squash.
1 pound small or medium red potatoes, chopped into about 36 ¾-inch pieces
1½ teaspoons salt, plus more as needed
1½ teaspoons minced fresh rosemary
1 tablespoon olive oil
Freshly ground black pepper
12 pieces thick-cut bacon
1 cup (8 ounces) sour cream
1 to 3 teaspoons hot sauce, such as Sriracha or Texas Pete
Preheat the oven to 400°F. Line a baking sheet with parchment paper or foil.
Put the potatoes in a medium pot, cover with cold water, and bring to a boil. Season the water with 1 teaspoon of salt. Boil the potatoes for 3 to 4 minutes, until you can stick a fork into them without too much resistance. You want the potatoes to be almost but not fully cooked through so they won’t fall apart during the next steps.
Drain the potatoes and put them in a large bowl. Add the rosemary, olive oil, the remaining ½ teaspoon of salt, and a few grinds of pepper, and toss gently until the potatoes are evenly coated.
Cut the strips of bacon crosswise into thirds. Wrap each potato bite in a piece of bacon, securing it with a toothpick. This recipe can be prepped up to this point the day before you plan to serve the potato bites.
Place the potato bites on the baking sheet, spaced an inch or two apart. You may need to bake the potato bites in two batches.
Cook the potato bites for 15 minutes and then flip each piece. Cook for another 15 to 20 minutes, until the bacon is cooked through and as crisp as you like it.
Mix the sour cream and hot sauce in a small bowl. Season with salt and pepper. Pile the hot potato bites on a plate and serve with the dip.
LETTUCE CUPS WITH RED PEPPER LENTILS
SERVES 6 TO 10
These intensely delicious lettuce cups are based on the Turkish dish mercimek köftesi, which came to our attention through a reader who rhapsodized over lentil balls full of smoky red pepper flavor, with a tangy pomegranate sauce, rolled up in crisp, fresh lettuce leaves. Our version turned out to be one of the best snacks or appetizers that we know. It takes a little time to put these together, but everything can be done ahead of time.
FOR THE LENTIL BALLS
1 tablespoon olive oil
½ red onion, finely chopped (about ½ cup)
4 garlic cloves, minced
½ cup store-bought or homemade Quick Red Pepper Paste
1 teaspoon ground cumin
1 teaspoon sweet paprika
1½ cups red lentils
1 to 2 teaspoons salt
¾ cup bulgur wheat
½ cup finely chopped scallions, green parts only (from 1 to 2 scallions)
1 cup finely chopped fresh cilantro (from 1 bunch)
3 tablespoons freshly squeezed lemon juice (from about 1 lemon)
Freshly ground black pepper
FOR THE POMEGRANATE SAUCE
¼ cup pomegranate molasses, warmed
½ cup store-bought or homemade Quick Red Pepper Paste
FOR ASSEMBLING THE LETTUCE CUPS
2 small heads butter lettuce, separated into leaves
To make the lentil balls: In a 2-quart or larger saucepan, heat the olive oil and cook the red onion and garlic over medium heat for 5 minutes, or until soft and fragrant. Add ¼ cup of the red pepper paste, the cumin, and paprika, and sauté for 30 seconds.
Stir in the red lentils and pour in 3 cups water and 1 teaspoon salt. Bring to a boil, then simmer for 10 minutes or until the lentils have softened. Stir in the bulgur wheat. Remove from the heat and cover the pan. Let the lentils and bulgur rest for 20 minutes, or until the mixture is thick and soft. Stir in the remaining ¼ cup red pepper paste, as well as the scallions, cilantro, lemon juice, and a generous quantity of black pepper. Taste and add more salt and pepper if desired. Set aside to cool.
To make the pomegranate sauce: In a small bowl, whisk together the warmed pomegranate molasses and red pepper paste until well combined. Taste and add more red pepper paste or salt and pepper if desired.
To assemble the lettuce cups: When the lentil mixture has cooled, form it into walnut-sized balls or stubby cigar shapes, or don’t shape the lentil mixture if you’d rather not. Place one or two lentil balls or a dollop of lentil mixture in the center of a lettuce leaf, drizzle with sauce, and roll up the lettuce or pinch it closed like a taco to eat. Eat immediately or refrigerate the lentil mixture for up to 3 days.
Tip from The Kitchn
Pomegranate molasses is pomegranate juice, without added sugar, that has been reduced into a rich, tangy syrup. It can be found in Mediterranean grocery stores and online, and we’ve even seen it in the international section of our large local grocery store.
Quick Red Pepper Paste
MAKES ABOUT 1½ CUPS
1 12-ounce jar roasted red peppers, drained
1 teaspoon smoked paprika
½ teaspoon red pepper flakes
2 tablespoons olive oil
In a small food processor, blend the red peppers with the smoked paprika, red pepper flakes, and olive oil until it forms a thin paste or sauce. Leftover paste may be refrigerated in a covered container for up to 1 week.
Roasted Shrimp with Horseradish Ketchup
ROASTED SHRIMP WITH HORSERADISH KETCHUP
SERVES 6
We have an unabashed love for a big bowl of shrimp, but we have freshened up the old steakhouse classic, shrimp cocktail, by roasting the shrimp and serving them with a homemade sauce. Whip up your own sassy ketchup spiked with fresh horseradish. This ketchup recipe makes plenty of extra sauce, so there will be some left over for slathering on burgers or hot dogs.
2 pounds uncooked extra-jumbo shrimp (16 to 20 shrimp per pound) with tails on, peeled and deveined
Olive oil
Salt and freshly ground black pepper
Horseradish Ketchup, for serving
Place the broiler shelf on the lowest level and preheat the oven to broil. Pat each shrimp dry and spread them out in one layer on a large baking sheet. Drizzle with olive oil, salt, and pepper and shake to coat well. Broil for 5 to 6 minutes or until pink and cooked through. Cool for at least 10 minutes before serving.
Pile the shrimp in a pretty pie dish or shallow bowl, arranged around a dipping bowl of
Horseradish Ketchup. Don’t forget to set out another small bowl for the discarded tails.
Horseradish Ketchup
MAKES ABOUT 1¼ CUPS
The amount of horseradish you use in this recipe is very much up to you. We like to feel a tingle of heat shoot straight up to the brain, but maybe you want something milder—or even more electrifying. For the hottest horseradish flavor, use freshly grated horseradish root.
1 tablespoon olive oil
4 garlic cloves, minced
1 cup chopped yellow onion (from about ½ large onion)
2 14.5-ounce cans diced tomatoes, drained
¼ cup cider vinegar
1 teaspoon salt
½ teaspoon freshly ground black pepper
½ teaspoon ground paprika
⅛ teaspoon ground cloves
⅛ teaspoon ground ginger
⅛ teaspoon ground cinnamon
2 tablespoons (packed) dark brown sugar
1 tablespoon molasses
3 to 5 tablespoons prepared horseradish, or to taste
Heat the olive oil over medium heat in a 2-quart or larger heavy saucepan. Add the garlic and onion and cook for 2 minutes, stirring frequently. Add the tomatoes, vinegar, salt, pepper, paprika, cloves, ginger, and cinnamon and cook until the tomato pieces fall apart, about 20 minutes.
Puree in a blender, holding the lid down very tightly with a folded towel. (The lid will try to shoot off, so be careful!). Alternately, use a handheld immersion blender right in the pan. Puree until the mixture is smooth and then strain it through a fine-mesh strainer. Whisk in the brown sugar and molasses, return the mixture to the stove, and continue to cook over medium heat, stirring often, until the sauce has the consistency of ketchup. Whisk in the horseradish and taste for seasoning.
Let the ketchup cool to room temperature then refrigerate in a tightly covered container. The ketchup will keep refrigerated for up to 2 weeks.
Minty Summer Rolls with Spicy Peanut Sauce
MINTY SUMMER ROLLS WITH SPICY PEANUT SAUCE
MAKES 8 ROLLS
Here is one of our favorite snacks for a warm evening. Heaps of fresh mint, shaved colorful vegetables, and light rice noodles neatly wrap up, ready for a spicy, tangy peanut sauce. For vegetarians, a mixture of ½ teaspoon light soy sauce, ½ teaspoon lime juice, and ¼ teaspoon sugar can be substituted for the fish sauce.
FOR THE SPICY PEANUT SAUCE
2 tablespoons creamy natural peanut butter
2 tablespoons rice vinegar
1 tablespoon soy sauce
1 teaspoon sugar
½ teaspoon red pepper flakes
FOR THE NOODLE FILLING
2 ounces cellophane noodles (also called bean threads or glass noodles; about 1 cup cooked)
1 teaspoon sesame oil
Crushed red pepper flakes, to taste
FOR THE VEGETABLE FILLING
⅓ seedless cucumber
½ medium carrot, peeled
½ red bell pepper, seeded
2 to 3 medium radishes
1 scallion, chopped (green and light green parts only)
FOR DRESSING THE VEGETABLE FILLING
1½ teaspoons rice vinegar
½ teaspoon sugar
1 teaspoon fish sauce
1 tablespoon freshly squeezed lime juice (from about ½ lime)
FOR ASSEMBLING THE ROLLS
8 8½-inch rice paper spring roll wrappers
2 tablespoons roughly chopped cilantro leaves
16–24 fresh mint leaves
To make the spicy peanut sauce: Whisk together all the ingredients until smooth and creamy. Set aside.
To make the noodle filling: If the cellophane noodles are very long, break them into smaller bits. Cook the noodles according to the package directions. Drain the noodles, place them in a bowl, and toss with the sesame oil and red pepper flakes.
To make the vegetable filling: Using a mandoline or box grater, slice the cucumber, carrot, and red pepper and radishes into very thin strips, or julienne by hand (see
this page).
Whisk together the rice vinegar, sugar, fish sauce, and lime juice in a large bowl. Add the vegetable filling and the scallion and toss to coat.
To prepare the wrappers: Fill a 9-inch round (or larger) cake pan halfway with hot water (not so hot that you can’t touch it). Immerse the wrappers one at a time in the hot water bath. Watch for the wrapper to begin curling, then immediately flip it over, and continue flipping until it is just softened, about 30 seconds total. Be careful not to oversoak the wrappers; otherwise they will tear.
To assemble the rolls: Use both hands to pull the wrapper out of the water, being careful so it won’t collapse on itself. Spread it immediately on a plate and begin the assembly process.
To fill the softened wrapper, lay about 3 to 4 mint leaves down the center of the wrapper from left to right. Then add 1 to 2 tablespoons of the noodle filling. On top of the noodles, add an eighth of the veggie mixture. Top with a sprinkle of cilantro and a few mint leaves. Whatever is resting directly against the wrapper will be visible through the translucent wrappers.
To complete the roll, first fold the left and right edges of the wrapper over the filling, and then fold the bottom edge toward the center. Continue rolling the filled wrapper away from you until it is closed and snug. Continue the process of filling the remaining wrappers. Partway through you may need to change the hot water you use for soaking the wrappers. As you finish each roll, place it on a cookie sheet and cover the rolls with a damp towel.
Serve immediately, by slicing each roll in half with a sharp knife and serving the peanut sauce on the side.
BUTTERNUT WITH CHILI-LIME SAUCE
MAKES 48 POT STICKERS
Although we love no-cook appetizers, we also like to prepare at least one hot, irresistibly savory recipe like this one that will draw people around the stove to wait for these pan-crisped dumplings to be ready. They’re filled with roasted butternut squash and a touch of umami-laden miso. They are pan-fried until tender yet crisp and served with a spicy sauce.
FOR THE FILLING
1 whole butternut squash (2 to 2½ pounds)
½ cup whole-milk ricotta
½ cup finely chopped fresh chives
1 tablespoon sesame oil
1 tablespoon red miso paste
1½ teaspoons chili powder
Salt and freshly ground black pepper
FOR ASSEMBLING THE POT STICKERS
48 wonton wrappers, about 3 inches square
2 to 4 tablespoons vegetable or peanut oil
FOR THE CHILI-LIME SAUCE
¼ cup freshly squeezed lime juice (from about 4 limes)
2 tablespoons vegetable or peanut oil
2 teaspoons Sriracha hot sauce
2 teaspoons honey, warmed
2 teaspoons soy sauce
TO PREPARE THE FILLING
Preheat the oven to 350°F. Place the whole butternut squash directly on the oven rack and roast until it is beginning to soften, about 30 minutes. Remove from the oven and carefully slice lengthwise and then crosswise to make 4 quarters. Scrape out the seeds and strings and discard. Place the squash quarters cut side down in a baking dish that will accommodate them in a single layer. Pour in ½ cup water. Return the squash to the oven and bake for an additional 30 to 45 minutes, or until the flesh is soft and the skin peels away easily.
Let the squash cool, then scrape the flesh out and mash. You should have about 2 cups of chunky mashed squash. Whisk the ricotta, chives, sesame oil, miso paste, and chili powder into the squash. Taste and season with salt and pepper.
TO ASSEMBLE THE POT STICKERS
Lay a row of 6 wonton wrappers on a cutting board or on the countertop. (If the wrappers stick, rub the board or countertop with a little vegetable or peanut oil.) Fill a small bowl or cup with lukewarm water and set it to the side.
Place a dollop, about 2 teaspoons, of the squash mixture in the center of a wonton wrapper. Fold the top of the wrapper over to form a triangle, and press to close. To help the edges seal, dip a finger in the lukewarm water and run it along the seam. Place the filled and sealed pot stickers in a large dish or tray. Repeat the process until all 48 wrappers have been filled. Cook the pot stickers immediately or freeze them. (They will get rubbery if they are left out for too long before cooking.) To freeze the pot stickers, spread them in one layer on a large baking sheet and freeze until solid, then put them in a freezer bag. They can be frozen for up to 3 months.
TO COOK THE POT STICKERS
Heat a 12-inch or larger lidded skillet over high heat until very hot. Drizzle in 1 tablespoon oil and swirl to coat the pan. Lay as many dumplings into the pan as will fit in one layer without overlapping. Pour in 2 tablespoons water, cover the pan immediately, and turn the heat down to low. Cook for 10 minutes without removing the lid. When the dumplings are done, remove the lid and transfer the dumplings to a serving plate.
Repeat as necessary to cook the remaining pot stickers.
Cook frozen pot stickers without defrosting, following the cooking directions given above, and adding 2 minutes to the cooking time.
TO MAKE THE CHILI-LIME SAUCE
In a small bowl, whisk together the lime juice, oil, Sriracha, honey, and soy sauce. The sauce can be made ahead of time and refrigerated in an airtight container for up to 3 days.
Let the pot stickers cool for 5 minutes before serving with dipping sauce.
EL PRESIDENTE
SERVES 1
This rum cocktail is a Prohibition classic from Havana, Cuba, where expats would go to drink and dance the nights away while America was sunk in a liquor-free decade. Rum drinks are due for a comeback, thanks to the underground culture of tiki bars and the availability of better rum. (We’re fans of Pusser’s, a deeply flavorful yet affordable bottle.) This cocktail is easy to drink, and simple to multiply into a pitcher drink for a crowd, who will appreciate its smooth sweetness and the spark of orange from the curaçao.
This drink is usually stirred, but we find that grenadine, especially the homemade sort, sometimes seizes up in a stirred drink. Shaking the drink briefly helps the flavors mix completely.
1½ ounces (3 tablespoons) aged rum
1 ounce (2 tablespoons) white vermouth, such as Dolin
½ ounce (1 tablespoon) orange curaçao
1 teaspoon grenadine
Thinly cut orange peel, for garnish
Combine all ingredients in a shaker with ice. Shake for about 10 seconds, or until well combined and chilled. Strain the mixture into a chilled cocktail glass or Champagne coupe and garnish with an orange peel.
Tip from The Kitchn
We mentioned that Pusser’s is one of our favorite rums, and we also want to recommend Pierre Ferrand Dry Curaçao Ancienne Méthode, an excellent orange curaçao that was formulated in part by David Wondrich, the cocktail expert. Because it’s formulated without artificial flavoring to be drier and truer to the original spirit of curaçao, it makes any drink more complex and interesting.
PURE MEXICAN MARGARITA
MAKES 1 DRINK
Joanne Weir, a San Francisco chef, tequila expert, and the subject of one of our early kitchen tours on the site, makes a margarita at her Bay Area restaurant Copita that is known as one of the best in the region. She says—and we agree wholeheartedly—that the biggest mistake people make with their margaritas is that they use too many ingredients such as Triple Sec, Grand Marnier, and Cointreau. Perfection in a margarita is all about balancing sweet and tart. This is what we are doing in this stripped-down recipe: 100 percent agave tequila (Weir prefers blanco), freshly squeezed lime juice, and agave nectar.
2 ounces (¼ cup) tequila
2 tablespoons freshly squeezed lime juice (from 1 to 2 limes)
¾ ounce (1 tablespoon plus 1½ teaspoons) agave nectar or ½ ounce (1 tablespoon) Simple Syrup
¾ ounce (1 tablespoon plus 1½ teaspoons) cold water
1 lime slice, sliced crosswise into a wheel
Shake the tequila, lime juice, agave nectar, and water vigorously in a cocktail shaker or lidded jar with a handful of ice and strain into a chilled rocks glass filled with ice. Garnish with the wheel of lime.
Optional garnish: Before filling the glass with ice, moisten the rim and dip it in a dish of
Lime-Chili Rim Salt.
Left to right: Spiked Strawberry Limeade, Coconut Bourbon Nog, Rye and Ginger Hot Toddy, El Presidente, Michelada Especial, Rhubarb-Vanilla Soda, Southside Gin Cooler
Coconut Bourbon Nog