Chapter 2
Gaining the Tools and Skills to Play
In This Chapter
![]() Holding your bass properly
Holding your bass properly
![]() Positioning your right and left hands
Positioning your right and left hands
![]() Finding out how to read a fingerboard diagram
Finding out how to read a fingerboard diagram
![]() Getting your bass in tune
Getting your bass in tune
![]() Practicing your first song on your bass
Practicing your first song on your bass
![]() Access the audio tracks and video clips at www.dummies.com/go/bassguitar
Access the audio tracks and video clips at www.dummies.com/go/bassguitar
In this chapter, you tackle the basics of playing the bass: how to hold your instrument, how to position your hands, how to read a fingerboard diagram, how to tune your bass, and how to play a song. So roll up your sleeves and dive in.
Getting a Handle on Your Bass
Before getting started, let me clarify some terminology. I refer to right hand and left hand in this book, but what really matters is what each hand does:
- The right hand is your striking hand; that is, it strikes (or plucks) each string and puts it into motion to produce a sound.
- Your left hand is your fretting hand; it presses the strings onto the fret to settle on a pitch.
If you're left-handed and you decide to play your bass as a lefty, apply the instructions for your right hand to your left and vice versa.
Frets are the small metal strips embedded in the fingerboard of your bass, underneath the strings. You usually have 20 to 24 frets on your bass. To fret a note, you press the string onto the fingerboard between two frets with your left hand. For example, to play a string at the 3rd fret, you press your finger between the 2nd and 3rd frets, closer to the 3rd. Doing so shortens the string so when you strike it, the string vibrates beginning at the 3rd fret. Take a look at Figure 2-1 to see the proper way to fret a note on the 3rd fret. Note that the string doesn't have to touch the wood of the fingerboard between the frets, just the frets (in this case, mainly the 3rd fret).
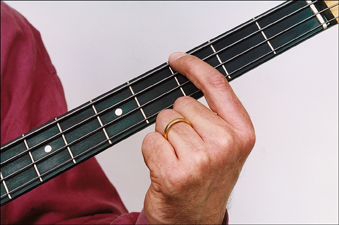
Photo by Steven Schlesinger
Figure 2-1: Fretting a note.
Holding Your Bass
In this chapter, you finally get to wear your bass, which, after wading through the preliminaries in Chapter 1, is a welcome change.
 If you watch other bass players, either live or on television, you may notice an array of ways to hold a bass. Some definitely look cooler than others, but you may have difficulty playing with a proper hand position when the instrument is either scraping along your ankles or creeping up around your chin. Compromise is the name of the game here.
Strapping on your bass: Strings to the outside
When you strap on your bass for the first time, I recommend that you sit down to do it. Adjusting the strap is easier this way. Ideally, the strings of the bass should cross over your belly button at a slight angle upward (up on the neck end). This position ensures optimum right- and left-hand coverage, and it works well regardless of whether you're standing or sitting. Oh, and, yes, the strings should face the outside!
 Strapping on and adjusting a bass eventually becomes as natural as riding a bike, but when you first start out, you have to follow some basic instructions to get it right. If your left hand is strained when playing, try raising the height of the bass. If your right hand feels uncomfortable, try lowering the bass.
You can achieve the ideal compromise position for both your left and right hands by following these steps:
- Attach the thick end of your strap to the strap pin (the little metal knob) on the body at the neck end of the bass.
- Attach the thin end of your strap to the bottom strap pin (also called the end pin) of the bass.
- Hold your bass solidly by the body or the neck with your left hand, and pull the strap over your head and right shoulder, putting your right arm through as well.
Allow the strap (with the bass attached) to rest on your left shoulder and continue across your back until it connects with the bottom strap pin of the bass just below the right side of your rib cage.
- Adjust your strap in length until the strings are crossing the area over your belly button, and then fine-tune it from there.
You can find your own personal preference, but you want your bass to rest in this general area. Take a look at Figures 2-2 and 2-3 and note that the general position of the bass is the same whether you're standing or sitting.
Voilà! Standing with your bass
And now, get on your feet! The time has come to take a stand with your bass. Here's how:
- Make sure your strap is securely attached to the strap pins.
Also, make sure your strap is straight, not twisted from one end to the other.
- Let your bass hang loosely from your shoulder.
Keep your left hand underneath the neck, but don't clutch it. Some basses are a little neck-heavy and others are perfectly balanced. No matter what type of bass you have, you need to get used to the feel of it.
- Position your hands on the bass.
Your left hand should be free to roam the neck from top to bottom without having to hold the bass. Your right hand should be able to reach all the strings comfortably.
The standing position will most likely be your live or performance position (see Figure 2-2).
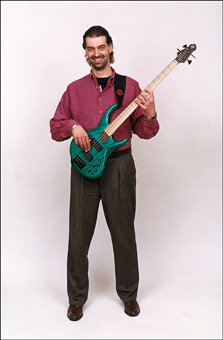
Photo by Steven Schlesinger
Figure 2-2: Standing with your bass.
Sitting with your bass
During those endless hours of practice, you may want to sit down to play (see Figure 2-3). When you do, try to sit so your thighs are higher than your knees. I recommend using a stool or a tall chair without armrests. That way, the position of your bass is similar whether you're standing or sitting.
After you sit down, keep the strap on. You may feel a slight slack in the strap when the bass touches your thighs, but it should still hold the bass stationary. Your left hand needs to be free to roam across the neck without your having to worry about holding the bass in place, and your right hand must be able to reach all the strings comfortably.

Photo by Steven Schlesinger
Figure 2-3: Sitting with your bass.
Placing Your Hands in the Proper Position
The secret to getting your hands into position is simple: Keep them loose and relaxed. You want to strike and fret the strings with the least amount of effort possible. The proper position enables you to play at great speed and with great accuracy. It also helps you control your tone.
 Check out Video 1 to see me demonstrate the left- and right-hand positioning.
Positioning your left hand
You want your left hand to cover one fret per finger without causing any undue stress. By using one finger per fret, you set up your hand to execute almost any musical figure without shifting, or moving your hand position to reach a note. (A figure is an independent and self-contained musical phrase, sort of like a sentence when you're speaking.)
When you do have to shift your hand, a move of one fret in either direction usually suffices.
Check out Figure 2-4 for the proper left-hand position, and follow these steps to accomplish it:
- Hold out your left hand with your outstretched arm in front of you.
Keep your wrist and hand limp.
- Without changing the angle on your wrist, turn your hand so your palm faces up and your fingers are slightly curved.
Position your thumb so it faces your index finger (or the area between your index and middle fingers).
- Bring in your elbow to the side of your rib cage (without moving your hand) until the neck of your bass is in the palm of your hand.
Remember not to close your hand!
- Place the tip of your thumb on the middle of the back of the bass neck.
Make sure that your fingertips are pointing upward.
- Gently spread your fingers onto the strings, with each finger close to an adjacent fret.
- Curl your fingers until your fingertips are on one of the strings.
Be sure to keep the tips of your fingers close to the frets.

Photos by Steven Schlesinger
Figure 2-4: Position of the left hand.
Now you're just about ready to press the string to the fret to play a note. Even though you can now fret the desired note, something still has to set the string in motion to produce the actual sound. This is where your right hand comes in. Read on for details.
Positioning your right hand
You may see several popular right-hand techniques; so many, in fact, that they could fill a book all on their own. In this book, I concentrate on the finger-style technique, which is the most diverse and widely used among them, accommodating virtually all styles of music. This technique also allows you to work more efficiently with dynamics (accenting certain notes). In this section, I also show you the proper positions for the pick and slap (thumb) techniques.
I refer to the right hand as the striking hand rather than as the plucking or pulling hand. The other terms are technically correct, but I prefer the term striking because plucking and pulling imply that you should pull the strings away from the body of the bass, which produces a thin sound. Instead, you need to strike the string into the body of the bass, not away from it. Think of it as if you're trying to touch the pickup underneath the string with your fingertip after you strike the string.
Finger-style playing
The name finger-style refers to your striking the strings with the index and middle fingers of your right hand. You can hear this style in country, rock, jazz, and funk — and just about any other type of music. Jaco Pastorius, James Jamerson, and Francis Rocco Prestia are only three of the multitude of bassists who use this technique. Take the following steps to set up your hand properly. Then compare the position of your hand to Figure 2-5.
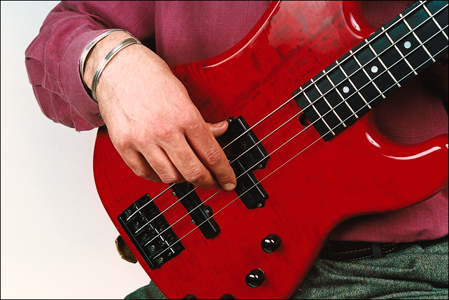
Photo by Steven Schlesinger
Figure 2-5: Right hand in the proper finger-style position.
- Bring your right arm up, as though you're pointing to something in the distance, while keeping your wrist, hand, and fingers relaxed.
Keep your wrist at a 45-degree angle (approximately), keep your thumb facing your index finger, and keep your fingers gently curved, with your fingertips pointing to the floor.
- Start bending your elbow slowly, keeping it just slightly away from your rib cage.
- Let your hand approach the instrument until your thumb settles onto the thumb rest (a small plastic or wood bar for resting your thumb on) or the edge of the pickup (the magnetic bars that pick up the string vibration).
Keep your elbow next to your body, not behind it.
- Settle the weight of your arm onto your thumb.
This position may take some time getting used to, but it keeps your hand and shoulder in their most relaxed state. The thumb acts as a measuring device for your fingers and the individual strings. In this position, you can feel which string you're playing instead of having to look to see where you are.
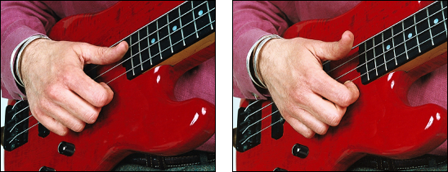
- Reach for your high string (the one closest to your feet) with your index or middle finger (see Figure 2-6).
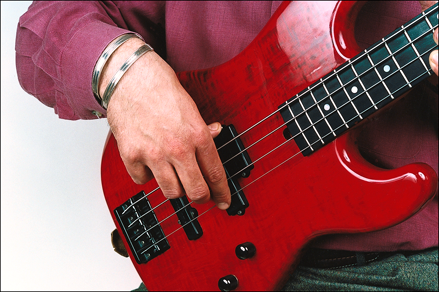
Photo by Steven Schlesinger
Figure 2-6: Hand reaching for the high string.
Your thumb has to bend a little, and your hand must pivot out on it to reach the highest string.
The terms high string and low string refer to the sound of the strings, not the position of your hand. Your high string is actually the string closest to your feet, whereas your low string is closest to your head. - Reach for your low string (the one closest to your head).
Your thumb is now straighter. Your hand pivots on the resting thumb toward your body, and your palm is closer to the body of the bass, as shown in Figure 2-7.
Pick-style playing
Some players prefer to use a pick (a small triangular plastic piece, about the size of a quarter) rather than their fingers to produce a note. Because the strings on a bass are much heavier than those on a guitar, your bass pick needs to be heavier as well.
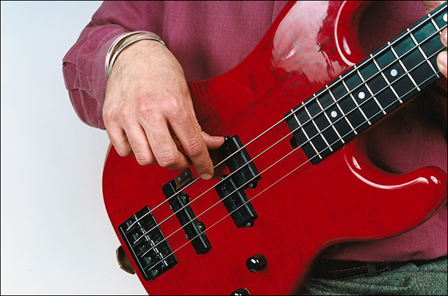
Photo by Steven Schlesinger
Figure 2-7: Hand reaching for the low string.
You can hold the pick in one of two ways: closed or open. To set your hand properly for closed-hand pick playing, follow these steps:
- Hold your pick between your index finger and thumb.
- Make a light fist and rest your thumb on top of your index finger.
- Slide your index finger along the bottom of your thumb until it reaches the first knuckle of your thumb.
This is where the pick goes, with only the tip of it showing. See Figure 2-8.
You also can try playing with an open hand (see Figure 2-9). The pick still goes between your thumb and index finger, but you leave a space between your fingers and your palm, and you rest your ring finger and pinkie against the body of the bass. You may like the increased control you get from using this method. Both styles require you to make a twisting wrist movement with your picking hand.
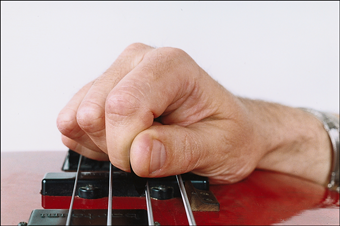
Photo by Steven Schlesinger
Figure 2-8: Holding the pick in a closed-hand position.
With a pick, you can strike the string from either above or below. Some players prefer only downstrokes; others use only upstrokes. Still other players combine the two for an even faster technique. Feel free to experiment and find out which technique suits your musical style.
Pick playing isn't an aural (acoustic) necessity anymore. Technology has caught up, and I assure you that your bass will be heard equally well without a pick. However, in the age of music videos, pick playing is preferred for its visual impact. You can really see the bass player working when he or she is using a pick.
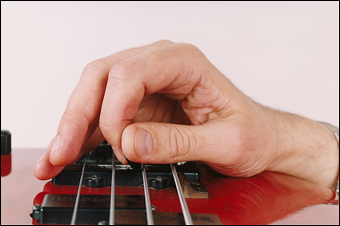
Photo by Steven Schlesinger
Figure 2-9: A pick in the open-hand style.
Slap-style playing
The technique of playing slap-style or thumb-style is to strike a low string with the side of your thumb, giving it a percussive sound (a sharp attack and decay of the note, like a drum), and then to snap (or pop) a high string with your index finger. Here's how you do it:
- Make a light fist with your right hand.
Lift your thumb away from your fist as though you were hitchhiking.
- Loosen up on your index finger and create a hook.
Your index finger should look like it's pulling the trigger of a gun.
- Rest your forearm on the body of the bass so your right hand hovers above the strings.
- With a sharp twist of your wrist, flick your thumb against one of the low strings, striking it at the very end of the fingerboard.
This flick creates the slap sound. You need a lot of wrist movement for this style. Figure 2-10 (see left side of figure) shows you how to do it correctly.
Photos by Steven Schlesinger
Figure 2-10: Thumb striking the string (left), and index finger snapping the string (right).
- Hook your index finger under a high string, and with an opposing twist of your wrist, pull the string away from the fingerboard, and then let it snap against the frets.
Make sure your thumb continues past the string and onto the fingerboard so the string is free to vibrate and the note rings. Figure 2-10 (see right side of figure) shows you how to do it.
 Don't pull too hard on the high string, or you may break it. Only a small amount of force is required.
Reading a Fingerboard Diagram
In some situations, musicians are required to read music and even play the exact note written on a chart or page of music. (I give you the basics of reading music in Chapter 4.) However, most bassists prefer to create their own accompaniment for a tune, if given a chance. They think of the selection of notes as a picture. Using a fingerboard diagram (or grid) is a great way to see such pictures.
The language of music: Scales and chords
Musicians choose notes from a scale, an orderly ascending or descending sequence of notes, to create their music. The most commonly used scales have seven notes, beginning with the root (the first note). The eighth note (the octave) in the sequence sounds similar to the root, but it's a higher root. A chord is a combination of three or more notes taken from a scale. (I cover both scales and chords in more detail in Chapter 5.)
You don't have to read music to play bass; music isn't a visual art — it's an aural art. You hear it. Some of my favorite bassists can't read a note and still manage to come up with incredible bass parts. Most bass players, however, find that reading music is a useful skill when playing with other people. Some band leaders require you to read music.
Music often is written on paper so it can be communicated to others; the same note can appear on paper in several forms. One form is the fingerboard diagram, or grid, which is simply a picture of the fingerboard (in an upright position). It's the clearest way to show you how to space your fingers along the fingerboard for playing the different scales and chords. Check out Figure 2-11 for a picture of the two grids I use in this book.

Figure 2-11: Description of the parts of two different grids.
A grid is composed of the following elements:
- The vertical lines on the grids represent the strings, from low (left) to high (right). The first grid shows four strings. The second shows only three, even though your bass has at least four, because on almost all parts of the neck, you can play one complete scale (one octave) or chord using only three strings. The beauty of indicating finger positions on grids is that you can superimpose the grid onto any part of the bass, as long as you have enough strings and frets to work with.
- The horizontal lines in the grid represent the frets.
- The solid black dots and the open circle represent notes to be played. The open circle is the root, or tonal center. The root is the most important note in a scale or chord, and it's usually the first note you play. (I cover these terms and concepts in detail in Chapter 5.)
- The numbers next to the dots tell you which finger you use to play the note, as follows:
- 1 = index finger (the pointer)
- 2 = middle finger (well, never mind)
- 3 = ring finger
- 4 = pinkie (little finger)
- The arrows from dot to dot indicate the sequence of the notes to be played (if there is a specific sequence). On the bass, you almost always play one note at a time.
The four-finger technique I describe in the preceding list can help you play everything with the least amount of effort, the fewest shifts, and the greatest level of consistency. Using the same fingering time after time when playing the same scale or chord is essential for developing speed and accuracy and for smooth playing. In other words, keeping your fingering consistent helps your hand become familiar with the moves and builds muscle memory so you can occupy your mind with other things (like fending off overly excited groupies).
The major scale starting on the root C, called the C major scale or the key of C, looks and feels exactly like the major scales that begin on any other root. For example, it looks exactly like the major scale starting on D (which, you guessed it, is called the D major scale, or the key of D). Both scales have the same structure and are played with the same fingers in the same sequence; the D scale just starts two frets above the C scale.
When you memorize a pattern for playing a scale or chord in one key, you can play the same pattern for that scale or chord in every key, anywhere on the neck of the bass.
Viewing a diagram of the major and minor scales
The major and minor scales are the two primary scales in music. Both are constructed in half-step and whole-step combinations. A half step is the distance from one fret to the next on the bass. A whole step skips one fret. I cover the exact construction of major and minor scales in Chapter 5.
In Figure 2-12, you see grids that indicate the notes of both the major and minor scales.

Figure 2-12: Grids showing a major scale (left) and a minor scale (right).
To play one complete scale, you start on one note (such as C) and play an ascending scale up to the same note C but higher, as you can see on the grids in Figure 2-12. The notes of the scales fit on three strings, and you can play them without shifting your left hand. One complete scale is an octave.
You can play any of the major and minor scales without shifting the position of your hand.
You can see me demonstrating both the major and minor scales in Video 2.
Playing open-string scales
Playing an open string means striking a string without first pressing down on a fret. Playing scales that include open strings involves a slightly different pattern from all the other scales. You play open-string scales without pressing down on a fret for some of the notes. In two keys, E and A, the open string itself is the root. See Figure 2-13 for some sample grids.

Figure 2-13: Grids showing open-string scales.
Finding the notes on the neck
Any of your patterns (except for the open E and A scales described in the preceding section) work in all keys. Because you can transpose these patterns to any key, all you have to do is nail the root with the proper finger of the left hand (usually the middle finger for the major patterns and the index finger for the minor patterns), and you're in position. Only one question remains: How do you find a certain key when someone asks you, for example, to play in C?
The sides, and sometimes the top, of your bass's neck are marked by dots. These dots are your landmarks for determining where a note is located. After you find a note, use the dots as a reference to find the note again. The notes are organized in a sequence of half steps, which are the smallest step in music (at least in music of the Western hemisphere). Each half step is one fret. The order of notes in half steps is: C, C (pronounced “C sharp”) or D
 (pronounced “D flat”), D, D or E, E, F, F or G, G, G or A, A, A or B, B, and C. Notice that some of the notes have two names. For example, C and D are the same note. (It's a half step above C or a half step below D.)
The notes on the open strings of your bass are tuned (from low to high) E, A, D, and G (the thinnest string). You can start from any open string and count the half steps to find a specific note. For example, to find your C on the A string (see Figure 2-14), your 1st fret on the A string is A or B, the next fret is B, and the one after that is C (the fret with the first dot).

Figure 2-14: Grid showing C on the A string.
If a note is raised by a half step (one fret), it has a (sharp) symbol next to it. For example, if you take the C that's played on the 3rd fret of the A string (the second thickest string) and raise it a half step to the 4th fret, it becomes C. If a note is lowered by a half step, it has a (flat) symbol next to it. For example, if you want to lower the B that's on the 2nd fret of the A string by a half step, press the string to the 1st fret and the B becomes B.
Your bass has two dots on the 12th fret. These dots are your octave marker for the open strings. By pressing down any string at the 12th fret and striking it, you produce the same note you get when playing the open string, but the note is an octave higher. If you want to find your C on the E string (see Figure 2-15), you can start on the E-string octave marker and go backward: E, E or D, D, D or C, and C. The C note is four frets below the octave marker, between the third and fourth dots of the E string.

Figure 2-15: Grid showing C on an E string.
Identifying intervals: They're always in the same place
An interval is the distance between two notes. For example, in the scale of C, the distance from the root C up to F is four notes (C, D, E, F), so the interval is called a 4th. When you identify an interval, you count the original note (C in this example) as well as the final note (F).
Musicians communicate with interval terminology: “Hey, try a 4th instead of the 5th on the G chord,” which means: Play the G with a C (an interval of a 4th) instead of the G with a D (an interval of a 5th). So recognizing intervals clearly is important. The intervals are always in the same configuration; a 4th, for example, always looks and feels the same, regardless of what key it's in.
Figure 2-16 shows the names and configurations of each interval. The open circle is the note you're measuring the distance from; the small black dot is the interval. You can find them on your own by feeling them with your hand (again, covering one finger per fret). When you get comfortable with how they feel, you'll have an easier time applying them to your playing. You can cover all the intervals with only three strings at your disposal.

Figure 2-16: Grids showing intervals.
Tuning Your Bass Guitar
After you strap on your bass, tuning it is the first item on your to-do list, which you can do in several ways. The following sections lead you through the different tuning techniques. It may take you a little time to get used to hearing the low frequencies of the bass notes, but with practice and a few tricks, you'll be able to tune a bass in no time.
On Track 1, I play the open strings of a four-string bass, one at a time. Get used to the sound of those strings so you know how a correctly tuned bass sounds. You can use this track for tuning your own bass. However, you need to be familiar with some other useful techniques for tuning your bass.
Whether you're playing alone or with others, you need to use an aural reference source, called a reference pitch, for tuning your strings. A reference pitch is a note you use as the basis for tuning the strings on your bass. It's to tuning what the North Star is to ship navigation. The piano is an excellent source for a reference pitch because its tuning is very stable. But you're not limited to the piano — many other sources are available as well.
When you play alone, you can use any of the methods described in the following sections for finding a reference pitch to tune your bass. But if your guitar- and piano-playing friends come over to jam, stop what you're doing and get your bass in tune with everyone else's instruments.
Reference pitch sources to use when playing alone
When you're playing alone, it doesn't matter whether you're in tune with the rest of the universe, but you do need to have all your strings in tune with each other if you want your music to sound harmonious. You can use any of the sources in the following sections to tune your bass.
A tuner
Using an electronic tuner is by far the easiest way to tune your bass. The modern tuners have a display that lets you see exactly where your string is, in terms of pitch, whether it's sharp (too high) or flat (too low), and what note it's closest to (in case your bass gets knocked around, and the G string is now closer in sound to F than G).
To get your bass into tune with a tuner, follow these steps:
- Buy a tuner.
Okay, okay! Maybe that goes without saying, but keep in mind that you want to use a tuner that can register the low bass frequencies. Not all tuners can hear bass notes. You can get a tuner that connects to your bass via a cable, or you can get a clip-on tuner.
- Plug your bass into the tuner via the cable (an electric cord that connects your bass to your amplifier) or clip the clip-on tuner onto your headstock.
You can see a picture of the cable in Chapter 16.
- Strike an open string and let it ring.
Low frequencies travel slowly, and the tuner needs time to read the note.
- Tune the string until the needle (or light) of the tuner is in the middle of the display, indicating that the string is in tune. (I tell you how to adjust the tuning heads in the later section “Tuning the bass guitar to itself.”)
Make sure to check that the pitch indicator shows the correct note for the string (E, A, D, G), or you may find that the G string is in perfect tune with G
, which is way out of tune with what the G string is supposed to sound like.
Tuning with a tuner works even when you're in a noisy environment. Make sure you have a spare battery for your tuner, though. Otherwise, the only way you can see motion in the tuner's needle is by watching it jump as you fling it against the wall in frustration.
You don't want to depend entirely on a mechanical device. You need to know how to tune the bass by yourself in case a garbage truck backs up and crushes your tuner as you're loading your gear into your car.
Your own strings
When you play alone, you can tune your bass relative to itself, which is referred to as relative tuning. For relative tuning, you use one string, usually the low E, as a reference pitch and adjust the other three so they're in tune with it. (I explain how to get the strings in tune in the later section “Tuning the bass guitar to itself.”)
When you use relative tuning, you may not be in tune with anyone else's instrument, because the E string you used as a reference for tuning the other strings may not be a perfectly tuned E. But if you're not playing with anyone else, who cares?
A tuning fork
The tuning fork gives you one reference pitch only. It corresponds to the sound of the open A string, the second-thickest string (although several octaves higher). The tuning fork gives you an excellent way to tune your bass, provided you follow these steps:
- Strike the tuning fork against a hard surface and place the handle of it (without touching the two prongs) between your teeth.
You can now hear the note A resonating in your head. Note: You may not want to share your tuning fork (other than with that special someone), and you may want to keep it reasonably clean; otherwise tuning with the tuning fork could leave a bad taste in your mouth.
- Tune your A string to the A of the tuning fork.
Refer to “Tuning the bass guitar to itself,” later in this chapter, for complete details on carrying out this step.
- Tune the other strings to the A string.
The later section “Tuning the bass guitar to itself” explains the basics of the tuning process.
Reference pitch sources to use when playing with others
When you play with other musicians, you need to get your bass in tune with their instruments. You can tune all your strings by comparing them individually with the appropriate note of the same pitch from an instrument that's already in tune, such as a piano. However, I strongly urge you to get just one string in tune with the reference pitch and then use your tuned string as a reference pitch for tuning your other strings. Read on for two common reference-pitch sources.
A piano
Because the tuning of a piano is very stable, it serves as an excellent source for a reference pitch. Figure 2-17 shows the keys on the piano that match your open strings. You may find it easiest to use a reference pitch (on the piano) that's one octave higher than the note you want to tune on your string.
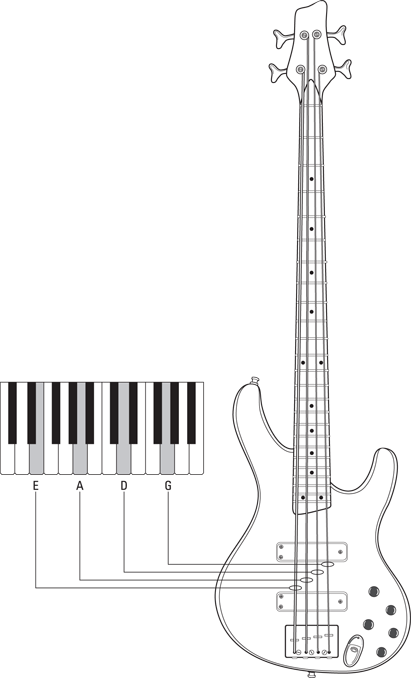
Figure 2-17: Piano keys that match the open strings on the bass.
A guitar
The lowest (thickest) four strings of a guitar correspond to the four strings of your bass (see Figure 2-18): Going from low to high (thick to thin), the strings are E, A, D, and G. Bear in mind that the guitar strings sound one octave higher than your bass strings. They're the same note, only higher.
Figure 2-18 shows which guitar strings correspond to your bass strings.
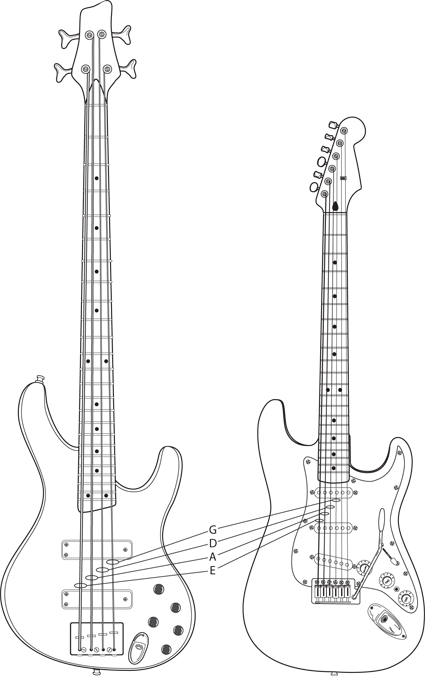
Figure 2-18: Guitar strings that match the open strings on the bass.
Tuning the bass guitar to itself
Eventually, it always comes down to this: First, you tune one string of your bass (usually the E string) to a reference pitch, and then you tune your other three strings to that tuned string.
To tune a bass string (usually the E string) to a reference pitch, listen carefully to the sound of the reference pitch you've chosen (for reference pitches, see the previous sections). If you choose E as a reference pitch, strike the open E string of your bass with one of the fingers of your right hand. If the note from your bass doesn't match exactly with the reference pitch, you hear a wavering sound. As you turn the tuning head, the wavering gets slower as your E string's pitch approaches that of the reference source. When you reach the exact match — the perfect E — the wavering stops. If the wavering gets quicker, you're turning the tuning head in the wrong direction. Restrike your E string and turn the tuning head the opposite way.
You can tune the rest of your bass guitar strings in one of three ways: With the 5th-fret method, the 7th-fret method, or the harmonics method.
In all cases, if the notes don't match exactly, you hear a wavering sound. As you turn the tuning head, the wavers occur at wider intervals as they approach an exact match. When you find the exact match, the wavering stops.
The 5th-fret tuning method
The 5th-fret tuning method is the most common method for tuning bass guitars.
If you're playing with other people, be sure to get a reference pitch for the E string (the lowest and thickest string) from one of the other tuned instruments, and then tune that string before tuning the others.
The following steps explain how to tune your bass by using the 5th-fret method (see Figure 2-19):
- Using one of the fingers on your left hand, press the tuned E string down at the 5th fret.
Touch only the E string, because the open A string needs to vibrate freely. The place to press is actually between the 4th and 5th frets, slightly behind the 5th fret.
- Strike the fretted E and the open A strings together with your right-hand index finger and let them ring.
While you're comparing the sounds of the two strings, keep your left-hand finger holding down the lower string at the 5th fret. Get used to turning your tuning heads with your right hand (by reaching over your left hand) when using this method. The notes should be a perfect match. If they're not (which is usually the case), follow these steps:
- Listen to whether the sound of the A string is lower (flat) or higher (sharp) than the E string.
You hear a wavering sound if the strings aren't in tune.
- If you're not sure whether the A string is sharp or flat, lower the pitch of the A string until you can hear that it's clearly flat.
- Restrike both strings, and then slowly raise the pitch of the A string by turning its tuning head with your right hand until the sound matches the pitch of the E string at the 5th fret.
If you go too far, you can hear that the A string is sharp (too high). In that case, lower the pitch of the A string by turning its tuning head in the other direction. When the A string is in tune with the E string, you're ready to tune the D string.
- Listen to whether the sound of the A string is lower (flat) or higher (sharp) than the E string.
- Press the tuned A string down at the 5th fret (touching only the A string).
- Strike the A and open D strings together and let them ring.
Listen to whether the D string is sharp or flat, and then turn the tuning head for the D string accordingly until the pitch of both strings matches perfectly. When the D string is in tune with the 5th fret of the A string, proceed to tuning the G string.
- Press the tuned D string down at the 5th fret (touching only the D string).
- Strike the D and open G strings together and let them ring.
Listen to whether the G string is sharp or flat, and then turn the tuning head for the G string accordingly until the pitch of the 5th fret of the D string matches the open G string perfectly.
Your bass is now in tune. If you tuned the E string to a reference pitch, you're now ready to play with anybody who's in tune with that same reference pitch.

Figure 2-19: The 5th-fret tuning method.
The 7th-fret tuning method
The 7th-fret method is similar to the 5th-fret method, but it works in reverse (from high to low). You need to tune your G string (not your bathing suit, but the highest, or skinniest, string on your bass) to a reference pitch from a tuned instrument (if you're playing with others).
When you have the G string in tune, press it down at the 7th fret. The note you get when you strike the G string, with the 7th fret pressed, is D, but it's an octave higher than the next lower (thicker) string. (See Figure 2-20 for a picture of the 7th-fret tuning method.)

Figure 2-20: Tuning with the 7th-fret tuning method.
Here's a step-by-step description of how to tune your bass with the 7th-fret method:
- Using a finger on your left hand, press the tuned G string down at the 7th fret.
Make sure you don't touch the adjacent (lower) D string; both strings should vibrate freely. (This brings a whole new meaning to the expression of fretting about your G string, doesn't it?)
- Strike the fretted G and open D strings with your right hand and let them ring together.
The pitch is an octave apart, but it's the same note. Listen to whether the D string is sharp or flat, and then turn the tuning head for the D string accordingly until the strings are in tune with each other.
- Press the tuned D string down at the 7th fret without touching the next lower string (the A string).
- Strike the D and open A strings and let them ring together.
The pitch is an octave apart, but it's the same note. Again, listen to whether the A string is sharp or flat, and then turn the tuning head for the A string accordingly until the A string is in tune.
- Press the tuned A string down at the 7th fret, making sure you don't touch the E string.
- Strike the A and open E strings together and let them ring.
As with the other strings, the pitch is an octave apart, but it's the same note. Listen to whether the E string is sharp or flat, and then turn the tuning head for the E string accordingly. When the E string is in tune, your entire bass is in tune.
The harmonics tuning method
Harmonics are notes that sound naturally on a string when you lightly touch it at certain points and then strike it with your right hand. Because the bass strings sound so low, the higher harmonics are much easier to hear. The strongest and clearest harmonics can be found at the 12th fret, the 7th fret, and the 5th fret.
Take a look at Figure 2-21 for the main harmonics.

Figure 2-21: The main harmonics.
The sounds of the harmonics are crystal clear, which makes them a great tuning tool. However, to use the harmonics, you must first develop a solid technique for making them ring. To play harmonics, follow these steps:
- Lightly touch the desired string at the 12th, 7th, or 5th fret with one of the fingers on your left hand (the middle or index finger is best, but any will do).
Don't press the string to the fret, and make sure only one finger is touching the string. Leaving your left-hand finger resting on the contact point (12th, 7th, or 5th fret), strike the string with your right hand, as I explain in Step 2.
- Place your right hand close to the bridge and strike the string (that you're touching with your left hand) with either the index or middle finger of your right hand.
The closer your striking (right-hand) finger is to the bridge, the clearer your harmonic will be.
- When the harmonic rings out, you can remove your left-hand finger from the string.
The harmonic will continue to ring out as long as you don't touch the string.
The harmonics tuning method is the most difficult and most precise tuning method you can use to tune your bass without a tuner. But if you follow these steps, you'll quickly get the hang of tuning your bass to itself using harmonics.
- Using the pinkie of your left hand, lightly touch the tuned G string at the 7th fret. (The G string should already be tuned to an outside reference source.)
Strike the string and let it ring. This sounds the harmonic.
- Using the middle finger of your left hand, lightly touch the D string at the 5th fret.
Strike the harmonic and let it ring together with the previous harmonic. Adjust the tuning head of the D string until the wavering stops.
- Using the pinkie of your left hand, lightly touch the D string at the 7th fret.
Strike the harmonic and let it ring.
- Using the middle finger of your left hand, lightly touch the A string at the 5th fret.
Strike the harmonic and let it ring together with the previous harmonic. Adjust the tuning head of the A string until the wavering stops.
- Using the pinkie of your left hand, lightly touch the tuned A string at the 7th fret.
Strike the harmonic and let it ring.
- Using the middle finger of your left hand, lightly touch the E string at the 5th fret.
Strike the harmonic and let it ring together with the previous harmonic. Adjust the tuning head of the E string until the wavering stops.
Check out Figure 2-22 for the relationships between the harmonics.

Figure 2-22: The relationships between the harmonics.
The following list gives you the most important harmonics for tuning:
- The 7th-fret harmonic on the G string (the thinnest string) is exactly the same note as the 5th-fret harmonic on the D string (the second-skinniest string).
- The 7th-fret harmonic on the D string is exactly the same note as the 5th-fret harmonic on the A string (the second-thickest string).
- The 7th-fret harmonic on the A string is exactly the same note as the 5th-fret harmonic on the E string (the thickest string).
Most of the notes that are offered to you as reference pitches (such as from a guitar) are in a higher octave. If you tried to match the higher note exactly, the string you're tuning would snap and whip around your ears. Comparing notes that are an octave (or two) apart is easiest using harmonics.
When you strike a harmonic on a string that isn't in perfect tune, you can hear a beating or wavering sound. Let the harmonics ring, and slowly turn the tuning head of the string you're trying to tune. If the wavering gets faster, you're turning in the wrong direction. If the wavering gets slower, you're turning in the correct direction. Turn the tuning head until the wavering stops. When the tone is even, your string is in tune. If the wavering gets slower and then speeds up again, you've turned the tuning head past the correct pitch. In this case, slowly turn the tuning head in the other direction until the wavering stops.
Playing a Song on Your Bass Guitar
Ladies and gentlemen, it's time for your very first song! What? Already? You bet! You may not be ready to tour, but you can certainly play along with the song on Track 2. In fact, you can do it with one hand tied behind your back. All you need to do is play the open strings on your bass . . . and break out some attitude.
Tracks 2 and 3 are play-alongs of two songs, the first using the open strings and the second using closed strings. I cover both scenarios in detail in the following sections. When you're comfortable with the songs, eliminate the bass on the recording by panning to one side so you can play along without any help. You can see me playing these songs in Video 3.
Making some noise with the open strings
Let your striking hand become comfortable with the individual strings on your bass. The thickest string, the one closest to your head, is the E string. Strike it a few times to get a feel for it. Careful! Don't strike it too hard. You get plenty of sound by striking the strings with a light touch, and quite frankly, the bass sounds at its best with a light touch.
The next string, the second-thickest, is the A string. Same deal here: Strike it a few times until you're comfortable and it sounds good. Next to the A string is the D string. Go ahead, you know what to do. Finally, the fourth string, the skinny one closest to your feet, is the G string (to bass players, it's more than a fashion statement). Make it sound good and get ready to rock and roll!
When you look at Figure 2-23, you see the letters that correspond to your open strings. Strike the appropriate string, in tempo with the song, each time you see its letter. Listen to Track 2 a few times before playing along.

Figure 2-23: Song played on open strings.
Closing the strings
Ready for another rousing performance? If you've really followed my instructions up to this point and tied one hand behind your back, please untie it now. You need it for this next song.
Looking at the fingerboard of your bass, you see the frets and the dots (inlays) between some of the frets. Find the 3rd fret. In the space between the 2nd and 3rd frets, you can see a dot. Press down on the E string with a finger (not the thumb) of your fretting hand in that space so the string is now touching the 3rd (and 2nd) fret. You have just “closed” the E string. While holding the string in place with your fretting hand, strike the same string with your other hand and listen to the sound. Instead of an E, you're now playing a G.
Find a balance in strength and coordination with both hands. If you don't press strongly enough with your fretting hand, the string will buzz; if you press too hard, it will hurt. If you strike too hard with the other hand, the string will rattle; if you don't strike it hard enough, you won't get much sound. Keep experimenting and have fun. Repeat this process with all the strings and get your hands used to what each string feels and sounds like.
Use your newfound skill in the song on Track 3. To keep things clear, the song in Figure 2-24 is written descriptively rather than in musical notation. When you see “E string, 3rd fret”; it means that you press the E string to the 3rd fret and strike it evenly in time with the music. When you see “A string, 3rd fret” you do the same with the A string. Ditto for “D string, 3rd fret” as well as “G string, 3rd fret.” Only the 3rd fret is being used right now so you can acquaint yourself with the sound and feel of the closed strings.

Figure 2-24: Song using closed strings.
You're now well on your way to being a full-fledged bass player. Congratulations!