10
CHAPTER
Electric Appliance and Air Conditioner Parts
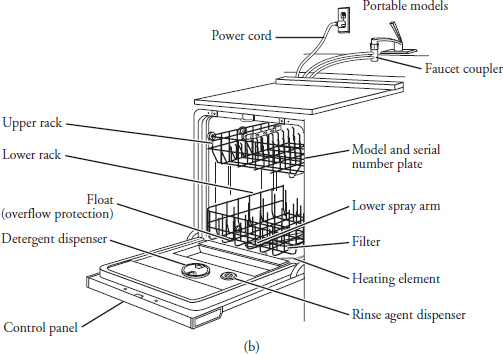
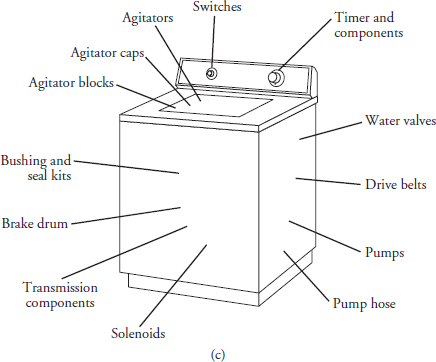
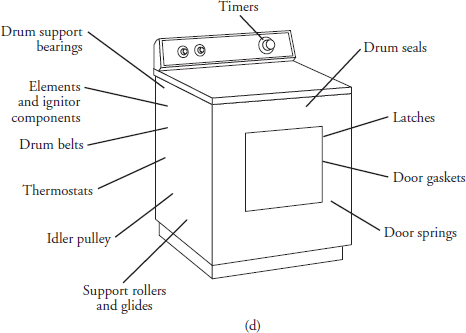
Servicing a highly complex electromechanical appliance or room air conditioner is not as hard as might be expected. Just keep in mind that an appliance or air conditioner is simply a collection of parts, located inside a cabinet, coordinated to perform a specific function (Figures 10-1a, 10-1b, 10-1c, 10-1d, and Figure 9-4). Before servicing an appliance or air conditioner, you must know what these parts are and how they function.
FIGURE 10-1a Typical locations of electric range parts.
FIGURE 10-1b Typical locations of dishwasher parts.
FIGURE 10-1c Typical locations of automatic washer parts.
FIGURE 10-1d Typical locations of automatic dryer parts.
The Switch
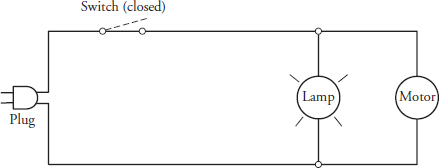
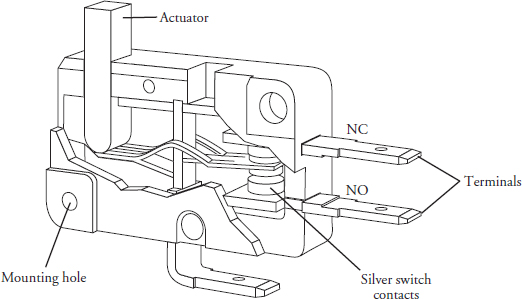
The switch is a mechanical device used for directing and controlling the flow of current in a circuit. Simply put, the switch can be used for turning a component on or off (Figure 10-2). Internally, the switch has a set of contacts that close, allowing the current to pass; when opened, current is unable to flow through it. Built into the switch, a linkage mechanism actuates these contacts inside of the closed housing (Figure 10-3).
FIGURE 10-2 The wiring diagram illustrates a switch in the closed position. If the switch is closed, the light and motor are on. If the switch is open, the light and motor are off.
FIGURE 10-3 The exploded view of a switch.
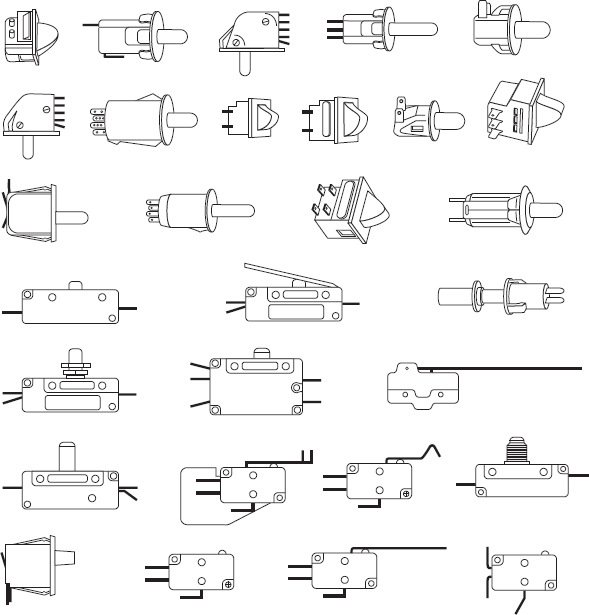
Switches come in a wide range of sizes and shapes, and can be used in many different types of applications (Figure 10-4). The voltage and amperage rating is marked on the switch or on the mounting bracket for the type of service the individual switch was designed to do. The switch housing is usually marked with the terminal identification numbers that correspond to the wiring diagram. These identify the contacts by number: normally open (NO) contacts, normally closed (NC) contacts, or common (COM) contacts. Internally, the switch can house many contact points for controlling more than one circuit.
FIGURE 10-4 This is a sample of the many types of switches used in major appliances.
When a switch failure is suspected, remember that there are only three problems that can happen to a switch:
• The contacts of the switch might not make contact. This is known as an open switch.
• The switch’s contacts might not open, causing a shorted switch.
• The mechanism that actuates the contacts might fail. This is a defective switch.
When these problems arise, the switches are not repairable, and they should be replaced with a duplicate of the original.
Pressure Switch
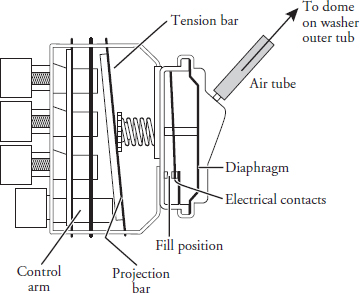
The pressure switch is a specialty switch, with a similar operation to those mentioned previously, but with one important exception: The pressure switch is actuated by a diaphragm that is responsive to pressure changes (Figure 10-5). This switch can be found in washing machines and in dishwashers, and it operates as a water level control. Other uses include furnaces, gas heaters, computers, vending machines, sump pumps, and other low-pressure applications. The pressure switch is not serviceable, and should be replaced with a duplicate of the original.
FIGURE 10-5 Construction of a pressure switch.
Thermostat
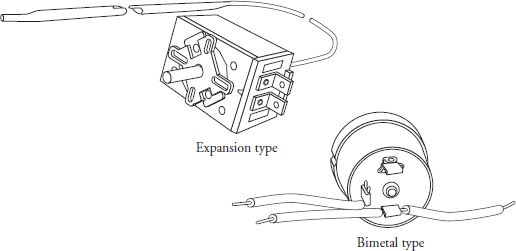
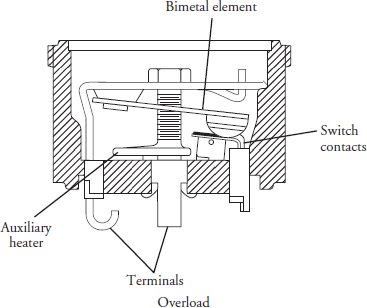
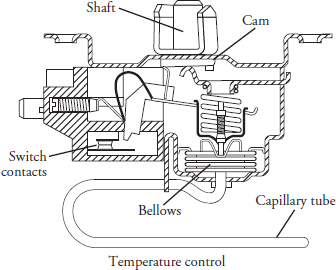
The thermostat operates a switch. It is actuated by a change in temperature. The two most common heat-sensing methods used in appliances and air conditioners are the bimetal and the expansion thermostats (Figure 10-6).
FIGURE 10-6 Bimetal and expansion thermostats.
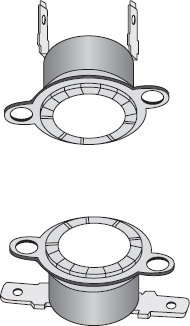
The bimetal thermostat (Figure 10-7) consists of two dissimilar metals combined together. Any change in temperature will cause it to deflect, actuating the switch contacts. When the bimetal cools, the reverse action takes place.
FIGURE 10-7 Construction of a bimetal thermostat.
The expansion (temperature control) thermostat (Figure 10-8) uses a liquid in a tube that is attached to bellows. The liquid converts to a gas when heated and travels up the tube to the bellows. This causes the bellows to expand, thus actuating the switch contacts. When the gas cools, the reverse action occurs.
FIGURE 10-8 Construction of an expansion (temperature-control) thermostat.
Thermostats are used in applications as diverse as gas and electric ranges, automatic dryers, room air conditioners, irons, waterbeds, spas, and in heating and refrigeration units.
Electromechanical Timer
Although the timer is the most complex component in the appliance, don’t assume that it is the malfunctioning part. Check all of the other components associated with the symptoms as described by the customer.
Electromechanical timers are utilized for controlling performance in automatic washers, automatic dryers, and dishwashers. Most of these timers are not serviceable and should be replaced with a duplicate of the original.
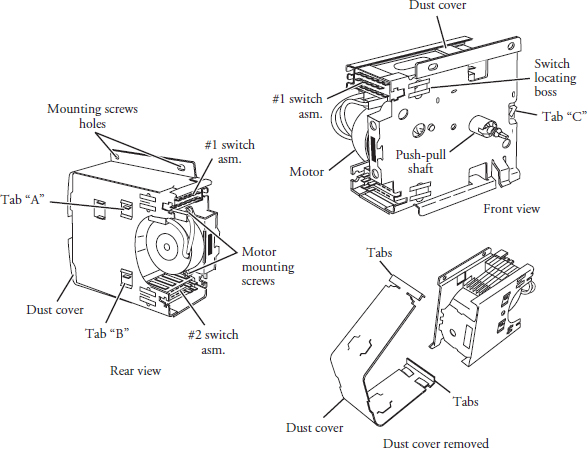
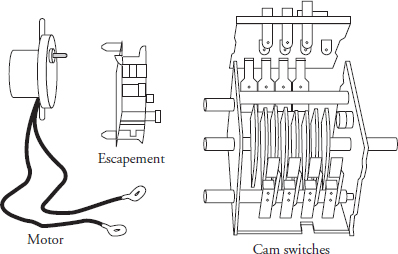
The timer assembly is driven by a synchronous motor in incremental advances. It controls and sequences the numerous steps and functions involved in each cycle of an appliance (Figure 10-9). The timer directs the on and off times of the components in an electrical circuit. It consists of three components assembled into one unit: the motor, the escapement, and the cam switches (Figure 10-10).
FIGURE 10-9 An electromechanical timer.
FIGURE 10-10 The timer components: motor, escapement, and cam switches.
The Motor
The motor is a synchronous motor, geared to drive the escapement. In Figures 10-9 and 10-10, the motor is mounted on the timer assembly. These are specially designed motors whose speed is controlled by the 60-cycle period of the current, rather than by the fluctuating supply voltage.
The Cam Switches
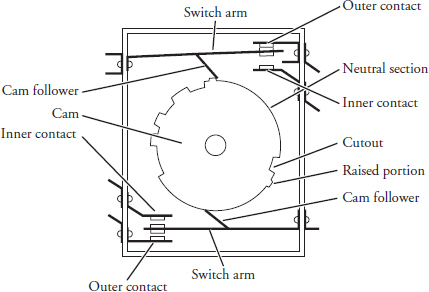
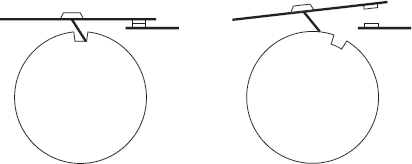
The number of switch contacts and cams varies with the number of functions an appliance performs. Some of the switches perform two or more functions (Figure 10-11). The particular shape of the cam varies with the number of switch contacts that it controls and with the length of time each switch contact opens and closes (Figure 10-12). A single metal strip, called a cam follower (see Figure 10-11), is anchored to each cam switch arm. As the cam turns, this metal strip follows the contour of the circumference of the cam, causing the cam switch to open or close at the proper time.
FIGURE 10-11 The construction of the timer cam and switch contact.
FIGURE 10-12 How a switch contact opens and closes on the cam.
The Escapement
The escapement is a spring-controlled mechanism that limits the cam shaft rotation to a set number of degrees in each increment (see Figure 10-10). The cam follower moves rapidly to ensure a snap action of the switch contacts and also to prevent any arcing of the points. Not all timers have an escapement. For example, some dryer timers, and all defrost and electronic timers, have no escapement.
Relays
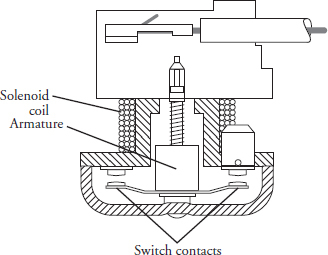
A relay is an electrically operated switch. It contains an electromagnet with a fixed coil and a movable armature, which actuates a set of contacts to open and close electric circuits (Figure 10-13). Relays have heavy-duty switching contacts, and they are used to operate larger components, such as motors and compressors. The most common failures of relays are:
• Open relay coil
• Burned switch contacts
• Armature not actuating the contacts
FIGURE 10-13 Construction of a relay.
A broken relay is not serviceable and should be replaced with a duplicate of the original.
Solenoids
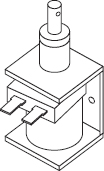
A solenoid is a device used to convert electrical energy into mechanical energy (Figure 10-14). When a solenoid is energized, it acts like an electromagnet and is positioned to move a pre-designated metal object. The work performed by the moving plunger makes the solenoid coil useful in appliances. Some solenoids are equipped with a free-moving armature or plunger. Common failures of a solenoid are:
• Open coil
• Shorted coil
• Jammed armature
FIGURE 10-14 The solenoid coil and plunger. When the coil is activated, the plunger will be drawn to the center of the magnetic field.
A solenoid is not a serviceable part and should be replaced with a duplicate of the original. These devices are manufactured in a variety of designs for various load force and operational requirements. Solenoids are found in automatic washers and dryers, gas and electric ranges, automatic dishwashers, refrigerators, freezers, automatic ice machines, and in heating and air conditioning units.
Water Valves
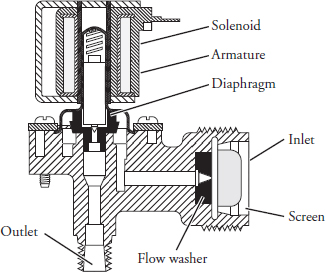
The water inlet valve controls the flow of water into an appliance, and is solenoid-operated (Figure 10-15). When it is energized, water in the supply line will pass through the valve body and into the appliance. Some of the different types of water inlet valves that are used on appliances include:
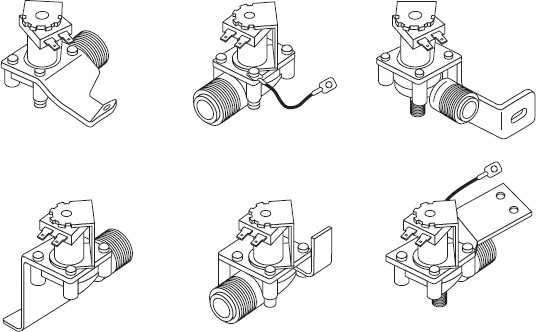
• Single water inlet valve (Figure 10-16) Used on dishwashers, ice makers, refrigerators, undercounter appliances and ice machines.
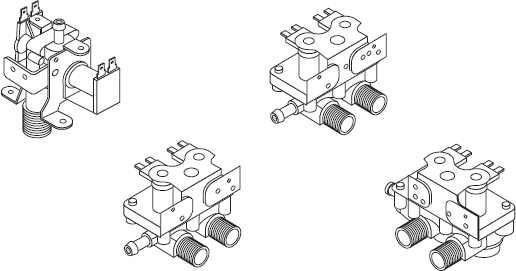
• Dual water inlet valve (Figure 10-17) Used on washing machines, refrigerators, and ice makers. Some dishwasher models also use dual water inlet valves. The inlet side of the valve has a fine mesh screen to prevent foreign matter from entering the valve. Some water valves also have a “water hammer” suppression feature built into them.
FIGURE 10-15 Construction of a water valve.
FIGURE 10-16 The single water valves are just some of the different types available that are used in major appliances.
FIGURE 10-17 These dual water valves are designed for dual water inlet connections.
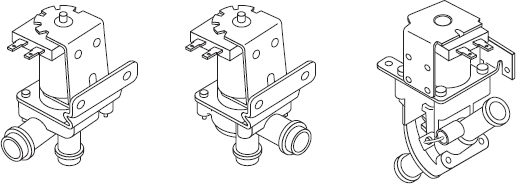
Drain valves (Figure 10-18) are used on some dishwasher and washing machine models to control the drainage of the water in the tub and its expulsion into the sewage system of the residence.
FIGURE 10-18 The drain water valves.
The water valve should not be serviced. Replace it with a duplicate of the original.
Motors
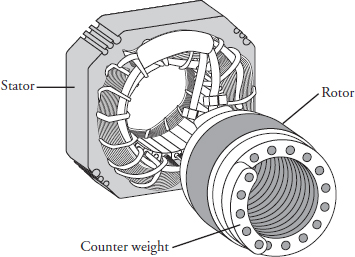
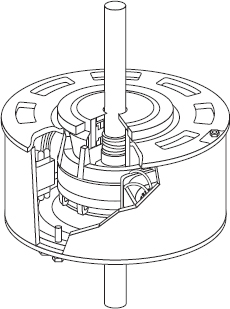
The two major assemblies that form an electric motor are the rotor and the stator (Figure 10-19). The rotor is made up of the shaft, rotor core, and (usually) a fan. The stator is formed from steel laminations, stacked and fastened together so that the notches form a continuous lengthwise slot on the inside diameter. Insulation is placed so as to line the slots; and then coils, wound with many turns of wire, are inserted into the slots to form a circuit. The wound stator laminations are pressed into, or otherwise assembled within, a cylindrical steel frame to form the stator (Figure 10-20). The end bells, or covers, are then placed on each end of the motor. One important function of the end bells is to center the rotor or armature accurately within the stator to maintain a constant air gap between the stationary and moving cores (Figures 10-19 and 10-21).
FIGURE 10-19 The stator and rotor.
FIGURE 10-20 Stator and rotor construction.
FIGURE 10-21 End bells position the motor shaft in the center of the stator.
These coils of wire are wound in a variety of designs, depending upon the electrical makeup of the motor. They provide two or more paths for current to flow through the stator windings. When the coils have two centers, they form a two-pole motor; when they have four centers, they form a four-pole motor. In short, the number of coil centers determines the number of poles that a motor has (Figure 10-22).
FIGURE 10-22 Two-pole motor and four-pole motor.
Thermal protection in a motor is provided by a temperature-sensitive element, which activates a switch. This switch will stop the motor if it reaches the pre-set temperature limit. The thermal protector in a motor is a non-replaceable part, and the motor will have to be replaced as a complete component. There are two types of thermal protection switches:
• Automatic reset It automatically resets the switch when the temperature has been reduced.
• Manual reset It has a small reset button on the motor on the opposite end from the shaft.
Several types of motors that are used for different types of applications include the following:
• Synchronous motors are permanent magnet-timing motors, often used in automatic ice cube makers, water softeners, and humidifiers. In addition, they are integral to timers for automatic washers, automatic dryers, and dishwashers.
• Shaded pole motors are used as continuous duty motors, with limited or adjustable speeds. They are used for small fans and clocks.
• Split phase motors are used as continuous duty motors, with fixed speeds. They are often used in automatic washer and dryer drive motors.
• Capacitor start motors are similar to the split-phase motors, and they are used in hard-to-start applications, such as compressors and pumps.
• Permanent split capacitor motors are used in a variety of direct-drive air-moving applications—for example, air conditioner fans.
• Three-phase motors are used in industrial or large commercial applications where three-phase power is available.
• Multispeed, split-phase motors are used in fans, automatic dryers, automatic washers, and many other appliances.
• Induction three-phase AC motor, 120 volt, used in some domestic washer models.
• Variable-speed, reversible, three-phase induction DC motor, used in some domestic washer models.
• Direct current (DC) motors, used in refrigerators, washers, dryers, ranges, microwave models.
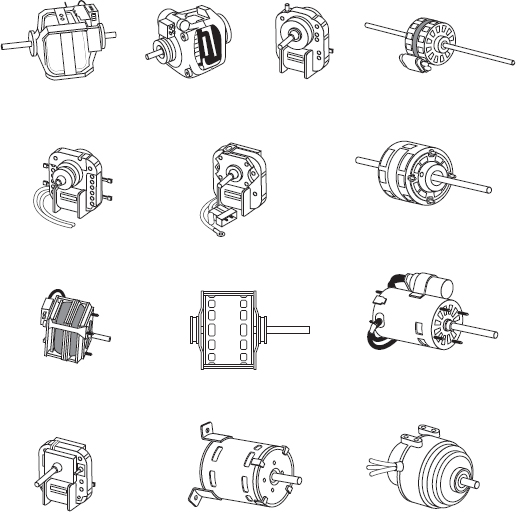
Figure 10-23 illustrates some of these motors. Appliance motors are not repairable, and they should be replaced with a duplicate of the original.
FIGURE 10-23 Motors are available in different sizes and shapes.
Compressors
The compressor is an electric motor that drives a mechanical compression pump designed to compress the refrigerant vapors and to circulate the refrigerant within a sealed system. Domestic refrigeration and room air conditioners use a hermetic compressor. The electric motor and mechanical compression pump are sealed within the same housing (Figure 9-7), and it is a non-serviceable part. If the compressor fails, it must be replaced with a duplicate of the original by a certified technician. Two types of compressors are used in domestic refrigeration and room air conditioners: reciprocating and rotary. For more information on compressor construction, visit the following compressor manufacturer’s websites:
Capacitors
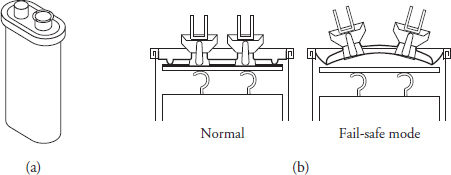
A capacitor is a device that stores electricity to provide an electrical boost for motor starting (Figure 10-24). Most high-torque motors need a capacitor connected in series with the start winding circuit to produce the desired rotation under a heavy starting load.
FIGURE 10-24 (a) The capacitor is rated by voltage and by capacitance (in microfarads). (b) This built-in disconnect device is also known as a fail-safe.
There are two types of capacitors:
• Start capacitor This type of capacitor is usually connected to the circuit between the start relay and the start winding terminal of the motor. Start capacitors are used for intermittent (on and off) operation.
• Run capacitor The run capacitor is also in the start winding circuit, but it stays in operation while the motor is running (continuous operation). The purpose of the run capacitor is to improve motor efficiency during operation.
Capacitors are rated by voltage and by their capacitance value in microfarads (µF). This rating is stamped on the side of the capacitor. A capacitor must be accurately sized to the motor and the motor load. Always replace a capacitor with one having the same voltage rating and the same (or up to 10 percent greater) microfarad rating. On larger capacitors, the rating is stamped on the side. Also, watch out for the decimal point on some capacitors. The rating might read .50 µF instead of 50 µF. Small capacitors in electronic circuits are rated by numbering or are color-coded.
Capacitors are used in electrical circuits to perform the following:
• An electrical voltage boost in a circuit
• Control timing in a computerized circuit
• Reduce voltage disruptions and allow voltage to maintain a constant flow
• Block the flow of direct current when fully charged and allow alternating current to pass in a circuit
Both run and start capacitors can be tested by means of an ohmmeter or a capacitor tester.
Testing a Capacitor
Before testing a capacitor, disconnect the electricity. This can be done by pulling the plug from the electrical outlet. Be sure that you only remove the plug for the product you are working on. Or, you can disconnect the electricity at the fuse panel or at the circuit breaker panel.
Some appliance or air conditioner models have the capacitor mounted on the motor, and some are mounted to the cabinet interior in the rear of the machine. Access might be achieved through the front or rear panel, depending on which model you are working on. Do not touch the capacitor until it’s discharged.
WARNING A capacitor will hold a charge indefinitely, even when it is not currently in use. A charged capacitor is extremely dangerous. Discharge all capacitors immediately any time that work is being conducted in their vicinity. Redischarge after repowering the equipment if further work must be done.
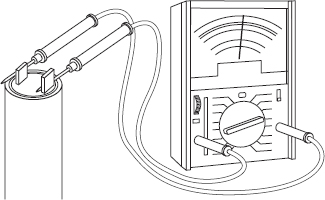
Many capacitors are internally fused. If you are not sure, you can use a 20,000-ohm, 2-watt resistor to discharge the capacitor. Do not use a screwdriver to short out the capacitor. By doing so, you will blow out the fuse in the capacitor and the capacitor will not work. Safely use an insulated pair of pliers to remove the wires from the capacitor, and place the resistor across the capacitor terminals. Set the ohmmeter on the highest scale, and place one probe on one terminal and the other probe on the other terminal (Figure 10-25). Observe the meter action. While the capacitor is charging, the ohmmeter will read nearly zero ohms for a short period of time. Then the ohmmeter reading will slowly begin to return toward infinity. If the ohmmeter reading deflects to zero and does not return to infinity, the capacitor is shorted and should be replaced. If the ohmmeter reading remains at infinity and does not dip toward zero, the capacitor is open and should be replaced.
FIGURE 10-25 Placing ohmmeter test leads on the capacitor terminals.
When using a capacitor analyzer to test capacitors, it will show whether the capacitor is “open” or “shorted.” It will tell whether the capacitor is within its microfarads rating, and it will show whether the capacitor is operating at the proper power-factor percentage. The instrument will automatically discharge the capacitor when the test switch is released.
Heating Elements
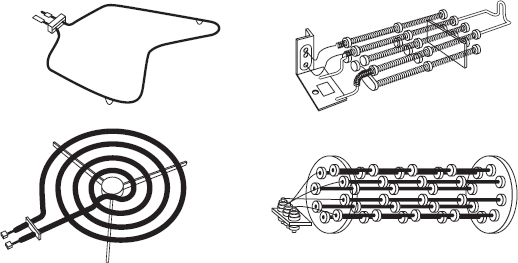
Most heating elements are made with a nickel-chromium wire, having both tensile strength and high resistance to current flow. The resistance and voltage can be measured with a multimeter to verify if the element is functioning properly. Heating elements are available in many sizes and shapes (Figure 10-26). They are used for
• Cooking food
• Heating air for drying clothes
• Heating water to wash clothes, dishes, etc.
• Environmental heating
FIGURE 10-26 Heating elements.
Heating elements are not repairable, and they should be replaced with a duplicate of the original.
Mechanical Linkages
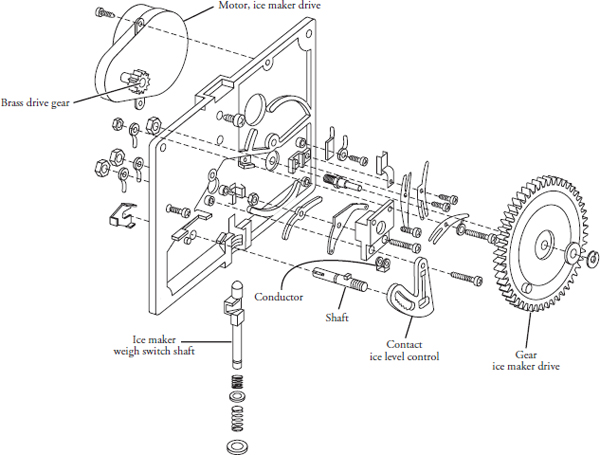
The mechanical linkages are those devices (connecting rods, gears, cams, belts, levers, pulleys, etc.) that are used on appliances and air conditioners in order to transfer mechanical energy from one point to another. Figure 10-27, the automatic ice maker, is an excellent example of this. Some other examples are:
• In the automatic dryer, the motor is turning a pulley, which moves a belt, which turns the drum.
• In the automatic washing machine, the motor turns a pulley, which moves the belt, which turns the transmission gears, which performs the agitation or spin cycle.
• In the automatic ice maker, the timer gear turns the drive gear, which moves the cam, which actuates the switches and rotates the ice ejector.
FIGURE 10-27 The ice maker is a perfect example of mechanical linkages in use.
Wires
The wiring, which connects the different components in an appliance or air conditioner, is the highway that allows current to flow from point A to point B. Copper and aluminum are the most common types of wires that are used in appliances. They are available as solid or stranded. Wires are enclosed in an insulating sleeve, which might be rubber, cotton, or one of the many plastics. Wires are joined together or to the components by:
• Solderless wire connectors
• Solderless wire terminal connectors
• Solderless multiple-pin plug connectors
• Soldering
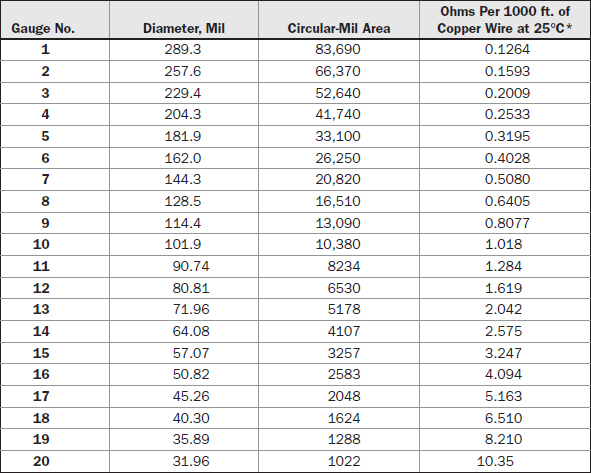
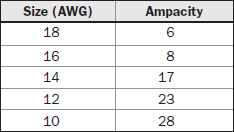
Never join copper and aluminum wires together, because the two dissimilar metals will corrode and interrupt the flow of current. The standard wire-gauge sizes for copper wire are listed in Table 10-1. As the gauge size increases from 1 to 20, the diameter decreases and the amperage capacity (ampacity) will decrease also (see Table 10-2).
TABLE 10-1 Standard Wire-Gauge Sizes for Copper Wire
TABLE 10-2 Wire Size and Ampacity
How to Strip, Splice, Solder, and Install Solderless and Terminal Connectors, and How to Use Wire Nuts on Wires
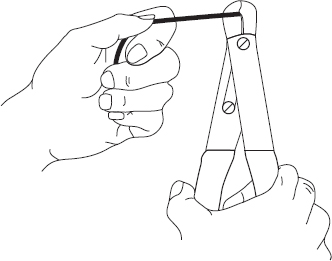
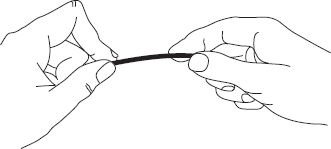
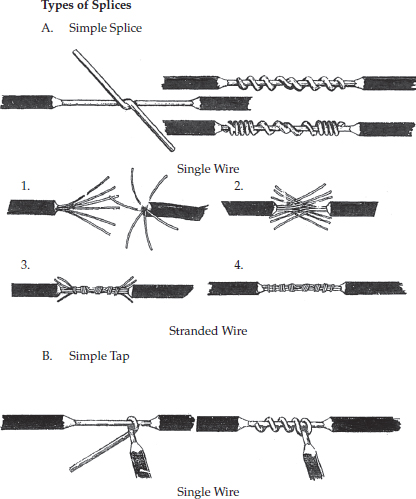
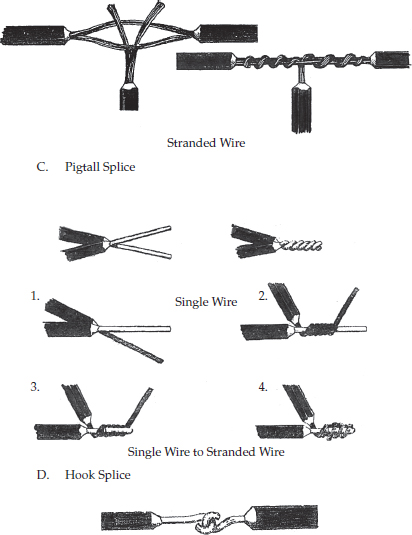
To strip the insulation off the wire, there are certain steps you need to follow. First, you must have a good wire stripper (Figure 10-28). Now, place the wire in the proper sized slot in the wire stripper and work the stripper back and forth until a cut is made in the entire insulation. Do not damage any of the strands in a stranded wire or put a knick in a solid wire; this will cause a weakness in the wire that may cause a break in the circuit in the not-too-distant future. To remove the insulation, hold the wire tight with one hand and use the other hand to gently move the insulation back and forth until the cut breaks clean and the unwanted insulation can be pulled off the wire (Figure 10-29). Next, taper the insulation with a knife to increase the wire’s flexibility, because a straight cut in the insulation will create a force that can cause a wire to break prematurely (Figure 10-30). Figures 10-31 and 10-32 illustrate the different methods of splicing single and stranded wires together.
FIGURE 10-28 Always use a wire stripper to remove the insulation from the wire.
FIGURE 10-29 Move insulation back and forth to remove insulation from wire.
FIGURE 10-30 Taper the insulation on the wire with a knife to increase the wire’s flexibility.
FIGURE 10-31 Different ways to splice stranded and solid wire together.
FIGURE 10-32 Different ways to correctly splice wire together.
To connect wires to screw terminals, the wire being attached at a screw terminal should be connected so that the loop lies in the direction the screw turns (Figure 10-33). The wire should loop the screw a little less than one full turn, but excessive loops around the screw terminal are not recommended, as this could cause wire damage.
FIGURE 10-33 Connecting a wire correctly to a screw terminal.
Here is a good guideline that you should practice for soldering wire splices (Figures 10-34, 10-35, and 10-36). First, the wire being soldered together should be bright and clean at the point of connection. The connection point should be tight so that the solder can flow between the joint and solidify without any wire movement. When soldering wires together, the wires should be coated with an electric soldering paste of flux, and soldered so that the solder melts and flows into every crevice of the spliced joint. After the soldered joint cools, the entire splice area should be covered with a waterproof plastic tape or heat-shrink covering to protect the joint from shorting out against the cabinet of the product.
FIGURE 10-34 Preparing to solder wires together. Connect the two ends of the wires as shown.
FIGURE 10-35 Having a tight wire connection and clean wires will allow the solder to flow through the joint.
FIGURE 10-36 When the solder cools off, tape the soldered splice to protect the wire from shorting out.
When you have to attach a solderless connector or wiring terminal to a wire, you should follow these guidelines. Solderless connectors should be used according to their color codes, and a connector for a smaller-gauge wire should never be used on a heavier-gauge wire. The wire connector might burn off the wire and break the circuit. A screw-on wire connector (also known as a wire nut) works well on pigtail splices (Figure 10-37).
FIGURE 10-37 Wire connector, also known as a wire nut. Twist wires in a clockwise direction; screw the wire nut cap in a clockwise direction onto the connected wires as shown.
When installing a crimp-on connector (Figure 10-38), there should not be a gap between the insulation and the terminal connector, and if there is a gap, a plastic sleeve should be added to cover the bare wire, or reinstall a new connector if needed. Always prevent wires from shorting out and breaking the circuit, causing you to have to return to the service call.
FIGURE 10-38 When attaching terminal connectors, try not to have any gaps from the end of the insulation to the end of the wire connector.
Circuit Protection Devices
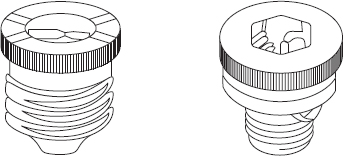
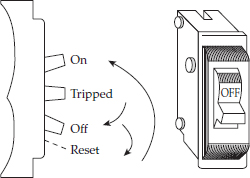
Circuit protection devices are important for appliances and air conditioners. These devices will protect the electrical circuits and components from damage from too much current flow. Each fuse (Table 10-3) or circuit breaker (Figures 10-39, 10-40, and 10-41) must be rated for voltage and current. Never replace a fuse or circuit breaker with one that is not correctly rated for the product. Fuses and circuit breakers must be able to do the following:
• Sense a short in the circuit
• Sense an overloaded circuit (too much current)
• Not open a circuit under normal operating current conditions
• Open a circuit before electrical damage to components or product
• Not exceed the current carrying capacity of the circuit
TABLE 10-3 Classifications of Cartridge Fuses According to Underwriters Laboratories (UL)
FIGURE 10-39 Two types of screw-in fuses.
FIGURE 10-40 A cartridge fuse.
FIGURE 10-41 A circuit breaker.
Other circuit protection devices include:
• Thermal overload Operated by heat; usually resettable; can also be one-time use (Figure 10-7).
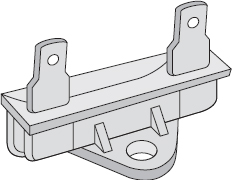
• Thermal fuse Encased in an insulated case; one-time use; turns circuit off (Figure 10-42).
• Bimetal thermostats Resettable switches; rated by temperature change; turns circuit on or off (Figure 10-43).
• Bimetal switches Turns a component on or off by design temperature rating (Figure 10-6).
• Fusible links Has a one-time thermal limit; turns the circuit off (Figure 10-44).
FIGURE 10-42 A thermal fuse.
FIGURE 10-43 A bimetal thermostat.
FIGURE 10-44 A fusible link (also known as a fuselink).


