28
CHAPTER
Residential Under-the-Counter Ice Cube Makers
There are three operating systems in the self-contained ice cube maker:
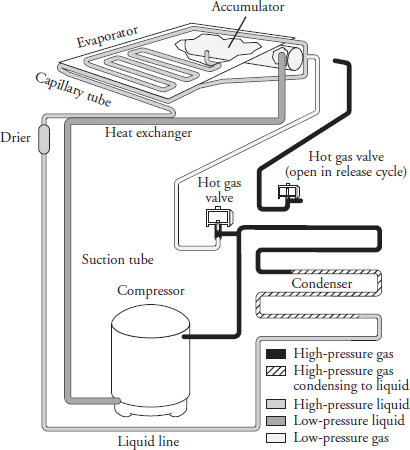
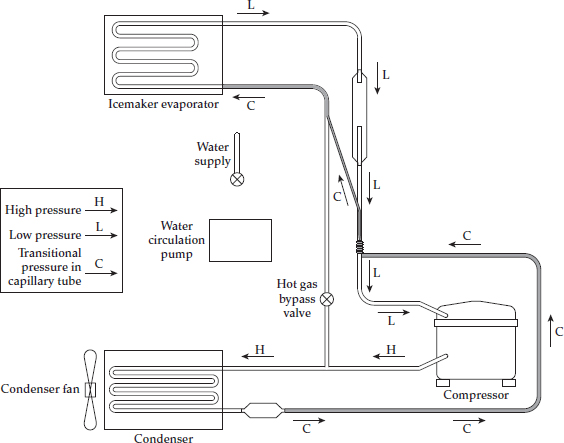
• The refrigeration system The refrigeration sealed system in the Type 1- self-contained ice cube maker operates similar to a refrigerator/freezer sealed system. The older models used R-12 and the newer models use R-134a. The ice cube maker has a hot gas solenoid valve to harvest the ice; it allows the high pressure refrigerant gas to bypass the condenser and flow through the condenser accumulator tube (Figure 28-3). When the refrigerant enters the condenser accumulator, the hot gas enters into the evaporator plate and it will evenly heat the evaporator plate so that the ice slab will release from the evaporator plate quickly and evenly.
FIGURE 28-3 A pictorial view of a refrigeration system.
• The water system The water system provides fresh water to the ice cube maker for ice production. The water in the reservoir will recirculate as ice is produced. The water system will also flush away any impurities, minerals, and contaminates at the end of the cycle. The water system will recirculate the water in the clean cycle.
• The electrical system The ice cube maker’s electrical system provides voltage for the refrigeration and the water systems to operate, and controls the operating and cleaning cycles.
Safety First
Any person who cannot use basic tools or follow written instructions should not attempt to install, maintain, or repair any residential under-the-counter ice cube makers.
Any improper installation, preventive maintenance, or repairs could create a risk of personal injury or property damage.
If you do not fully understand the installation, preventive maintenance, or repair procedures in this chapter, or if you doubt your ability to complete the task on your automatic ice maker, please call your service manager.
The following precautions should also be followed:
• Never place fingers or hands on the automatic ice maker mechanism while the ice cube maker is plugged in.
• Disconnect the electrical supply to the ice cube maker before servicing the ice cube maker.
• Be careful of any sharp edges on the ice cube maker, which might result in personal injury.
• Do not attempt to operate the ice cube maker unless it has been properly reinstalled, including the grounding and electrical connections.
Before continuing, take a moment to refresh your memory on the safety procedures in Chapter 2.
Automatic Ice Cube Makers in General
Much of the troubleshooting information in this chapter covers ice cube makers in general, rather than specific models, in order to present a broad overview of service techniques. The illustrations that are used in this chapter are for demonstration purposes only, to clarify the description of how to service ice cube makers. They in no way reflect a particular brand’s reliability.
Type 1-Self-Contained Ice Cube Maker
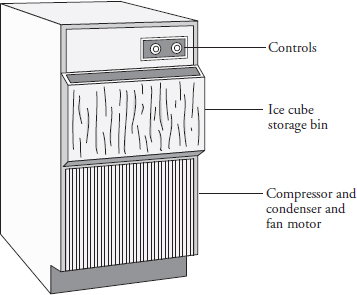
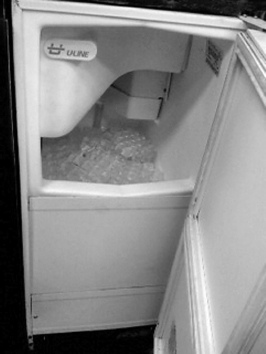
This type of ice cube maker is a freestanding, self-contained refrigeration appliance that produces a slab of ice, which is then cut into ice cubes (Figure 28-1). The production of ice cubes is all done automatically, and the entire mechanism is stored within the ice cube maker cabinet. The self-contained ice cube maker can also be installed under the counter. The thickness of the ice cubes can be adjusted by the thickness control, located on the control panel. This ice cube maker can produce up to 50 pounds of ice cubes in a 24-hour period. The amount of ice cubes will vary, depending on where it is installed, the room temperature, and the supply water temperature.
FIGURE 28-1 The self-contained ice cube maker.
Principles of Operation
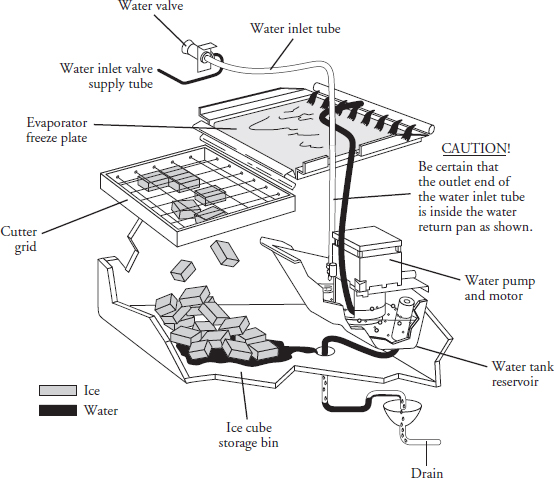
In the freeze cycle, water flows constantly, and it is recirculated over the evaporator freeze plate until a slab of ice is formed (Figure 28-2). When the ice slab reaches a predetermined thickness, the evaporator freeze plate temperature is sensed by the thermostat and the freeze cycle is terminated. At that point, the defrost cycle will begin to release the ice slab from the evaporator freeze plate. The ice slab will slide down onto the cutter grid, which cuts the ice slab into ice cubes. At the same time, the ice maker has automatically switched back into the freeze cycle.
FIGURE 28-2 A pictorial view of the water system.
When the defrost cycle begins, the remaining water in the water tank reservoir is discarded through the overflow tube. At that point, fresh water will enter through the water valve and go into the water tank reservoir.
The refrigeration cycle (Figure 28-3) in this type of ice maker is similar to that in a conventional refrigerator/freezer. The compressor pumps the refrigerant into the condenser coil, which is cooled by a fan and motor. The refrigerant leaves the condenser coil as a high-pressure liquid, passes through the dryer, and enters the capillary tube. The refrigerant is next metered through the capillary tube and then enters the evaporator freeze plate. The refrigerant gas then leaves the evaporator freeze plate and returns to the compressor.
When the ice maker goes into the defrost cycle, it energizes the hot gas solenoid, which reverses the refrigeration cycle, during which the condenser fan motor and water pump will stop. The hot gas passes through the evaporator freeze plate, heating it up enough to release the ice slab. The thermostat senses the temperature of the evaporator freeze plate again and activates the freeze cycle. The hot gas solenoid valve will then close, the water valve will close, the condenser fan motor will start, the water pump will start, and the freeze cycle will begin to manufacture a new slab of ice.
Step-by-Step Troubleshooting by Symptom Diagnosis
When servicing the type-1-self-contained ice cube maker, don’t overlook the simple things that might be causing the problem. Step-by-step troubleshooting by symptom diagnosis is based on diagnosing malfunctions, with possible causes arranged into categories relating to the operation of the automatic ice maker. This section is intended only as a checklist to aid you in diagnosing a problem. Look at the symptom that best describes the problem you are experiencing with the automatic ice maker, and then correct the problem.
Compressor Will Not Run and There Is No Ice in the Storage Bin
• Is the ice cube maker located in an area where the temperature is below 55 degrees Fahrenheit?
• Test for proper voltage supply.
• Check for loose or broken wires.
• Test the compressor, relay, and overload protector.
• Check the controls for the proper setting.
• Test the bin thermostat for continuity. If contacts are open, replace the thermostat.
• Test the compressor.
Compressor Runs, but There Is No Ice in Storage Bin
• Check water supply.
• Check water valve.
• Check evaporator thermostat.
• Check the hot gas solenoid. It might be stuck “open.”
• Check for sealed-system problems.
• Check for excessive use of ice cubes.
• Test cutter grid.
• Check wiring against wiring diagram.
• Is the water inlet tube from the water valve inserted in the return trough?
• Check condenser fan motor.
Ice Storage Bin Is Full of Ice and the Compressor Runs Continuously
• Check the calibration on the bin thermostat.
• Test the bin thermostat for continuity. Are the contacts stuck shut?
• Check wiring against the wiring diagram.
Low Ice Production
• Is the ice cube maker located in an area where the temperature is below 55 degrees Fahrenheit?
• Inspect the storage bin. Is water falling on the ice cubes?
• Check the calibration on the bin thermostat.
• Check the thickness control. Ice cubes produced should be between 1/2 and 5/8 inch thick.
• Check the hot gas solenoid. It might be stuck partially open.
• Check for sealed-system problems.
• Check the water supply in the reservoir. There might not be enough water circulating over the evaporator freeze plate.
Excessive Water Dripping on the Ice Cubes
• Is the water tank overflowing? Check for a blocked overflow tube.
• Is the water trough installed properly?
• Is the water inlet tube from the water valve inserted in the return trough?
• Check cutter grid for ice jam.
• Check the water deflector position.
• Check water valve for leaks.
Ice Cubes Are Too Thin
• Check thickness control setting.
• Check to see if there is enough water being circulated over the evaporator freeze plate.
• Check for restrictions in the water system.
• Check the water pump, motor, and the distributor tube.
• Check the thermostat calibration.
Ice Cubes Are Too Thick
• Check thickness control setting.
• Check the thermostat calibration.
The Condenser Fan Will Not Run During the Freeze Cycle
• Check the fan blades for binding on the shroud.
• Test the condenser motor for continuity.
• Check for open circuits against the wiring diagram.
• Check for a defective evaporator thermostat.
Water Pump Will Not Run
• Check the pump for binding in the housing.
• Check for open circuits against the wiring diagram.
• Test the pump motor for continuity.
• Check for a defective evaporator thermostat.
Water Tank Is Empty
• Water does not enter tank until the first defrost cycle is initiated.
• Check for an open circuit to the water valve solenoid.
• Check the water line for complete restriction.
• Check for a defective evaporator thermostat.
• Check the water valve; it might be stuck shut.
• Test the water valve solenoid for continuity.
• Check the water inlet tube from the water valve. It might not be directing the water into the tank.
• Check for a clogged water inlet screen in the water valve.
Treating the Water
In the freeze cycle, as the water passes over the evaporator freeze plate, the impurities in the water are rejected and only the pure water will stick to the plate. The more dissolved solids that are present in the water, the longer the freezing cycle. Bicarbonates, which are found in the water, are the most troublesome of all impurities. These impurities can cause:
• Scaling on the evaporator freeze plate
• Clogging of the water distributor head
• The water valve and many other parts in the water system to clog up
If the impurities become too concentrated in the water system, they can cause cloudy cubes and/or mushy ice.
All of the water system parts that come in direct contact with the water might become corroded if the water supply is high in acidity. The water might have to be treated in order to overcome problems with the mineral content. The most economical way to treat the water supply is with a polyphosphate feeder. This feeder is installed in the water inlet supply to prevent scale buildup. This will require less frequent cleaning of the ice maker. To install one of these feeders, follow the manufacturer’s recommendations in order to treat the water satisfactorily.
Cleaning Instructions for the Type-1 Ice Cube Maker
The manufacturer of this type of ice cube maker recommends that the ice maker be cleaned occasionally to help combat lime and mineral deposit buildup.
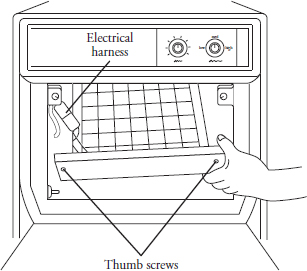
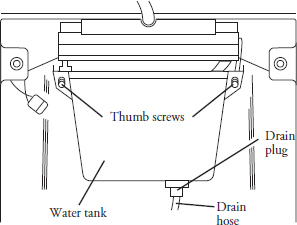
To clean the water system parts and the evaporator freeze plate, turn off the ice maker with the cycle switch. Open the bin door, and remove the cutter grid by removing the two thumb screws. Unplug the cutter grid, and remove it from the storage bin (Figure 28-4). A drain plug is located under the water tank. Remove it to drain the water out of the tank (Figure 28-5). After all of the water has been removed, reinstall the plug. Pour half a gallon of hot water into the tank, and set the switch to “clean.” The hot water will circulate through the water pump assembly and over the evaporator freeze plate, including all the water system components. Let the water circulate for five minutes, and then drain the water out of the tank. Replace the plug. Mix ice machine cleaner with half a gallon of hot water, and pour it into the water tank. If you use a recognized ice machine cleaner, follow the instructions on the label for best results. If you would rather prepare your own solution, add six ounces of citric acid and phosphoric acid to half a gallon of hot water, and pour into the water tank. Turn the switch to “clean,” and circulate this solution for 20 minutes or longer; then drain the water. Follow with two clean water rinses that circulate for five minutes, and then drain the water again.
FIGURE 28-4 Removing the thumbscrews, disconnecting the electrical harness, and pulling the cutter grid out of the bin.
FIGURE 28-5 The water tank is located in the storage bin.
Remove the splash guard, the water dispenser tube, and the plastic water pump tank. Place them in a solution of mild laundry bleach for five minutes, and then rinse. Use one ounce of bleach to one gallon of hot water. Be sure the water temperature does not exceed 145 degrees Fahrenheit—it could damage the plastic parts. Finally, sanitize the ice bin, door, ice cube scoop, grid panel, and grid with a bleach solution.
Reinstall all parts in the reverse order of disassembly, and test the ice machine operation. After the cleaning treatment, apply a release agent to the evaporator plate. This will retard any future buildup of scale and mineral deposits, and it will make the plate more slippery, which will provide for better ice slab release.
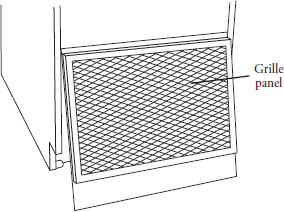
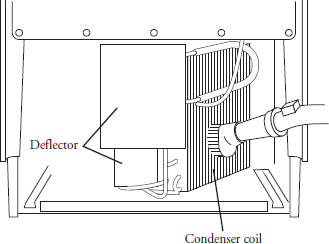
To clean the condenser coil, remove the screws that secure the front grille, and then remove the grille (Figure 28-6). Vacuum all lint and dust from the coil and from the surrounding area (Figure 28-7). Reinstall the grille. The frequency of cleaning will be determined by the surrounding conditions.
FIGURE 28-6 Front grille held in place with two screws located on the toe panel section.
FIGURE 28-7 The condenser section of the ice maker.
Prevention of Water-Utilizing System Explosions
In certain water-utilizing refrigeration systems, water can leak into the refrigerant side of the system. This can lead to an explosion of system components, including but not limited to the compressor. If such an explosion occurs, the resulting blast can kill or seriously injure anyone in the vicinity.
Systems at Risk of Explosion
Water-utilizing systems that have single-wall heat exchangers may present a risk of explosion. Such systems may include:
• Water-source heat pump/air conditioning systems
• Water cooling systems, such as ice makers, water coolers, and juice dispensers
Water-utilizing systems that have single-wall heat exchangers present a risk of explosion, unless they have one of the following:
• A high-pressure cutout that interrupts power to all leads to the compressor
• An external pressure-relief valve
How an Explosion Occurs
If the refrigerant tubing in the heat exchanger develops a leak, water can enter the refrigerant side of the system. This water can come in contact with live electrical connections in the compressor, causing a short circuit or a path to ground. When this occurs, extremely high temperatures can result. The heat buildup creates steam vapor that can cause excessive pressure throughout the entire system. This system pressure can lead to an explosion of the compressor or other system components.
Service Procedures
In light of the risk of explosion, be especially alert for signs of water leaking into the refrigerant side of the system. Whenever servicing or troubleshooting a water-utilizing system, always check to see if it has either a pressure-relief valve or a high-pressure cutout as previously described. If the system does not have at least one of these, disconnect all electrical power, and look for indications that water has leaked into the refrigerant side of the system. These indications may include:
• Observation of or a report of a blown fuse or tripped circuit breakers.
• Signs that water has leaked to the outside of the system.
• Reports that the system has made gurgling or percolating noises.
• A history of loss of refrigerant charge without a leak being found in the system.
NOTE Common leak-detection methods will not detect a water-to-refrigerant leak in the system’s heat exchanger(s).
• Observation of or a report of the compressor giving off an unusual amount of heat.
If any of these indications are present, do the following checks to determine if water has leaked into the refrigerant side:
Step 1: Check for a Ground Fault (a Short to Ground)
• Check the compressor for a ground fault (also known as a short circuit to ground).
• If a ground fault does not exist, go to step 2.
• If a ground fault does exist, keep the power off. Warning: To avoid electric shock, electrocution, and terminal venting with ignition, do not energize a compressor that has a ground fault. Mark and red-tag the compressor to indicate that there is a ground fault. Do not reconnect the power leads. Tape and insulate each power lead separately. Proceed to step 2. Do not replace the compressor or energize the system before performing step 2.
Step 2: Check for Water in the System
Once the compressor is cool to the touch, open the system process valve slightly to see if any water comes out of the system. Warning: Opening the system process valve while the compressor is hot can cause severe burns from steam coming out of the valve. If any water comes out of the process valve, the entire system must be replaced. See the section “Replacing a Single-Wall Water-Utilizing System.”
If water does not come out of the process valve, there is still a possibility that some water has leaked into the refrigerant side of the system. To address this possibility, determine if the system has a history of losing refrigerant charge without a leak being found or repaired.
If you find any indication of a history of losing refrigerant charge without detection of a leak, this is a sign that refrigerant has leaked into the water inside the heat exchanger. The entire system must be replaced. See the section “Replacing a Single-Wall Water-Utilizing System.”
If you do not find any indication of a history of loss of charge without detection of a leak, you still need to install one of the following:
• A high-pressure cutout that interrupts power to all leads to the compressor
• An external pressure-relief valve
Also, if you found a ground fault in the compressor in step 1, replace the compressor before applying power to the system.
Replacing a Single-Wall Water-Utilizing System
When replacing a single-wall water-utilizing system, replace the system with one that has one of the following:
• A double-wall heat exchanger(s)
• A high-pressure cutout that interrupts power to all leads to the compressor
• An external pressure-relief valve
Repair Procedures
Each repair procedure is a complete inspection and repair process for a single ice cube maker component, containing the information you need to test and replace components. The actual repair or replacement of any sealed-system component is not included in this chapter. It is recommended that you acquire refrigerant certification (or call an authorized service company) to repair or replace any sealed-system component. The refrigerant in the sealed system must be recovered properly.
Type-1 Ice Cube Maker Compressor, Relay, and Overload Protector
The compressor (reciprocating type) is the heart of the vapor compression system. It is used to circulate the refrigerant throughout the sealed system. The relay and overload are attached to the compressor. The relay starts the compressor and the overload protects the compressor. All three components are located in the machine compartment in the rear or front of the ice maker. The relay can be either a current or a PTC (positive temperature coefficient) type device. The overload is a bimetal switch that is secured to the outer shell of the compressor.
The typical complaints associated with failure of the compressor, relay, and overload protector are:
• Ice maker does not run at all.
• No new ice production.
• Ice cubes in the storage bin are melting rapidly.
• Compressor won’t run; it only hums.
To handle these problems, perform the following steps:
1.
Verify the complaint. Verify the complaint by asking the customer to describe what the ice maker is doing. It will be helpful if you can locate the actual service manual for the ice maker model you are working on to properly diagnose the ice maker.
The service manual will assist you in properly placing the ice maker in the service test mode for testing the ice maker functions.
2. Check for external factors. You must check for external factors not associated with the appliance. Is the appliance installed properly? Does the ice maker have the correct voltage? The voltage at the wall receptacle is between 108 volts and 132 volts during a load on the circuit. Do you have the correct polarity? (See Chapter 6.)
3. Disconnect the electricity. Before working on the ice maker, disconnect the electricity. This can be done by pulling the plug from the receptacle. Or disconnect the electricity at the fuse panel or at the circuit breaker panel. Turn off the electricity.
WARNING Some diagnostic tests will require you to test the components with the power turned on. When you disassemble the ice maker panel cover, you can position the panel in such a way that the wiring will not make contact with metal. This will allow you to test the ice maker components without electrical mishaps.
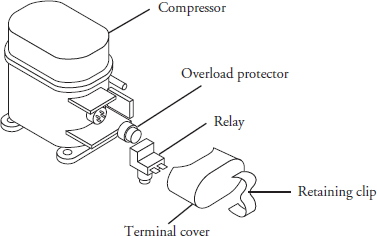
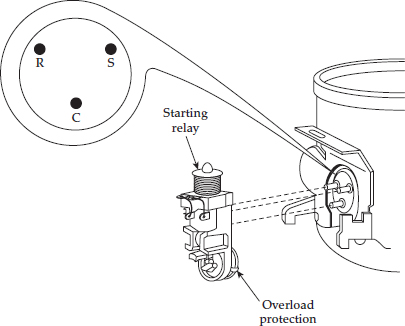
4. Gain access to the compressor. Access the compressor. To access the compressor, remove the front grille. Remove the two screws in the condensing unit base, and pull the unit toward you. Be careful to not damage any refrigerant lines. Next, remove the compressor terminal cover (Figure 28-8) by removing the retaining clip that secures the cover. Remove the terminal cover.
FIGURE 28-8 A pictorial view of compressor, overload, and relay.
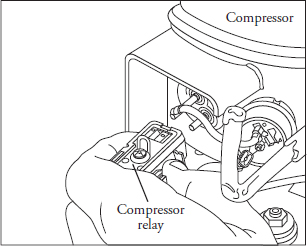
5. Test the compressor relay. To test the compressor relay, remove the relay by pulling it from the compressor terminals without twisting it (Figure 28-9). On the relay body is stamped the word TOP. Hold the relay so that TOP is in the up position. Next, place the probes of the ohmmeter on the relay terminals marked S and M. Set the meter scale on R × 1. The reading will show no continuity. Next, remove the probe from the terminal marked M, and place the probe on the side terminal marked L. The reading will show no continuity. Now, move the probe from terminal S, and place it on the terminal marked M. The reading will show continuity. With the probes still attached, turn the relay upside down (see Figure 25-35b), and perform the same tests. By turning the relay over, the switch contacts in the relay will close. When you retest the relay, you should get the opposite results. You should have continuity between terminals S and M and between S and L. The meter will not show continuity between M and L. If the relay fails this test, replace it.
FIGURE 28-9 Pull the relay off the compressor. Be careful not to break the compressor pins.
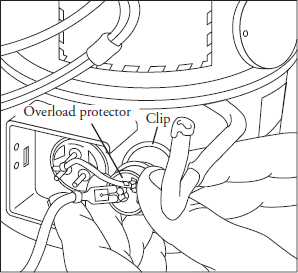
6. Test the overload protector. To test the overload protector, remove the wires from the overload protector and compressor terminals. Then remove the overload protector (from the compressor) by removing the retaining clip that secures the overload protector (Figure 28-10). Next, place the probes of the ohmmeter on the overload protector terminals. Set the meter scale on R × 1. The reading will show continuity. If not, replace the overload protector.
FIGURE 28-10 Disconnect the overload protector.
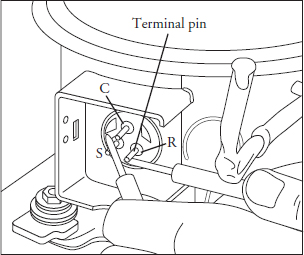
7. Test the compressor. To test the compressor, remove the relay and the overload protector. This will expose the compressor terminals. The compressor terminals are marked C, S, and R: C indicates the common winding terminal, S indicates the start winding terminal, and R indicates the run winding terminal. Next, place the probes of the ohmmeter on the terminals marked S and R (Figure 28-11). Set the meter scale on R × 1, and adjust the needle setting to indicate a zero reading. The meter reading will show continuity. Now place the meter probes on the terminals marked C and S. The meter reading will show continuity. Finally, place the meter probes on the terminals marked C and R. The meter reading will show continuity. The total number of ohms measured between S and R is equal to the sum of C to S plus C to R.
FIGURE 28-11 Testing the compressor windings.
To test the compressor for ground, place one probe on a compressor terminal and the other probe on the compressor housing or on any good ground (Figure 28-12). Set the meter scale to R × 1000. The meter reading will show no continuity. Repeat this for the remaining two terminals. The meter reading will show no continuity. If you get a continuity reading from any of these terminals to ground, the compressor is grounded and must be replaced.
FIGURE 28-12 Testing the compressor for ground.
Bin Thermostat
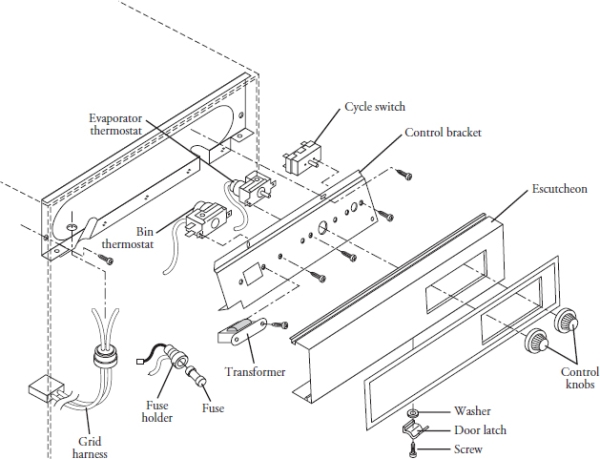
The bin thermostat is located behind the control panel (Figure 28-14). The thermostat sensing bulb is located in the ice maker bin compartment. It will sense how much ice is in the storage bin.
FIGURE 28-14 A pictorial view of the control panel.
The typical complaints associated with bin thermostat failure are:
• The ice maker runs all the time, making too much ice.
• The ice maker doesn’t run at all.
To handle these problems, perform the following steps:
1. Verify the complaint. Verify the complaint by checking the sensing tube and bulb and the control settings. It will be helpful if you can locate the actual service manual for the ice maker model you are working on to properly diagnose the ice maker. The service manual will assist you in properly placing the ice maker in the service test mode for testing the ice maker functions.
2. Check for external factors. You must check for external factors not associated with the appliance. Is the appliance installed properly? Explain to the user how to set the controls. The voltage at the wall receptacle is between 108 volts and 132 volts during a load on the circuit. Do you have the correct polarity? (See Chapter 6.)
3. Disconnect the electricity. Before working on the ice maker, disconnect the electricity. This can be done by pulling the plug from the receptacle. Or disconnect the electricity at the fuse panel or at the circuit breaker panel. Turn off the electricity.
WARNING Some diagnostic tests will require you to test the components with the power turned on. When you disassemble the ice maker control panel cover, you can position the panel in such a way that the wiring will not make contact with metal. This will allow you to test the ice maker components without electrical mishaps.
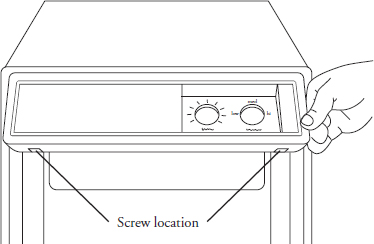
4. Gain access to the bin thermostat. To access the bin thermostat, remove the screws from the escutcheon (Figure 28-13), and remove the panel. Next, remove the screws from the control bracket (Figure 28-14). Pull back on the control bracket, exposing the controls.
FIGURE 28-13 Removing the control panel to expose the controls.
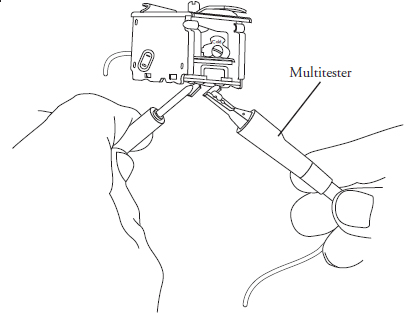
5. Test the bin thermostat. To test the bin thermostat, remove the wires from the thermostat terminals and place the ohmmeter probes on those terminals (Figure 28-15). Set the range scale on R × 1, and test for continuity. The meter should read continuity between the contacts if the temperature of the capillary tube is above 42 degrees Fahrenheit. The meter should not read continuity between the contacts if the temperature of the capillary tube is below 36 degrees Fahrenheit.
FIGURE 28-15 The bin thermostat.
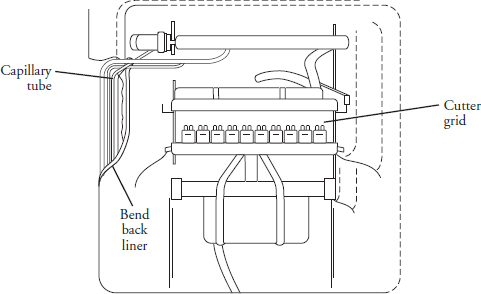
6. Remove the bin thermostat. Remove the bin thermostat from the control bracket by removing the two screws (see Figure 28-13). Remove the bin thermostat well from the left wall of the liner. Next, remove the five clips (under the gasket) from the left side of the liner (Figure 28-16). Now, bend the liner flange forward, and remove the capillary tube and thermostat control.
FIGURE 28-16 Peel back the liner to gain access to the capillary tube.
7. Install a new bin thermostat. To install the new bin thermostat, just reverse the order of disassembly, and reassemble. Then test the control. Remember to reinstall the capillary tube in the same location from which it was removed. If you do not, the ice maker will not cycle properly.
Evaporator Thermostat
The evaporator thermostat is located behind the control panel (Figure 28-14). The thermostat’s capillary tube is attached to the evaporator freeze plate. The purpose of the evaporator thermostat is to end the freeze cycle and initiate the harvest cycle when the ice thickness has been reached.
The typical complaints associated with failure of the evaporator thermostat are:
• Unable to control ice cube thickness.
• Ice maker water not circulating.
• The ice maker runs, but there is no ice in the bin.
To handle these problems, perform the following steps:
1. Verify the complaint. Verify the complaint by checking the sensing tube and bulb and the control settings. It will be helpful if you can locate the actual service manual for the ice maker model you are working on to properly diagnose the ice maker. The service manual will assist you in properly placing the ice maker in the service test mode for testing the ice maker functions.
2. Check for external factors. You must check for external factors not associated with the appliance. Is the appliance installed properly? Explain to the user how to set the controls. The voltage at the wall receptacle is between 108 volts and 132 volts during a load on the circuit. Do you have the correct polarity? (See Chapter 6.)
3. Disconnect the electricity. Before working on the ice maker, disconnect the electricity. This can be done by pulling the plug from the receptacle. Or disconnect the electricity at the fuse panel or at the circuit breaker panel. Turn off the electricity.
WARNING Some diagnostic tests will require you to test the components with the power turned on. When you disassemble the ice maker control panel cover, you can position the panel in such a way that the wiring will not make contact with metal. This will allow you to test the ice maker components without electrical mishaps.
4. Gain access to the evaporator thermostat. To access the evaporator thermostat, remove the screws from the escutcheon (see Figure 28-13), and remove the panel. Next, remove the screws from the control bracket (see Figure 28-14). Pull back on the control bracket, exposing the controls.
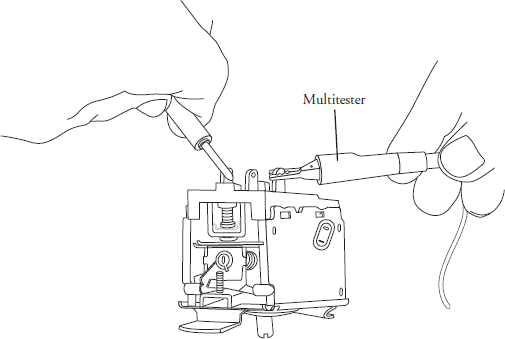
5. Test the evaporator thermostat. To test the evaporator thermostat, remove the wires from the thermostat terminals, and place the ohmmeter probes on terminals 1 and 2 (Figure 28-17). Set the range scale on R × 1, and test for continuity. The meter should show continuity between the contacts if the temperature of the evaporator freeze plate is 30 degrees Fahrenheit or warmer. The meter should not read continuity between the contacts if the temperature of the evaporator freeze plate is +10 to -3 degrees Fahrenheit. By disconnecting the water pump at the terminal board and operating the ice maker without the pump, the evaporator thermostat action can be easily observed. This will cause the thermostat to cycle in a matter of a few minutes.
FIGURE 28-17 The evaporator thermostat.
6. Remove the evaporator thermostat. Remove the cutter grid by removing the thumbscrews (see Figure 28-4). Remove the evaporator thermostat from the control bracket by removing the two screws (see Figure 28-14). Remove the clamp from underneath the evaporator freeze plate, which secures the capillary tube to the evaporator. Next, remove the five clips, under the gasket, from the left side of the liner (see Figure 28-16). Now, bend the liner flange forward, and remove the capillary tube and thermostat control.
7. Install a new evaporator thermostat. To install the new evaporator thermostat, just reverse the order of disassembly, and reassemble. Then test the control. Remember to reinstall the capillary tube in the same location from which it was removed. Also, the capillary tube must be taped to the hot gas restrictor tube. If you do not do these things, the ice maker will not cycle properly.
Hot Gas Solenoid Valve
The hot gas solenoid valve allows the high pressure refrigerant gas to bypass the condenser and flow through the condenser accumulator tube (Figure 28-3). When the refrigerant enters the condenser accumulator, the hot gas enters into the evaporator plate and it will evenly heat the evaporator plate so that the ice slab will release from the evaporator plate quickly and evenly. The hot gas solenoid valve is accessed through the rear of the ice maker on some older models. On newer models the hot gas valve is located behind the condenser coil.
The typical complaints associated with failure of the hot gas solenoid valve are:
• Ice maker runs, but there is no ice production.
• Evaporator freeze plate will not heat up to release ice slab.
• Ice maker runs continuously.
To handle these problems, perform the following steps:
1. Verify the complaint. Verify the complaint by checking the ice maker cycles. It will be helpful if you can locate the actual service manual for the ice maker model you are working on to properly diagnose the ice maker. The service manual will assist you in properly placing the ice maker in the service test mode for testing the ice maker functions.
2. Check for external factors. You must check for external factors not associated with the appliance. Is the appliance installed properly? Explain to the user how to set the controls. The voltage at the wall receptacle is between 108 volts and 132 volts during a load on the circuit. Do you have the correct polarity? (See Chapter 6.)
3. Disconnect the electricity. Before working on the ice maker, disconnect the electricity. This can be done by pulling the plug from the receptacle. Or disconnect the electricity at the fuse panel or at the circuit breaker panel. Turn off the electricity.
WARNING Some diagnostic tests will require you to test the components with the power turned on. When you disassemble the ice maker control panel cover, you can position the panel in such a way that the wiring will not make contact with metal. This will allow you to test the ice maker components without electrical mishaps.
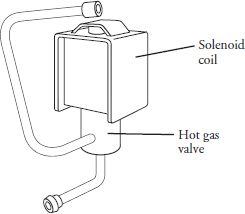
4. Gain access to the hot gas solenoid valve. To access the hot gas solenoid valve (Figure 28-18), remove the grille (see Figure 28-6). Next, remove the deflector from the condenser (see Figure 28-7).
FIGURE 28-18 The hot gas defrost valve. This valve will reverse the flow of refrigerant to the evaporator in the defrost cycle.
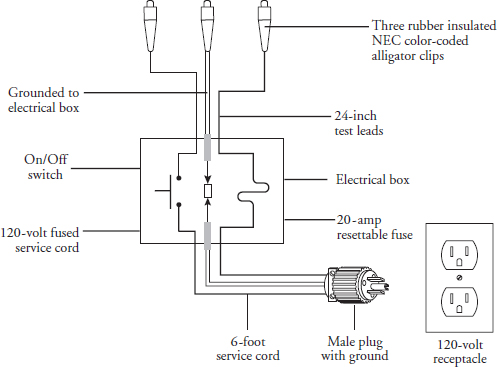
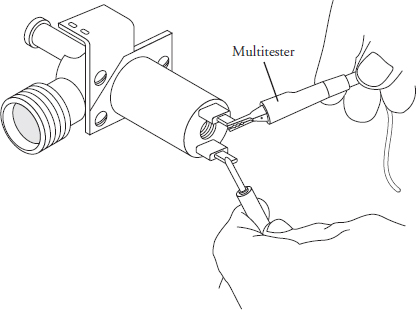
5. Test the hot gas solenoid valve. Test the hot gas solenoid valve for continuity. Remove the wires from the solenoid coil. Place the ohmmeter probes on the solenoid coil terminals (see Figures 28-18 and 28-19). Set the range scale on R × 1, and test for continuity. To test the hot gas valve itself, connect a 120-volt fused service cord (Figure 28-20) to the solenoid coil. Listen for a click sound as the plunger rises up. Now, disconnect the service cord, and you will hear the plunger drop back. If you cannot hear a distinct click sound from the hot gas valve, it will need to be replaced by an authorized service company (the sealed system might be under warranty from the manufacturer) or by a licensed refrigerant technician.
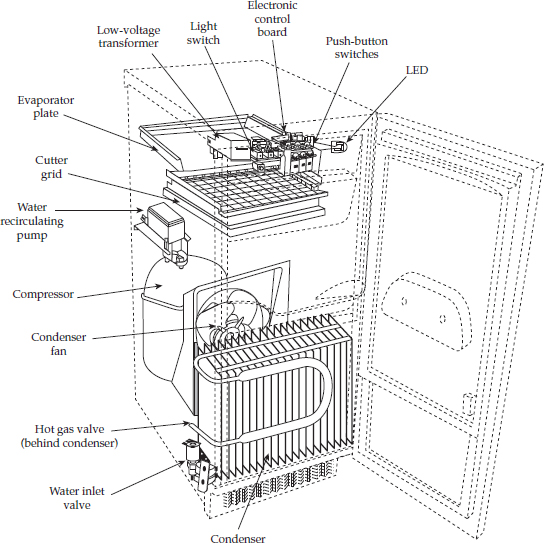
FIGURE 28-19 Type 1 - Newer model - Self-contained ice cube maker with electronic controls and thermistors. This model has the hot gas valve located behind the condenser coil. Also, the water inlet valve is located on the left side of the condenser coil.
FIGURE 28-20 A 120-volt fused service cord test.
The solenoid coil is a separate component that can be replaced without replacing the entire hot gas valve assembly. Another way to test the hot gas valve is to leave the wires off the solenoid coil and reconnect the service cord to the solenoid coil. This test requires the electricity to be turned on.
CAUTION Tape the solenoid coil leads that were removed so that they will not touch the chassis when you plug in the ice maker for this test. Be cautious when working with live wires. Avoid getting shocked!
With the ice maker plugged in and running, feel the hot gas defrost tube—it should feel warm or hot when the valve is energized.
6. Remove the hot gas solenoid coil. To remove the hot gas solenoid coil, remove the spring clip from the top of the coil, and then remove the coil (be sure the electricity is off).
7. Install a new hot gas solenoid coil. To install the new solenoid coil, just reverse the order of disassembly, and reassemble. Then test the valve.
Water Valve
The water inlet valve controls the flow of water into the ice cube maker, and is solenoid-operated. When it is energized, water in the supply line will pass through the valve body and into the water reservoir.
The typical complaints associated with failure of the water valve are:
• Ice maker runs, but there is no ice production.
• No water is circulating across the evaporator freeze plate.
• Water is flooding the storage bin, causing the ice to melt.
To handle these problems, perform the following steps:
1. Verify the complaint. Verify the complaint by checking the ice maker cycles. It will be helpful if you can locate the actual service manual for the ice maker model you are working on to properly diagnose the ice maker. The service manual will assist you in properly placing the ice maker in the service test mode for testing the ice maker functions.
2. Check for external factors. You must check for external factors not associated with the appliance. Is the appliance installed properly? Explain to the user how to set the controls. Is the water supply turned on? The voltage at the wall receptacle is between 108 volts and 132 volts during a load on the circuit. Do you have the correct polarity? (See Chapter 6.)
3. Disconnect the electricity. Before working on the ice maker, disconnect the electricity. This can be done by pulling the plug from the receptacle. Or disconnect the electricity at the fuse panel or at the circuit breaker panel. Turn off the electricity.
WARNING Some diagnostic tests will require you to test the components with the power turned on. When you disassemble the ice maker control panel cover, you can position the panel in such a way that the wiring will not make contact with metal. This will allow you to test the ice maker components without electrical mishaps.
4. Gain access to the water valve. To access the water valve, remove the top insulated panel. The water valve is located in the upper-right front corner (older models). On newer models, the water valve is located next to the condenser (Figure 28-19).
5. Remove and test the water valve. In order to test the water valve solenoid coil, the water valve must be removed from the storage bin. Shut off the water supply to the ice maker. Now disconnect the water line from the valve. Next, remove the screws from the water valve bracket. Pull on the valve to release it from the receptacle in the liner. Place the ohmmeter probes on the solenoid coil terminals (Figure 28-21). Set the range scale on R × 1, and test for continuity. If there is no continuity, replace the water valve.
FIGURE 28-21 The water valve.
6. Install a new water valve. To install the new water valve, just reverse the order of disassembly, and reassemble. Then test the valve. Don’t forget to turn on the water supply.
Condenser Fan Motor
The condenser fan motor is a 120 VAC, single-speed fan motor. The condenser fan motor is located near the compressor in the machine compartment in the rear of the ice cube maker. The condenser fan motor, when operating, will pull air across the condenser coil and then exhaust it past the compressor and out through the rear of the ice cube maker. The condenser fan will remove the heat from the condenser coil.
The typical complaints associated with failure of the condenser fan motor are:
• The ice maker has stopped producing ice.
• The condenser fan motor runs slower than normal.
• The condenser fan motor does not run at all.
• The compressor is sometimes noisier than normal.
To handle these problems, perform the following steps:
1. Verify the complaint. Verify the complaint by asking the customer to describe what the ice maker is doing. Is the condenser fan motor running during the freeze cycle? It will be helpful if you can locate the actual service manual for the ice maker model you are working on to properly diagnose the ice maker. The service manual will assist you in properly placing the ice maker in the service test mode for testing the ice maker functions.
2. Check for external factors. You must check for external factors not associated with the appliance. Is the appliance installed properly? Are there any foreign objects blocking the condenser fan blades? The voltage at the wall receptacle is between 108 volts and 132 volts during a load on the circuit. Do you have the correct polarity? (See Chapter 6.)
3. Disconnect the electricity. Before working on the ice maker, disconnect the electricity to the ice maker. This can be done by pulling the plug from the receptacle. Or disconnect the electricity at the fuse panel or at the circuit breaker panel. Turn off the electricity.
WARNING Some diagnostic tests will require you to test the components with the power turned on. When you disassemble the ice maker control panel cover, you can position the panel in such a way that the wiring will not make contact with metal. This will allow you to test the ice maker components without electrical mishaps.
4. Gain access to the condenser fan motor. To access the condenser fan motor, remove the front grille. Remove the two screws in the condensing unit base, and pull the unit toward you. Be careful not to damage any refrigerant lines.
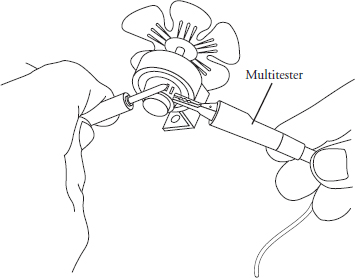
5. Test the condenser fan motor. To test the condenser fan motor, remove the wires from the motor terminals. Next, place the probes of the ohmmeter on the motor terminals (Figure 28-22). Set the meter scale on R × 1. The meter should show some resistance. If no reading is indicated, replace the motor. If the fan blades do not spin freely, replace the motor. If the bearings are worn, replace the motor.
FIGURE 28-22 A pictorial view of the condenser fan motor assembly.
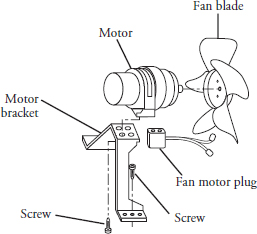
6. Remove the condenser fan motor. To remove the condenser fan motor, you must first remove the fan blades. Unscrew the nut that secures the blades to the motor. Remove the blades from the motor. Then remove the motor assembly by removing the mounting bracket screws (Figure 28-23).
FIGURE 28-23 A pictorial view of the condenser fan motor assembly.
7. Install a new condenser fan motor. To install the new condenser fan motor, just reverse the order of disassembly, and reassemble. Remember to reconnect the ground wire to the motor. Reconnect the wires to the motor terminals, and test.
Water Pump
The water pump will circulate the water from the water tank across the evaporator freezing plate (Figure 28-2). It is located behind the water tank (Figure 28-5) on the right side.
The typical complaints associated with failure of the water pump are:
• Ice maker runs, but there is no ice production.
• No water circulating across the evaporator freeze plate.
To handle these problems, perform the following steps:
1. Verify the complaint. Verify the complaint by checking the ice maker cycles. It will be helpful if you can locate the actual service manual for the ice maker model you are working on to properly diagnose the ice maker. The service manual will assist you in properly placing the ice maker in the service test mode for testing the ice maker functions.
2. Check for external factors. You must check for external factors not associated with the appliance. Is the appliance installed properly? Explain to the user how to set the controls. The voltage at the wall receptacle is between 108 volts and 132 volts during a load on the circuit. Do you have the correct polarity? (See Chapter 6.)
3. Disconnect the electricity. Before working on the ice maker, disconnect the electricity. This can be done by pulling the plug from the receptacle. Or disconnect the electricity at the fuse panel or at the circuit breaker panel. Turn off the electricity.
WARNING Some diagnostic tests will require you to test the components with the power turned on. When you disassemble the ice maker control panel cover, you can position the panel in such a way that the wiring will not make contact with metal. This will allow you to test the ice maker components without electrical mishaps.
4. Gain access to the water pump. To access the water pump, remove the bin door, the front insulated panel, and the inner bin door. A drain plug is located under the water tank. Remove it to drain the water out of the tank (see Figure 28-5). Next, remove the thumbscrews that secure the water tank, and remove the tank.
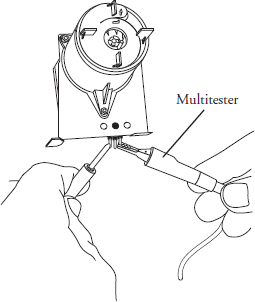
5. Test the water pump. To test the water pump motor, isolate the motor, and place the probes of the ohmmeter on the motor terminals (Figure 28-24). Set the meter scale on R × 1. The meter should show some resistance. If no reading is indicated, replace the water pump. Next, check the motor with a 120-volt fused service cord (see Figure 28-20).
FIGURE 28-24 A bottom view of the water pump. When checking the pump, be sure the inlet is free of debris.
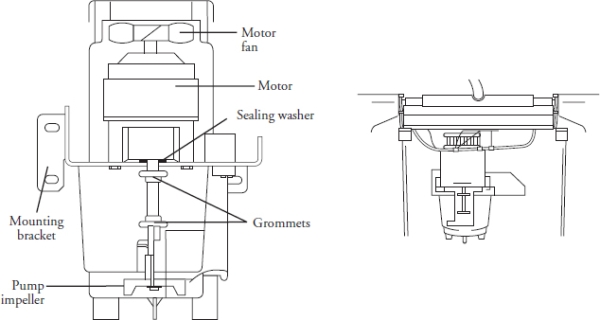
6. Remove the water pump. To remove the water pump (Figure 28-25), remove the screws from the water pump bracket that secure the pump to the liner. Disconnect the discharge hose from the pump. Remove the water pump.
FIGURE 28-25 A pictorial view of the water pump.
7. Install a new water pump. To install a new water pump, just reverse the order of disassembly, and reassemble. Reconnect the wires to the motor terminals, and test.
Cutter Grid
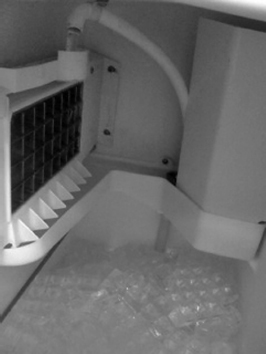
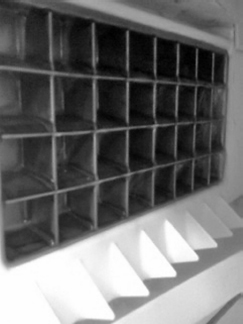
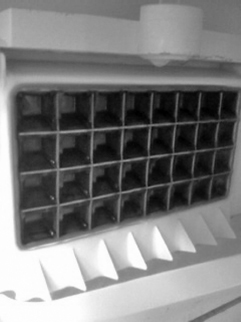
The cutter grid is located inside the storage bin (Figure 28-4). It is used for cutting the ice slab into ice cubes.
The typical complaints associated with failure of the cutter grid are:
• Ice slabs lie on top of the cutter grid.
• Cutter grid is not cutting ice slab into cubes evenly.
To handle these problems, perform the following steps:
1. Verify the complaint. Verify the complaint by checking the ice slab and cutter grid fuse. It will be helpful if you can locate the actual service manual for the ice maker model you are working on to properly diagnose the ice maker. The service manual will assist you in properly placing the ice maker in the service test mode for testing the ice maker functions.
2. Check for external factors. You must check for external factors not associated with the appliance. Is the appliance installed properly? Explain to the user how to set the controls. The voltage at the wall receptacle is between 108 volts and 132 volts during a load on the circuit. Do you have the correct polarity? (See Chapter 6.)
3. Disconnect the electricity. Before working on the ice maker, disconnect the electricity. This can be done by pulling the plug from the receptacle. Or disconnect the electricity at the fuse panel or at the circuit breaker panel. Turn off the electricity.
WARNING Some diagnostic tests will require you to test the components with the power turned on. When you disassemble the ice maker control panel cover, you can position the panel in such a way that the wiring will not make contact with metal. This will allow you to test the ice maker components without electrical mishaps.
4. Gain access to the cutter grid. To access the cutter grid, open the bin door and remove the cutter grid by removing the two thumbscrews. Unplug the cutter grid, and remove it from the storage bin (see Figure 28-4).
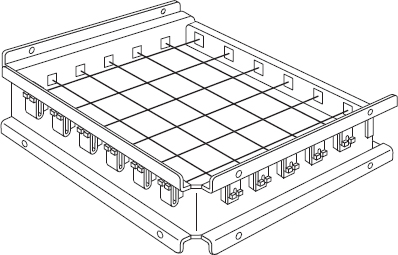
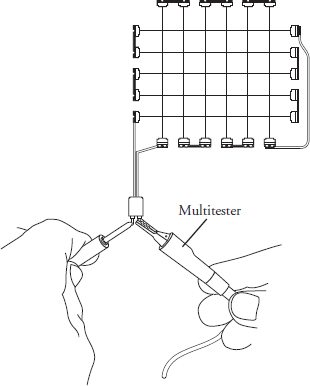
5. Test the cutter grid. Examine the cutter grid for broken wires, and check the connecting pins for corrosion (Figure 28-26). As you inspect the cutter grid, look for cracked or broken insulators in the frame. Next, place the probes of the ohmmeter on the cutter grid plug terminals (Figure 28-27). Set the meter scale on R × 1. The meter should show continuity. If no reading is indicated, one or more grid wires or insulators are defective.
FIGURE 28-26 A cutter grid cuts an ice slab into strips and then into cubes.
FIGURE 28-27 A pictorial view of the cutter grid circuit.
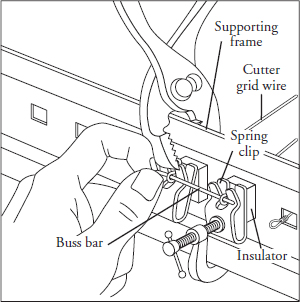
6. Repair the cutter grid. If the cutter grid frame and insulators are broken, it would be advisable to replace the entire cutter grid. Using a C-clamp, compress the spring clip to relieve the tension (Figure 28-28). Next, use a pair of pliers to compress the adjacent spring clip, and remove the buss bar. Do the same procedure for the other side of the cutter grid. The insulators, clips, and grid wires can now be removed and replaced. If any of the grid wires break, it is time to replace all of the grid wires.
FIGURE 28-28 Side view of the cutter grid, showing the clips, buss bars, and insulators.
7. Install a new cutter grid. To install a new cutter grid, just reverse the order of disassembly, and reassemble. Reconnect the wires to the cutter grid, and test it.
Cutter Grid Transformer and Fuse
The cutter grid transformer and fuse are located behind the control panel. Low voltage is used on the cutter grid to cut up the ice slab.
The typical complaints associated with failure of the grid transformer or fuse are:
• Ice slabs lie on top of the cutter grid.
• Cutter grid is not cutting ice slab into cubes evenly.
To handle these problems, perform the following steps:
1. Verify the complaint. Verify the complaint by checking the ice slab and cutter grid. It will be helpful if you can locate the actual service manual for the ice maker model you are working on to properly diagnose the ice maker. The service manual will assist you in properly placing the ice maker in the service test mode for testing the ice maker functions.
2. Check for external factors. You must check for external factors not associated with the appliance. Is the appliance installed properly? The voltage at the wall receptacle is between 108 volts and 132 volts during a load on the circuit. Do you have the correct polarity? (See Chapter 6.)
3. Disconnect the electricity. Before working on the ice maker, disconnect the electricity. This can be done by pulling the plug from the receptacle. Or disconnect the electricity at the fuse panel or at the circuit breaker panel. Turn off the electricity.
WARNING Some diagnostic tests will require you to test the components with the power turned on. When you disassemble the ice maker control panel cover, you can position the panel in such a way that the wiring will not make contact with metal. This will allow you to test the ice maker components without electrical mishaps.
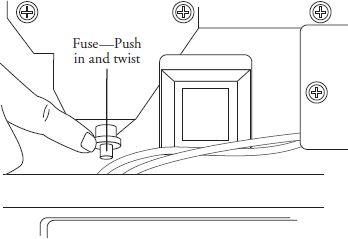
4. Gain access to the cutter grid transformer and fuse. To access the cutter grid transformer and fuse, remove the screws from the escutcheon (see Figure 28-13), and remove the panel. The fuse is located on the control bracket on the left side. To remove the fuse, push in and twist—it will pop out of the holder (Figure 28-29). Next, remove the screws from the control bracket (see Figure 28-14). Pull back on the control bracket, exposing the controls.
FIGURE 28-29 The cutter fuse, located behind the control panel.
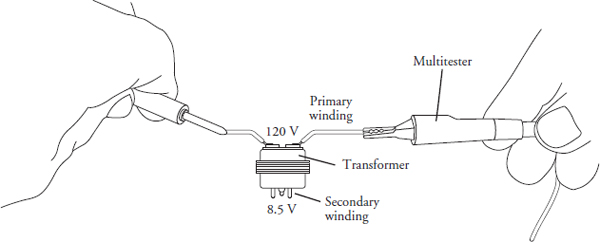
5. Test the cutter grid transformer and fuse. To test the transformer, disconnect the wires from the transformer to isolate it from the circuit. Use a 120-volt fused service cord, and connect it to the primary side of the transformer.
NOTE This test requires the electricity to be turned on. Be cautious when working with live wires. Avoid getting shocked!
You might have to look at the wiring diagram for assistance in identifying the primary side and for the proper color-coding of the wires. Using the volt meter, connect the probes to the secondary side of the transformer. Plug in the 120-volt fused service cord; the meter should read 8.5 volts. Unplug the service cord.
To test for resistance, disconnect the power cord, and set the ohmmeter scale on R × 1. Place the probes on the primary wires of the transformer. The meter should show resistance. Next, place the probes on the secondary wires of the transformer (Figure 28-30). The meter should show resistance. If the transformer fails either test, replace it.
FIGURE 28-30 The cutter grid transformer.
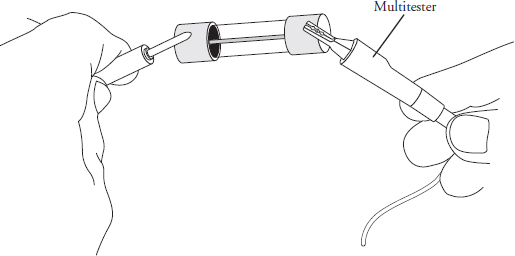
To test the fuse, place the probes on each end of the fuse (Figure 28-31). Set the ohmmeter scale on R × 1. The meter should show continuity. If not, replace the fuse.
FIGURE 28-31 The cutter grid fuse. If this fuse blows, the cutter grid will not function. Check for a short.
6. Remove the transformer. To remove the transformer, remove the screws that secure it to the control bracket (see Figure 28-14).
7. Install a new transformer or fuse. To install a new transformer or fuse, just reverse the order of disassembly, and reassemble. Reconnect the wires to the components, and test it.
Cycle Switch
The cycle switch is located in the control panel. This switch will start the ice cube maker cycle, and when it is positioned in the clean cycle, it will start the cleaning cycle.
The typical complaints associated with failure of the cycle switch are:
• Unable to turn on the clean cycle.
• Unable to turn on the ice maker.
To handle these problems, perform the following steps:
1. Verify the complaint. Verify the complaint by checking the control settings. It will be helpful if you can locate the actual service manual for the ice maker model you are working on to properly diagnose the ice maker. The service manual will assist you in properly placing the ice maker in the service test mode for testing the ice maker functions.
2. Check for external factors. You must check for external factors not associated with the appliance. Is the appliance installed properly? Explain to the user how to set the controls. The voltage at the wall receptacle is between 108 volts and 132 volts during a load on the circuit. Do you have the correct polarity? (See Chapter 6.)
3. Disconnect the electricity. Before working on the ice maker, disconnect the electricity. This can be done by pulling the plug from the receptacle. Another way to disconnect the electricity is at the fuse panel or at the circuit breaker panel. Turn off the electricity.
WARNING Some diagnostic tests will require you to test the components with the power turned on. When you disassemble the ice maker control panel cover, you can position the panel in such a way that the wiring will not make contact with metal. This will allow you to test the ice maker components without electrical mishaps.
4. Gain access to the cycle switch. To access the cycle switch, remove the screws from the escutcheon (see Figure 28-13), and remove the panel. Next, remove the screws from the control bracket (see Figure 28-14). Pull back on the control bracket, exposing the controls.
5. Test the cycle switch. To test the cycle switch for continuity between the switch contacts, refer to the wiring diagram for the correct switch positions (Figure 28-32). Disconnect the wires from the switch, and turn the switch to the “on” position. Place the probes of the ohmmeter on the cycle switch terminals marked 2 and 3. Set the meter scale on R × 1. The meter should show continuity. Now place the probes of the ohmmeter on the cycle switch terminals marked 1 and 6. The meter should show continuity. Next, turn the cycle switch to the “clean” position. Place the probes of the ohmmeter on the cycle switch terminals marked 5 and 6. The meter should show continuity. If the switch fails these tests, replace it.
FIGURE 28-32 A sample wiring diagram of a self-contained ice maker.
6. Remove the cycle switch. To remove the cycle switch, remove the two screws that secure it to the control bracket (see Figure 28-14).
7. Install a new cycle switch. To install a new cycle switch, just reverse the order of disassembly, and reassemble. Connect the wires to the switch terminals according to the wiring diagram, and test it.
Self-Contained Ice Cube Maker Performance Data
There are a number of factors that can affect the overall performance of the ice cube maker.
Installation
• Installation in a dusty environment will cause the ice cube maker to operate continuously and have a low ice production rate.
• Installation in a greasy atmosphere will cause the ice cube maker to operate in high temperature conditions with low to no ice production.
• Installation next to a high temperature appliance will cause the ice cube maker to operate in high temperature conditions with low to no ice production.
Water Temperature
• Higher water temperatures will increase the operating time of the ice cube maker.
• Higher water temperatures will cause decreased ice production in a 24-hour period.
Ambient Temperature
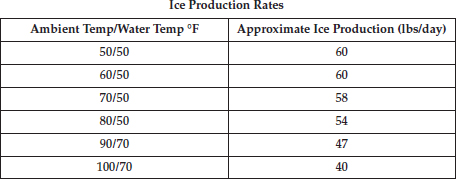
• High temperatures will decrease ice production.
• Ice storage bin melting ice above 25 percent.
Maintenance
• Restricted air movement through the condenser coil and front grille will cause low to no ice production.
Other
• If the ice cubes are more than ½ inch thick the ice production will decrease and the operating time will increase.
TABLE 28-1 Ice Thickness Controlled by Evaporator Thermostat
TABLE 28-2 Water Temperature
TABLE 28-3 Ice Cube Operating Cycle Times
Troubleshooting Water and Its Effect on Ice Making
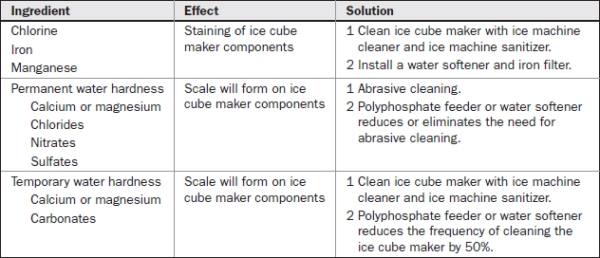
When making ice cubes in a self-contained ice cube maker, the quality of the ice should be defined as solid, clear, and free of taste or odor. The ice cube maker can provide this if the quality of the water is pure. The following charts (Tables 28-4 and 28-5) will show some of the ingredients that can affect ice cube production.
TABLE 28-4 Ingredients that Affect Ice Cube Quality
TABLE 28-5 Ingredients that Affect the Ice Cube Maker Operation and Quantity of Ice Production
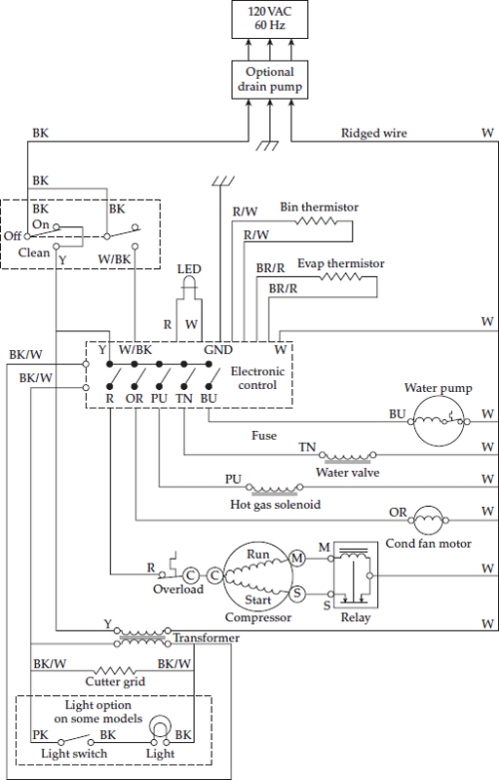
Type-1 Self-Contained Ice Cube Maker Wiring Diagrams
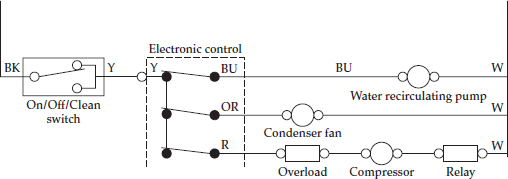
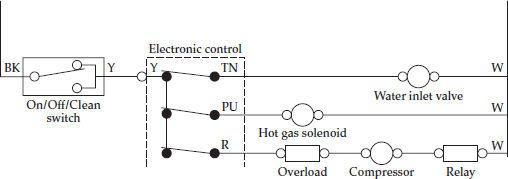
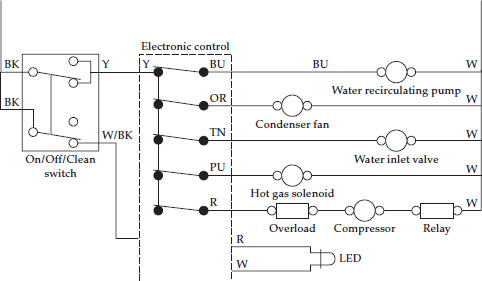
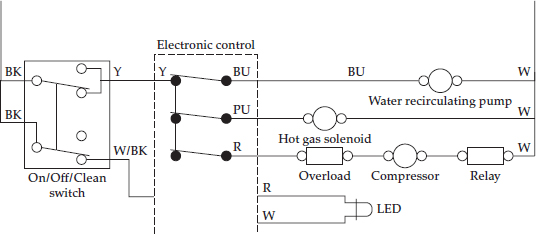
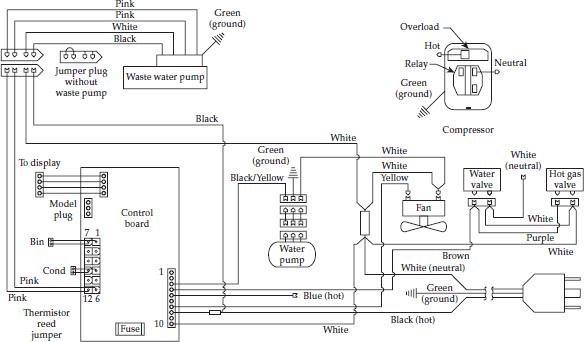
Figures 28-33 through 28-37 depict a wiring schematic and strip circuits for a type-1 self-contained ice cube maker with electronic components.
FIGURE 28-33 A sample wiring diagram of a self-contained ice maker with electronic components.
FIGURE 28-34 Strip circuit (electronic model) – Ice production mode.
FIGURE 28-35 Strip circuit (electronic model) – Harvest mode.
FIGURE 28-36 Strip circuit (electronic model) illustrates the first 25 seconds of the diagnostics/clean cycle.
FIGURE 28-37 Strip circuit (electronic model) illustrates the last 47 minutes of the diagnostics/clean cycle.
Type-2 Self-Contained Ice Cube Maker
This type of ice cube maker is a free-standing, self-contained refrigeration appliance that produces ice cubes (Figure 28-38). This self-contained ice cube maker can also be installed under the counter. This type of ice cube maker is similar in operation to some commercial ice machines. The type-2 ice cube maker is designed to make clear ice cubes from most water supplies.
FIGURE 28-38 Type-2 self-contained ice cube maker.
Principles of Operation
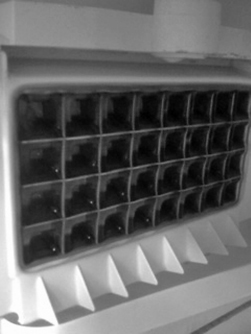
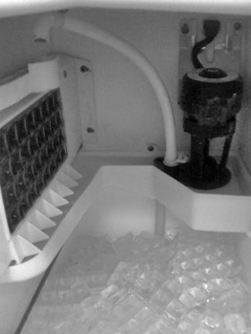
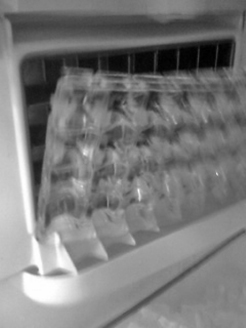
On startup, the bin thermostat closes; the water valve and the hot gas valve are energized for 3 minutes. This process will ensure the ice making process starts with fresh water and the refrigerant pressures are equalized prior to the compressor starting up. The compressor will start in about 3 minutes after the hot gas valve and the water valve de-energize. In the freeze cycle, water flows constantly over the evaporator and into each cube cell (Figure 28-39). The length of the freeze cycle is determined by a thermostat or thermistor, which monitors the refrigeration system (Figures 28-40, 28-41, and 28-42). At the end of the freeze cycle, a thermostat or thermistor will signal the beginning of the harvest cycle. In the harvest cycle (Figure 28-43) the water pump and the condenser fan motor will be de-energized and the compressor will still be running. The hot gas valve and the water valve will be energized for the remainder of the harvest cycle. The hot refrigerant gas will warm up the evaporator, releasing the ice cubes into the storage bin (Figure 28-44). At the same time, the water trough is being purged with fresh water. At the end of the harvest cycle, the freeze cycle will begin anew. As ice fills the storage bin, it will come in contact with the bin thermostat (Figure 28-45). When this happens the ice cube maker will shut off completely until the ice level drops in the storage bin. When no ice comes in contact with the bin thermostat, the freeze cycle will begin again.
FIGURE 28-39 Ice cube maker in the start-up cycle. Water is circulating over the evaporator.
FIGURE 28-40 Ice beginning to form on the evaporator.
FIGURE 28-41 The ice cubes are getting larger in the mold.
FIGURE 28-42 The ice cubes have reached their desired thickness. The water stops circulating.
FIGURE 28-43 The hot gas valve is energized. The ice cubes are defrosting off the evaporator.
FIGURE 28-44 The end of the harvest cycle. The ice cubes leave the evaporator.
FIGURE 28-45 The ice cubes enter the storage bin. When the ice cubes reach the bin thermostat, the ice production will stop.
The refrigeration cycle (Figure 28-46) in this type of ice maker is similar to that in a conventional refrigerator/freezer. The compressor pumps the refrigerant into the condenser coil, which is cooled by the condenser fan motor. The refrigerant leaves the condenser coil as a high-pressure liquid, passes through the dryer, and enters the capillary tube. The refrigerant is next metered through the capillary tube and then enters the evaporator freeze plate as a low-pressure liquid. The refrigerant low-pressure gas then leaves the evaporator freeze plate and returns to the compressor.
FIGURE 28-46 Type-2 ice cube maker in the freeze cycle.
When the ice maker goes into the defrost (harvest) cycle, it energizes the hot gas solenoid, which reverses the refrigeration cycle, during which the condenser fan motor and water pump will stop. The hot gas passes through the evaporator freeze plate, heating it up enough to release the ice cubes. The thermostat senses the temperature of the evaporator freeze plate again and activates the freeze cycle. The hot gas solenoid valve will then close, the water valve will close, the condenser fan motor will start, the water pump will start, and the freeze cycle will begin to manufacture new ice cubes.
Step-by-Step Troubleshooting by Symptom Diagnosis
When servicing the type-2 self-contained ice cube maker, don’t overlook the simple things that might be causing the problem. Step-by-step troubleshooting by symptom diagnosis is based on diagnosing malfunctions, with possible causes arranged into categories relating to the operation of the automatic ice cube maker. This section is intended only as a checklist to aid you in diagnosing a problem. Look at the symptom that best describes the problem you are experiencing with the automatic ice cube maker, and then correct the problem.
No Ice Production
• Check the water supply. Is it turned on?
• Check and make sure the stand pipe is connected to the water trough.
• Check the water pump.
Low Ice Production
• Check the ambient temperature around the ice maker. Lower ice cube production is normal in higher temperatures.
• Check the evaporator for deposit buildup.
• Check ice thickness setting.
• Check for a dirty condenser coil.
• Check hot gas valve.
• Check refrigeration system.
Ice Is Slow to Release from the Evaporator
• Check the evaporator for deposit buildup.
• Check the ice maker may not be level. Level ice maker.
Ice Maker Will Not Fill with Water
• Check and make sure the stand pipe is connected to the water trough.
• Check the water valve.
• Check wiring.
Continuous Ice Production
• Check the bin thermostat.
• Check bin thermostat bulb alignment.
• Check ice cube thickness.
Shallow or Incomplete Ice Cubes
• Check the water level.
• Check and make sure the stand pipe is connected to the water trough.
• Check the water pressure. The water pressure should be 20 to 120 psi.
• Is the ice maker level?
• Are you operating the ice maker without the front and back panels? This type of ice maker must have the front and back cover installed to operate properly.
• Check the thermostat or thermistor.
• On electronic models, check the control board.
Compressor Not Running, Not Making Ice; Condenser Fan Motor Running
• Check compressor relay.
• Check compressor overload.
• Check compressor.
Compressor Not Running, Not Making Ice; Condenser Fan Motor Not Running
• Check for voltage to the ice maker.
• Check circuit breaker and/or fuses.
• Check switches.
• Check wiring.
Water in the Ice Storage Bin
• Check the storage bin drain system.
• Check external drain system.
• Check drain pump.
Water Will Not Stop Filling the Trough
• Check the water valve.
• Check the electronic control board.
Ice Cube Maker Noisy
• Check the condenser fan motor.
• Check the condenser fan blade for proper alignment and for any obstruction.
• Check the refrigerant copper lines. Make sure they are not touching anything.
Poor Ice Quality (Soft or Cloudy Cubes)
• Check the quality of the water inlet.
• Evaporator may have to be cleaned.
• Check for water splashing onto the ice cubes.
No Water in the Trough
• Make sure the stand pipe is inserted into the trough.
• Check the water valve.
• Check how the water circulates over the evaporator. Make sure that the water does not splash out of the trough.
• Check the leveling of the ice maker.
Repair Procedures
Each repair procedure is a complete inspection and repair process for a single ice cube maker component, containing the information you need to test and replace components. The actual repair or replacement of any sealed-system component is not included in this chapter. It is recommended that you acquire refrigerant certification (or call an authorized service company) to repair or replace any sealed-system component. The refrigerant in the sealed system must be recovered properly.
Adjusting the Ice Cube Thickness
The typical complaints associated with size of ice cubes are:
• Water supply to ice maker inadequate.
• Ice cubes too small.
• Ice cubes too large.
• Ice cubes are being produced in a sheet.
To handle these problems, perform the following steps:
1. Verify the complaint. Verify the complaint by asking the customer to describe what the ice maker is doing. It will be helpful if you can locate the actual service manual for the ice maker model you are working on to properly diagnose the ice maker. The service manual will assist you in properly placing the ice maker in the service test mode for testing the ice maker functions.
2. Check for external factors. You must check for external factors not associated with the appliance. Is the appliance installed properly? Does the ice maker have the correct water supply? Does the ice maker have the correct voltage? The voltage at the wall receptacle is between 108 volts and 132 volts during a load on the circuit. Do you have the correct polarity? (See Chapter 6.)
3. Disconnect the electricity. Before working on the ice maker, disconnect the electricity. This can be done by pulling the plug from the receptacle. Or disconnect the electricity at the fuse panel or at the circuit breaker panel. Turn off the electricity.
WARNING Some diagnostic tests will require you to test the components with the power turned on. When you disassemble the ice maker panel cover, you can position the panel in such a way that the wiring will not make contact with metal. This will allow you to test the ice maker components without electrical mishaps.
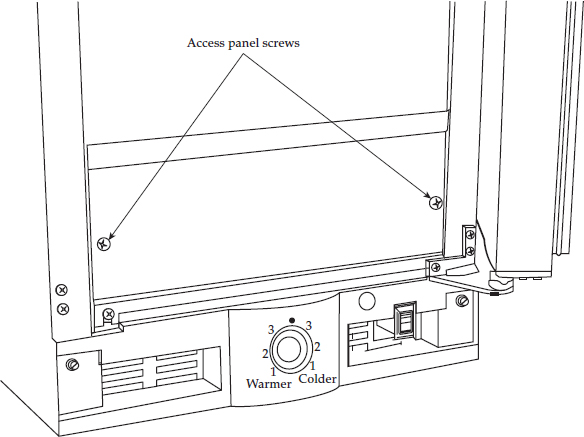
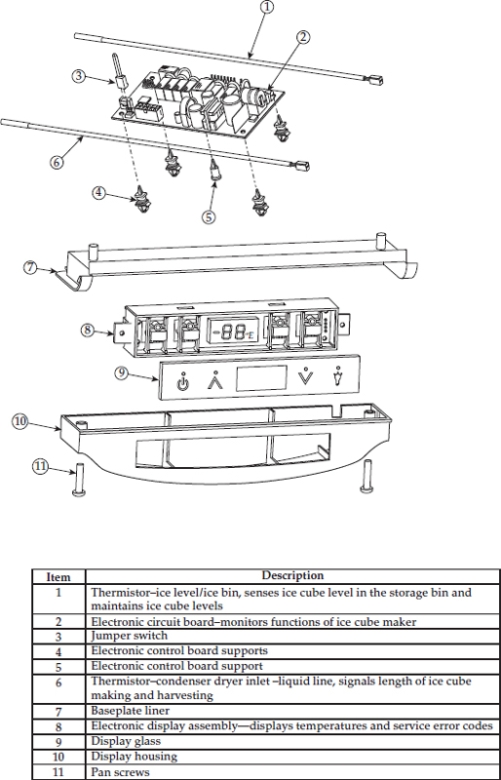
4. Gain access to the electronic control board. Open the ice cube maker door, and remove the screws from the front cover (Figure 28-47).
FIGURE 28-47 Remove the access panel screws to gain access to the electronic control board.
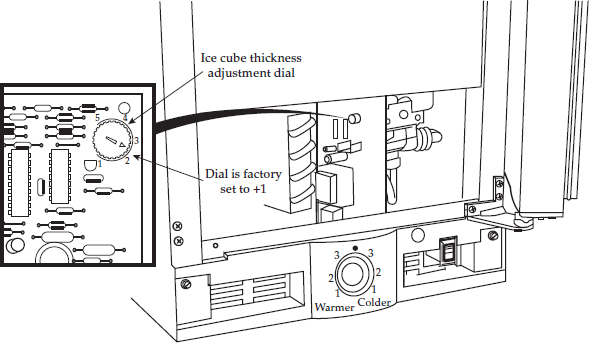
5. Adjust the ice cube size dial on the electronic control board. Look on the electronic control board for the ice cube thickness adjustment dial. If you need to make the ice cubes thicker, turn the dial clockwise to a higher number. If you need to make the ice cubes thinner, turn the dial counterclockwise to a smaller number (Figure 28-48.
FIGURE 28-48 The ice cube thickness adjustment is located on the electronic control board. Turn adjustment dial clockwise for thicker cubes. Turn adjustment dial counterclockwise for thinner ice cubes.
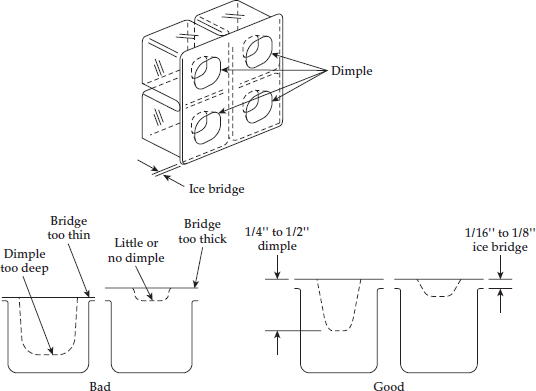
6. Test ice cube thickness. Reinstall the front access cover and reconnect the electricity to the ice cube maker. Remove the old ice cubes from the bin and test the ice maker. If the ice cube size is not correct, then repeat steps 3 through 6. The type-2 ice cube maker produces the ice cube in a slab. When the ice slab is harvested, it will fall vertically into the ice storage bin, breaking into cubes. Figure 28-49 depicts the correct thickness.
FIGURE 28-49 This type of ice cube maker produces a dimple in the ice cubes formed by the cascading water over the evaporator. Sometimes the dimples are different sizes. The ice cube adjustment dial is preset from the factory to produce an ice bridge of approximately 1/16 inch to 1/8 inch resulting in a dimple of approximately ¼ inch to ½ inch in depth. An ice cube that has less of a dimple and a thicker ice bridge will cause the ice slab to stay intact when entering the storage bin. It can also cause the storage bin to overfill.
Type-2 Ice Cube Maker Compressor, Relay, and Overload Protector
The compressor (reciprocating type) is the heart of the vapor compression system. It is used to circulate the refrigerant throughout the sealed system. The relay and overload are attached to the compressor. The relay starts the compressor, and the overload protects the compressor. All three components are located in the machine compartment in the rear of the ice maker. The relay is a current relay. The overload is a bimetal switch that is secured to the relay assembly which will attach to the outer shell of the compressor.
The typical complaints associated with failure of the compressor, relay, and overload protector are:
• Ice maker does not run at all.
• No new ice production.
• Ice cubes in the storage bin are melting rapidly.
• Compressor won’t run; it only hums.
To handle these problems, perform the following steps:
1. Verify the complaint. Verify the complaint by asking the customer to describe what the ice maker is doing. It will be helpful if you can locate the actual service manual for the ice maker model you are working on to properly diagnose the ice maker. The service manual will assist you in properly placing the ice maker in the service test mode for testing the ice maker functions.
2. Check for external factors. You must check for external factors not associated with the appliance. Is the appliance installed properly? Does the ice maker have the correct voltage? The voltage at the wall receptacle is between 108 volts and 132 volts during a load on the circuit. Do you have the correct polarity? (See Chapter 6.)
3. Disconnect the electricity. Before working on the ice maker, disconnect the electricity. This can be done by pulling the plug from the receptacle. Or disconnect the electricity at the fuse panel or at the circuit breaker panel. Turn off the electricity.
WARNING Some diagnostic tests will require you to test the components with the power turned on. When you disassemble the ice maker panel cover, you can position the panel in such a way that the wiring will not make contact with metal. This will allow you to test the ice maker components without electrical mishaps.
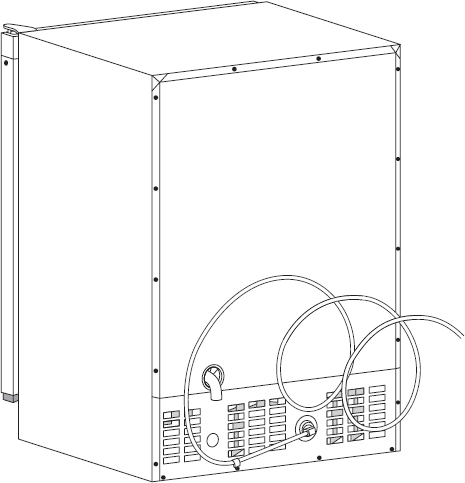
4. Gain access to the compressor. Access the compressor. To access the compressor, remove the rear cover (Figure 28-50). Next, remove the compressor terminal cover (Figure 28-8) by removing the retaining clip that secures the cover. Remove the terminal cover.
FIGURE 28-50 Remove the screws from the rear cover to gain access to the compressor, condenser fan motor, and water valve.
5. Test the compressor relay. To test the compressor relay, remove the relay and overload by pulling it from the compressor terminals without twisting it (Figure 28-51). On the relay body is stamped the word TOP. Hold the relay so that TOP is in the up position. Next, place the probes of the ohmmeter on the relay terminals marked S and M. Set the meter scale on R × 1. The reading will show no continuity. Next, remove the probe from the terminal marked M, and place the probe on the side terminal marked L. The reading will show no continuity. Now, move the probe from terminal S, and place it on the terminal marked M. The reading will show continuity. With the probes still attached, turn the relay upside down (see Figure 25-35b), and perform the same tests. By turning the relay over, the switch contacts in the relay will close. When you retest the relay, you should get the opposite results. You should have continuity between terminals S and M and between S and L. The meter will not show continuity between M and L. If the relay fails this test, replace it.
FIGURE 28-51 Disconnect the relay and overload assembly.
6. Test the overload protector. To test the overload protector, remove the wires from the overload protector and compressor terminals. Then remove the overload protector from the compressor by removing the retaining clip that secures the overload protector (Figure 28-51). Next, place the probes of the ohmmeter on the overload protector terminals. Set the meter scale on R × 1. The reading will show continuity. If not, replace the overload protector.
7. Test the compressor. To test the compressor, remove the relay and the overload protector. This will expose the compressor terminals. The compressor terminals are marked C, S, and R: C indicates the common winding terminal, S indicates the start winding terminal, and R indicates the run winding terminal. Next, place the probes of the ohmmeter on the terminals marked S and R (Figure 28-51). Set the meter scale on R × 1, and adjust the needle setting to indicate a zero reading. The meter reading will show continuity. Now place the meter probes on the terminals marked C and S. The meter reading will show continuity. Finally, place the meter probes on the terminals marked C and R. The meter reading will show continuity. The total number of ohms measured between S and R is equal to the sum of C to S plus C to R.
To test the compressor for ground, place one probe on a compressor terminal and the other probe on the compressor housing or on any good ground (Figure 28-12). Set the meter scale to R × 1000. The meter reading will show no continuity. Repeat this for the remaining two terminals. The meter reading will show no continuity. If you get a continuity reading from any of these terminals to ground, the compressor is grounded and must be replaced.
Water Valve
The water inlet valve controls the flow of water into ice cube maker, and is solenoid-operated. When it is energized, water in the supply line will pass through the valve body and into the water reservoir. The water valve is located in the rear of the ice cube maker.
The typical complaints associated with failure of the water valve are:
• Ice maker runs, but there is no ice production.
• No water is circulating across the evaporator freeze plate.
• Water is flooding the storage bin, causing the ice to melt.
To handle these problems, perform the following steps:
1. Verify the complaint. Verify the complaint by checking the ice maker cycles. It will be helpful if you can locate the actual service manual for the ice maker model you are working on to properly diagnose the ice maker. The service manual will assist you in properly placing the ice maker in the service test mode for testing the ice maker functions.
2. Check for external factors. You must check for external factors not associated with the appliance. Is the appliance installed properly? Explain to the user how to set the controls. Is the water supply turned on? The voltage at the wall receptacle is between 108 volts and 132 volts during a load on the circuit. Do you have the correct polarity? (See Chapter 6.)
3. Disconnect the electricity. Before working on the ice maker, disconnect the electricity. This can be done by pulling the plug from the receptacle. Or disconnect the electricity at the fuse panel or at the circuit breaker panel. Turn off the electricity.
WARNING Some diagnostic tests will require you to test the components with the power turned on. When you disassemble the ice maker control panel cover, you can position the panel in such a way that the wiring will not make contact with metal. This will allow you to test the ice maker components without electrical mishaps.
4. Gain access to the water valve. To access the water valve, remove the rear panel. The water valve is located in the rear of the machine compartment.
5. Test the water valve. Place the ohmmeter probes on the solenoid coil terminals (Figure 28-21). Set the range scale on R × 1, and test for continuity. If there is no continuity, replace the water valve.
6. Install a new water valve. To install the new water valve, just reverse the order of disassembly and reassemble. Then test the valve. Don’t forget to turn on the water supply.
Water Pump
The water pump will circulate the water from the water tank across the evaporator freezing plate (Figure 28-43).
The typical complaints associated with failure of the water pump are:
• Ice maker runs, but there is no ice production.
• No water circulating across the evaporator freeze plate.
To handle these problems, perform the following steps:
1. Verify the complaint. Verify the complaint by checking the ice maker cycles. It will be helpful if you can locate the actual service manual for the ice maker model you are working on to properly diagnose the ice maker. The service manual will assist you in properly placing the ice maker in the service test mode for testing the ice maker functions.
2. Check for external factors. You must check for external factors not associated with the appliance. Is the appliance installed properly? Explain to the user how to set the controls. The voltage at the wall receptacle is between 108 volts and 132 volts during a load on the circuit. Do you have the correct polarity? (See Chapter 6.)
3. Disconnect the electricity. Before working on the ice maker, disconnect the electricity. This can be done by pulling the plug from the receptacle. Or disconnect the electricity at the fuse panel or at the circuit breaker panel. Turn off the electricity.
WARNING Some diagnostic tests will require you to test the components with the power turned on. When you disassemble the ice maker control panel cover, you can position the panel in such a way that the wiring will not make contact with metal. This will allow you to test the ice maker components without electrical mishaps.
4. Gain access to the water pump. To access the water pump, open the ice maker door, and then remove the front cover. A drain plug is located in the water trough. Remove it to drain the water out of the trough (see Figure 28-43). Next, remove the screws that secure the water pump. Remove the water pump
5. Test the water pump. To test the water pump motor, isolate the motor and place the probes of the ohmmeter on the motor terminals. Set the meter scale on R × 1. The meter should show some resistance. If no reading is indicated, replace the water pump. Next, check the motor with a 120-volt fused service cord (see Figure 28-20). If there is rust on the water pump, replace it.
6. Install a new water pump. To install a new water pump, just reverse the order of disassembly and reassemble. Reconnect the wires to the motor terminals, and test.
Thermistor
The thermistors used in the type-2 ice cube maker plug into the electronic control board (Figure 28-52) and they monitor the ice cube maker’s functions and troubleshooting capabilities. The thermistors, in conjunction with the electronic control board, determine the length of the freeze and harvest cycles.
FIGURE 28-52 Exploded view of a type-2 ice cube maker control panel.
The typical complaints associated with failure of thermistor are:
• Ice maker runs, but there is no ice production.
• Too much ice in the storage bin.
• Ice maker not running, error code displayed.
To handle these problems, perform the following steps:
1. Verify the complaint. Verify the complaint by checking the ice maker cycles. It will be helpful if you can locate the actual service manual for the ice maker model you are working on to properly diagnose the ice maker. The service manual will assist you in properly placing the ice maker in the service test mode for testing the ice maker functions.
2. Check for external factors. You must check for external factors not associated with the appliance. Is the appliance installed properly? Explain to the user how to set the controls. The voltage at the wall receptacle is between 108 volts and 132 volts during a load on the circuit. Do you have the correct polarity? (See Chapter 6.)
3. Disconnect the electricity. Before working on the ice maker, disconnect the electricity. This can be done by pulling the plug from the receptacle. Or disconnect the electricity at the fuse panel or at the circuit breaker panel. Turn off the electricity.
WARNING Some diagnostic tests will require you to test the components with the power turned on. When you disassemble the ice maker control panel cover, you can position the panel in such a way that the wiring will not make contact with metal. This will allow you to test the ice maker components without electrical mishaps.
4. Gain access to the thermistor. To gain access to the thermistor, disassemble the control panel (Figure 28-52).
5. Test the thermistor. To test the thermistor, isolate the thermistor from the control board, and place the probes of the ohmmeter on the thermistor terminals. Set the meter scale on R × 1. The meter should show some resistance. For the exact resistance reading you will have to look it up in the service manual. If no reading is indicated, replace the thermistor. On some models, you will have to enter into the service mode to diagnose the problem with the thermistor. Thermistors generally fail due to moisture or physical damage.
6. Install a new thermistor. To install a new thermistor, just reverse the order of disassembly and reassemble. Reconnect the thermistor to the electronic control board, and test. Don’t forget to take the ice maker out of the service mode after the repairs are made.
Electronic Control Board
The electronic control board (Figure 28-52) monitors the ice cube maker’s functions and troubleshooting capabilities.
The typical complaints associated with failure of electronic control board are:
• Ice maker runs, but there is no ice production.
• Ice maker not running, error code displayed.
To handle these problems, perform the following steps:
1. Verify the complaint. Verify the complaint by checking the ice maker cycles. It will be helpful if you can locate the actual service manual for the ice maker model you are working on to properly diagnose the ice maker. The service manual will assist you in properly placing the ice maker in the service test mode for testing the ice maker functions.
2. Check for external factors. You must check for external factors not associated with the appliance. Is the appliance installed properly? Explain to the user how to set the controls. The voltage at the wall receptacle is between 108 volts and 132 volts during a load on the circuit. Do you have the correct polarity? (See Chapter 6.)
3. Disconnect the electricity. Before working on the ice maker, disconnect the electricity. This can be done by pulling the plug from the receptacle. Or disconnect the electricity at the fuse panel or at the circuit breaker panel. Turn off the electricity.
WARNING Some diagnostic tests will require you to test the components with the power turned on. When you disassemble the ice maker control panel cover, you can position the panel in such a way that the wiring will not make contact with metal. This will allow you to test the ice maker components without electrical mishaps.
4. Gain access to the electronic control board. To gain access to the electronic control board, disassemble the control panel (Figure 28-52).
5. Test the electronic control board. To test the electronic control board you will need the service manual for the model you are servicing. You will need to enter the service mode to test the electronic control board. After you enter the service mode, you can test for voltage at the relays outputs. See wiring schematic for locations (Figure 28-53).
FIGURE 28-53 A typical wiring diagram for a type-2 ice cube maker with electronic controls.
6. Install a new electronic control board. To install a new electronic control board, just reverse the order of disassembly and reassemble. Reconnect all connectors on the electronic control board, and test. Don’t forget to take the ice maker out of the service mode after the repairs are made.
Condenser Fan Motor
The condenser fan motor is a 120 VAC, single-speed fan motor. The condenser fan motor is located near the compressor in the machine compartment in the rear of the ice cube maker. The condenser fan motor, when operating, will pull air across the condenser coil and then exhaust it past the compressor and out through the rear of the ice cube maker. The condenser fan will remove the heat from the condenser coil.
The typical complaints associated with failure of the condenser fan motor are:
• The ice maker has stopped producing ice.
• The condenser fan motor runs slower than normal.
• The condenser fan motor does not run at all.
• The compressor is sometimes noisier than normal.
To handle these problems, perform the following steps:
1. Verify the complaint. Verify the complaint by asking the customer to describe what the ice maker is doing. Is the condenser fan motor running during the freeze cycle? It will be helpful if you can locate the actual service manual for the ice maker model you are working on to properly diagnose the ice maker. The service manual will assist you in properly placing the ice maker in the service test mode for testing the ice maker functions.
2. Check for external factors. You must check for external factors not associated with the appliance. Is the appliance installed properly? Are there any foreign objects blocking the condenser fan blades? The voltage at the wall receptacle is between 108 volts and 132 volts during a load on the circuit. Do you have the correct polarity? (See Chapter 6.)
3. Disconnect the electricity. Before working on the ice maker, disconnect the electricity to the ice maker. This can be done by pulling the plug from the receptacle. Or disconnect the electricity at the fuse panel or at the circuit breaker panel. Turn off the electricity.
WARNING Some diagnostic tests will require you to test the components with the power turned on. When you disassemble the ice maker control panel cover, you can position the panel in such a way that the wiring will not make contact with metal. This will allow you to test the ice maker components without electrical mishaps.
4. Gain access to the condenser fan motor. To access the condenser fan motor, remove the rear panel.
5. Test the condenser fan motor. To test the condenser fan motor, remove the wires from the motor terminals. Next, place the probes of the ohmmeter on the motor terminals (Figure 28-22). Set the meter scale on R × 1. The meter should show some resistance. If no reading is indicated, replace the motor. If the fan blades do not spin freely, replace the motor. If the bearings are worn, replace the motor.
6. Remove the condenser fan motor. To remove the condenser fan motor, you must first remove the fan blades. Unscrew the nut that secures the blades to the motor. Remove the blades from the motor. Then remove the motor assembly by removing the mounting bracket screws (Figure 28-23).
7. Install a new condenser fan motor. To install the new condenser fan motor, just reverse the order of disassembly and reassemble. Remember to reconnect the ground wire to the motor. Reconnect the wires to the motor terminals, and test.
Type-2 Ice Cube Maker Performance Data
See on the section “Self-Contained Ice Cube Maker Performance Data” in this chapter. Figure 28-54 depicts the ice cube production for the type-2 ice cube maker.
FIGURE 28-54 Type-2 ice cube maker ice production rates. The amount of ice cubes produced will vary depending on operating conditions, how clean the condenser coil is, type of installation, and application of the appliance.
