An SSH agent is a program that caches private keys and responds to authentication-related queries from SSH clients. [2.5] They are terrific labor-saving devices, handling all key-related operations and eliminating the need to retype your passphrase.
The programs related to agents are ssh-agent and ssh-add. ssh-agent runs an agent, and ssh-add inserts and removes keys from the agent's key cache. A typical use might look like this:
    # Start the agent
    $ ssh-agent $SHELL
    # Load your default identity
    $ ssh-add
    Need passphrase for /home/barrett/.ssh/identity (barrett@example.com).
    Enter passphrase: ********
By typing your passphrase a single time, you decrypt the private key which is then stored in memory by the agent. From now on, until you terminate the agent or log out, SSH clients automatically contact the agent for all key-related operations. You needn't type your passphrase again.
We now briefly discuss how agents work. After that we get practical and illustrate different ways to start an agent, various configuration options, and several techniques for automatically loading your keys into the agent. Finally, we cover agent security and agent forwarding.
Agents perform two tasks:
Store your private keys in memory
Answer questions (from SSH clients) about those keys
Agents don't, however, send your private keys anywhere. This is important to understand. Once loaded, private keys remain within an agent, unseen by SSH clients. To access a key, a client says, "Hey agent! I need your help. Please perform a key-related operation for me." The agent obeys and sends the results to the client, as in Figure 6-4.
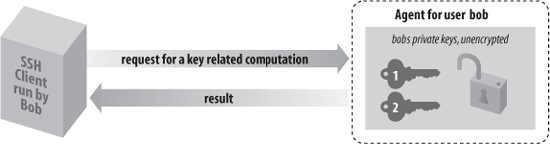
For example, if ssh needs to sign an authenticator, it sends the agent a signing request containing the authenticator data and an indication of which key to use. The agent performs the cryptographic operation itself and returns the signature.
In this manner, SSH clients use the agent without seeing its private keys. This technique is more secure than handing out keys to clients. The fewer places that private keys get stored or sent, the harder it is to steal them.[93]
There are two ways to invoke an agent in your login account:
The single-shell method that uses your current login shell
The subshell method that forks a subshell to facilitate the inheritance of some environment variables
Warning
Don't invoke an agent with the "obvious" but wrong command:
$ ssh-agent
Although the agent runs without complaint, SSH clients can't contact it, and the termination command (ssh-agent -k) doesn't kill it, because some environment variables aren't properly set.
The single-shell method runs an agent in your current login shell. This is most convenient if you're running a login shell on a single terminal, as opposed to a Unix Window system such as X. Type:
$ eval `ssh-agent`
and an ssh-agent process is forked in the background. The process detaches itself from your terminal, returning a prompt to you, so you needn't run it in the background manually (i.e., with an ampersand on the end). Note that the quotes around ssh-agent are backquotes, not apostrophes.
What purpose does eval serve? Well, when
ssh-agent runs, it not only forks itself in the
background, but it also outputs some shell commands to set several
environment variables necessary for using the agent. The variables
are SSH_AUTH_SOCK and SSH_AGENT_PID for OpenSSH, or SSH2_AUTH_SOCK and SSH2_AGENT_PID for Tectia. The
eval command causes the current shell to
interpret the commands output by ssh-agent,
setting the environment variables. If you omit the
eval, the following commands are printed on
standard output as ssh-agent is invoked. For
example:
    # OpenSSH
    $ ssh-agent
    SSH_AUTH_SOCK=/tmp/ssh-barrett/ssh-22841-agent; export SSH_AUTH_SOCK;
    SSH_AGENT_PID=22842; export SSH_AGENT_PID;
    echo Agent pid 22842;

    # Tectia
    SSH2_AUTH_SOCK=/tmp/ssh-barrett/ssh2-22842-agent; export SSH2_AUTH_SOCK;
    SSH2_AGENT_PID=22842; export SSH2_AGENT_PID;
    echo Agent pid 22842;
Now you've got an agent running, but inaccessible to the shell. You can either kill it using the pid printed in the previous output:
$ kill 22842
or point your shell manually to the agent by setting the environment variables exactly as given:[94]
    # OpenSSH
    $ SSH_AUTH_SOCK=/tmp/ssh-barrett/ssh-22841-agent; export SSH_AUTH_SOCK
    $ SSH_AGENT_PID=22842; export SSH_AGENT_PID

    # Tectia
    $ SSH2_AUTH_SOCK=/tmp/ssh-barrett/ssh2-22842-agent; export SSH2_AUTH_SOCK
    $ SSH2_AGENT_PID=22842; export SSH2_AGENT_PID
Nevertheless, it's easier to use eval, so everything is set up for you.[95]
To terminate the agent, kill its pid:
$ kill 22842
and unset the environment variables:
    # OpenSSH
    $ unset SSH_AUTH_SOCK
    $ unset SSH_AGENT_PID

    # Tectia
    $ unset SSH2_AUTH_SOCK
    $ unset SSH2_AGENT_PID
Or for OpenSSH, use the more convenient -k command-line option:
    # OpenSSH
    $ eval `ssh-agent -k`
This prints termination commands on standard output so that eval can invoke them. If you forget eval, the agent is still killed, but your environment variables don't get unset automatically:
    # OpenSSH
    $ ssh-agent -k
    unset SSH_AUTH_SOCK;        # This won't get unset,
    unset SSH_AGENT_PID         # and neither will this,
    echo Agent pid 22848 killed # but the agent gets killed.
Running an agent in a single shell, as opposed to the method we cover next (spawning a subshell), has one problem. When your login session ends, the ssh-agent process doesn't die. After several logins, you see many agents running, serving no purpose:[96]
    $ ps uax | grep ssh-agent
    barrett   7833  0.4  0.4  828  608 pts/1    S 21:06:10  0:00 grep agent
    barrett   4189  0.0  0.6 1460  844 ?        S   Feb 21  0:06 ssh-agent
    barrett   6134  0.0  0.6 1448  828 ?        S 23:11:41  0:00 ssh-agent
    barrett   6167  0.0  0.6 1448  828 ?        S 23:24:19  0:00 ssh-agent
    barrett   7719  0.0  0.6 1456  840 ?        S 20:42:25  0:02 ssh-agent
You can get around this problem by running ssh-agent -k automatically when you log out. In Bourne-style shells (sh, ksh, bash), this may be done with a trap of Unix signal 0 at the top of ~/.profile:
    # ~/.profile
    trap '
      test -n "$SSH_AGENT_PID"  && eval `ssh-agent -k` ;
      test -n "$SSH2_AGENT_PID" && kill $SSH2_AGENT_PID
    ' 0
For C shells and for tcsh, terminate the agent in your ~/.logout file:
    # ~/.logout
    if ( "$SSH_AGENT_PID" != "" ) then
      eval `ssh-agent -k`
    endif
    if ( "$SSH2_AGENT_PID" != "" ) then
      kill $SSH2_AGENT_PID
    endif
Once this trap is set, your ssh-agent process is killed automatically when you log out, printing a message like:
Agent pid 8090 killed
The second way to invoke an agent spawns a subshell. You provide an argument to ssh-agent, which is a path to a shell or shell script. Examples are:
    $ ssh-agent /bin/sh
    $ ssh-agent /bin/csh
    $ ssh-agent $SHELL
    $ ssh-agent my-shell-script      # Run a shell script instead of a shell
This time, instead of forking a background process, ssh-agent runs in the foreground, spawning a subshell and setting the aforementioned environment variables automatically. The rest of your login session runs within this subshell, and when you terminate it, ssh-agent terminates as well. This method, as you will see later, is most convenient if you run a Window System such as X and invoke the agent in your initialization file (e.g., ~/.xsession).[97] However, the method is also perfectly reasonable for single-terminal logins.
When using the subshell method, invoke it at an appropriate time. We recommend the last line of your login initialization file (e.g., ~/.profile or ~/.login) or the first typed command after you log in. Otherwise, if you first run some background processes in your shell and then invoke the agent, those initial background processes become inaccessible until you terminate the agent's subshell. For example, if you run the vi editor, suspend it, and then run the agent, you lose access to the editor session until you terminate the agent:
    $ vi myfile               # Run your editor.
    ^Z                        # Suspend it.
    $ jobs                    # View your background processes.
    [1] + Stopped (SIGTSTP) vi
    $ ssh-agent $SHELL        # Run a subshell.
    $ jobs                    # No jobs here! They're in the parent shell.
    $ exit                    # Terminate the agent's subshell.
    $ jobs                    # Now we can see our processes again.
    [1] + Stopped (SIGTSTP) vi
The advantages and disadvantages of the two methods are shown in Table 6-2.
Table 6-2. Pros and cons of invoking an agent
Method | Pros | Cons |
|---|---|---|
eval 'ssh-agent' | Simple, intuitive. | Must be terminated manually. |
ssh-agent $SHELL | Agent's environment variables are propagated automatically; terminates on logout. Conveniently set up by many Linux distributions. | Your login shell becomes dependent on the agent's health; if the agent dies, your login shell may die. |
As we've said, ssh-agent prints a sequence of shell commands to set several environment variables. The syntax of these commands differs depending on which shell is being used. You can force the commands to use Bourne-style or C-shell-style syntax with the -s and -c options, respectively:
    # Bourne-shell style commands
    $ ssh-agent -s
    SSH_AUTH_SOCK=/tmp/ssh-barrett/ssh-3654-agent; export SSH_AUTH_SOCK;
    SSH_AGENT_PID=3655; export SSH_AGENT_PID;
    echo Agent pid 3655;

    # C-shell style commands
    $ ssh-agent -c
    setenv SSH_AUTH_SOCK /tmp/ssh-barrett/ssh-3654-agent;
    setenv SSH_AGENT_PID 3655;
    echo Agent pid 3655;
Normally ssh-agent detects your login shell and prints the appropriate lines, so you don't need -c or -s. One situation where you need these options is if you invoke ssh-agent within a shell script, but the script's shell is not the same type as your login shell. For example, if your login shell is /bin/csh, and you invoke this script:
    #!/bin/sh
    `ssh-agent`
ssh-agent outputs C-shell-style commands, which fails. So, you should use:
    #!/bin/sh
    `ssh-agent -s`
This is particularly important if you run an agent under X, and your ~/.xsession file (or other startup file) is executed by a shell different from your login shell.
The program ssh-add is your personal communication channel to an ssh-agent process. When you first invoke an SSH agent, it contains no keys. ssh-add, as you might guess from its name, can add private keys to an SSH agent. But the name is misleading because ssh-add also controls the agent in other ways, such as listing keys, deleting keys, and locking the agent from accepting further keys.
If you invoke ssh-add with no arguments, your default SSH keys are loaded into the agent, once you have typed their passphrases.[98] For example:
    # Output shown for OpenSSH
    $ ssh-add
    Enter passphrase for /home/smith/.ssh/id_dsa: ********
    Identity added: /home/smith/.ssh/id_dsa
Normally, ssh-add reads the passphrase from
the user's terminal. If the standard input isn't a terminal, however,
and the DISPLAY environment
variable is set, ssh-add instead invokes an X
Window graphical program called ssh-askpass or
x11-ssh-askpass that pops up a window to read
your passphrase. This is especially convenient in
xdm startup scripts.[99]
Tip
If you don't like ssh-askpass, set your
environment variable SSH_ASKPASS
to the full path to an alternative program (say, /usr/local/bin/my-ask-pass). Then this
other program, rahter than ssh-askpass, runs
automatically to gather your passphrase. (OpenSSH only.)
ssh-add supports the following command-line options for listing and deleting keys, and for reading the passphrase:
List all identities loaded in the agent. OpenSSH lists the key fingerprints with -l (see the earlier sidebar "Key Fingerprints" for more detail):
    # OpenSSH
    $ ssh-add -l
    1024 e9:39:50:f0:b4:65:ba:b9:d7:d3:69:10:d0:23:a7:88 a (DSA)
    1024 7c:91:07:29:46:a8:61:b4:7c:95:69:fc:47:1e:3c:ff b (RSA)
To print the public keys held in the OpenSSH agent, use -L:
    # OpenSSH
    $ ssh-add -L
    ssh-dss AAAAB3NzaC1kc3MAAACBAK5ArDaZyPXa5Iz... and so forth
    ssh-rsa AAAAB3NzaC1yc2EAAAABIwAAAIEAtIgHblLp1i... and so forth
Tectia lists brief information about the loaded keys with -l:
    # Tectia
    $ ssh-add -l
    Listing identities.
    The authorization agent has two keys:
    id_dsa_2048_a: my main key
    id_dsa_2048_b: another key
Delete an identity from the agent, with -d:
    $ ssh-add -d ~/.ssh/second_id
    Identity removed: /home/smith/.ssh/second_id (second_id.pub)
If you don't specify a key file, ssh-add deletes your default identity from the agent:
    $ ssh-add -d
    Identity removed: /home/smith/.ssh/id_dsa (/home/smith/.ssh/id_dsa.pub)
Delete all identities from the agent, with -D; this unloads every currently loaded key but leaves the agent running:
    # OpenSSH
    $ ssh-add -D
    All identities removed.

    # Tectia
    $ ssh-add -D
    Deleting all identities.
Set a timeout for a key, with -t. Normally when you add a key, it remains loaded in the agent indefinitely, until the agent terminates or you unload the key manually. The -t option assigns a lifetime to a key, measured in seconds (OpenSSH) or minutes (Tectia). After this time has passed, the agent automatically unloads the key:
$ ssh-add -t 30 mykey
OpenSSH has a richer syntax for specifying times that may also be used here; see the sidebar "Time Values in Configuration Files" in Chapter 5:
    # OpenSSH
    $ ssh-add -t 3W mykey         Set a key lifetime of three weeks
You can also specify the maximum lifetime for all keys in the agent:
    # OpenSSH
    $ eval 'ssh-agent -t 3W'      All keys in the agent have a lifetime of three weeks or less
Lock and unlock the agent with a password, using -x and -X (OpenSSH) or -L and -U (Tectia). A locked agent refuses all ssh-add operations except an unlock request. If you try to modify the state of the agent (adding or deleting keys, etc.), the operation is rejected, and if you try to list the agent's keys, you are told the agent has no keys.
To lock:
# OpenSSH $ ssh-add -x Enter lock password:****Again:****Agent locked # Tectia $ ssh-add -L Enter lock password:****Again:****and to unlock:
# OpenSSH ssh-add -X Enter lock password:****Agent unlocked # Tectia $ ssh-add -U Enter lock password:****Locking is a convenient way to protect the agent if you step away from your computer but leave yourself logged in. You can instead unload all your keys with ssh-add -D, but then you have to reload them again when you return. If you have only one key there's no difference, but if you use several it's a pain. Unfortunately, both OpenSSH and Tectia's locking mechanism aren't tremendously secure. ssh-agent simply stores the lock password in memory, refusing to honor any more requests until it receives an unlock message containing the same password. The locked agent is still vulnerable to attack: if an intruder gains access to your account (or the root account), he can dump the agent's process address space and extract your keys. The lock feature certainly deters casual misuse, but the potential for an attack is real. If you're seriously concerned about key disclosure, think twice before relying on locking. We prefer to see this feature implemented by encrypting all the agent's loaded keys with the lock password. This gives the same user convenience and provides better protection.
OpenSSH's ssh-add program can also be forced to confirm identities via ssh-askpass before using them, with -c. [6.3.3]
Tectia's ssh-add program has additional features controlled by command-line options:
Place limits on agent forwarding with -f and -F. (Agent forwarding, which we'll cover soon, transmits agent requests between hosts.) The -f option lets you limit, for a given key, the distance that requests for this key may traverse. If a request is made from too far away, measured in hops from machine to machine, the request fails. A hop count of zero disables forwarding for this key alone.
    # Tectia
    $ ssh-add -f 0 mykey          Load a key that may be used only locally
    $ ssh-add -f 3 mykey          Load a key and accept requests from up to three hops away
The -F option lets you limit the set of hosts that may make requests relating to this key. It takes as an argument a set of hostnames, domains, and IP addresses that may make or forward requests. The argument is a comma-separated list of wildcard patterns, as for the serverwide configuration keywords
AllowHostsandDenyHosts. [5.5.3]# Tectia $ ssh-add -F '*.example.com' mykey Permit forwarding only in the example.com domain $ ssh-add -F 'server.example.com,*.harvard.edu' mykey Permit forwarding from server example.com and the harvard.edu domain $ ssh-add -F 'server.example.com,*.harvard.edu' -f 2 mykey Same as the preceding command, but limit forwarding to two hopsReading your passphrase from standard input, with -p, to provide it by a pipe or similar means. So, if you had a program passphraser that produces the passphrase, you could feed the passphrase to ssh-add:
    # Tectia
    $ passphraser | ssh-add
Read keys from a URL rather than a file, with -u:
    # Tectia
    $ ssh-add -u http://server.example.com/mykey
Prohibit keys from being used for SSH-1 protocol connections, with -1:
    # Tectia
    $ ssh-add -1 my-ssh2-only-key
Perform PGP key operations. Tectia's ssh-add2 manpage documents the options -R, -N, -P, and -I for OpenPGP keyring operations, but they aren't officially supported.
Print the program version number, with -V:
    # Tectia
    $ ssh-add -V
    ssh-add2 SSH Tectia Server 4.2.1 on i686-pc-linux-gnu
    Build: 1
    Released 2004-11-30 (YYYY-MM-DD).
It's a pain to invoke ssh-agent and/or ssh-add manually each time you log in. With some clever lines in your login initialization file, you can automatically invoke an agent and load your default identity. We'll demonstrate this with both methods of agent invocation, single-shell and subshell.
With the single-shell method, here are the major steps:
Make sure you're not already running an agent, by testing the environment variable
SSH_AUTH_SOCKorSSH2_AUTH_SOCK.Run ssh-agent using eval.
If your shell is attached to a tty, load your default identity with ssh-add.
For the Bourne shell and its derivatives (ksh, bash), the following lines can be placed into ~/.profile:
    # Make sure ssh-agent dies on logout
    trap '
      test -n "$SSH_AGENT_PID"  && eval `ssh-agent -k` ;
      test -n "$SSH2_AGENT_PID" && kill $SSH2_AGENT_PID
    ' 0

    # If no agent is running and we have a terminal, run ssh-agent and ssh-add.
    # (For Tectia, change this to use SSH2_AUTH_SOCK.)
    if [ "$SSH_AUTH_SOCK" = "" ]
    then
      eval `ssh-agent`
      /usr/bin/tty > /dev/null && ssh-add
    fi
For the C shell and tcsh, the following lines can be placed into ~/.login:
    # Use SSH2_AUTH_SOCK instead for Tectia
    if ( ! $?SSH_AUTH_SOCK  ) then
      eval `ssh-agent`
      /usr/bin/tty > /dev/null && ssh-add
    endif
and termination code in ~/.logout:
    # ~/.logout
    if ( "$SSH_AGENT_PID" != "" ) eval `ssh-agent -k`
    if ( "$SSH2_AGENT_PID" != "" ) kill $SSH2_AGENT_PID
Tip
Another single-shell technique to make your clients aware of the agent is to use OpenSSH's ssh-agent -a option. (This does not work with Tectia's agent.) With this approach, you choose your own socket in advance—say, ~/.ssh/mysocket--and make decisions based on its existence. For example, in your ~/.profile you could have:
    #!/bin/bash
    SOCKETFILE=~/.ssh/mysocket
    if [ ! -S "$SOCKETFILE" ]
    then
      eval `ssh-agent -a $SOCKETFILE`
    fi
Since you know the socket path, you can direct SSH clients to it by setting SSH_AUTH_SOCK=~/.ssh/mysocket as needed. When you terminate the OpenSSH agent with ssh-agent -k, the socket file is deleted automatically.
The second way to load an agent on login uses the subshell method to invoke the agent, and is described in the following list. This time, you add lines to both your login initialization file (~/.profile or ~/.login), an optional second file of your choice, and your shell initialization file (~/.cshrc, ~/.bashrc, etc.). This method doesn't work for the Bourne shell, which has no shell initialization file.
In your login initialization file, make sure you're not already running an agent, by testing the environment variable
SSH_AUTH_SOCKorSSH2_AUTH_SOCK.As the last line of your login initialization file, exec ssh-agent, which spawns a subshell. Optionally run a second initialization file to configure aspects of the subshell.
In your shell initialization file, check whether the shell is attached to a tty and the agent has no identities loaded yet. If so, load your default identity with ssh-add.
Now let's see how to do this with Bourne-shell and C-shell families. For derivatives of the Bourne shell (ksh, bash), put the following line at the end of ~/.profile:
test -n "$SSH_AUTH_SOCK" && exec ssh-agent $SHELL
This runs the agent, spawning a subshell. If you want to tailor the environment of the subshell, create a script (say, ~/.profile2) to do so, and use this instead:
test -n "$SSH_AUTH_SOCK" && exec ssh-agent $SHELL $HOME/.profile2
Next, in your shell initialization file ($ENV for ksh, or ~/.bashrc for bash), place the following lines to load your default identity only if it's not loaded already:
    # Make sure we are attached to a tty
    if /usr/bin/tty > /dev/null
    then
      # Check the output of "ssh-add -l" for identities.
      ssh-add -l | grep 'no identities' > /dev/null
      if [ $? -eq 0 ]
      then
        # Load your default identity.
        ssh-add
      fi
fiIf you're using X and want to run an agent and load your default identity automatically, it's simple. Just use the single-shell method. For example, in your X startup file, usually ~/.xsession, you can use these two lines:
    eval `ssh-agent`
    ssh-add
However, first check if your window environment (e.g., GNOME or KDE) is already running an SSH agent for you, in which case you needn't do it yourself. This setup is commonly found in Linux distributions.
As we mentioned earlier, agents don't expose private keys to SSH clients. Instead, they answer requests from clients using the keys. This approach is more secure than passing keys around, but it still has security concerns. It is important to understand these concerns before completely trusting the agent model:
When your agent is loaded with private keys, a potential security issue arises. How does your agent distinguish between legitimate requests from your SSH clients and illegitimate requests from unauthorized sources? Since the agent speaks only to other processes on the same host, it uses the host's existing security mechanisms. These vary from one operating system to another, but the four main mechanisms are:
File permissions
Client identification
Protected memory
Prompt-on-use
File permissions. Under Unix, the agent communicates with users via a named pipe (Unix-domain socket) in the filesystem, so the first line of defense is the file permissions on the socket. OpenSSH and Tectia keep agent sockets in a protected directory. OpenSSH's socket is named /tmp/ssh- STRING /agent. n, where STRING is random text based on the agent's process ID, and n is a number:
    # OpenSSH
    $ ls -la /tmp/ssh-alHMKX4537
    drwx------   2 smith    smith       4096 Feb  4 13:40 .
    drwxrwxrwt   7 root     root        4096 Feb  4 13:40 ..
    srwxr-xr-x   1 smith    smith       0 Feb  4 13:40 agent.4537
while Tectia's is named /tmp/ssh- USERNAME / ssh2 - n - agent, where USERNAME is your username and n is again a number:
    # Tectia
    $ ls -la /tmp/ssh-smith/
    drwx------   2 smith   smith       4096 Feb  4 13:40 .
    drwxrwxrwt   7 root    root        4096 Feb  4 13:40 ..
    srw-------   1 smith   smith       0 Feb  4 13:40 ssh2-4537-agent
The number n is usually one less than the process ID (pid) of the agent itself. This is because ssh-agent first creates the socket using its pid, then later starts another process that actually persists as the agent. In these examples, user smith has a socket for an agent which probably has PID 4536. The containing directory itself has mode 0700.
This organization of a user's sockets into a single directory is not only for neatness but also for security and portability, because different operating systems treat socket permissions in different ways. For example, Solaris appears to ignore them completely; even a socket with permission 000 (no access for anyone) accepts all connections. Linux respects socket permissions, but a write-only socket permits both reading and writing. To deal with such diverse implementations, SSH keeps your sockets in a directory owned by you, with directory permissions that forbid anyone else to access the sockets inside.
Using a subdirectory of /tmp, rather than /tmp itself, also prevents a class of attacks called temp races. A temp-race attack takes advantage of race conditions inherent in the common setting of the "sticky" mode bit on the Unix /tmp directory, allowing anyone to create a file there, but only allowing deletion of files owned by the same uid as the deleting process.
If you want to move the socket out of the default /tmp directory, use the -a option: [6.3.3.1]
    # OpenSSH
    ssh-agent -a /private/ssh/mysocket
    SSH_AUTH_SOCK=/private/ssh/mysocket; export SSH_AUTH_SOCK;
    echo Agent pid 28320;
Client identification. Some flavors of Unix allow one process to find out who's on the other end of a named pipe: the peer's process ID, user ID, etc. If this feature is available, an agent can verify that the client's user ID matches its own.
Protected memory. The ssh-agent process won't reveal keys via the agent protocol, but those keys are in its memory. A privileged user might be able to attach to the agent process and read the keys from its memory space, bypassing the usual Unix process separation. Some Unixes allow a process to limit or prevent this kind of external interference, so some agents make use of this feature.
Prompt-on-use. Some agents can query the user for permission each time a request comes in over the agent socket (e.g., OpenSSH ssh-add -c). If you use this feature and a window pops up unexpectedly asking about your agent, something's wrong!
If the machine running your agent is compromised, an attacker can easily gain access to the IPC channel and thus to your agent. This permits the interloper to make requests of the agent, at least for a time. Once you log out or unload your keys from the agent, the security hole is closed. Therefore, you should run agents only on trusted machines, perhaps unloading your keys (ssh-agent -D) if you're away from the computer for an extended time, such as overnight.
Since agents don't give out keys, your keys seem safe from theft if the machine is compromised. Alas, that's not the case. An enterprising cracker, once logged into the machine, has other means for getting your keys, such as:
Stealing your private-key file and attempting to guess your passphrase
Tracing processes that you're running, and catching your passphrase while you type it
Trojan horse attacks: installing modified versions of system programs, such as the login program, shells, or the SSH implementation itself, that steal your passphrase
Obtaining a copy of the memory space of your running agent and picking the keys out of it directly (this is a bit harder than the others)
The bottom line is this: run agents only on trusted machines. SSH does not excuse you from securing other aspects of your system.
So far, our SSH clients have conversed with an SSH agent on the same machine. Using a feature called agent forwarding , clients can also communicate with agents on remote machines. This is both a convenience feature—permitting your clients on multiple machines to work with a single agent—and a means for avoiding some firewall-related problems.
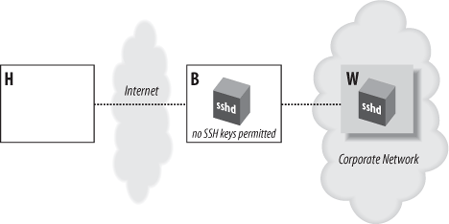
Suppose you want to connect from your home computer, H, to a computer at work, W. Like many corporate computers, W is behind a network firewall and not directly accessible from the Internet, so you can't create an SSH connection from H to W. Hmm...what can you do? You call technical support and for once, they have good news. They say that your company maintains a gateway or "bastion" host, B, that is accessible from the Internet and runs an SSH server. This means you should be able to reach W by opening an SSH connection from H to B, and then from B to W, since the firewall permits SSH traffic. Tech support gives you an account on the bastion host B, and the problem seems to be solved...or is it?
For security reasons, the company permits access to its computers only by public-key authentication. So, using your private key on home machine H, you successfully connect to bastion host B. And now you run into a roadblock: also for security reasons, the company prohibits users from storing SSH keys on the exposed bastion host B, since they can be stolen if B is hacked. That's bad news, since the SSH client on B needs a key to connect to your work account on W. Your key is at home on H. (Figure 6-5 illustrates the problem.) What now? Use SSH agent forwarding.
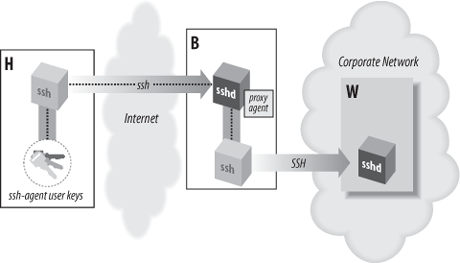
SSH agent forwarding allows a program running on a remote host, such as B, to access your ssh-agent on H transparently, as if the agent were running on B. Thus, a remote SSH client running on B can now sign and decrypt data using your key on H, as shown in Figure 6-6. As a result, you can invoke an SSH session from B to your work machine W, solving the problem.
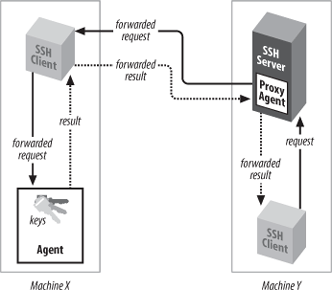
Agent forwarding, like all SSH forwarding (Chapter 9), works "behind the scenes." In this case, the key-related requests of an SSH client are forwarded across a separate, previously established SSH session to an agent holding the needed keys, shown in Figure 6-7. Let's examine in detail the steps that occur.
Suppose you're logged onto machine X, and you invoke ssh to establish a remote terminal session on machine Y.
    # On machine X:
    $ ssh Y
Assuming that agent forwarding is turned on, the client says to the SSH server, "I would like to request agent forwarding, please," when establishing the connection.
sshd on machine
Ychecks its configuration to see if it permits agent forwarding. Let's assume that it's enabled.sshd on machine Y sets up an interprocess communication (IPC) channel local to Y by creating some Unix domain sockets and setting some environment variables. [6.3.2.1] The resulting IPC mechanism is just like the one ssh-agent sets up. As a result, sshd is now prepared to pose as an SSH agent.
Your SSH session is now established between X and Y.
Next, from machine Y, you run another ssh command to establish an SSH session with a third machine, Z:
    # On machine Y:
    $ ssh Z
This new ssh client now needs a key to make the connection to Z. It believes there's an agent running on machine Y, because sshd on Y is posing as one. So, the client makes an authentication request over the agent IPC channel.
sshd intercepts the request, masquerading as an agent, and says, "Hello, I'm the agent. What would you like to do?" The process is transparent: the client believes it's talking to an agent.
sshd then forwards the agent-related request back to the original machine, X, over the secure connection between X and Y. The agent on machine X receives the request and accesses your local key, and its response is forwarded back to sshd on machine
Y.sshd on Y passes the response on to the client, and the connection to machine Z proceeds.
Thanks to agent forwarding, you have transparent access from machine Y to any SSH keys back on machine X. Thus, any SSH clients on Y can access any hosts permitted by your keys on X. To test this, run this command on machine Y to list your keys:
    # On machine Y:
    $ ssh-add -l
You see all keys that are loaded in your agent on machine X.
It's worth noting that the agent-forwarding relationship is transitive: if you repeat this process, making a chain of SSH connections from machine to machine, then clients on the final host still have access to your keys on the first host (X). (This assumes agent forwarding is permitted by sshd on each intermediate host.)
Before an SSH client can take advantage of agent
forwarding, the feature must be turned on. SSH implementations vary
in their default settings of this feature, and of course the system
administrator can change it. If necessary, you can turn it on
manually with the configuration keyword ForwardAgent in the client configuration
file ~/.ssh/config, giving a
value of yes (the default) or
no:[100]
ForwardAgent yes
Likewise, you can use command-line options. In addition to the -o command-line option, which accepts any configuration keyword and its value:
$ ssh -o "ForwardAgent yes" ...
ssh accepts command-line options to turn on agent forwarding, even though it's on by default:
    # OpenSSH
    $ ssh -A ...

    # Tectia
    $ ssh +a ...
The option -a turns off agent forwarding:
$ ssh -a ...
Before we leave our discussion of agents, we'll make one final note about performance. Agents carry out all cryptographic work that is otherwise done by SSH clients. This means an agent can accumulate substantial CPU time. In one case we saw, some friends of ours were using SSH for a great deal of automation, running hundreds of short-lived sessions in a row. Our friends were quite puzzled to find that the single ssh-agent used by all these processes was eating the lion's share of CPU on that machine!
OpenSSH's ssh-agent has a primitive debugging mode that's enabled with the -d option:
    # OpenSSH
    ssh-agent -d
    SSH_AUTH_SOCK=/tmp/ssh-nQxHO27500/agent.27500; export SSH_AUTH_SOCK;
    echo Agent pid 27500;
In debug mode, the agent runs in the foreground instead of putting itself into the background (forking). To communicate with the agent and watch it print debug messages, open a second shell (e.g., in a separate X terminal window) and run the variable-setting command that ssh-agent printed on invocation:
$ SSH_AUTH_SOCK=/tmp/ssh-nQxHO27500/agent.27500; export SSH_AUTH_SOCK;
Then try some ssh-add commands and see what the agent does. For example, if you run this in your second shell:
    $ ssh-add -l
    The agent has no identities.
then the agent in the original shell prints:
    debug1: type 1
    debug1: type 11
The type output indicates the
type of message that ssh-agent has received.
Types 1 and 11 are requests for identities (SSH-1 and SSH-2,
respectively), which makes perfect sense because that's what
ssh-add -l does. A few other message codes are 17
to load an identity, 18 to delete one, and 19 to delete all
identities. You can learn more message types by reading the C header
file authfd.h in the OpenSSH
source code.
[93] This design also fits well with token-based key storage, in which your keys are kept on a smart card carried with you. Like agents, smart cards respond to key-related requests but don't give out keys, so integration with SSH would be straightforward. Though adoption of tokens has been slow, we believe it will be commonplace in the future.
[94] This is Bourne shell syntax. If your shell is csh or tcsh, use the appropriate syntax. [6.3.2.3]
[95] Why can't ssh-agent set its environment variables without all this trickery? Because under Unix, a program can't set environment variables in its parent shell.
[96] Actually, you can reconnect to an agent launched in a
previous login, by modifying your SSH_AUTH_SOCK variable to point to the
old socket.
[97] In fact, many Linux distributions set this up for you, automatically launching ssh-agent when you log in via KDE or GNOME. Red Hat Linux and SUSE Linux are two examples. After logging in, run a ps command and grep for "agent" to see this in action.
[98] OpenSSH's ssh-add tries to reuse a passphrase to load subsequent keys.
[99] X has its own security problems, of course. If someone can connect to your X server, they can monitor all your keystrokes, including your passphrase. Whether this is an issue in using ssh-askpass depends on your system and security needs.
[100] Tectia supports the keyword AllowAgentForwarding as a synonym for
ForwardAgent.