N0 3
CARPENTRY
Nature—a treasure trove
In several of the book’s woodworking projects, I use natural, untreated wood, which is a beautiful material and one that’s great to work with. In this chapter, there is a tool rack built of driftwood, birch trunks crafted into a partition, and a chair made of pine branches; these projects have allowed me to adapt to the natural shapes and textures of the wood. For other projects, I use finished lumber of various dimensions, which is easy to use and quick to build with.

Many of us have built tree houses from wooden scraps, but even some historic castles have been made of wood. Sweden’s Ekebyhov Castle is a well-preserved wooden castle from the late 1600s.
It’s difficult to find a building material more natural than wood. Wood has a surprisingly long life, can be recycled, and has its own natural cycle. Different types of wood show great variation in their qualities. Color, texture, durability, density, hardness, and strength are just some of the characteristics that vary between types of wood. In the olden days, peasants and craftsmen had a deep, cultural knowledge of different woods and their various functions—a knowledge that migrated and evolved through the generations. When they made wooden tines, they used lilac wood. Ash, which is resilient and strong, is still used today to make oars, tool handles, and dog sledges. Alder is worked into shape easily and can absorb moisture well, and therefore it makes great clogs. Matches are made of aspen, which is a light wood without resin.
The Age of a Tree
Some tree species are fast growing while others are slow growing. Oak is one of the longest-lived trees in the world, and can grow for a thousand years or more, while aspen does not live beyond a hundred years. You can find out the age of a tree by counting the trunk’s annual rings. These cells grow differently depending on the seasons.

This 30 cm-thick tree was 59 years old when it fell. The maximum age for a pine is about 400 years.

This Scots pine was only 20 cm in diameter, but even so, it was 85 years old. Scots pines can live up to 800 years.
Rings that grow in the spring are lighter in color and are called “springwood.” Toward the end of the summer darker rings form and are called “summerwood.” In some tree species, such as aspen, it is difficult to discern annual rings, while the pine’s and Scots pine’s growth rings tend to be easier to count.
From Log to Plank
During large-scale logging, tree trunks are picked up by timber trucks and delivered to a sawmill where the logs are sawn into the appropriate dimensions. For small-scale logging, mobile sawmills are used. The sawmill is sent out to the courtyard, and the logs are sawn up on site. After they are sawn, the planks must be dried. At the lumber yard, freshly sawn timber is laid flat and aired during the stacking process, when the sun and wind removes water from the wood.
Wood shrinks when water evaporates. Shrinkage occurs differently in different areas in the wood, and the tensions that build up may cause the wood to crack or twist. Depending on how a plank is sawn from the log, shape differences will appear between the boards. A plank that is sawn from the center of the tree may shrink uniformly and have only small shape changes, while a board sawn from the outer edge of the tree will have relatively large changes in shape.
The moisture content is higher in the outer edge than in the heartwood, which means that planks sawn from the outer parts of the tree will shrink more than heartwood. By looking at the rings, one can predict how the plank will change in shape when it dries.

A plank tends to become concave if the heartwood is facing downward when it dries during the stacking process. Correspondingly, the plank becomes convex if the heartwood is facing upwards. If the planks are screwed onto the underlying joists instead of nailed, they retain their shape better.

Stakes of juniper, oak, dense-growing fir, and pine have been used to make fences for a long time. Sometimes the tips are charred or tarred to protect them from rotting, but often they are used untreated. When the bottom end is rotten, it can be trimmed off and reused. This beautiful old fence is surrounded by flowering pansies.
SAFETY
In carpentry there are many types of saws and sharp instruments for cutting, such as axes, planes, and chisels. Be careful when measuring; work slowly and methodically to create a foundation that’s safe and sturdy. A good foundation will allow for a good final product.
• Ensure that the protective devices in your cutting tools and power tools are set correctly and activated. Hearing protection is a must.
• Use heavy-duty work gloves to protect your hands from splinters.
• Be careful when using sharp tools. It’s easy to slip when using a knife or chisel.

Wide Range of Applications
The easiest way to build with wood is to use narrow trunks and branches without any special processing. When thicker tree trunks are sawn into planks of varying dimensions, the field of use is large. Timber is used in frame structures as well as fitments and joinery, while planks made from compressed wood fibers or particles are suitable for all kinds of uses.
You can glue, nail, and assemble wooden structures. If you choose to use screws, then it’s good to use self-tapping screws or to pre-drill holes for screws to ensure that the wood won’t crack. This is particularly important if screws are placed close to the end grain of the plank.
Treating the wood with paint, oil, or tar will prolong its lifespan significantly. In crafts, wood is often transformed into beautiful utilitarian and art pieces.
Trees on Trees

For generations, forests have been planted for specific purposes. One of the most famous historical examples was the careful cultivation of over 300,000 oaks in the beginning of the 1800s in Visingsö, with the idea that the wood could be harvested several hundred years later for boat construction. Today, we plant fast-growing willows of the genus Salix on arable land to mine energy. Energy forests are usually felled in 3–5 years.
Buying Lumber
In many of the projects in this book, a beam or wooden sheet is required. The lumberyard has many different lumber sizes and grades, and it can sometimes be difficult to find what you are looking for.
Besides looking for lumber of the right dimensions, you must also ensure that they are the right lengths. Wood is bought in standard lengths, so one must assume that there will always be leftover wood. Bring a list of the lengths you will need and buy pieces in the size that will produce the least waste.
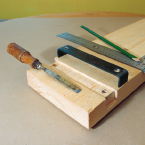
DRIFTWOOD TOOL RACK
Items such as machinery, planting pots, seed boxes, and willow trellises should be stored in the garden shed. However, it’s not always convenient to walk over to the shed to fetch a tool you need, and these are often left lying out by the flowerbed or wherever they were last used. So they’re not where they’re supposed to be, and the long search begins—where did I put the shovel? It usually takes one or two laps around the garden to locate the lost shovel. This annoyance can easily be avoided. The tools that I use most often have their own easily-accessed place outside the shed—hanging on a tool rack. This tool rack is made from two materials of aged character: driftwood and hand-forged nails. The silver-gray wood and the black, slightly rough iron nails warm my heart.
MATERIALS
• 1 piece of driftwood (120 x 1100 mm)
• 1 wall stud (45 x 70 x 650 mm)
• 2 brackets (75 x 19 x 2 mm)
• 5 hand-forged nails (5 x 120 mm)
• 2 decking screws (4.8 x 55 mm)
• 8 wood screws (4 x 40 mm)
TOOLS
• Directional board
• Jigsaw
• Utility knife
• Drill driver
• Drill bits (3 mm and 5 mm)
• Hacksaw
• Spirit level
• Hammer
STEP BY STEP
Getting a hold of a piece of driftwood may not be easy. If you want to make a tool rack that has the beautiful silver-gray color of aged wood but you don’t have driftwood, you can treat fresh, untreated lumber with copperas (see tip on page 85). Use a wood with a rough surface.
1 Measure the wood stud that will be attached to the back of the driftwood and placed against the wall. Make sure it fits. If it is too big, cut it down to size, so it doesn’t stick out from behind the driftwood.

2 Place the front side of the board against the wood stud. Fasten the driftwood and wood stud to the workbench so that the driftwood sticks out equally on both sides. The driftwood and the wood stud should both be uniformly thick in order for the driftwood to hang nicely on the wall.

3 Place the wood stud parallel to the workbench’s edge against the driftwood’s backside. Measure the largest gap between the driftwood and the stud. In my case it was 8 mm. Copy the contour of the driftwood to the stud by bringing the folding ruler along the driftwood simultaneously as you hold a pen at the 8 mm line on the folding ruler.

4 Saw and trim away the material from the stud according to the marks so that the ruler and driftwood are equally thick. Fasten them to the workbench and verify the total thickness.

5 Pre-drill 2 holes with a 3 mm drill through the stud, about 10 cm from the stud’s short sides. Screw the stud together with the driftwood on the backside of the stud.

6 Pre-drill 5 holes with a 5 mm drill through the driftwood for the iron nails. Distribute the holes evenly on the board and make sure they do not completely go through the stud. Drill the holes so that the nails lean upwards. This way, the tools will hang steadily on the nails. Put the nails in the holes and make sure they sit on a straight line.

7 Cut the brackets so that they fit on the backside of the tool board. Pre-drill with a 3 mm drill and screw the brackets into the stud, 5 cm from the stud’s short sides. Then, screw the tool rack on the wall. Check with a spirit level that the tool rack sits horizontally.

8 Hammer the iron nails into the pre-drilled holes. Make sure they are secured. The tool rack is ready to be used.
HOP POLE
Nature’s vigorous growth is fascinating. As a child, I was delighted by the hop plant’s fast rampage up all the hop poles. It was almost as if I could watch the hops grow each time I looked at them. Making a hop pole is a simple and fun garden project and it offers quick rewards. Following the hops as they make their way to the top of pole is fun for both children and adults. We made our hop pole out of recycled materials. The pole itself began as a flagpole from the children’s old playhouse, and it was ready for a new assignment.
Help Nature Along
Ferrous sulfate, also known as copperas, is a water-soluble substance with the chemical formula FeSO4. It’s found naturally in certain minerals and can be used to tint wood. The structure of the wood will show through, and the surface will become similar to aged wood. Ferrous sulfate can be purchased at home improvement stores in powder or crystal form. Dissolve the powder in water according to the instructions on the package.
MATERIALS
• 1 long pole of 6 m (60 mm thick)
• Copperas
• 1 ground anchor (50 x 50 mm)
• 1 decoration for the top
• Two screws (4 x 40 mm)
TOOLS
• Paint scraper (if the pole is painted)
• Brush
• Saw
• Knife or chisel
• Hammer
• Sledgehammer
• Wooden block
• Spirit level
• Drill driver
• Drill bit (3 mm)
• Spade
PLANTS
• Golden Hop, Humulus lupulus ‘Aureus’ (1 pc)
• White Navelwort, Omphalodes verna ‘Alba’ (5 pcs)
STEP BY STEP
Carefully select where you want to place your hop pole. Hops grow incredibly vigorously, and if they get the opportunity, they can grow over garden beds, bicycles, and other things standing nearby. Hops can even smother other vegetation if they’re left unmanaged. Hops thrive in deep, processed, and fertile soil. Nurture the soil with compost if you want the hops to grow lushly.
1 Prepare a long straight pole. The taller the pole, the more exciting it will be to watch. Our old white-stained flagpole by the playground was a 6 m long pine pole, from which I scraped off the paint.

2 Treat the pole with copperas and it will soon turn a silver-gray (see tip on page 85).

3 Make sure the pole fits into the ground anchor. Our pole was a little too wide to fit. Mark the height of the ground anchor around the pole.

4 Cut four evenly distributed slots around the pole by the mark made in step 3.

5 Use a sharp knife or chisel and peel off the wood along the sides up to the slots. Check regularly if the pole fits the anchor so that you do not peel away too much.

6 Place a decoration at the top of the pole. We reused the ball that graced the top of the old flagpole.

7 Insert a block of wood into the ground anchor as protection and knock the anchor down into the ground where the hop pole will stand.

8 Remove the wooden block and insert the hop pole into the ground anchor. Check with a spirit level to confirm that the pole is straight. Pre-drill holes in the pole for the screws. Screw the hop pole to the ground anchor.

9 Plant hops beside the pole. Water them and watch how the hops begin to work their way toward the top. You may need to redirect the shoots back to the pole if they’re trying to climb onto something else.

10 Blue-eyed Marys work well as ground covering vegetation with the hops. In the beginning of the summer, they produce flowers similar to those of the Forget-me-not. Very soon, their shoots will grow together and will spread to cover the earth.
Many houses have a long side or wall that is completely smooth and has no protruding stairs, balconies, or other structures. Nothing is there to catch the eye and the wall can feel bare and uninviting. The back of our house was just like this. Our ’80s house has a long flat wall facing north with a wide soffit. Not many plants are happy in these conditions. Instead of being a cozy place where we could enjoy the evening sun, our back wall had become an eyesore. An easy way to visually shorten one side of the empty wall is to put up a divider so you can’t see the entirety of the long wall at once. My simple partition is built from narrow birch trunks.
Betula
MATERIALS
• 5 birch saplings (4–8 cm in diameter)
• 5 galvanized eye bolts (30 x 12 mm)
• 5 galvanized screw hooks (length 50 mm)
• 2 rebar at 70 cm (8 mm)
TOOLS
• Saw
• Ruler
• Drill driver
• Drill bits (4 mm and 8 mm)
• Ladder
• Hammer
• Clamps
• Bolt cutter
STEP BY STEP
Birch saplings and other leafy trees make excellent screens and partitions. They need to be narrow and relatively straight. Check how many saplings you need. In my case, I needed five; I used one sapling per eave board.
1 Trim the birch trunks so they are 10 cm shorter than the distance between the eaves and the ground. Pre-drill a hole with a 4 mm drill in the middle of the top edge of each birch trunk.

2 Screw the eye bolts in the pre-drilled holes so that the eye almost touches the birch trunk.

3 Mark the place on the overhang of the roof where you want to insert the hooks. Drill holes at the marks with a 4 mm drill.

4 Screw the hooks into the eaves. Hang the birch saplings on the hooks.

5 Use two horizontal rebars to hold the logs together. Select the height where the rebars should run across. Start with the lower hinge. Drill a horizontal hole into the outer birch sapling with a 8 mm drill.

6 Hammer the rebar through the first birch sapling so that it reaches the next sapling. Mark the rebar where it should hit the next log. Move the outer birch sapling away so that you can drill a horizontal hole at the mark in the second trunk.

7 Continue in the same way with other trunks until the rebar has been inserted through all of them. Proceed similarly with the upper rebar; this time you’ll have to remove one birch sapling from its hook at a time, and hold it to the side so you can drill the holes.

8 Use two clamps to adjust the distance between the birch saplings; they should hang vertically and be evenly spread over the bars.

9 Remove the screw clamps. Trim any excess rebar; only 1–2 cm should protrude on either side of the outer birch saplings. The partition is done.
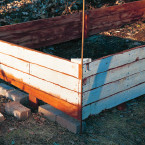
GARDEN BOX
Picking fresh lettuce, crispy carrots, and sweet peas straight from the vegetable garden makes for an inspired cook and meal. However, this can be troublesome if the conditions are not just right. Heavy loam is nutritious but too compact for vegetables to thrive in. Since rocky soil does not usually produce good conditions for plants, a stand-alone garden box is perfect. Place the box in the sun, fill it with nutritious soil, water it regularly, and you’ll be rewarded with a vegetable garden that yields a great harvest and is easy to manage. A good tip is to plant a few small summer flowers among the vegetables. It looks beautiful and you can pick a floral bouquet for the dinner table while you harvest the vegetables for your meal.
MATERIALS
Makes a box 1.4 x 3 m.
• 38 m raw cut boards (22 x 95 mm)
• 4.2 m wall stud (45 x 45 mm)
• Approx. 100 wood screws (4 x 55 mm)
• Wood screws (4 x 40 mm) to join the boards
• 1 liter water-based wood stain
• 5 m2 black plant cover
• 1.5 m3 planting and compost soil
TOOLS
• Yardstick or tape measure
• Saw
• Ax
• Screwdriver
• Brush
• Spirit level
• Sledgehammer
• Scissors
• Spade
• Rake
• Wheelbarrow
STEP BY STEP
Find a sunny spot in your garden that’s large enough for your garden box. If possible, place the garden box close to the kitchen, so you have a real kitchen garden. Measure out the preferred dimensions for your garden box and gather all the materials. My box is placed on a slope and is therefore three boards high at the back end and four boards high at the front.
1 Cut the first 4–7 boards to the required length (see the drawing on the next page) and shape them into a base frame. I had to make oblique cuts for the bottom sideboards as the box is standing on a slope.

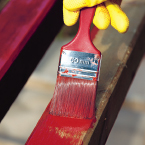
2 Glaze all the surfaces that will soon be hidden with copperas or paint to treat the wood.

3 Screw together the bottom of the frame and place it in its designated location. Use a spirit level to check that it’s straight.

4 Cut the wood stud into five 55 cm-long pieces and three 45 cm-long pieces. Form one end of each piece into a spike, so you can insert them easily into the ground where they will stay. Put two long stays or upright supports in the inside corners of the front of the box and two short stays (or upright supports) in the back corners. Hammer the corner stays about 15 cm into the soil and screw the box wall and the corner stays together. The stays stabilize and anchor the box in the ground. I had some leftover lumber of triangular studs, which I put in the corners, but you can also use square studs.

5 My box was so long that it needed extra stays. Hammer a short stay down in the middle of the box’s edge and distribute the three additional long stays along the inside of the front edge. Screw the wall of the garden box to the stays.

6 It’s possible to splice the boards to make the box wall. If you choose to do this, insert a piece of wood on the inside of the box’s wall and screw the boards with 40 mm screws.
7 Cut the stays on a line with the top of the garden box. Slope the top edge of the stays a bit, or screw a piece of wood onto the stay, as decoration and protection from the rain. Glaze the box’s inside and outside.

8 Dig away the turf in the box and line the base with newspapers. Cover the gaps between the boards with a black plant cover so the soil is better able to stay in place.
9 Fill the box with nutritious garden or compost soil. I built the foundation for the soil with material from rabbit hutches.

10 The top layer of the soil should be 20 cm deep with fine garden or compost soil.

11 Mark straight seed rows with a straight stick. Water the rows before planting the seeds so they can germinate faster.

12 Planting the seeds in straight lines makes it easy to clear out and weed. I put a row of strawberry plants in the front and clumps of chives in one corner.

13 Remember to mark the rows properly. This will help when it’s time to clean out the garden box.

14 After a few weeks the seeds will have germinated, and there will be a row of small plants in the garden box.
Important Dimensions
You can make your garden box as long as you like. Typically, the length of the box is determined by the space available in your garden. However, the width is also important. In order to be able to reach your plants from all directions, the garden box shouldn’t be wider than 1.5 m. This way you can reach everything without needing to step into the box. When placing a garden box against an existing wall or a fence, it shouldn’t be wider than 90 cm. The box needs to be at least 30 cm tall for the carrots and other deep-growing vegetables, so the roots can thrive.

Spec drawing of the garden box
Annual Malope, Malope trifida

Zinnia, Zinnia elegans

Cornflower, Centaurea cyanus

Marigold, Calendula officinalis

Cosmos, Cosmos bipinnatus ‘Purity’
Fill the Box with Your Favorites
For me, it’s important to have access to fresh dill, parsley, and chives. So of course, they have a permanent place in my box. I also like to have something to nibble whenever I clear out the garden box and care for my plants; my row of strawberry plants produce sun-warmed berries that I can pop directly in my mouth.
Different kinds of beets—’Forono,’ ‘Moulin Rouge,’ and ‘Chioggia’—are three varieties that produce fine, healthy vegetables. ‘Chioggia’ is called the candy-striped beet and is striped like a candy cane. It tastes like regular beetroot, but it’s more beautiful on the plate. The garden box also needs a few rows of summer and winter carrots.
For peas and beans, I chose the taller varieties. These provide a plentiful harvest and only take up a small area. Sow the beans in a 20 cm large square. All you need is to sow two bean plants in each corner. If both bean plants germinate, cut away one of them so there’s only one bean plant per corner. Place long sticks in the soil beside the seedlings and tie them together at the top to give the beans a good frame to climb on.
Growing onions is also rewarding work. The easiest and fastest way to do this is to buy small onion bulbs in the spring rather than sowing seeds. I grow leeks in a similar manner. Instead of pre-growing the leeks indoors, I buy a box of seedlings from the nursery. Then, all I have to do is distribute the seedlings in the garden box. Lastly, I leave room for summer flowers. These break up the green with a symphony of colors. More than this, they’re rewarding to grow—the more flowers you pick the more you’ll get.

Tree Mallow, Lavatera trimestris ‘Silver Cup’

Care and Growing Advice
Your vegetables need water and nutrition to grow. Water them at least once a week if it’s been dry and sunny for a long time. Loosen up the earth’s surface after rain or watering so the soil will better retain moisture.
A garden box elevates the plants and the edge prevents most weeds from penetrating the box. The stray weed that does get in can easily be plucked.
If you want to enjoy small delicate vegetables early in the season, you should cull your plants twice. Once the seeds have germinated and the delicate plants are growing close to their lines, it is time to cull a first time. Don’t thin them out too much—leave a smaller distance between younger seedlings than you would leave for fully-grown plants. After a few weeks you can harvest every other vegetable and leave more space for the remaining plants to grow big.
To prevent the earth from becoming depleted, you’ll need to stock up on plant food. This can be done easily and naturally with grass clippings. Introducing a 5 cm-thick layer twice per season is quite enough. Clippings provide nitrogen to the plants and also help the soil better retain moisture.
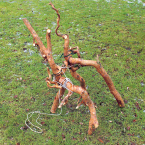
Putting nature’s offerings to use is something that’s very attractive. My friend Eva passionately told me about the beautiful garden furniture her family had when she was a child; it was all made of gnarled branches. The thought of furniture made out of branches appealed to me. After an autumn storm, several trees had fallen around our house. The logs were put to use, but the branches would have been thrown out or burned for fire wood. I saved a few and built myself a rustic chair. While it has no straight lines, the chair is comfortable, rugged, and very charming. It looks right at home in the corner of the garden by the blueberry bushes, beside the small pond.
Let the Chair Evolve
When building a chair out of tree branches, you can’t really follow a detailed spec drawing. Instead, you’ll have to work with the material and allow the chair to grow organically, step by step. It’s easier to see what the chair will ultimately look like if you tie its parts together with string and straps at the beginning. If you’re not satisfied with the shape, you’ll have to look for branches that fit together better.
Pinus sylvestris
MATERIALS
• 10–15 pine branches (2–6 cm in diameter)
• 20–30 self-drilling decking screws (30–90 mm)
• 1 wooden plank (40 x 400 x 400 mm)
TOOLS
• Pruning saw
• Quick-grip clamps
• String or straps
• Utility knife
• Drill driver
• Drill bit (3 mm)
• Jigsaw
• Spirit level
• Sander
• Sandpaper
STEP BY STEP
Oak and pine branches are usually crooked and gnarled and excellent to make a chair out of. Since pine trees had fallen around our house, pine branches were the obvious choice. If you can’t get a solid 40 cm-wide plank, you can also build the seat with thinner wood.
1 Choose two branches of equal thickness that are naturally bent; these will serve as front legs and sidepieces. Piece these together with branches between the legs and the rear. Make sure the legs are a little longer than needed so there is the possibility to adjust them by cutting them down to size.

2 Select two fairly straight branches for the crossbars that the seat will rest on. A crossbar should sit between the front and back legs.

3 Disassemble the chair and remove the bark on the branches with a knife.

4 Reassemble the branches and tie the chair together with string.

5 Cut a piece of paper to be approximately the same shape as the frame’s outer line. Insert the paper under the frame and attach it with clamps.

6 Draw the frame’s inner edge on the paper template.

7 Remove the template from the frame. Draw a second line on the paper about 2 cm outside the first one. Cut the paper template at the outer line.

8 Turn the plank so the growth rings point up (otherwise the seat will become bowl-shaped when it settles (read more on p 80)).

9 Mark the paper template’s outer lines on the plank and cut the seat with a jigsaw.

10 Angle the blade on the jigsaw to a 45º angle.
11 Miter the top edge on the seat’s back and side edges.

12 On the seat, mark out how much wood must be removed to insert one of the legs. Cut; test to see if the leg fits in the hole. Deepen the hole as needed. Mark the hole for the next leg and cut it out. Repeat for all legs.

13 Place the seat on the crossbars and tie it together with string and straps.

14 Try to fit the seat into the frame. Mark the points where the seat must be tweaked and trim it until you are satisfied.

15 Use self-tapping screws and fasten the seat to the top edge of the frame.

16 Ensure that the crossbars rest firmly against the seat. Screw the crossbars to the legs. Also screw together the chair’s legs, the backside edge, and the side branches so that the legs are sturdy.

17 Screw the seat into the two crossbars from below.

18 Put spacers under the chair’s legs so that the seat is horizontal. Check both directions with a spirit level.

19 Trim off any parts of the legs that are too long so the chair is level.

20 Sand the seat until it becomes smooth. If you can’t get a hold of an electric sander, use sandpaper.

21 Choose two rounded branches to make the arm rests. Remove the bark and cut the branches to fit the chair. Screw the arm rests into the frame.

22 Finally, screw in a lightly bent branch that has been stripped of bark to decorate the back of the stool. Cut off any little branches that stick out and the chair is done!
When traveling around the world, I find myself attracted to beautiful old structures. A structure that has been etched into my memory is the traditional Japanese gate called the torii (pronounced with a long “e”). The word means ‘gate’ in Japanese. Torii are large and stately, and they traditionally lead into Shinto shrines or sacred natural places. A classic torii has two vertical columns and two horizontal lintels. Although my trellis is made to be a climbing frame and a screen between the neighbor’s yard and mine, the color and diagonally cut top also give a little hint of Japan. This trellis is built from wood and steel mesh and is simple in its design.
MATERIALS
• 2 ground anchors (70 x 70 mm)
• 7.4 m flat planed lumber (70 x 70 mm)
• 1 mesh with 20 x 20 cm square pattern (145 x 165 cm)
• 0.5 liter of oil-based wood stain (English red)
• 0.5 liter black metal paint
• 4 brackets (50 x 50 x 35 mm)
• 32 wood screws (4 x 40 mm)
• 16 staples
• 8 French wood screws (10 x 50 mm)
TOOLS
• Sledgehammer
• Ruler
• Saw
• Clamps
• Spirit level
• Corner clamp
• Brush
• Sponges
• Drill driver
• Drill bits (3 mm and 9 mm)
• Hammer
• Socket wrench (for the French wood screws)
• Masking tape
STEP BY STEP
Reinforcement nets make very useful climbing frames for plants. Clematis, especially, likes to spin its petioles around the brackets and will quickly fill up a large area. If you want to build a longer trellis, you’ll need several vertical posts that are anchored in the ground. The distance between the posts should not be wider than 160 cm, so the trellis will be stable and steady.
1 Place the ground anchors where the trellis posts are to stand. Put a block of wood in the ground anchor so it doesn’t get damaged when you hammer it. Hammer the ground anchor into the ground so it stands steady.

2 Insert the posts into the ground anchors and clamp the top rail with screw clamps. Use a spirit level to ensure that it lies flat. Mark the posts where they should be cut.

3 Cut the poles by the marks and miter the header at 60 degrees. Cut the wood stud at the bottom of the trellis to fit between the posts.

4 Test-mount the trellis by holding the poles and mesh with screw clamps. The reinforcing mesh is attached to the back of the trellis. It should overlap on the wooden posts so there will be plenty of space for securing the net to the posts.
5 Disassemble the trellis and paint the wood studs red.

6 Paint the reinforcing mesh with black metal paint. Dip a sponge into the paint to better paint the iron (read more to the right).

7 Also paint the brackets, staples, and heads on the French screws with black metal paint.

8 Screw the brackets onto the underside of the horizontal wood stud. Drill the holes so that the wood does not crack.

9 Reassemble the trellis. Hold the parts together with screw clamps.

10 Fasten the spirit level against one of the posts with a screw clamp and make sure that the trellis is straight, both horizontally and vertically.
11 If necessary, align the wooden frame so that it is parallel with the reinforcing mesh.

12 Place brackets under the crossbars and pre-drill the holes. Screw the brackets to the inside of the posts and the crossbars’ underside. Fasten the lower stud to the trellis in the same manner as the brackets on the underside of the stud.

13 Use staples to attach the reinforcing mesh to the backside of the wooden frame.

14 Drill with 9 mm drill and fasten the posts into the ground anchors with French screws. Mark the drilling depth with masking tape on the drill to get the correct depth. Angle the screw holes slightly so that the screws do not meet in the middle.

15 Screw the pole into the ground anchor with French screws. Check regularly with a spirit level to ensure that the pole is straight.

Spec drawing of the Japanese-inspired trellis

Painting Reinforcement Mesh
Many like the rusty color that reinforcement mesh gets when it’s left untreated. Others think it looks better as a glossy black. Sometimes it can be tricky to paint all around the steel mesh. A convenient way is to hang it in a tree and paint it. When the net hangs freely, it’s easier to access all the surfaces from both the front and back, and to check if the color covers the brackets. Use a sponge to apply the paint; it’s much smoother than using a brush.
As a little girl, one of my favorite things to do was to swing. In the middle of the garden stood a huge, old apple tree that we called the “cranky stump.” The trunk was partially hollow and just like Pippi Longstocking, we stored our soda in the tree. A swing was attached to a branch high above the ground, and we would swing as fast and as high as we could. It was delightful to feel the breeze in our hair and butterflies in our stomachs as we swung back down from a great height. A classic swing still creates warm feelings of nostalgia. Today, my swing is attached to a big branch high up in a large oak. The swing has room for two—a wonderful combination of nostalgia and romance.
Take Care of Your Tree
In order not to damage the branch of the tree, I attached the swing’s ropes to a wide strap that runs across the branch. The strap is gentler on the branch than rope, which would cut into the bark. The strap distributes the weight of the swing so the underlying growth layer (cambium) isn’t damaged.
MATERIALS
Makes a swing that is attached 7.5 m up in the tree.
• 1 planed wooden plank (45 x 195 x 1100 mm)
• 47 cm flat bars of steel (30 x 3 mm)
• Copperas
• 4 loop nuts M8
• 4 M8 bolts (60 mm)
• 8 washers M8
• 32 m 3-battle cordage (14 mm)
• 4 snap hooks with eyelet (80 mm)
• 4 locking carabiner (100 mm)
• 12 m synthetic tape (50 mm)
• 4 buckles for strap
• 8 m double braided scout rope (12 mm)
• Tape, for example Tesa (19 or 38 mm)
TOOLS
• 20 m light string with a weight attached, for example, a small cloth bag filled with sand
• Ruler
• Saw
• Angle grinder
• Bending machine or vise and pipe wrench
• Chisels
• Drill driver
• Drill bit (9 mm)
• Fretsaw or utility knife
• Countersink bit
• Sander or sandpaper
• Wrench
• Split needles
• 20 m rope, e.g. a flagpole rope
STEP BY STEP
Start by measuring the height of the selected branch to find out how much rope is needed. Then, check that the branch is strong enough to hold the weight. It should be able to bear the weight of two adults. I have chosen 3-battle cordage to be the safety rope. By splicing the rope, the fastening loops will become both beautiful and durable.
1 Hold the loose rope end and throw the weight over the branch. Pull back the string to stretch it, so that the weight hovers just above the ground. Make a mark on the string level with the ground and measure the string’s length.

2 Prepare the support rails of the flat bar. Cut it into two parts so that each one is 23.5 cm long. Bend both ends of the bar at a 90-degree angle, 2.5 cm from the edge. Then cut a 105 cm-long wooden plank, if it is not already the right length.
3 Cut and carve out 2 tracks, which are 0.5 cm deep and 3.5 cm wide at the seat’s bottom, so that the support rails can be folded into the board. Place the tracks 5 cm from the seat’s edges. Drill a hole through the support rail and the seat half an inch away from the seat’s long sides.

4 Round off the seat edges at the top until smooth, so that no splinters are sticking out. It can be done with a hand-held plunge router. If not, carve the edges with a knife.

5 Bevel the drilled holes in the seat on the upper side so that the screws are countersunk.

6 Sand the board with a sander or sandpaper so that the surface becomes soft and smooth.

7 Treat the board with copperas (see tip on page 85); to get a natural graying color from the beginning.

8 Bring out loop nuts, bolts, and four washers to each side when the surface dries.

9 Mount the support rails to the seat’s bottom. Put a washer between the bolt and rail and between the screw and loop nuts on the seat’s top. Secure the loops properly.

10 The seat is finished. Safely attach the ropes to the loops.
To prevent the branch from being damaged, the swing’s ropes are mounted with locking carabiners on a broad strap, which is placed on top of the branch. I also attached an additional rope to act as a safety line. It goes parallel to the strap on the top of the branch. The strap will be shorter than the safety line.
[Make a loop of ribbon with a safety rope]

1 To mount the swing you need a loop of ribbon and a safety line for each side. Start by cutting the synthetic strap in two parts. Take one part and make the first loop. Slide the buckles onto the belt ends. Tie a loose knot outside the buckle on one end of the ribbon so that there is an approximately 30 cm band hanging from the knot.

2 Insert the second end of the strap through the loose knot so the buckles end up on each side. Adjust the strap so that the loop is about 2 m long.

3 Insert the loose strap ends through the buckles and tape the straps together at the side of the knot.
4 Tighten the knot so that it is properly secured.

5 Tape the loose strap ends to the band with Tesa tape.

6 Attach the two locking carabiners to the belt loop and tape the band below the carbines. Cut the double braided rope in half. Take one string and make one eight-knot with a loop at each end (see spec drawing on the previous page). Attach the safety line to the locking carabiners so that it hangs parallel to the belt loop. The string should be 30 cm longer than the band. Adjust the length if necessary. Make the next one in the same way.
[Splice the battle cordage]

1 Cut the battle cordage into four parts. Splice one suspension rope at a time. Pass the line through the carbine loop. Wrap the rope with a thin string, 20 cm and 40 cm in from the rope’s end.

2 Separate the strands of the first band and spread them as shown in the picture. Insert the middle strand (B) perpendicular to a strand of the cord, just above the second knot.

3 Remove the lower strand (A) and insert it to the left of the first strand (B).

4 Flip the rope so the bottom comes up. Stick the third strand (C) between the first two tucks, from right to left. The first row of the splice is complete.

5 Continue in the same way “over one and under one.” With a split pin it is easier to insert the strands through the rope.

6 In order to obtain a strong splice five plugins are needed. Finish the splice by cutting the string ends. You can also make a tapered splice by removing some yarn from each strand before the end. Make the other three suspension lines in the same way. Make an eight-knot with a loop at the rope’s other end (see diagram on previous page).
[Mount the swing in the tree]
The last step is to mount the swing in the tree. If the branch sits high, it is both difficult and dangerous to climb the tree. It is better to mount the swing from the ground; just make sure that you know in what order the ropes are to go up into the tree. Follow the diagrams below.
1 Throw the weight that is attached to the lightweight rope over the branch where the swing will hang.

2 Remove the weight and tie the more powerful rope instead (highlighted green) to the string. Pull back the lightweight rope (marked in red) over branch. Remove the light string.

3 Start by linking two of the suspension ropes upside down on each side of the band loop, meaning, connect the carbines with the spliced loop to the locking carabiner in the string. Let the end with the eight-knot hang free. Attach one of the eight-knots to the battle cordage (highlighted green) and pull it over the branch.

4 Adjust the length of the suspension lines by adjusting the eight-knots, and measure exactly where they should sit so that the swing will hang at the right height. Tighten the eight-knots when the alignment is made.

5 Now, the suspension lines should be correctly positioned. The eight-knots should sit in the locking carabiner. Attach one of the free snap hooks to the battle cordage (marked in green) and pull back through the rope so that the battle cordage hangs on each side of the branch.

6 Disconnect the string. Now, one of the suspension lines is in place and has the right length. Proceed in the same way with the ropes on the other side of the swing. Lastly, hook the seat on.