CHAPTER
N0 5
STONE AND BRICKLAYING
Layers
Applying mortar is almost like baking cake. The mortar is used to bind bricks, and you make the “cake” layer by layer. I love walls and think they’re one of the most decorative elements a garden can have. The most beautiful walls are made of natural stone or old brick. In this chapter, the small steps and stone pedestal are quick projects. The ruined wall and the lion’s head fountain are big projects that take a little longer, but, when completed, will give the garden a lovely ambiance.


The front of a large manor house in Tavistock in Devon, England. Nature is beginning to reclaim the remains of an old stone wall.
Masonry is a traditional skill that hasn’t much changed since the days of our ancestors. Today, just like in the past, we bind units of natural stone and brick together with mortar. To make large churches and houses through masonry requires huge amounts of skill and is a professional job. However, most of us have the know-how to make smaller walls for our gardens.
Laying Stone
Natural stones such as granite, diabase, and limestone are mined in large quarries and cut into building blocks. Because they vary in size, structure, and color, great skill is required to mortar natural stone. However, there are few materials that make bridges, basements, and walls as comparably beautiful and solid as stone can.
Brick—An Artificial Building Stone
Brick consists mainly of dried or baked clay. Hand-cut brick is, as the name suggests, made by hand and shaped with wooden molds. Machine-made bricks are shaped by roller presses.
Today, there are only a few isolated brickworks left in Sweden, and most bricks are imported. In the past, some bricks were stamped with the brickyard’s name or crest, so you could see where the bricks were manufactured. When I built my romantic ruin, I used old bricks (see page 163). I found some bricks that had been stamped for quality-control, but none had brickyard stamps.
The cheapest type of brick is the masonry brick. It’s used for hidden masonry structures, such as walls that will be polished or suspended.
There are also frost resistant bricks and refractory bricks.
Facing brick is used, as its name states, for building facings.
In addition to different varieties and qualities of brick, brick also comes in different sizes. The dimensions of bricks have varied over the centuries, and today they vary from country to country.
Standard brick size in Sweden is 250 mm long, 120 mm wide and 62 mm high. Bricks are usually 4:2:1 in length, width, and thickness. This way, stones placed in different directions can be cemented together into different types of bonds. Bricks with underlying bonds are called a shift.
The simplest wall bond is the running bond and Flemish bond. A running bond is when each shift consists of bricks lying along the wall’s length.

Running bond

Flemish bond

Monk bond
In the running bond and Flemish bond, bricks lie along the wall (stretchers) and are perpendicular to the wall (headers). A monk bond consists of stretchers and headers. If the shifts are laid unevenly, it will give the wall a different character.

Combining natural stone and brick can make an eye-catching effect. This little house in Mevagissey in Cornwall has a facade of natural stone masonry, and the gate is beautifully framed by brick.

TOP: Sweden’s 17th century Brahehus Castle is primarily natural stone masonry. Today, the windows still open to delicious panoramic views of Visingsö and Lake Vättern. BOTTOM: Some of the bricks in my wall have pretty stamps.
I used a running bond for the ruined wall.
If the stones are laid the opposite ways at a 45º angle to the direction of the wall, this is called a header.
Other examples of bonds are the monk, cross, block, Dutch, American, and English bonds.
The Mortar Bonds
The mortar that bonds bricks together forms a joint that can smooth out both the imperfections of the bricks and pressure from overlying bricks.
The mortar usually consists of limestone or concrete, and fine sand mixed with water. Dry pre-mix can be purchased in eighty-pound bags. Follow the mixing instructions on the packaging. To keep a wall from cracking, it will need to have a solid foundation. A piece cast in concrete should reach frost-free depth. If you are building a long wall, it may be necessary to support the wall with columns at each end and evenly distributed supports.
Time for Shopping
Masonry, bricks, and mortar are available in home improvement stores. Bring gloves to the store if you don’t need entire pallets-worth of building materials. They’ll be useful when loading.
Different kinds of mortar are suitable for different uses. Consult the staff in the store to find out which product best suits your purposes. Keep the bags of mortar dry to prevent the mortar from curing prematurely.
SAFETY
It’s vital that you use both gloves and a respirator when mixing the mortar. The limestone in the mortar dries out your skin and will irritate your respiratory tract.
• Protect your hands and feet with heavy-duty gloves and steel-toed boots.
• Protect your eyes with safety-glasses or a face shield or glasses when chopping stone or brick. Shards will often fly off and can cause serious eye damage.
• Wear hearing protection to guard against the high noise level when cutting brick or stone. Wear a respirator to protect against the fine brick and stone dust.


SMALL STONE STEPS
A flat garden certainly has its advantages. A level surface is good for playing games and for positioning terraces and sun decks. It’s also much easier to steer the wheelbarrow laden with potting soil or stones around the garden. That being said, a flat garden may look and feel boring. Adding levels will make your garden more exciting and interesting; you can add a small mound with shrubs or a sunken surface paved with stones for garden furniture. Small decorative stone steps in our garden link the pathway to the greenhouse and accentuate an 20 cm difference in the level of the ground.
Cutting Large Paving Stones

Make an incision with an angle grinder where the stone needs to be cut. Here is the corner that should be removed.
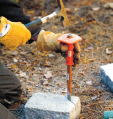
Insert a chisel into the cut and lightly tap the chisel with a hammer.

The cuts do not need to be deeper than this to divide the stone nicely.
MATERIALS
• 2m2 ground cloth
• 80 liters crushed rock (0/12)
• 18 large pavement stones (10 x 14 x 20 cm)
• 20 liters rock flour (0/4)
• 25 kg concrete
• 40 liters red porphyry gravel (8/11)
GEAR
• Yardstick or tape measure
• Spade
• Scissors
• Spirit level
• Angle grinder with stone cutting wheel
• Chisel
• Hammer
• Bucket
• Trowel
STEP BY STEP
Because our walkway was elevated 20 cm above its surroundings, two shallow steps with a height of 10 cm were needed. The steps were 40 cm deep and 60 cm wide, and filled with porphyry aggregate, just like the existing walkway. Start by digging away 15 cm of soil where the stairs are to be constructed.

1 Cover the excavation with a ground cloth. Fill it up with crushed rock. Compress the crushed rock layer by watering it and treading on it. You can use a soil compactor to compress the substrate if you’re making larger steps.

2 Place the first layer of large paving stones, which will become the base for the two steps (see drawing below). Check the stones with a spirit level. Trim any corners from the stones that will come in contact with the existing pavement (see previous page).

3 Mix the concrete according to the instructions on the packaging. Bond the large paving stones with concrete. Allow the concrete to cure for 3–4 hours before you start on the next layer.

4 Cut 3 paving stones vertically. They will form the raised lip on the upper step. Position the halved stones and bond them together with concrete.

5 Fill the bottom of the two steps with stone dust. Compress the stone dust to a hard, flat surface. Cover the surface with a ground cloth.

6 Lastly, fill the steps with the red porphyry gravel.

The placement of the paving stones for the first layer (B) that connects to the existing paving (A).

Placement of paving stones for the second layer of the upper step (C).

STONE PEDESTAL
Do you have any garden decorations that you’re especially fond of? I have an urn from Greece that I wanted to highlight, so now it stands on a stone pedestal. The urn isn’t perfectly round, and the ears are a bit uneven, but that’s what makes it so charming. The style is called Pithos and it comes from Volyrakis pottery, in Crete, where they have manufactured ceramics by hand for generations. The Mediterranean vibe is enhanced by the fragrant lavender that surrounds the stone pedestal.
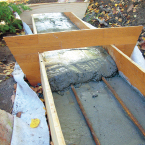
Tap the Bubbles Away!
When the wet concrete is placed in a mold, air bubbles will appear. If the bubbles are left in the concrete before it cures, they may absorb excess moisture and that may lead to freezing and cracking. By tapping the outside of the mold with a rubber mallet, you can remove air bubbles from the wet concrete. In larger molds, you may need to pump a rebar up and down in the concrete to remove them.
MATERIALS
• 2.5 m batten (25 x 120 mm)
• 50 cm triangular rod (50 x 50 mm)
• 4 brackets (90°)
• 8 wood screws (4 x 30 mm)
• 1 m2 ground cloth
• 5 crusher buckets each containing 20 liters (0/8 and 0/12)
• 87.5 kg rough concrete
• 3 m rebar (8 mm)
• 1 piece of protective plastic (1 x 1 m)
• 50–75 kg concrete
• 1 m2 raw trimmed slate
• 1 slate plate (30 x 30 cm)
• 2 buckets of filling, such as brick and stone
For planting surface
• 2m2 ground cloth
• 48 small cobblestones (10 x 10 x 10 cm)
• 40 liters rock dust
• 100 liters of sand mixed with potting soil
TOOLS
• Ruler
• Saw
• Screwdriver
• Bolt cutter
• Marking sticks
• Spade
• Scissors
• Spirit level
• Concrete mixing paddle or cement mixer
• Bucket and trowel
• String line
• Shovel
• Rubber mallet

STEP BY STEP
Make sure you have a circle of free space that is 1.6 m in diameter around the stone pedestal. This is where you will build a flowerbed. Build the casting frame for the base slab and mark the area where it is to be placed.

Cut the boards into two pieces that are 60 cm and 2 pieces that are 65 cm. Cut a triangular rod into four pieces. The pieces should sit on the inner corners for support. Assemble the frame with angle brackets on the outside. Cut the rebars and bend them according to the diagram so that the pieces will fit in the frame. They should be placed 5–10 cm away from the frame’s inner edge.

1 Dig a ditch that is 30 cm deep. Cover the bottom and walls of the ditch with a ground cloth. Fill it with crushed stones to ground level. Compress the gravel by watering it and treading on it. Level the surface and confirm it is straight with a spirit level. Place the frame for the slab on the compacted gravel’s surface.

2 Mix the coarse concrete according to the instructions on the packaging. Pour the concrete into the mold until it is half-full. Place the bent rebar onto the surface of the concrete for reinforcement.

3 Fill the mold the rest of the way with concrete. Tap the outside of the mold with the rubber mallet and pump a rebar up and down in the wet concrete to remove the air bubbles. Level the concrete surface by shearing off excess concrete with the edge of a wooden beam.

4 Cover the frame with plastic sheeting and let the concrete cure for about 3 days. During this time, occasionally remove the plastic and spray the concrete with water. When the concrete has finished curing, remove the mold. If it’s stuck to the concrete, unscrew the brackets and remove each plank separately.

5 Mix the concrete according to the instructions on the bag. Make the stone pedestal a little smaller than the base slab (see the drawing on the next page). Place the border stones on the first layer and bond them. Add filler and fill the gaps with concrete. Allow the concrete to cure for 1–2 hours.

6 Mark the stone pedestal’s height with string. Check with a spirit level to ensure that the horizontal strings are straight. Continue to lay brick on brick so that the outer edges and upper edge of the pedestal are as flat as possible. Fill up the inside of the stone pedestal with stone, brick, and concrete.
7 Finish by bonding a square slate slab on the top of the pedestal. Check with a spirit level to confirm that the slab is level.
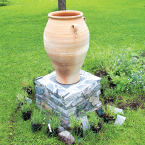
8 The slate slab makes a simple, classic base for the urn. The pedestal is now done and it’s time to make the flower bed and to plant the plants.

1 Mark a circle around the pedestal with a 1.6-m diameter (see page 230). Remove the sod. Loosen the soil with a pitchfork.

2 Dig a 15 cm-deep gutter at the edge of the flower bed. Place a ground cloth at the bottom. Fill it with stone dust and tread on the surface. Place the small paving stones and adjust their height by adding or removing stone dust.

3 Hammer the stones down into the stone dust so that the top of the stone is level with the surrounding lawn. Load in the potting soil. Make sure the pedestal base slab is covered and that the earth’s surface descends toward the stone edge.

4 For my flower bed I used 16 lavender plants—Lavandula angustifolia ‘Hidcote Blue.’ In early July, the buds will blossom abundantly, and will continue to do so throughout the month. With luck, you’ll still be getting new flowers even at the end of the summer.

5 Fill the gap between the stone edge and the surrounding lawn with stone dust. Water the lavender plants thoroughly before planting them along the border.

6 Distribute the plants evenly around the pedestal. Water the plants until they establish themselves on the plant site. Lavender is a very drought-tolerant plant, and therefore doesn’t need to be watered at all.
The Baseboard Should Be Bigger
Build the stone pedestal’s edges 5 cm into the bottom slab’s perimeter. Try to find slate stones that have a relatively smooth edge. Piece the stones together so the edges of the pedestal and the top are as smooth as possible.

Spec drawing of the stone pedestal
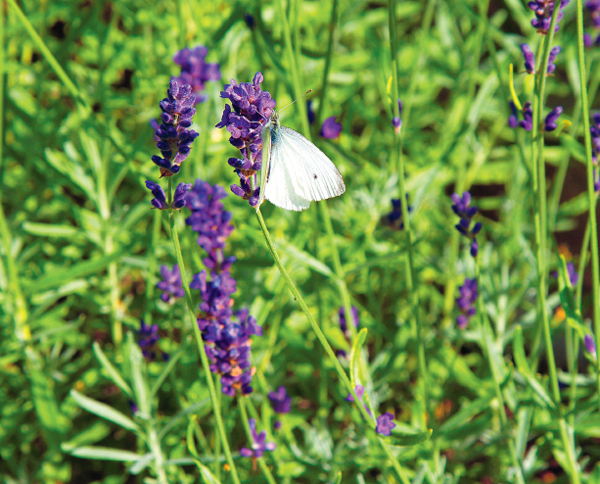
Butterflies love to visit lavender. Here is a cabbage butterfly that has landed on a ‘Hidcote Blue.’
That Heavenly Fragrance
Touch a lavender plant gently and it will spread a wonderful fragrance that is attractive to both humans and butterflies. It’s soothing to watch butterflies flit from flower to flower.
Lavender, Lavandula angustifolia, is a perennial small shrub. The flowers hover over the gray-green or silver-gray foliage of their long stems. The blooms often range among shades of blue-violet, but there are also pink and white variations. ‘Hidcote Blue’ has blue-violet flowers, ‘Artic Snow’ blooms in white, and ‘Rosea’ in pink.
Plant the lavender in a dry and sunny place. It does not like moisture. One of the toughest lavender varieties is the violet blooming ‘Munstead.’
During the spring, when the lavender starts to grow new shoots, it should be pruned to maintain a pretty appearance. Cut it down, but do not remove the bottom shoots. It can sometimes be difficult to break new shoots in the woody strain.
I usually keep the cut shoots and grow new lavender plants. Crop the shoots to about 7 cm and shave off the leaves from the stem. There should only be a small rosette of leaves at the top. Put 5–6 shoots together in a bunch and stick the stems directly into sandy soil, all the way down to the leaf rosette. Water them so that they don’t dry out, and they will soon form roots. If you put them in rows and keep a 6-inch distance between the bunches, you’ll have the beginning of a new lavender hedge.
In the Middle Ages, lavender was used as perfume and medicine. It’s considered to be an analgesic, as well as an antiseptic, expectorant, and anticonvulsant.
Today, lavender is cultivated on a large scale in the Mediterranean for the perfume and cosmetics industries. You can also spice meat with lavender leaves and use the flowers in baked goods. Some insects shun the fragrance of lavender, so lavender can also be used as mothballs. Dry the lavender flowers and put them in a small linen bag; put this in the closet to protect your textiles and keep them smelling fresh and fragrant.

WETLAND
Many of us dream of a lush garden, but in order for this to happen, your plants have to thrive. The right soil, light, and water conditions are crucial. Near big trees, the soil is often bone dry and the earth is invaded with roots. In this case, it makes little sense to plant the plants in native soil. Your solution can be a wetland that is either an elevated or lowered cultivation bed with integrated reservoirs. Plants that are not drought-resistant will thrive in a wetland. I built mine out of natural stone. A wetland is perfect for those who want lush perennials that require minimal maintenance.
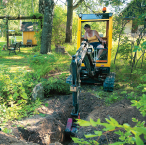
Lift the Right Way
Put boards or planks at the bottom of the trailer if you are getting large natural stones from a gravel pit. They help to distribute the weight. You can lift up the stones with a loader. Then, gently roll the rocks off the excavator. Be careful when unloading, since the rocks are heavy and might break the bottom of the trailer.
MATERIALS
Makes a 50 cm high wetland surrounded by 10 m stone edge.
• 6 buckets crushed rock 20 liters each (0/16)
• 12 m2 ground cloth
• 1 m³ of natural stone (10–40 cm)
• 150 kg cement
• 1 dust cloth or thick tarpaulin (2.1 x 4.2 m)
• 1 m³ skeletal material such as large rocks or aerated concrete pieces
• 1 tube of hard plastic at 30 cm (5 cm in diameter)
• 1 piece of fine-mesh wire (10 x 10 cm)
• 2 cable ties
• 1 m drain hose (80 mm inside diameter)
• 1 end plug (DN80)
• 3 m³ potting soil
TOOLS
• 6 marking pegs
• Yardstick or tape measure
• Spade
• Mini excavator (suggested; this is available for rent)
• Spirit level
• Rake
• Pruning shears
• Wheelbarrow
• Scissors
• Concrete mixer
• Bucket
• Trowel
• Shovel
• String line
• Hacksaw
STEP BY STEP
Choose a location where the bottom of the wetland can be completely flat, and mark its shape on the ground. If you are building a wetland of a different shape, calculate the linear feet of stone edge and the materials you need. It takes about 150 kg of stone and 8 liters of concrete to make a linear stone edge. Try to get a hold of rocks of assorted sizes to bring your wall to life.
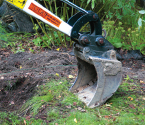
1 Remove any sod, roots, and rocks. It might be easier to rent a small excavator for the heavy work. If you can dig out enough of the soil that the ground level is lowered, then the wall doesn’t need to be very high. The key is to make the wetland about 50 cm deep.
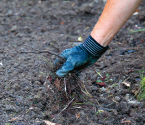
2 Clear any remaining roots and pebbles by hand. Rake the surface and check with a spirit level to make sure it is flat.

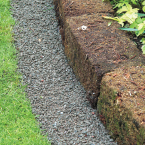
3 Dig a 25 cm-wide and 5 cm-deep trench along the edge of the wetland and cover the trench with a ground cloth. Fill it with crushed rock and compress the gravel by stepping on it.

4 Place the largest blocks down as the first layer. Align the stones as needed so they fit together to create an even outer edge. Stabilize the bigger stones by wedging in smaller rocks on the inside of the wall.

5 Mix the concrete by following the instructions on the bag. Continue to piece together the stones and bond them with concrete. If necessary, you can also create flat surfaces with concrete to create a solid foundation for the next layer of stones.

6 When the wall is 15 cm high at the lowest point, it’s time to begin work on the water reservoir. If you have any extra mixed concrete left in the bucket, find some way to use it before beginning the next step.

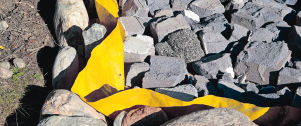
7 Place a thick ground cloth or tarp in the wetland. It should be large enough to reach up at least 25 cm along the wetland’s inner wall. Once, I used a thick yellow tarp that my neighbor was about to throw out.

8 Press the tarp down into the ground and onto the inner wall. Trim off any excess tarp.
9 To create a space for the water reservoir, you need a 15 cm-thick skeleton base. Large voids will form between the skeleton stones, which will fill with the water that creates the wetland’s waterbed. My neighbor was building a garage, so I managed to use his building remnants of concrete and lightweight aggregate blocks.

10 For the water reservoir, an outlet pipe is needed to direct out excess water. Attach a dense wire with cable ties around the opening. Place the outlet pipe so that it rests on the skeleton layer’s top edge, and goes through the wetland’s wall, between the stones. It should slope downward slightly.

11 Place the drain hose on the opposite side of the outlet pipe. Put the hose at the bottom of the water reservoir. It should extend to the top of the wall. Fresh water will fill the reservoir through this pipe.

12 Cover the skeleton layer with ground cloth. Only the outlet and filling pipe should stick out from the cloth. The reservoir is now done.

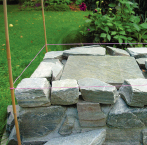
13 Mix the fresh concrete and continue to build the stone wall by piecing it together, layer by layer. When you are approaching the designated height, you will need strings.

14 Hammer down marker sticks outside each corner. Clamp the wall strings between the bars so that they are in line with the top of the wall. Check with a spirit level to confirm that the string and the top of the wall are level.

15 Now it is time to fill the wetland with nutritious earth. I mix sandy potting soil with compost soil for my plants.

16 Fill the water tank through the filling tube. The wetland is ready for planting.

17 Cut away excess filling tube just above ground level by the wall’s upper edge.

18 Put a cap on the filling tube to prevent small animals and debris from falling in.

19 Place the plants on the bed and adjust the position of each plant until you are satisfied.

20 Plant the plants in the bed. Water them so the roots make good contact with the earth. If rainfall has been poor during the summer, you’ll need to fill the reservoir a few times.
GROWING IN THE PENUMBRA
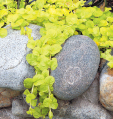
1. Creeping Jenny ‘Goldilocks’

2. Hosta ‘Golden Waffles’

3. Scaly Male Fern ‘Crispa Gracilis’

4. Chinese Silver Grass ‘Kleine Fontaine’
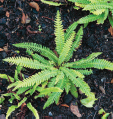
5. Hard Fern

6. Hard Shield Fern

7. Chinese Silver Grass ‘Kleine Silberspinne’

8. Coral Bells ‘Lime Rickey’

9. Drumstick Primrose

10. Geranium Rozanne ‘Gerwat’

11. Giant Hyssop ‘Black Adder’

12. Hyssop

13. Hakone Grass ‘Aureola’

14. Purple Cranesbill

15. Pendulous Bellflower

16. Speedwell ‘Knallblau’

17. Japanese Aster ‘Starshine’

18. Black Mondo Grass

19. Iceland Poppy ‘Pacino’

20. Hakone Grass ‘All Gold’

21. Woodland Crocus ‘Barr’s Purple’

22. Flowering Onion ‘Purple Sensation’
Spring onion
Planted in groups between the perennials.
21. Crocus tommasinianus ‘Barr’s Purple’
22. Allium hollandicum ‘Purple Sensation’

I chose lime and dark blue-violet to be the base colors for my wetland. It stands located in partial shade, and the bright lime color contrasts beautifully against the violet.
PLANTS
1. Creeping Jenny, Lysimachia nummularia ‘Goldilocks’ (10 pcs)
2. Hosta, Hosta ‘Golden Waffles’ (1pc)
3. Scaly Male Fern, Dryopteris affinis ‘Crispa Gracilis’ (1 pc)
4. Chinese Silver Grass, Miscanthus sinensis ‘Kleine Fontaine’ (1 pc)
5. Hard Fern, Blechnum spicant (3 pcs)
6. Hard Shield Fern, Polystichum aculeatum (1 pc)
7. Chinese Silver Grass, Miscanthus sinensis ‘Kleine Silberspinne’ (1 pc)
8. Coral Bells, Heuchera ‘Lime Rickey’ (6 pcs)
9. Drumstick Primrose, Primula denticulata (3 pcs)
10. Geranium Rozanne ‘Gerwat’ (1 pc)
11. Giant Hyssop, Agastache ‘Black Adder’ (3 pcs)
12. Hyssop, Hyssopus officinalis (12 pcs)
13. Hakone Grass, Hakonechloa macra ‘Aureola’ (1 pc)
14. Purple Cranesbill, Geranium x magnificum (1 pc)
15. Pendulous Bellflower, Campanula pendula (5 pcs)
16. Speedwell, Veronica austriaca ‘Knallblau’ (3 pcs)
17. Japanese Aster, Aster ageratoides ‘Starshine’ (1 pc)
18. Black Mondo Grass, Ophiopogon planiscapus ‘Nigrescens’ (5 pcs)
19. Iceland Poppy, Papaver miyabeanum ‘Pacino’ (3 pcs)
20. Hakone Grass, Hakonechloa macra ‘All Gold’ (3 pcs)

LION’S HEAD FOUNTAIN
There are many like myself who have dull, empty corners in the garden. Our lifeless corner was situated by the driveway and was very noticeable. There was a rocky slope facing south that had no beautiful plants, and a trash can was the only focal point. After reading a number of books on Italian and English gardens, I was inspired to build a fountain. Today, our stone lion peeks out from under the big oak tree and welcomes us with the happy sound of trickling water. The trash can is now hidden behind a narrow carpinus hedge, and our corner has been transformed from a weed-shrouded slope to a tranquil spot with splashes of the Mediterranean.
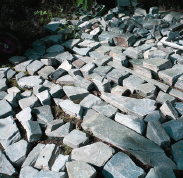
Mortar with Irregular Stone
Making a wall out of irregular Oppdal slate is like piecing together a jigsaw puzzle. Spread out the slate pieces on a flat surface so it’s easier to find the right piece for your project.
MATERIALS
BASE MATERIALs
• 1 bendable Flexible MDF (9 x 1220 x 2440 mm)
• 1 particle board (12 x 1200 x 2500 mm)
• 1 box of nails (35 x 1.7 mm)
THE LION’S BACK PIECE
• Approx. 30 small nails (25 mm)
• 30 cm plastic tube 1”
• 4 sticks 40 cm (10 mm)
• 2 m cord
• Duct tape
• 2 L-hooks (50 mm)
• 25 kg concrete
THE MOLDS AND REINFORCEMENT
• 6 m stud (22 x 120 mm)
• 2 m battens (25 x 38 mm)
• 20 m rebar (8 mm)
THE GROUND AND THE FOUNTAIN
• Wheat flour for marking
• 4 m2 ground cloth
• 0.25 m2 gravel (0/32)
• 400 kg coarse concrete
• 1 piece of plastic (2 x 2.5 m)
• 25 cm plastic tube 1”
• 14 large pavement stones
• 150 kg mortar
• 2 m2 crude carved Oppdal slate
• 36 small pavement stones
• 1 piece of plywood (1.2 x 1.3 m)
• Duct tape and plastic sheeting
• 2 solid slate tiles (25 x 600 x 350 mm)
• 1 lion’s head
• Silicone
• One adjustable fountain pump
• 2 m garden hose ½”
TOOLS
• Ruler
• Saw
• Hammer
• Drill driver
• Drill bit (30 mm)
• Scissors
• Concrete mixer or concrete mixing paddle
• Bucket
• Trowel
• Bolt cutter
• Spade
• Spirit level
• Angle grinder with stone cutting wheel
• Chisel
• Small sledgehammer
STEP BY STEP
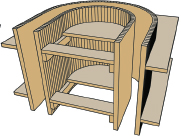
Building a lion’s head fountain is a pretty major undertaking. I did it at a leisurely pace during the summer, and it took several months. Plan for at least two weeks. Stone lion’s heads are available at well-stocked garden centers, Oppdal slate at stone companies, and the other supplies can be found at home improvement stores. Start by sawing the MDF and particle board. Be sure to draw out all parts before you begin cutting. Then, build three molds. First, prepare the shape of the oval backing, which is needed to support the lion’s head against the fountain wall’s irregular slate stones. Then, make the molds for the ground and the water reservoir.
[Cut spec for the grooved MDF]

Draw all the parts that are to be cut out from the MDF. If you have another shape for a fountain or a different lion’s head than what I show here, it’s important to adapt the sizes of the pieces to your fountain in your drawing. The pieces must be placed so that they can fit. The gray surface becomes waste.
[Cut spec for the particle board]
Draw the parts on the particle board. Double-check all measurements before cutting. Make sure to check the dimensions of piece A if you need to adapt it to a lion’s head that is different from the one I used. The gray surface becomes waste.
[Lion’s head cover]

1 Use the MDF piece that is 10 x 96 cm (A). Cut off a 5 x 48 cm MDF piece (grayed out).

2 Use the particle board piece that is 40 x 52 cm (A). Draw an ellipse (see next page) that is 32.5 cm along the major axis and 28 cm along the minor axis. Make the loop on the string 24.5 cm, with the distance between the foci 16.5 cm. Continue drawing all the pieces that are to be cut out from the particle board. The narrow oval strip that runs around the edge of the ellipse is 9 mm wide. It is easily done by measuring the distance outward from the ellipse line with a ruler, and marking a new line with a pencil. Cut out all parts with a saw and put them aside. The gray bits become waste.

3 The diagram shows how the sawn pieces are to be assembled. First, measure the position of the lion’s head’s water connection on the form’s base plate. Drill a 30 mm hole at the mark.

4 Nail the pieces together according to the diagram.

5 Insert the 30 cm-long plastic tubing through the hole and seal inwardly as shown in the image. Secure the hose using sticks, string, and tape so that it is firm and tight. There should be no gap between the hole and the base plate.
6 Cut a piece of paper that has the same oval shape as the mold’s inside edge. Put the lion’s head on the paper and trace the outline. Draw where the brackets for the lion are to be hung.
7 Mix concrete according to the instructions on the bag. Fill the mold with concrete and smooth the surface with a trowel. Tap to remove the air bubbles (see tips on page 143). Remove the sticks and place the paper template on the concrete. Stick down the suspension hooks and add pins for support so that the hooks will not fall. Let concrete cure for 3–4 days.

8 Tear away the form when the concrete has hardened. The lion’s head’s back plate is now done.
[Mold and reinforcement for the ground]

1 Take the MDF piece that is 12 x 145 cm (B).
2 Cut the wooden profiles in the lengths shown in the sketch. Cut the batten into 12 cm-long pieces.
3 Nail together wooden profiles, batten, and the traced MDF strip as shown.
4 Bend and nail a 3.2 m long rebar around the traced MDF strip for extra stability.
5 Cut and bend the reinforcing bars as shown in the sketch. There should be about 5 cm of free space to the mold wall.

Front

Back
[Mold and reinforcement for the water reservoir]

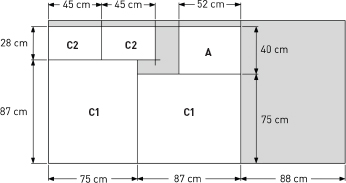
1 Bring out the two particle board pieces that are 75 x 87 cm (C1). Draw the water reservoir’s outer contour on one of the discs as shown above (see also page 230). Cut out the pieces. The gray portion becomes waste. Work the second board in the same way. This will become the support discs to the rim of the reservoir.

2 Take out the two particle board pieces that are 45 x 28 cm (C2). Draw the water reservoir’s inner contours on the pieces as shown above and cut them out. The gray portion becomes waste. Make the second disc in the same way. This will become the support discs for the inside edge of the reservoir.

3 Pick up the pieces of the slotted MDF board that are 21 55 x 131 cm (C1) and 55 x 162 cm (C2). They will be used to mold the inner and outer edges. Build the mold according to the drawings of the concrete foundation. Cut out the pieces from what was left of the particle board and use it to nail the shape together.

4 Cut and bend eight rebars so that they fit the mold. Make sure that the rebars are not in contact with the inner and exterior walls.
Create an Ellipse
An ellipse is similar to an extended circle. The shape corresponds to an eccentric circle. The ellipse has two focal points. Since the sum of the distances from two foci to a point at the periphery is always the same, it is easy to create an ellipse with the help of two nails, a string, and a pen. The cord will be as long as the ellipse’s major axis (long diameter), plus the distance between the foci. Be sure to include an allowance for attaching the cord to the nails. Put the nails in the foci. Tie the string into a loop and place the loop around the nails. Put the pencil inside the string loop and stretch the cord. Move the pen along the stretched string in both directions. Move the pen to the other side of the lace loop and draw the ellipse’s second half in the same way.

[Lion’s Head fountain]

1 Build the mold for the fountain base plate as described on the previous page. Place the completed form on the ground where the fountain is to be placed.

2 Mark the base plate form. A simple way is to mark the template mold with flour along its outer edges.

3 Dig out approximately 30 cm according to the line traced for the base.

4 Check that the mold fits into the pit. If not, adjust the pit. Pick up the mold. Line the pit with ground cloth. Fill half of it with gravel. Compress the gravel so that the surface is about 12 cm below ground level. Check it with a spirit level.

5 Put the mold on the compacted surface. Mix the concrete according to the directions on the bag. Fill up the mold halfway with concrete. Add in the bent rebars and top up with more concrete. Vibrate the concrete (see tip on page 143). Make the surface smooth by shaving off excess concrete with a board. Cover the concrete with plastic and let it cure for 3–4 days (see also page 43).

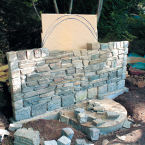
6 Mix the mortar according to the instructions on the bag. Start to build the fountain wall with a row of large pavement stones. The 25 cm-long pipe is to be cast in the middle row. The pipe allows water to travel from the container to the lion’s head.

7 Continue building the fountain wall with Oppdal slate. Start and finish each layer with small cobblestones to even out the outer edge. Use the most beautiful stones at the front of the wall. Place the stones that are difficult to position in the sidewalls or in the back wall of the fountain (see illustration on previous page).
8 Place a sheet of plywood on the backside of the wall as a template for the fountain wall’s top oval portion. Draw the desired shape of the top of your fountain.

9 Insert the lion’s head’s oval back piece in the middle of the top of the fountain wall. Use a number of small cobblestones to finish the top portion.
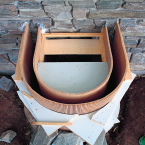
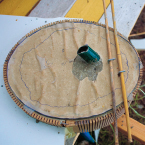
10 Place the mold for the water reservoir on the base plate directly next to the fountain wall.

11 Check the mold with a spirit level. I used waste wood to support the reservoir’s rounded outer edge, but in the spec drawing of the shape, there are two discs that provide better support.

12 Seal the connection between the mold and the fountain wall with duct tape and plastic film so that the concrete does not leak out of the mold.

13 Fill the mold with concrete. Gradually add the eight bent rebars. Tap the concrete to remove air bubbles (see tip on page 143). Smooth the surface with a trowel and let the concrete cure for 3–4 days before the mold is demolished.

14 Decorate the water container’s exterior with stones. Halve the large cobbles lengthwise (see tip on page 141). Mix the mortar. Lay a first layer with the halved pavement stones. Continue with small pieces of Oppdal slate.
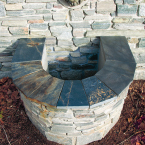
15 Cut the sawn pieces of slate with a grinder to fit the reservoir’s round facade. Lastly, bond the slate pieces into the shape of the top of the water reservoir.

16 Thread the 2 m garden hose from the fountain wall’s backside partway through the cast tube stub in the fountain wall’s bottom, and through the oval piece (see sketch on previous page).

17 Connect the garden hose with the lion’s head by attaching the hose’s upper end to the lion. Hang the lion’s head on the oval cover.

18 Now it is time to add the adjustable fountain pump at the bottom of the water reservoir. Secure the garden hose to the pump connection. Seal the gap at the fountain wall with duct tape. Small holes are sealed with silicone. Fill the container with water and start the pump. Adjust the flow so that the stream of water arches in a nice shape and produces a beautiful tinkling sound.

ROMANTIC RUIN
A visit to Angkor Wat, Cambodia’s city of ruins, made me fall head over heels in love with ruins. It was a completely magical experience to walk among the ruined temple of Ta Phrom. After centuries of oblivion and neglect, the jungle took over the building. Gigantic trees and roots have formed new walls beside old stone walls and natural ramparts surround religious relics. Just the thought of a small ruined wall surrounded by white flowers and partially hidden in the far corner of our garden makes me happy. To build your own romantic ruin, you’ll need to plan and you’ll need to have enough time and bricks. It may sound ridiculous, but the most important thing when building a ruin is preparing the foundation. After all, you want your newly built ruin to stand, colored with patina, for many, many years to come.
Recycling
Used bricks will give the appearance of ruin and decay from the very start. Remove old mortar from the bricks with a mason’s hammer before building.

MATERIALS
FOR THE FOUNDATION
• 24 m2 ground cloth
• 2.5 m³ crushed rock (0/32)
• 0.5 m³ crushed rock (0/12)
FOR THE MOLD
• 10 m boards (25 x 150 cm)
• 24 wood screws (4 x 40 mm)
• 6 brackets or 90 cm gusset
FOR THE RUIN WALL
• 600 kg coarse concrete
• 8.5 m rebar (10 mm)
• 5 m2 protective plastic
• 300 kg mortar
• 380 second-hand bricks
• 3.6 m rebar (8 mm)
• 1 iron window (62 x 105 cm)
• 1 board (34 x 100 x 650 mm)
• 19 m battens (28 x 34 mm)
• Wood glue
• About 50 nails (35 x 1.7 mm)
• 2 pieces of Masonite (65 x 130 cm)
• 1.5 m flat bar steel to vault (30 x 5 mm)
• Black paint for iron and wood
FOR THE WHITE FLOWER BED
• 21 peat blocks (18 x 20 x 42 cm)
• 4 m2 ground cloth
• 12.6 m rebar (8 mm)
• 1.5 m³ potting soil
• 40 liters packed gravel (6/11)
STEP BY STEP
Select a suitable location and size for the ruin. Mine is 3.4 x 1 m. Measure and mark the ruin’s contours with sticks and strings. If you wish to use different measurements, draw and adapt the amount of material according to the desired size of your ruin. Prepare the iron window and the two iron supports before working on the base.
[Preparing the iron window]

1 Copy the arched window’s upper shape on the 100 mm-wide board and cut out a curved frame section that is 28 mm wide. Cut the battening to fit it into a frame around the window’s three straight edges. Cut a 10 mm-wide groove in the middle where the standing frame edges. Make a 10 mm joiner on the resting frame pieces’ ends, so that they fit in the tracks.

2 Paint the frame pieces with black paint. Assemble the frame around the window. Glue together the joints. Paint the window frame a second time.

3 In the ruin wall, only one part of the window, the arched top, is covered with bricks. In order to lay the bricks steadily, two iron supports are required in the shape of the window arch. Let a smith or forging workshop bend two flat iron bars according to the window frame’s arched shape. Bend the ends at a 90-degree angle so that the iron can be cast into the ruin wall. Paint the bent bars black.

4 Build the window into a box with the same width as the length of the bricks. Line the box with hardboard. In the picture, only half of the box is dressed to show how the window is placed in the middle of the box.
5 Dig a 60 cm-wide furrow into the ground down to the frost depth, at least 60 cm deep. It may be heavy work if there are a lot of stones or large roots. A mini-excavator will simplify the job. With some practice behind the levers, it is not difficult to dig with the scoop.

6 Our ground furrow is 90 cm deep. Line the bottom and walls with ground cloth. Fill the furrow with crushed rock. Flatten the gravel afterwards. Water and step on the stones. Finish with a layer of finely chopped gravel. The crushed stone should be level with the ground.

7 Tap the gravel with a hammer so that a flat and hard surface is created. You may need to add more crushed stone, and vibrate it once more to get the flat surface to the right level. Check with a spirit level so that the surface is more or less flat.

8 Build an L-shaped mold of wood for the ruin’s base disc. The base disc should be 5–10 cm wider than the planned ruin wall. Add these margins for all sides—both the length of the disc and the width. Make the mold’s walls 15 cm high.
[Casting the base]

1 My mold was 3.6 x 1.2 m on the long sides and 50 cm wide. Assemble the mold with angle brackets or corner plates in the corners.

2 Check the mold with a spirit level to ensure that the top edge is horizontal. Put clamps on the mold so that the walls do not fall out when the mold is filled.

3 Mix the concrete according to the instructions on the bag. Fill the mold halfway. Vibrate the concrete (see tips on page 143). Cut and bend 2 rebars (10 mm) in at a 90-degree the mold.
4 Fill up the rest of the form with concrete. Vibrate it by hand with a rebar as you go.

5 Remove any excess concrete with the edge of a plank. Cover the casting with plastic and let the concrete cure for 3–4 days. Water the concrete occasionally to slow the curing and the concrete will become stronger.

Spec drawing of the ready-made ruin
Primula vulgaris mura
TOOLS
• Cord and marking pegs
• Yardstick or tape measure
• Mason’s hammer
• Spade and/or mini excavators (available for rent)
• Wheelbarrow
• Scissors
• Soil compressor
• Spirit level
• Saw
• Clamps (50 cm)
• Chisel
• Knife
• Screwdriver
• Hammer
• Concrete mixer
• Bucket
• Trowel and caulking trowel
• Angle grinder, with wheels for cutting stone and metal
• Brush
• Shovel
• Saw
• Bolt cutter
• Small sledgehammer
[Build the ruined wall]

1 Mix the mortar according to the directions on the bag. Start to build the ruin wall’s corners. It should be two bricks wide, with a half brick displacement (read more on page 139). Bond the stones and continue building the entire first layer, brick by brick. Then bond them layer by layer.

2 When the wall is 50–60 cm high, reinforce it. Bend the rebar (8 mm) at a 90-degree angle and insert it between two brick rows. The iron is cast to stabilize the wall. Continue building the wall until you reach the height where the window is to be installed, approximately 65 cm up.

3 Place the window mold on the ruin wall. Fix the boards so they are secure. Place a brick on its edge with the long side facing the window. The bricks that stand against the window should always stand on their edge (see sketch on previous page).

4 Bond a window niche that has the same depth as the brick is wide (see illustration on previous page). The niche is the same height as the window’s bottom edge. Putting tea lights in the niche at night will give it a lovely charm. Use bricks to support the building arch. Remove the support when the mortar has cured.

5 Remove the window mold’s outer casing when you begin to reach the window’s top edge. Place the two iron supports on the top arch and measure where the protruding pieces will end up in relation to the bricks.

6 Adjust these bricks to the iron’s form. I had to cut out some notches in the top bricks so that the iron’s top edge would be level with the arched top edge.

7 Bond together horizontal bricks on their edges as an arch over the window. The ruin will look more authentic if the arch is not completed.

8 The ruin is complete. All that remains is to give it a beautiful frame. My ruin stands in a rather dark corner. Therefore, the choice fell on white flowering plants.
[The white flower bed]

1 Begin by digging away the lawn—remove roots and loosen the existing soil with a garden fork. Top it up with potting soil of good quality.

2 The flower bed’s edge is built of peat blocks. Put the blocks in the shade and cover them if they are not yet in use. This way they will retain moisture better.
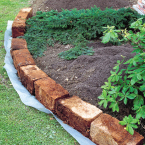
3 Cut 40 cm strips of ground cloth. Put the strips where the peat blocks are to be placed. Place the peat blocks on top of the ground cloth, around the edge. The ground cloth should stick out 20 cm outside the blocks.

4 Adjust the shape of the peat blocks with a hand saw so that they lie close together.

5 The peat blocks need to be fixed to the ground. Cut 60 cm pieces of rebar with a bolt cutter and sharpen one end with the angle grinder.

6 Pound a rebar down into and through each peat block. Lean the rebars obliquely inwards towards the flowerbed. Beat them all the way into the peat blocks’ top edge with a small hammer. The peat edge is complete.

7 An American yew and an azalea were already in my flowerbed. The maple was re-planted and tied up against two sturdy poles, with an elastic band for support until it is firmly rooted.

8 Add a few large stones to the peat edge for an interesting contrast.

9 Cover the entire flower bed with good potting soil.

10 Plant the plants and water them properly so that the roots make good contact with the soil. At twilight, magical white flowers will grow around the romantic ruin.
11 Peel off the grass. Add a 2 cm-thick macadam layer on the uncovered ground cloth. The gravel gives the flower bed a nice finish and reduces the risk of wild grass encroaching into the peat blocks.
Magical white flowers at dusk

1. Elderberry
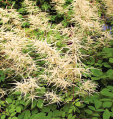
2. Goat’s beard

3. Lily of the Valley

4. English Ivy

5. Snowy Barrenwort

6. Azalea ‘Persil’

7. Woodruff

8. White Turk’s Cap Lily
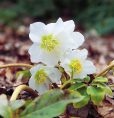
9. Christmas Rose

10. Primrose

11. Hosta ‘Undulata’

12. Hosta ‘June’

13. Western Bleeding Heart ‘Alba’

14. Foxglove ‘Snowy Mountain ‘

15. English Yew ‘Repandens’

16. Hosta ‘Halcyon’

17. Smooth Hydrangea ‘Annabelle’

18. Astilbe ‘Brautschleier’

19. Foam Flower

20. Solomon’s Seal

21. Ostrich Fern

22. Drummond Norway Maple

23. Daffodil ‘Mount Hood’

24. Grape Hyacinth ‘White Magic’

25. Hyacinth ‘Carnegie’

The ruin is surrounded by greenery and white flowers for a large part of the year. Plant spring bulbs in clusters between the perennials for greater effect.
PLANTS
1. Elderberry, Sambucus nigra (1 pc)
2. Goat’s beard, Aruncus dioicus (2 pcs)
3. Lily of the Valley, Convallaria majalis (8 pcs)
4. English Ivy, Hedera helix (2 pcs)
5. Snowy Barrenwort, Epimedium youngianum ‘Niveum’ (13 pcs)
6. Azalea, Rhododendron ‘Persil’ (1 pc)
7. Woodruff, Galium odoratum (17 pcs)
8. White Turk’s Cap Lily, Lilium martagon (8 pcs)
9. Christmas Rose, Helleborus niger (3 pcs)
10. Primrose, Primula vulgaris (7 pcs)
11. Hosta, Hosta ‘Undulata’ (10 pcs)
12. Hosta, Hosta ‘June’ (4 pcs)
13. Western Bleeding Heart, Dicentra formosa ‘Alba’ (9 pcs)
14. Foxglove, Digitalis purpurea ‘Snow Mountain’ (5 pcs)
15. English Yew, Taxus baccata ‘Repandens’ (1 pc)
16. Hosta, Hosta ‘Halcyon’ (1 pc)
17. Smooth Hydrangea, Hydrangea arborescens ‘Annabelle’ (1 pc)
18. Astilbe, Astilbe arendsii ‘Brautschleier’ (3 pcs)
19. Foam Flower, Tiarella cordifolia (6 pcs)
20. Solomon’s Seal, Polygonatum multiflorum (3 pcs)
21. Ostrich Fern, Matteuccia struthiopteris (5 pcs)
22. Drummond Norway Maple, Acer platanoides, ‘Drummondii’ (1 pc)
23. Daffodil, Narcissus pseudonarcissus ‘Mount Hood’
24. Grape Hyacinth, Muscari aucheri ‘White Magic’
25. Hyacinth, Hyacinthus orientalis ‘Carnegie’