A thick paper stock. Also known as cover stock. Its thickness is described by pound weight or GSM (grams per square meter) and is generally available in 80 to 140 lb, or 100 to 400 GSM thicknesses. The best weight range for a nice card is 80 to 110 lb, or 200 to 300 GSM.
Inexpensive, stiff board often used for bookmaking and other projects that require rigidity. It is available at most art-supply and general craft stores.
A lighter weight paper; copy paper and writing paper are text-weight papers.
Water-based white glue that dries clear. It is nontoxic and can be cleaned up with soap and water, making it great for use with kids.
A sheet of adhesive that has a removable backing on both sides, allowing you to turn anything into a sticker. Peel the backing from one side, and apply it to the first piece of paper. Then, peel off the backing from the other side, and stick your first piece of paper onto your second piece of paper.
Stabilizes fabric so that you can work with it like paper. Fusible web is made from a fabric that melts when heated. Double-sided fusible web comes with a pressure-sensitive coating on both sides; this enables you to adhere the web to your fabric, cut out your shapes, and then position and adhere the shapes to another piece of fabric or paper.
Easily removable tape that does not leave a sticky residue when peeled off.
A fine-nibbed pen filled with glue, useful for adhering small things.
A solid adhesive that comes in a twist or push-up tube. It is great for working with papers, as it will not saturate paper or cause it to wrinkle or curl.
An electric gun containing a heating element that melts plastic glue, which is sold in sticks.
Paste glue that dries clear. It is nontoxic and can be cleaned up with soap and water, making it great for use with kids.
A water-based white glue. Widely used in bookbinding and book arts because of its flexibility and the fact that it is archival (pH neutral).
Glue that comes in a spray can. It is excellent for applying a thin coat of glue that will not saturate your paper or cause it to wrinkle or curl—also great for applying glue to delicate papers. Be sure to use spray adhesive in a well-ventilated area or outside. Also, it can get quite messy, so make sure to protect your work surface.
Small, pointed tool (looking a bit like a small ice pick) that can be used to punch little holes in papers. It also may be used as a pencil substitute when marking for cutting.
Bookbinder’s tool used to crease and smooth folds, score and burnish paper, and work materials into tight corners. It is polished to a smooth finish to avoid damaging the paper or fabric it is drawn across.
Small hand roller used to spread ink thinly and evenly. It is typically used in printmaking.
Adjustable tool that allows you to cut perfect circles.
Copyright-free artwork and alphabets, available in books and online (see Resources, page 139).
A punch tool that rounds the corners of your paper.
The best surface on which to use a utility knife. It is self-healing and will protect the blade of the knife. It's also typically marked with a ruled grid, handy for measuring and marking right angles.
Punches are available in all sorts of shapes and sizes: variations on the classic hole punch, punches that make assorted shapes, and punches for cutting out fancy corners.
Decorative scissors have fancy-edged blades so that you can give paper scalloped or zigzagged edges.
A tool with a round-tipped metal end used to press designs into paper.
A simple, clean, self-contained printing system that allows you to make colorful prints at home.
Safer and more accurate to use than a plastic ruler, these are available with a cork back to prevent slipping.
www.flickr.com is an excellent resource for looking up images to trace or draw from.
Handy for making right angles. It is especially useful for scoring and folding a card in half without having to do a lot of measuring and marking.
Translucent paper (also known as onion skin) that allows you to see the image you want to trace.
Knife with a penlike body that holds a short, sharp, replaceable blade. It is exceptionally handy for making quick, accurate cuts.
Tool for applying adhesive to the back of your paper. It essentially allows you to make a sticker out of anything. These machines are available in a variety of sizes, from 1" wide to 81/2 × 11" wide, at general craft stores.
This is the fold you used in kindergarten for making fans and rows of gingerbread men; the resulting pleats resemble the bellows of an accordion, hence the name.
Start with a strip of paper. Fold a portion of the paper from left to right. Continue folding back and forth until you have folded the entire strip, and then use your bone folder to make strong creases.
Place the photo inside your card, and mark the top right and lower left corners with a pencil. Cut a slit diagonal to the two corners using a utility knife. Make the slits just wide enough that the photo corners will tuck in and hold the photo securely.
You can transfer a clip-art image to any paper using a photocopy transfer.
you’ll need:
Paper
Photocopy or black-and-white laser printout of artwork you want to transfer
Blender marker
how to:
1 Place the paper you are transferring the artwork to right side up on your work surface.
2 Place your artwork photocopy right side down on this paper.
3 Holding the photocopy in place with one hand, go over the area of your image with a blender marker, pressing firmly. Carefully lift one corner up to make sure that the image is transferring properly. Go over any areas that have not transferred completely.
Custom rubber stamps are inexpensive and handy for things like return addresses or blocks of text, particularly if you are making multiples. Additionally, you can create your own artwork, to be used in all kinds of creative ways. You can usually send your artwork to a rubber-stamp maker via e-mail or just supply them with a photocopy or black-and-white printout of your image (See Resources, page 139).
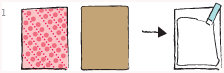
This technique allows you to neatly glue together two different types of paper so that they look like one sheet of double-sided paper. This is a great technique for creating cards that are patterned on the outside, but plain (and awaiting your clever missive) on the inside.
you’ll need:
Two sheets of paper
Glue stick
Ruler
Utility knife
Cutting mat, or a magazine
how to:
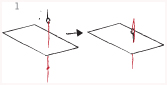
1 Lay one piece of paper, wrong side up, on your work surface. Apply glue to the entire surface using a glue stick (Figure 1).
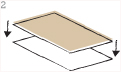
2 Center the second piece of paper, wrong side down, on the first piece of paper (Figure 2). Smooth to adhere.
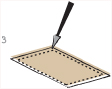
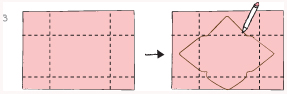
3 With a ruler and utility knife, cut through both sheets of paper to the desired size (Figure 3).
4 Let it dry. (Stack several heavy books on top of your paper to ensure that it dries flat.)
you’ll need:
2 envelopes
Ruler
Pencil
Utility knife or scissors
Cutting mat, or a magazine
Paper to use as liners (text-weight or lighter)
Glue stick or double-sided tape
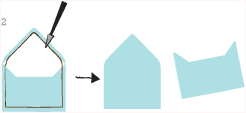
1 Open your first envelope, and lay it flat.
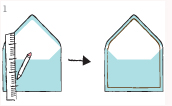
2 Using a ruler and pencil, draw lines about 1/2” in from the edges of the flap (just inside the glue strip) and the sides, and about 1/16" above the bottom edge of the envelope (Figure 1). These lines will define the edges of your liner template.
3 Cut out the template you just created, using a ruler and utility knife or scissors (Figure 2).
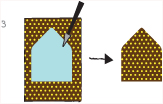
4 Lay this template on your chosen liner paper. (If you are doing multiple envelope liners, you can lay your template on a stack of paper; you can cut though up to five sheets at once.) Cut around the template with the utility knife, using a ruler lined up with your envelope to give you a hard edge to cut against (Figure 3).
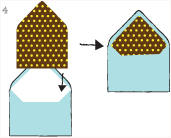
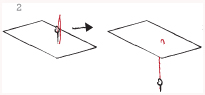
5 Slip the liner into your envelope and center it (Figure 4).
6 Holding the liner and envelope in place, fold the flap over and crease (Figure 5).

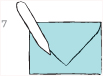
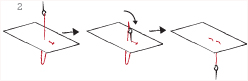
7 Lift the envelope flap, and apply glue or double-sided tape to the back of the liner flap (Figure 6).
8 Fold the envelope flap back down, smoothing to adhere it to the liner (Figure 7).

you’ll need:
Ruler
Card stock
Utility knife or scissors
Cutting mat, or a magazine
Pencil
Bone folder
how to:
1 Measure the height and width of your envelope. Double the side you want to fold (the short side for a vertical card, the long side for a horizontal card), and subtract 1/4” from both the length and width. This will be the size of your unfolded card. Trim down your card stock using these measurements.
2 Using your ruler and a pencil, make a mark halfway along the longest edge, both at the top and the bottom. Line up your ruler with these two marks, and run your bone folder along the edge of the ruler, pressing firmly. Fold your card along this score line, lining up the corners where they meet before creasing the paper.
Making your own envelopes allows for all kinds of fabulous results; you can make envelopes out of everything from pretty, patterned papers to pages from a magazine. Follow the instructions below to make your envelope entirely from scratch, using just a sheet of text-weight paper. You could also purchase an envelope template (available at craft stores) or take apart an envelope whose size and shape you like and use that as a template.
you’ll need:
An envelope of any size, carefully torn open at the seams and laid flat, for guiding the shape of the envelope (Note: If the envelope is the same size as your card, you could just trace this envelope to use as your template.)
1 sheet of 81/2 × 11" or 11 × 17" text-weight paper (depending on the size of your card)
Bone folder
Pencil or a pen if you are making envelopes from magazines
Ruler
Utility knife or scissors
Cutting mat or a magazine
Glue stick or double-sided tape
Remoistenable envelope glue (optional; available at many craft stores)
Mailing label (optional)
Stickers (optional)
how to:
1 Lay the text-weight paper on your work surface and place your card on it, centered from side to side and leaving more room at the top than the bottom (Figure 1).
2 Fold the bottom of the text-weight paper up and the top down, creasing the folds with a bone folder (Figure 2). Repeat for each side.

3 Unfold all four sides of the paper. You should be able to clearly see the dimensions of your card, along the folds. Use a pencil and ruler to mark the shape of the side, bottom, and top flaps, using your open envelope as a guide (Figure 3). Remember that the top flap should cover the side flaps and overlap the bottom flap.
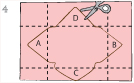
4 Using a ruler and utility knife or scissors, cut out your envelope (Figure 4).
5 With your paper facing right side up, fold the side flaps (A and B) first, creasing them with a bone folder for a sharp fold. Next, fold the bottom flap (C), and crease. Unfold flap C and, with a glue stick, apply glue to it and fold up over flaps A and B, smoothing to adhere (Figure 5).

6 Fold the top flap (D), and crease (Figure 6). Apply envelope glue to the flap and let it dry, to be remoistened when you are ready to mail.

Alternatively, you can seal your envelope with glue, stickers, or a return address label. If you are using a magazine or other busy paper for your envelope, stick a mailing label on the front of the envelope for the address.
The easiest way to round corners is to use a punch, available at any general craft store. If you don’t have a corner rounder handy, use the bottom of a glass. Line up the curve of the glass to the corner of your paper and, using the edge of the glass as your guide, trim off the corner of your paper using a utility knife. Alternatively, you can mark along the edge of your glass with a pencil and cut the corners using a pair of scissors.
SIMPLE SEWING
A straight stitch is the basic sewing stitch.
you’ll need:
Threaded
Sewing needle
Fabric or paper scraps for practicing
how to:
1 Tie a knot at the end of the thread, and thread your sewing needle.
2 Hold the threaded needle in your dominant hand; push the needle up through the back of your fabric (or paper), and pull until you hit the knot (Figure 1).

3 Reinsert the needle through the front of your fabric, a short distance from where it exited the fabric, and pull the thread all the way through (Figure 2).
4 Repeat (Figure 3).

A speedy way to make a line of straight stitches (when you are not concerned about looks) is to accordion fold your fabric and run your needle through all the folds, pulling until you hit the knot at the end of your thread. When you pull your fabric flat, you’ll have a row of stitches. This is also called a running stitch.
Backstitching is a method for making end-to-end stitches in a neat and tidy line; you do this by taking each stitch back to the end of the one you just made.
you’ll need:
Thread Sewing needle
Fabric or paper scraps for practicing
how to:
1 Make a straight stitch (Figure 1).
2 Push the needle up from the back of your fabric to the front, moving about the length of your first stitch away from that stitch. Insert the needle into the hole made by the end of your first stitch (Figure 2).
3 Repeat Step 2.
you’ll need:
Button
Fabric or paper scraps for practicing
Threaded sewing needle
how to:
1 Hold your button against the fabric. With your threaded needle in your dominant hand, push the needle up through the back of your fabric through one of the holes in your button, and pull until you hit the knot at the end of your thread (Figure 1).

2 Reinsert the needle through the buttonhole diagonally opposite the one you started with, and pull the thread all the way through the fabric (Figure 2).

3 Repeat Steps 1 and 2, starting with one of the buttonholes next to the one your needle just went through, to form an X across the face of your button (Figure 3).

4 Tie a knot, and trim off the remaining thread (Figure 4).

you’ll need:
Tracing paper
An image you would like to transfer
Pencil, 2B or softer
Sheet of paper
Ballpoint pen
Light-colored chalk or pastel (optional)
how to:
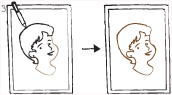
1 Lay a piece of tracing paper over the image you would like to transfer, and trace it using your pencil (Figure 1).

2 Remove the tracing paper and place it facedown on the work surface. You should be able to see your tracing through the back of the tracing paper. Trace over it using your pencil (Figure 2).

3 Place the tracing paper on the paper you would like to transfer to, with your most recent tracing facedown (Figure 3). Hold your paper in place with one hand, and trace over the drawing with a ballpoint pen, pressing firmly. Carefully pull up one corner of the tracing paper to make sure that the drawing has transferred completely before removing it from your work.
Wax seals are a fabulous way to add a lovely, formal, and old-world feel to any project.
Traditional sealing wax comes in a stick with a wick. Light the wick with a lighter or match and allow the melting wax to drip onto your surface, forming a small puddle. Press your seal into the wax, and set the wax aside to cool and harden.
Glue-gun sealing wax is the modern-day version of sealing wax. It is especially useful when you are working on a large project. The sticks of wax will fit into any standard-size glue gun and are available in a wax that resembles genuine sealing wax.
Seals are available in a variety of motifs, or you can have one custom made.
Use a gel pen to write on dark papers; gel pens come in many light shades and are opaque. They are also available with glittery inks.