
This wonderfully youthful card uses the most basic type of print imaginable—a thumbprint. With the addition of a few scraps of fabric and pencil details, the thumbprint becomes a charming Humpty Dumpty, whose sad fate can aptly convey apologies, sympathy, or regret. But of course, the thumbprint technique can also illustrate cheery occasions!
1. Draw the wall.
Decide on the placement of your wall. On your first sheet of text-weight background paper (Card 1): Use your pencil or pen and ruler to draw seven parallel, horizontal lines, about 3" long each, spaced evenly 1/8" apart. Decorate the first line with a row of small rectangles (the “bricks”)—we drew the rectangles using each row’s upper horizontal line as the top edge of that row of bricks, so that each brick is a U shape extending down from the line. Continue drawing rows of bricks, spacing them so that each brick falls between two bricks above it (Figure 1). Repeat for all rows.

2. Place your Humpty.
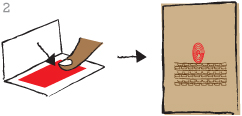
Press your thumb onto the ink pad, and make a thumbprint above your wall—this will be Humpty’s body (Figure 2).
3. Dress your Humpty, and draw his features.
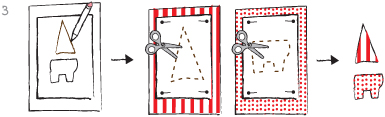
Photocopy or trace the templates for Humpty’s pants and hat. Pin the tracing paper or photocopy to your selected fabrics using straight pins, and cut out the hat and pants (Figure 3). Apply glue to the wrong side of the hat and pants, and affix them to your Humpty. With a pencil or pen, add two dots for the eyes, some eyebrows, a nose, a mouth, and two arms (Figure 4).

4. Plant some flowers.
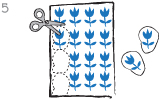
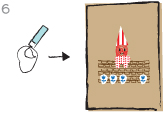
Cut four flowers from your flowered fabric (Figure 5). We cut around them very loosely—the imperfection adds to the charmingly naive quality of this card. Apply glue to the wrong side of the fabric, and affix the flowers along the bottom of the wall (Figure 6).
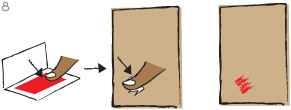
5. Make your Broken Humpty.
Photocopy or trace and cut out the two Broken Humpty stencils (Figure 7). Place Broken Humpty 1 on the left side of your second sheet of background paper (Card 2), with the “broken” edge facing to the right. Press your thumb onto the ink pad, and make a thumbprint over the stencil (half of your thumb should be on the stencil and half on the paper) (Figure 8). Place Broken Humpty 2 on the right side of the paper, making sure the “broken” edge is facing to the left. Press your thumb onto the ink pad, and make a thumbprint over the stencil (half of your thumb on the stencil and half on the paper).

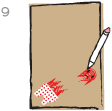
6. Dress your Broken Humpty, and draw his features.
Using the stencil you already cut, trace and cut out a second pair of pants for Humpty. Apply glue to the wrong side of the fabric, and adhere to the left side of Broken Humpty. With a pencil or pen, draw the face and arms on the right half of Broken Humpty (Figure 9).
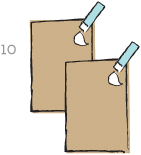
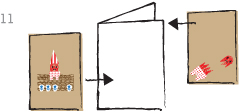
7. Assemble the card, and add a message.
With your glue stick, apply glue to the wrong side of Card 1. Center it on the front of your folded card, and smooth to adhere. Repeat with Card 2, placing it on the inside of the card (Figures 10–12). If you like, add a message on the inside of the card. Or, just leave it blank and let the illustrations convey your sentiment!

The thumbprint technique is a great starting point for all kinds of amusing cards, especially when you give each thumbprint a distinct personality or character.
Happy holidays from all of us! Orient the card in landscape position and create an entire thumbprint family on the front of the card. Decorate each person with an appropriate pair of pants or skirt, hat, hair, mustache, glasses, et cetera, using fabric scraps and a pencil or pen. Add a Christmas tree, wreath, menorah, or brick fireplace in the background. If your family has a beloved pet, make a thumbprint portrait of him or her inside the card.
First comes love! Draw a tree branch extending from one side of the card, and add two thumbprint characters sitting on the branch, representing you and your honey. Repeat the image on the inside of the card, but place the thumbprint characters so they are touching. Draw faces in profile (with half a mouth and one eye), kissing. If you like, add the greeting, [Name] and [Name] sittin’ in a tree … K-I-S-S-I-N-G!
New baby. Create thumbprint portraits of the new parents on the front of the card. Inside, use your pinkie finger for a baby-sized print. Dress the baby in a fabric swaddling cloth.
New home! Draw a simple house on the front of the card, with several large windows. Make thumbprint portraits of family members, peeking out of the windows. Be sure to add the appropriate hats, hair, and features. Add a row of fabric flowers growing in front of the house. On the back of the card (we suggest using a flat card), write your new address and contact details. Be sure to mail the card in an envelope so that the front of the card stays intact.