Good defense is most of all the product of proper spirit. Some players are discouraged if not defeated the minute their opponent seizes the initiative. Others excel at defense because they accept the role as a challenge – and because they know how often good defense wins.
Before we look at specific defensive devices, it’s important to take stock of the priorities, principles and mental attitudes of good defenders. Let’s begin with something all good defenders understand: A weakness is not a weakness if it can’t be exploited.
That is something the strange Latvian game in the first chapter can teach us. Who really stands better?
We say White must have the superior chances because of his edge in development. But the value of development depends on how open the position is. That’s another way of saying how easy it is to reach a target.
In Paul Morphy’s day, having two more pieces developed than your opponent could be a decisive advantage. That was because games typically began with 1 e4 e5 and often led to pawn trades that opened attacking files and diagonals and made quick mates possible. (And in Morphy’s day, defense was dreadful.)
Here Black’s position is riddled with apparent weaknesses, like the holes at d6, f6 and a5. But White has no easy way to get a minor piece, ideally a knight, to them. White lacks an accessible target.
On the other hand, Black does have a target: the White king. Even though White made no weakening pawn moves, by castling queenside his king became vulnerable to ... ♘d7-b6-c4.
Understanding what is a vulnerable weakness and what is just an apparent one is extraordinarily difficult:
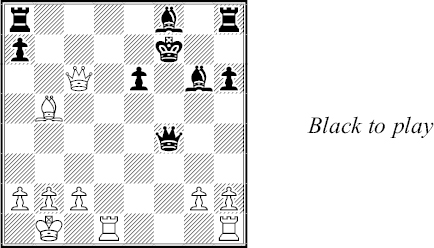
Topalov – Ivanchuk, Linares 2008
1 e4 c5 2 ♘f3 d6 3 d4 cxd4 4 ♘xd4 ♘f6 5 ♘c3 a6 6 ♗e3 e5 7 ♘b3 ♗e6 8 f3 ♘bd7 9 g4 b5 10 g5 b4 11 ♘d5 ♘xd5 12 exd5 ♗f5 13 ♗d3 ♗xd3 14 ♕xd3 ♗e7 15 h4
This seems like a simple case of opposite wing attacks:
White will castle queenside and try to open the kingside with h4-h5 and g5-g6. Black will castle kingside and work the queenside with ... a5-a4. What could be clearer?
With that in mind, Black sought a head start with 15 ... a5. White shot back 16 a3! and the question of weaknesses has been turned around.
White saw queenside targets that he can exploit after 16 ... bxa3 17 ♖xa3. The Black a-pawn would likely be doomed after ♕b5 and 0-0/♖ha1.
No better is 16 ... 0-0 in view of 17 axb4 axb4 18 ♖xa8 ♕xa8 19 ♔e2! followed by ♖a1 and ♘a5-c6. White’s king only looks vulnerable on e2.
Black continued his plan of queenside pressure, 16 ... a4 17 ♘d2 ♖b8 and play went 18 axb4 ♖xb4.
White would have had a clear edge after 19 ♕c3! ♕a5 20 b3 and then 20 ... 0-0 21 ♘c4 ♕b5 22 ♗d2!. The same goes for 19 ... ♕b8 20 ♕c6 ♖xb2 21 ♔e2!, when White threatens ♖xa4 and ♖a8.
What went wrong for Black? He gave his opponent a target prematurely. The right way was 15 ... 0-0! in the first diagram.
Then on 16 0-0-0 he can play 16 ... a5! and his attack would have a target to hit, the White king, which would be more vulnerable on c1 than e2.
If White continues 16 a3 bxa3 17 ♖xa3, as in the game, Black hasn’t weakened b5 yet. He could drum up counterplay with 17 ... ♕c7 18 0-0 ♖fc8 19 c3 ♘b6 or 18 ♖xa6 ♖xa6 19 ♕xa6 ♕xc2.
“A weakness is not a weakness . . .” is an invaluable insight for the defender. There are others, beginning with:
Defense comes down to making it hard for an opponent to win. Making the situation worse – by handing him a winning plan – is the ultimate disaster. The words of the Hippocratic oath – Primum Non Nocere (First, Do no harm) – apply to chess players as well as to doctors.
Of course, you’re going to say, that’s obvious. But it’s shocking how even GMs flunk this test.
Despite White’s passed e-pawn, a win is far from likely. It would take several moves before his king can affect events.
That’s too long. With ... ♖ba8! here or on the next two moves Black could have eliminated the dangerous a-pawn. For example, 1 ... ♖ba8! 2 ♖xb7? ♖xb7 3 axb7 ♖xa1+ and ... ♖b1, or 2 axb7 ♖xa1.
Instead he played 1 ... ♗d6 2 h4 ♔g7 3 ♗c4 b6??. This last move was much worse than the missed opportunities for ... ♖ba8. It made ♗b5-c6-b7! a way for White to trap a Black rook. If the Black rooks flee the queenside, White will queen the a-pawn on the square his bishop will control.
Black had zero counterplay after 3 ... b6?? and White took his time: 4 ♗b5 h6 5 ♔f1 ♖f8 6 ♔e2 ♖f6 7 ♖b3 ♔f8 8 ♖h3 ♔e7 9 ♔d3 ♔f8 10 ♔c4 ♔g7 11 ♗c6 ♔f8 12 ♔b5! ♔g7 13 ♗b7! ♔f8 14 ♖g1 ♔e7 15 g3!.
Black was playing, in effect, a rook down. That means the opening of the kingside, say by 15 ... fxg3 16 ♖hxg3, must lose eventually. He tried 15... f3 16 ♖c1 ♔d8 17 ♖c3 h5 but after 18 ♖h1 ♔e7 19 ♖d1 he resigned.
There is no defense to ♖dd3 and ♖xf3, followed by the decisive penetration of a White rook.
After “Do no harm” comes a second priority, stopping immediate threats. Your impulse should be to consider the most direct way of preventing an opponent from carrying out a game-winning threat.
Again, this sounds obvious but ...
White has just traded off his best minor piece, a light-squared bishop, to obtain kingside threats. That’s a risky decision because his remaining pieces may be grossly inferior to Black’s – provided that Black can deal with the threats.
Black can see one danger: ♖f3 and ♖h3 followed by a queen mate on h8 or h7. But he has a more immediate concern. White threatens g5-g6 followed by ♕h7 mate or gxf7+.
Can Black create an escape route for his king? Yes, 1 ... ♖c8 and 2 g6 ♖f5 allows ... ♔f8-e7. But 3 ♕h7+ and 4 ♕h8+ is punishing.
What about a desperate sacrifice such as 1 ... ♘e7 2 g6 ♕xg6 ? That also stops mate. But a piece down, Black has little chance of salvation.
What Black should look for is the one move that stops g5-g6, not just prepares to answer it. Black found 1 ... g6!.
It’s an easy move to overlook because there is nothing to support that pawn. But after 2 ♕xg6+ ♖g7 White’s immediate threats are stopped and his queen is driven back.
True, after White played 3 ♕d3 Black could not regain his pawn with 3 ... ♕xb2?? 4 ♖fb1. He settled for a retreat, 3 ... ♘e7!.
Black is a pawn down but the nature of the struggle has changed drastically. That’s a known defensive technique, as we’ll see in a few pages.
Now he is the one making threats (... ♗b5!). If White has to play the super-cautious 5 ♖fb1 ♘g6 6 ♕d2 to defend his pawns, Black would have compensation after 6... ♖h7 or 6 ... ♖gf7.
White chose 4 ♕b3 instead. Black jumped at the chance for 4 ... ♕xb3! 5 axb3 because his remaining pieces are far superior to White’s. This became clearer after 5 ... b6 6 ♗d2 ♘f5 7 ♖f3 ♖h7 8 ♖af1 ♗b5. He eventually won after 9 ♖e1 ♔f7 10 ♔f2 ♖h2 11 ♗c3? ♘h4 12 ♖g3 ♗xf4.
Sure, it’s obvious that a defender should stop threats from being carried out. But it isn’t obvious how to stop them. There are usually several ways to parry a threat. One guideline: It is generally better to parry with a move that both defends as well as threatens.
White threatens ♕xf6 but also ♖f4-g4 mate. There are Black moves that stop one threat but allow the other, such as 1 ... ♕b6? 2 ♖f4.
The correct method is 1 ... ♕b2!. It protects f6 and allows Black to meet 2 ♖f4 with 2 ... ♖e4!. But in addition, it also threatens 2 ... ♖e2! and ... ♖xg2+ with a quick mate.
White tried 2 ♔h1 ♖e2 and saw that 3 ♖f4 fails to 3 ... ♖e1+! 4 ♔h2 ♖e4, the same position as before. So he tried 3 ♗xd5.
But this was a blunder that allowed the counterattack, 3 ... ♗xf5! 4 ♕f4 (4 ♖xf5?? ♖e1+) ♗e6 5 ♗f3 ♖h2+ 6 ♔g1 ♖xh3! 7 ♗g2 ♖h5 8 ♕xf6 ♕xf6 9 ♖xf6 ♖a5 and Black won the endgame.
So, a good defender tries to meet a threat with an active move, preferably one that makes its own threat. But there is something else to guide the defender.
Wilhelm Steinitz is credited with this advice: Try to find a way to meet a threat in the least ‘expensive’ way. That means without giving up material or making major positional concessions.
For example, if Black needs to defend his castled position and particularly h7, the economic way is to bring a knight to f6 or f8. In contrast, pushing a pawn to g6 and h6 creates a new weakness.
Here’s another way to meet a threat to a castled king.
Anand – Kramnik, Las Palmas 1996
1 e4 c5 2 ♘f3 d6 3 d4 cxd4 4 ♘xd4 ♘f6 5 ♘c3 ♘c6 6 ♗g5 e6 7 ♕d2 ♗e7 8 0-0-0 ♘xd4 9 ♕xd4 0-0 10 f4 ♕a5 11 ♗c4 ♗d7 12 ♖d3 ♖ad8
A good plan for White is ♖g3 with the idea of ♗h6 or ♗xf6. But Black can defend with a minor precaution, 13 ♖g3 ♔h8!.
Then on 14 e5 dxe5 15 fxe5 ♗c6 White’s queen is attacked by the rook on d8. After 16 ♕e3 ♘g8 the g7 square that was White’s main target is safeguarded (17 ♗xe7 ♘xe7 18 ♕g5 ♘g6). His attack would halt as he pauses to meet the threat of 19 ... ♕xe5.
If White aims at a new target, h7, with 17 ♗d3, Black would rely on 17 ... ♕b6! and 18 ♕xb6 axb6.
But hold on. Aren’t doubled pawns an ‘expensive’ concession? No, they would be no weaker than the White e-pawn. A previous game went 19 ♖e1 ♗xg5+ 20 ♖xg5 ♖d4 21 ♗e4 ♘e7 22 ♖g3 ♖fd8 23 b3 ♘g6 and Black won.
In this game White passed up 13 ♖g3. Instead, he played the immediate 13 e5 and after 13 ... dxe5 14 ♕xe5
... he evaluated – correctly – that this time an endgame would be very good for him, 14 ... ♕xe5 15 fxe5 ♘d5 16 ♗xe7 and 17 ♖hd1.
Black defended instead with 14 ... ♕b4, threatening the bishop on c4. He met 15 ♖g3 with 15 ... ♔h8!. Again this quiet move eliminates the gravest dangers to g7. And it’s much better than 15 ... ♕xc4 16 ♗xf6 ♗xf6 17 ♕xf6 g6 18 ♖d1 when Black is tied up (18 ... ♗c6? 19 ♖xd8) and facing 19 ♖gd3.
Note how well Black’s rook at d8 is placed for counterattack after 15 ... ♔h8!. White can set a trap with 16 ♘e4 – so that 16 ... ♘xe4 loses to 17 ♗h6! (17 ... ♗f6 18 ♗xg7+). But Black would foil this with 16 ... ♗c6 (17 ♘xf6?? ♕d2+ 18 ♔b1 ♕d1+ and mates).
White found the superior 16 ♗d3 and then 16 ... ♗c6 17 ♖h3.
This is what good attack and good defense looks like. One side keeps making threats and the other finds ways to thwart or anticipate them. But how does Black met the new threat of 18 ♗xf6 and 19 ♖xh7+ ?
After all, 17 ... h6? fails to 18 ♗xh6. And trying to drive off the rook with 17 ... ♗xg2 invites 18 ♗xf6! ♗xh3 19 ♗xg7+ ♔g8 and now 20 ♗xh7+! ♔xh7 21 ♕h5+ ♔xg7 22 ♖g1+ ♔f6 23 ♕g5 mate.
But once again Black made the minimum concession: 17 ... ♖fe8!. Then on 18 ♗xf6 ♗xf6 19 ♖xh7+ ♔f8 his king has an escape route via f8 and e7. For example, 20 ♕h5 ♕xf4+ 21 ♔b1 ♔f8 and Black is better thanks to his powerful bishops (22 ♕e2 ♗xc3).
In the game White backed off with 18 ♕e2 and a draw was agreed after 18 ... h6 19 ♖f1 ♔g8 20 ♗h4 ♘d5.
There is a danger when facing serious threats – and when you see pretty ways to lose – that you will make concessions that are not only excessive but unnecessary.
All of White’s pieces are splendidly placed for a knockout blow. He prepares ♘xg6 followed by ♗xf6, among other ideas.
Some obvious defensive measures allow White to be brilliant. For example, he can meet 1 ... ♕d8 with 2 ♘xf7! ♔xf7 3 ♖xh7! (3 ... ♘xh7 4 ♕xg6+ and ♕xg7+, or 3 ... ♗e4 4 ♕h6!).
Another natural defense, 1 ... ♘d7, loses neatly to 2 ♖xh7! ♔xh7 3 ♗xg6+ fxg6 4 ♕xg6+ ♔g8 and 5 ♕f7+ ♔h7 6 ♘xd7 (or 2 ... ♘xe5 3 ♖xg7+ and 2 ... ♗xe5 3 ♗xg6).
Black, a world-class player, chose 1 ... ♖d8. White won a pawn with 2 ♘xg6 fxg6! 3 ♗xf6 ♗xf6 4 ♕xf6 and threatened to win another.
Black’s 4 ... ♕d6 seemed like a limp bid for a swindle (5 ... ♕d1+ 6 ♗xd1 ♖xd1 mate). White replied 5 h3 and had a new threat, 6 ♖xh7! ♔xh7 7 ♕xg6+ and mates.
But 5 ... ♖f8 6 ♕d4 ♖d8 7 ♕f6 e5 8 ♕xd6 ♖xd6 gave Black hope. Winning the endgame would not be easy, e.g. 9 c5 bxc5 10 bxc5 ♖d4.
White played 9 ♖g4 instead. Black’s rook was suddenly the more active one after 9 ... ♖d2!.
An attacking piece, the White rook, is clumsy in defense. The game went 10 ♗b3 ♔g7 11 ♖g3 a5! 12 a3 ♗c6 13 ♖c3 ♔f6 and 14 c5 axb4 15 axb4 b5!.
White discovered his b-pawn was lost to 16 ... ♖d4. He conceded a draw after 16 ♔f1 ♖d4 17 f3 ♖xb4 18 ♖d3.
After the game, annotators were so charmed by Black’s resourceful play that they didn’t look for improvements. There are several, including 1... ♘h5 in the first diagram (2 ♖xh5 f6! 3 ♕g4 f5! and Black is better).
Another is 1 ... ♘d5!, which wins. For example, 2 cxd5 ♕xc3 or 2 ♗b2 ♗f6.
In other words, Black chose the practical concession 1 ... ♖d8? – which could have cost the game – when he should have been looking for ways to turn the table.
In fact, the defender should always be looking for an opportunity to drastically alter the position. This can be done with a dramatic move, a sacrifice or something else that changes the nature of the struggle.
When the game is beginning to take a trend you don’t like you may have to take strong measures.
White is a pawn down but his last move, ♖f1-f4, dreams of mate on h8 or h7 after ♖h4. If Black brings in reinforcements to the kingside, 1 ... ♘f6, he walks into 2 e5!, which threatens the knight as well as ♖fxc4.
Black decided to seek refuge in a trade of rooks, with 1 ... ♗a6. But 2 fxg6 was an unpleasant surprise. He realized that 2 ... fxg6, the move he intended, would be met by 3 ♖xc8 ♖xc8 and then 4 ♕g4! with winning threats of ♕xd7 and ♕e6+ (or 4 ... ♘f8 5 ♕xc8).
Black had to retake 2 ... hxg6. White continued as planned with 3 ♖h4.
This looked scary. On 3 ... ♖xc3 White can play 4 ♗d2, after which 5 ♗xc3 would threaten the queen on a5 as well as ♖h8 mate. On other Black moves, White will play 4 ♕d2!, which threatens 5 ♕h6 followed by mate on h7 or h8, as well as 5 ♖xc8! ♕xd2 6 ♖xf8+ and 7 ♗xd2.
With the wrong attitude, Black might conclude that these variations represented an appropriate way for the game to end. But with the right attitude, Black concluded that he needed to change a very bad trend. He did it with 3 ... ♖xc3! 4 ♗d2 ♖fc8! 5 ♗xc3 ♖xc3.
Then 6 bxc3 ♕xc3 would allow the queen to defend the kingside and give him ample compensation for the lost Exchange. In an endgame, his passed a-pawn is a dangerous, perhaps winning, asset.
It was White’s turn to try to change the trend. He found 6 ♕d2! so that 6 ... ♖c5 7 b4! ♕c7 8 bxc5 ♕xc5 could be met by 9 ♕h6 ♕e5 10 ♕h7+ ♔f8 11 ♕h8+ ♕xh8 12 ♖xh8+ ♔g7 13 ♖a8 and ♖xa7. Without a passed a-pawn, Black is no better than White.
Black found the superior 6 ... ♕e5 which favors him in all lines. For example, 7 ♕xc3 ♕xc3 8 bxc3 ♗c4 and ... a5. Or 7 bxc3 ♗c4 8 ♖f4 ♘c5! and, as the game went, 8 ♕h6 ♘f8 9 ♖g4 a5! 10 ♖g5 ♕xc3 11 e5 ♕xc2 (threat of ... ♗f1) 12 ♔h1 ♕b1+ 13 ♔h2 ♕b2 14 ♔h1 dxe5, when the a-pawn won.
Trends can be broken by surprise sacrifices – or just by creating a material imbalance, as in this case:
Black is in trouble because a move of the attacked knight allows ♖xf7+. Even on 1 ... ♘xg4 White can pass up 2 ♖xg4 in favor of 2 ♖xf7+ ♖xf7 3 ♕xf7+ ♔h6 (forced). After 4 ♕f8+ ♔h5 5 ♘e4 his pieces swarm for the kill.
Black’s simple choice in the diagram was resignation or desperation. He chose the latter, 1 ... ♗xg4!?. It shouldn’t work because White can move his queen, leaving the threat of ♖xf6 on the table. For example, 2 ♕h1! ♘h5? 3 ♖xg4 is quite lost.
Better is 2 ... ♗f5. But 3 ♗xf5 gxf5 4 ♕g1+ ♘g4 5 ♔b1! threatens to win with 6 ♖xf5 now that ... ♕e3 isn’t a check. If Black had inserted the check, 3 ... ♕e3+ 4 ♔b1 gxf5, White should win after 5 ♖xf5 ♘e8 6 ♘e4.
However, White thought that 2 ♖xg4? ♘xg4 3 ♕xg4 was a winner. (Some computers agree.)
What White didn’t appreciate is that without his initiative, the nature of the middlegame has turned against him. Play went 3 ... ♖bd8 4 ♕f3 ♖d6 5 ♘e4 ♖b6 6 c3.
Now 6 ... f5! would eliminate attacks on f7 and limit White’s minor pieces. Black actually went pawn grabbing, 6 ... ♕h2 7 ♗c2 ♕xh4 and gave White chances of salvation after 8 ♖h1 ♕d8 9 ♕e3 h5 10 ♖d1 ♕c7 11 ♕d4+. (But Black won eventually.)
A bad position can be easier to play because it allows you to consider desperate steps you might have rejected in a less-lost position.
Belyavsky – Kasparov, Moscow 1981
1 d4 ♘f6 2 c4 g6 3 ♘c3 ♗g7 4 e4 d6 5 f3 0-0 6 ♗e3 ♘c6 7 ♕d2 a6 8 ♘ge2 ♖e8? 9 ♘c1 e5 10 d5 ♘d4 11 ♘1e2! c5 12 dxc6 ♘xc6 13 ♘d5!
White threatens ♗b6! followed by ♘c7, winning the Exchange. Garry Kasparov set a personal record here by thinking for 68 minutes. He needed that much time to convince himself that passive defense, such as 13 ... ♘d7 14 h4! or 13 ... ♘xd5 14 cxd5 ♘e7 15 ♘c3, would ultimately lose.
That helped narrow his options: Kasparov realized he had to allow ♗b6. Better to go down fighting in a sharp position than to be slowly ground down in a helpless one. With that (proper) attitude, he went for 13 ... b5 14 ♗b6 ♕d7 15 ♘c7 ♖b8 16 ♘xe8 ♕xe8.
It was White’s turn to sink into thought. He didn’t like the looks of 17 ♗c7 ♖b7 18 ♗xd6 bxc4 or 17 cxb5 ♖xb6 18 bxc6 d5!?.
In hopes of reducing risk, he gave back a pawn 17 ♗e3? bxc4 18 ♘c3 ♗e6 19 ♗e2. But Black had sufficient play after 19 ... ♘d4 20 0-0 d5 and eventually won. Another example:
Anand – Belyavsky, Belgrade 1997
1 e4 d6 2 d4 ♘f6 3 ♘c3 g6 4 ♗e3 e5 5 f3 exd4? 6 ♕xd4! ♗g7 7 0-0-0 0-0 8 ♕d2 ♗e6 9 ♗h6! ♗xh6 10 ♕xh6 ♘bd7 11 g4 ♕e7 12 h4! ♘e5 13 ♗e2 c6 14 ♘h3 ♖ad8 15 h5 ♖fe8 16 ♘f4
White’s last move advertises his knockout ideas: g4-g5 and/or hxg6. Black chose what he called “the last chance in a hopeless position” – 16 ... ♘fxg4!?! and 17 fxg4 g5!. And he used his acting skills: He looked at his opponent in a confident manner.
It was more than a bluff. There are ways that White’s queen, which has no safe moves, can be caught, such as 18 ♘h3 f6 19 ♘f2?? (to stop ... ♘xg4) ♘f7!.
Nevertheless White had an extra piece in a winning position. The future world champion became nervous. Instead of 18 ♘d3! he chose 18 ♘xe6? fxe6 and then 19 ♖df1 ♖f8 20 ♘d1.

White felt he had a simple way of sealing matters, ♘e3-c4! followed by trading knights and then all four rooks. He can meet 20 ... ♘f7 with 21 ♕f6.
He didn’t believe Black had a useful move – until he saw 20... ♖f7!!. Suddenly the queen-trapping idea was alive, e.g. 21 ♖xf7?? ♘xf7 or 21 ♘e3 ♖df8 followed by taking (twice) on f1 and ... ♘f7.
After long thought, White conceded material 21 ♗c4 ♖xf1+ 22 ♖xf1 ♘xc4 and drew after 23 ♖f6 ♕g7 24 ♕xg7+ ♔xg7 25 ♖xe6. As Anand himself later said, when he escaped from a lost position against Anatoly Karpov, “Once you understand you are lost, you can do anything,”
So far we’ve considered proper attitudes for the defender as well as a few principles to guide him. What else can he rely on?
A common misconception is that attackers calculate while defenders do ... something else.
Actually, an attacker can choose many of his moves based on intuition and general principles. Or, he can look just two or three moves into the future. If he misses something tactical by his opponent, it usually costs him nothing more than the initiative. Not so for a defender.
Anand – Tiviakov, Wijk aan Zee 2006
1 e4 d5 2 exd5 ♕xd5 3 ♘c3 ♕d6 4 d4 ♘f6 5 ♘f3 c6 6 ♘e5 ♘bd7 7 ♗f4 ♘d5 8 ♘xd5 ♕xd5 9 ♗e2!? ♘xe5 10 ♗xe5 ♕xg2! 11 ♗f3 ♕g6 12 d5
A pawn down, White seems to have a powerful initiative, e.g. 12 ... cxd5 13 ♕xd5 e6? 13 ♕b5+.
Black was forced to calculate and found 12 ... ♗g4!. He would have the strong 13 ♗xg4 ♕e4+!.
White had missed 12 ... ♗g4. But he didn’t lose his head. He played 13 dxc6 bxc6 14 ♕e2 ♗xf3 15 ♕xf3 ♖d8 16 ♖d1 and built enough play to draw.
Because the defender is typically at greater risk of losing, he must calculate more than the attacker. He can’t stop at two moves into the future if there’s a good chance that disaster awaits him at move three. The cost of an oversight is greater for him.
Yusupov – A. Sokolov, Riga 1986
1 d4 ♘f6 2 c4 e6 3 ♘f3 b6 4 g3 ♗a6 5 b3 ♗b4+ 6 ♗d2 ♗e7 7 ♗g2 d5 8 ♘e5 ♗b7 9 0-0 ♘bd7 10 ♘c3 c5 11 ♗f4 0-0 12 cxd5 ♘xe5 13 ♗xe5 ♘xd5 14 ♘xd5 ♗xd5 15 e4 ♗b7 16 ♕g4!
White threatens 17 ♕xg7 mate. Black can readily see that he has five ways to meet it. But one of them, 16 ... g5, is so weakening that he can push it down to the bottom of his mental list.
At the top of the list is 16 ... ♗f6, because it offers a trade of bishops and, in most positions, exchanges tend to favor a defender.
In between these two alternatives are the other candidate moves that meet the ♕xg7 mate threat: 16 ... g6, 16 ... ♗g5 and 16 ... f6.
As he takes a more serious look at the position, Black can see that 16 ... ♗f6 17 ♗xf6 and 18 dxc5 would isolate a potentially weak pawn at c5.
White can play for more with 17 ♖fd1. Then 17 ... cxd4 18 ♖xd4 ♕e7 looks adequate. But a defender has to look further. Black would see that 19 ♖d7! wins (19 ... ♕xd7 20 ♗xf6 g6 21 ♕g5 and ♕h6-g7 mate).
What about 17 ... ♗xe5 18 dxe5 ♕c7 instead? If Black looks further he’ll see that 19 ♖d6! is another substantial positional plus for White.
So he looked for other alternatives. Black can see that after 16 ... g6 or 16 ... ♗g5 White could keep a significant edge with the simple 17 ♖fd1, if there’s not something sharper.
Realizing that he must calculate more than White, Black looked at the unlikely 16 ... f6!? and then 17 ♕xe6+ ♔h8.
Hmm, this is better than it seemed at first, he might say to himself. The White bishop must move because the combination 18 dxc5 fxe5! 19 ♖ad1 ♕e8 20 ♖d7 fails to 20 ... ♗c8!.
So Black must evaluate 18 ♗f4 cxd4. At first glance, that looks risky because the pawn at d4 appears weak. But after ... ♗c5 the pawn is supported, while the e4 pawn would be threatened by with ... ♖e8.
In the end, Black chose 16 ... f6! 17 ♕xe6+ ♔h8 18 ♗f4 cxd4. White had nothing better than 19 ♖fc1 ♗c5 and then 20 b4! ♗xb4 21 ♖c7.
Black shot back 21 ... ♗c8 22 ♕c6 ♗g4 and coasted to a quick draw (23 h3 ♗e2! 24 ♕b7 ♖b8 25 ♕xa7 ♖a8 26 ♕b7 ♖b8 27 ♕a7 ♖a8).
The good defender knows that he is going to be surprised from time to time. He cannot expect to see all of his opponents’ moves in advance. Shock happens.
With that attitude, he can prepare himself emotionally. What he must avoid is not so much surprise as being rattled by surprise.
White found 1 ♘f6!. Taking the knight, 1 ... gxf6 2 ♗xh6, leads to mate and 1 ... ♘xf6 2 exf6 would expose both Black’s king (3 ♗xh6) and queen (♗xc7) to deadly threats.
White wasn’t counting on those lines. His basic idea was to trade off the best defender of the kingside with ♘xg8!.
Even if Black had not expected 1 ♘f6! he should take it in his stride and look for a saving resource. The one he found was 1 ... c4!, to eliminate one of the minor pieces essential to White’s attack.
There followed 2 ♘xg8 ♔xg8. Since 3 ♗e4 ♗b7 only helps Black, White searched for a killer and spotted 3 ♗xh6.
Black faces new dangers because 3 ... cxd3? loses to 4 ♗xg7! ♔xg7 5 ♕g4+ and ♖f3-h3 mate. White also threatens 4 ♕g3 g6 5 ♗xg6!.
But once again a good defender would just take a deep breath and look for a saving grace. It may not exist. But if you don’t look, you won’t find.
What Black found was 3 ... gxh6! 4 ♕xh6 cxd3. Or rather, he found that the apparent killer, 5 ♖f3 and 6 ♖g3+ is refuted by 5 ... ♕xe5! 6 ♖g3+ ♕xg3. Black would have more than enough compensation for the queen.
White played 5 ♖f4! but Black anticipated ♖g4+ with 5 ... ♖b4!. The game ended in perpetual check, 6 ♖xb4 ♗xb4 7 ♕g5+ ♔h7 8 ♕h4+ ♔g7.
In double-edged positions the player with the stronger nerves is playing with an extra piece. We see the attack succeed so often that we can come to the mistaken conclusion that only the defender’s nerves can fail.
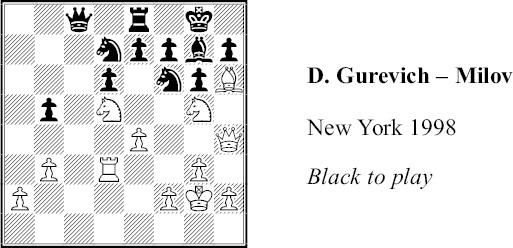
Radulov – R. Byrne, Leningrad 1973
1 e4 e6 2 d4 d5 3 ♘d2 c5 4 ♘gf3 ♘c6 5 ♗b5 a6 6 exd5 axb5 7 dxc6 bxc6 8 dxc5 ♗xc5 9 0-0 ♘f6 10 ♕e2 ♗e7 11 ♖d1 ♕b6 12 c4 0-0 13 ♘e4 bxc4 14 ♗g5 ♗a6! 15 ♘xf6+ ♗xf6 16 ♗xf6 gxf6
Black demonstrated boldness with his pawn-grabbing 13th and 14th moves. Boldness came with the price: a mangled king position. To play this way required nerves – and seeing that the dangerous-looking 17 ♘e5 fails to 17 ... fxe5 18 ♕g4+ ♔h8 19 ♕h4 ♖g8! and the king escapes.
And what about White? He also has to meet threats, such as 17 ... c3!, which threatens his queen and prepares 18 ... cxb2.
White tried 17 ♘d4 to get his queen to the kingside quickly. Black calmly replied 17 ... ♖fd8! and there followed 18 ♕g4+ ♔f8 19 ♕h4 c5!.
“If Radulov had shown the cold-bloodedness of his opponent,” the tournament book said, “he would have played 20 ♘f3!.” For example, 20 ... ♔e7 21 ♘e5! ♖xd1+ 22 ♖xd1 ♖d8 23 ♖xd8 with good chances, it added.
But if Black’s nerves remained strong, he would have met 20 ♘f3 with 20 ... ♕xb2! and challenged White to play 21 ♕xh7 c3 or 21 ♖db1 ♕c2 22 ♕xf6 ♕f5!, for example.
Instead, White misfired with 20 ♘f5? exf5 21 ♕xh7, expecting to win with ♖e1 and ♕h8 mate. Black had calculated further – because he knew he had to. He found 21 ... ♗c8! 22 ♖e1 ♗e6!, and won in a few moves.
And most of all, a good defender never resigns until he has considered virtually every legal move in his search for a saving resource.
Mueller – Tidman, Bunratty 2007
1 d4 e6 2 e4 d5 3 ♗e3 ♘f6 4 ♘d2 ♘xe4 5 ♘xe4 exd4 6 f3 ♗d6 7 ♕d2 b6 8 fxe4 ♗b7 9 ♗d3 ♗e4
Black’s last move was based on 10 ♗xe4 ♕h4+ and 11 ... ♕xe4. But she overlooked 10 ♗g5. Black appears to be losing a piece since ... ♕h4+ is ruled out and 11 ♗xe4 is coming.
She played her worst possible move: 10 ... resigns??. There were two improvements. One was 10 ... ♗e7 so that 11 ♗xe7? ♕xe7 12 ♗xe4 ♕h4+ or 11 ♗xe4 ♗xg5 12 ♕c3 c6 13 ♗xc6+ ♘xc6 14 ♕xc6+ ♔f8 and Black can play on.
But she had much better: 10 ... ♗b4! and then 11 ♗xd8 ♗xd2+ or 11 ♕xb4 ♕xg5 or 11 c3 ♕d5 (12 cxb4 ♗xg2) would have given her a fine game.
One of the reassuring facts of middlegame play is that some attacks run out of steam. If the defender meets all the threats – and the attacker cannot add additional pieces – his initiative will die.
White has just advanced his rook from d1 and hopes to bring it to good use on c3 or f3. Black could test him with 1 ... ♕c2 and then 2 ♖c3 ♕xa2.
But White would justify his loss of the pawn with the combination 3 ♖c8 ♖xc8 4 ♘xe7+ ♔f8 5 ♘xc8. Then 5 ... ♕xb3 6 ♘xh7+! is messy.
Black chose the more circumspect 1 ... ♕b7!. White had a problem because 2 ♖c3 fails to 2 ... ♘xd5 3 exd5? ♗xc3 and 3 ♗xg7 h5! favors Black.
But the key to the position is that after 2 ♖f3 all of White’s pieces are attacking the kingside – yet there is no threat or way to make progress. If it were his move, 3 ♗xg7 ♔xg7 4 ♘xf6 ♘xf6 achieves nothing because 5 ♖xf6? exf6 6 ♕xh7+ ♔f8 ends the attack.
That’s comforting for Black. He played for a win with 2 ... ♗h8!.
Now ♗xg7 is ruled out. White has reached the end of his kingside buildup and must defend against threats such as 3 ... ♘e5 followed by 4 ... ♘xf3 or 4 ... ♘xd5.
White didn’t like the looks of 3 ♘xf6+ exf6! or 3 ♖d3 ♘c5!. So he played a move that only looks like it attacks, 3 g4?. His position fell apart after 3 ... ♘xe4!. For example, 4 ♘xe4 ♕xd5 or 4 ♘xe7+ ♖xe7 5 ♘xf7 ♗f6!.
Masters often take what seems to be considerable risk because they can accurately evaluate the limits of an enemy attack. We’ll examine risk further in Chapter Six. But for the time being let’s see how a player can allow his kingside to be damaged – because he knows he can’t be mated by a lone enemy piece.
Carlsen – Kramnik, Dortmund 2009
1 d4 ♘f6 2 c4 e6 3 ♘c3 ♗b4 4 ♕c2 0-0 5 a3 ♗xc3+ 6 ♕xc3 d5 7 ♘f3 dxc4 8 ♕xc4 b6 9 ♗g5 ♗a6 10 ♕a4
Black is a bit constricted and his c7-pawn is a potential target. With 10 ... ♕d7 11 ♕c2!, preparing ♗xf6 or ♖c1, his troubles would remain.
The thematic way to handle the position is 10 ... c5. But Black has to carefully weigh the consequences of 11 dxc5 bxc5 and 12 ♖d1.
Then 12 ... ♘bd7? 13 ♕xa6 is out of the question and 12 ... ♕e8 is uncomfortable after 13 ♕xe8 ♖xe8 14 ♗xf6 gxf6 15 e3. And 12 ... ♕b6 allows doubled kingside pawns, 13 ♗xf6 gxf6.
All true. But in the last line, Black threatens ... ♕xb2, e.g. 14 ♕g4+ ♔h8 15 ♕h4 ♕xb2!.
Black liked what he saw and went into this. White had no good means of sacrificing the b-pawn, so 14 ♖d2 and then 14 ... ♘c6 were played.
Black’s kingside remains weakened. But White only has one piece to attack it with, e.g. 15 ♕g4+ ♔h8 16 ♕h4 ♔g7 17 ♘g5 fxg5 18 ♕xg5+ ♔h8 19 ♕f6+ ♔g8 is only a perpetual check.
Since “a weakness is not a weakness ...” White took the draw with 17 ♕g4+ ♔h8 18 ♕h4 ♔g7 19 ♕g4+.
Most players love to attack. If they had a choice, perhaps only one out of ten would say they prefer to defend. Why? Because it is fun to win with sacrifices, checks and mating nets. And because the attacker usually has an easier time finding good moves.
But this is not always the case. Sometimes the defender has an easier task because his moves are forced or severely limited: He can rely on the process of elimination. Anything other than what he chooses would lose. It is the attacker who may face more difficult choices.

White sacrificed two pawns to exploit Black’s insecure king. (Black had previously played ... ♔e8-d8-e8 so he can’t castle now.)
White has a wide variety of discovered checks but they lack a strong follow-up. For example, 1 ♗c7+ may force 1 ... ♗e6. Then 2 f5 ♘xc7 3 fxe6 looks good – until you see 3 ... ♘d5!, when Black weathers the storm. e.g. 4 ♘b7 a5! 5 ♘d6+ ♔e7 6 exf7+ ♔xd6 7 fxg8(♕) ♖xg8 and the queenside pawns are strong.
White found the inspired 1 c4! with the idea of 1 ... bxc4 2 ♖b1 or 2 ♗c3+. On 1 ... ♗xd1 he would continue 2 cxd5 because 2 ... ♗xc2?? 3 ♗c7+! ♔f8 4 ♗d6 is mate and 2 ... f6 3 ♗d6+ ♔f7 4 ♖xd1 is double-edged.
But Black also found a great move, 1 ... f6!. His king now had an escape square at f7.
The pressure is back on White. He had a difficult choice: 2 ♖b1 would be consistent but 2 cxd5 seems to win material.
After 2 cxd5 ♗xd1 the 3 ♗c7+ idea is stronger than before and leads to 3 ... ♔f7 4 ♖xd1 cxd5 5 ♖xd5. White may have rejected that because at the end, 5 ... a5! favors Black a bit.
He chose 2 ♖b1 instead, hoping for 2 ... fxe5 3 cxd5 or 2 ... bxc4 3 ♗xf6+ ♔f7 4 ♗e5 and ♖b7+.
All of this was difficult for White to find. But it was relatively easy for Black to find the best move, 2 ... ♘b6!, since it closes the dangerous b-file. White could get one pawn back, 3 ♗d4+ ♔f7 4 cxb5 cxb5 5 ♖xb5, but he would be worse.
Instead, White played 3 ♗xf6+ ♔f7 4 ♗g5 and Black was on the road to victory with two extra queenside pawns and a safe king, 4 ... ♘xc4 5 ♖e7+ ♔g6.
White was able to delay matters with a few threats but he lost soon after 6 ♖be1 ♗f5 7 ♔f2 ♖ad8 8 ♘d3 a5 9 ♖g1 ♖d7! 10 ♗h4+ ♔h7.
The two types of position – the ones in which it’s easier to conduct the attack and the others when it’s easier to defend – may occur at different times in the same game:
Stein – Flohr, Kiev 1957
1 e4 c6 2 d4 d5 3 ♘c3 dxe4 4 ♘xe4 ♘d7 5 ♗c4 ♘gf6 6 ♘g5 e6 7 ♕e2 ♕e7? 8 ♗d2 b6 9 0-0-0 ♗b7 10 ♘1f3 h6 11 ♗b4!
A rude shock for Black. He realized that 11 ... ♕xb4 makes 12 ♘xf7! strong. For example, 12 ... ♔xf7 13 ♕xe6+ ♔g6 14 ♗d3+ and mates. Or 12 ... ♖h7 13 ♕xe6+ ♗e7 14 ♖he1.
What made this difficult for Black was not only finding those losing lines but choosing between the more playable 11 ... ♕xb4 12 ♘xf7 ♕xc4!? and the move he adopted in the game, 11 ... c5.
White replied 12 dxc5 bxc5 13 ♗xc5!? ♘xc5 14 ♘e5! with a check coming up on b5. Yes, it took a bit of calculation to convince himself that 13 ♗xc5 might work. But so far it’s been easier for White to find good moves than for Black to defend.
Black found a way to avoid a quick loss: 14 ... ♘fd7 15 ♘gxf7 ♘xe5 16 ♘xe5 ♕g5+ and then 17 f4! ♕xf4+ 18 ♔b1 ♗e4!.
White is still a piece down. He needed sharp moves and looked for checks, captures and other forcing moves. The game went 19 ♕h5+ g6 20 ♗b5+ ♔e7 21 ♘xg6+ ♗xg6 22 ♕xc5+ ♔f7 23 ♕c6. Only his last move and the dead end of 22 ♕xg6+? ♕g5! might be hard to calculate.
This looked like a winning position because 24 ♖hf1 and 24 ♕xa8 are threatened. But a subtle change has occurred. Positions like this are easier for Black to play than earlier ones in this game because there is only one move to meet both threats, 23 ... ♕e4!.
White had more shots to come: 24 ♕d7+ ♔g8 25 ♗d3 ♕g4 26 h3 ♕g5. The turning point of the game was 27 ♕xe6+?.
The quieter 27 ♖hf1! might have won (27 ... ♖h7 28 ♕xe6+ or 27 ... ♗g7 28 ♕xe6+ ♔h7 29 h4).
Black replied 27 ... ♗f7 28 ♕c6 ♖b8 29 ♕c7 ♖b6. It was harder and harder for White to find good-looking moves.
Instead of 30 ♖hf1! he chose 30 ♗c4?. Black consolidated with virtually forced defensive moves, 30 ... ♖h7 31 ♖hf1 ♖f6! 32 ♖xf6 ♕xf6.
In the end, White blundered with 33 ♖f1? ♕xf1+ and resigned when he saw that 34 ♗xf1 ♗xa2+ and ... ♖xc7 wins for Black.
Good attitudes and spirit, backed by a few basic guidelines, are the foundation of successful defense. Let’s see if you can apply them in these quiz positions. Take at least five minutes to study each diagram and try to find the answer. The solutions for this chapter and for the quizzes in later chapters can be found at the end of the book.
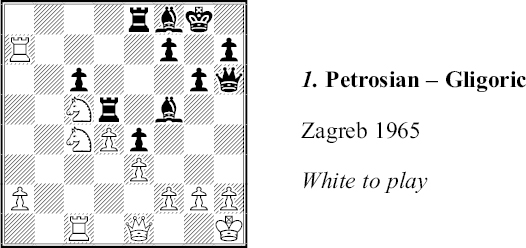
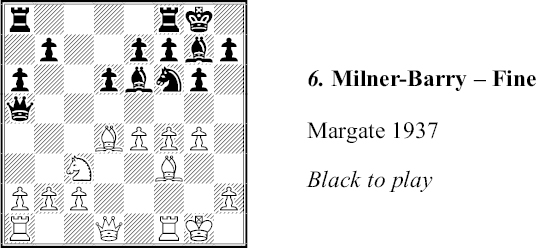
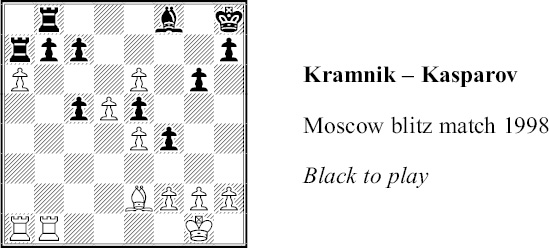
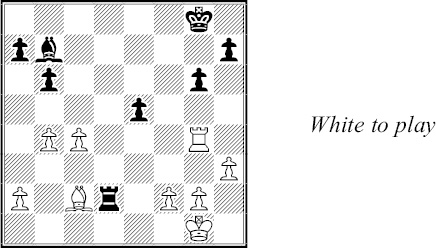
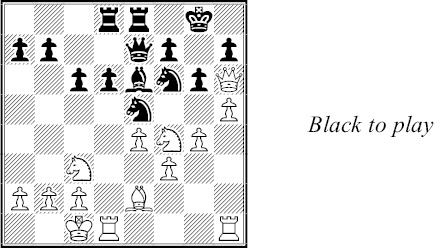
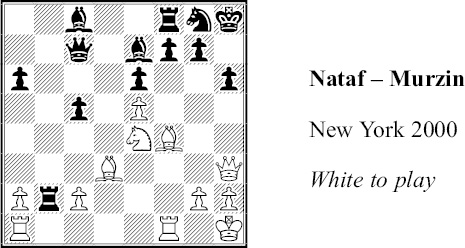
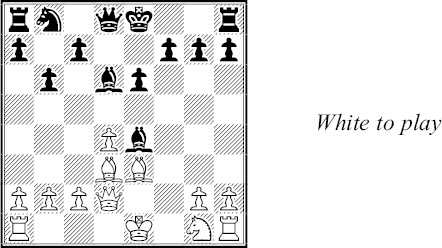
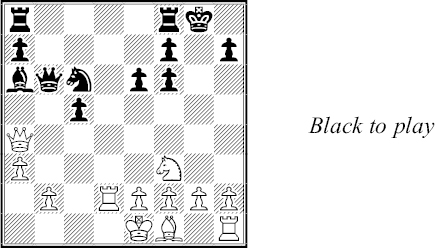
Black’s immediate threat of ... ♗xc5, winning back a pawn, would leave White with the better game positionally. Does Black have a greater threat brewing on the kingside? And how can White deal with it?
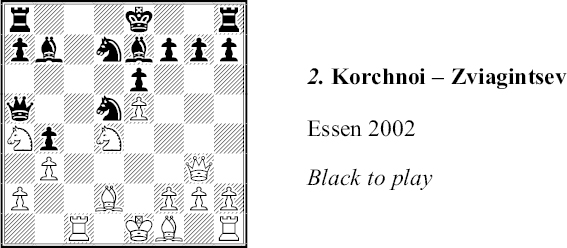
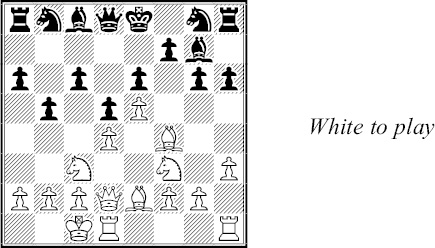
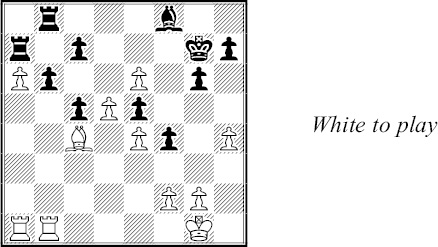
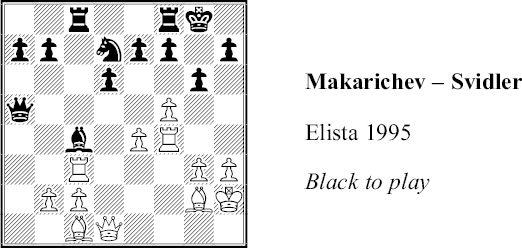
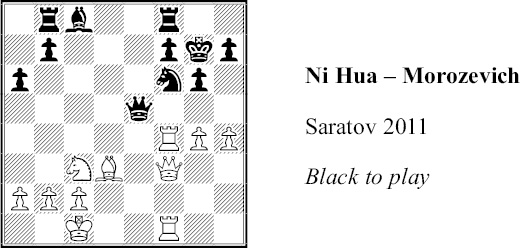
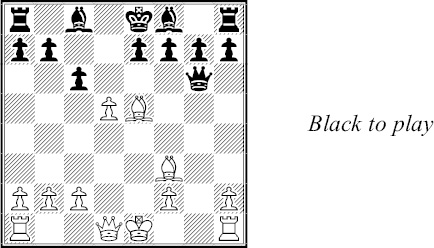
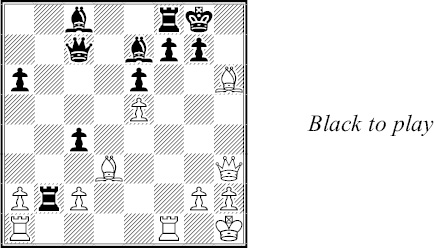
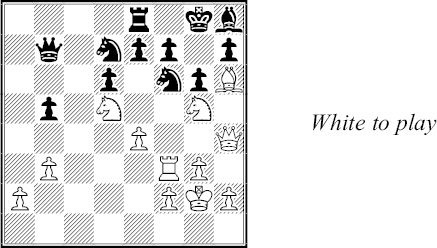
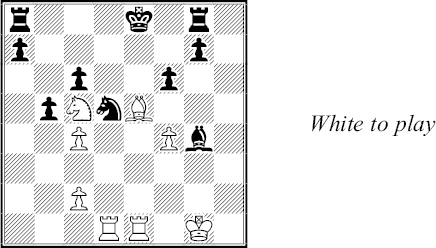
White threatens ♕xg7. What is the best of Black’s options?
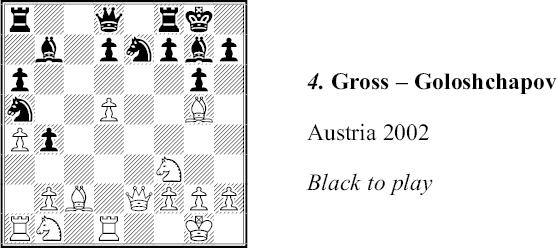
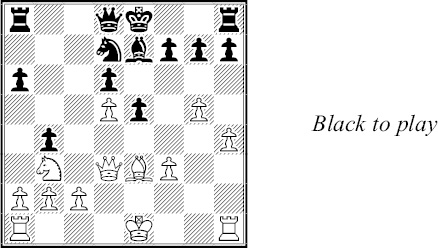
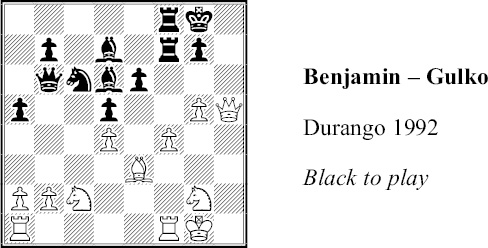
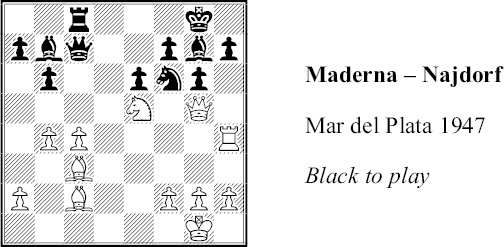
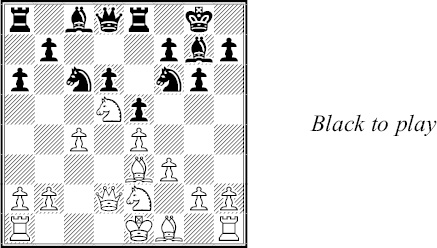
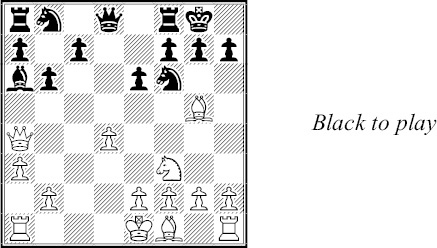
Four attacking pieces seem too many for Black to handle in lines such as 1 ... ♕xd5 2 ♖xg7+ ♔h8 3 ♘f6!. What can Black do?
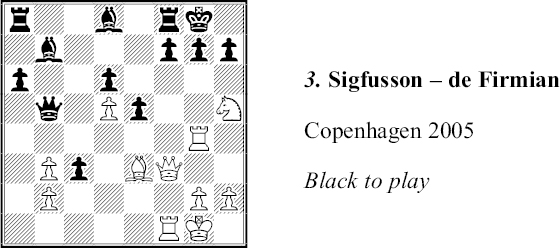
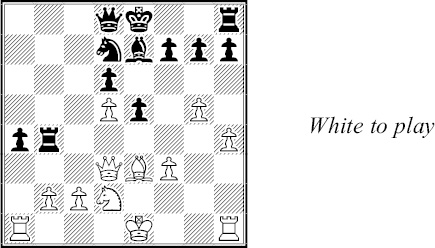
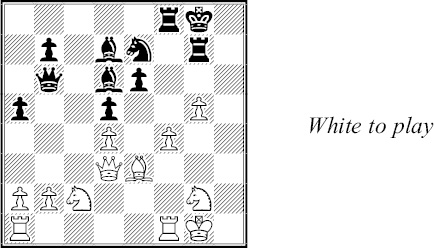
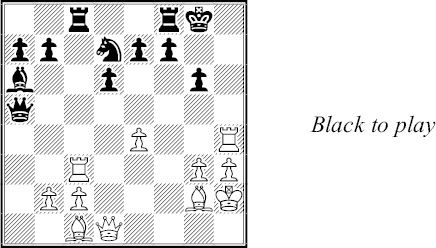
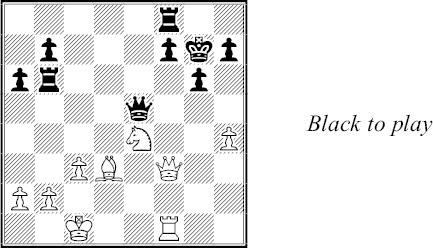
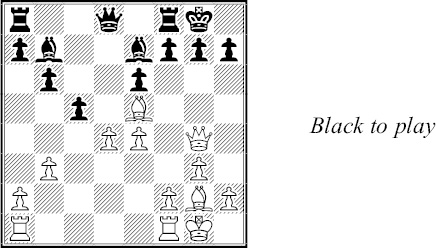
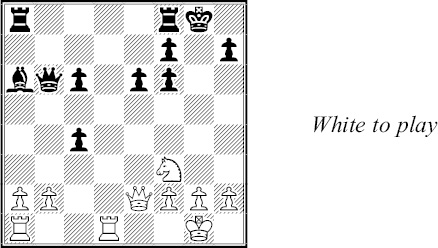
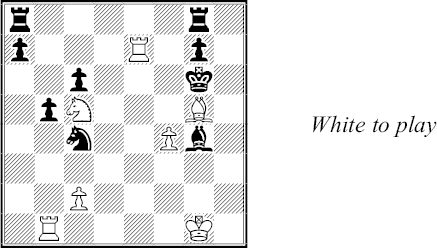
White threatens the pinned knight. How should Black respond?
White played 1 ♗xg5. Analyze the consequences.
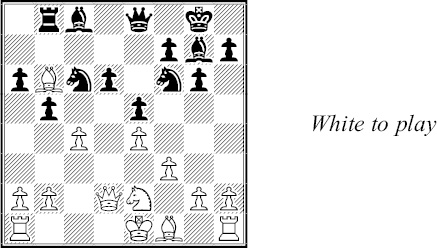
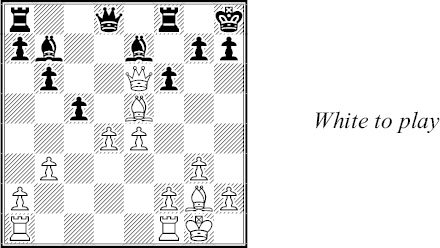
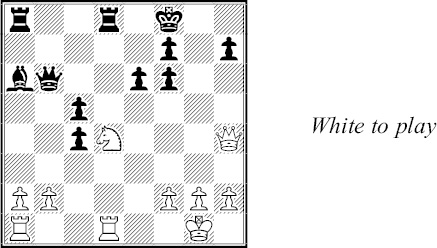
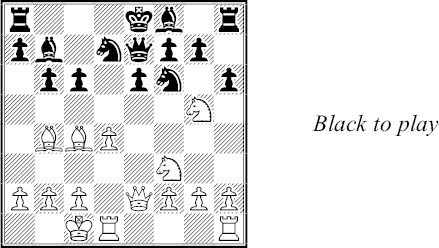
White has just played 1 ♗d4 and clearly intends 2 g5 followed by a trade of bishops. What’s best for Black?