In preparing to give a healing, the healer must first open and align herself with the cosmic forces. This means not only just before the healing, but in her life in general. She must be dedicated to the truth and be meticulously honest with herself in all areas of her being. She needs the support of friends and some form of spiritual discipline or purification process. She needs teachers, both spiritual and physical. She needs to keep her own body healthy through exercise and healthy nourishment, balanced diet (including high intake of vitamins and minerals, which the body uses more of when running high energy), resting and playing. Through this nourishment, she maintains her own physical vehicle in a condition that allows her to raise her vibrations to reach up and out to the universal energy field and those spiritual healing energies that will then flow through her. She must first raise her own vibrations to connect with the healing energies before channelling can take place.
Before starting a day of healing, it is good to do some form of physical exercise in the morning, as well as a meditation to center oneself and open the chakras. This does not have to take a long time. Thirty to forty-five minutes is sufficient. The following exercises are the ones that I find very effective. I change them periodically to suit the constantly changing needs of my energy system.
1. Lie flat on your back with your arms at your sides, palms facing upwards. Move your feet slightly apart to a comfortable position. Close your eyes. Relax your whole body by focusing on each part of it, one after another. Breathe naturally. Focus on your breath and count—one in, one out, two in, two out, and so on—for five minutes. If your mind starts to wander, bring it back to the counting; if the number is forgotten, start at one again.
As your attention is kept for a few minutes on counting breaths, your mind and body are gradually relaxed.
2. The best exercise to start the day can be done before you get out of bed (if it doesn’t bother your sleeping partner, but it probably will). Lie flat on your back, spread your arms out perpendicular to your body and bring your knees up with your feet flat on the bed. Keeping your shoulders down, allow your knees to fall to the right while you roll your head to look left. Now bring your knees up and let them fall to the left while you roll your head to the right. Repeat this movement until your back feels well stretched out.
Joint exercises are especially good to create a smooth flow of energy in the acupuncture channels through adjustment of the joints. Since all the meridians flow through the joints, moving the joints activates the meridians. These joint exercises were developed by Hiroshi Motoyama to open the acupuncture channels. They are given in his pamphlet, “The Functional Relationship Between Yoga Asanas and Acupuncture Meridians.”
3. Sit erect on the floor with your legs stretched straight out in front. Place your hands on the floor beside your hips and lean backwards using your straight arms for support. Place your attention in the toes. Move only the toes of both feet. Slowly flex and extend them without moving your legs or ankles. Repeat ten times. See Figure 21-1A.
4. Remain in the sitting position described above. Flex and extend your ankle joints as far as possible. Repeat ten times. See Figure 21-1B.
5. You are still in the sitting position given in #3. Separate your legs slightly. Keeping your heels in contact with the floor, rotate your ankles ten times in each direction.
6. Still sitting in the starting position, bend and raise the right leg as much as possible at the knee bringing the heel near the right buttock. Straighten the right leg without allowing the heel or toe to touch the ground. Repeat ten times and then do the same process with the left leg. See Figure 21-1C.
7. In the same sitting position, hold the thigh near the trunk with both hands and rotate the lower leg in a circular motion about the knee ten times clockwise and then ten times counterclockwise. Repeat the same procedure with the left leg.
8. Bend the left leg and place the left foot on the right thigh. Hold the left knee with the left hand and place the right hand on the left angle. Gently move the bent leg up and down with the left hand, relaxing the muscles of the left leg as much as possible. Repeat the same process with the right knee. See Figure 21-1D.
9. Sitting in the same position as in #8, rotate the right knee around the right hip joint ten times clockwise and then ten times counterclockwise. Repeat the same process with the left knee. See Figure 21-1E.
10. Sitting in the starting position with legs stretched out, raise the arms forward to shoulder height. Stretch and tense the fingers of both hands. Close the fingers over the thumbs to make a tight fist. Repeat ten times. See Figure 21-1F.
11. Maintain the position in #10 above. Flex and extend the wrists. Repeat ten times. See Figure 21-1G.
12. From the same position as in #10, rotate the wrists ten times clockwise and ten times counterclockwise.
13. Taking the same position as #10 above, stretch out the hands with the palms upwards. Bend both arms at the elbows and touch the shoulders with the fingertips and straighten the arms again. Repeat ten times and then perform the same exercise ten times but with the arms extended sideways. See Figure 21-1H.
14. Remaining in the same position with the fingertips in constant contact with the shoulders, lift elbows as high as possible. Then lower them. Repeat ten times. Now point elbows forward. Repeat. See Figure 21-1I.
15. In same position as #14 above, make a circular movement of the elbows by rotating the shoulder joints. Do this ten times clockwise and then ten times counterclockwise. Make the circular movement of each elbow as large as possible, bringing the two elbows together in front of the chest. See Figure 21-1J.
Once you learn these exercises, you can probably do the fingers/toes, ankles/wrist at the same time.
16. Now do several sit-ups, breathing out each time you sit up. Do at least ten to start with. Work your way up to twenty.
Figure 21-1: Joint Exercises
17. Reach over and touch your toes without bending your legs. Do this from a sitting up posture with your legs together, straight and in front of you. Do this ten times. Now simply stay over and hold your toes without bending your knees. Do this for three minutes without getting up.
18. Spread your legs as wide as they will go and repeat the above exercise, first reaching for the left toes, then switch to the right side and reach for the right toes. Now repeat by reaching straight out in front of you. Hold this position for three minutes without getting up.
19. Do some head and neck rolls. First look up and then down with your face. Repeat ten times. Now look to each side ten times. Then roll your head around first clockwise and then counterclockwise several times till your neck feels more flexible.
20. Stand up. With your body straight and your feet about two feet apart, bend over to the left side reaching your right arm over your head and to the left. Repeat several times. Now bend over to the right reaching over with your left arm.
There are three different sets of exercises that I know to charge and open chakras. The first set of physical exercises opens the chakras very well on the lower three levels of the aura. The second set opens the chakras well on the astral level. And the third set is a combination of breathing and postures that open the chakras on the higher levels of the auric field.
These exercises are shown in Figure 21-2.
Chakra 1. Stand with feet wide apart and toes and knees pointed out to an angle that is comfortable for your knees. Now bend your knees as deeply as you can. You should eventually be able to go down so that your buttocks are as low as your knees. Move up and down several times. Now add a swing motion to your pelvis. Push your pelvis as far forward and as far back as you can. Emphasize the forward movement. Rock back and forth this way three times as you go down. Stay down and rock back and forth three times while you have your knees bent; then rock back and forth three times on the way up. The most important movement of this exercise is the rocking when your knees are deeply bent. Repeat the whole thing at least three times.
Chakra 2. Stand with your feet shoulder width apart and parallel. Now rock your pelvis back and forth bending the knees slightly. Repeat several times.
Now make believe you are inside a cylinder that needs to be polished. Polish it with your hips. Put your hands on your hips. Move then in a circular fashion, making sure you polish all sides of the cylinder evenly.
Chakra 3. Jumping. This requires a partner. Hold each other’s hands firmly. While one person supports, the other jumps up and down. Bring your knees up as high as possible into your chest when you jump. Jump continuously without stopping for several minutes. Rest. Do not bend over to rest. Switch, let your partner jump while you support him.
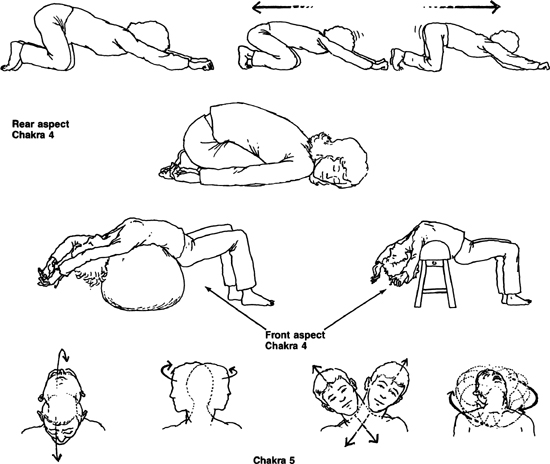
Chakra 4. This is an isometric posture exercise. Get on your hands and knees as shown in Figure 21-2. In this position, your elbows do not touch the floor. Your arms are used as a fulcrum. Vary the angle of your legs and buttocks until you feel pressure between your shoulder blades (some men with big shoulder muscles will feel it more in the shoulders, so be careful). When you succeed in getting pressure between your shoulder blades, then put isometric pressure in that place by pushing your whole body forward for a while, then pull backward. You can do this from the hips and legs. This exercise works the back of the heart chakra or the will center.
For the front of the heart chakra, find something large and round like a barrel, a soft couch back, or a bioenergetic stool to lean backwards over. Lean backwards over it, with your feet firmly planted. Relax and let the muscles of your chest stretch out.
Chakra 5. Head and neck rolls. Move your head several times in the following directions. Facing forward, up and down, side to side. Up to the left, then down to the right. Reverse. All the way up to the right, all the way down to the left. Now roll your neck and head all the way around several times in both directions.
The throat chakra also responds very well to sound. Sing! Make any kind of noise you like to, if you don’t sing.
Chakra 6. Repeat the movements for chakra 5 with the eyes.
Chakra 7. Rub the crown of your head in a clockwise direction with your right hand.
To do this exercise, sit in a comfortable chair or in the lotus position on a pillow on the floor. Keep your back straight. First, after calming the mind with one of your meditation exercises, bring your awareness to your first chakra. Visualize it as a vortex of red light spinning clockwise. (Clockwise as defined by looking at the chakra from the outside of your body.) It is positioned directly under you with the larger end of the spinning cone open to the earth and the tip of the cone pointing into the bottom of your spine. As you watch it spinning, breathe in red. Breathe out red. Visualize the breath as red on the inbreath. On the outbreath, do not visualize, just watch what color it is. Repeat until you can clearly see red both on the inbreath and on the outbreath. If the color red is either lighter or muddy on the outbreath, that means you need to balance your red energies. If it is lighter, you need more red in your field. If it is muddy, you need to clean your lower chakra. Do this by repeating the exercise until the ingoing and outgoing colors are the same. This is true for all the chakras.
Maintaining your picture of the first chakra, move to the second located about two inches above your pubic bone. Visualize two vortices. One on the front of your body and one on the back of your body. See them spinning clockwise with with a bright red-orange color. Breathe in red-orange. Breathe it out. Repeat. Check to make sure the ingoing and outgoing colors are the same before moving on.
Maintaining the visualization of the first two chakras, move up to the third at the solar plexus. Here visualize two yellow spinning vortices. Breathe in yellow. Breathe it out. Repeat until the yellow is bright on the inbreath and outbreath.
Move to the heart. See the clockwise spinning vortices in green. Breathe green in and out until the colors are balanced. Look down to make sure you can see all the other chakras (that you have already charged) spinning before moving to the throat chakra.
At the throat, breathe in and out blue through the clockwise spinning vortices.
At the third eye chakra, see the clockwise spinning vortices on the front and back of the head as violet. Repeat the breathing exercises.
Then move to the crown. It is opalescent white and sits on top of your head. It spins clockwise. Breathe in white. Breathe it out. Repeat. See all seven chakras spinning clockwise. See the vertical power current flowing up and down your spine. It pulsates with your in breath. As you breathe in, it pulsates up. As you breathe out, it pulsates down. See all the chakras connected to it at their tips, with the crown chakra forming the top entrance and exit, and the root chakra forming the base entrance and exit for energy to flow through your field. See the pulsating energy flowing in through all your chakras with your inbreath. Your whole field is now filled with a lot of light energy. This is a good exercise to do before healing to open and charge all your chakras.
The most powerful exercises I have seen to charge up the auric field, brighten it, clear it and strengthen it are those taught by the Kundalini Yoga people, who focus on position, breathing and spine flexibility. I would recommend that you learn them directly from a Kundalini Ashram if you have the opportunity. If not, I have simplified some of what they teach to add to this book. These are shown in Figure 21-3.
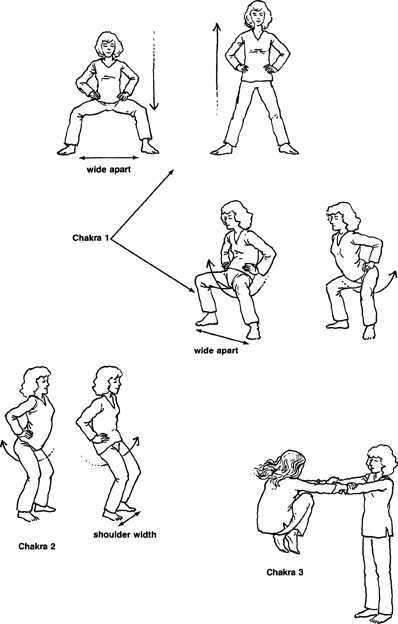
Figure 21-2: Physical Exercises to Charge and Open Chakras
Chakra 1. Sit on the floor on your heels. Place the hands flat on the thighs. Hex spine forward in pelvic area with the inhale, and backward with the exhale. If you like, use a mantra with each breath. Repeat several times.
Chakra 2. Sit on the floor with your legs crossed. Grab the ankles with both hands and deeply inhale. Flex the spine forward and lift the chest; rotate the top of the pelvis back. On exhale, flex the spine backwards and the pelvis forwards near your “sit bones.” Repeat several times, using a mantra if you like.
Chakra 2—Another Pose. Lying on back, prop yourself up on your elbows. Raise both legs about one foot above the floor. Open legs and breathe in; as you breathe out, cross legs at knees keeping legs straight. Repeat several times. Slightly raise legs and repeat again. Do this until your legs are about two and a half feet above the floor, then lower them following the same procedure. Rest. Repeat several times.
Chakra 3. Sit with crossed legs; grasp the shoulders with fingers in front, and thumbs in back. Inhale and twist to the left; exhale and twist to the right. Breathing is long and deep. Make sure spine is straight. Repeat several times and reverse direction. Repeat again. Rest one minute.
Repeat entire exercise sitting on the knees.
Chakra 3—Another Pose. Lie on back with legs together and raise the heels six inches. Raise the head and shoulders six inches; look at your toes; point to your toes with your fingertips, arms straight. In this position pant breath through your nose to a count of 30. Relax; rest for a count of 30. Repeat several times.
Chakra 4. Sitting up with legs crossed, lock fingers in a bear grip at the heart center, elbow pointing out to the sides. Elbows move in a seesaw motion. Breath long and deeply with the motion. Continue several times, and inhale, exhale and pull on the grip. Relax one minute.
Repeat sitting on your heels. This raises the energy higher.
Be sure to tuck in your pelvis.
Chakra 5. Sit with crossed legs, grasp knees firmly. Keep the elbows straight. Begin to flex the upper spine. Inhale forward; exhale back. Repeat several times. Rest.
Now flex spine by shrugging shoulders up with inhale and down with exhale. Repeat several times. Inhale and hold 15 seconds with shoulders pressed up. Relax.
Repeat the above exercises while sitting on the heels.
Chakra 6. Sitting with crossed legs, lock fingers in bear grip at throat level. Inhale; hold your breath; then squeeze your abdomen and sphincters and push energy up, as if you were pushing toothpaste up out of the tube. Exhale the energy out the top of your head, as you raise your arms above your head, holding same bear grip. Repeat.
Repeat sitting on your heels.
Chakra 7. Sit with crossed legs with arms stretched over the head. Interlock the fingers except for the two index fingers, which point straight up. Take an inbreath by pulling the navel point in, saying “sat.” Let the breath out, saying “nam” while relaxing the navel point. Repeat in rapid breaths for several minutes. Then inhale and squeeze the energy from the base of the spine to the top of the head by squeezing and holding the sphincter muscles first, and then the stomach muscles. Hold your breath. Then let it out maintaining all muscle contractions. Relax. Rest. If “sat nam” does not feel right for you, use a different mantra.
Repeat, sitting on your heels. Rest.
Repeat without using mantra. Instead take short fast pant breaths through the nose.
Chakra 7—Another Pose. Sit with legs crossed. Hold arms up at a 60-degree angle with wrists and elbows straight, palms facing up. Pant breathe through the nose, with a rasping breath against upper back part of throat for about one minute. Inhale, hold the breath and pump the abdomen in and out 16 times. Exhale; relax. Repeat two or three times. Rest.
With your feet parallel and shoulder width apart, slowly bend and unbend your knees. Each time you bend your knees and go down, breathe out. As you come up, breathe in. Allow yourself to go down as far as you can without having your heels come up. Relax your arms. Keep your back straight and do not bend forward. Allow the lower half of your pelvis to jut forward a bit.
Now stretch your arms out in front of you, palms down. Add a circular motion with your hands to the up-and-down motion you are already making. Your arms are stretched out as far as possible on the upward motion. As you reach the top of your movement, bring your arms into the body (palms down) and allow them to remain close to your body on the downward motion. At the bottom of your movement, again stretch your arms out. (See Figure 21-4.)
Add a visualization to this movement. You will breathe in colors from the earth up through your hands and feet and in from the air all around you. As you breathe out, you will breathe out the colors. Breathe each color several times.
Start with red. When you reach the bottom of the next movement, breathe in red. See the whole balloon of your aura fill up with red. After you reach the top of your movement and begin moving down, breathe the color out. Now try it again. Can you see the red clearly with your mind’s eye? If not, repeat the exercise till you do. Colors that are hard to visualize are most likely the ones you need in your energy field. Again, as in exercise 22, just watch the color as you breathe out; don’t control it. When it is bright and clear, move on to the next color.
Now breathe in orange as you move upward. Let it come into you from the earth up into your feet, into your hands and into you from the air all around you. If you have trouble visualizing these colors in your mind, get some color samples to look at; or it might be easier for you to do this with your eyes closed. Repeat the exercise with orange again.
Continue the exercise through the following sequence of colors: yellow, green, blue, violet and white. Make sure you see the whole egg form of your aura filled with each color before moving to the next color. These are good colors for each of the chakras. If you would like to add even higher vibrations to your aura, continue with the following colors: silver, gold, platinum and crystalline; then come back down to white. All colors of this second group should have an opalescent quality.
Vibrating your body means to hold your body in a position of tension that sets up involuntary physical vibrations in the body. This will increase energy flow and release blocks. These exercises are well known in core and bioenergetic therapy.
Stand with your feet parallel and shoulder width apart. After you complete the aura charging exercises given above, stand and again simply breathe out when you go down and in when you go up. Bend your knees as much as you can; let your legs begin to feel tired. If you keep doing this long enough, your legs will begin to physically vibrate in an involuntary way. If they do not, start a vibration by quickly bouncing up and down on your heels. Allow the vibrations to work up into the upper part of your legs and your pelvis. With practice, these vibrations will spread over your whole body. This is a very good way to create a strong energy flow throughout your body. Once you get the feel of it, you can devise exercises to cause any part of your body to vibrate in order to increase the energy flow through that part. In this case, one usually needs the pelvis to vibrate in order to enhance the earthly energies flowing through the first and second chakras. Later, when you are in a healing situation, you can slowly roll your pelvis back and forth (while in a sitting position), then add a little short, fast vibration to the rolling motion. This should help the pelvis vibrate. You will feel the increased energy flow throughout your whole body.

Figure 21-3: Breathing/Posture Exercises to Charge and Open Chakras
Figure 21-4: Standing Color Meditation
Now sit for meditation for 10 to 15 minutes. Be sure your back is straight and comfortable.
A good mantra to repeat to yourself to silence the mind for this meditation is: “Be still and know that I am God.” Simply keep your consciousness focused on that mantra. If your mind wanders, simply bring it back.
Another good meditation to still the mind is simply counting to ten. Count one on the inbreath, two on the outbreath, three on the in-breath, four on the outbreath, until you reach ten. The hard part is that every time you allow your mind to wander and think another thought other than the counting, you go back to one and start all over again! This type of meditation really lets us know just how sloppy our minds are! Very few people can get to ten on the first try!
Now you are ready (after a large glass of water) to begin a day of healing.
It is important to work in a clean room that has been cleared of low energies, bad vibes or dead orgone energy (DOR) as Wilhelm Reich called it. If possible choose a room that is full of direct sunlight and has access to open air. You may also keep the room clean by smoking it in the Native American Indian tradition with sweet-grass and cedar or with sage and cedar.
To smoke a room with cedar and sage, put some dried green cedar and dried sage plant into a container and set it afire. It is a Native American Indian tradition to use an abalone shell for the smoking so that all four elements—fire, earth, air and water—are represented. However, if you do not have an abalone shell, you can use a frying pan. When a large amount of the cedar and sage are burning, put out the fire. A lid works best. There will be a great deal of smoke, sending it into all the corners of the room. It is also a Native American Indian custom to start at the easternmost part of the house or room and cover the room in a sunrise direction (clockwise). Be sure that a door is open before you start the smoking. The smoke attracts the DOR energy and carries it out the door.
To complete the smoking, you can give a small offering of corn meal into the fire as a thank you. To learn more about these Native American Indian traditions, I refer you to Oh-Shinnah of the Four Corners Foundation, 632 Oak Street, San Francisco, California 94117. Oh-Shinnah, by the way, smokes each of her patients before working with them. This clears away a lot of the DOR before she starts. You can smoke yourself if you feel clogged. Some people burn epsom salts by pouring a little alcohol over them in a saucepan and then lighting it. Using the saucepan, walk around the room, patient or yourself.
Crystals sitting around the room help collect dead orgone energy. They are then cleaned by simply putting them in a bowl of one-quarter teaspoon sea salt and one pint spring water to soak overnight. Negative ion generators also help clear the room. Never work in a room without ventilation or with fluorescent lights. These lights generate a frequency that interferes with the normal pulsation of the aura causing a beat frequency to be set up in the field. The spectral range is also unhealthy.
If you work in an unventilated or fluorescent lighted room, you will probably get sick. You will start accumulating DOR in your body; your vibrations will slow down and slowly get weaker. Eventually you will have to stop your work, probably for several month’s time until your energy system can clear itself out again. You may not even notice your energy frequencies decreasing because your sensitivity will decrease with them.
If you find yourself accumulating DOR in your body, to clean your aura take a 20-minute bath in a warm tub of one pound sea salt and one pound baking soda. This may make you very weak as it draws large quantities of energy out of the body, so be prepared to rest afterward to replenish yourself. Lying in the sunshine helps recharge your system. Just how long to take a sunbath entirely depends on your system. Be intuitive; trust when your body says it has had enough. You may have to take these baths several times per week to clear yourself.
One should always drink a full glass of spring water after each healing; so should the patient. Running water through your system helps carry away the DOR and prevents bloating. Bloating, paradoxically, is caused by not drinking enough water in the first place. Your body will retain the water in an effort to hold the DOR in the water rather than let it go deeper into the tissues of your body.
Crystals also help protect the healer’s energy system. A clear quartz or amethyst crystal can be worn over the solar plexus to strengthen your field and make it less permeable. Rosy quartz helps protect the heart when worn over the heart chakra. There is much to be said about healing with crystals. I generally use four crystals on the client in healing, in addition to the ones I wear, which are an amethyst and a rosy quartz. I put a large rosy quartz in the left hand (heart meridian) of the patient and a large clear quartz in the right hand. These soak up DOR that is released in the healing. I use a large amethyst with iron deposits in it on the second or first chakras to keep the patient’s field pulsating strongly. The iron helps keep the patient grounded. The crystals tend to hold the patient in the body. A smoky quartz at the solar plexus is very good for this.
If you wear a crystal, you should be sure that you wear the right one for your body. If the crystal is too strong, it will increase your field vibrations and eventually deplete your field, because your basic metabolism rate will not be strong enough to keep up with the rate that the crystal induced on your field; i.e., you will not be able to supply enough energy to your field to keep up the higher vibrations. You will eventually lose energy. If, however, you choose a crystal that is slightly stronger than your field, you will then enhance your field.
If you wear a crystal that vibrates slower than your field, it will put a drag force on your field and slow your vibrations down. You simply need to be aware of how each crystal affects you. As you become stronger you will be able to wear stronger crystals. You will also need different crystals at different times of your life, depending on the circumstances.
Crystals in the form of old jewels or keepsakes have imbued the energy of their former owners in them and should be thoroughly cleaned for a week in one-quarter teaspoon sea salt to one quart of spring water or in ocean water. Many crystal workshops are being presented now. I suggest if you want to use crystals, attend one and learn about them before using them.
I use a massage table and a secretary’s chair when healing. This way I do not have to stand all day, and my back gets plenty of support. The wheels on the chair allow free movement, and I can stand or sit whenever appropriate during a healing. I also use oil to anoint the feet. This helps the energy enter the body.
One of the most important things a healer needs to stay healthy is private personal time and space. This is not easy, for most healers are in great demand by their patients. It is imperative that the healer be able to say, “No, I need time for myself now,” no matter how great the demand is. This means that when you need time you give it to yourself no matter what. If you do not, you will get depleted and have to stop practicing for a while anyway. Don’t wait till there is nothing more to give. Rest now. Give time to your hobbies and other personal pleasures. It is very important that a healer lead a full personal life that provides for her needs. If she does not, she will eventually try to get those needs met by her patients. She will develop dependencies on her patients, which will then interfere with the healing process. The golden rule for the healer is: first, the self and what nourishes the self; then, deep pause for consideration; then, the nourishment of others. Healers who do not do this will eventually suffer from burnout and may risk disease from energy depletion.