cooking from the
rainbow
garden
I’ve been attracted to vegetables of unusual colors for as long as I can remember. As a gardener I enjoy both their novelty and beauty and as a cook I glory in their eye appeal. And why not? A plate of sliced red, orange, and yellow tomatoes becomes an artistic creation. Further, red, orange, and yellow bell peppers not only look more exciting than green peppers, they taste much better too. Then there’s the fact that I’m a “show-off” cook. Through the years I found I could set guests atwitter when serving pureed ‘All Blue’ potatoes or lavender vichyssoise or drizzling margaritas over a melange of red, orange, and yellow watermelon cubes!
My experiences with these colorful varieties were not always positive. Twenty years ago, when I was new to cooking them, most of the chefs and cookbook authors I knew had never even seen blue potatoes much less prepared them. Fumbling in the dark I would gnash my teeth when the lovely lavender vichyssoise I’d visualized turned into a dismal gray soup (through trial and error I learned to start with only the darkest blue potatoes and to add lemon juice to set the pigments. See the recipe, page 65). I remember making and refrigerating a chiffonade of orange chard stems in the morning only to find them an unappetizing dull, orange-brown at dinner that night. Then there were all those puzzling results: Why did purple asparagus, beans, and cauliflower turn green when cooked but purple cabbage remained purple? Why did red okra lose its color when cooked but red beets and all the red and orange peppers and tomatoes keep their color?

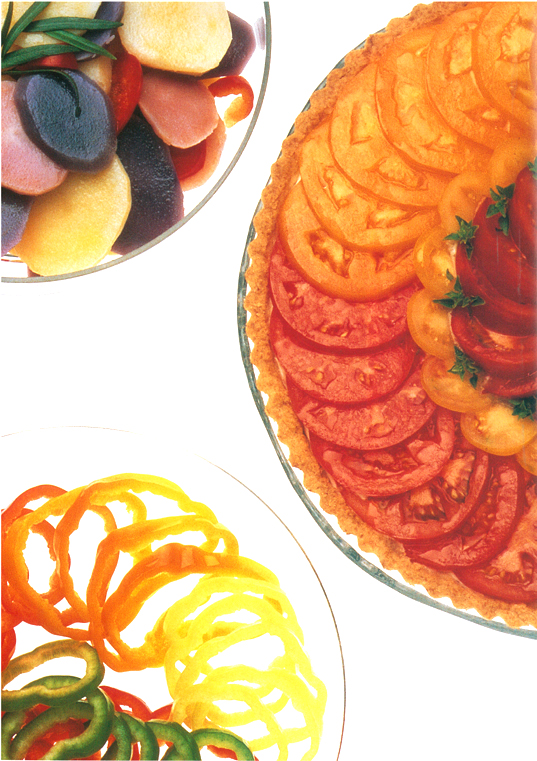
Red, white, and blue potato salad, a tomato tart of many colors, and rings of bell peppers show the range of colorful dishes that utilize vegetables of many hues.
At first, I gleaned a few answers from Jan Blüm and Renee Shepherd as well as a few chefs. Then, bless Harold McGee. In 1984 he wrote On Food and Cooking, a fabulous dissertation about the science of cooking including detailed information about pigments in vegetables. With McGee’s information I could more reliably predict how a vegetables’ color would hold up in the kitchen.
Basically, there are four major groups of pigments in plants. Each group has different functions in the plant and in the kitchen. The pigment groups are the chlorophylls, the anthocyanins, the carotenoids, and the betalains. Because vegetables often contain more than one pigment, the color of a vegetable can be deceptive. For example, while the orange carotenoids in carrots are obvious, the same orange pigments are masked in dark green leafy vegetables because of large amounts of chlorophyll.
The Chemistry of Cooking
Chlorophylls: We’re most familiar with the chlorophylls and their life-giving ability to take the sun’s energy and through photosynthesis convert water and carbon dioxide into sugars. Chlorophylls are the green pigments in leaves and vegetables, and they are marginally stable when cooked. While most green vegetables are not the focus of this book, it certainly is most pleasing to be able to cook them well and produce lovely bright green, not khaki-colored, asparagus and broccoli to combine with other colorful vegetables. It helps, therefore, to know that chlorophyll is affected adversely by heat, acids, different metals, and enzymes. For example, long cook times dull the color because the cell walls break down and the green pigments leak out. Green pigment also degrades when the cook covers the pan so acids from the vegetables deposit on the lid and drip back in the water. To keep the green pigments as bright as possible in green vegetables like beans, peas, and spinach, McGee recommends cooking them as quickly as possible in a large volume of boiling water, uncovered, and for a maximum of seven minutes. Cut large vegetables in pieces so they cook in the allotted seven minutes. Drain them immediately.

The red varieties of basil are a great addition to herbal vinegar, turning it a lovely shade of pink.
Anthocyanins: Anthocyanins comprise a large family of pigments that give flowers, vegetables, and fruits a range of colors from purple and blue to shades of red. The amount in plants can vary from season to season; for instance, pale red kales and lettuces usually turn a dark burgundy in cold weather. Anthocyanins are water soluble and the majority fade badly when cooked. I find some anthocyanin pigments more stable than others, even from plant to plant, and I can’t always predict their behavior when cooked. This is especially true when these pigments come in contact with acidic and alkaline substances, as anthocyanins are sensitive to pH. The anthocyanin family is so sensitive to pH that they can be used as a rough litmus test. To experience this effect I followed McGee’s suggestion: I slivered red cabbage and put half of it in a bowl with a tablespoon of vinegar and the other half in a bowl with two teaspoons of baking soda dissolved in water. As predicted, the vinegar mixture turned bright pink and the baking soda mixture turned a lovely sky blue.
Anthocyanins are the colorful pigments in red cabbage, red mustard, red lettuce, red onions, blue corn, purple basil, purple asparagus, purple artichokes, purple potatoes, purple beans, purple carrots, eggplants, and radishes. (See the individual listings in “The Rainbow Vegetable Encyclopedia” for plant-by-plant details.)
To get the most benefit from the colors, whenever possible I use these vegetables raw. If they need to be cooked, I cook them for as short a time as possible. Some, like purple string beans and asparagus, lose all their purple color and turn green before the vegetable is tender. Others, such as red cabbage and blue potatoes, can be coaxed to keep much of their color, especially if you add lemon juice or vinegar. The acid helps preserve the color though they turn from purple to magenta.
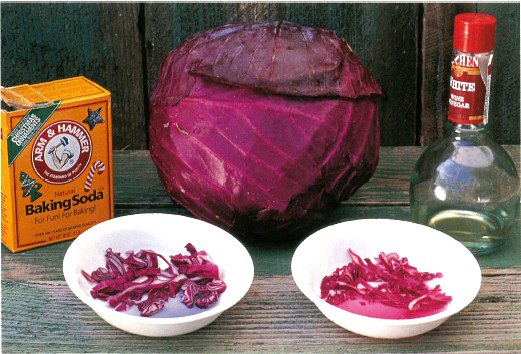
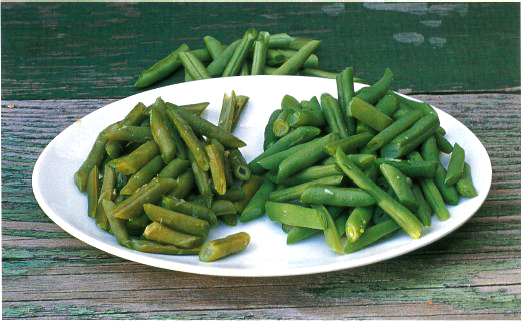
The pigment anthocyanin in red cabbages, basil, and blue potatoes is pH sensitive. They turn blue when put in a baking soda solution and they turn pink in vinegar water. When green vegetables are boiled too long they lose their bright green color. Overcooked beans on the left and properly cooked beans on the right.
Carotenoids: Carotenoids consist of a large group of pigments that play an indirect role in photosynthesis. We see these red, yellow, and orange pigments in sweet potatoes, muskmelons, water melons, tomatoes, peppers, yellow squash, and carrots. These pigments are fat soluble; when cooked, they keep most of their color. Carotenoids, however, fade if cooked for a very long time or change color at elevated temperatures. For example, red tomatoes turn yellow-orange when cooked in a pressure cooker. All things considered, the carotenoids are a joy for the color-maven cook. As Harold McGee says, “...compared to the green chlorophylls and multihued anthocyanins, the carotenoids are a model of steadfastness.”
Betalains: This is another category of pigments found in only one order of plants, the Chenopodiales, a classification (order) of plants that includes the genera Beta and Atriplex. The betalains include the compounds betacyanin and betaxanthin. Betacyanin gives red beets, red chard, and red amaranths their color; betaxanthin gives golden beets and orange chard their bright sunset hues. Unlike the anthocyanins, these rosy pigments are fairly stable if cooked briefly. In my experience, pickling seems to make the colors even more stable. Long cooking gives the vegetables a brownish look. As a note, betalains are never found in combination with anthocyanins.
Super-Healthy Vegetables
Pigments and vitamins are related chemicals in vegetables and usually there is a direct correlation between vivid color and their health-giving benefits. The red and orange carotenoids and the blue and red anthocyanins are categorized by scientists not only as pigments but also as phytochemicals (plant chemicals), a broad class of thousands of substances derived from plants that can have a beneficial effect on health. Dr. John Navazio, a plant breeder with Alf Christianson Seed Company, prefers to call them phytonutrients, and explains, “Most phytonutrients are antioxidants, that is they collect and remove “free radicals” (highly reactive molecules that have the potential to damage our DNA and arteries). These antioxidants also may also boost our immune systems; inhibit attacks from bacteria, fungi, and viruses; and help protect against cancer, premature aging, and age-related blindness.” Research indicates that relatively high amounts of these chemicals are needed when compared to vitamins; that some work in combination with other phytochemicals and vitamins; and that while all vegetables and fruits contain phytochemicals, they do so in varying degrees. With the latter in mind, plant breeders like Dr. Navazio are hard at work developing new varieties especially high in these phytochemicals. Look for new, especially colorful (and thus healthful) vegetable varieties to be introduced in the future. See the many available now that are listed in “The Rainbow Vegetable Encyclopedia.”

Many breeders, such as those at Seminis Seeds, are introducing vegetables with extra nutrition, such as this as-yet-unnamed red-orange carrot with extra beta carotene.
When preparing these extra-nutritious vegetables, it helps to know that raw vegetables usually have the most color when we use them in recipes, but not necessarily the most nutrition. To quote Dr. Navazio, “While some nutrients are lost in cooking, some become more available. For example, light cooking actually increases betacarotene availability in carrots and lycopene in tomatoes, probably by softening the tissue and making it more digestible.” Further, valuable nutrients are lost when some vegetables are peeled. For instance, much of the lutein in squash is located in the skin; when beets are peeled before boiling, nutrients are lost to the water. Another aspect of rainbow cooking involves creating especially colorful meals. Consequently, a platter of vegetables for a rainbow party platter might include slices of pink radishes, yellow zucchini, purple broccoli florets, snap beans, and orange and red cherry tomatoes. What an array of both colors and nutrients! So you can see, the most eye appeal, can also mean the most nutrition.
Since the 1970s, research about antioxidants as “chemopreventers” has highlighted carotenoids and anthocyanins with their ability to cut down on cardiovascular disease and certain forms of cancer. The latest information indicates that chlorophylls are antioxidants; betalains may be too, but the carotenoids and the anthocyanins are best documented at this time.
Carotenoids: There are dozens of carotenoids in foods, the most familiar being beta-carotene, one of the orange pigments. Its healthful benefits have been known for years as it is the primary source of provitamin A, which our bodies convert to vitamin A. Vitamin A is an essential nutrient required for a healthy immune system, for growth, for reproduction, and to prevent night blindness. More recently research shows beta-carotene also acts as an antioxidant and may lower the risk of several cancers. Evidence also shows beta-carotene works well only when consumed with other carotenoids, not when isolated in pill form. Further, most Americans consume only 1.5 mg a day, far less than the recommended 5 to 10 mg. Beta-carotene is in many vegetables; for instance, a single sweet potato contains 5 to 10 mg. Other vegetables that are great sources of beta-carotene include carrots, leafy greens including beet greens (generally the darker green the leaf the higher the carotenoid content), broccoli, cantaloupe, orange tomatoes, and red peppers. Another carotenoid, lycopene, lends its red color to watermelon and tomatoes; evidence shows it may help protect against prostate cancer. Yet another carotenoid, lutein, helps prevent damage to the retina as we age; people who consume little lutein are more apt to suffer from macular degeneration. Lutein is a yellow pigment that gives bright color to summer and winter squashes where it is found primarily in the peel. Lutein is present but masked in spinach, beans, and green peppers.
Anthocyanins: The pigments that make many vegetables red, blue, or violet are in a group of cancer-fighting phytochemicals called flavonoids. Anthocyanins are in red cabbage, basil, and lettuce; purple carrots; blue potatoes and corn; eggplants; and radishes. The healthful effects of anthocyanins are less well known than the carotenoids but Dr. Navazio says they also are considered antioxidants that neutralize free radicals that cause cell damage and protect against cardiovascular diseases and certain cancers.
cooking with colors

Now that you know the chemistry of cooking colorful vegetables, it’s on to creating Technicolor layouts. First some of the basics.
To arrange colorful raw vegetables on a dip plate, try making combinations. Instead of using orange peppers or tomatoes alone, experiment by combining them with red, green, and yellow varieties too. Salads lend themselves to the multicolor approach. Use red orach, ornamental kale, lavender radishes, and any of the vegetables mentioned above. Arrange them on a plate to enhance their many colors or add them to a conventional tossed salad.
If you are serving the vegetables cooked, look for light, transparent dressings to feature the colors best. Dark or opaque sauces and dressings muddy the colors. For instance, roasting red onions with olive oil and balsamic vinegar features the rosy colors better than a cream sauce; blue and red potato salads look best with a vinaigrette instead of mayonnaise. For many more ideas enjoy Renee Shepherd’s interview, the multitude of suggestions in “The Rainbow Vegetable Encyclopedia,” and the recipes that follow.
These exotic vegetables should inspire your own creations as perhaps no other produce has. Here’s a chance to treat your garden as an artist’s palette. Make a multicolored quiche, bicolored paprika from orange and yellow peppers, or nestle a rainbow of red, yellow, and green cherry tomatoes among your spaghetti squash strands. I plan to serve a white Bloody Mary with a swizzle stick of red celery. Someday I would like to bake tricolored cornbread from my red, blue, and yellow grinding corns; one section of the loaf will be pink, one light blue, and the other yellow. Maybe I’ll even use one of those cake pans with compartments to separate the batters to make checkerboard cornbread. With a rainbow garden, the sky’s the limit.
Lavender-Tinted Vichyssoise
Vichyssoise is an elegant but easily made first course. Make it with blue potatoes and you’ll really delight your guests. To get the lavender effect you need to use the very deep purple varieties. The medium or light blue potatoes carried by some seed companies will give you a sickly gray, not lavender, soup. Serve this lavender vichyssoise in white or clear glass bowls so the color is featured, garnished with chives and chive florets.
3 onions, diced (about 3 cups)
3 to 4 deep-blue potatoes, peeled and cubed (about 3 cups)
1 tablespoon fresh lemon juice
1 cup half-and-half
Salt and freshly ground black pepper
Dash of nutmeg
Garnish: fresh chive leaves and flowers
In a large saucepan, melt the butter and sauté the onions over medium heat till softened but not browned, about 7 minutes. Add the potatoes and 3 cups of water. Cover and simmer until potatoes are tender, 15 to 20 minutes.
Add the lemon juice, half-and-half, and seasonings and puree the soup in a food processor or blender. Chill and serve cold. Garnish by sprinkling the soup with the chives and the chive flowers, separated into florets.
Serves 4.

Golden Gazpacho
This classic Spanish recipe is usually made with red tomatoes and green peppers, but here I put a spin on the ball and make it with gold tomatoes and yellow bell peppers.
7 to 10 medium ripe gold tomatoes
1 large yellow pepper
1 small onion, or 2 to 3 scallions
2 garlic cloves, minced
½ green Anaheim chile pepper
1 small hot red chile pepper, or to taste
1 large or 2 small cucumbers, peeled
1 tablespoon extra virgin olive oil
⅓ cup white wine vinegar
½ cup dry white wine
Salt and freshly ground black pepper
3 or 4 sprigs fresh cilantro
Garnish: cilantro sprigs, a slice of or diced avocado
Immerse the tomatoes in boiling water for 30 seconds, or until the skins have loosened. Peel them and remove the seeds and cores. Remove the seeds and membranes from the yellow pepper. Chop the rest of the vegetables coarsely for processing in the food processor or blender (if you use a food processor the soup will have some crunch; using the blender will give a smoother texture).
Process all ingredients in batches, pouring them into a large nonreactive bowl to mix. Refrigerate the soup at least 3 hours before serving. If the gazpacho is too thick, thin it with a little cold vegetable or chicken stock before serving. Taste and adjust seasonings. Serve the soup in individual bowls and garnish each serving as desired.
Serves 4.
Two Rainbow Chard Relishes
These two chard relishes are both quite spicy and crunchy, yet have very different flavors. Offer them with poultry or mild fish and with egg dishes. Use them within two weeks.
Ruby Chard Relish with Spicy Beets
1 teaspoon whole peppercorns
1 teaspoon whole cloves
1½ cups diced red chard stems (3-4 medium stems)
½ cup diced cooked red beets (1 medium beet)
1 tablespoon diced red onion
½ teaspoon celery seeds
⅛ teaspoon salt
1 tablespoon honey
1½ cups red wine vinegar
Select a sterilized pint jar that seals well. In the bottom put the peppercorns and cloves. In a small bowl, combine all ingredients except the vinegar and transfer them into the pint jar. Add vinegar until it covers all the ingredients. Screw the top in place and rotate the jar a few times to stir the ingredients. Refrigerate.
To blend the flavors, repeat the rotating process a few times over the next several days. When serving, leave the cloves and peppercorns in the bottom.
Makes about 1 pint.
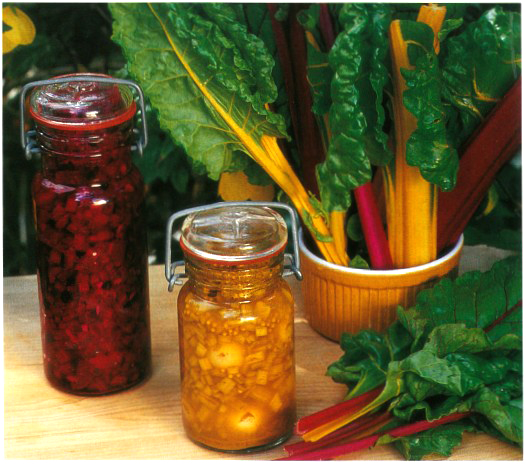
Golden Chard Relish with Curry
8 pearl onions, peeled
1 cup diced yellow chard stems (2 to 3 stems)
1 teaspoon yellow mustard seeds
½ teaspoon coriander seeds
½ cup white wine vinegar
1 tablespoon honey
1 tablespoon curry powder
1 garlic clove, crushed
Pinch of salt
In the bottom of a sterilized 1½-pint jar with a tight fitting lid, put 4 of the onions. Cover the onions with half of the chard stems. Top the chard with the remaining onions and then fill the jar with the rest of the chard.
Combine the remaining ingredients in a small bowl and mix well. Pour them into the jar and rotate it to stir the ingredients. Refrigerate. Rotate the jar a few times a day for the first few days.
Makes 1 cup.
Pickled Golden Beets
When I was a child, my cousin and I got into big trouble by consuming almost the entire batch of my aunt’s pickled beets that she had made for a potluck dinner. We started by sampling them but we just couldn’t stop. She used red beets, but I like to use golden beets because they don’t bleed all over my plate. I serve these beets as a condiment with a salad or to accompany a sandwich. The pickled beets will last a few weeks in the refrigerator.
6 large or 9 medium ‘Burpee’s Golden’ beets
1 large sweet white onion, sliced thin
⅓ cup sugar
1 cup cider vinegar
Beet juice
1 teaspoon mixed pickling spices
Remove all but 1 inch of the greens from the beets. Wash the greens and put them in a large kettle. Barely cover the beets with water, and boil until just tender. (Depending on the size of the beets, this will take 1 hour to 1 hour and 20 minutes). Drain the beets and reserve the liquid. Set them aside to cool. Peel the beets and cut them into thin slices.
In two wide-mouth (pint-size) sterilized mason jars, layer the beets with the onion slices within a half inch of the top. In a saucepan put the sugar, vinegar, about a cup of the reserved beet juice, and the pickling spices and bring to a boil.
Pour the hot pickling mixture over the beets and onions until they are completely covered. (If you run out of pickling liquid, top the jars off with hot beet juice.) Close the jars. Cool them slightly and refrigerate until ready to serve.
Makes 2 pints.

[note]
Pickling spices are a combination of mustard seeds, cloves, cinnamon, peppercorns, hot peppers, celery seeds, and coriander seeds.
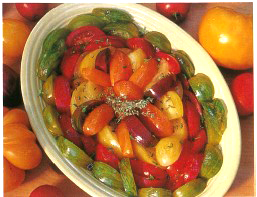
Toy Box Cherry Tomatoes with Warm Gruyère Cheese Toasts
Doug Gosling, of the Occidental Arts and Ecology Center in Occidental, California, sold a mix of different cherry tomatoes at farmer’s markets for years and called them his Toy Box selection. Jesse Cool, executive chef and owner of Flea Street Cafe in Menlo Park, California, takes Gosling’s colorful concept to the table in the following rustic appetizer.
2 tablespoons chopped chives
¼ cup finely chopped parsley
1 tablespoon finely chopped rosemary
1 tablespoon finely chopped basil
⅓ cup extra virgin olive oil
2 garlic cloves, minced
3 tablespoons balsamic vinegar Salt and freshly ground black pepper
2 pounds (5 to 6 cups) cherry tomatoes of all colors: select from green grape, red cherry, yellow pear, locerno’s Ivory Pear, sweet 100, sun gold, and many others
For the Gruyère cheese toasts:
2 tablespoons extra virgin olive oil
3 garlic cloves, finely chopped
4 large slices of thick rustic Italian bread
4 thin slices Gruyère cheese, ½ ounce each slice
To make the marinated tomatoes: In a large bowl, put the chives, parsley, rosemary, basil, olive oil, and vinegar and mix. Add salt and pepper and stir to combine. Add the tomatoes, cover, and marinate for a minimum of an hour.
To make the toasts: Preheat the broiler. Mix the olive oil with the garlic and let sit 10 minutes. Brush the mixture on one side of each slice of bread. Broil the brushed side until lightly browned. Put a piece of cheese on the raw side of each piece of bread and set the bread aside until the tomatoes are ready.
Just before serving, preheat broiler again if necessary. Lay bread on a rack or cookie sheet and toast under the broiler 2 or 3 minutes or until the cheese has melted.
To assemble, place a slice of still-warm toasted bread on a plate or in a shallow soup bowl. Spoon one quarter of the tomatoes and some of the marinade around each piece of toast.
Serves 4.

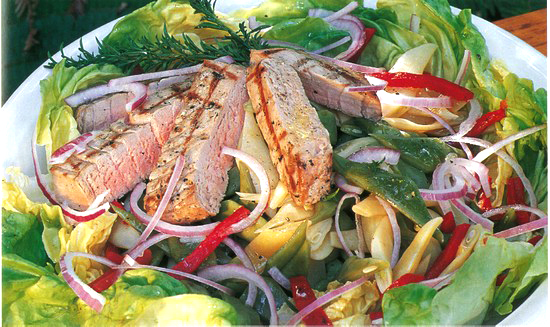
Romano Bean Salad with Grilled Tuna
This mid-summer treat is great with crusty bread, and just right for a light fancy lunch.
For the dressing:
½ cup extra virgin olive oil
3 to 4 tablespoons fresh lemon juice
Salt and freshly ground black pepper For the salad:
½ small red onion, thinly sliced
1 teaspoon salt
1 medium red bell pepper
1½ pounds green and gold Romano beans, sliced 1 inch on the bias (about 4 cups)
Optional: 3-inch sprig of fresh winter savory
8 to 10 leaves butter or leaf lettuce
½ to ⅔ pound fresh tuna fillet
To make the dressing: In a small bowl, whisk the olive oil, lemon juice, salt, and pepper together until they emulsify and set aside.
To make the salad: Put the onion slices into a small bowl, cover them with cold water, and add the salt. Mix together and let them sit for 1 hour to remove some of the bite.
Meanwhile, roast the pepper over the flame of a gas stove, or under a broiler until charred. Place the charred pepper into a brown paper bag and let it cool. When it is cool enough to handle, remove the seeds, scrape off the skin, and cut the pepper into ½-inch strips. Set them aside.
Steam the beans with the (optional) savory over simmering water about 5 minutes or until just tender. Drain the beans, discarding the savory. Shock the beans in ice water until they are chilled and drain again. Drain the onion slices. Arrange the butter lettuce leaves on a serving platter or in a large flat bowl. Arrange the beans, onion slices, and peppers over top.
Meanwhile, preheat the grill. Brush the tuna with one tablespoon of the dressing mixture. Over high heat, grill the tuna to medium rare for about 7 minutes on each side. Cut the fish on the bias into ½-inch-thick slices and arrange them on the vegetables. Drizzle the remaining dressing over the tuna and the vegetables. Serve immediately.
Serves 4.
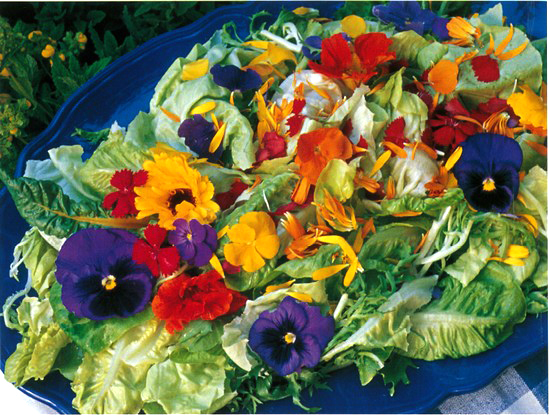
Riot of Color Salad
How about a really colorful salad for a special occasion? Use your imagination and the prettiest edible flowers from your garden.
1½ tablespoons white wine vinegar
3 to 4 tablespoons sunflower oil
1 tablespoon clover or wildflower honey
Salt and freshly ground black pepper
For the salad:
1 large head romaine lettuce
1 head butter lettuce
1 small head frisée
4 to 6 young leaves of yellow chard
About a dozen edible flowers such as yellow and blue violas, purple pansies, nasturtiums, yellow calendulas, and red dianthus
To make the dressing: In a small bowl, combine the vinegar, sunflower oil, honey, salt and pepper. Set aside.
To make the salad: Arrange the romaine lettuce, butter lettuce, and chard leaves on a large colorful platter. Separate the flowers into petals, reserving some whole. Sprinkle the greens with flower petals and garnish with the whole blossoms. Bring the salad to the table and let diners dress their own salad.
Serves 4.
Rainbow Party Slaw with Chard
For a party dish this slaw is fairly low in calories. Serve it with grilled vegetables, fish, or as part of a buffet selection.
For the dressing:
Juice of 1 lemon
⅔ cup white wine vinegar
1 teaspoon salt
¾ teaspoon celery seeds
⅓ cup vegetable oil
3 to 4 tablespoons frozen apple juice concentrate
Freshly ground black pepper
For the salad:
1 large green cabbage, finely sliced (about 8 cups)
1 cup thinly sliced chard leaves
2 cups finely sliced carrots (about 4 carrots)
1 small sweet onion, thinly sliced
1 cup thinly sliced red chard stems (about 4 chard stems)
To make the dressing: In a small bowl, combine the lemon juice, vinegar, salt, celery seeds, oil, apple concentrate, and pepper. Stir until well blended. Set aside.
To make the salad: Place the cabbage in the bottom of a large salad bowl. Creating a decorative pattern, arrange the chard leaves, the carrots, the onions and finally, the chard stems on top of the cabbage.
Pour the dressing over the sliced vegetables and serve. The salad may be refrigerated for a few hours, but the dressing will separate and the red chard stems will lose some of their color if it sits too long.
Serves 8 to 10.
Red, White, and Green Radish Salad
This recipe is another imaginative creation from Renee Shepherd, of Renee’s Garden, and Fran Raboff who work together to develop novel recipes.
1 tablespoon fresh lemon juice
1 tablespoon raspberry vinegar
1 teaspoon stone-ground mustard
1 teaspoon sugar
3 tablespoons extra virgin olive oil
Salt and freshly ground black pepper
For the salad:
2 bunches ‘Easter Egg’ radishes, thinly sliced
¼ cup chopped red onions
3 tablespoons chopped fennel leaves
1 fennel bulb, diced
½ cup thinly sliced scallions, including part of the green
1 large unpeeled green apple, diced
¼ cup dried currants
Garnish: ⅓ cup coarsely chopped toasted walnuts
To make the salad: Combine the dressing ingredients and whisk until blended.
In a salad bowl, combine the radishes, onion, fennel leaves, fennel bulb, scallions, apple, and currants. Pour the dressing over the salad, tossing until mixed. Refrigerate the salad for several hours before serving. Garnish the salad with the chopped walnuts before serving.
Serves 6.
Rainbow Beets Vinaigrette
I like to make this recipe with beets of many colors: gold, red, white, and pink. I steam rather then boil them, so the red and gold beets do not bleed all over the pink and white ones. The greens are delicious too. Steam them separately and they can be served on the same plate with the beets.
6 medium beets, of assorted colors
3 tablespoons balsamic vinegar
⅓ cup extra virgin olive oil
½ teaspoon minced fresh tarragon or dill
Salt and freshly ground black pepper
Wash the beets and steam them for about 40 minutes, or until they are just tender. Cool then peel and slice them.
In a bowl, put the vinegar, oil, herbs, and seasonings and stir. Pour the dressing over the beets and let them marinate for about 1 hour. Serve hot or cold.
Serves 4.

Garden Celebration Salad
This dish is a busy assembly project and takes lots of bowls, but it requires little in the way of technique. It provides plenty of room for creativity and makes a spectacular party salad. Some of the vegetables work best when cooked, others when raw. As with any good garden recipe, the ingredient list is fluid and can be varied by the season and by what’s in the garden.
The salad has five layers of colors, each layer with a slightly different flavor combination. Suggested vegetables and herbs for the orange/gold layer include slivered carrots, chopped orange peppers, gold beets, and sliced gold tomatoes; for the yellow layer: yellow zucchini, wax beans, chopped yellow peppers, and sliced yellow tomatoes. For the green layer choose among: chopped lettuces, cabbages, baby spinach, snow pea pods, scallions, and any of the herbs: parsley, chives, basil, fennel, or savory. For the red layer I suggest: red beets, tomatoes, and peppers; and for the purple layer: chopped red cabbage, magenta radicchio, and blue potatoes.
I’ve given directions for stacking the prepared vegetables in a glass trifle bowl to reveal the colors through the sides of the bowl, but the same ingredients can be laid out on a large colorful platter instead. If you use a clear glass bowl, the moisture from the vegetables will condense on the bowl when you add hot ingredients or when you bring it out of the refrigerator. Let the bowl stand at room temperature before serving time to give the condensation time to evaporate.
For the garlic vinaigrette:
2 garlic cloves, minced
1 tablespoon Dijon mustard
½ cup extra virgin olive oil
¼ cup white wine vinegar
Freshly ground black pepper and salt
For the salad:
1 pound yellow zucchini, sliced
1 pound yellow wax beans cut in 2-inch sections
1 medium yellow sweet pepper, chopped
1 pound green zucchini, sliced
1 pound green beans cut in 2-inch sections
4 tablespoons chopped scallion greens
½ teaspoon minced fresh savory
1 small red cabbage, shredded
1 medium red sweet pepper, chopped
3 red paste tomatoes, sliced
⅓ teaspoon red pepper flakes
1 medium orange sweet pepper, chopped
3 orange paste tomatoes, sliced
3 medium golden beets, steamed 30 minutes, peeled and sliced
For the honey vinaigrette:
¼ cup extra virgin olive oil
1 teaspoon honey
2 tablespoons white wine vinegar
1/8 teaspoon red pepper flakes
To make the vinaigrettes: In two separate bowls, whisk together the ingredients for each of the vinaigrettes and set them aside.
To prepare the salad layers: Bring a large pot of salted water to a boil. First cook the yellow zucchini, then the yellow wax beans for 3 minutes each, or until just tender. After each batch is done, remove the vegetables from the cooking water with a slotted spoon and refresh them for a couple of seconds in a bowl of ice water to keep their color. Drain the vegetables and put them in a small bowl. Add the yellow pepper and toss with ¼ cup of garlic vinaigrette.
Repeat the process with the green zucchini and green beans. When the vegetables are at room temperature, toss the contents of the bowl with ¼ cup more of garlic vinaigrette. Set aside to marinate for about 10 minutes, then sprinkle with the scallions and savory.
Mix the shredded red cabbage with the remaining garlic vinaigrette and set it aside.
In a fourth bowl, combine the red pepper, red tomato, and red pepper flakes.
In a fifth bowl, combine the orange peppers, the orange tomatoes, and the golden beets.
To assemble the salad: You will need a glass bowl 5 inches wide and 8 inches deep. A traditional footed trifle bowl works well. Each layer of vegetables needs to be about 1 inch thick.
Build the salad by first layering the marinated yellow vegetables 1 inch deep on the bottom. On top of this create a green layer. Create the third purple layer with the red cabbage.
Cover with the red layer and finally the orange layer. Glaze the top of the salad with the honey dressing. Serve immediately.
Serves 12 to 14 for a buffet.

Red, White, and Blue Potato Salad
This potato salad is an eye-catching addition to luncheons, particularly around the Fourth of July and elections. If you have no blue potatoes in your garden, they are occasionally available from specialty produce markets. Select only the deep blue-fleshed potatoes as the light and medium blue-fleshed ones turn an unappetizing gray when boiled. Blue-fleshed potatoes can be used in any potato salad recipe, but the color is best featured when a clear dressing is used.
For the dressing:
2 tablespoons rich chicken stock
¼ cup white wine vinegar
2 tablespoons dry white wine or white vermouth
Salt and freshly ground pepper to taste
½ cup extra virgin olive oil
1 tablespoon chopped parsley
1 tablespoon fresh chopped tarragon
For the salad:
4 medium white boiling potatoes
4 medium deep blue-fleshed potatoes (or 2 blue- and 2 red-fleshed potatoes)
½ cup thinly sliced red bell peppers
½ teaspoon freshly ground pepper
To make the dressing: In a small bowl, mix the chicken stock, vinegar, wine, salt, and pepper until the salt is dissolved. Slowly, whisk in the olive oil. Add the parsley and the tarragon and stir well to combine.
To make the salad: In two separate pots, boil the 2 or 3 colors of potatoes for 20 to 30 minutes until just barely tender when stuck with a fork. While still warm, peel the potatoes and slice them into ¼-inch-thick slices.
Place the potatoes in a large salad bowl, alternating layers of blue and white potatoes with the red peppers. Pour the dressing over the still-warm potatoes and sprinkle with the pepper. Toss gently so the dressing gets evenly dispersed and the potatoes don’t fall apart. (If the potatoes are overcooked or the mixing is too vigorous it will cause the separate colors of potatoes to mingle and the result will be a muddy looking salad.)
Let the salad sit for 3 or 4 hours so the flavors will meld. Serve the salad at room temperature or chilled.
Serves 4 to 6.
Multi-Colored Tomato Wedges
This salad is a simple but elegant way to show off the kaleidoscope of tomato colors in your garden.
1½ tablespoons balsamic vinegar
1 teaspoon chopped fresh thyme leaves
¼ cup extra virgin olive oil
Optional: salt and pepper
For the salad:
3 red paste tomatoes
2 orange gold paste tomatoes
1 yellow tomato
2 ‘Green Zebra’ tomatoes
1 purple tomato
Garnish: sprigs of fresh thyme
To make the salad: In a small bowl, combine the vinaigrette ingredients and whisk until they emulsify. Set aside.
Cut the tomatoes into equal-sized wedges. Arrange them in a shallow round or oval bowl so the skin sides of the tomatoes are showing. Drizzle them with the vinaigrette and garnish with the fresh thyme sprigs.
Serves 6.
Grilled Red and Gold Peppers with Melted Anchovies, Garlic, and Basil Sauce
This is one of Renee Shepherd’s favorite recipes. Once I made it I had to agree. She developed it when working with her cooking partner Fran Raboff. Accompany the peppers with slices of crusty bread.
2 large sweet peppers, one red and one yellow
1 tablespoon extra virgin olive oil
1-2 ounce can anchovies, drained and coarsely chopped
6 garlic cloves, minced
2 tablespoons balsamic vinegar
½ cup chopped fresh Italian parsley
½ cup chopped fresh basil
Preheat a charcoal grill. Remove the seeds and membranes from the peppers and cut them lengthwise into 1-inch-wide strips. Brush them with olive oil and grill them over charcoal until they are slightly charred and tender, from 5 to 7 minutes. Put the peppers aside.
In a heavy skillet, heat one tablespoon of olive oil. Add the chopped anchovies and the garlic and cook over low to medium heat, stirring, until the anchovies melt and the garlic is fragrant, about 2 to 3 minutes. Stir in the balsamic vinegar. Add the parsley and basil and remove from the heat.
Arrange the grilled pepper strips on a serving platter and spoon the sauce over them. Serve immediately.
Serves 4.
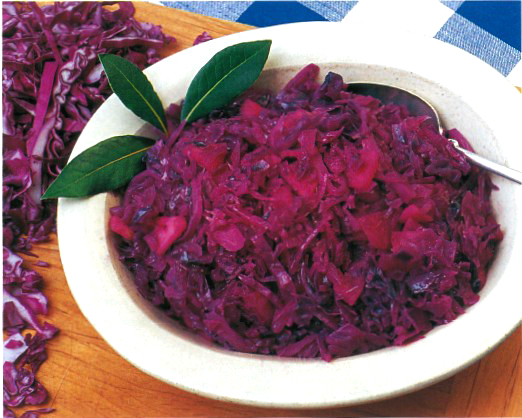
Braised Red Cabbage
This dish is most often associated with northern France and Germany. The brilliant red color is achieved by adding acidic vinegar and red wine to the cabbage. Serve this cabbage dish with roast chicken or pork and mashed potatoes.
2 tablespoons butter
1 onion, thinly sliced
1 medium red cabbage, shredded (about 8 cups)
1 tart apple, peeled, cored, and sliced
1 tablespoon sugar
1 tablespoon red wine vinegar
½ cup good red wine
1 bay leaf
Salt and freshly ground black pepper
Melt the butter in a Dutch oven or a soup pot. Add the onions and sauté them over medium heat until they are soft, about 7 minutes. Add the cabbage, apple, sugar, vinegar, red wine and the bay leaf. Stir the ingredients together and simmer on low for 30 to 40 minutes, or until the cabbage is tender. Remove the bay leaf and season with salt and pepper.
Serves 6.
Golden Tomato Tart
This spectacular tart can be served as an appetizer or as an entree for a light lunch. It is quite dramatic, made with gold tomatoes or any combination of colorful homegrown luscious tomatoes. Any leftover marinade can be used as a base for a vinaigrette dressing.
4 to 5 medium gold tomatoes, thinly sliced
6 to 7 gold cherry or pear tomatoes, halved
½ cup extra virgin olive oil
1 to 2 garlic cloves, crushed
2 tablespoons chopped fresh parsley
1 tablespoon minced fresh chives
Freshly ground black pepper
For the filling:
1 cup soft goat cheese or natural cream cheese
3 to 4 tablespoons heavy cream
1 tablespoon minced fresh rosemary
1 9-inch prebaked pie shell
Put both kinds of tomatoes into a bowl. In another bowl combine the ingredients for the marinade. Set aside ¼ cup of the marinade and pour the rest over the sliced tomatoes. Marinate them for at least 1 hour.
In a mixing bowl, combine the cheese with the cream and work them into a smooth, creamy consistency that will spread easily. Mix in the rosemary and spread the cheese mixture over the cooled pie crust.

Arrange drained tomato slices in a single-layered circular pattern over cheese mixture, using the large slices for the outside and one slice for the middle. Fill in between the rows of large tomatoes with halved cherry tomatoes. Refrigerate until ready to serve. Just before serving, glaze the tomatoes with a ¼ cup of the marinating mixture.
Serves 6 as an appetizer.
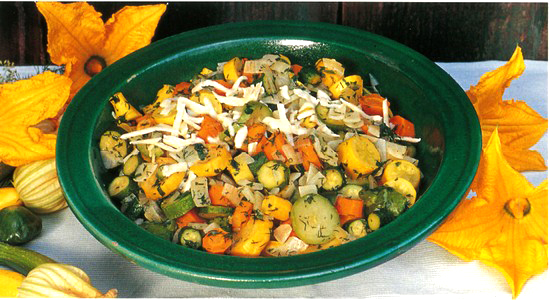
Grandma Alice’s Summer Vegetables
This recipe was given to me by Renee Shepherd of Renee’s Garden. Renee’s Grandma Alice made this dish for her when she was a kid after she let her pick all the vegetables. Renee loved all the colors. Here, the onions and carrots add sweetness while the fresh squash tastes quite nutty and creamy.
When I tried it I used small squash cut in pieces, as Renee recommends. Subsequently, I have also made it using only the tiniest baby squashes, such as pattypans, crooknecks, and zucchini, along with baby carrots. In that case, the squash and carrots should be left whole to really enjoy their beauty.
4 to 5 cups green and gold summer squashes, cut into 1-inch pieces (4 to 5 medium squashes)
1 cup sliced carrots (2 medium carrots)
1 large onion, coarsely chopped
1 cup rich chicken stock
2 tablespoons butter
2½ tablespoons chopped fresh dill
1 tablespoon chopped fresh Italian parsley
Salt and freshly ground black pepper
2 tablespoons freshly grated Parmesan or Asiago cheese
In a 3-quart Dutch oven, combine the vegetables with the chicken broth and the butter. Bring the mixture to a boil and then reduce the heat and simmer for about 8 to 10 minutes or until the carrots and squash are just tender.
Remove the pan from the heat and mix in the dill, parsley, salt and pepper. Serve immediately with the freshly grated Parmesan or Asiago cheese.
Serves 6.
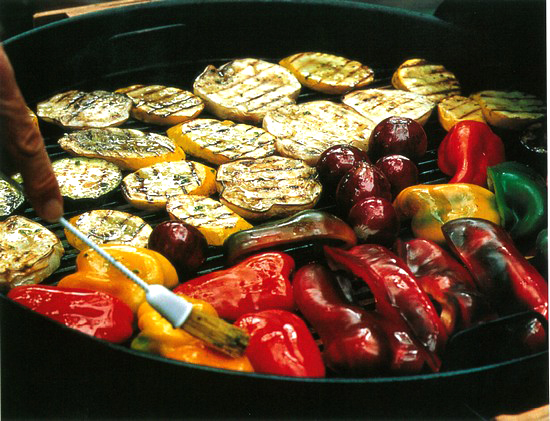
Show-Off Barbecued Vegetables
One of the tastiest and showiest ways to prepare summer vegetables is a quick and easy adaptation of the ever-popular barbecue. Although meat, fish, or poultry can be a nice complement, the vegetables are so good cooked this way; one is tempted to dispense with the rest.
If you are limited by the size of your grill you may have to cook the vegetables in more than one batch. Also consider that some of the vegetables cook at different rates. Peppers need the least amount of time, followed by the eggplant, squash, and onions.
For the seasoned oil:
1 cup extra virgin olive oil
2 garlic cloves, crushed
¼ cup minced fresh basil or 1 tablespoon minced fresh rosemary
For the vegetables:
2 (medium to large) eggplants, cut into ½-inch-thick rounds
2 to 4 assorted colored summer squash, depending on their size (if large, cut diagonally into ½-inch-thick slices; if small, slice lengthwise into halves or leave whole)
4 small red onions whole, or 1 large onion, quartered
2 to 4 sweet red or yellow peppers, halved and seeded
Salt and freshly ground black pepper
To make the seasoned oil: In a small bowl, mix the olive oil, garlic, and herbs and let them marinate at least 2 hours. (Refrigerate them if they are left to stand much longer).
To make the vegetables: Prepare the barbecue with charcoal and preheat. Meanwhile, place the vegetable slices on a cookie sheet and brush them with the seasoned oil. When the coals die down and are ready, spread them evenly around the bottom of the barbecue kettle. Place the vegetables oiled-side down on the grill. Brush the top sides of the vegetables with the oil and turn them when they are starting to brown.
Cooking time will vary in accordance with heat, distance from coals, and size and density of the vegetables. Over medium coals, expect average cooking time to be about 4 minutes on the first side and 3 minutes on the second side, but watch them carefully. Cook the vegetables until they are just tender, as they will fall apart if they are overcooked. Sprinkle with salt and pepper and serve.
Serves 4.
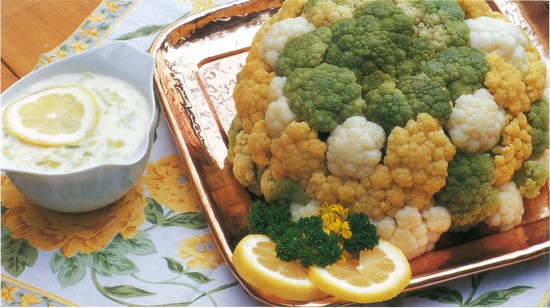
Cauliflower Mold with Lemon-Leek Béchamel Sauce
This is a fun way to feature differently colored cauliflower.
For the mold:
1 head each of yellow, white, and Romanesco cauliflower (about 1 pound each)
1 teaspoon butter
To make the mold: Cut equal-sized florets off the cauliflower. In a large pot bring 3 cups of water to a rolling boil. First cook the white cauliflower for 4 minutes and then the yellow and Romanesco. Drain the florets and reserve about ½ cup of the cooking water.
Butter a rounded stainless steel or glass bowl (about 8 inches wide and 5 inches deep). Line the bowl with alternating cauliflower colors, starting with a cluster of Romanesco in the center, then a ring of white, then yellow, and so on, until the bowl is filled. All the florets should have their stems pointing inward and their florets pressed against the bowl.
Fill the center with smaller pieces and sprinkle with salt and pepper. Cover the mold with buttered parchment paper and press down lightly to compact.
For the sauce:
2 tablespoons butter
1 leek, light green parts only, sliced and cleaned (about 1 cup)
2 tablespoons all-purpose flour
1 cup milk
¼ cup cooking water from the cauliflower
2 tablespoons fresh lemon juice
Dash of freshly grated nutmeg
Salt and freshly ground black pepper
To make the sauce: In a saucepan melt the butter and over medium heat sauté the leeks until tender, about 10 minutes. Add the flour and cook for another 2 minutes while stirring.
Add the milk a little at a time, continuing to stir until the sauce is free of lumps. Add ¼ cup of the cauliflower cooking water, the lemon juice, a grating of nutmeg and the salt and pepper to taste. If the sauce is too thick, add a little more cooking water and reserve.
Before serving, reheat the mold in a hot water bath for 10 minutes. To serve, place a warm plate on top of the mold and invert the mold with the plate. Gently remove the mold. Serve with the lemon-leek bechamel sauce.
Serves 6.
Yellow Tomatoes Stuffed with Shrimp and Salsa
This is quick, but zesty first course for a summer dinner. The unusual tomatoes will throw your guests for a loop. Stuffing tomatoes have an extra large cavity and fairly solid walls. Other large tomatoes can be used for this recipe but they are just not as easy to hollow out without having them rip.
4 large yellow stuffing tomatoes
1 medium avocado
1 teaspoon fresh lemon juice
½ pound cooked baby shrimp
1 cup fresh salsa, or your favorite commercial salsa
Garnish: sprigs of fresh cilantro
Cut the top off the stuffing tomatoes and remove the seeds and liquid from the cavity. Stand them upright on a serving plate. If they are not even on the bottom, carefully slice a little off the bottom to make them level, but be careful to not cut through the outside wall.
Cut the avocado into ½-inch cubes, place in a bowl, sprinkle with the lemon juice and stir. Add the baby shrimp and the salsa and gently mix the ingredients together. Stuff the tomato cavities with the filling and garnish with the cilantro leaves.
Serves 4.

Sunny Delight Squash Blossom Omelet
Squash blossoms can be combined with red peppers and yellow zucchini for a colorful and especially tasty entree. Choose from ‘Sunny Delight’, ‘Gold Rush’, ‘Golden Dawn’, ‘Sunburst’, and ‘Yellow Crookneck’ yellow summer squashes for the brightest colors.
For the filling:
2 tablespoons extra virgin olive oil
1 medium red onion, thinly sliced
1 garlic clove, minced
1 medium red bell pepper, seeded and chopped
6 baby yellow and green summer squash, cut in half lengthwise
6 large squash blossoms
2 tablespoons chopped fresh basil
½ teaspoon salt
Freshly ground black pepper
For the omelet:
1 teaspoon olive oil
6 large eggs
4 tablespoons grated Parmesan cheese
Garnish: 2 tablespoons snipped fresh chives and extra whole squash blossoms
To make the filling: In a large nonstick sauté pan, heat the olive oil and sauté the onions over medium heat until soft, about 7 minutes. Add the garlic and bell peppers and cook for 5 minutes or until tender. Remove the onion mixture to a bowl and set it aside. Put the yellow and green summer squash in the same pan and sauté them until lightly browned. Combine the onion mixture with the squash in the pan.
Carefully open the squash blossoms and remove any possible critters. Remove the stamens and pistils and coarsely chop the flowers. Add the chopped blossoms and the basil to the zucchini pan, season with the salt and pepper, cover and set aside.
To make the omelet: In a small mixing bowl, mix 3 of the eggs using a fork. In a nonstick 8- to 10-inch sauté pan, heat the olive oil until hot, but not smoking. Pour the eggs into the pan (they should sizzle). Tilt the pan in a few directions to assure that the mixture evenly coats the pan. Give the mixture a gentle shake to make sure it is not sticking. With a spatula, gently lift sections of the cooked portions and let a little of the uncooked egg flow underneath.
When most of the egg is set but the top is still moist, sprinkle 2 tablespoons of the Parmesan cheese over one half of the omelet. Spoon half of the vegetable filling over the cheese. With a spatula make sure the omelet is not sticking and then gently fold the other half of the omelet over the filling.
Slide the omelet onto a preheated plate, garnish with the chives and squash blossoms. Repeat the process for the second omelet.
Serves 2.

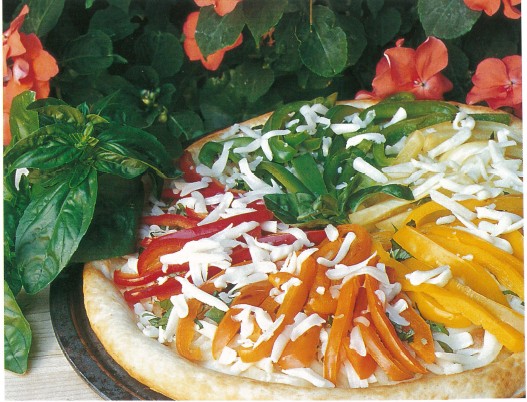
Rainbow Pepper Pizza with Pesto
Colorful wedges of peppers arranged in a color shift on a pesto base makes this pizza party fare. It can be made with only one or two colors of peppers and in any pattern, it will taste the same.
For the pesto:
⅔ cup extra virgin olive oil
4 tablespoons pine nuts
4 garlic cloves, minced
2½ cups loosely packed fresh basil leaves
⅔ cup freshly grated Parmesan cheese
Salt and freshly ground black pepper
For the pizza:
1 tablespoon extra virgin olive oil
1 large yellow onion, thinly sliced
¼ teaspoon red pepper flakes, or to taste
½ cup fresh basil leaves, chopped
½ teaspoon dry oregano leaves
1 cup plus ½ cup grated mozzarella cheese (about 6 ounces)
A combination of red, yellow, orange, ivory, and green bell peppers cut into thin strips with colors kept separate (about ⅓ cup of each color)
1 12-inch prebaked commercial pizza shell
To make the pesto: In a blender or food processor, place 3 tablespoons of the olive oil, the pine nuts, garlic, and the basil. Process for 1 minute or so, stopping the machine occasionally to push the basil leaves down and clean the sides of the container. Continue processing, adding the rest of the olive oil. Process until the mixture is smooth. Transfer the pesto to a bowl, stir in the Parmesan cheese and season to taste with salt and freshly ground black pepper.
To make the pizza: Preheat the oven to 450°F. Spread the pesto evenly up to 1 inch from the edge of the pizza shell.
In a large nonstick frying pan, heat the olive oil and sauté the onions over medium heat until translucent, about 7 minutes. Spread the onions evenly over the pesto base.
Sprinkle the pepper flakes, chopped basil, oregano, and 1 cup of mozzarella cheese evenly over the onion mixture.
Place the orange and red pepper slices in a single layer in the frying pan used for the onions and gently sauté until they are limp but not brown. Add a little oil if they start to stick. (To simplify the recipe, all the peppers can be cooked together. If you want to achieve a rainbow effect, however, you need to separate the red and orange peppers from each other and the other colors as their pigments bleed.)
Repeat the process, cooking the yellow, ivory, and green peppers together. To give the rainbow effect, keep the red peppers separate and arrange them over a fifth of the pizza in a wedge pattern. Repeat the process with the orange, yellow, ivory, and green bell peppers, covering the whole pizza shell in a wedge pattern. Sprinkle the remaining ½ cup mozzarella cheese evenly over the peppers.
Bake for 12 to 14 minutes, or until the cheese has melted and started to brown.
Serves 4.
Tortilla chips and peppers come in many colors. This recipe is a variation on a tried-and-true restaurant dish.
12 ounces corn tortilla chips (red or blue or a combination of both)
1 pound of pepper Jack cheese, grated
1½ cups roasted pepper strips, of all different colors
1 teaspoon ground cumin
2 tablespoon freshly chopped cilantro
1 cup fresh salsa, or your favorite commercial salsa
Preheat the oven to 350°F. Place one layer of chips in a baking dish. Sprinkle with ⅓ each of the cheese, the pepper strips, and the cumin. Repeat with a second and third layer. Bake until the cheese has melted and started to brown, about 3 to 5 minutes. Watch carefully to avoid burning the chips. Garnish the nachos with the cilantro and serve with the salsa.
Serves 4.
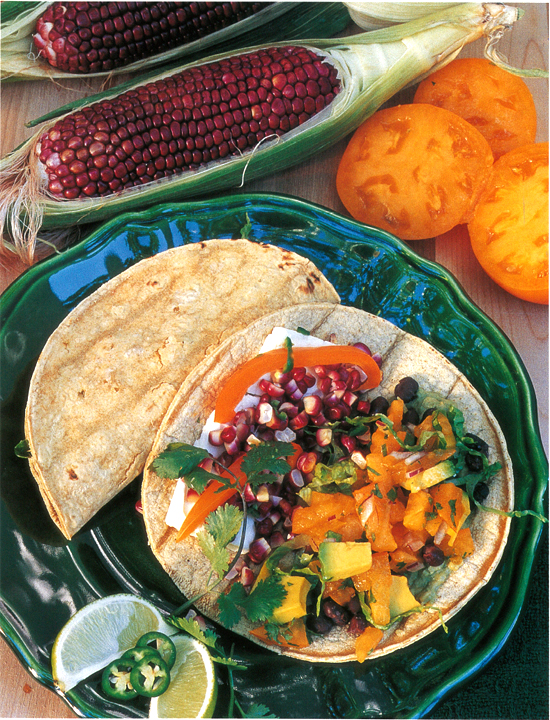
Kaleidoscope Tacos
These unusually colorful tacos are best served “do-it-yourself’’ style. Every diner assembles their own, according to taste.
For the guacamole:
1 ripe avocado
1 teaspoon fresh lime juice
1 teaspoon sour cream
½ teaspoon chile powder
Cut the avocado in half; remove the pit and the peel. In a small bowl, mash the avocado with a fork, add the lime juice, sour cream, and chile powder. Mix until smooth and creamy. Place in a small bowl, cover with plastic wrap, and refrigerate until ready to serve.
For the salsa:
2 yellow or orange tomatoes, chopped
2 tablespoons chopped red onion
1 small avocado, peeled, pitted, and chopped
1 teaspoon minced jalapeño pepper
1 tablespoon minced fresh cilantro
2 tablespoons fresh lime juice
2 tablespoons extra virgin olive oil
¼ teaspoon ground cumin
⅛ teaspoon salt
Freshly ground black pepper
In a bowl, combine the tomatoes, red onion, avocado, jalapeño pepper, and the cilantro with the lime juice, olive oil, cumin, and salt and pepper. Cover with plastic wrap and set aside.
For the taco filling:
4 ears Ruby Queen corn, husked
1 (15-ounce) can black beans
½ pound French feta cheese, sliced
1 yellow or orange bell pepper, sliced
6 leaves romaine lettuce, chopped
12 corn tortillas (1 14-ounce package)
Cook the ears of corn in the microwave on high for about 2 minutes each. (Cooking them in the microwave will preserve the red color.) With a sharp knife, cut off the kernels. Set them aside in a small bowl.
Drain the beans into a sieve; rinse them with cold water and set aside in a small bowl. Place cheese, peppers, and lettuce in separate bowls.
To make the tacos: Preheat the grill. Toast the corn tortillas on the hot grill for 10 to 20 seconds on each side. Present the guacamole, salsa, and the filling ingredients in bowls at the dining table.
Each diner should fill a tortilla with about 1 tablespoon each of guacamole, salsa, corn kernels, and the black beans, then add several slices of feta cheese, bell pepper, romaine, and then fold them together to eat.
Serves 4.
Mystery Marinara
This dish can really confuse guests. If you do not tell them it’s made with tomatoes, they rarely guess correctly. The light-colored tomatoes are generally sweeter than the red ones and have an elusive taste of their own. Serve this meal with a salad and a crusty French baguette.
2 pounds white or cream-colored tomatoes: ‘Locerno’s Ivory Pearl’, or ‘White Beauty’
1 tablespoon butter
1 small onion, minced (about ⅔ cup)
2 garlic cloves, minced
½ teaspoon dried herbs: choose a combination of marjoram, thyme, rosemary, and oregano
Salt and freshly ground black pepper
1 pound fresh spinach fettuccine
⅓ cup heavy cream
Grated Parmesan cheese
Put the tomatoes into a large saucepan and pierce their skins with a sharp knife. Cover and bring to the boil, then simmer for about 5 minutes, or until the tomatoes are soft. Transfer them to a food mill and strain out the seeds and skins (I use the food mill attachment to my stand mixer).
In a sauté pan, melt the butter and sauté the onions and garlic over low heat for about 7 minutes or until the onions are translucent.
Return the tomato puree to the saucepan and add the onion and garlic mixture and the herbs. Simmer the sauce over low heat till it has reduced to 1 ½ cups, about 40 minutes. (Most light-colored tomatoes are quite juicy and need to be cooked quite a long time.) Season with salt and pepper to taste.
Meanwhile, cook the fettuccine according to the directions on the package. Drain and put them into a warm serving bowl. Add the cream to the sauce and stir. Heat the sauce to serving temperature, but do not boil or it will separate. Pour the sauce over the fettuccine and serve with grated Parmesan cheese.
Serves 4 to 6.

Golden Chard Dessert Tart
It is not unusual in Italy to have ricotta cheese in a tart. This version is enriched with golden grapes and chard. It makes a lovely, not-too-sweet finale to a meal.
2 cups all-purpose flour
½ cup ground blanched almonds
¼ cup sugar
¾ cup butter, cut in small pieces, at room temperature
1 egg yolk
For the filling:
3 eggs
15 ounces low-fat ricotta cheese
¼ cup honey
¼ cup dry white wine
Dash of grated nutmeg
2 cups finely chopped golden chard leaves and tender stems, (about 5 medium leaves)
1 tablespoon chopped fresh mint
1½ cups grated yellow squash, (about 1 large squash)
To make the crust: In the bowl of a stand mixer combine the flour, almonds, and sugar and stir. Add the butter and the egg yolk to the dry ingredients. Using the paddle attachment, beat on medium speed until the mixture is the texture of coarse corn meal. Gather into a ball, wrap in plastic wrap and refrigerate the dough for 15 minutes.
Preheat the oven to 375°F. Press the dough evenly into a 9-inch tart or pie pan. Cover it with parchment paper or aluminum foil and chill the crust for 15 minutes. Before prebaking the shell, fill its cavity with dry beans or rice to weigh down the crust so it will not bubble up. Bake for 10 minutes. Remove the paper and the beans and rice used as weights and reserve.
To prepare the filling: In a mixing bowl, blend the eggs with the cheese, honey, wine, and nutmeg. Then fold in the chard, mint, and squash. Pour the filling into the warm pie shell and bake it on the middle shelf of the oven for 50 minutes or until golden brown. The filling should be set when a toothpick inserted in the center comes out clean.
Serves 6 to 8.

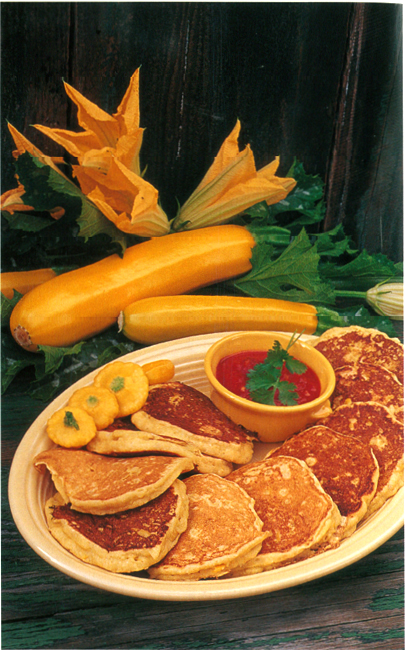
Sunshine Zucchini Pancakes with Salsa
Most often, I serve these pancakes with salsa for a light supper; but for breakfast I omit the onions and serve them with maple syrup. This is a fun dish to make with children. If they want to do it all by themselves, a package of corn muffin mix works well. Follow the directions for corn-meal pancakes and add the vegetables to the wet mixture.
¾ cup all-purpose flour, sifted
2½ teaspoons baking powder
1 tablespoon sugar
1¼ cups yellow cornmeal
¾ teaspoon salt
1 egg
1 cup milk
2 tablespoons vegetable oil
1 cup grated yellow summer squash or yellow zucchini, (about 1 ½ medium)
3 tablespoons yellow bell pepper, seeded and chopped fine
3 tablespoons finely chopped onion
1 cup fresh salsa, or your favorite commercial salsa
In a medium bowl, put flour, baking powder, sugar, cornmeal and salt. Blend with a spoon. In another small bowl, put the egg, milk, oil, squash, pepper, and onion. Mix the wet ingredients with a spoon. Pour over the dry ingredients and stir lightly until just barely moist.
Heat a nonstick frying pan or grid-die, then cook 2 or 3 pancakes at a time over medium heat until both sides are golden brown and the insides are firm. Keep the pancakes warm in a low oven until all are cooked. Serve the pancakes with the salsa.
Makes 8 to 10 3-inch pancakes.
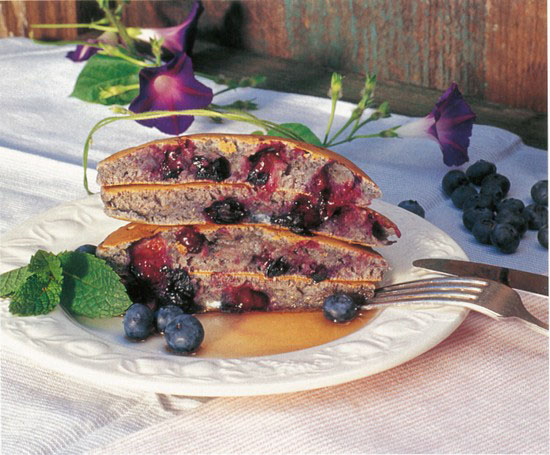
True-Blue Pancakes
These delicious, hearty pancakes get their lovely blue-green hue from the blue cornmeal and, of course, the blueberries.
¾ cup all-purpose flour, sifted
2½ teaspoons baking powder
1 tablespoon sugar
1¼ cups blue cornmeal
¾ teaspoon salt
1 egg
1 cup milk
2 tablespoons vegetable oil
1 cup fresh blueberries
Garnish: more fresh blueberries
In a medium bowl, put the flour, baking powder, sugar, cornmeal, and salt. Blend with a spoon. In another small bowl, put the egg, milk, and oil. Mix the wet ingredients with a spoon and pour them over the dry ingredients and lightly stir until the batter is just barely moist. Fold in the blueberries.
Heat a frying pan or griddle, lightly grease it, then cook 2 or 3 pancakes at a time over medium heat until both sides are golden brown and the insides are firm. Keep the pancakes warm in a low oven until all are cooked.
Stack the pancakes and serve them with maple syrup and more fresh blueberries.
Makes 8 to 10 3-inch pancakes.