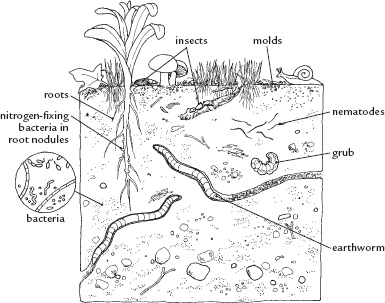
Q I heard someone on a radio gardening show talking about soil care and how important it is to take care of your soil’s “microherd.” Just what does that mean?
A Soil isn’t just an inanimate substance that supports plant roots; it’s actually a complex community of living things that successful gardeners actively cultivate. Organisms in the soil — its microherd — break down compost and other organic matter slowly, releasing nutrients to plants. They’re the basis for the process that organic gardeners swear by: “Feed the soil, and let the soil feed the plants.” Earthworms are one component of a soil’s microherd, but it contains many other organisms, including insects, bacteria, fungi, and other microscopic organisms, both good and bad. Gardeners care for soil and its microherd by adding compost, manure, and other organic matter. A large, active microherd speeds the breakdown of organic matter and also helps decrease problems with plant diseases and pests. The more organic matter a soil contains — and the more different types of organic materials you add to your soil — the larger and more active its microherd will be. And the more active the microherd, the more nutrients there are that are available to plants.
Soils rich in organic matter have good tilth, meaning they have a loose, crumbly structure and are easy to dig or work. (The microherd helps form this crumbly structure that’s so desired by gardeners.) Ideal planting soils drain well, because they have plenty of large spaces, or pores, that hold air that plant roots need to grow. Organic matter — especially humus, the end product of the decomposition of compost and other organic matter — also holds moisture in the soil, which is essential to plants as well as the microherd.

The Soil Microherd
Q Why is it important to know whether my soil is clayey or sandy?
A You need to know because it will affect when and how you plant and water your garden.
 Clay soil is very heavy when wet. It holds water and nutrients but stays wet and cool for a long time in spring, so you may have to plant your crops later than the standard recommended time. When it’s dry, the soil can be as hard as cement, and naturally, plant roots don’t fare too well in those conditions!
 Sandy soil is gritty and doesn’t hold together well; water drains through it quickly. It’s easy to plant in sandy soil, because it warms up and dries out quickly in spring, but it requires more frequent watering, and more added organic matter to keep crops from suffering nutrient stress.
 Loamy soil, which contains a relatively equal mix of clay, sand, and silt, is ideal for vegetable gardening.
Grab a handful of soil and rub it between your palms. Clay soil has a sticky texture, and you can form a long “worm” of soil easily. Sandy soil is gritty and won’t stick together at all. Loamy soil clings together, but clumps break apart easily with a little pressure from your thumb.

A “worm” of clay soil
COVER CROPS—also called green manures — offer one of the easiest ways to improve your soil. They not only add essential organic matter to the soil; they also reduce erosion, improve compacted soil, outcompete weeds, encourage beneficial insects, and pull nutrients up from lower soil layers. Tilling or digging a cover crop into the soil also encourages robust populations of beneficial soil microbes, which reduces pests and diseases. In fact, they are one of the biggest undiscovered secrets to a great garden, plus they’re easy to plant and grow.
Sow cold-tolerant crops in early spring or fall, heat-tolerant ones in summer. Sow about 1 cup per 50 square feet/4.5 square meters; read seed package instructions for more exact rates. Simply broadcast the seed over the soil and rake it in. Water the area gently after sowing, unless rain is expected.
Here’s how to put cover crops to work in your garden:
 PROTECT THE SOIL. Cover crops to sow in spring or fall include crimson clover, hairy vetch, oats, ryegrass, and kale. Try buckwheat, red clover, Sudan grass, or sweet clover in spring and summer.
 TAKE A SUMMER BREAK. In the South, summertime temperatures make gardening difficult. Sow a heat-tolerant cover crop such as Sudan grass, cowpeas, or buckwheat until you begin to garden again in fall.
 USE A KILLED COVER. You don’t necessarily have to dig in a cover crop: Sow crops in late summer or fall that are killed by winter cold, then plant your crops through the remains of the crop when the next season starts. Try this with hairy vetch or annual ryegrass (from Zone 5 north).
 PLANT SMALL BLOCKS. Don’t wait until your entire garden is empty. Sow cover crops as small blocks and patches of soil become available.
 DIG IN. Be sure to dig in cover crops before they go to seed, self-sow, and become weedy. No more than a week after they begin to flower, cut them down, using a mower or string trimmer.
 PLANT AGAIN AND AGAIN. If you are leaving part of your garden fallow for a season or are improving new soil for next year, dig in one cover crop and plant another.
 GROW SOME MULCH. Use cover crops as living mulches to protect soil and reduce weed problems: 4 or 5 weeks after planting your main crop, sow seed of crops such as crimson clover, dwarf white clover, or annual ryegrass.
Q When and how can I add organic matter to my garden?
A Try to add organic matter every time you plant, dig, or till. Here’s a basic plan that will improve any soil, from clay to sand:
 ADD BEFORE YOU PLANT. When preparing a new garden bed, spread a thick layer of compost, well-rotted manure, or other organic matter. Then add a new layer of organic matter every spring after that. See the next page for help determining how much organic matter you’ll need.
 APPLY MULCH. Once the soil warms up and crops are in place and growing, spread a layer of organic mulch, such as straw, dried grass clippings, or chopped leaves.
 DIG IN AT SEASON’S END. Once a particular crop is finished, dig the mulch and crop residue into the soil (unless it is diseased).
 PLANT A COVER CROP. Once you’ve pulled out a crop at season’s end, sow an annual cover crop like red clover or hairy vetch to protect the soil over winter, control weeds, and add more organic matter. Dig it into the soil a few weeks before planting in spring.
Q I’m preparing a new garden bed this spring. How thick a layer of organic matter should I spread over it before I start planting?
A The amount of organic matter you should add depends on where you live, what kind of soil you’re starting with, and also how you garden. In the North, a 1"–2"/2.5–5 cm layer is sufficient. After the first year, add at least 1"/2.5 cm per year in the spring. Since organic matter is used up much more quickly in southern gardens because of the hot, humid weather, start with a 3"–4"/7.6–10.2 cm layer. In subsequent years, add 2"–3"/5–7.6 cm per year. No matter where you live, if you are dealing with heavy clay soil or sandy soil or if you are planning on gardening intensively, add twice the standard recommended amounts for your area.
Q What will happen if I just prepare a bed and plant a vegetable crop without adding any extra organic matter?
A One of the most straightforward ways to answer this question is to try it. Follow the bed preparation steps on pages 78–79, but skip the step of adding organic matter. Wait a couple of weeks to let the soil settle, then start planting. As your crops grow, monitor how vigorous they are, and at the end of the season, evaluate your harvest. If plants aren’t doing well, mulch with compost and consider supplementing with organic fertilizers. You may get satisfactory results from a single crop, but keep in mind that you’ll need to add more organic matter before you plant the next one, because each crop uses up lots of nutrients in the soil.
SEE ALSO: For a year-round approach to improving garden soil, page 71.
Q I have horrible soil and am very close to giving up on gardening. Is there any hope?
A Raised beds are a terrific solution if horrible soil is your lot in life. Whether you have pure clay or only an inch of soil over bedrock, you can make framed raised beds and fill them with purchased topsoil mixed with compost to create perfect growing conditions. See page 82 to learn how to make this kind of raised bed.
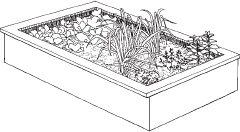
A framed raised bed
If you have loads of earthworms, you probably have rich, healthy soil. Earthworms tunnel through soil looking for organic matter to ingest, and in the process they aerate the soil, making it looser and easier for roots to penetrate. They also bring organic matter from the soil surface down into your plants’ root zones.
It’s easy to check how healthy your soil’s earthworm population is. First make sure your soil is moist and relatively warm. (You won’t find earthworms in dry soil or if the weather is too cold or too hot, since they tunnel down deep to escape extreme conditions.) Dig a 1'/⅓ m-wide, 10"/25.4 cm-deep hole. Count the number of worms in the soil removed from the hole. If you have more than ten, your soil is in great shape; six to ten, it’s pretty good but would benefit from more organic matter. If you find fewer than six earthworms, your soil has low organic matter levels, poor soil drainage, or a pH level that is either too acid or too alkaline.
Q I want to have a really great garden. What are the big soil-care mistakes I should try to avoid?
A There are a few basic rules all gardeners should follow. First, develop the habit of adding organic matter every chance you get. In addition:
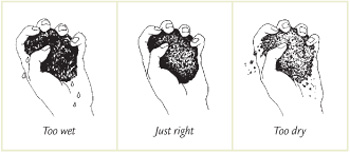
 DON’T WORK SOIL WHEN IT’S TOO WET. Squeeze a handful in your hand; if it forms a tight ball, it’s too wet. The handful should crumble easily before you dig, as shown on page 77.
 DON’T WORK SOIL WHEN IT’S TOO DRY. Digging dusty-dry soil will pulverize it and destroy its texture. Water dry soil deeply before you work it.
 DON’T LEAVE IT BARE TOO LONG. Direct sunlight dries out soil fast, and your soil microherd will die out without moisture. Bare soil erodes when it rains, and it’s an invitation to weed problems. Except for short periods when you’re trying to warm the soil, keep it covered with mulch, veggie crops, or cover crops.
 KEEP OFF! Once you’ve prepared the soil for planting, don’t walk on it. Half the volume of soil should be pore space occupied by air and water. Walking on soil compresses the pores and makes the soil less hospitable to plant roots.
If your soil is soppy for days after a rainstorm or stays wet for a long time in spring, you need to do something to improve drainage. Vegetables need soil that is moist and rich but that drains well, because, in addition to water, roots need air in the soil to grow well. If you’re gardening on a low-lying spot, look around your property for a higher sunny spot with better drainage. You could try regrading the site to improve drainage, but this can be a large-scale, expensive project. Installing drainage tile is a project for professionals, too.
Other problems that can cause poor drainage include heavy clay soil and/or compacted soil. Adding sand to clay soil isn’t a practical solution, because it would take several tons to improve the top 6"/15.2 cm of soil.
The best solution is to build raised beds on the site and fill them with improved soil. If possible, loosen the soil at the site and add plenty of organic matter to it before you build the beds.
Q Do I have to get my soil tested?
A There are good gardeners who have their soil tested regularly and equally good gardeners who have never had it done. If your plants don’t seem to be growing as well as they should or you suspect your soil’s pH is out of the best range for vegetables (6.5 to 7.0), testing your soil will help you adjust nutrient levels and pH. On the other hand, if everything seems to be growing well, and it doesn’t bother you that you don’t know your exact pH, don’t worry too much about it. If you do decide to have your soil tested, follow the directions for collecting the sample carefully. Also, ask for organic recommendations for correcting nutrient deficiencies.
Many local Cooperative Extension Service offices provide soil-testing services. Contact your local office to find out where to pick up a kit. They are sometimes available through the office itself but also may be available at the local library. Commercial soil-testing labs are another excellent option. Finally, you can also purchase a home soil-test kit to test for pH as well as nutrient levels.
SEE ALSO: For more information on pH, page 413.
PLANTING INSTRUCTIONS for peas and other crops say to sow “as early as the soil can be worked in spring,” so it’s helpful to know how to test whether your soil is “ready to work.” Grab a handful of soil from the bed you want to plant and squeeze it tightly. It will probably form a clod or clump. Press on the clod with your thumb: If it breaks apart easily with gentle pressure, the moisture level is right for digging. If it doesn’t break apart, it’s too wet to dig, so wait a few days. If your soil won’t form a clod at all, it’s too dry, so water it deeply, and test it again. For early spring crops, the soil also has to be warm enough for seed to germinate. (The range of temperatures at which seed will germinate varies from crop to crop.) A soil thermometer will tell you exactly what the temperature is, or you can use other seed-sowing guidelines, such as the number of weeks before the last spring frost date, to determine whether it should be warm enough to plant.
Q My husband and I have picked out our garden site. What do we need to do next to get it ready for planting?
A Prepare the soil well before it’s time to plant: Ideally, a full season ahead — in fall for spring planting, for example. If you can’t do that, dig a new garden in spring once the soil is dry enough to work, as explained on page 77. For fabulous results, mark off the site with stakes, then follow these steps:
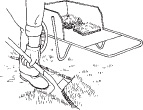
1. REMOVE GRASS AND WEEDS. Slice off lawn grass with a sharp spade, or rent a sod cutter to remove it. (Cut pieces of sod can be put upside-down on a compost heap; lift and reposition them if any continue to grow. They’ll break down into terrific compost in a few months to a year.)
2. SPREAD ORGANIC MATTER. Spread a 3"–4"/7.6–10.2 cm layer of organic matter over the site and dig or till it into the soil. You can use compost, well-rotted manure, grass clippings, chopped leaves, or any combination of organic matter that’s at hand. If you decide to use grass clippings, chopped leaves, or other rough organic matter, wait several weeks for it to break down before planting the bed.

3. MULCH. Apply a light layer of compost or other organic mulch to help prevent rain from beating down the soil clods and wind from blowing soil away until you’re ready to plant the bed. If you need to prewarm the soil for spring crops, cover it with plastic mulch, as described on pages 105–106.
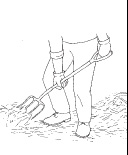
4. RAKE IT SMOOTH. On planting day pull back the covering of organic mulch and rake the surface of the bed smooth. Break up large clods of soil as needed, but don’t try to break up every clump of dirt. Ideally, you want the surface to be covered with small, loose clumps.
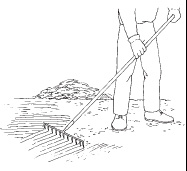
If you prefer not to dig to create garden beds, try one of the other bed-preparation methods described on pages 82–84.
Q I’ve got a tiller to break up my soil. How often should I use it?
A Tillers are great back-saving devices, but use them too much and you’ll actually destroy your soil. While dirt doesn’t seem like something you could destroy, tilling it too often (or working it when it’s too wet or too dry) breaks down both small and large clods until the soil is essentially dust. Soil clods, called crumbs or aggregates, affect how water and air move through soil and how available both are to roots. They also are important for the health of earthworms and other beneficial soil organisms. When preparing a new garden or incorporating a new layer of organic matter, try to accomplish the job with a single pass of the tiller. Avoid using a tiller for everyday weeding or routine soil cultivation, to avoid breaking down smaller soil aggregates. A good rule to follow is never to till your soil without adding more organic matter to it.
SEE ALSO: For more about soil structure, page 414.
Q Can I create a vegetable garden on a site that’s covered with bindweed or poison ivy?
A To kill a stubborn woody weed like poison ivy, cut it back to the ground and cover the whole site tightly with a layer of black plastic for up to a year. Then remove the plastic, and cover the site with a thick layer of newspapers topped by mulch, as shown on page 82.
Q Do raised beds have to be a certain size or shape for growing vegetables?
A Raised beds can be any shape you like, although rectangular is traditional. The simplest raised beds are freestanding, meaning they are created by simply hoeing up soil to create a bed that’s higher than the surrounding soil. Freestanding beds are a good option if you aren’t sure exactly how your garden is going to be laid out. You’ll need to maintain them by periodically hoeing up soil, compost, and mulch that have spread from the beds out into the pathways.
Make the beds narrow enough that you can easily reach the center of the bed from the sides — from 3'/.9 m to perhaps 5'/1.5 m wide — so you can tend plants without stepping on the soil. It’s best to create ones that aren’t too long, too. Otherwise it’s tempting to walk across them if you need to move from one row to another, and you’ll compact the soil in the process.
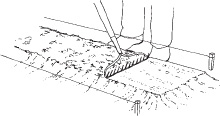
Making a freestanding raised bed
Q I don’t have any gardening beds prepared. Are raised beds the quickest way to make them?
A Yes, even if you have a site that’s currently covered by lawn, you can build a raised bed right on top of the sod and be ready to plant in as little as a weekend. To do this, mark off the site and cover the grass with a thick layer of overlapped newspapers or corrugated cardboard. (Weight down the paper or cardboard with shovels full of topsoil as you spread it or soak it with the hose; otherwise the wind will blow it away.) Then frame the site with landscape ties or 2Ö6s/38Ö140 mm, laying the sides over the edge of the paper or cardboard to discourage grass from growing up into the garden. Use stakes to hold the frame in place. Fill the garden with a mix of purchased topsoil and compost. Mound the soil mix several inches above the outer frame, then water it thoroughly to help it settle. Let the soil dry for a day or so before planting.
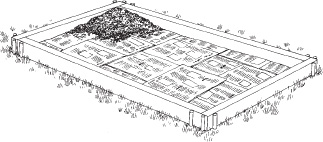
Making an instant raised bed
Q What are the other options for framing in permanent raised beds?
A If you don’t want to use landscape ties, consider framing raised beds with boards that are connected by wood screws at the ends and staked in place along their length. You also can purchase corners for beds that hold the boards or landscape ties in place (they’re available from mail-order garden suppliers). For a more formal look, consider framing beds with stone or brick.
Q I plan to enlarge my vegetable garden quite a bit next season. Is there anything I can do to eliminate having to dig up the lawn by hand?
A If you’re not itching to plant tomorrow, you can use no-dig methods to create great garden beds. Here’s how:
1. If you haven’t had rain recently, water the site thoroughly — you’ll want to soak the soil to a depth of at least 6"/15.2 cm.
2. Cut down all the vegetation on the site as close to the soil surface as possible.
3. Cover the site with either large pieces of cardboard or a thick layer of overlapping newspaper, eight to ten sheets thick. (Do your covering on a windless day, and have a pile of soil or mulch to dump on each sheet as you spread it.)
4. Once you’ve got cardboard or newspaper in place, cover it with thick layers of any other mulch you can find — chopped leaves, compost, weeds (that have not gone to seed), plant residue, grass clippings, you name it. Add layers of well-rotted manure, too, along with other materials such as upside-down chunks of sod, topsoil, straw, and spoiled hay. You can cover the site in sections, as organic matter becomes available.
5. Consider adding a layer of topsoil over all the mulch. Ideally, you want to pile a minimum of about 6"/15.2 cm of the stuff, but 10"–12"/25.4–30.5 cm is better. Then wait.
6. Sow the bed with a cover crop, such as rye or oats, in late summer or early fall.
7. In spring, plant directly into the mulch (including the remains of the cover crop).

Making a no-dig bed
Q I live in Arizona. Are raised beds the best option for me?
A Actually, in dry climates such as the Southwest, ground-level or even sunken beds often are a better option, since preserving soil moisture is so important. To create a sunken bed, dig the soil to at least a shovel blade’s depth and remove caliche layers, which are hardened calcium carbonate cemented together with other soil particles. In soil, caliche is either a dense, light-colored layer or it appears as white- or creamy-colored lumps mixed into the soil. Layers of caliche can vary from a couple of inches to several feet, and you may encounter more than one layer of it. Removing caliche is hard work, requiring the use of a mattock or a heavy-duty pick, but you’ll only have to do it once. Amend the remaining soil with compost. The surface of the prepared soil should be several inches below the pathways, and beds should be rimmed with soil or framing so that water stays on the beds, where you want it. Crops growing in sunken beds also receive some wind protection because they’re slightly below the surrounding soil surface.
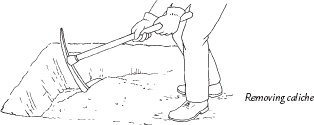
Removing caliche
If you have little space for your veggie growing, or very poor soil, you can still have a garden: Try growing in containers.
For topnotch harvests from vegetables grown in containers, you’ll need to start with a good soil mix. For a variety of reasons, soil dug from your yard isn’t suitable for filling pots. Instead, you can create a soil mix that includes purchased topsoil, or you can blend a soilless potting mix.
2 parts purchased topsoil
1 part screened compost
1 part peat moss
1 part perlite
1 part vermiculite
Note: If the topsoil is very sandy, add 1 additional part compost.
2 parts vermiculite
2 parts peat moss
3 parts screened compost
1 part perlite
1 part builder’s sand
Q What’s the best way to make hills? I’ve frequently seen melons and squash grown in them.
A Hills offer warm, well-drained soil and are ideal for many crops, especially melons, watermelons, squash, and pumpkins. To build hills, use a hoe to mound soil up 1'/.3 m high and 2'–3'/.6 to .9 m wide. Work at least two shovelfuls of finished compost into the soil in each hill. To give plants an extra boost, before pulling up soil to make a hill, first dig a hole that’s 1'/.3 m deep and 1'–2'/.3–.6 m across, then fill the bottom with compost, well-rotted manure, or a mixture of the two. Create a hill on top of that. As the plants become established, their roots will penetrate this cache of superamended soil for extra nutrients and water.
Q What is compost?
A Often called “gardener’s gold,” compost is the decomposed remains of organic matter — such as leaves, kitchen scraps, and other garden remains — produced in a pile or a specially designed structure. Compost is a valuable soil amendment that will improve soil structure and provide nutrition for plants.
Q Do I have to make compost to have a good garden?
A You can purchase bagged compost at your local garden center, but the quality varies, so it pays to read the label and/or open the bag and look at the compost before you buy. The best bagged composts smell woodsy or earthy, and they’re moist but neither too wet nor too dry. They should have a granular texture and be dark brown or nearly black in color. Ground-up or shredded bark isn’t compost — it’s mulch — so don’t pay compost prices for it. If you’re buying manure-based compost, make sure it isn’t gooey and wet and that it doesn’t smell like ammonia or other unpleasant substances. (If you buy some that does, just dump the bag on your compost pile and let it finish composting.)
Many municipalities have large-scale composting operations that offer compost free or for a small fee. While these can be a great source for organic matter, municipal composting operations take in a wide range of materials that you may not want to add to your garden, including weed seeds, diseased plant parts, and grass clippings that contain herbicide residue. Compost made from leaves collected in fall is a better bet than that made from yard waste, so ask about the source of the materials used. Also, it’s a good idea to ask friends and neighbors if they’ve used it and whether they’ve experienced any weed, disease, or other problems after adding it to their gardens.
Q What kind of setup do I need to make compost?
A To start a compost pile, select a level spot that is convenient to your garden. While flower gardeners try to keep their composting operations out of sight, vegetable gardeners find it’s most convenient to make their compost right in the garden or right next to it. (It is best to look for a spot that is shielded from neighbors’ yards.) Stash a bale of straw next to your pile so you can easily cover up kitchen scraps whenever you bring them out.
You can compost in an open pile or contain your composting operation in a cage, bin, or other structure, either purchased or homemade. A structure makes your composting area look neater, helps keep the materials evenly moist, promotes faster decomposition, and discourages animals from stakes and wire mesh fencing rooting around in the pile. For fast, efficient composting, plan on a pile or enclosure that is 3'–4'/.9–1.2 m square. Two enclosures are best so you can fill up the second one while materials in the first are breaking down.
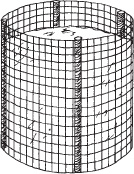
Compost bin made from stakes and wire mesh fencing
Q What goes into a compost pile?
A The main ingredients in most gardeners’ compost piles are trimmings and clippings from the garden, including weeds, grass clippings, and leaves. In addition, add kitchen scraps, sod (place it upside down), wood shavings, manure, spoiled hay, and shredded newspaper — even the guck from cleaning out gutters. Droppings from rabbits, guinea pigs, and other small rodents make great compost, along with their spoiled bedding.
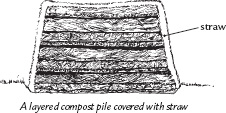
A layered compost pile covered with straw
Q Is there anything I should not add to my compost pile?
A Don’t add cat or dog droppings to the pile, because they can spread disease. Avoid adding plant parts that show signs of disease, weeds that have gone to seed, and roots of perennial weeds unless you leave them in the sun to make sure they’re very, very dead. (The length of time it takes for the sun to kill weeds varies: Plants with fleshy, succulent stems or fleshy taproots may take several days to die, while plants with less succulent leaves or finer fibrous roots will die within a couple of hours.) Also don’t add meat, bones, or cooking fat to your compost pile.
Q I’ve got two neighbors. One just piles up his clippings, and the other one is always digging through them and moving them around. Which is the better way to make compost?
A Your neighbors are using two different composting systems: cold composting and hot composting. Both yield compost, but hot composting produces it faster than the cold method. To cold compost, simply toss ingredients in a pile or other enclosure, and then wait a year or two for them to break down. Turning the pile, which means moving the materials from one spot to another to mix them up, is optional, although tackling this task once or twice a year will speed up the decomposition process.
Hot composting takes more time and energy to prepare but produces finished compost in about 3 months. It also lets you produce more compost per year in the same amount of space. Hot composting gets its name because all the microorganisms busily breaking down materials generate heat within the pile.
IF YOU’RE BUILDING A NEW GARDEN BED or improving the soil in an existing one, start a new pile right on the site where you’ll be working. That way, you won’t have to move finished compost to the site. Trench composting is another supereasy way to keep your compost where you use it. Dig a trench 1'–2'/.3 to .7 m wide and up to 1'/.3 m deep. Pile the excess soil alongside it. Then, as kitchen scraps and other compostables become available, simply dump them in a section of the trench. Spread out the material in a layer no deeper than about 4"/10.2 cm, and don’t pack it down. Top that with 2"–3"/5–7.6 cm of soil, and place a board on top (to keep out animals). Continue layering until the trench is nearly filled, then cover with 3"–4"/7.6–10.2 cm of soil. Plant directly into this soil topping. Earthworms and other soil organisms will gradually decompose the organic matter below and spread the benefits throughout the bed.
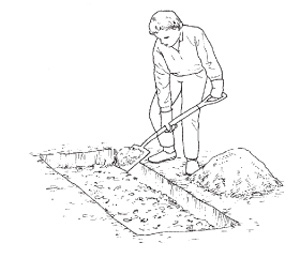
Trench composting
Q Apparently, building a pile for cold composting is easy — just throw yard waste in a pile and leave it alone. But how do I build a pile for hot composting?
A To build a pile for hot composting, it’s best to stockpile materials and build the pile all at once. You need to build a pile that is 3'–4'/.9–1.2 m square and at least 3'/.9 m tall; otherwise it won’t heat up and break down the materials quickly. You can pile the organic matter in layers or just mix it all together. Chopping up or shredding leaves or other large materials speeds up the composting process but isn’t essential. As you pile up materials, spray them with water periodically unless they’re very wet. The finished pile should feel lightly moist to the touch, like a damp sponge. The pile will heat up in a day or two. Once it begins to cool off, usually after a few weeks, turn it by dumping the materials into a new pile next to the old one. This aerates the materials. Add water if materials in the pile seem dry. Let the pile heat up again, and turn it again in another few weeks once pile temperatures cool off, or use the compost if it is finished.
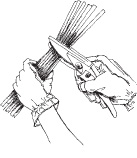
Cut woody material into pieces before composting
Q I need bins or something to contain my compost, but I’m not handy. What can I buy or make without having to use any tools?
A Ordinary wood pallets make a fine composting system. Wire them together at the corners — either drill holes for the wire or simply wire the corners together. You can make a single bin with three pallets and use a fourth bin or a sheet of lattice for a front to keep pets out of the compost. Add additional bins by wiring on another back and side to the end of the first bin. You can also make a round compost bin with a 10-foot (3 m)-long length of 4'/1.2 m-tall welded wire fencing. Fasten the ends with wire ties or pieces of wire.
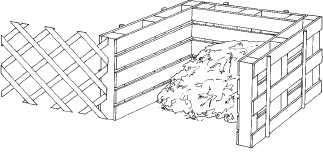
Wooden pallet compost enclosure with lattice door
SEE ALSO: For an illustration of a round bin, page 89.
Q I want to make lots of compost. I don’t think I can collect enough organic matter in my own yard. Where else can I get some?
A Devoted composters are very creative when it comes to finding compost ingredients. Here are a few suggestions:
 PICK UP BAGGED LEAVES and grass clippings set out for trash collection.
 CONTACT A LOCAL STABLE for manure and spoiled hay or bedding.
 ASK YOUR LOCAL GROCERY STORE what they do with spoiled produce. (Some composters hit the dumpsters behind grocery stores for cast-off produce — really!)
 COFFEE GROUNDS make great compost. Ask at a local coffee house or restaurant if you can provide a bucket to collect them. (You’ll be far from the first composter who does this, so don’t be shy. Set up a regular schedule for collecting and replacing the bucket.)
 CHECK WITH FACTORIES in your area for locally available, compost-safe materials like sawdust.
 CHECK OUT LOCAL FARMERS’ MARKETS to see if you can collect leaves, vegetable discards, and/or spoiled produce.
Q What does finished compost look like?
A Finished compost is dark and crumbly, and the original ingredients are mostly unrecognizable. It’s fine if there are still some lumps in it, especially if you plan to work it into the soil. If you don’t want lumps, sift the compost before using it. To sift compost, staple ½"/1.3 cm mesh screen to a square wood frame (2'–3'/.6–.9 m on all sides is fine). Place the screen over a garden cart or wheelbarrow and add a shovelful of compost on top. Gently sift the compost through, and break up the larger lumps as you sift. Return any large lumps or pieces of plants to the compost pile for further decomposition.
Q My last compost pile smelled bad, and the one before it just sat there! What am I doing wrong?
A To build a compost pile that breaks down quickly and doesn’t smell, you need to pay attention to the quantities of the materials you use, plus how moist the materials are. Ideally, you need 2 or 3 parts high-carbon materials with 1 part high-nitrogen materials. Here’s a simple way to remember which is which: High-carbon materials usually are brown and dry, and high-nitrogen ones are green and moist. Two materials that don’t fit this rule are kitchen scraps and manure: Both are high in nitrogen, so use them as green and moist ingredients.
If your compost pile isn’t performing up to par, try one of these tactics to revive it.
 ADD AIR. Turning a compost pile by forking material from one place to another is one way to give microorganisms the air they need to decompose organic matter, and that helps keep the pile smelling good. It’s hard work (and good exercise!), but passive ventilation is an easier way to get much-needed air into your pile. The three methods shown here — a bundle of cornstalks, a perforated plastic pipe, and a tube formed from wire mesh fencing — all ensure airflow deep into the pile, where it can be in short supply. Select the ventilation method that’s most convenient for you, and incorporate two to three in your pile as you build it. If you have a pile that’s already built but needs ventilation, jam a pry bar or a spade down through the center of the pile to make enough room to jam in sections of perforated pipe.
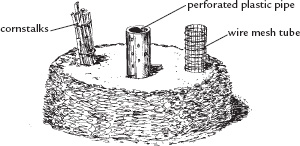
Aerating compost
 ADD CARBON. If you go overboard with the high-nitrogen ingredients, your pile may turn smelly. If that is the problem, turning the pile and adding more high-carbon materials (brown and dry; ingredients like chopped leaves, spoiled hay, dried grass, or sawdust) will correct it.
 STOP THE FLOOD. Even if you have a good balance of materials in your pile, if it’s too wet, a compost pile can turn smelly and slimy. (The smell is caused by anaerobic bacteria that thrive when there isn’t enough oxygen at the center of a wet, compacted pile.) Gardeners in rainy climates, such as the Pacific Northwest, may want to construct a roof over their compost piles, since conditions that are too wet are commonplace there. In other areas, use a tarp over the pile in rainy weather to keep it from getting drenched.
 REBUILD IT. To fix a smelly, too-wet pile, first put on old clothes and gather a few bushels of coarse, dry materials such as leaves, clean straw, grasses, cornstalks, or even twiggy brush. Lay down a layer of cornstalks or a mix of twiggy brush and straw, then fork on a layer of the soggy compost. Continue alternating layers of coarse, dry materials and wet compost. Cover the finished pile so that rain won’t saturate it again.