Do you have a dream profession? Something that you would do simply because you love it and not for any financial reason? I do.
It’s house flipping. I am addicted to every house-flipping show on TV, but have a special fondness for Flip This House and Flipping Boston on A&E and Flip or Flop on HGTV. Every Saturday morning I get up, get the kids breakfast, make a cup of coffee, and sit down in our squeaky rocking chair to feed the baby and turn on Flip This House. While it normally takes twenty minutes to feed my little angel, for some reason it takes at least an hour on Saturday mornings.
There’s just something about taking an old, broken-down, and deteriorating home and making it new that thrills me. I like seeing things become new again.
Since I don’t think I’ll be buying an old home anytime soon, I will just stick to cake home construction for now!
2 recipes White Cake
½ recipe Chocolate Cake
½ recipe Red Velvet Cake
1 recipe Basic Buttercream
Sky blue gel food coloring; white gel food coloring (optional)
SPECIAL EQUIPMENT:
4 8-inch round cake pans; rotating cake stand; offset spatula; bamboo skewer; 4½-inch and 4-inch round cookie cutters; small, sharp knife; disposable plastic pastry bag; #46 and #12 decorating tips; coupler
DIFFICULTY: Medium
1. Bake 4 layers of white cake in 8-inch cake pans. Cool to room temperature, then freeze them for at least 6 hours, preferably overnight.
2. Bake 1 layer of chocolate cake and 1 layer of red velvet cake in 8-inch round cake pans. Cool to room temperature.
3. Prepare the buttercream.
4. Crumble the red velvet cake into a large bowl, add 2 to 4 tablespoons of buttercream, and use a rubber spatula to combine them thoroughly. The cake mixture will have a smooth, Play-Doh-like consistency. In a separate bowl, repeat the process with the chocolate cake.
5. Place the chocolate and red velvet cake mixtures into airtight containers or plastic bags and refrigerate until you’re ready to assemble the cake.
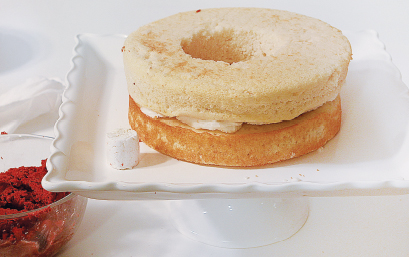
6. Place a white cake layer on a piece of parchment paper. Using an offset spatula, cover the top smoothly with about ¼ cup of buttercream. Top with another white cake layer. Repeat with the remaining 2 white cake layers to make a second 2-layer cake.
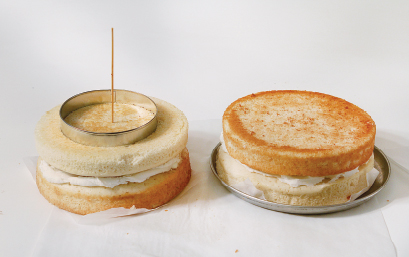
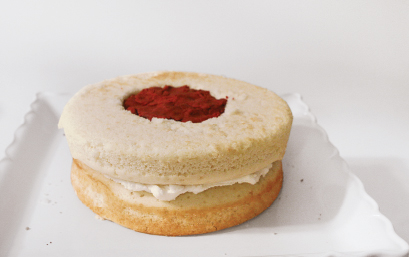
7. If you have a rotating cake stand or turntable, place one of the layer cakes on it. Now you’ll be removing a cone-shaped piece of cake from the center of the cake, cutting three-quarters of the way through the cake. Insert a long, bamboo skewer into the center of the cake. Center the 4½-inch round cookie cutter on the cake, then gently press down, just far enough to make a guideline.
8. Insert a small, sharp knife on the guideline at about a 45-degree angle toward the center of the cake and press it into the cake until it hits the skewer. Slowly and steadily cut around the cake, keeping the base of the knife on the guideline and the tip of the knife touching the skewer.
9. When you’ve cut around the entire perimeter of the cake, gently remove the cone-shaped portion you just cut. Set aside the cone.
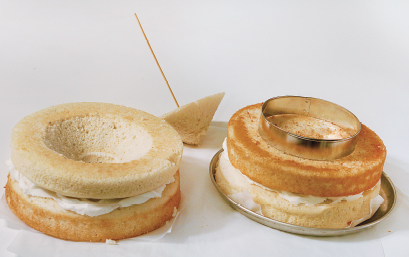
10. Place the other white cake on parchment paper. Center the 4-inch round cookie cutter on the cake and gently press down, just far enough to make a guideline. (You can use the 4½-inch cookie cutter; just move in ½ inch from the cutter to cut the guideline with your knife.)
11. Insert a thin knife on the guideline straight down to the bottom of the cake and follow the guideline to cut a perfect cylinder.
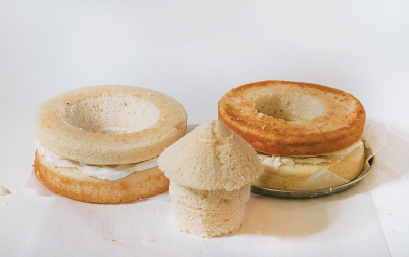
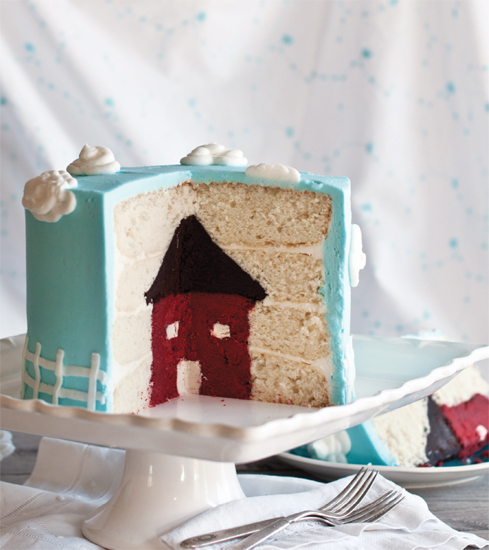
12. Remove the cylinder of cake. If you put the cone piece on top of the cylinder piece, you can start to see how the house will come together.
13. Crumble the cone and cylinder cake scraps into a large bowl, add 2 or so tablespoons of buttercream, and combine them thoroughly with a rubber spatula to make a white cake mixture. Add white food coloring if you want a brighter white.

14. Remove the red velvet and chocolate cake mixtures from the refrigerator. Fill the triangular cavity (cone shape) of the first layer cake with the chocolate cake mixture, taking care to make a level top. Place this cake in the freezer.
15. Place the second layer cake onto a cake stand. Scoop out ¼ cup of the white cake mixture and carefully roll it into a rope that’s about 1 inch in diameter. Cut off the ends to create a clean 2-inch-long cylinder.
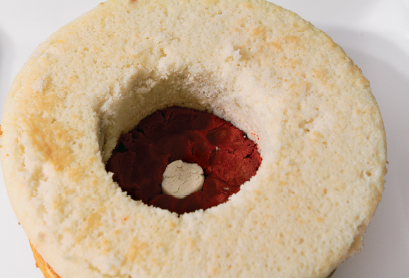
16. Stand the small white cylinder on end in the center of the cavity and fill all around it with red velvet cake mixture. Cover the top of the small white cylinder with a ¼-inch-thick layer of red velvet cake mixture.
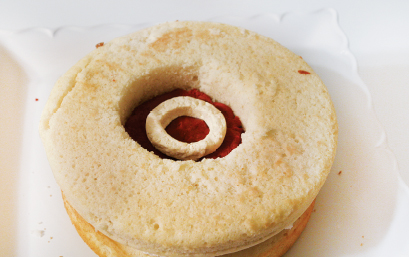
17. Now make a thin rope from the white cake mixture and cut it to a 6-inch length. Square off the edges with a knife so that it has 4 sides. Press one end against the other to make a circle. Center the circle on top of the red velvet cake mixture.
18. Gently fill the cavity with more red velvet cake mixture, taking care to make a level top.
19. Cover the top white part of this cake with a thin layer of white buttercream, taking care not to get any frosting on the red velvet cake mixture.
20. Remove the other layer from the freezer, then carefully flip it onto the palm of your hand and transfer it to the top of the layer on the cake stand. You’ve completed your house!
21. Cover the cake in a crumb coat and freeze it for at least 15 minutes, but preferably overnight.
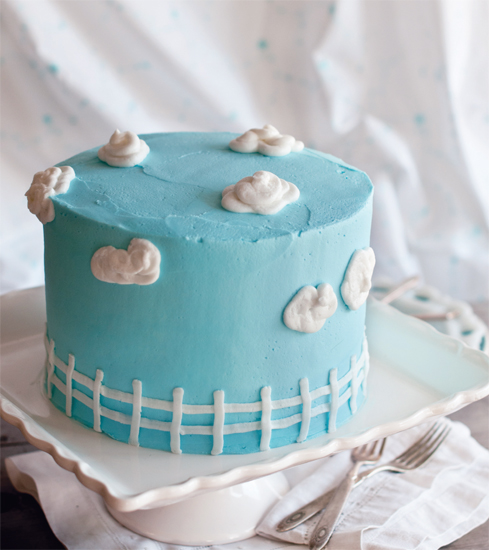
22. Reserve 1 cup of the remaining buttercream to leave white (and feel free to tint it with white food coloring to make it brighter). Tint the rest sky blue and use it to frost the exterior of the cake).
23. Insert a coupler into a pastry bag and attach a #46 decorating tip. Fill the pastry bag with white frosting. Pipe evenly spaced vertical lines around the bottom of the cake, making sure the serrated side of the tip is facing the cake, then finish the fence by piping white frosting in 2 rows across the vertical lines. Change to the #12 decorating tip and pipe out fluffy clouds.
24. Chill the cake until serving.