I highly recommend starting out simple. If you’ve never made a surprise-inside cake before, don’t start with the Cowboy Boot Cake. Instead start with the Rainbow Cakes or the Opposites Cake, both of which pack a punch with a minimal amount of effort on your part. The most important thing is to practice, practice, practice! Even if a design doesn’t turn out the way you envisioned it, the worst-case scenario is that you’ll still have a delicious cake to share!
Here are some general tips to help you achieve success with your surprise-inside cakes.
Read the directions from beginning to end before starting
Very important! An average cake in this book is baked over the course of a couple days, so be sure to give yourself enough time, including freezer time. When reading the directions, determine if there are any steps you can complete ahead of time. For instance, you can make buttercream and cake mixture days in advance.
While the steps and carving can seem daunting, the very best possible way to create these cakes is practice! If you’re making a surprise-inside cake for a specific event, consider making a practice cake first. I made the surprise-inside heart cake (from my blog http://iambaker.net/heart-cake-surprise-inside-cake/ and similar to the Rainbow Heart Cake) three times in one month and by the third go-round, my confidence level was very high! Once you create your first surprise-inside cake, any anxiety or nervousness will diminish and you’ll even be able to start envisioning your own designs.
Embrace learning
While I will always recommend starting out with an easier cake, truly the best way to learn is to try. I made the Cowboy Boot Cake a few times before determining that it just wasn’t going to be perfect. Did it mostly look like a cowboy boot? Yes. Would the person who I was giving it to understand the significance? Yes. Did it have to be perfect to be appreciated? Not at all.
Difficulty Levels
I’ve given each cake a rating of Easy, Medium, or Challenging. I highly recommend starting out simple. You’ll gain confidence and get a rhythm, and you’ll be off and running on more difficult cakes!
Easy: Anyone with a passion for baking can attempt these cakes! If you can follow a basic recipe, you’ll be able to make one of these—the time invested, number of steps, and amount of deconstruction is minimal.
Medium: These cakes require a bit more concentration and attention to detail. You should be comfortable with basic baking, be ready to commit some time, and be willing to step a bit out of your comfort zone.
Challenging: These cakes are for intermediate to advanced bakers. You should have a good grasp of how three-dimensional design works and feel very comfortable with cake deconstruction and reassembly. It’s best to attempt a challenging cake only after you’ve had success with a surprise-inside cake that has an easy or medium level of difficulty. If you’re making one of these for a special event, perhaps do a test cake (it will taste great no matter what!). Once you get your hands into a cake and have a successful completion under your belt, your confidence will soar and the “challenging” aspect won’t seem so daunting anymore!
Choosing a cake recipe
The beauty of these cakes is that you can make them with your favorite basic recipes. While I’ve provided a few favorites starting, I’m also a fan of using a box mix as a quick substitute (my favorite brand is Betty Crocker). And trust me—people will be so impressed with your skills that they’ll never realize you didn’t make it from scratch.
If you do want to use your own tried-and-true recipe, I encourage that as well! It can be gluten-free or sugar-free or dairy-free. You’ll have a cake that fits your dietary needs but is still visually stunning!
Flavors are up to you
I often choose cake flavors based on their color. You’re welcome to use any flavors that fit your needs and wants!
How to Bake a Level Cake (and How to Fix One That Isn’t)
Baking a level cake is one of the easiest and most difficult things in the world. Wait, that makes no sense at all. Is it easy or difficult?
Well, it helps if you have a perfectly balanced and uniform recipe. I tested and retested my Chocolate Cake and White Cake recipes, which are specifically created to be level, stable, sturdy cakes (see Cakes). If any alterations are made to a recipe—say, for flavor, consistency, or even altitude—the result is often a domed cake.
Here are a few tips to help you get perfect cakes every time!
Before Baking
Get an oven thermometer, and use it!
It’s very common for your oven to have hot spots or to be off in temperature. If your oven is not heating evenly, you’ll especially see this when cooking layer cakes. One layer could be done and the other still raw in the middle. This frustrating occurrence can easily be avoided! I bought a little oven thermometer at the store for a few dollars. Use it to determine the spot in your oven that has the most accurate temperature reading. Try to place cakes in that spot to ensure even and consistent baking.
Prepare your pans
I prefer to use a nonstick spray for my baking pans. Typically I buy one specifically made for baking.
Try using cake strips
These are water-soaked fabric strips that wrap around the cake pan. They can slow down the heat that reaches the edges of the cake and help with even baking. I’ve used both purchased cake strips and homemade, and I find that they both work equally well. To make your own, simply cut a towel into 1½-inch-wide strips. Thoroughly soak the towel strips in water prior to using. Place them around the outside of the cake pan and either tie them in place with a knot or insert a pin to fasten.
Don’t let cake layers touch one another or the sides of the oven when baking.
Make sure there is at least an inch between cake pans. I prefer to bake all my cakes on the center rack of my oven, approximately 9 inches from the top and 9 inches from the bottom. I can successfully bake four 8-inch layers or three 9-inch layers on the middle rack.
Don’t be an impatient baker.
Do not check on the cake before the halfway mark. If your cake needs 18 minutes to bake, you are safe to start checking it around the 13-minute mark.
Test the cake about 5 minutes before it’s supposed to be done.
Use a toothpick or cake tester and insert it into the cake. If any wet batter clings to the toothpick, the cake needs to bake more. If the toothpick comes out clean or with minimal crumbs, then the cake is done.
After Baking
If your cake still comes out domed even after you’ve taken precautions, you’ll need to carefully cut off the domed part with a serrated bread knife or a cake leveler. You can also place a clean dish towel over the hot cake and gently press down. This can help lower the dome but typically will not make the cake completely flat.
“Doming” isn’t my problem—what do I do if my cake falls in the center?
Specifically for these recipes, that’s not always a bad thing. As long as the cake is fully cooked in the center, you can still use it! You’ll often remove the center of the cake to make the surprise inside, so it might work to your advantage. If you really do need a level cake, you can always bake a new one and keep the collapsed cake in the freezer. It will work wonderfully for a future project!
What to do with extra cake
If you have leftover cake mixture or whole cakes, I would recommend freezing. But by far the best option is to eat it. Since we’re often gifting the cakes we make or sharing them on special occasions, having a little leftover cake can be a big treat to all those who have watched you make your labor of love.
Freezing cake
Success in making surprise-inside cakes depends on having them firm enough to cut and carve. This involves freezing the cake elements at various points in the process. It’s much easier to work on a chilled cake. You’ll be able to get precise cuts and almost eliminate crumbs.
For freezing multiple layers of cake, separate each layer with a sheet of parchment paper. If I’m using those layers within hours of placing in the freezer I will use a sheet of parchment between each layer. If the cakes will be in the freezer for longer than 6 hours I will wrap each layer in plastic wrap then place in a plastic sealable bag.
When freezing your cakes during the building process, follow the recommended time frames. For a cake that has been freezing overnight or for 24 hours, you have about 30 minutes to get all your modifications done before it starts getting too soft and crumbly.
My typical recommendation is to freeze a finished cake for at least 6 hours before serving. I often freeze my cakes for days! It’s amazing how quickly they thaw out. For a cake that has been in the freezer for 6 hours, I would recommend serving it right out of the freezer.
If you freeze a finished cake for longer, be sure to thaw it in the fridge and not at room temperature. The most important thing is to just make sure your cake has had a chance to chill and set up before serving. The more intricate the design in the interior of the cake, the longer it should chill.
Cutting and carving
The “surprise” in a surprise-inside cake will often depend on carving out cones, cylinders, channels, valleys, and wells from cakes. To direct the cuts, you’ll rely on things like cookie cutters, skewers, kitchen string, rulers—even a glass, bowl, or container lid, if it’s the right size. For cutting you’ll rely on cookie cutters (again), paring knives, serrated knives, soupspoons, baby spoons—whatever gets you the result you need! Whenever possible, I’ll suggest that you use commonly found household items.
It may take a bit of nerve the first time you cut out a cake cone, carve out a channel, or insert a column from one cake into another, but believe me—with every step you’ll gain confidence. It’s like the best parts of kindergarten, art class, and home ec—and it results in a beautiful edible product. What could be more fun?
Making cake mixture
Anytime I make a reference to a cake mixture, I’m talking about cake that has been crumbled and had frosting added to it for the interior of a surprise-inside cake. I learned the secret of cake mixture from another blogger, Angie Dudley (also known as Bakerella), author of Cake Pops. She’s a genius, and I’m in constant amazement at her work. Without her techniques, there are so many cakes I would never have been able to do!
You can use whatever flavor frosting you desire in the cake mixtures. I have found that most versions of buttercreams and cream cheese frostings work well. I prefer my cake mixture to have a Play-Doh-like consistency, which can sometimes mean using more frosting than cake. Be sure to test as you go, as this can vary based on personal preference.
For the color cake mixtures, you can go about achieving color in one of three ways (see below). I find that all the methods work equally well.
I prefer to use gel food coloring, and my favorite brands are AmeriColor and Ateco.
If you have leftover cake mixture, the first and best option is, of course, cake pops! I highly recommend getting Bakerella’s book and utilizing her methods and techniques.
How to tint your cake? Choose one!
|
Bake a cake in the color you’re trying to achieve, then add white (or a coordinating color) frosting to achieve the cake mixture consistency. For example, add ¼ cup white frosting to a blue 8-inch layer cake to achieve a blue cake mixture. |
|
Add your desired color frosting to crumbled cake. For example, add ¼ cup red frosting to a white crumbled 8-inch layer cake to achieve a red cake mixture. |
|
Combine crumbled white cake, white frosting, and the desired gel food coloring. For example, add ¼ cup white frosting to a white crumbled 8-inch layer cake. Add 2 to 3 drops of red gel food coloring to achieve a pink cake mixture. |
I love frosting cakes. To me, they’re a blank canvas ready to be beautified! But getting the perfectly crisp, clean base cake isn’t always easy. Through much trial and error, I’ve found a method that works for me, and I believe it can work for you as well.
If you see a frosting technique on one cake and want to pair it with a different cake, you should go for it! Just make sure you have all the necessary ingredients, tools, and gel food coloring and/or sprinkles needed to achieve your desired look.
Rotating cake stand—useful for making many of the surprises in this book and really handy for frosting and decorating as well
Baker’s blade or mudding trowel—handy for lifting and moving cakes
Offset spatula—great for frosting, whether your goal is smooth lines or swirls and different effects
Disposable plastic pastry bags and decorating tips—great to have lots on hand for experimenting!
Coupler set—this makes it easy to swap in different bags of frosting, which is handy when you’re frosting a large area or switching out different tips.

1. Place a leveled cake layer on a rotating cake stand. (You can also place your cake on your display cake plate and put that cake plate right on your rotating cake stand.)

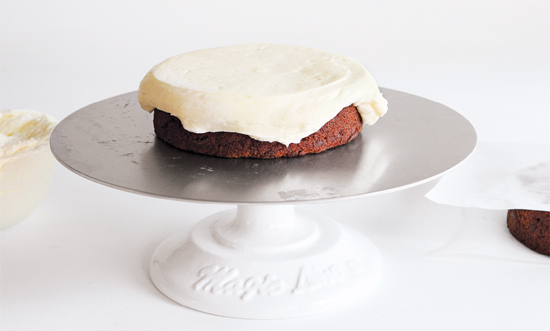
2. Using an offset spatula, place approximately ½ cup frosting on the center of the cake. The amount can vary depending on the size of your cake.
3. Place the spatula just above the surface of the cake and hold it still. Using your free hand, rotate the cake stand. You do not need to move the spatula, only the stand. Continue until you have a nice even surface of frosting anywhere from ¼ to ½ inch thick. The frosting will spill out over the edges, and that’s okay.
4. Place the final layer of cake on top. If the cake has more layers, just repeat steps 3 and 4 until you reach the top of the cake.
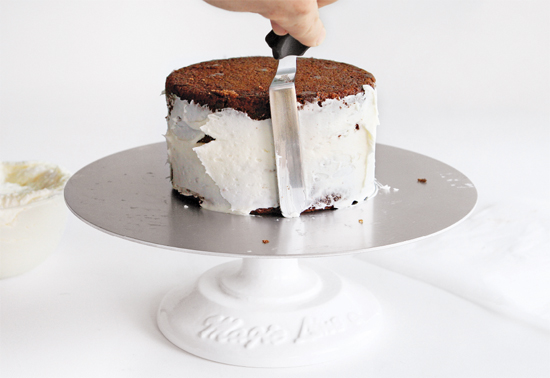
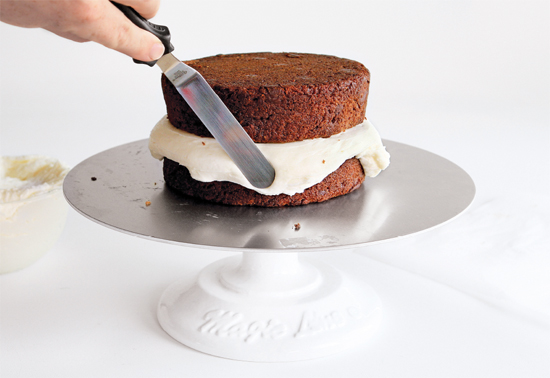
5. Now you’ll create the crumb coat of the cake—a thin layer of frosting that seals in all the crumbs to allow the next frosting layer to go on cleanly. Holding the offset spatula firmly against the side of the cake, begin to turn the cake stand again, spreading the frosting that has spilled out between the layers smoothly over the surface. Add more frosting to the spatula as needed—just keep the layer thin and smooth.
The crumb coat creates a nice, clean, smooth working surface for your cake decorations.
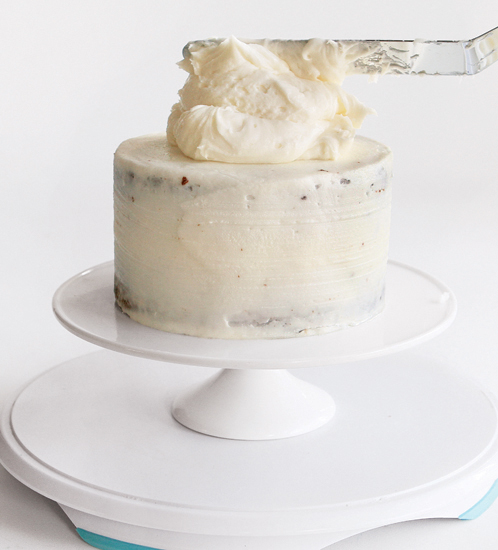
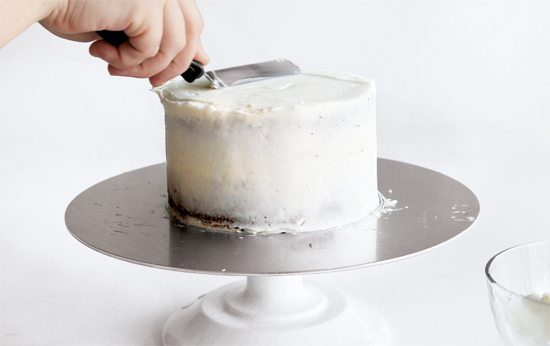
6. Place approximately ½ cup of frosting on top of the cake. Place the offset spatula level on the top surface of the cake and rotate the cake stand, creating a smooth, flat surface.
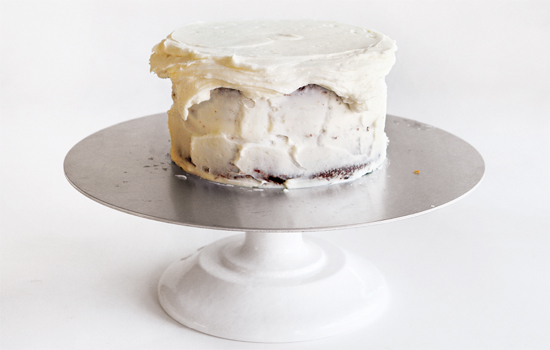
7. Now place the spatula firmly against the side of the cake. Rotate the cake stand and smooth out the excess frosting. If you need to wipe excess frosting off your spatula, be sure to do this into a separate bowl so you don’t get any crumbs in your frosting. If you come to a spot that needs more frosting, take some from the excess frosting bowl and continue to smooth the edges.
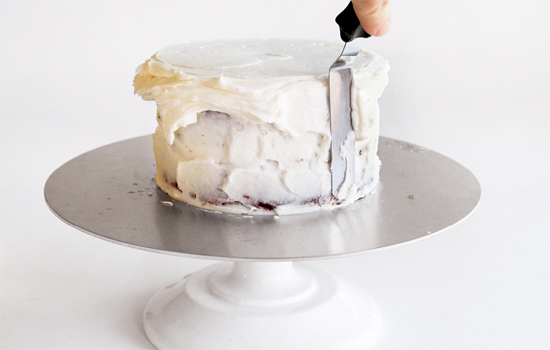

8. When you’re happy with the smoothness, turn your attention back to the top. Take your spatula and hold it just outside the edge of the cake.
9. Push the spatula toward the center of the cake, dragging along any excess frosting. Then lift the spatula and wipe it clean. Repeat around the entire perimeter of the cake.
10. Place the cake on the cake stand in the freezer. You want the cake to be very firm so it can easily be moved from the stand to a display plate, where it will receive the final decoration. This usually takes at least 2 hours.

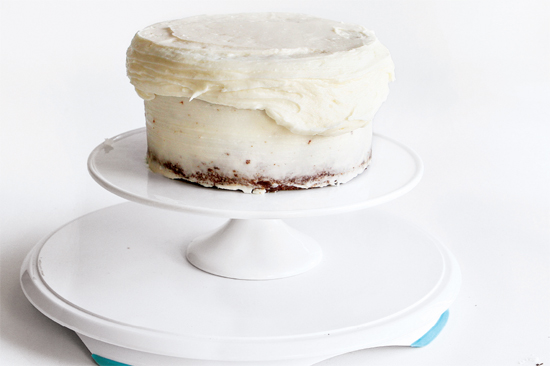
11. When your cake is nice and frozen, slide a baker’s blade under the cake as far as you can. Gently lift the whole cake, then quickly transfer it to your display plate, center the cake, and remove the baker’s blade. Place the cake back onto a rotating cake stand. (I switched to a lower stand to make things easier.)

12. Drop approximately ½ cup of frosting in the center of the cake and use the same method as in step 3 to create a level top.
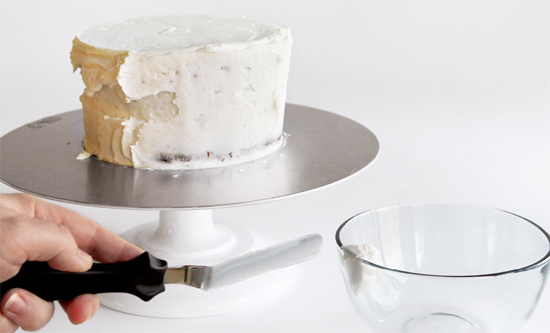
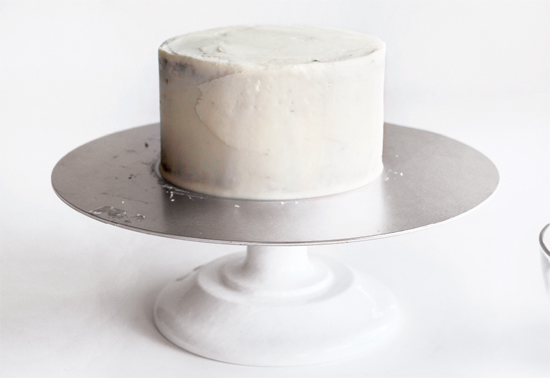
13. I switch between a baker’s blade and an offset spatula for the sides of the cake, using whatever tool feels most comfortable. Add more frosting around the base as needed. As in step 5, hold the spatula squarely against the side of the cake and rotate the cake stand, removing any excess frosting as you go. If there are spots that appear too thin, just go back and add a bit more frosting.

The very best way to get smooth frosting on a cake is to practice. I’m still learning new techniques and methods all the time!
I’ve found that while I love the look of sharp, clean lines on a buttercream-frosted cake, perfection is not necessary. The less time I spend worrying about how crisp my edges are, the more time I can focus on creating a beautiful, fun design.
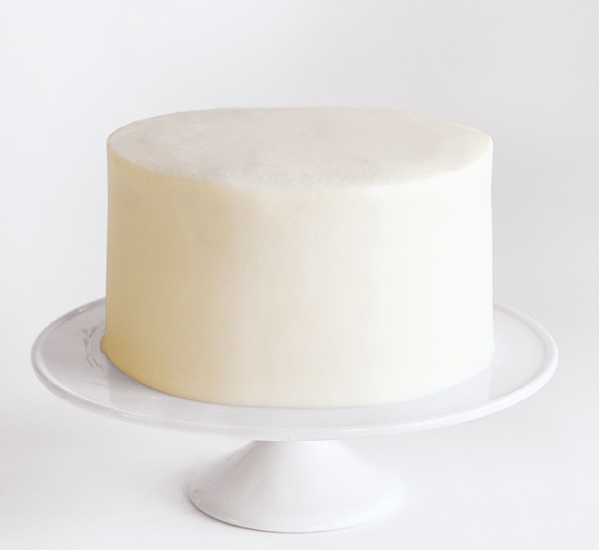
The perfect blank canvas.
How to Serve a Surprise-Inside Cake
Many cakes have special shapes in the center that require carving and/or cutting out the interior. This can change the structural integrity of the cake, so you’ll want to be careful when serving. I always try to serve a surprise-inside cake cold and place it back in the fridge after everyone has gotten a piece to keep it chilled for a second round. Most cakes will be just fine if kept at room temperature as well—you’ll just want to gauge the integrity after you’ve cut into it.
Basic Cakes and Frostings
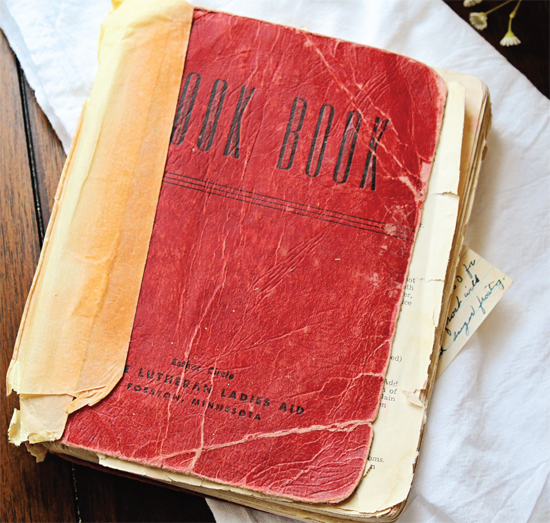
I’m happy to share some of my tried-and-true recipes with you—cakes and frostings that you can use as the building blocks for my surprise-inside cakes. A few of these recipes were handed down to me by Great-Great-Grandma Inga from her Hope Lutheran Ladies Aid Cook Book from 1955. The instructions in that beautiful cookbook are quite brief, so I’ve rewritten them in my own voice while still honoring the classic simplicity of the great bakers of my past.
I’ve also included the recipes for my favorite frostings. My basic buttercream recipe yields about 4 cups of frosting. I tend to have a heavy hand when decorating, so I tried not to get too specific with my suggested quantities. The general ratio goes a little like this: Figure about ½ cup of frosting between each layer of cake and 1 cup of frosting to crumb-coat one layer of cake. Any decorations will mean additional frosting is needed, but all exterior decorations are optional, of course.