This cake is dedicated to one of my very favorite people, the Pioneer Woman, blogger Ree Drummond, who’s been a blessing to me in many ways. Her help and advice throughout the process of writing this book has been invaluable. Through Ree’s blog I learned how to hold my camera, how to make jaw-dropping food, and that it’s okay to be in love with your dog! The surprise is cowboy boots: The outside is meant to look like denim (if you know Ree’s site, you’ll understand the significance there!), and the cut piece is sitting in a little cast-iron skillet, one of her favorite kitchen accessories!
This is a pretty tricky cake to make, but I think it’s fun to honor someone special in your life by personalizing a cake to fit their favorite things!
2 recipes White Cake
1 recipe Chocolate Cake
1 recipe Basic Buttercream
Royal blue and black gel food coloring
SPECIAL EQUIPMENT:
4 8-inch round cake pans; 9 × 13-inch pan; large and small offset spatulas; 2-inch, 3-inch, and 4½-inch round cookie cutters; small, sharp knife; disposable pastry bag; #4 decorating tip
DIFFICULTY: Challenging
1. Bake 4 layers of white cake in 8-inch round cake pans.
2. Prepare the buttercream.
3. Cool the layers to room temperature and place one of the layers on a sheet of parchment paper. Level the cake if needed.
4. Using an offset spatula, cover the cake layer with a thin layer of buttercream. Place another cake layer directly on top and freeze for at least 6 hours, preferably overnight. You’re looking for a firm, noncrumbling cake.
5. Repeat with the remaining 2 white layers and freeze.
6. Bake the chocolate cake in a 9 × 13-inch pan, then cool it to room temperature.
7. Remove any hard edges, then crumble the chocolate cake into a large bowl. Add 1 to 3 tablespoons buttercream and mix to create a cake mixture. You’re looking for a Play-Doh-like consistency.
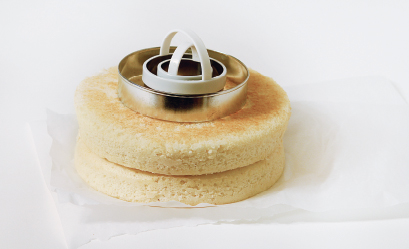
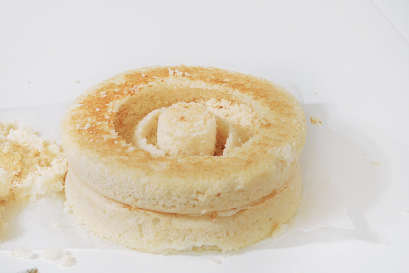
8. Working with one of the 2-layer cakes, center the 2-inch cookie cutter and press lightly to make a guideline. Repeat with the 3-inch and 4½-inch cutters.

9. Insert a sharp, thin knife into the 2-inch guideline and cut around the cake, following the guideline, until you reach buttercream (you cut through the whole first layer). Next, insert the knife at the 3-inch guideline and do the same thing, cutting through the first layer. Carefully go in and remove all the cake between the cuts, to give you a deep, round channel.
10. Make sure both cakes are well chilled at this point. If they seem at all crumbly, return them to the freezer.
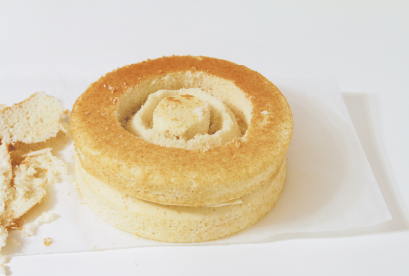
11. To protect it from damage, you may remove the remaining center section of the cake before you do any more carving. It should easily separate from the bottom layer of cake. It does need to be replaced when done, so if you choose to remove it while carving out the next layer, be gentle and set it somewhere safe.
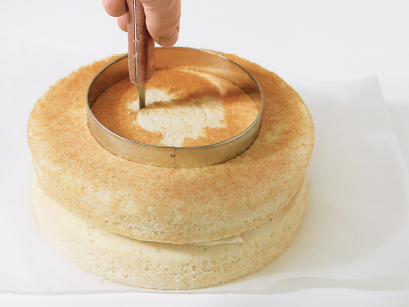
12. When you look at the profile of a cowboy boot, there’s a space between the heel of the boot and the front sole. You’ll work on this area next. Remove 1 cake from the freezer and set it on parchment. Insert your knife at the 3-inch guideline at a 45-degree angle toward the outside of the cake, then cut around the entire cake at this angle. You will cut through a single layer.
13. Remove the knife and insert it in the 4½-inch guideline at a 45-degree angle toward the outside of the cake. Cut around the entire cake, working as slowly as you need to.

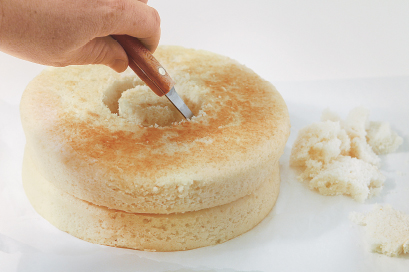
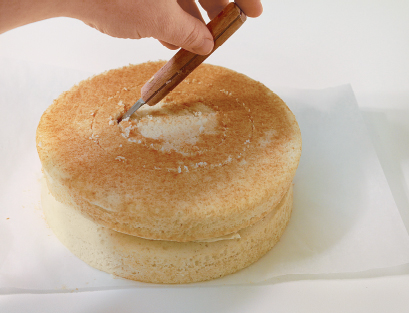
14. Using a baby spoon or a butter knife, carefully remove the cake between the two cuts. This is what it looks like when you first go in and start removing excess cake. You want a rounded toe to your boot.
15. Remove as many crumbs as you can, then place the cake back in the freezer.
16. Remove the second 2-layer cake from the freezer. For this cake we are forming the tall part of the boot that goes over the ankle and calf.

17. Find the center of the cake using a 2-inch round cookie cutter. Press in gently to make a guideline. Repeat with a 4½-inch round cookie cutter.
18. Insert a thin, sharp knife into the 2-inch guideline and cut through one layer of cake, working around the guideline and keeping the knife straight up and down. Repeat the cut on the 4½-inch guideline.

19. To make the notch at the top of the bootleg, start at a center point between the two guidelines, insert the knife at a 45-degree angle, and cut to the edge of the inner (2-inch) guideline. Cut around the entire cake, going through the top layer only.
20. Repeat, with the knife angled in the opposite direction.
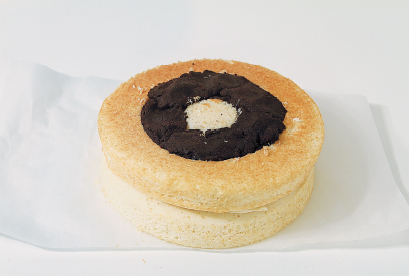
21. Remove the cake in this section except for the upside-down V that you carved in steps 19 and 20. Then gently fill the cavity with chocolate cake mixture.
22. Return to the other 2-layer cake (the lower part of the boot), and fill the cavity with chocolate cake mixture, starting with the heel of the boot and carefully building from there.

23. Place this cake on a cake stand and cover the edge and center of the white cake with a thin layer of buttercream, avoiding the chocolate cake mixture. Turn over the other cake and set it carefully on top. If the cake is crumbly, freeze it for at least 1 hour.
24. Cover the cake in a crumb coat.
25. Tint the remaining frosting dark denim blue. I used about 10 drops of royal blue gel food coloring, then added 1 small drop of black.
26. Using an offset spatula, cover the cake in a smooth coat of denim blue. Tint 1 cup of frosting a darker blue, with about 3 drops more food coloring.
27. Insert a #4 decorating tip into a pastry bag and fill it with the dark blue frosting. Pipe a thread detail along the edge of the top and the upper and lower edges of the cake. Then draw out a pocket shape on the side of the cake.
28. Using a small offset spatula or a butter knife, fill in the pocket outline with about 2 tablespoons of the darker frosting. Go back over with the #4 tip and pipe the thread detail.
29. Chill the cake until serving.