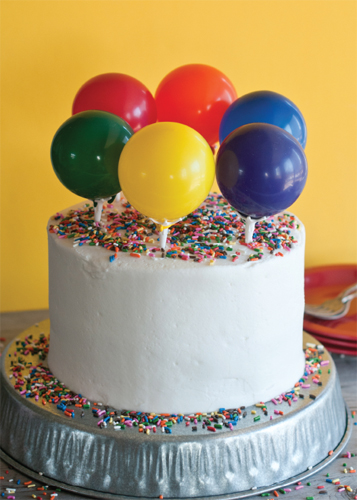
Not only does this cake have balloons on it, but it has a balloon in it. Not a real balloon, mind you, because that would be kind of gross, but a red velvet cake balloon. Now that, I do want to bite into!
My kids loved this cake and couldn’t get enough of these miniballoons. I went to a local balloon shop and purchased six balloons and six holders for a grand total of $2.57. The kids were awestruck that they had their very own balloon stuck into their slice of cake! And I was awestruck that they were entertained for three hours and that I actually got to enjoy a piece of the delicious cake for once!
Okay, it was two pieces.
2 recipes White Cake
½ recipe Red Velvet Cake
1 recipe Basic Buttercream
Rainbow sprinkles
SPECIAL EQUIPMENT:
4 8-inch round cake pans; 9 × 13-inch pan; offset spatula; 4½-inch round cookie cutter; 2-inch round cookie cutter; small, sharp knife; 6 miniballoons and holders
DIFFICULTY: Medium
1. Bake four white cake layers in 8-inch pans.
2. Bake the red velvet cake in a 9 × 13-inch pan.
3. Cool the cakes to room temperature.
4. Make the buttercream.
5. Set one white cake layer on a piece of parchment paper. Using the offset spatula, cover the top in a thin coat of buttercream, then add a second cake layer. Repeat with the other 2 cake layers to make a second 2-layer cake.
6. Refrigerate the cakes for at least 6 hours.
7. Prepare red cake mixture by crumbling the red velvet cake into a large bowl, removing any dark or hard spots as you crumble. Add 2 to 4 tablespoons of buttercream and combine to make a cake mixture. You’re looking for a Play-Doh consistency. Refrigerate the cake mixture in a plastic bag or storage container while you work on the white cakes.
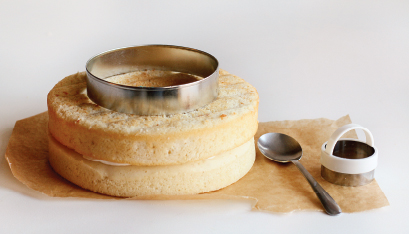
8. Remove one cake from the refrigerator. Center a 4½-inch round cookie cutter on the cake and press in gently to make a guideline.

9. Center a 2-inch round cookie cutter on the guideline and tip it over to use as a scoop. Slowly pull the cutter around the top of the cake, keeping it centered on the guideline. Remove the excess cake and discard (or use it to make cake pops). It’s important that the cake not become too crumbly or soft, so freeze it for 30 minutes or so if you’re finding it hard to work with.
10. Repeat with the second layer cake.

11. Next you’ll create the knot at the bottom of the balloon. Working with one of the two cakes, use a small, sharp knife to make a guideline through the bottom center of the channel you just created. Cut gently on either side of the guideline with your knife to make a minichannel. Use the tip of the knife to carve out the crumbs. To remove the crumbs, place your hand flat over the center of the cake and tip the cake over so the crumbs fall into the sink or garbage. This is much easier than trying to dig out each little crumb! This works best if your cake is very cold and solid.
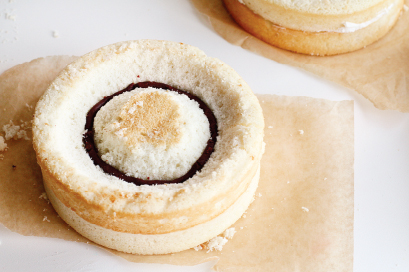
12. Remove a golf ball–size portion of red velvet cake mixture and roll it into a snake about the size of the minichannel you just carved. Insert it carefully into the channel, making sure it’s level with the bottom of the larger channel.
13. Next, fill the entire cavity with red velvet cake mixture. This is the bottom of your cake—be sure to keep track. An easy way to keep track is to write “bottom” on the parchment or put a small dollop of buttercream on the outside of your cake.
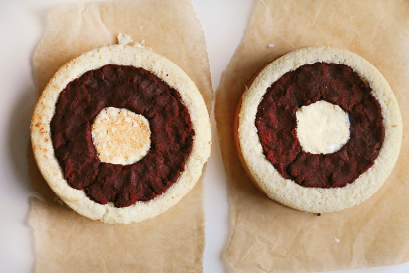
14. Fill the other cake with cake mixture as well.
15. Place a thin layer of white buttercream around the top of the bottom layer (both the outside and the island), taking care not to get it on the red velvet cake mixture.
16. Carefully flip the top cake onto the palm of your hand and place it on top of the bottom cake layer. Try to align the two cakes as much as possible so that the red velvet mixtures meet evenly.
17. Cover the cake in a crumb coat and chill for at least 2 hours.
18. Cover the cake in a smooth coat of buttercream. Assemble the balloons and holders and insert them into the cake.
19. Cover the top of the cake in rainbow sprinkles.