Every day I teach my kids not to be selfish:
“Put others’ needs first.”
“Give one to your sister before you eat them all.”
“Share with him the way you want him to share with you.”
On the day I made this cake, I cast selflessness to the wind. I couldn’t help it. I love brownies. I love strawberries. I love mounds of sugary whipped frosting. I love milk chocolate.
I love this cake. And I wanted it all for myself.
It’s probably the easiest cake in the book. If you can turn on a mixer, you can do it. Heck, you don’t even need a mixer. Just give it a shot. I promise you won’t be disappointed.
1 recipe Decadent Brownies
1 recipe Strawberry Cake
½ recipe Chocolate Buttercream
2 16-ounce containers of whipped topping, such as Cool Whip, very well chilled
12-ounce bag of milk chocolate chips
½ cup canola oil
SPECIAL EQUIPMENT:
9-inch round cake pans; cake leveler or long serrated knife; disposable pastry bag; small offset spatula
DIFFICULTY: Easy
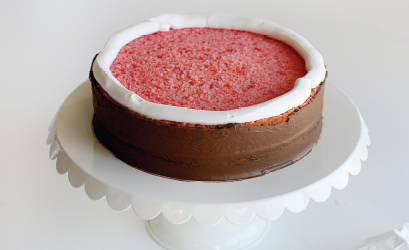
1. Bake the brownies in a 9-inch round cake pan.
2. Bake the whole strawberry cake recipe in a single 9-inch pan. You may need to add extra time for baking.
3. Cool both the cake and the brownies to room temperature.
4. Prepare the chocolate buttercream.


5. Level the strawberry cake to the height of the brownies. A hand-held leveler works best, but you can also use a long serrated knife.
Making the Surprise
6. Place the brownie layer on a cake stand, then set the strawberry layer on top.

7. Using the offset spatula, cover the sides of the cake with chocolate buttercream.
8. Place the whipped topping in a pastry bag and cut off the tip so that you have an opening about 1 inch wide. Pipe out a circle of whipped topping around the perimeter of the cake. This wall will help to keep the whipped topping in place.

9. Scoop extra whipped topping onto the cake and smooth it with an offset spatula.
10. Moving slightly in, pipe out another circle on top of the layer of whipped topping. Fill the center with more whipped topping. Continue this process until you have a nice point on top. If the whipped topping is not holding the layers, remove what you have and chill it until it’s sturdier. You can then start again. Smooth the sides, if necessary, when you are done.
11. Freeze the cake for 30 minutes before coating it in chocolate; if you won’t be serving the cake quickly, keep it in the fridge overnight.
Frosting and Decorating
12. Pour the chocolate chips and the canola into a heat-safe bowl. Heat 1 cup of water in a small saucepan over medium-low heat (you want a simmer, not a rolling boil). Set the bowl of chocolate over the saucepan and heat, stirring, until the chips are melted.
13. Pour the chocolate into a high-sided container. Let it sit for a few minutes to cool down.
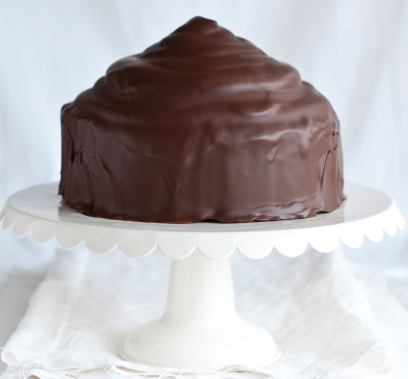
14. Lay 4 pieces of parchment around the base of the cake. Pour the chocolate over the cake, coating the whole thing.
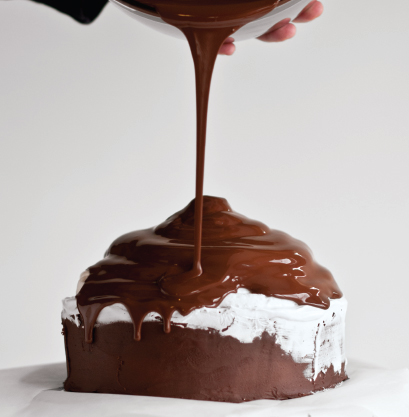
15. Let the chocolate set for about 5 minutes, then remove the parchment paper. (You can remove the paper earlier if you like the look of chocolate puddles—I kind of do!)
16. Keep the cake chilled in the fridge until ready to serve. Dip a knife in hot water before using it to cut the cake.