My niece Inga Grace is supersmart. She’s a human sponge, just absorbing information all around her at all times.
I remember when she was three years old she sat me down and recited every one of Santa’s reindeers. Every. Single. One. She obviously sensed my awe at her abilities, and I believe it dawned on her that she could do something that I could not do.
She leaned in close, patted my hand, and said, “It’s okay, Aunt Amanda. I will teach you.”
To this day she teaches me something new every time I see her. Clearly she inherited her smarts from her aunt Amanda.
2 recipes White Cake
Red, brown, and black gel food coloring; white gel food coloring (optional)
1 tablespoon cocoa powder
1 recipe Basic Buttercream
¼ cup milk chocolate chips
SPECIAL EQUIPMENT:
4 6-inch round cake pans; 3-inch round cookie cutter; offset spatula
DIFFICULTY: Challenging
1. Prepare one of the white cake recipes in two 6-inch round cake pans (you may need a little extra baking time when using 6-inch pans).
2. Prepare the batter for the second white cake and divide it in half. Tint half the batter red. (If you add 1 tablespoon cocoa to the white cake batter, you’ll be able to use less red food coloring.) Bake 1 white and 1 red layer in two 6-inch round cake pans.
3. Cool the layers to room temperature, then freeze them for at least 6 hours, or overnight.
4. Prepare the buttercream. Place 2 cups of the buttercream in a bowl and color it medium brown with food coloring.
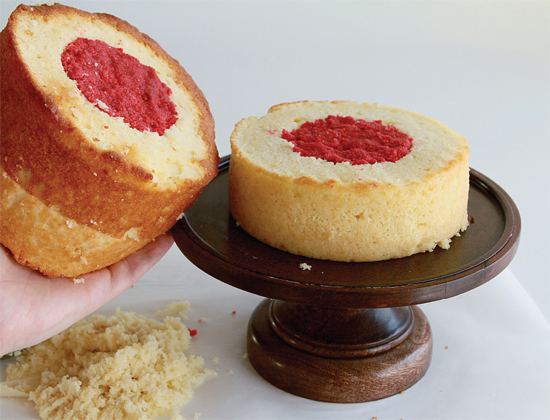
5. Place the three white layers on a piece of parchment paper. Make sure the layers are level and all the same height.
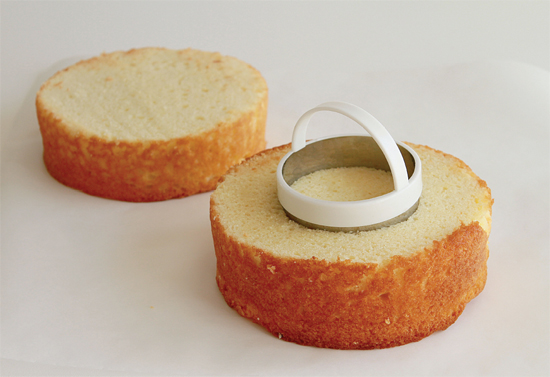
6. Center a 3-inch round cookie cutter on top of one of the white layers and press in to create a guideline. Repeat on a second layer.

7. Use a teaspoon to dig out a channel in the first layer. Follow the guideline and cut in about 1 inch deep. (To ensure a consistent depth, I wrap a piece of tape around the spoon. When I insert the spoon into the cake, I know not to go beyond the line of the tape.) Save all the cake scraps in a bowl.
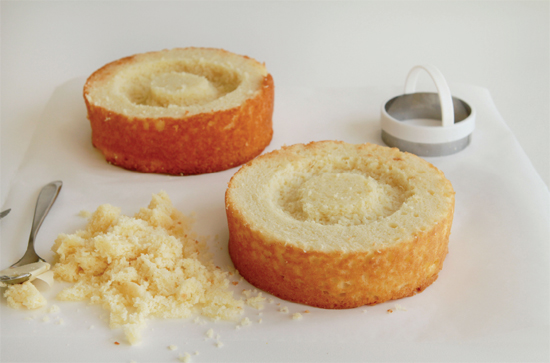
8. Dig a shallower channel, about ½ inch deep, around the guideline on the other layer. This will be the upper part of Rudolph’s eyes. Set this layer aside.
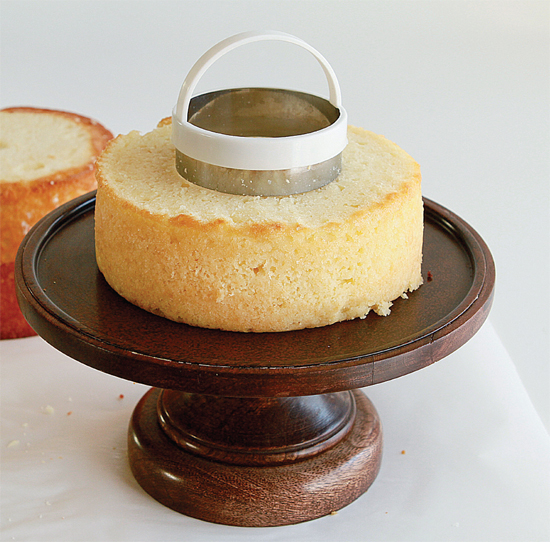
9. Place the uncut white layer on a cake stand. Use the 3-inch cookie cutter to press a guideline in the center.
10. Now go back to the layer with the deeper channel and flip it over. Cut a guideline in this layer as well.
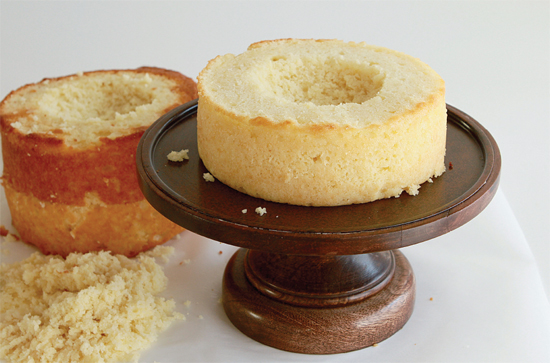
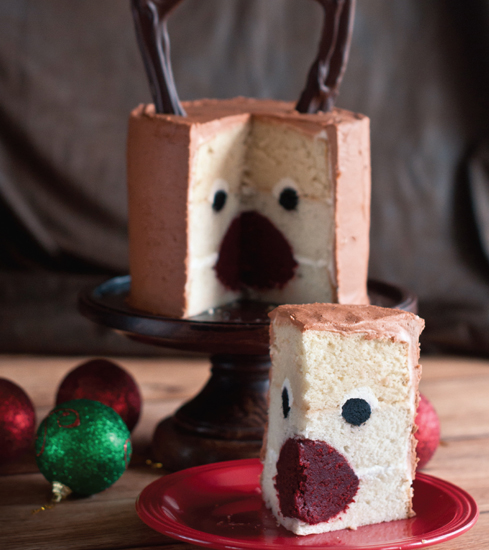
11. Gently scoop out cake within the guideline on the layer on the cake stand. You’re carving out a bowl in the cake, but keep it shallow—1 to 1½ inches deep, tops. Repeat with the second layer, being careful, as a channel is already cut into this layer on the other side. You’re creating Rudolph’s nose! Remember to save those cake scraps.
12. Crumble the red cake, removing any hard bits or edges, into a bowl and add 1 to 2 tablespoons of buttercream (either white or red will work). Create a pliable cake mixture.
13. Fill the bowl in the layer on the cake stand with red cake mixture. Using an offset spatula, spread a thin layer of white buttercream around the top edge of the layer, taking care not to touch the red cake mixture. Then fill the bowl in the other layer with cake mixture as well.
14. Divide the white cake scraps between 2 bowls. To the first bowl add about 1 teaspoon of white buttercream and a few drops of black gel food coloring. Combine to make a black cake mixture.
15. To the second bowl add about 1 teaspoon buttercream and a bit of white food coloring if you have it on hand. Combine to make a white cake mixture.

16. Roll the black cake mixture into a snake. Carefully flip over the layer on the parchment paper that is filled with red cake mixture. Fill the channel with the black cake mixture.
17. Roll the white cake mixture into a thicker snake and place it on top of the black snake. Gently press the white down around the edges of the black snake.
18. Spread a thin layer of white buttercream around the top edge and center of the layer, avoiding the snakes. Turn over the cake layer with the shallow channel and nestle it onto the snakes so that they fit inside the channel.
19. Then gently flip the two layers over onto the layer on the cake stand so that the red nose meets in the middle.
20. Cover the cake in a crumb coat.

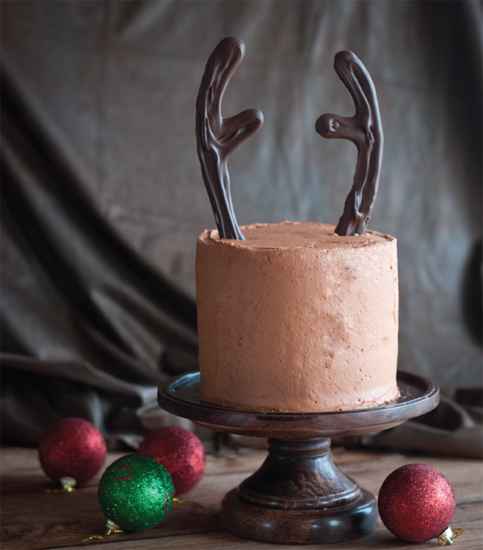
21. Draw an antler shape on paper. Add 2 inches to the bottom of the antlers, since you’ll need extra to insert into the cake. Hold the drawing next to the cake and make sure the antlers are the right size. Place the antler tracing underneath a piece of parchment or wax paper on a baking sheet.
22. Place the chocolate chips in a disposable plastic pastry bag. Microwave on high in 30-second bursts until they’re fully melted.
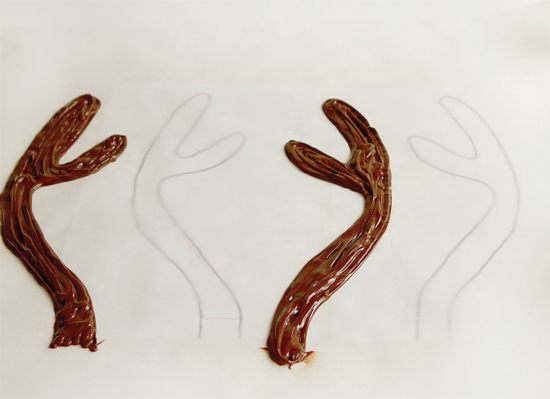
23. Cut a very small tip from the pastry bag and pipe the chocolate onto the parchment paper following the lines of the antler drawing. I made an extra set of antlers just in case.
24. Place the baking sheet in the freezer for 1 or 2 minutes or in the fridge for 15 to 30 minutes.
25. Cover the cake in a slightly rough coat of brown buttercream.
26. Chill the cake. Right before serving, peel the parchment away from the chocolate antlers and insert them into the cake.