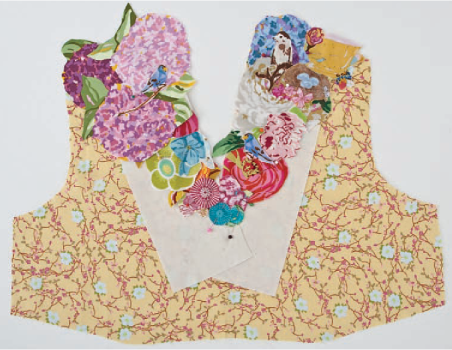
The bias cut of the fabric and the eased shoulders of the pattern make the fit super comfy. With its floral collage neckline, this piece is highly original while still being stylish and contemporary.
Before you begin this project, especially if you’re new to garment sewing, carefully read Keeping It Real: Garment Sewing 101 (page 29). Also see Sewing Basics on page 20.
* ½ yard of small-print fabric (Fabric A) for the tunic front top
* ⅞ yard of large-print fabric (Fabric B) for the tunic front bottom and neckline facing
* 1¾ yards of small-print fabric (Fabric C) for the tunic back
* 1 yard of large-print fabric (Fabric D, or repeat Fabric B) for the sleeves
* ⅓ yard of fabric for ties, cut into 2 pieces 4” × 38” (This can be a different fabric or the same as one of the other fabrics.)
* 20–30 large floral motifs for the neckline collage
* 3 strips 4” × 10” of muslin for the collage foundation
Patterns are available to print from (http://tinyurl.com/InspiredToSew-Patterns)
* Cut out all pattern pieces and mark notches and darts.
* Cut 1 piece 1¼” × 35” of Fabric B for the neckline facing.
note: Cut the pieces on the grainline as marked. Several are cut on the bias.
1. Zigzag stitch all edges of each piece and the facing.
2. Sew the tunic back pieces together along the center seam. Press.
3. Sew the darts in the front top of the tunic as marked. Start at the bottom raw edge and backstitch. End at the bust point, and knot the threads by hand instead of backstitching. Backstitching at the bust point will cause an unattractive lump in the fabric. Press.
4. With centers matching, sew the tunic front top to the tunic front bottom. Press.
5. Sew the front to the back at the shoulder seams. Press.

Keeping It Real
Sewing Long Stretches of Fabric
This is a great trick to make sure your ends match up when you sew a long seam: Match up and pin the centers of the 2 pieces that you want to sew together. Sew from the center to an end, and then from the center to the other end.

1. Fold each tie in half lengthwise, right sides together, and press. At an end of each tie, fold the raw edge up toward the folded edge to create a triangle.
2. Starting at the tip of the triangle, sew the fabric together as shown. Trim the excess fabric at the corner. Press, turn, and press again, teasing the seam out neatly.

Keeping It Real
Turning Corners and Edges
It’s often not easy to get the corners of pieces like these ties turned completely. I suggest poking out the corners with the end of a paintbrush and then using a pin to pull the tiniest bits out of the ends.
For fabric collage information, see Keeping It Real: Free-Motion Quilting and Fabric Collage (page 63).
note: The facing you are attaching in these steps will be flipped to the inside of the tunic. The fabric collage will be on the outside.
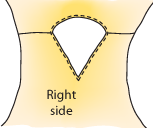
1. Starting at the point of the V, topstitch around the neckline ¼” from the edge, backstitching at each end.
2. With right sides together, center and pin the facing to the neckline, with the excess ends of the facing at the V.

3. From the right side of the tunic, start at the V and sew the facing in place along the topstitching line. As you approach your starting point at the V, fold back the facing you left hanging at the end. Sew right up to the fold, and backstitch.
4. Clip the seam at the V right up to the stitching but not through it, and press the seam toward the facing.
5. Fold the raw edge of the facing to the wrong side of the tunic, aligning the facing edge with the stitching line, and pin in place. Press. From the right side, edgestitch the facing ⅛” from the seam. This sews the seam allowance to the facing and makes the facing “want” to fold toward the wrong side of the neckline.

6. Press the facing to the inside along the seamline. Edgestitch close to the neckline edge, starting and ending at the V and backstitching at both ends.

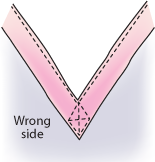
7. At the V on the inside of the tunic, trim the excess fabric ends evenly to 1". Overlap and stitch them together (not to the tunic), sewing a square as shown.

The floral motifs should be both large and small pieces. Having varying sizes will create interest plus allow you to make the collage gradually wider toward the shoulder line.


1. Place 4”-wide strips of muslin on the neckline, overlapping into the opening. You’ll need to use 3 strips: 1 for each side and 1 for the back.
2. Pin motifs artfully around the neckline. As I pinned mine on, I started narrower at the V and spread the design out as I got to the shoulder seam and the back of the tunic. Make sure all the pieces are pinned on well by giving it a shake. You don’t want any pieces flipping and flopping as you quilt.

3. Using a free-motion machine foot, stitch down all of the pieces, removing the pins as you go. Be careful around the shoulder seam—it’s easy to fold the fabric of the tunic in on itself and sew it together at that point. Trim off the extra muslin along both edges of the collage. Be careful not to cut into the tunic.
4. Zigzag stitch around the inside raw edge. Go 3 times around, making your stitch length shorter each time to achieve a satin-stitch effect. The outer edges will be left raw.
1. First, create the ease in the shoulders. When you cut out the sleeve pattern, you made 2 notches to mark the ease, notches to mark each sleeve front and back, and a notch to mark the shoulder seam. Using a basting stitch, sew from one ease notch to the other. Pull the thread to gather. With right sides together, pin the shoulder notch of each sleeve to the shoulder seam of the tunic.
2. Align the underarm edges of each sleeve with the side edges of the tunic and pin. Spread the ease evenly across the shoulder from notch to notch. Pin the whole edge in place, matching the shoulder notch to the shoulder seam, and then sew the sleeve to the tunic.
3. Turn the tunic wrong side out. Pin the tunic ties in place, with raw edges aligned above the seam between the tunic front top and bottom, keeping ties toward the inside of the tunic. With right sides facing, match the ends of the armhole seam and pin. Pin the sleeve edges together and the tunic side seam edges together.
Keeping It Real
An Easy Way to Hem
I often topstitch ¼” from the bottom edge of a piece I’m going to hem. This puts a very clear mark at the point where I will fold and press the hem, making the hem nice and even.
Keeping It Real
Pinning with Ease
To ease a seam, I find it best to first pin each end of the whole section in place. Then I pull the fabric from the end up to the notch so it is nice and flat up to the point of the ease. Do this on both the front and the back of the seam allowance. That way, the extra fabric is in the ease. Spread the ease evenly across the ease allowance.
4. Sew from the armhole seam to the bottom edge of the tunic, and then sew from the armhole seam to the end of the sleeve. Press.
note: It is important that you sew in the same direction on both sides. Doing this ensures that the flow of the fabric is the same on both sides.
1. Press the bottom tunic edge under ¼” and then under ¼” again.
2. Topstitch on the wrong side of the tunic, ⅛” from the top of the folded edge.
3. Repeat these steps to hem the sleeves.