Making a Ribbon-Tied Pillow Back
This style of pillow back is pretty to look at, and it lets you remove the pillow form easily if you want to clean the pillow cover. I have you make this back for the Sweet Home Chicago Pillow (page 109) as well as the Flowering Container Garden Pillow. See Sewing Basics on page 20.
1. Fuse interfacing to the wrong sides of the pillow back pieces. On a long edge of each, turn under ¼” and press, then turn another ¼” and press. Stitch ⅛” from the folded edge.
2. Place the 2 back pieces right side up on the wrong side of the pillow front, aligning and overlapping them to match the size of the pillow front. Pin the overlap together at the top and bottom edges (don’t pin the back pieces to the pillow front yet). Baste the overlapping edges together ⅛” from the top and bottom edges.
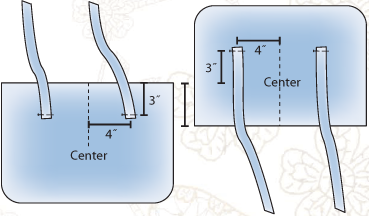
3. To mark the placement of the ribbon ties, measure and mark the center of the overlapping edges. Place the tie marks 4” from the middle and 3” back from where the pieces overlap. Fold an end of each piece of ribbon under ½” and pin the ribbons in place as shown, with the folded raw edges tucked underneath.

Note: Pieces shown side by side to show overlap. The two pieces are actually overlapped and basted together at the point.
4. Sew the ribbons in place and topstitch a rectangle with an X through the middle on the folded ends.

5. Pin the pillow front and back together with right sides facing and edges even. Cut the back corners to match the front corners. Sew together and press. Clip the rounded edges to—but not through—the stitching, and turn the pillow right side out.