
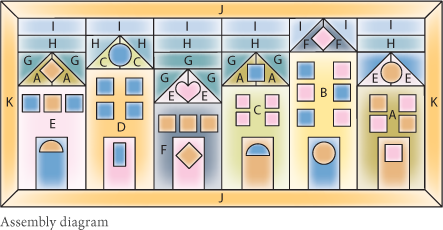
You can use a fun mix of prints for the row houses. Sometimes the fabric motifs add extra “architectural” details, as on the right-hand row house in the photo on page 108.
* ¼ yard or 1 fat quarter each of 6 coordinating fabrics for the row houses (fabrics A-F)
* ⅛ yard each of 3 or 4 blue fabrics for the sky (fabrics G, H, I)*
* ¼ yard of coordinating fabric for the border (fabric J)
* ¾ yard of coordinating fabric for the ruffle (fabric K)
* ⅞ yard of coordinating fabric for the pillow back
* ⅛ yard each of 3 colors of wool or wool blend felt for the window and door appliqués
* 5 yards of thin elastic cord for gathering the ruffle
* 1 yard of woven cotton fusible interfacing
* 2 yards of ribbon for the back ties
* 28” × 14” pillow form
* Appliqué glue
*“You’ll be using the wrong side of the sky fabrics, so turn them over to see how you like them. Even prints that contain darker colors, such as brown, can work well.
Keeping It Real
Cutting Half-Square Triangles
There are several methods of cutting half-square triangles. In my directions I ask you to cut squares at 2⅞". This is the most accurate way to get your squares to the correct finished size. You simply add ⅞” to the desired finished measurement. However, many people round up to the next inch and trim after they sew the triangle. If you feel more confident doing it that way, by all means do so. But if you have a clear quilting ruler and a ¼” foot on your sewing machine, you should have no problem using the ⅞” measurement.
Patterns are available to print from (http://tinyurl.com/InspiredToSew-Patterns)
note: Before you cut the squares for the half-square roof and sky triangles, see Keeping It Real: Cutting Half-Square Triangles (page 110).
Row houses:
* Cut 1 piece 4½” × 6½” and 2 squares 2⅞” × 2⅞” each from fabric A, fabric C, and fabric E.
* Cut 1 piece 4½” × 8½” from fabric B.
* Cut 1 piece 4½” × 7½” from fabric D.
* Cut 1 piece 4½” × 5½” from fabric F.
Sky:
* Cut 1 piece 4½” × 1½” and 4 squares 2⅞” × 2⅞” from fabric G.
* Cut 4 pieces 4½”× 1½” and 1 square 2⅞” × 2⅞” from fabric H.
* Cut 5 pieces 4½” × 1½” and 1 square 2⅞” × 2⅞” from fabric I.
Border:
* Cut 2 strips 2” × 33” and 2 strips 2” × 20” from fabric J.
Ruffle:
* Cut enough 4½”-wide strips from fabric K to total a minimum of 168” when pieced together end to end.
Pillow back:
* Cut 2 pieces 27½” × 11” from the pillow back fabric.
Window and door appliqués:
From felt color 1:
* Cut 1 strip 1½” × 6”; subcut into 2 rectangles 1½” × 3”.
* Cut 1 strip 1” × 10”; subcut into 10 squares 1” × 1”.
* Cut 1 rectangle 1” × 1½".
* Cut 1 circle, pattern C.
* Cut 1 half circle, pattern HC.
From felt color 2:
* Cut 1 strip 1½” × 6”; subcut into 2 rectangles 1½” × 3”.
* Cut 1 strip 1” × 11”; subcut into 11 squares 1” × 1”.
* Cut 1 heart, pattern H.
From felt color 3:
* Cut 1 strip 1½” × 6”; subcut into 2 rectangles 1½” × 3”.
* Cut 1 strip 1” × 8”; subcut into 8 squares 1” × 1”.
* Cut 2 circles, pattern C.
* Cut 1 half circle, pattern HC.
Interfacing:
* Cut 1 piece 27½” × 13½” for the row houses.
* Cut 2 pieces 27½” × 10” for the pillow back.
note: To create a faded look for the sky pieces and for maximum contrast between the roofs and the sky, use the wrong side of the sky fabrics. Also see Sewing Basics on page 20.
1. You will make 6 sets of 4 triangles, 1 for each row house roof. Refer to the assembly diagram to see which fabrics to use.
2. To create a set of 4 triangles, sandwich the right side of a roof square to the wrong side of a sky square.
3. Using a quilting ruler and either chalk or an air erasable marker, draw a line from a corner to its opposite corner on a diagonal. Then draw a line ¼” to each side of the diagonal line.
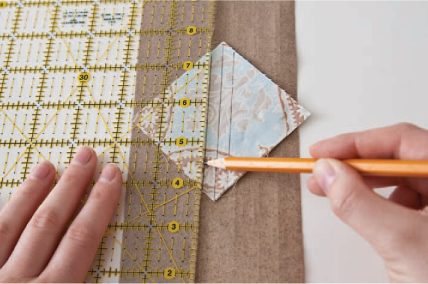
4. Stitch on the 2 outer lines and cut the square in half along the middle line. You now have 2 pieced squares made of 2 triangles each. Repeat to make 6 sets, keeping the sets paired together.
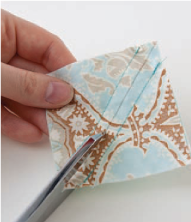
5. You can either press seams toward the darker fabric so the seam doesn’t show through or press 1 seam of each square in each direction, which is what I like to do. I find it easier to piece the squares together this way in the next step.
6. To complete a roof, layer 2 corresponding roof pieces, right sides together, with the raw edges of the roof fabrics aligned. Make sure the seams are matched up, and pin in place.
7. Using a ¼” seam allowance, sew the raw edges of the roof triangles together. Press the seam to one side. Repeat for the remaining 5 roofs.

1. Sew each roof to its row house. Then sew the 4½” × 1½” sky pieces above the roofs, following the assembly diagram on page 112. Press the seams of the row house / sky sets in alternating directions—one up and the next down.
2. Sew the 6 row house / sky sets together, making sure the seams match as indicated in the diagram.
note: To avoid a warp in the fabric, stitch the seams between the row houses in opposite directions. So if you sew the first row house from top to bottom, flip the pieces over and sew the next seam from bottom to top.
The contrasting border for this pillow is mitered at the corners like a picture frame. For general instructions, see Keeping It Real: Making A Mitered Border (page 115).
1. Press the 27½” × 13½” piece of interfacing to the wrong side of the assembled row house panel, with borders.
2. Using appliqué glue and referring to the assembly diagram (page 112), glue the felt pieces to the houses.
3. Stitch each felt piece in place with a hand or machine blanket stitch. I used contrasting thread for each. You can do the same or use matching thread.
4. To create panes on the windows, stitch across the centers horizontally and vertically, using a tiny zigzag stitch.

1. Sew together the strips of ruffle fabric, using diagonal seams, to create 1 strip about 168” long.
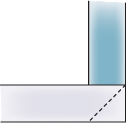
2. Join the ends of your strip together, also using a diagonal seam, to create a big circle. Fold it in half lengthwise, wrong sides together, and press.
Keeping It Real
Foolproof Ruffles
There are many ways to make ruffles. The one I like best is using a ruffler foot (page 13) on my sewing machine. However, if you don’t have a ruffler foot, a great alternative is to use elastic cord. I like this method because it creates such pretty, even ruffles and it avoids the problem of breaking thread, which can happen when you use a basting stitch and pull it to create a ruffle.
If this is your first ruffle-making experience, I also want to mention something that surprised me the first time I made ruffles. I thought I’d done something terribly wrong when the raw edges frayed as I pulled the thread. Don’t fret when you see this. It happens. Just trim the edges neatly before you sew the ruffle on.
3. Fold the whole piece in half crosswise to find the center of each side, and mark each with a pin.
4. Set your sewing machine to a zigzag stitch wide enough so the stitches straddle the elastic cord.
5. At the machine, align the elastic cord about ⅛” from the raw edge of the folded ruffle; center the needle over the center of the elastic cord.
6. Leaving 3”-4” of elastic cord hanging loose at each end, zigzag stitch over the cord, going all the way around the ruffle raw edge. Be very careful not to stitch through the cord. Trim the edges and press.
7. Fold the pillow front in half crosswise and mark the center of each long side with a pin. Match the centers of the ruffle to the centers of the pillow, and pin the ruffle to the right side of the pillow front, with raw edges together.
8. Pull the elastic cord to create the ruffle, pulling until the ruffle fits the pillow edges. Arrange the gathers evenly and pin the ruffle in place.
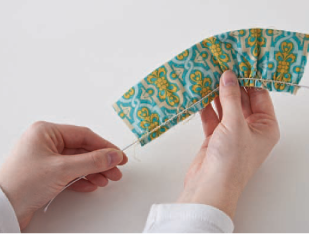
9. Sew in place by creating a seam all the way around the inside of the piece of elastic cord. You can use the cord as a guide, but make sure you keep the raw edges in place and do not catch the threads from the zigzag stitching.
This pillow has rounded corners and ribbon ties on the back. For complete instructions on cutting rounded corners, see page 67. For making this kind of back, see Keeping It Real: Making a Ribbon-Tied Pillow Back (page 69).
1. Pin the completed pillow front and back, right sides together, with the front piece on top so you can see where the ruffle is stitched on. Using a ½” seam allowance, sew all the way around the edge of the pillow, stitching just inside the ruffle stitching line so the ruffle stitches won’t show. Press, trim the corners, and turn through the back opening.
2. Insert your pillow form, fluff, and tie the ribbon ties.