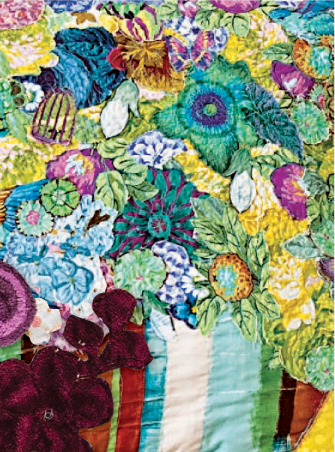
Collage is even more fun when you use it to make something you can see and admire in your home. That’s why I love this technique for all sorts of items. Really, who could bear to put a plain pillow anywhere again when you can have a pillow like this?
This design features a lavish collage of flower “blooms” in a bright, striped container. For detailed instructions on the fabric collage, see Keeping It Real: Free-Motion Quilting and Fabric Collage (page 63).
* Approximately 72 floral motifs, in a variety of large and small prints, for the fabric collage
* 1 fat quarter of striped fabric for the flower container
* ¾ yard of contrasting background fabric*
* ¾ yard of fabric for the pillow back (I used denim.)
* 3 yards of ribbon for the pillow back ties
* 1½ yards of woven cotton fusible interfacing
* ½ yard of fusible fleece
* Coordinating or contrasting thread (I love variegated thread for collage.)
* 24” × 24” pillow form
* I’d suggest using something pretty subdued to allow for a nice contrast between the flowers and the background.
* Cut out the flower collage motifs as you compose your piece because that way you can balance the colors and sizes visually.
* Flower container fabric: Cut 1 of pattern A.
* Background fabric and fusible fleece: Cut 1 square each 23½” x 23½".
* Pillow back: Cut 2 pieces, each 23½” x 16".
* Woven cotton fusible interfacing: Cut 1 square 23½” x 23½” and 2 pieces 23½” x 16".
* Ribbon: Cut 4 pieces ¾ yard long each.

1. Fuse interfacing to the wrong side of the background fabric.
2. Referring to the photo (page 65) and without pinning anything in place yet, lay the container piece at the bottom center of the background piece. Begin cutting out and layering flowers to fill and overflow the pot. Remember to mix larger- and smaller-scale pieces to balance your design, and remember to balance the color throughout the piece. If you notice a concentration of color in one area and none of that color in another area, you might want to move the pieces around. The same goes for large and small pieces.
3. Refer to Keeping It Real: Free-Motion Quilting and Fabric Collage (page 63) to pin, quilt, and finish your collage.
4. Press the fleece to the wrong side of the collage.
5. To round the pillow corners and prevent them from being pointy, place a bowl in a corner. Draw around the edge of the bowl at the corner. Cut along the marked line. Repeat for all 4 corners.

1. Follow the instructions in Keeping It Real: Making a Ribbon-Tied Pillow Back (page 69) to create the back and assemble the pillow.
2. Insert the pillow form through the back opening, fluff, and tie the pillow ties.