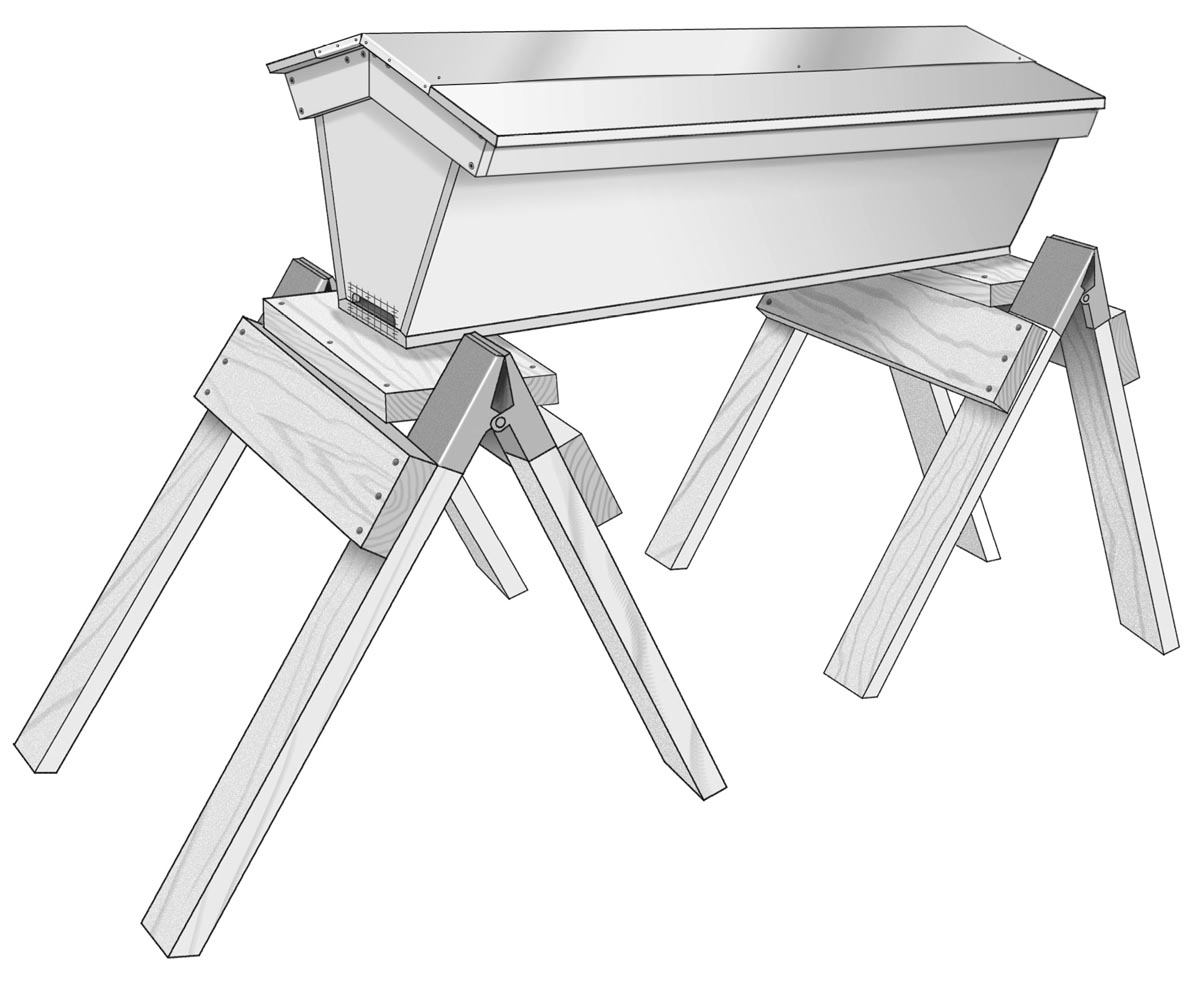
A top-bar hive on sawhorses.
Hive stands are the least demanding part of your setup. They can be as simple or as fancy as you’d like. There are several benefits to using a stand for your beehive, some of which are: getting it off the dampness of the ground, putting it at an easier working level for lifting the boxes, and getting it up out of the reach of skunks that like to scratch on the front of the hive at night and eat the emerging bees.
A top-bar hive on sawhorses.
Hive stands come in all sizes and can be made of anything and everything under the sun, from cinder blocks and tire rims, to timbers and old boards, to sawhorses. For the most part, anything that happens to be available and will get the hive off the ground a little can be used as a hive stand.
Beekeepers are an innovative lot. Many beekeepers will use a couple of old skids or wooden pallets to set their hives on. These do the job and can usually be had for free. Check your local newspaper ads or drive around to various businesses and you can usually find some. With the help of a flood control wall and some 2×10s, my friend Lloyd made a level place for some of his hives.
Long stands that hold multiple hives do have their drawbacks. If there comes a time when you want to move one, it’s heavy and awkward. Another disadvantage is that while you are working on one hive, the noise and vibrations are getting transferred to the other hives, which, depending on the temperament of the other hives, can make the bees at the end of the row pretty grouchy by the time you get to them.
I prefer individual hive stands for each hive or at least no more than two hives per stand. You can position them in a semicircle so that the entrances face slightly different directions, to minimize drifting.
If you plan on only having one or two hives in your backyard, perhaps you have the time and luxury to make a stand that will be nice to look at and also work well for you. This means getting them at a height that makes the hive easy to work on. One thing to consider is the fact that in an average year, you may have several supers stacked on the hive and it can get tall fast. My advice is to get it up off the ground, but not too far off. Keep in mind, too, that at peak a hive with honey supers will weigh more than a couple of hundred pounds, so you want a stand that is strong and won’t easily tip.
Beekeeping advice: I once started a 5-frame nuc set on a couple of sawhorses, intending to move it to another spot when it was ready to switch to 10 frames. Well, it didn’t happen, and the next thing I knew I had two deeps and four medium supers piled on, and it got pretty high and interesting to work on. Sawhorses do work great for top-bar hives, though (see chapter 10). They raise hives to a good working level, and they are sturdy.
Free is always the best price for materials. A hive measures only about 16" × 20", so it doesn’t take much material to build a stand. If you know someone building a deck, set of steps, or other outdoor project, see if they have any usable leftovers. I often find wood for all kinds of little projects at our landfill, where wood is kept in a separate area.
Here’s a simple base that will be adequate for supporting your hive or even a fancier hive stand. Since it will go directly on the ground and the bees won’t really be crawling on it, this is one case where I recommend using pressure-treated wood, for rot resistance. You can give the top a coat of paint if you are concerned about chemical exposure.
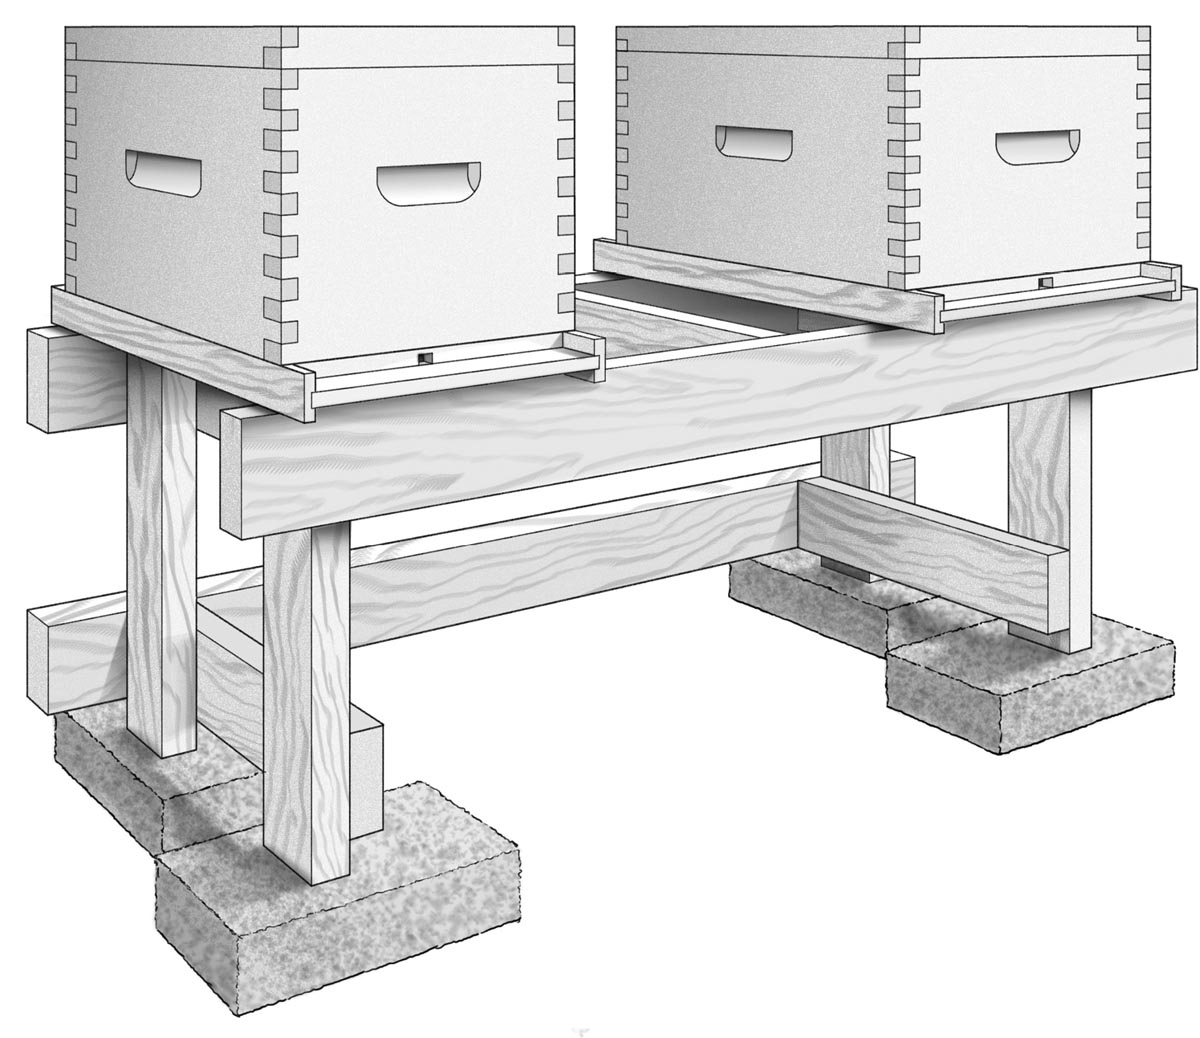
Any size stand that the hive will fit on is fine, but it’s nice to have some room on either side to set frames on when you are inspecting. Once you build this base stand, you can put your solid or screened bottom board right on top and continue setting up your hive. Or you can build the Hive Stand with Landing Boards (next project) to give your hive a little loft.
Cut the 4-foot timber and 2×6 or 2×8 in half, using a handsaw and/or a circular saw. A reciprocating saw is really handy for cutting through the full thickness of timbers in one pass.
Place the two timbers 24" apart and set the 2-bys across them so all pieces are flush at the sides and ends. Check for square and drive two screws or nails through each end of the 2-bys and into the timber below.
If desired, cut pieces of 2-by material to fit between the 24" 2-by crosspieces and fasten them to the timbers with screws or nails. Fillers are helpful for giving a little more support for the weight of the hive.

Simple hive stand assembly.
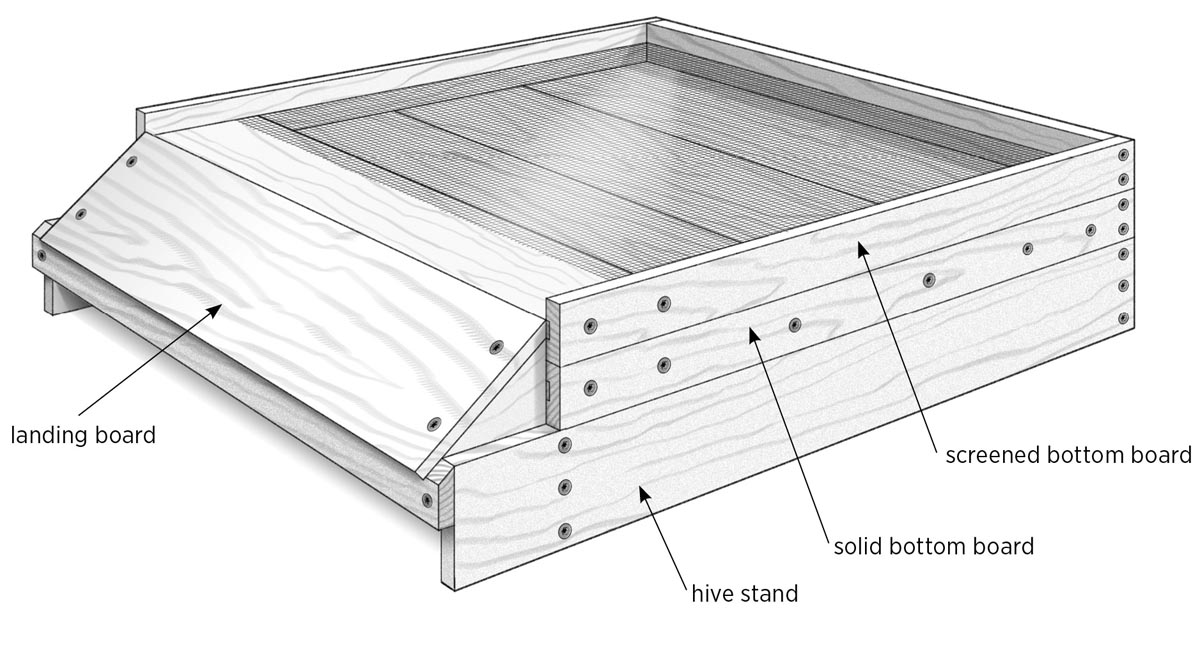
Here’s a hive stand that you can set on top of the timber base (page 59) to get your hive higher off the ground. It could also be put directly on the ground, which should be solid and level. Cedar makes a great material for the stand, since it will be in contact with moisture more than other hive components, but don’t worry if you don’t have access to cedar or other decay-resistant wood. Pine with a coat of primer and topcoat of exterior paint will work fine.
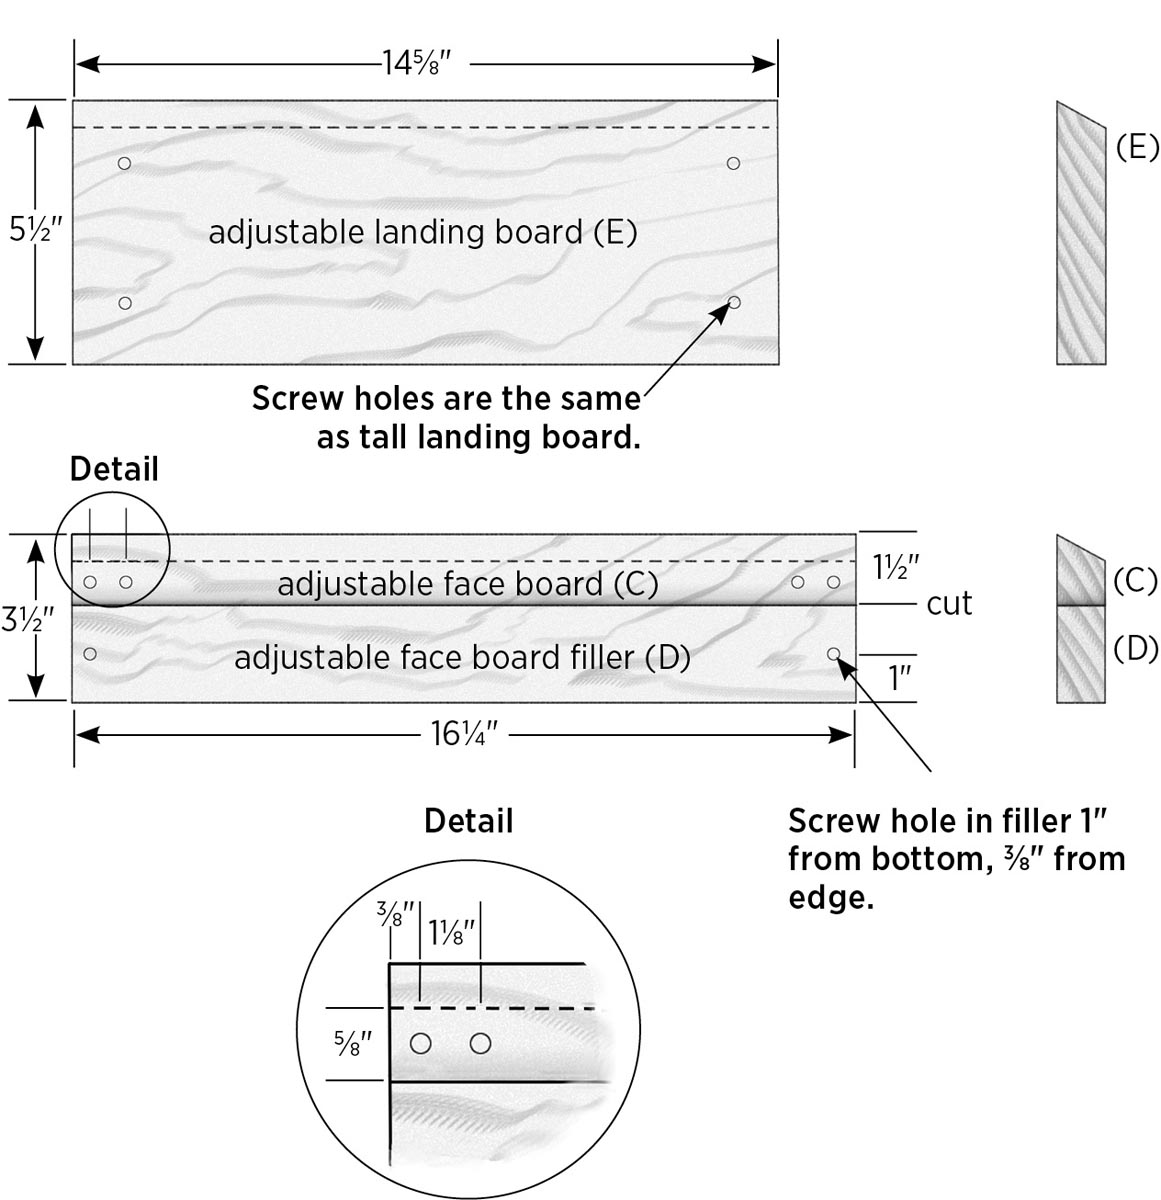
This project includes steps for building both a tall, fixed landing board assembly and an adjustable landing board assembly. When I first decided to try a screened bottom board, I noticed that the landing board on my hive stand was no longer useful because it was in a fixed position and my entrance was now higher. After years of using combinations of one and two bottom boards, I designed a handy adjustable landing board assembly that attaches to the end of the hive stand frame with two screws and can be adjusted to work with one or two bottom boards.
The adjustable board allows you to experiment with using a solid bottom board, an open screened bottom, or a combination of the two, while still using the same hive stand. The only disadvantage to the adjustable landing board assembly is that the landing board doesn’t extend over the sides of the stand, but the trade-off is flexibility while you sort out your preferences.
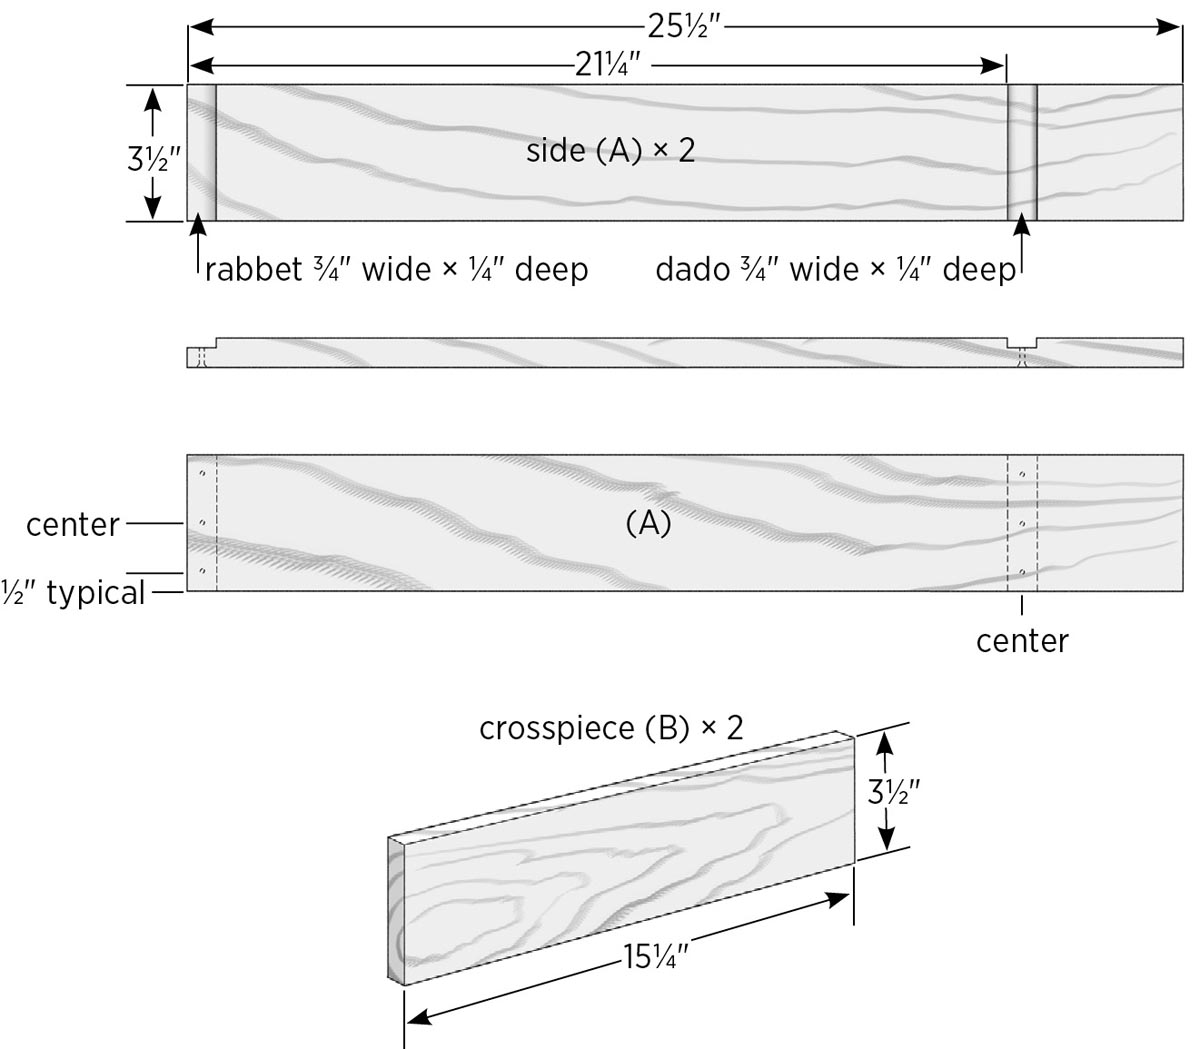
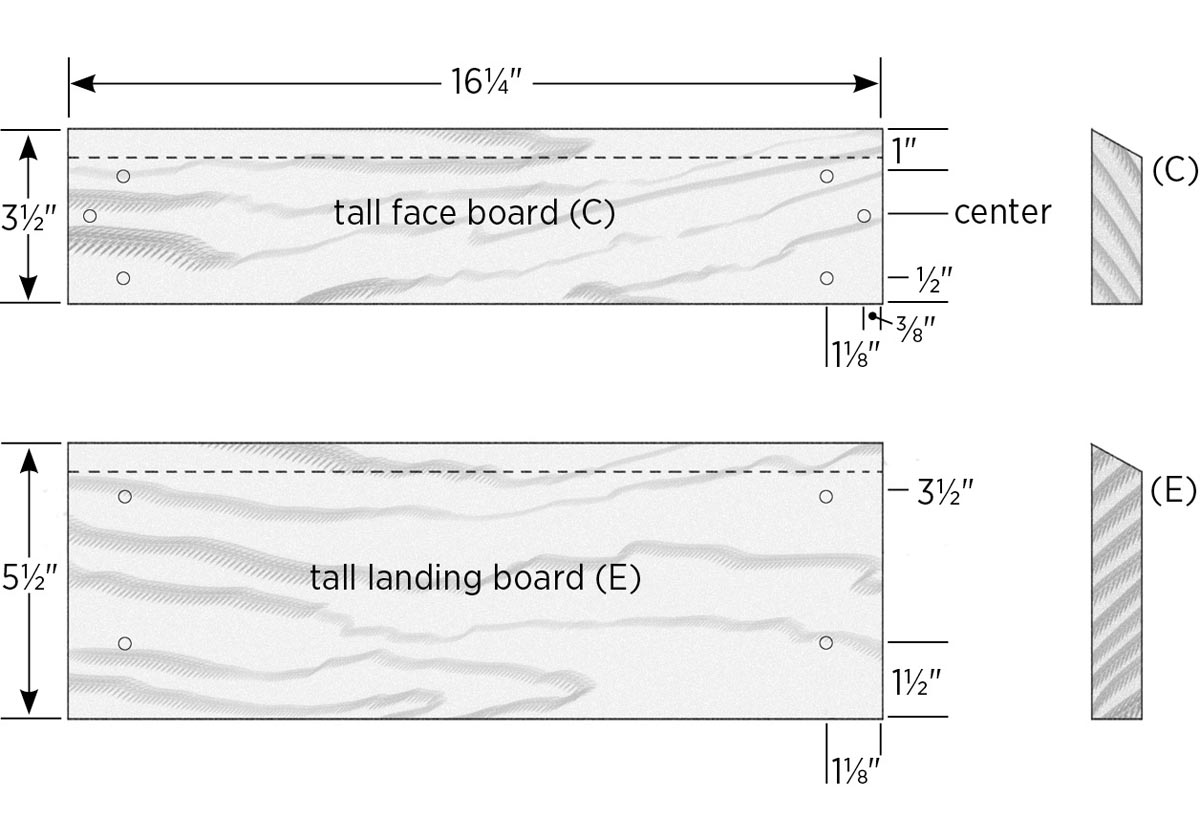
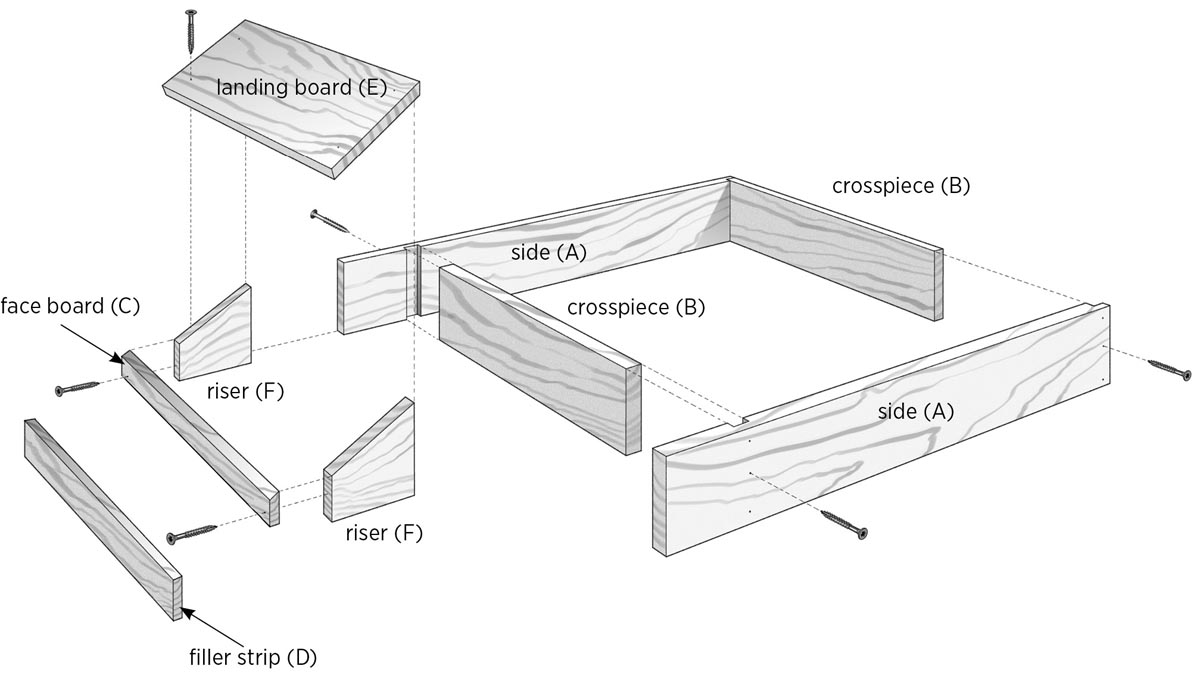
Cut two pieces of 1×4 to length at 251⁄2"; these will become the sides (A). Each side gets a rabbet and a dado, both measuring 3⁄4" wide × 1⁄4" deep, for accepting the crosspieces, as shown. To cut the rabbets using a standard blade on a table saw, set the blade height to 1⁄4" and set the fence 3⁄4" to the far side of the blade. Using the miter gauge and a piece of scrap, make a test cut, then cut the rabbet in one end of each side, moving the workpiece slightly away from the blade for each pass.
Reset the fence to 31⁄2" from the near side of the saw blade and cut a 3⁄4"-wide dado by gradually moving the fence away from the blade with successive cuts.
Hive stand frame parts.
On each side piece, draw guide lines for screws, centered on the rabbet and dado, as shown in Hive Stand Frame Parts, below. Mark three screw holes at 1⁄2" from each edge one in the center. Drill countersunk pilot holes at the marks.
Cut two pieces of 1×4 to length at 151⁄4"; these are the crosspieces (B).
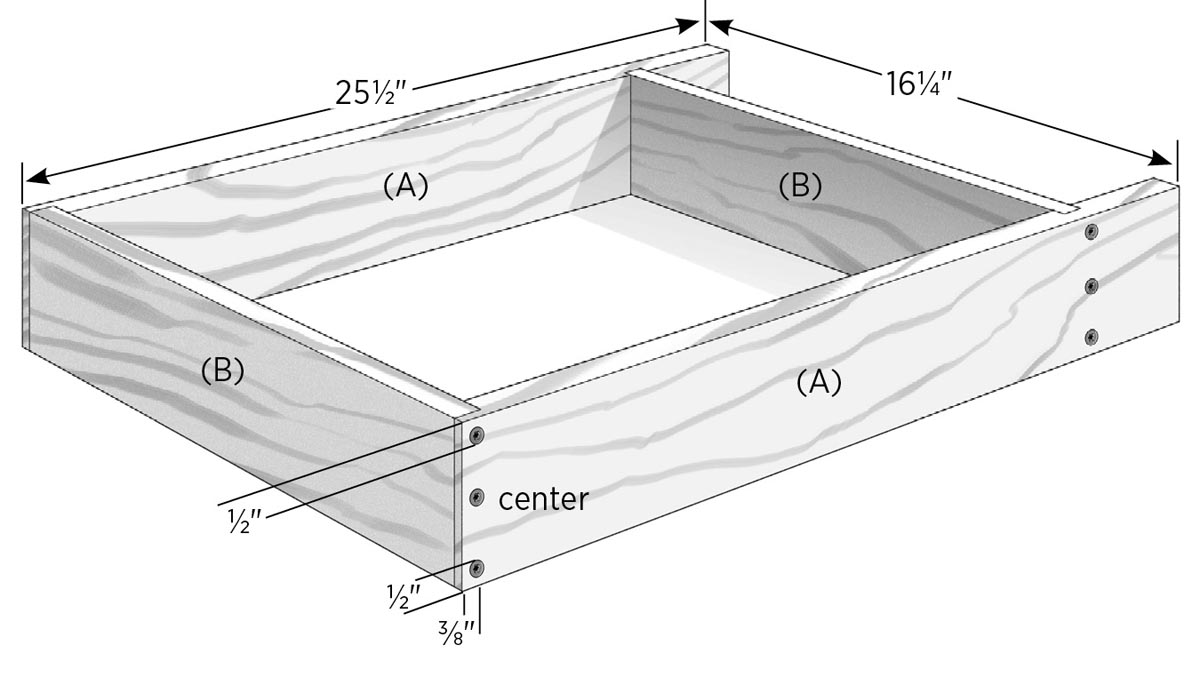
Dry-assemble the frame to make sure everything fits well. Apply glue to the rabbet and dado joints and clamp the sides and crosspieces together. Check the frame for square, then drive three 13⁄4" deck screws at each joint. Let the glue dry as directed.
Assembled landing board frame.
Cut one piece of 1×6 to length at 145⁄8" (for the adjustable landing board) and one piece at 161⁄4" (for the tall landing board). Cut two pieces of 1×4 to length at 161⁄4"; these are the face boards for both the tall and adjustable landing boards.
All of these four boards get a 60-degree angle cut along one long edge. To cut the 1×6 landing boards, tilt the table saw blade to 30 degrees, and set the blade just high enough to cut through the 1-by material. Set the fence so the blade just cuts the full edge of the 1×6 board. Cut one edge of each landing board. Drill two countersunk pilot holes on each end of the landing boards as shown.
Landing boards and face boards.
To cut the face boards, reset the fence and make the same angled cut on the edge of the two 1×4 face boards.
Return the saw blade to 90 degrees and check it with a square. Rip one of the face boards to 11⁄2" wide; this is now the adjustable face board. The cut-off strip is the filler strip (D) and will be used when the adjustable landing board is in the upper position. Drill pilot holes in the face boards as shown.
Hive stand — exploded view.
Safety note: Always use extra caution when cutting on a table saw with the blade tilted.
The risers are cut from 1×4 and have 60-degree angles cut along their faces (not their edges, as with the landing boards). Because the risers are short, it’s best to cut them from the leftover piece of 1×4 that’s about 21" long. Lay out the riser cuts as shown. Set the miter gauge on the table saw at 30 degrees and cut one riser from each end. This will leave a 60-degree angle on each end of the board. Return the miter gauge to zero and cut one long riser from each end of the board.

Riser diagrams.
Fold two sheets of standard 81⁄2" × 11" paper in half twice the short way; these will be used as spacers between the risers and insides of the frame. Spread glue on the angled edges of the short risers, set them inside the open ends of the frame using the paper spacers, and clamp them to the frame sides with spring clamps. Place the adjustable landing board on the risers, lining up the angled edge flush at the top of the risers. It will be centered side-to-side in the frame with about 1⁄16" clearance on either side. Fasten the landing board to the risers with 11⁄4" screws near the lower end of the risers and 13⁄4" screws near the upper end.
Spread glue on the front (exposed) edges of the risers. Center the adjustable face board (11⁄2") over the glued edges and attach with two 13⁄4" screws. Remove the assembly from the frame and wipe any glue from surfaces with a damp rag. Let the glue dry as directed.
Slide the adjustable landing board assembly back into the open end of the frame. Place the bottom board you intend to use (from chapter 2) on top of the hive stand. Position the landing board so it lines up with the top surface of your bottom board and drive the two remaining 13⁄4" screws through the face board and into the ends of the hive stand.
Work tip: Do not use glue on this part, or you won’t be able to adjust it.
Clamp the tall risers inside the frame, as you did with the short adjustable landing board, using the paper spacers. Apply glue to the angled edges of the risers. Line up the tall landing board flush with the high ends of the risers so it’s centered on the sides of the frame. Drive two 13⁄4" screws in each end.
Line up the tall face board and drive two 13⁄4" screws at each end. Place the solid and screened bottom boards you made in chapter 2 on the stand. The edge of the landing board should line up with the top surface of the screened bottom board. Drive one screw through each end of the face board and into the frame. Your multipurpose hive stand is done. Next, you’ll see how to make a sturdy two-hive stand using just a couple of 2×4s and some screws.
Doone’s finished double-hive stand set on concrete blocks.
When my friend Doone Mackay decided to get some bees, she opted to go with two 8-frame hives. Before I knew it, she had a nice little stand set up. She’s quite good with numbers and doesn’t like to waste material, and this stand is proof of that. By happy accident, it also turned out to be a perfect stand for a top-bar hive. The entire project is made with three 8-foot 2×4s and uses every bit of wood.
Cut three 16" pieces from each of the three 2×4s, for a total of nine pieces. This leaves three pieces at about 48" long for top section and long brace; it’s okay if the lengths vary a little.
Set two of the 4-foot 2×4s together on a flat surface, with both pieces flush at one end. Use a tape measure and square to mark the faces of the boards at 6", 231⁄4", and 401⁄2". Line up three 16" crosspieces on these lines, as shown in Double-Hive Stand Parts, below, and clamp the assembly with bar clamps. Drill countersunk pilot holes as shown, and drive two 4" deck screws through the long boards and into the ends of the crosspieces, making sure the frame is square as you go.
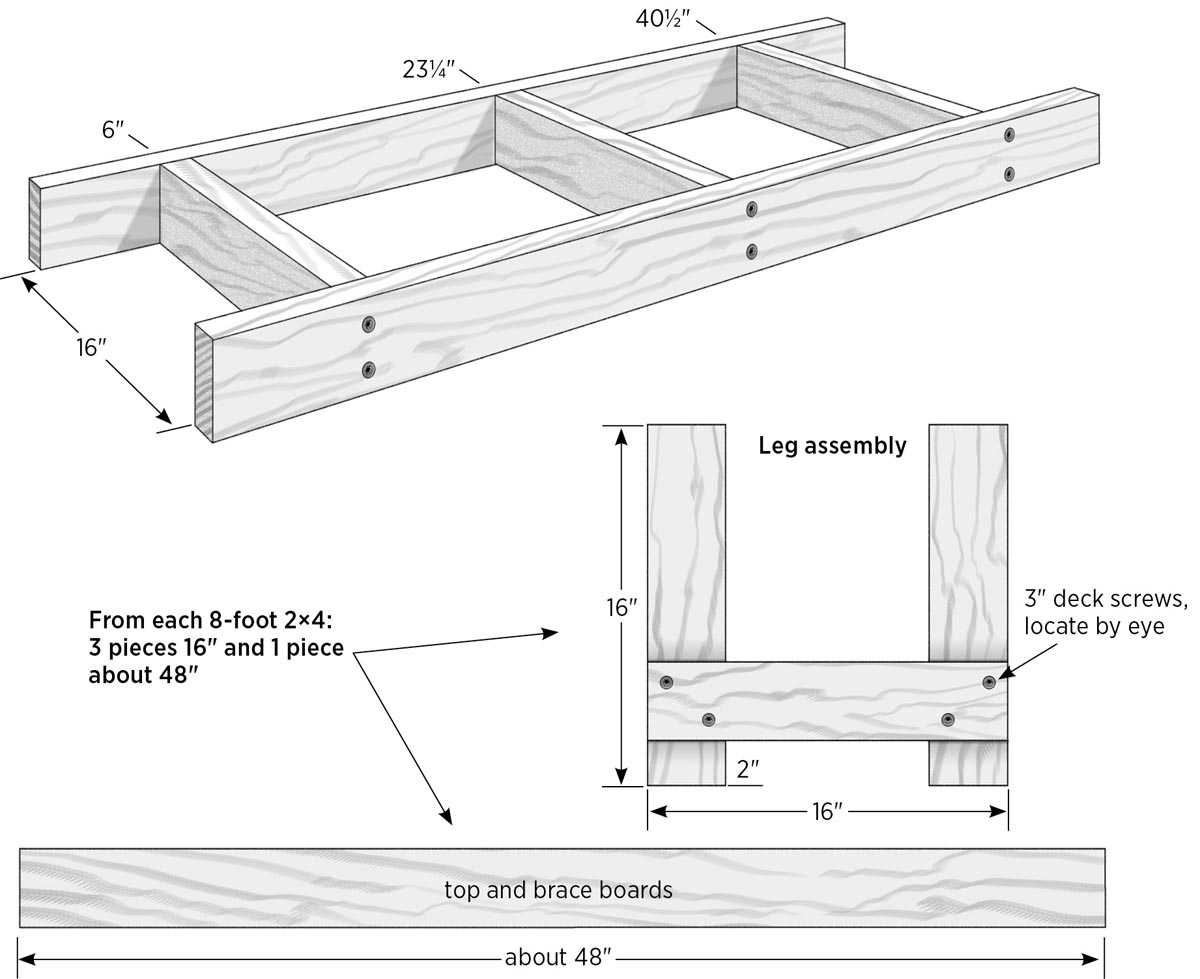
Double-hive stand parts.
Construct two leg assemblies with three 16" 2×4s for each and 3" deck screws, following Double-Hive Stand Parts, facing page. Be sure to maintain the 16" dimension across the top.
The easiest way to attach the legs is upside down: Set each leg assembly, with the braced end up, into one end of the top section and fasten it with four 3" screws driven into the outer crosspiece. Repeat with the other leg set.
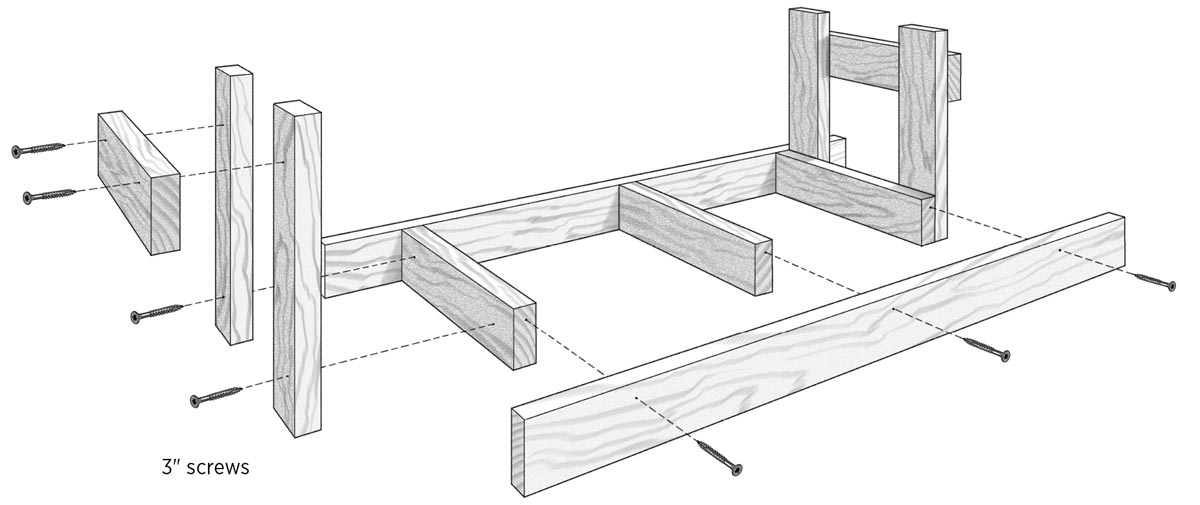
It’s easiest to assemble this upside down, as shown here.
Position the stand on its side, line up the last 2×4 with the leg braces, and fasten the pieces with two 4" screws at each end.
Beekeeping advice: You can take this basic plan and modify it to fit your needs. For example, you can make the top smaller to use with just one hive, or use it as a handy stand to set boxes on during inspection.As you can see, when it comes to hive stands, your imagination is your only limitation. You can shoot for form or function, or combine the two. I’m sure you’ll be dreaming up the perfect hive stand before you know it. You can make the sides higher and combine a stand/bottom board/varroa screen.