Chapter Two
Starting at the Bottom
Bottom boards — both solid and screened — and slatted racks make up the first components in your hive. Deciding which to use may be the hardest part. You can use all three together or any combination of them. Talk to other beekeepers in your area to see what works for them, then decide how you want to set up your hive.
Bottom Boards Defined
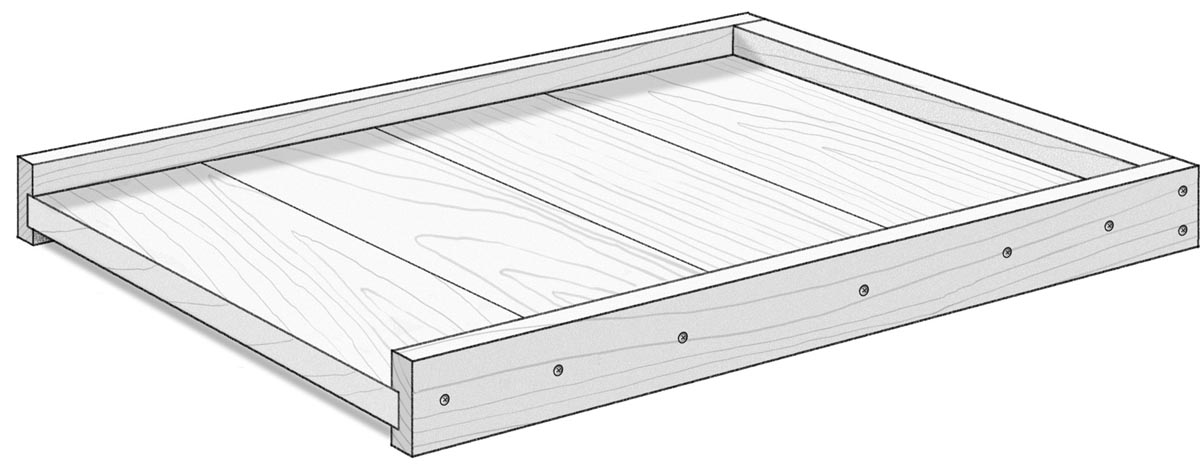
Solid bottom boards provide the base on which all other hive parts will rest. The bottom board must carry the full weight of the hive, which can be more than a few hundred pounds if you are running two deep boxes for brood and have several full honey supers on top. When a solid bottom board is used alone, it becomes the landing board for the bees as they fly off in search of nectar, pollen, propolis, and water, and return with their load of goods. For this reason, the bottom board is usually a few inches longer than the hive bodies themselves.
Screened bottom boards, commonly called varroa screens, are used as part of an integrated pest management (IPM) program to help reduce the number of varroa mites in the hive. The way they work is very simple. When varroa mites fall off the bees, either naturally or with the use of a control method such as powdered sugar dusting, they fall through the screen, below the hive, and are unable to attach themselves to another incoming bee.
They were initially developed to give bees more room, to prevent swarming. They also are thought to help encourage the queen to lay farther down on the bottom frames, which prevents chilled brood in the lower part of the hive. All of those reasons seem to make sense. I can’t offer any scientific proof as to the value of a slatted rack, but I do use them.
Solid Bottom Board
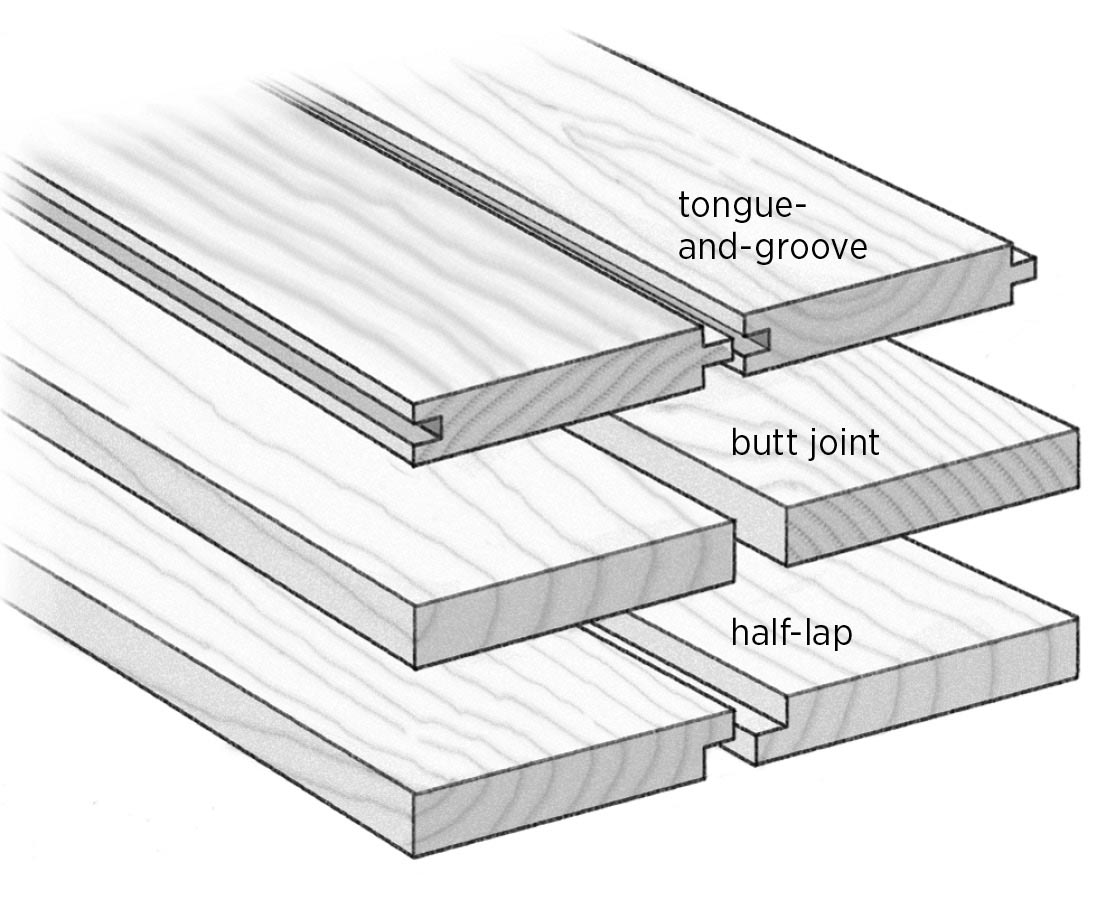
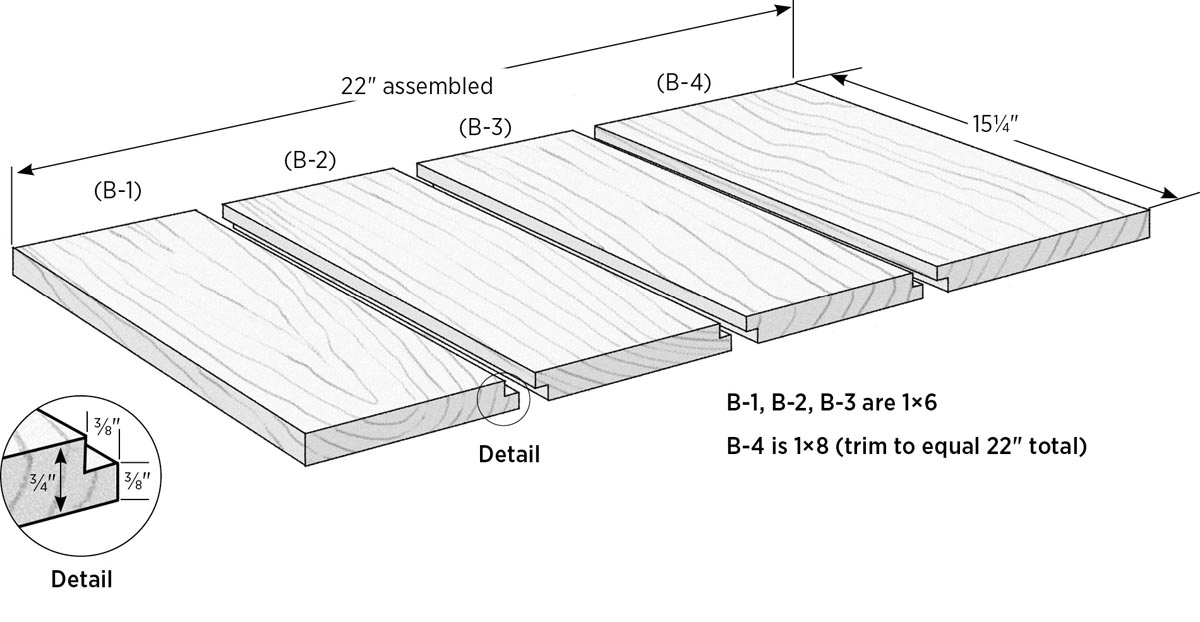
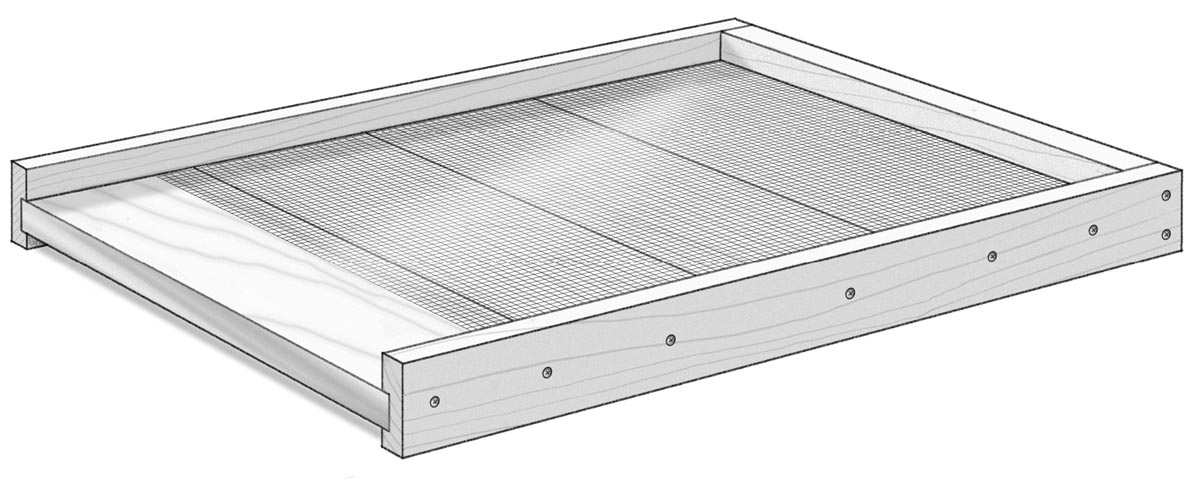
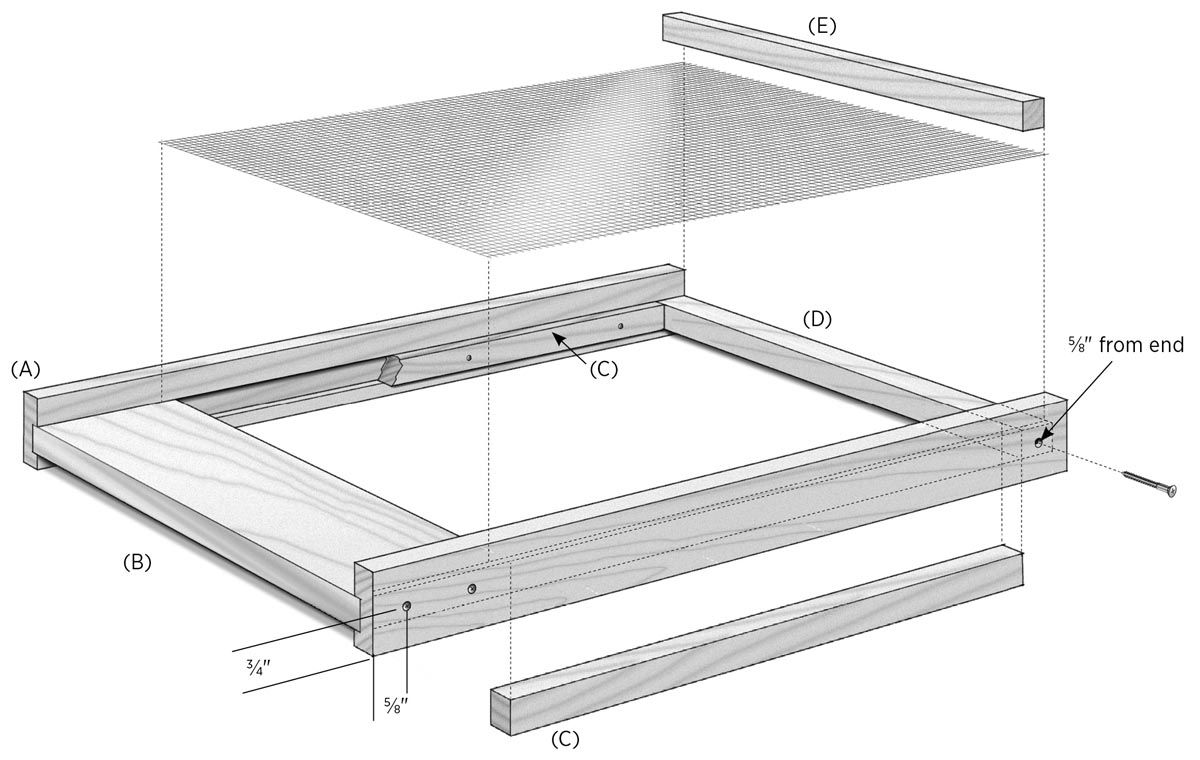
The simple bottom board in this project will fit the hive bodies I show you how to build in chapter 3. Tongue-and-groove boards make for the strongest solid bottom board, but you can also use half-lap joints, or even straight sides, butted together and glued. What you use for these pieces may change your material list. The plan below is for using ⅜" half-lap joints. The parts consist of two sides (A), four platform boards (B-1 through B-4), and a filler strip (C), as shown in Assembling the Solid Bottom Board, on page 21.
Any sturdy solid wood will work as material, such as pine, spruce, cypress, or cedar. You may want to use a solid bottom board in conjunction with a screened bottom board (page 22), making it easy to slide a sticky board or tray underneath to check for mites.
Tools
- Table saw
- Drill with combination drill/countersink bit
Materials
- One 6-foot pine or cedar 1×6
- One pine or cedar 1×8, 16" minimum
- Waterproof glue
- Twelve 13⁄4" deck screws
- Four 11⁄4" deck screws
1. Make the sides.
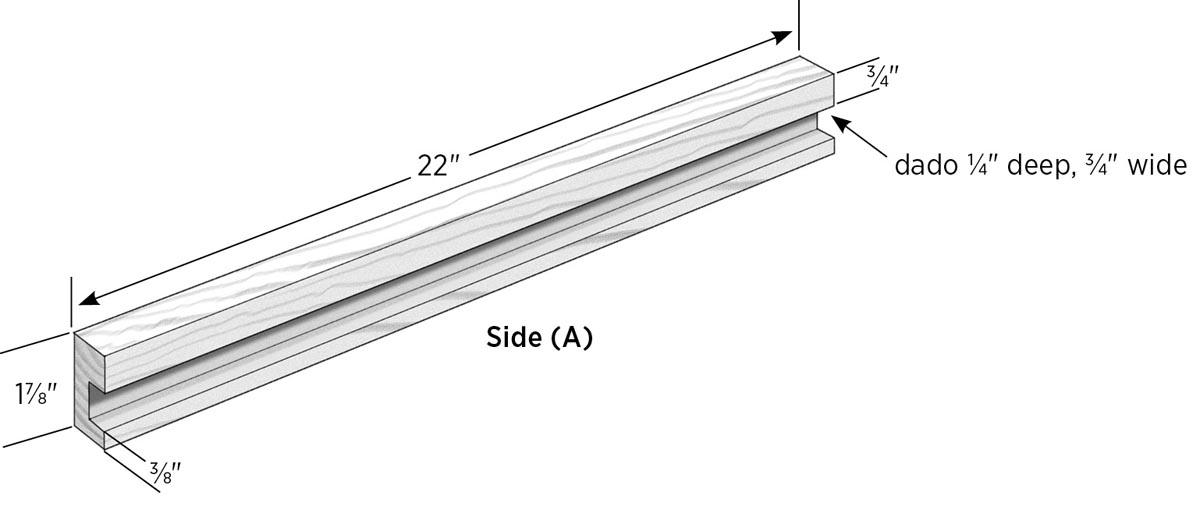
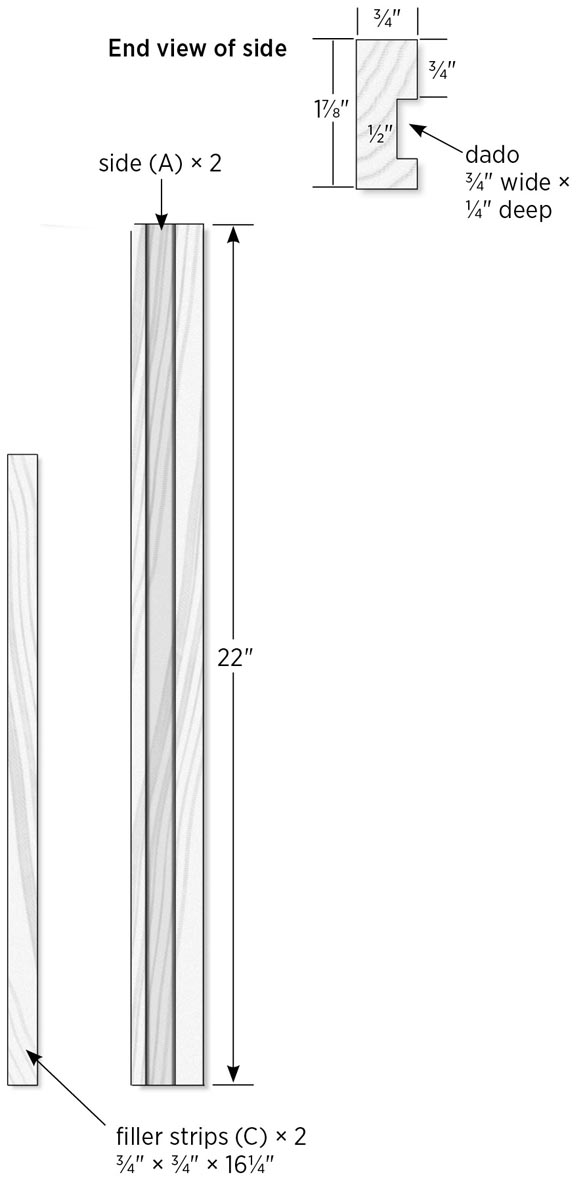
Square off the 1×6 and cut one piece to length at 22" long and three pieces at 151⁄4". Square off the piece of 1×8 and cut it to length at 151⁄4". On a table saw, rip the 22" 1×6 into two pieces that are 17⁄8" wide for the sides (A). Save the cut-off piece and trim it to length at 143⁄4", then set it aside; this is the filler strip (C).
Set the saw fence at 3⁄8" from the blade, and set the blade height at 1⁄4". Make a test cut using scrap, then cut a 3⁄4"-wide dado in both of the side pieces, moving the fence away a little at a time and testing the fit until the pine boards will slide in the slot. Don’t make it too tight, because the boards may have some cupping. Using a combination square set to 3⁄4", draw a screw guideline down each side piece centered over the dado.
Note: If you have a dado blade or router table, you can use them to speed up this step, but setting up sometimes takes as long as it does to cut with the single blade on the saw.
2. Cut the half-lap joints.
Set a zero-clearance fence (see page 16) 3⁄8" to the far end of the blade. Set the blade height to 3⁄8". Cut rabbets on the 151⁄4" boards: Cut one rabbet on a bottom piece for each end (B-1 and B-4), and cut two rabbets on the two center bottom pieces (B-2 and B-3). Test-fit the boards together to make sure the surfaces are flush. When placed together, your platform boards should measure 22". If necessary, trim the 1×8 (B-4) to get the 22" dimension.
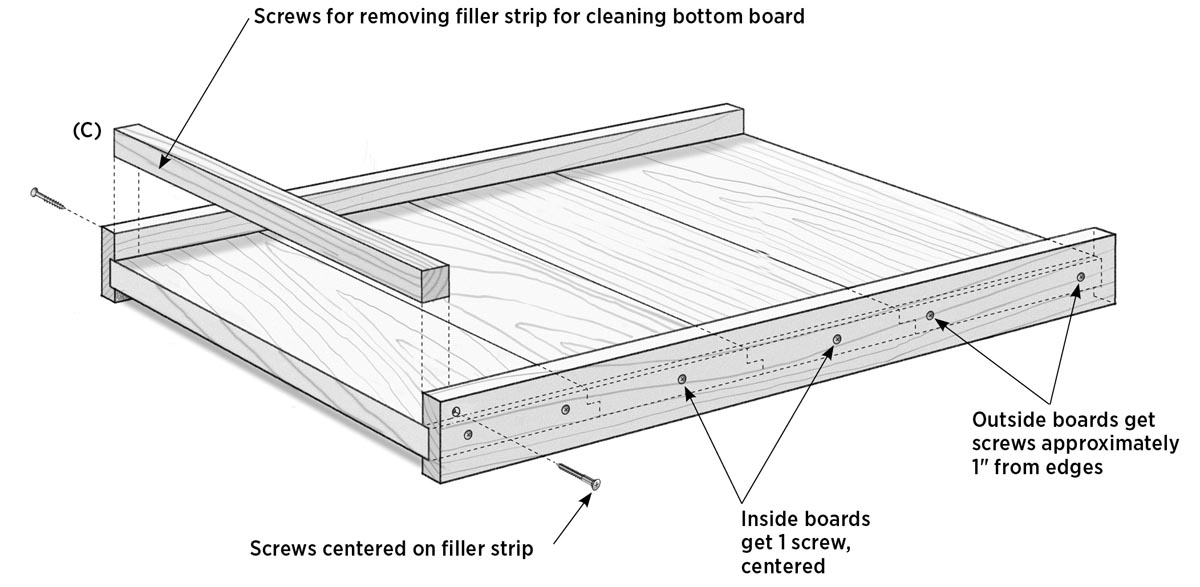
3. Assemble the bottom board.
Dry-fit all of the bottom board pieces. If everything fits right, generously glue the dadoes in the sides and the half-lap joints and reassemble the boards. Use two pipe or bar clamps to clamp the assembly. Check for squareness. Drill countersunk pilot holes for 13⁄4" screws, and install the screws. I put two screws in the end boards (B-1 and B-4), about 1" from each edge, and one screw centered in the two center boards (B-2 and B-3). Let the glue cure as directed.
4. Install the filler strip.
You can install the filler strip permanently by driving screws or nails through the sides, or make it removable for easier cleaning of the bottom board. To make it removable, drill through the sides into the filler with the drill/countersink bit. Remove the filler and open up the holes in the sides with a 3⁄16" drill bit. Replace the filler strip and drive two 11⁄4" screws through the holes and into the filler.
Next, looking from the back of the bottom board, drill pilot holes about 2" in from each end of the filler strip and drive two 11⁄4" screws, leaving the screw shanks and heads sticking out enough to grab onto; these will act as pulls for removing the filler piece.
5. Finish the board.
Now your completed bottom board is ready for priming and painting. If you made your filler removable, take it off while painting so the parts don’t stick together. You’ve done it! You’ve made the first part of your beehive. I hope you are as excited as I am for you.
Screened Bottom Board
Screened bottom boards were offered in the Dadant catalog (see Resources) beginning in 2002. Virtually all companies that sell beekeeping supplies now offer varroa screens in their catalogs. They were probably predated by the use of open mesh floors in the UK, referenced in a July 1990 article by Helmut Horn in Bee Craft magazine.
Varroa screens can also help with ventilation and the prevention of moisture buildup in the hive. If you use a screened bottom board on top of a solid one, the screened board becomes the landing board, so it’s best to block off the space between the two to prevent bees from going under the screen.
Some beekeepers (even here in the cold Northeast) use the screened boards as stand-alone bottom boards, so the mites fall directly on the ground. One member of our club leaves them wide open all year round with great success and low hive losses, but I’m too chicken to try it with our long and cold New England winters.
Tools
- Table saw
- Drill with combination drill/countersink bit
- Tin snips
- Brad nailer (optional)
- 24" clamps
- 2" spring or C-clamps
- Staple gun
Materials
- One pine 1×8, 22" minimum
- One pine 1×6, 151⁄4" minimum
- One piece #8 galvanized hardware cloth, 18" × 143⁄4" minimum
- Waterproof glue
- Six 2" deck screws
- Ten 11⁄4" galvanized brads
- 1⁄2" or 5⁄8" staples
1. Cut the wood parts.
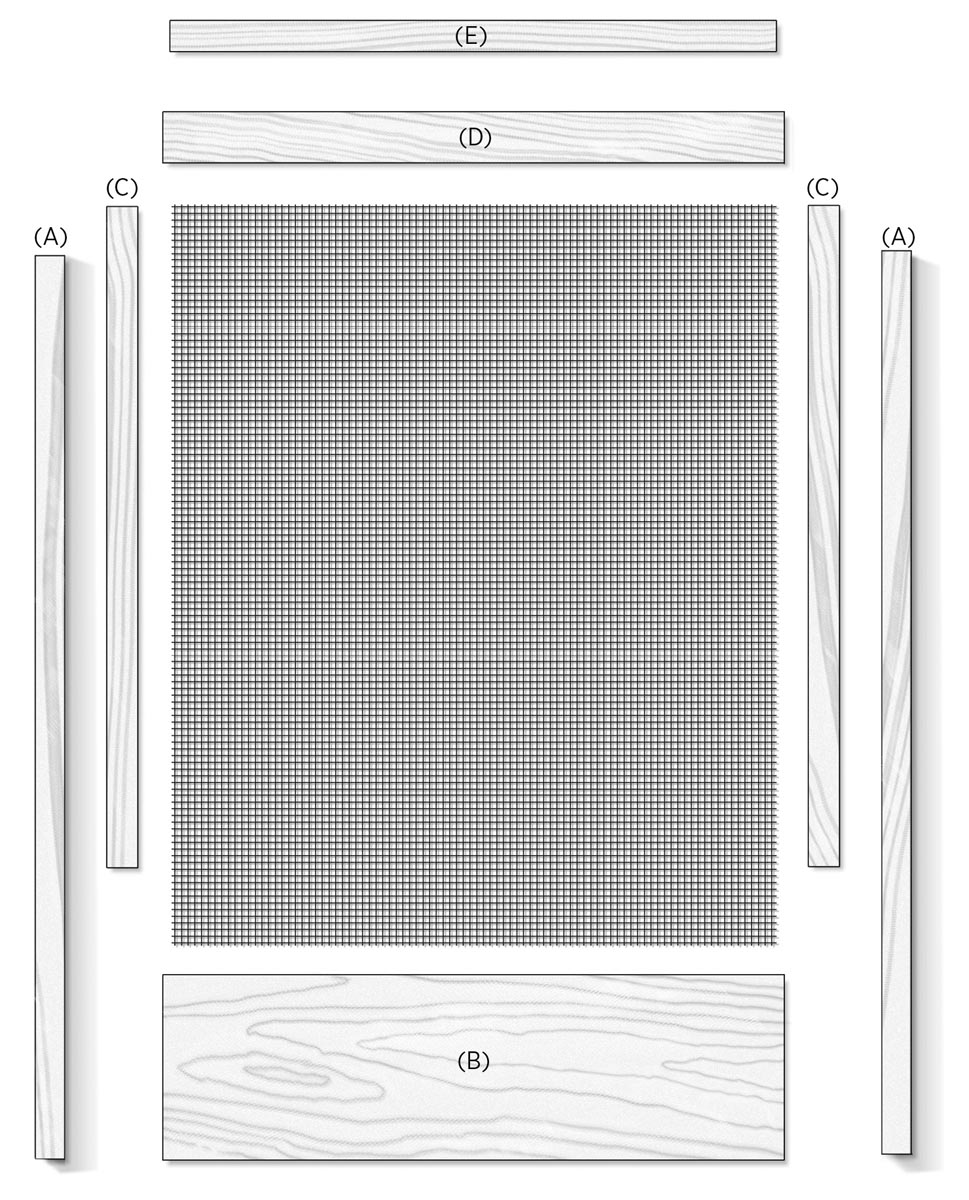
Cut the 1×8 to length at 22" and the 1×6 at 151⁄4". Set your table saw fence 3⁄4" from the blade and rip two strips from the 22" piece. Cut each of these to length at 161⁄4"; these are the filler strips (C).
Adjust the table saw fence to 1⁄2" from the blade and rip one strip from the 1×6, then cut it to length at 143⁄4"; this is the top end piece (E).
The remaining piece of 1×8 should be about 51⁄2" wide. This will become the two side pieces (A) and the bottom end piece (D). Mill a 3⁄4"-wide × 1⁄4"-deep dado on each side of one face of the board, starting 3⁄8" from each edge, using a table saw or a router table (see No Dado Blade? No Problem, on page 17). Test-fit the filler strips in the dadoes.
Set the fence for 17⁄8" and rip the two side strips from the dadoed 1×8. Cut the leftover piece to size at 11⁄4" wide × 151⁄4" long; this is the bottom end piece (D).
Rip the remaining piece from the 1×6 to 41⁄2" wide; this will be the landing board (B).
2. Prepare for assembly.
Sand the edges of all the wood parts, then dry-assemble the project, as shown in Assembling the screened bottom board (facing page): Fit the landing board (B) into the dado slots of the side pieces (A) so it’s flush with the front ends of the sides. Place the side fillers in the dado slots against the landing board, then slide the bottom end piece (D) into place. Confirm that everything fits well, then disassemble the parts.
Cut a piece of hardware cloth to size at 145⁄8" × 18", using tin snips.
Drill three countersunk pilot holes in each side piece, as shown. Be sure to make one left-hand and one right-hand.
3. Assemble the project.
Apply glue to the dadoes of the side pieces and assemble the parts as before. Check the assembly for square, then tighten two pipe or bar clamps across the sides to hold everything in place. You can use C-clamps or spring clamps to hold the side fillers in place.
Drive 2" deck screws through the sides and into the landing board, and drive one screw into each side to hold the bottom end piece in place. Fasten the fillers with five 11⁄4" brads, spaced evenly and nailed from the outside. Remove the clamps.
Clamp the top end piece (E) in place for reference and staple hardware cloth along its edges using 1⁄2" or 5⁄8" staples. You have the option of attaching the top end piece or not, so it’s removable for easy screen cleaning (that’s what I prefer). If desired, you can drive in a couple of nails or screws partway, leaving them sticking out the end, to give you something to pull on for removal.
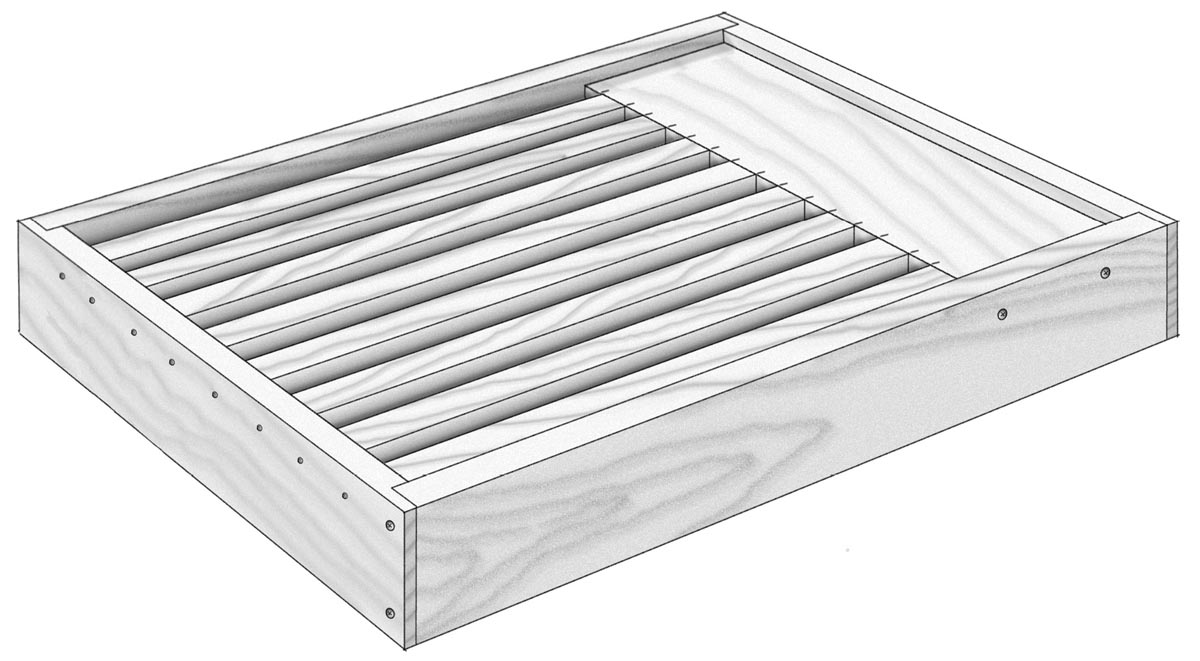
Slatted Rack
I’m not sure when slatted racks were first developed. The first reference I found was in the June 1968 edition of Gleanings in Bee Culture, published by the A.I. Root Company. In early versions, the slats went from side to side, but with the advent of IPM, slats were reoriented to go from front to back and line up with the frames. This allows varroa mites to fall through a screened bottom board.
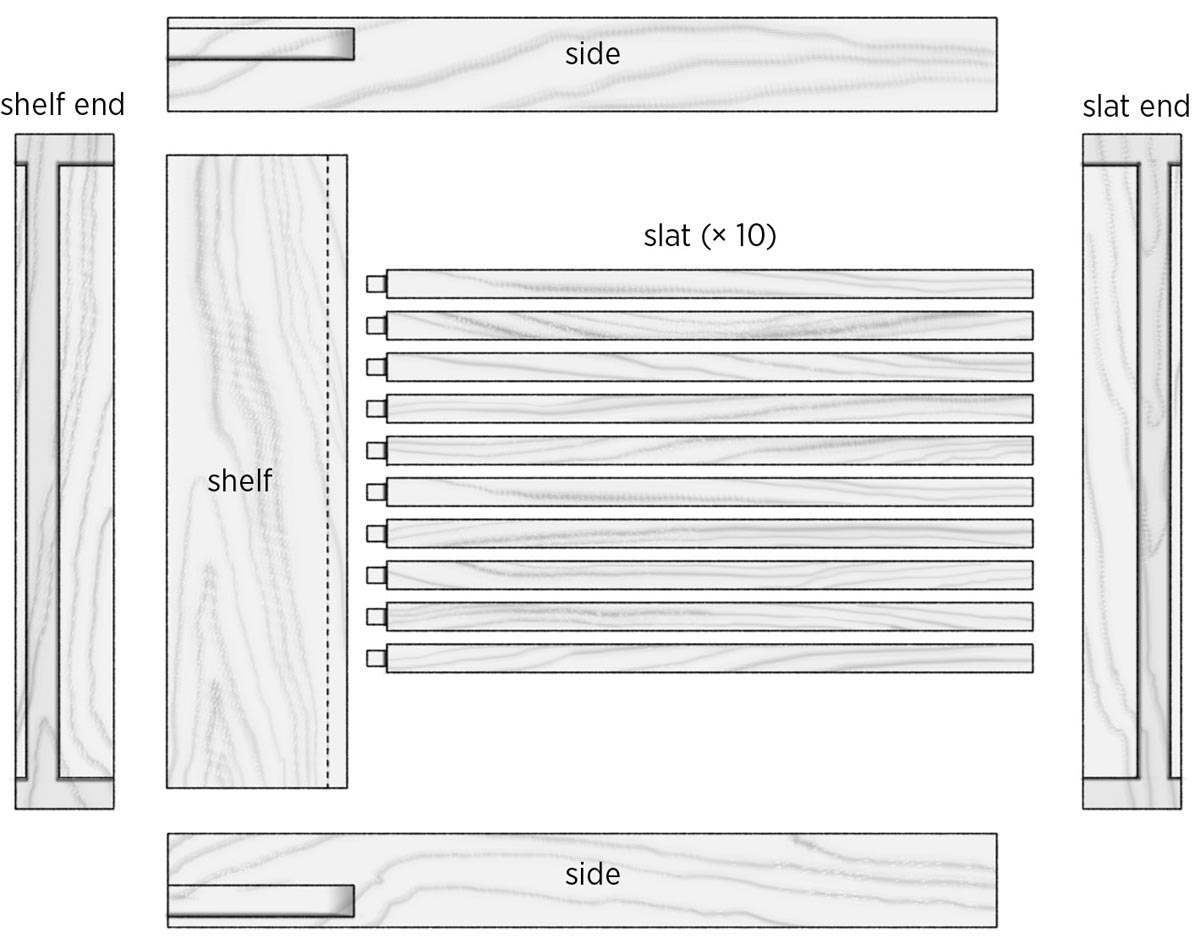
This slatted rack design consists of two identical ends, two identical sides, a shelf, and 10 slats. It’s a good idea to read through all the instructions to familiarize yourself with the procedure before you get started. This project has a fair number of parts, and a brad nailer makes assembly a lot faster and easier.
Tools
- Table saw
- Drill and drill/countersink bit
- Router table (optional)
- Brad nailer (optional but recommended)
Materials
- One pine 1×8, 32" minimum
- One pine 1×6, 36" minimum
- Waterproof glue
- Thirteen 2" deck screws
- Twenty 11⁄4" brads (for brad nailer) or ten 4d galvanized box nails
- Twenty 3⁄4" brads (for brad nailer) or 5⁄8" or 3⁄4" wire nails
1. Cut the ends and sides.
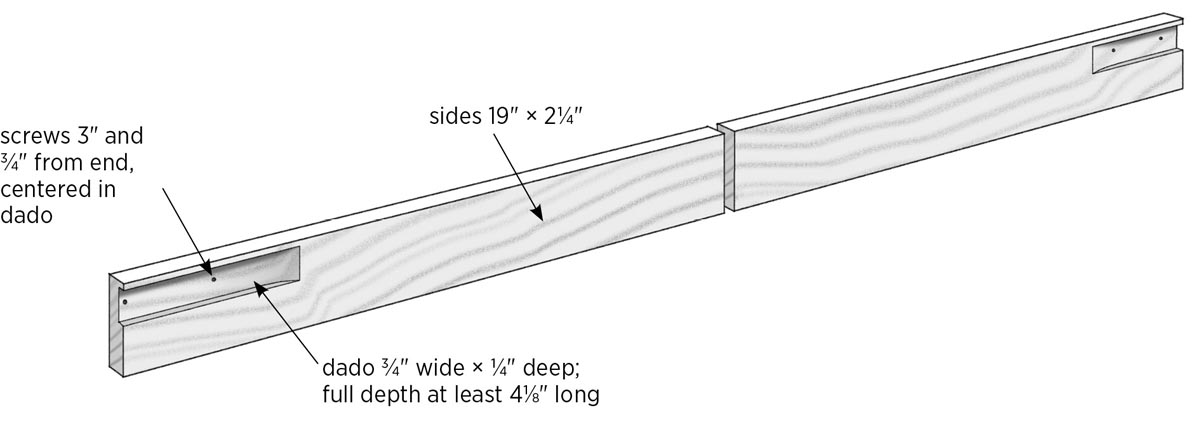
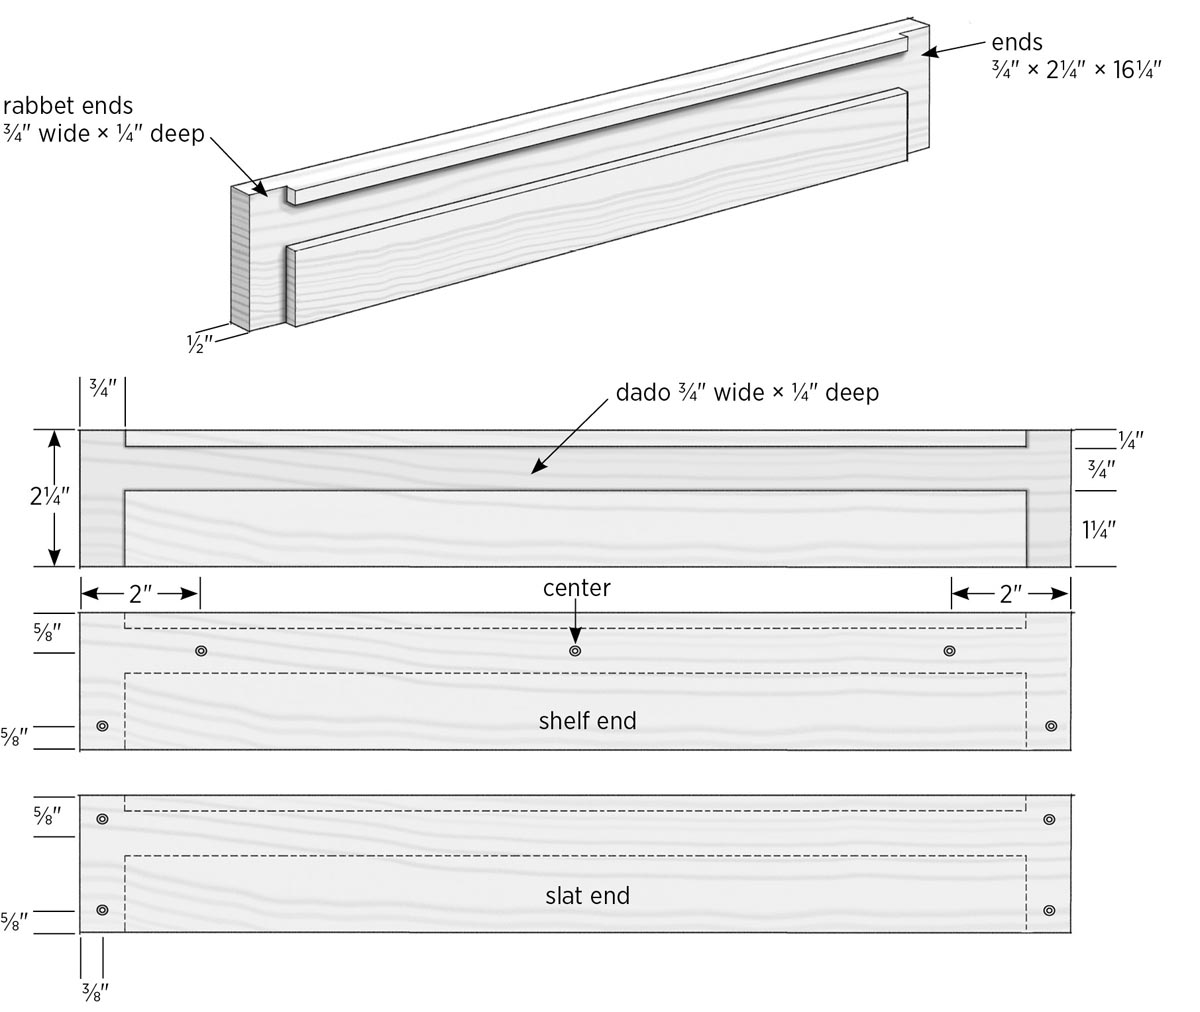
Square the end of the 1×8, then cut two pieces to length at 151⁄4". Square the end of the 1×6 and cut one piece to length at 161⁄4" and one piece at 19".
Set your table saw fence to 21⁄4" and rip two pieces from the 161⁄4" board; these are the ends. Rip two pieces from the 19" board to create the sides.
Slatted rack ends.
2. Mill dadoes and rabbets into the ends.
Each end piece gets a full-length, 3⁄4"-wide × 1⁄4"-deep dado, starting 1⁄4" from the top edge of the piece; these will accept the unmilled slat ends and the shelf. Each end piece also gets a rabbet at each end to accept the side pieces. The rabbets create strong corner joints and help to keep things square during assembly.
Make the dadoes using a table saw and standard blade or dado blade (see No Dado Blade? No Problem, on page 17) or a router table. Test-fit a piece of the 1×8 material (which will be used for the slats and shelf) in the dadoes, and make any necessary adjustments.
Keeping the blade height at 1⁄4", set your fence so the distance to the far side of the blade is 3⁄4". Make a test cut with a piece of scrap material, using the miter gauge. Test-fit the cut with a side piece, and make any necessary adjustments. Position each end piece with the dadoes facing down, and cut rabbets in both ends, using the miter gauge.
3. Dado the sides.
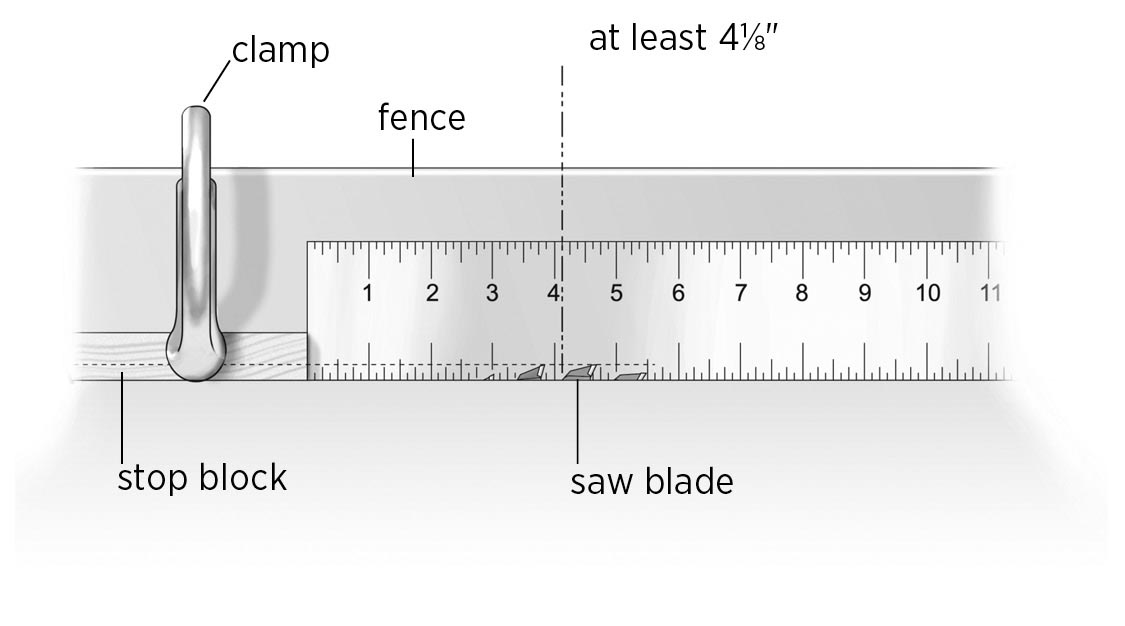
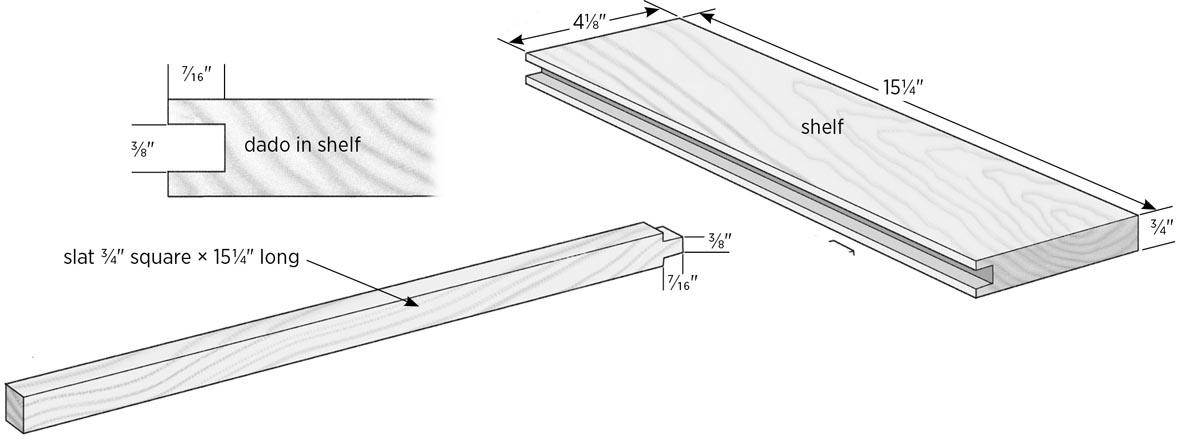
The side pieces also get 3⁄4" × 1⁄4" dadoes, but these are blind dadoes and don’t run the full length of the boards. Also note that there is a left side and a right side, and they’re not interchangeable. This dado will hold the shelf, which is 41⁄8" wide, so the full-depth portion of the side dado must be at least that long.
To cut the left dado on the table saw, with the blade height still set at 1⁄4", measure from the high point on the blade 41⁄4" toward the back of the table and clamp a stop to the fence. This ensures that the full depth of cut is enough to accept the shelf. Once you are set up, the process is the same as cutting the dados in the sides.
The right side piece is a mirror image of the left. Move the saw fence to the other side of the blade and repeat the same process to cut the dado.
Safety note: When cutting the blind dado, cut until your board hits the stop, then shut off the saw. Let the blade come to a complete stop before backing off your piece and moving the fence.
You can also make the blind dadoes with the router table, using the same technique of measuring to the center of the router bit and setting a stop. If you want a very tight fit, you could make the dado 41⁄8" long and round over the shelf for a precise fit, or chisel the end of the slot square. But we’re not building fine furniture here, and I really don’t think the bees will notice the difference.
Completed dadoes.
4. Cut and dado the shelf.
Cut the shelf piece from one of the 151⁄4"-long 1×8s. Set the table saw fence to 41⁄8" and rip one piece for the shelf. Save the leftover piece; you will use it for some slats. The shelf needs a 3⁄8"-wide × 7⁄16"-deep tenon slot centered along the length of one edge. Set the blade height to 7⁄16", and set the fence to 3⁄16". After making a test cut, cut one slot, then rotate the board and cut another slot. Move the fence and clean out the center to complete the slot.
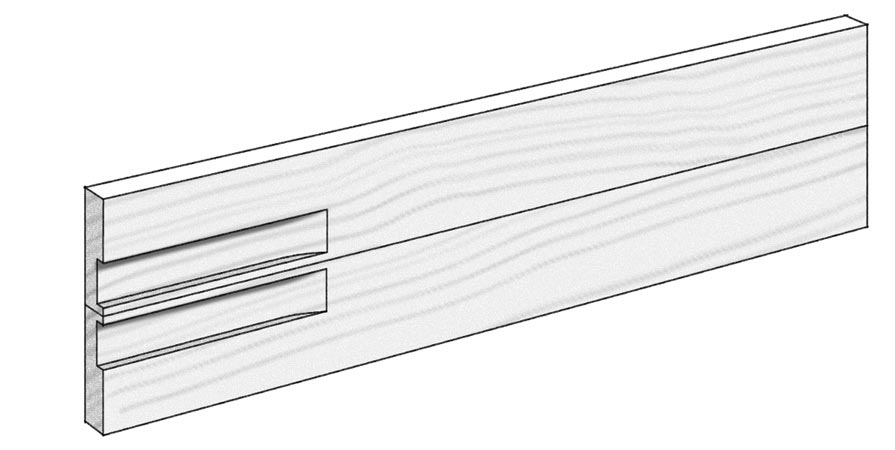
5. Make the slats.
Use the two remaining 151⁄4" pieces to make the 10 slats. There is enough material for a few extras. The slats get a tenon that fits into the dado of the shelf. Set the saw blade back to 3⁄16" high, and set the fence so that the distance to the far side of the blade is 7⁄16". After making a test cut, cut a rabbet in one end of each board that measures 7⁄16" wide × 3⁄16" deep. Flip the board and repeat to cut a second rabbet, thus completing the tenon. Check the fit of the tenon in the shelf. Raise the blade and set the fence to 3⁄4", then rip the slats.
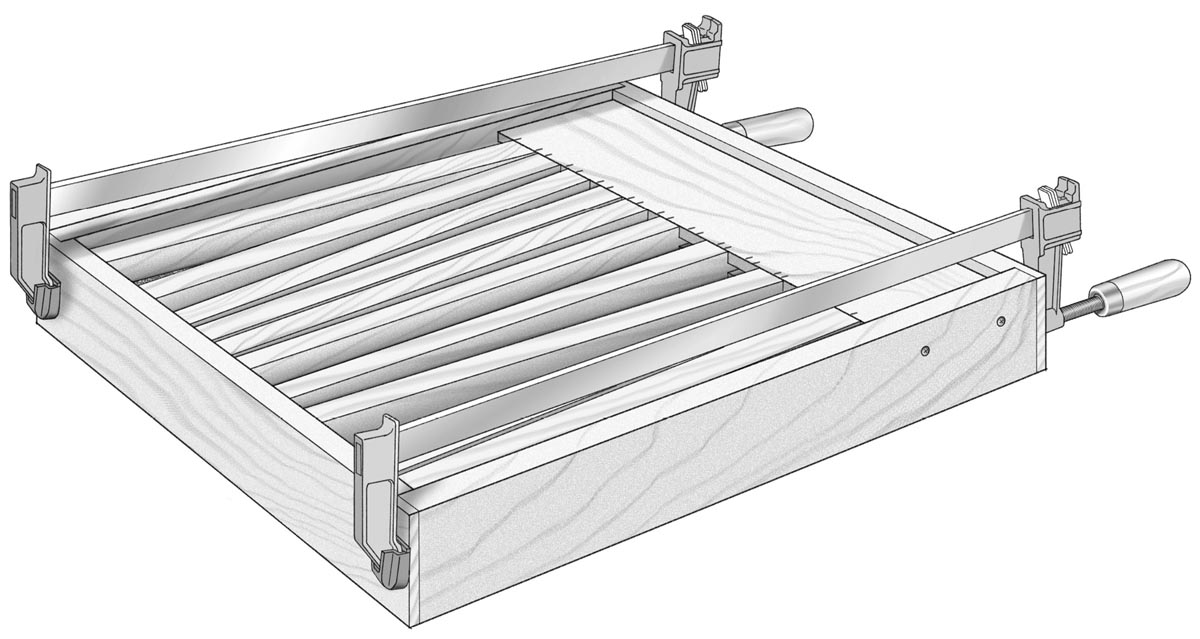
6. Begin the rack assembly.
Dry-fit the pieces of the frame, shelf, and a few slats as shown. Mark the locations of all screws and the slats. Disassemble the rack and apply glue to the dadoes of the side pieces and the end piece with the five screw holes only. Note: Do not apply glue to the other end piece or the dadoes that the slats will fit into.
Assemble the rack, making sure the slat markings face up. Install the slats into the slots, but for now don’t worry about lining them up. Put a couple of clamps lengthwise on the frame and check it for square. Drill countersunk pilot holes at the screw marks on a side piece, and drive two 2" deck screws through the side and into the shelf. Turn the rack around and repeat for the other side.
7. Install the ends.
To install the first end, drill pilot holes and drive five screws into the end piece, making sure everything stays straight and square. Three of these screws will go into the shelf and two will go into the sides. Install the second end using four screws, but don’t tighten them all the way. Remove the bar clamps. The ends should be loose enough for you to get the slats lined up with their marks.
Once you have the slats pretty much lined up, fully tighten the four screws in the second end. You’ll still be able to tweak them a little if needed.
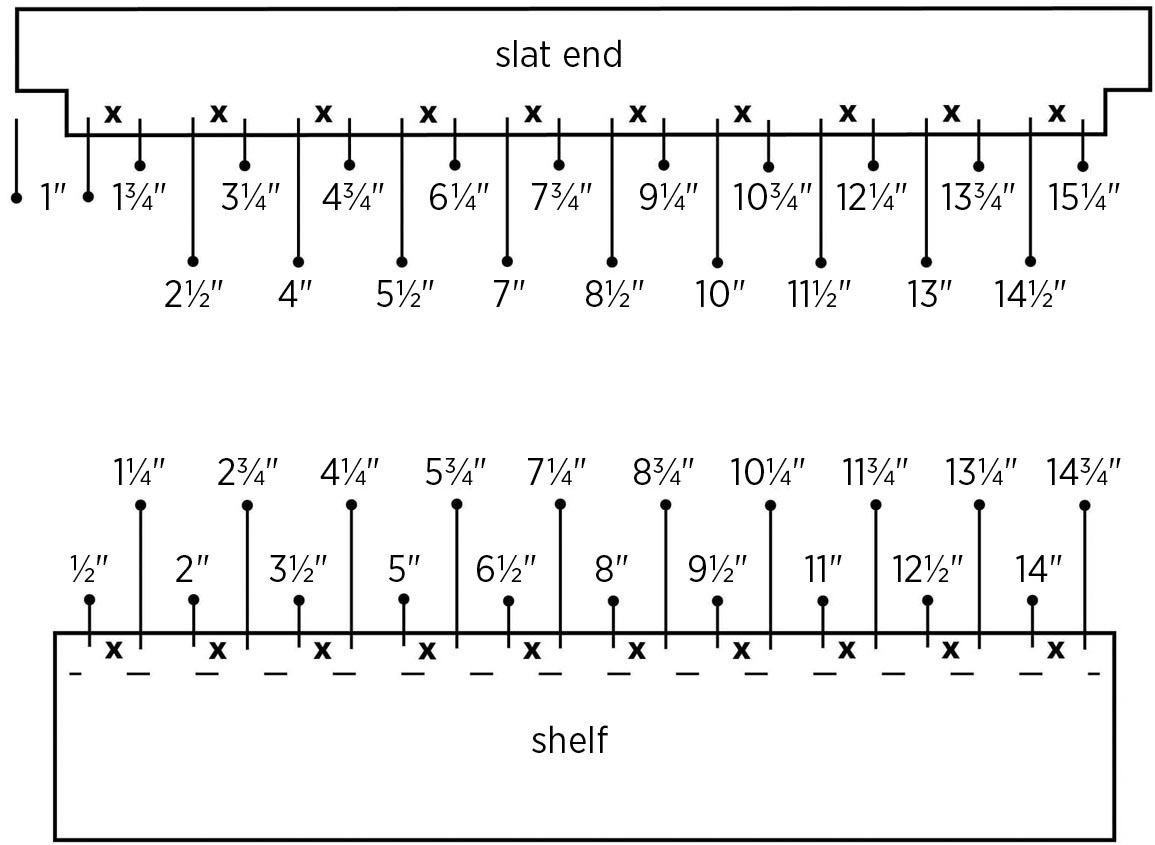
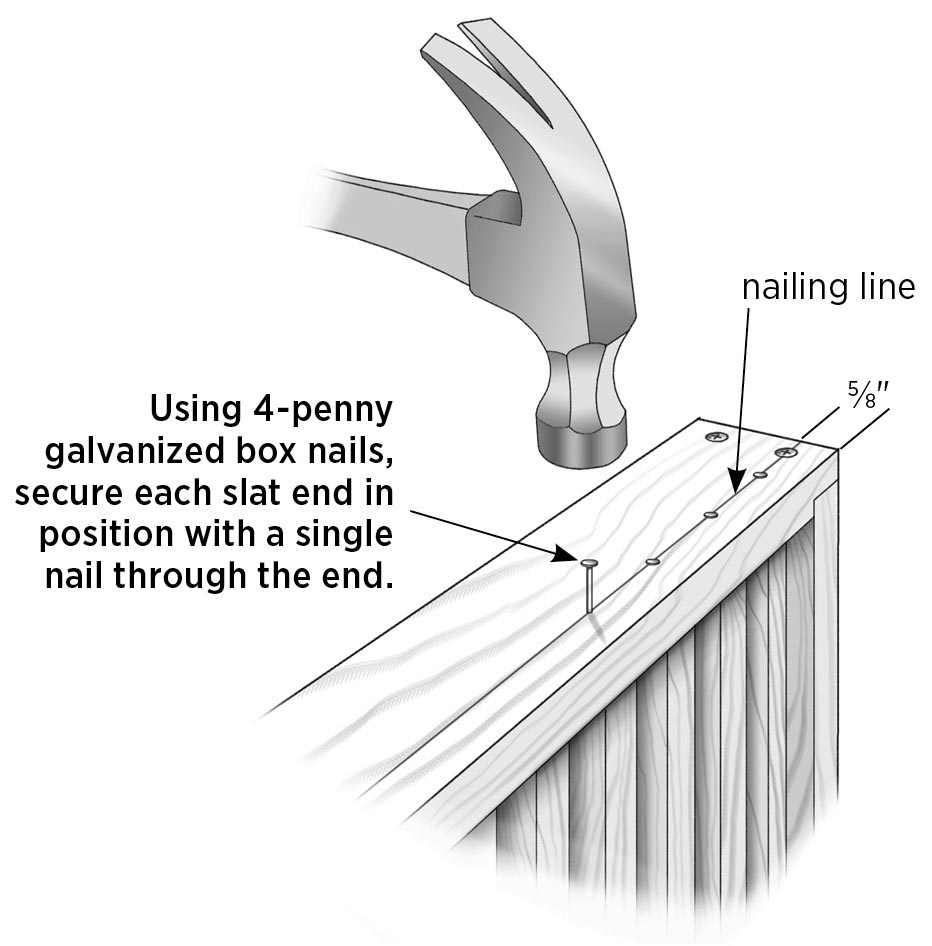
8. Attach the slats to the end piece.
Draw a line across the end piece, 5⁄8" down from the top edge; this is the nailing line for your (non-tenoned) slat ends. Fasten each slat end with two 11⁄4" brads if you have an electric brad nailer, or one 4d galvanized box nail if you’re nailing by hand. Be sure to check the alignment of the slats as you go. It’s a lot easier to get them in the right place the first time.
Work tip: If you have enough scrap pieces of pine, you can cut them to use as 3⁄4" spacers for lining up the slats. This will be helpful if you plan to build a lot of slatted racks, because you can use this first finished one as a template for building an assembly jig.
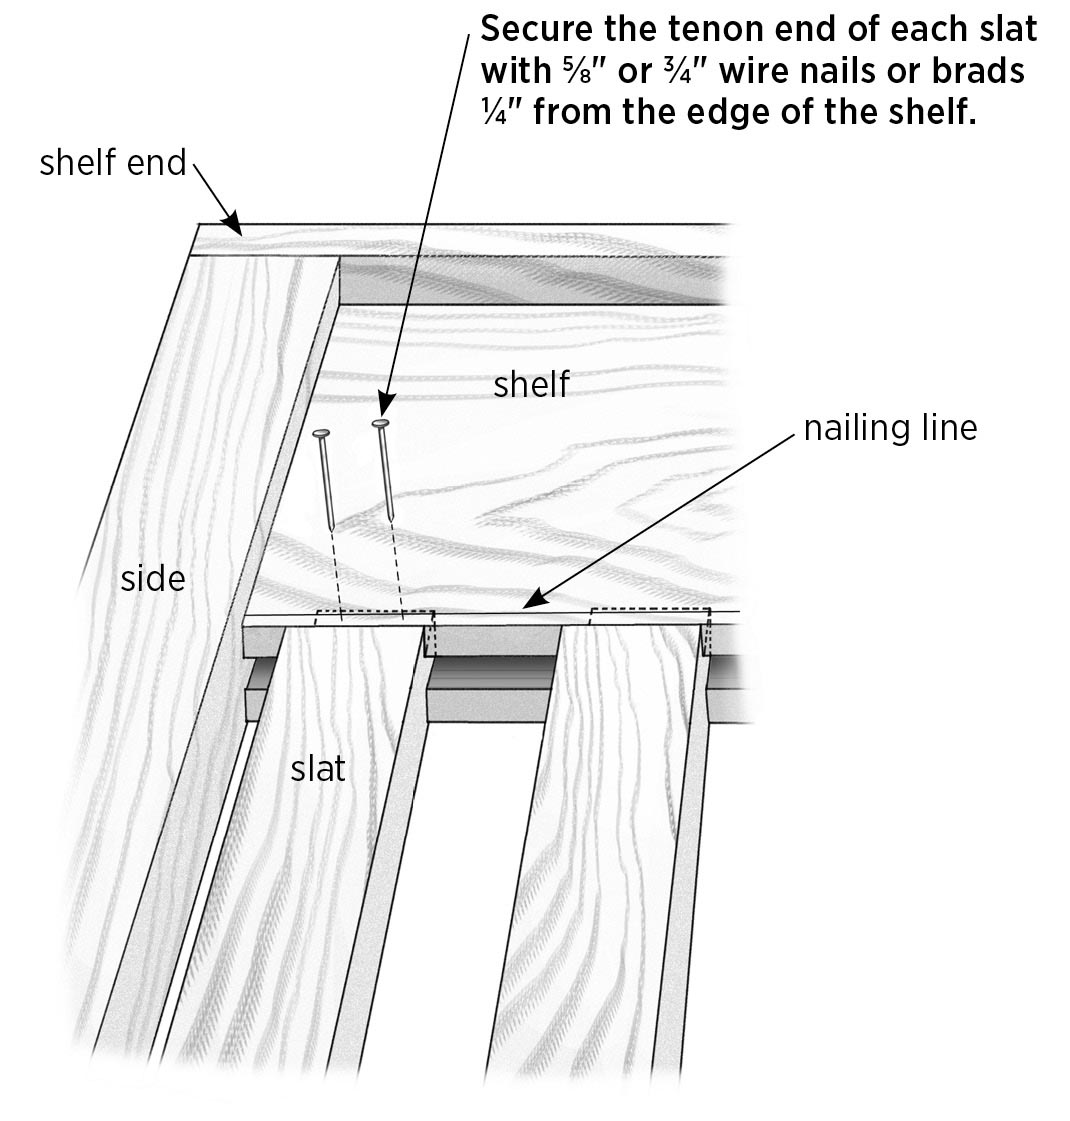
9. Fasten the tenoned slat ends.
Draw a nailing line across the shelf about 1⁄4" from the edge. If you didn’t use spacers, readjust the tenon ends of your slats to line up with their marks. If you’re using a brad nailer, switch to 3⁄4" brads. If you’re nailing by hand, use 5⁄8" or 3⁄4" wire nails. Nail down through the shelf into each slat in two places.