This wasn’t just plain terrible, this was fancy terrible. This was terrible with raisins in it.
The ornament of a house is the friends who frequent it.
She well knew the great architectural secret of decorating her constructions, and never condescended to construct a decoration.
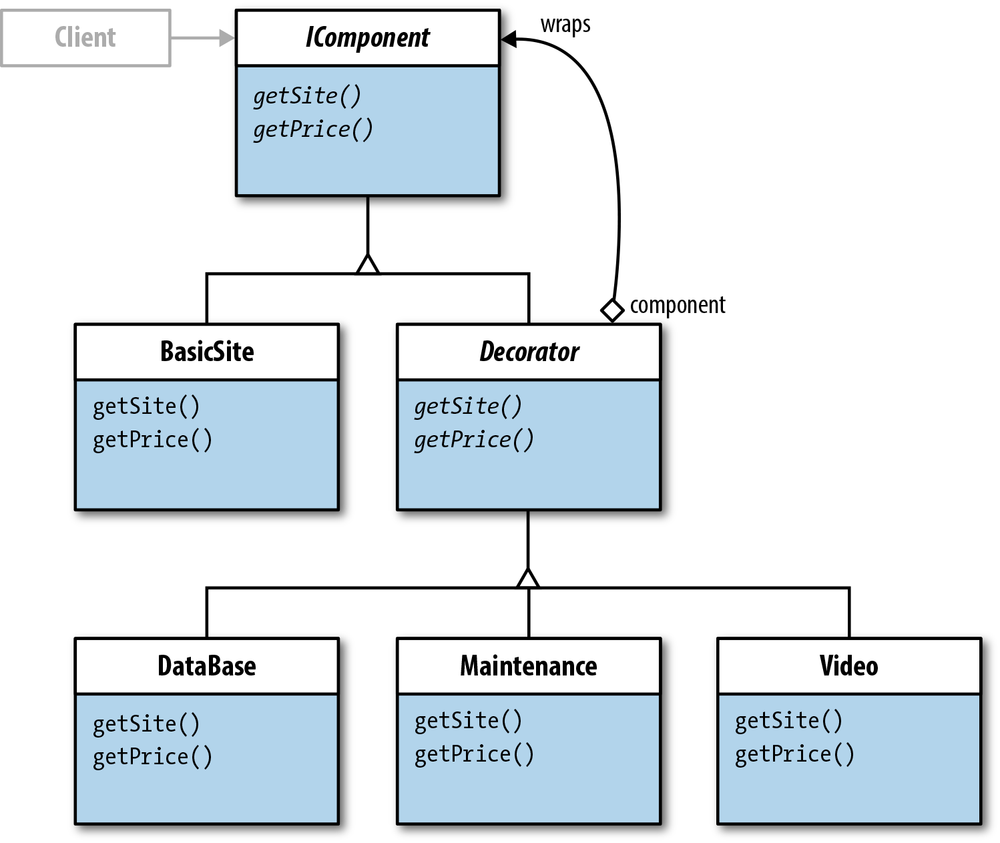
As a structural pattern, the Decorator adds to an existing structure. With the Adapter pattern, the addition to an existing structure is by adding an adapter class that resolves incompatible interfaces. The Decorator adds objects to existing objects. Also called wrapper (as was also the Adapter), the Decorator participant wraps the Component participant with concrete components. Figure 8-1 shows the class diagram, but before going over it, several details need to be considered.
First of all, the Decorator is one of the few design patterns that includes one abstract class inheriting another abstract class. As you can see in Figure 8-1, a looping aggregation connects the Decorator to the Component participant. (The looping line looks more like “wrapping” than the straight line used in the original Gang of Four’s class diagram—see also the Freemans’ Head First Design Patterns, page 91.) The Decorator can be said to “wrap” the Component.
The design creates both the component to be decorated and the decorators. Think of the Component participant as an empty room to be decorated with furniture and rugs—the furniture and rugs being concrete decorators. Note also that all of the participants share a common interface through the Component.
![Decorator class diagram [Client implied]](httpatomoreillycomsourceoreillyimages1529757.png)
The Client is included in the diagram but is
really is not a part of the pattern—not even implied. Given the loose
coupling, it could make a direct request to any of the concrete components
or decorators. However, when using the Decorator pattern, the
Client holds a reference to the
Component interface.
The Gang of Four point out some very general guidelines for using the Decorator. Primarily, the Decorator is used when you want to add functionality to existing objects without affecting the other objects. If you have painstakingly created a website format for a customer with key components that work flawlessly, you don’t want to have to upset the applecart when new functionalities are requested. For example, suppose your customers want to include video functionality in their websites after you have built all of the components originally requested. Instead of reworking your original components, you could “decorate” existing components with video functionality. In this way, you can maintain the original functionality while adding new functionality.
Another important feature of the Decorator design pattern can be found in projects where sometimes you need decoration and other times you don’t. Suppose your fundamental site development model works just dandy with the majority of your customers. However, some want certain functionality that will help their particular needs. Not everyone wants or needs these additional functionalities. As a developer, you want to create sites that will meet their business goals, and so you need what the business schools call customerization—features unique to a specific business. With the Decorator pattern, you can include both the core functionality and then “decorate” those cores with functionality unique to the customer.
With the change that constantly occurs on the Web and Internet—not to mention the scope—the Decorator can be a huge asset in your kit of developer tools. It is a case where you can have your cake and eat it, too—or at least decorate it with sprinkles.
This first example whittles the Decorator down to the most basic participants, but it clearly illustrates a PHP application. The example depicts a web development business where the business plan has a basic website it markets with added enhancements available. However, the web developer is aware that while the basic plan may work for most customers, along the way they may want certain enhancements.
Another point this minimalist Decorator example makes is the ease with which a number of concrete decorators can be added. In addition to the three decorators provided in this example, see if you can add more. It’s easy.
Further, because you can pick and choose which decorators to add, the business can control both the functionality and cost of a project. The ease of the Decorator includes both what can be used in a decoration and what does not have to be added.
The Component participant is an interface, and in this
case it will be an abstract class, IComponent. It has a single property, $site, and two abstract methods, getSite() and getPrice. It sets up the interface for both
the concrete components and the abstract class for the Decorator
participant:
<?php
//IComponent.php
//Component interface
abstract class IComponent
{
    protected $site;
    abstract public function getSite();
    abstract public function getPrice();
}
?>
In PHP, abstract methods have a very small signature, and so while
getSite() and getPrice() have an expected return, nothing
can be provided further in the abstract method declaration to suggest
the kind of return they should generate.
The decorator interface in this example may surprise you.
It is an abstract class that extends another abstract class! The purpose
of the class is to maintain a reference to the component interface
(IComponent) and by extending
IComponent, its job is done:
<?php
//Decorator.php
//Decorator participant
abstract class Decorator extends IComponent
{
    //Inherits both getSite() and getPrice()
    //This is still an abstract class and there's
    //no need to implement either abstract method here
    //Job is to maintain reference to Component
    //public function getSite() { }
    //public function getPrice() { }
}
?>
Like any other abstract class, you have the option of implementing
methods and adding properties. However, the fundamental the role of the
Decorator class is in this minimalist example is to
keep a link to the component interface.
Before going on to the concrete component participant, take a look at the class diagram for this Decorator implementation in Figure 8-2.
All of the participants have identical interfaces. In all implementations of the Decorator, you will find that both the concrete components and decorators have the same interfaces. Their implementations will be different, and both components and decorators can have added properties and methods beyond the basic interfaces. However, the lesson in this first example is that all concrete components and decorators share common interfaces.
The single concrete component in this example generates a name for the site and a price ($1,200) for a basic site:
<?php
//BasicSite.php
//Concrete Component
class BasicSite extends IComponent
{
    public function __construct()
    {
        $this->site="Basic Site";
    }

    public function getSite()
    {
        return $this->site;
    }
    public function getPrice()
    {
        return 1200;
    }
}
?>
Both of the abstract methods are implemented using literal assignments (“Basic Site” and 1200), but the flexibility is not in changing the set values. Rather, the value of the “Basic Site” is changed by adding the values of the decorators. The following section shows how this is done.
The concrete decorators in this example have the same
interface as the concrete component. However, they inherit the interface
from the Decorator abstract class and not the
IComponent class. Remember, though,
that all the Decorator does is to inherit the
IComponent interface.
<?php
//Maintenance.php
//Concrete decorator
class Maintenance extends Decorator
{
public function __construct(IComponent $siteNow)
{
$this->site = $siteNow;
}
public function getSite()
{
$fmat="<br/> Maintenance ";
return $this->site->getSite() . $fmat;
}
public function getPrice()
{
return 950 + $this->site->getPrice();
}
}
?>If you look at the concrete constructor, you will see that it looks almost identical to the decorators. However, each of the concrete decorators adds its own value to the value of the concrete component it wraps. The remaining two concrete decorators are similar to the Maintenance decorator.
<?php
//Video.php
//Concrete decorator
class Video extends IComponent
{
public function __construct(IComponent $siteNow)
{
$this->site = $siteNow;
}
public function getSite()
{
$fmat="<br/> Video ";
return $this->site->getSite() . $fmat;
}
public function getPrice()
{
return 350 + $this->site->getPrice();
}
}
?><?php
//DataBase.php
//Concrete decorator
class DataBase extends Decorator
{
public function __construct(IComponent $siteNow)
{
$this->site = $siteNow;
}
public function getSite()
{
$fmat="<br/> MySQL Database ";
return $this->site->getSite() . $fmat;
}
public function getPrice()
{
return 800 + $this->site->getPrice();
}
}
?>When you test the application, you can see that each individual price is added to the base cost. The names are formatted to add a couple of spaces to indent each decorator name.
One of the most important elements of the decorator implementations is in the constructor where a component type is expected. With only a single concrete component, it will be used in all of the instantiations of the decorator. When multiple components are used, the decorators can wrap some, all, or none of the components in the application.
While the Client class is not a part of
the design pattern or even implied, using it correctly is crucial. Each
decorator must “wrap” the component in its instantiation, as you saw in
the previous section. First, though, it must create an instance of the
BasicSite class to wrap:
<?php
//Client.php
function __autoload($class_name)
{
include $class_name . '.php';
}
class Client
{
private $basicSite;
public function __construct()
{
$this->basicSite=new BasicSite();
$this->basicSite=$this->wrapComponent($this->basicSite);
$siteShow=$this->basicSite->getSite();
$format="<br/> <strong>Total= $";
$price=$this->basicSite->getPrice();
echo $siteShow . $format . $price . "</strong><p/>";
}
private function wrapComponent(IComponent $component)
{
$component=new Maintenance($component);
$component=new Video($component);
$component=new DataBase($component);
return $component;
}
}
$worker=new Client()
?>Once the Client instantiates the BasicSite, a wrapComponent() method checks to make sure
that the correct data type is in the argument (IComponent), and then instantiates each of the
three decorators. (In a typical use of the Decorator pattern, only those
selected would be included;
comment out a couple to see how different combinations affect the total
cost.)
When the wrapComponent() method
returns the component ($this->basicSite), it has been changed and
now contains the added decorations. The output shows that the concrete
component instance is now wrapped with the three decorators, but keep in
mind that the output is minimal:
Basic Site
   Maintenance
   Video
   MySQL Database
  Total= $3300
The Client could just as well have wrapped the
decorators without the wrapComponent() method by the simple expedient
of having the same sequence of statements in the constructor function.
However, it was added to bring attention to the wrapping process in this
pattern.
Both the Adapter and Decorator patterns have the alternative name wrapper. In fact, some definitions describe a wrapper as an adapter. In case you’re not certain about the definition of a wrapper, this is a good point to stop and take a look at wrappers in coding in general and PHP specifically.
Perhaps the best way to start with wrappers is looking at wrapping a primitive. The following shows how an integer is wrapped in an object and retrieved:
<?php
class PrimitiveWrap
{
    private $wrapeMe;
    public function __construct($prim)
    {
        $this->wrapeMe=$prim;
    }

    public function showWrap()
    {
        return $this->wrapeMe;
    }
}
$myPrim=521;
$wrappedUp=new PrimitiveWrap($myPrim);
echo $wrappedUp->showWrap();
?>
If you need a primitive in an object, such as the PrimitiveWrap one, it’s a little more
difficult than in some languages, where you can wrap it with a built-in
wrapper. Some languages, like Java, have built-in wrapper classes for
every primitive type, and so you don’t have to build a class for a
wrapper.
While not having wrappers for all primitives, PHP does
have wrappers of its own. For instance, in Chapter 5, one example of a wrapper at
work is the file_get_contents()
wrapper. It binds a named resource, such as a filename (or URL to a
filename), to a stream. The following example uses a little poem by
Ogden Nash to illustrate. First, the poem is saved as a text file
(celery.txt):
<strong>Celery</strong><p/>
Celery, raw<br/>
Develops the jaw,<br/>
But celery, stewed,<br/>
Is more quietly chewed. <p/>
--Ogden Nash<br/>
The file_get_contents() wrapper
opens celery.txt, and makes it
available to the PHP program for output. The following shows this
wrapper at work:
<?php
class TextFileLoader
{
    private $textNow;
    public function __construct()
    {
        $this->textNow = file_get_contents ("celery.txt");
        echo $this->textNow;
    }
}
$worker=new TextFileLoader();
?>
The code generates the following output:
Celery

 Celery, raw
 Develops the jaw,
 But celery, stewed,
 Is more quietly chewed.

 --Ogden Nash
The filename (celery.txt) is
“wrapped” in the built-in file_get_contents() wrapper.
In Chapter 7, you saw how the
Adapter participant in the object Adapter pattern “wrapped” the Adaptee.
By doing so, it is able to create a compatible interface with the
Adaptee. Likewise, in the minimal example of the Decorator pattern, you
saw how the Decorator participants “wrapped” a component object to add
responsibilities to an existing component without having to change it.
The following code illustrates how the code in the
Client wraps a component object ($component) in a decorator (Maintenance):
$component=new Maintenance($component);
Like the term interface, the word wrapper applied to computer programming has different uses in different contexts. In general, the term used in the context of design patterns refers to working with incompatible or added on interfaces, and wrappers represent the strategy used to reduce incompatibility.
While only a single concrete component is used in the minimalist example of the Decorator pattern, the use of more than a single component is common. For example, Figure 8-3 shows a class diagram with multiple concrete components.
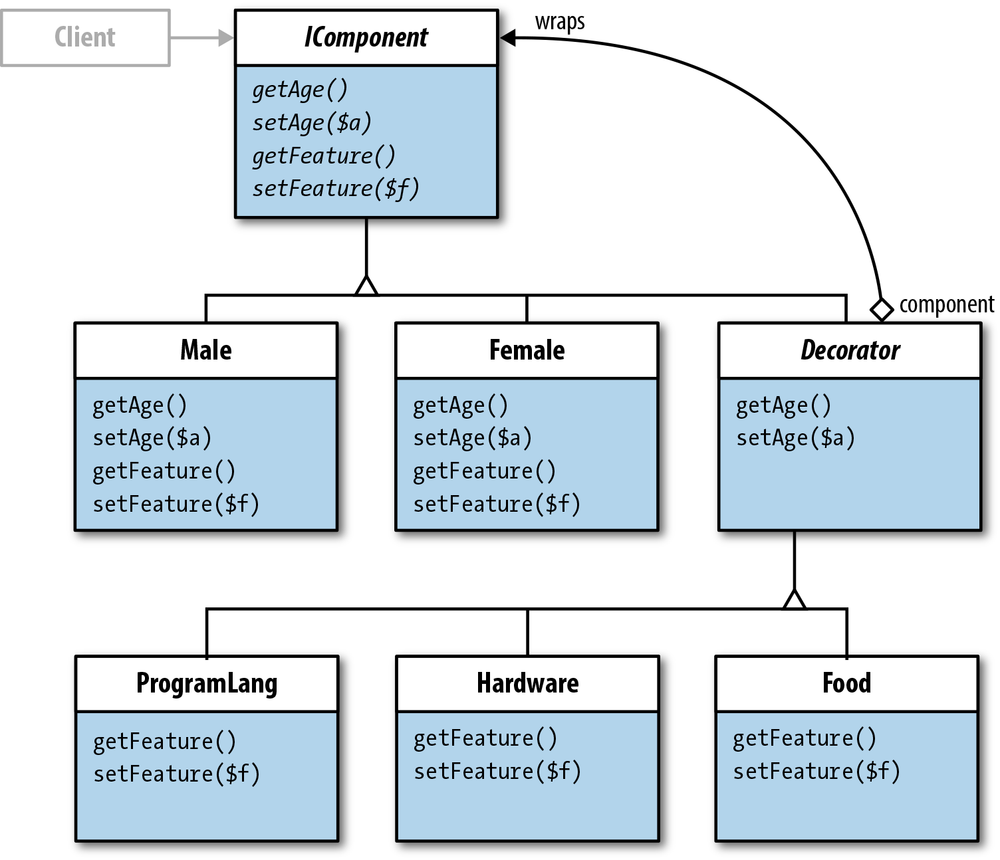
The Male and Female classes represent concrete
implementations of the IComponent
abstract class. The Decorator adds properties in the form of arrays.
Further on in this section, each of these will be examined closely.
Including multiple concrete components is not a problem as far as implementation or decoration. As long as they have the same interface as the component that is passed to the decorators, either one (or one of several) can be wrapped in a concrete decorator, just like a program or system with a single component.
In Figure 8-3, the Decorator,
which has inherited the IComponent
abstract class interface implements some methods. A couple of things are
going on here. First of all, the Decorator implements all of the methods
that will not be used in setting the states of the decorations.
Basically, the Decorator recognizes certain elements will not be changed
in Components through decoration such as age and the name of the
component. If the methods responsible for the components are implemented
only in the Decorator, they don’t have to be reimplemented in the
concrete decorators. Secondly, as you can see in Figure 8-1, the Decorator
class diagram indicates that it does implement at least some of the
Component’s interface. The method (Operation()) is not in italics, indicating
that the method has been instantiated. The getAge() and setAge($a) methods are implemented but not
used. If they were not implemented in the Decorator, they would have to
be in each of the concrete decorators because all inherited abstract
methods must be implemented in the child class.
To illustrate how to implement a Decorator with more than a single component, this next example sets up a dating service for software developers. The two components are Male and Female, and each can be decorated with different interests of those seeking dates. The components can be decorated with the same or different concrete decorations in any combination.
At the base, each should have a name and assigned age. We’ll assume that age is not a decoration whereas in “real life” it often is. As for the concrete decorations, they will have different states. Not only will each decoration be something that can be added to the concrete components, as was done in the initial example, each concrete decoration can have different states.
The component interface includes three properties and
five methods. The $date property is
used to identify the date as in “a date to go out on” and not a
day/month/year kind of date object. The $ageGroup is set in a component and the
$feature is a characteristic
supplied by one of the concrete decorations:
<?php
//IComponent.php
//Component interface
abstract class IComponent
{
    protected $date;
    protected $ageGroup;
    protected $feature;

    abstract public function setAge($ageNow);
    abstract public function getAge();
    abstract public function getFeature();
    abstract public function setFeature($fea);
}
?>
All methods are abstract and all properties are protected.
The two concrete methods are implemented as Male and
Female. Each has a constructor that sets the $date
value—an ID as “Male” or “Female.” Getter/setter methods establish an
age and any of the decorations that might be added:
<?php
//Male.php
//Male Concrete Component
class Male extends IComponent
{
    public function __construct()
    {
        $this->date="Male";
        $this->setFeature("<br/>Dude programmer features: ");
    }
    public function getAge()
    {
        return $this->ageGroup;
    }
    public function setAge($ageNow)
    {
        $this->ageGroup=$ageNow;
    }
    public function getFeature()
    {
        return $this->feature;
    }
    public function setFeature($fea)
    {
        $this->feature=$fea;
    }
}
?>
The initial feature set by both concrete components establishes them as male or female:
<?php
//Female.php
//Female Concrete Component
class Female extends IComponent
{
    public function __construct()
    {
        $this->date="Female";
        $this->setFeature("<br />Grrrl programmer features: ");
    }
    public function getAge()
    {
        return $this->ageGroup;
    }
    public function setAge($ageNow)
    {
        $this->ageGroup=$ageNow;
    }
    public function getFeature()
    {
        return $this->feature;
    }
    public function setFeature($fea)
    {
        $this->feature=$fea;
    }
}
?>
Other features can be added as decorations to both components
using the $setFeature() method.
Think of $setFeature() as a
component enhancer rather than a component
setter.
The decorator interface extends the component interface. However, as previously noted, it also implements getters/setters for age:
<?php
//Decorator.php
//Decorator participant
abstract class Decorator extends IComponent
{
    public function setAge($ageNow)
    {
        $this->ageGroup=$this->ageGroup;
    }
    public function getAge()
    {
        return $this->ageGroup;
    }
}
?>
If you want to add an active error-catching routine using an
else statement, you can easily do
so. However, the current setup would be a “quiet fail,” where the
object would not be passed.
The concrete decorators in this example are quite different from the concrete decorators in the minimalist example. Instead of having a single state, the concrete decorators all contain arrays with multiple property values. Instead of having a single concrete decorator with four different language choices to be used as a concrete decoration, we could have had four separate concrete decorations, each representing a different computer language. However, combining the same choices in an array accomplishes the same goal and maintains loose coupling:
<?php
//ProgramLang.php
//Concrete decorator
class ProgramLang extends Decorator
{
private $languageNow;
public function __construct(IComponent $dateNow)
{
$this->date = $dateNow;
}
private $language=array("php"=>"PHP",
"cs"=>"C#",
"js"=>"JavaScript",
"as3"=>"ActionScript 3.0");
public function setFeature($lan)
{
$this->languageNow=$this->language[$lan];
}
public function getFeature()
{
$output=$this->date->getFeature();
$fmat="<br/> ";
$output .="$fmat Preferred programming language: ";
$output .= $this->languageNow;
return $output;
}
}
?>All of the concrete decorators have the same formatting. An
output variable is first assigned the selected element using getFeature(), and then formatting tags and
general concrete component information is concatenated to the output
variable:
<?php
//Hardware.php
//Concrete decorator
class Hardware extends Decorator
{
private $hardwareNow;
public function __construct(IComponent $dateNow)
{
$this->date = $dateNow;
}
private $box=array("mac"=>"Macintosh",
"dell"=>"Dell",
"hp"=>"Hewlett-Packard",
"lin"=>"Linux");
public function setFeature($hdw)
{
$this->hardwareNow=$this->box[$hdw];
}
public function getFeature()
{
$output=$this->date->getFeature();
$fmat="<br/> ";
$output .="$fmat Current Hardware: ";
$output .= $this->hardwareNow;
return $output;
}
}
?>Using associative arrays (arrays that use string element keys) makes it a little easier to choose which property of the decorations to select. All of the concrete decorators have a similar style of array for each feature:
<?php
//Food.php
//Concrete decorator
class Food extends Decorator
{
private $chowNow;
public function __construct(IComponent $dateNow)
{
$this->date = $dateNow;
}
private $snacks=array("piz"=>"Pizza",
"burg"=>"Burgers",
"nach"=>"Nachos",
"veg"=>"Veggies");
public function setFeature($yum)
{
$this->chowNow=$this->snacks[$yum];
}
public function getFeature()
{
$output=$this->date->getFeature();
$fmat="<br/> ";
$output .="$fmat Favorite food: ";
$output .= $this->chowNow . "<br/>";
return $output;
}
}
?>The concrete decorations all must be easily accessible to the
client, and so each of the getter and setter methods are public. However, the values set in the
different properties (arrays) are private, adding a measure of encapsulation
in the component decoration process.
Finally, the Client class requests a
component and concrete decorations. After selecting a concrete
component through instantiation, the Client sets
the age group of interest. The Client sets one of four age groups with the
strings “Age Group N” where “N” is a string value from 1–4:
<?php
//Client.php
/*Age groups:
    18-29: Group 1
    30-39: Group 2
    40-49: Group 3
    50+  : Group 4
*/
function __autoload($class_name)
{
    include $class_name . '.php';
}
class Client
{
    //$hotDate is component instance
    private $hotDate;

    public function __construct()
    {
        $this->hotDate=new Female();
        $this->hotDate->setAge("Age Group 4");
        echo $this->hotDate->getAge();
        $this->hotDate=$this->wrapComponent($this->hotDate);
        echo $this->hotDate->getFeature();
    }

    private function wrapComponent(IComponent $component)
    {
        $component=new ProgramLang($component);
        $component->setFeature("php");
        $component=new Hardware($component);
        $component->setFeature("lin");
        $component=new Food($component);
        $component->setFeature("veg");

        return $component;
    }
}
$worker=new Client()
?>
After instantiating one of the two concrete components, the
Client decorates them by wrapping them in one of
three concrete decorators. This whole process is within the wrapComponent() method. As each instance is
created, the setFeature() method,
using an argument made up of an associative array key, decorates the
component. The client generates the following output:
Female
Age Group 4
Grrrl programmer features:
   Preferred programming language: PHP
   Current Hardware: Linux
   Favorite food: Veggies
As you can see, the decorators are elements from the associative arrays in the concrete decorator classes.
Up to this point in the book, no HTML UI has been included. In Part V, all of the applications include an HTML UI. The reason for not adding a UI thus far is that the focus has been on the fundamentals of the different design patterns. The PHP has not been embedded in an HTML wrapper, and the only HTML generated is that used for general formatting.
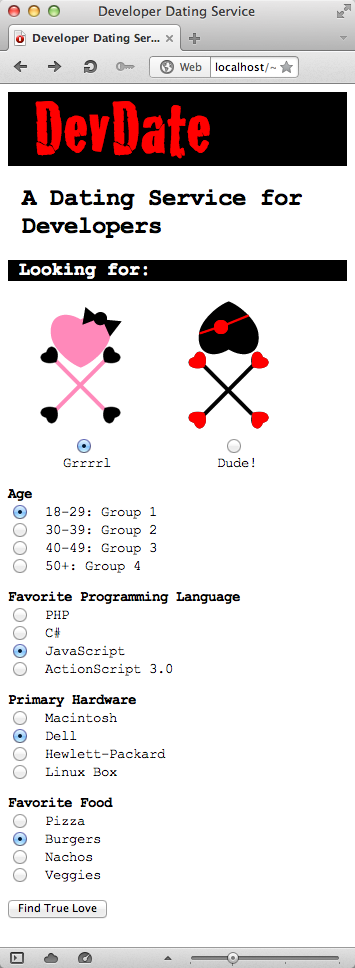
At this point, the HTML UI is to show how to connect to a PHP design
pattern through the Client class (object). Using the
example in the Developer Dating Service, you can see
that communication between HTML and PHP is the same as you have used with
any other HTML→PHP program used in other
projects. The only change in the PHP is to allow values to be passed from
an HTML form to the Client class. All of the other
participants in the pattern remain unchanged.
To get started, take a look at the finished HTML UI in Figure 8-4. As you can see, the page uses radio buttons for all of the data input.
The data input is simple, and all that’s required are the standard HTML/CSS files for the page. First, the page uses the following CSS file:
@charset "UTF-8";
/* CSS Document */
/* devedate.css */
header
{
    font-family:Cracked;
    font-size:72px;
    color:#F00;
    background-color:#000;
}
h2
{
    font-family:"Courier New", Courier, monospace;
    font-size:24px;
}

h3
{
    font-family:"Courier New", Courier, monospace;
    font-size:18px;
    color:#fff;
    background-color:#000;
}

body
{
    font-family:"Courier New", Courier, monospace;
    font-size:14px;
}
#sex
{
    display:table;
}
#fem
{
    display:table-cell;
    width:150px;
    text-align:center;
}
aside
{
    display:table-cell;
    width:150px;
    text-align:center;
}
The page is set up for mobile vertical, but it works just as well on a table or desktop system. Next, the HTML for the page is listed in the following code block. It calls a page, ClientH.php. The H in the class and filename indicates that it is set up to receive HTML data (you may want to add validation code either to the HTML or PHP scripts; it throws errors for any unchecked radio buttons!):
<!doctype html>
<html>
<head>
<meta charset="UTF-8">
<link rel="stylesheet" type="text/css" href="css/devdate.css">
<title>Developer Dating Service</title>
</head>
<body>
<article>
<header> DevDate</header>
<h2> A Dating Service for <br/>
Developers</h2>
<h3> Looking for:</h3>
<form action="ClientH.php" method="post">
<div id="sex">
<div id="fem"> <img src="pix/grrrl.png" width="95" height="128"
alt="grrrl"><br/>
<input type="radio" name="gender" value="Female">
<br/>
Grrrl </div>
<aside> <img src="pix/dude.png" width="99" height="133" alt="dude"><br/>
<input type="radio" name="gender" value="Male">
<br/>
Dude!
<p/>
</aside>
</div>
<strong>Age<br/>
</strong>
<input type="radio" name="age" value="Age Group 1">
18-29: Group 1 <br/>
<input type="radio" name="age" value="Age Group 2">
30-39: Group 2<br/>
<input type="radio" name="age" value="Age Group 3">
40-49: Group 3<br/>
<input type="radio" name="age" value="Age Group 4">
50+: Group 4
<p/>
<strong>Favorite Programming Language<br/>
</strong>
<input type="radio" name="progLang" value="php">
PHP<br/>
<input type="radio" name="progLang" value="cs">
C#<br/>
<input type="radio" name="progLang" value="js">
JavaScript<br/>
<input type="radio" name="progLang" value="as3">
ActionScript 3.0
<p/>
<strong>Primary Hardware<br/>
</strong>
<input type="radio" name="hardware" value="mac">
Macintosh<br/>
<input type="radio" name="hardware" value="dell">
Dell<br/>
<input type="radio" name="hardware" value="hp">
Hewlett-Packard<br/>
<input type="radio" name="hardware" value="lin">
Linux Box
<p/>
<strong>Favorite Food<br/>
</strong>
<input type="radio" name="food" value="piz">
Pizza<br/>
<input type="radio" name="food" value="burg">
Burgers<br/>
<input type="radio" name="food" value="nach">
Nachos<br/>
<input type="radio" name="food" value="veg">
Veggies
<p/>
<input type="submit" name="search" value="Find True Love">
</form>
</article>
</body>
</html>Basically, this page passes data to a PHP page exactly as you would if you were sending data from an HTML page to a MySQL database via PHP. So, even though the data is going to a client class in a Decorator design pattern, passing data is no different than what you’re used to doing with any other data to a PHP file.
As noted, sending data to a PHP client class from HTML is
similar to sending it to a database table. In looking at the ClientH class, you will see that it is just
like the Client
class except that it uses the data from the DeveloperDating.html file:
<?php
//ClientH.php
function __autoload($class_name)
{
    include $class_name . '.php';
}
class ClientH
{
    //$hotDate is component instance
    private $hotDate;
    private $progLange;
    private $hardware;
    private $food;

    public function __construct()
    {
        $gender=$_POST["gender"];
        $age=$_POST["age"];
        $this->progLang=$_POST["progLang"];
        $this->hardware=$_POST["hardware"];
        $this->food=$_POST["food"];

        $this->hotDate=new $gender();
        $this->hotDate->setAge($age);
        echo $this->hotDate->getAge();
        $this->hotDate=$this->wrapComponent($this->hotDate);
        echo $this->hotDate->getFeature();
    }

    private function wrapComponent(IComponent $component)
    {
        $component=new ProgramLang($component);
        $component->setFeature($this->progLang);
        $component=new Hardware($component);
        $component->setFeature($this->hardware);
        $component=new Food($component);
        $component->setFeature($this->food);

        return $component;
    }
}
$worker=new ClientH()
?>
Using the $_POST associative
array, the radio button variables and values are passed to PHP
variables. The gender and age variable were passed within the
constructor function, while the component variable ($hotDate) and three decorator variables
($proLang, $hardware, and $food) were all declared as private variables
and then used in the place of literals as had been done in the original
Client class.
The normal process for instantiating an object instance is to assign a named variable to a class instance. In this book, the convention is to capitalize all class names and use lowercase names for variable class instances, such as the following:
$someInstance= new SomeClass();
That format works fine as long as you know the name of the class.
However, when you have multiple components that must be declared through
a variable passed from an HTML page, the name of the class must come
through a variable’s value. PHP makes the process incredibly easy,
especially compared with methods that use some form of an eval function.
The general process for naming and instantiating a class through a
variable, as you saw in Chapter 6, is
to assign the class name to the variable and then instantiate the class
using the variable. For example, suppose you have a class named Nature; an instance can be instantiated
dynamically through a variable:
$quack = "Nature";
$myNature= new $quack();
Now, $myNature is an instance
of the Nature class. In the class
ClientH, you can see that the
$hotDate variable must instantiate
one of the two component classes, Female or Male. In selecting a male or female date, the
user chooses one of two radio buttons, both named
gender. The two values are the class names,
Female and Male. So, when those
values are passed to the PHP variable $gender, they are all set to be instantiated
into one or the other of the two concrete component classes. The
following line does the instantiation:
$this->hotDate=new $gender();
Note that the expression includes both the new keyword and adds open and close
parentheses at the end of the variable $gender.
Suppose you think it would be a good idea to include a query about the kinds of movies the users enjoy as a measure of compatibility. For example, the categories of action, romance, science fiction, and musicals could be film types that users may enjoy. In order to measure your own understanding of the Decorator design pattern, add a single concrete decorator class that can decorate the selected concrete component with movie preference.
The process is quite easy. In fact, you can copy and paste one of
the existing concrete components and rename it Films. Then just change the options for the
categories and test it using literal values in the
Client class. If that works as desired, update the
HTML UI to include a films option and change the ClientH class to pass the request to the rest
of the program.
The larger a program gets, the more useful both OOP programming and design patterns from the Structural category become. That’s because all of the patterns discussed in Part III are used to change the functionality of existing structures without having to rewrite the existing structure.