In dream consciousness... we make things happen by wishing them, because we are not only the observer of what we experience but also the creator.
Knowledge is what we get when an observer, preferably a scientifically trained observer, provides us with a copy of reality that we can all recognize.
One of the many treats found within PHP 5.1.0 and up is a
set of interfaces that can be used with the Observer design pattern. This
chapter will look at an Observer pattern beginning from scratch without
any built-in features, but to get started we’ll have a short overview of
the SplObserver interface along with
the SplSubject and the SplObjectStorage interfaces that make building
an Observer pattern with PHP a snap. “SPL” is shorthand for
Standard PHP Library and consists of a collection of
interfaces and classes used to solve standard problems.
However, before we get ahead of ourselves, you need some idea of what the Observer pattern is and what it does. Fortunately, its class diagram is quite detailed, and many of the features prized in the Model-View-Controller (MVC) pattern can be found in the Observer. (You might even think of the pattern as an alternative to the MVC.) At the root of the Observer are Subject and Observer interfaces. The Subject holds a given state and the observers “subscribe” to the subject to be informed of the current state. You can think of it as a blog with many subscribers—one set of information is routinely updated for a variety of users who subscribe or regularly read the blog. Each time the blog is changed (its state changes), all of the subscribers “are informed.” Figure 14-1 shows the Observer class diagram.
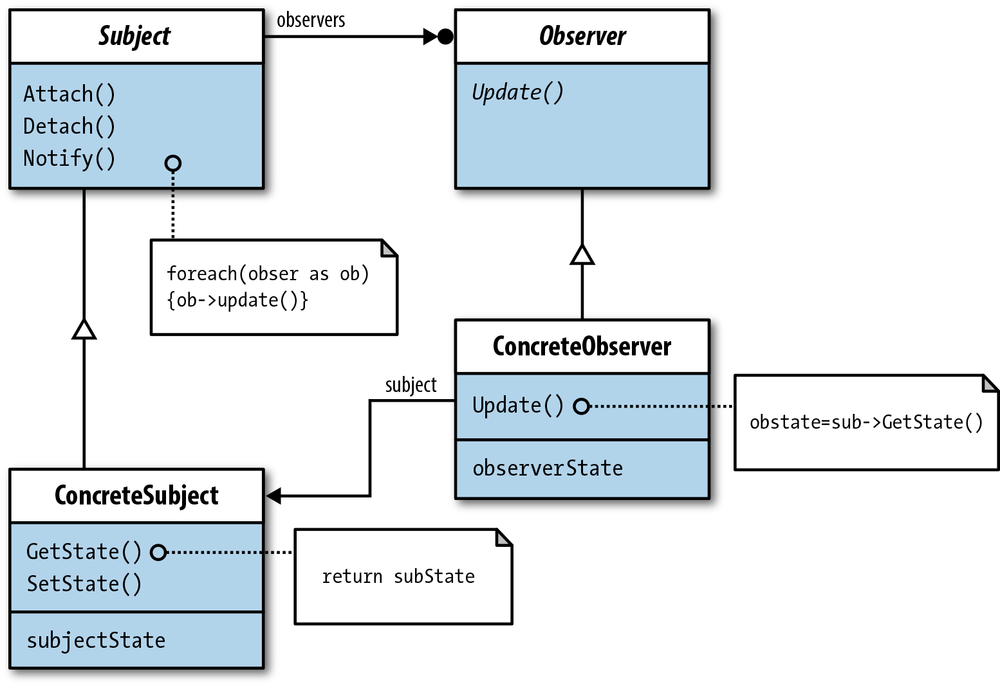
One of the more interesting and possibly perplexing features of this
pattern is the Subject’s methods. While the italicized title
“Subject” title indicates an interface (an abstract
class in this case), abstract methods are italicized as well. However, as
you can see in Figure 14-1, none of the
methods are italicized. It is clear which methods Subject generates, and
the Notify() method even has pseudocode
to help out. You will find several different implementations of the
Observer pattern, and even the one built into PHP has its own spin.
The Observer pattern was designed so that a single object could keep track of a state and when the state changed, all of the subscribing objects would be informed. In situations where you need consistency in one state but may have several different views of a given state, the Observer pattern is both appropriate and helpful. You can maintain consistency while keeping down the number of objects that must create a given state on their own.
The Observer pattern makes intuitive sense. Why should more than one object do the work to create or keep track of a given state? If one object can do the job and then inform others that may use the state, it makes a lot more sense.
One ongoing issue for PHP developers and designers is taking one set of data in the form of text, numbers, and graphics and formatting them for different devices for web presentation. Mobile devices ranging from smartphones to tablets of varying sizes, and nonmobile devices like desktop computers and laptops all need different design configurations. However, they need the same data. Figure 14-2 illustrates this relationship.

Connected to a content management system (CMS), the Observer design pattern is a way to make sure that all configurations are presenting the same materials. Each observer can use the identical data, and all the developer and designer have to concern themselves with is setting up the content for the different devices and getting the data information to the Subject participant.
The three SPL interfaces/classes that can be employed usefully with the Observer design pattern are the following:
SplSubjectSplObserverSplObjectStorage
A quick review of each shows its structure in relationship to the Observer design pattern. Figure 14-3 gives a quick conceptual layout.
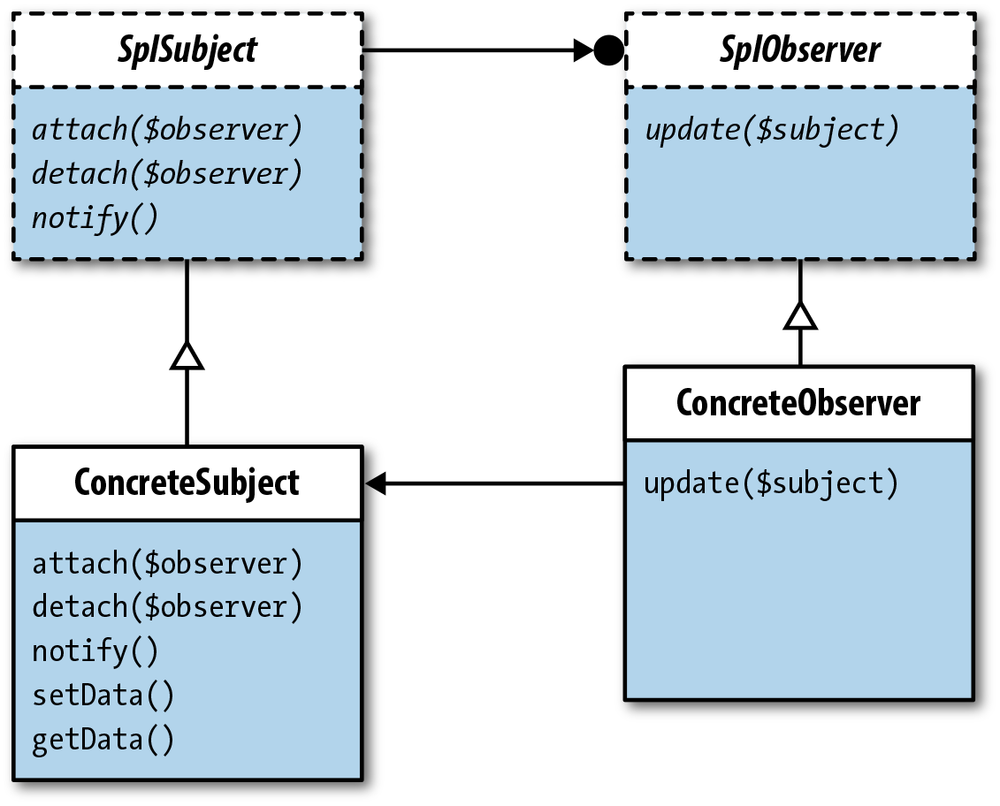
Compare the SPL Observer class diagram in Figure 14-3 with the GoF version in Figure 14-1. All of the same parts are there, but the SPL diagram has more abstractions.
The SplSubject interface
has three abstract methods similar to the ones found in
the original Observer class diagram. However, SplSubject is an interface, whereas the most
likely implementation of the original Subject participant is an abstract class
because its methods are not abstract.
The PHP Manual lists the methods for SplSubject as the
following:
abstract public void attach ( SplObserver $observer )
abstract public void detach ( SplObserver $observer )
abstract public void notify ( void )
The void term simply means that
the methods do not return anything. In a standard PHP interface, the
function keyword would be included as
well. Here’s what it would look like if you created the interface
yourself:
public function attach(SplObserver $observer);
public function detach(SplObserver $observer);
public function notify();
The SplSubject interface can be
implemented without having to create a Subject interface or abstract
class. Importantly, the interface specifies that the data type of the
$observer must be a SplObserver object in both the attach() and detach() methods parameters.
The SplObserver interface
has a single method, update(). It is presented as the
following:
abstract public void update ( SplSubject $subject )
In standard PHP interface formatting, that would be:
public function update(SplSubject $subject);
The update() method is crucial
to the Observer pattern because it gets the latest changes in the
Subject state to the observer instance. However, the original GoF
version does not include a parameter for a Subject data type, and in
further PHP Observer implementations in this chapter, you will see
implementations that do not include such parameters and the implications
of doing so.
The SplObjectStorage class has no inherent relationship to the Observer design
pattern, but it is a handy way to attach and detach observer instances
from a subject instance. While the SplObjectStorage class is described as
providing a map from objects to data or, by ignoring data, an object
set, I like to think of it as an array with built-in attach() and detach() methods. This class provides a simple
way of attaching and detaching observers from a subject object sending
out state-change notifications.
The subject needs to attach and detach observers and to notify
subscribers (attached observers) of the change. A private variable
$observers encapsulates the property.
In this implementation, the $observers property is instantiated as a
SplObjectStorage object. Think of it
as something like an array. Then, individual $observer instances are
attached as SplObserver objects (The storage unit is
$observers that stores individual
$observer instances.) Figure 14-4 shows this
arrangement.
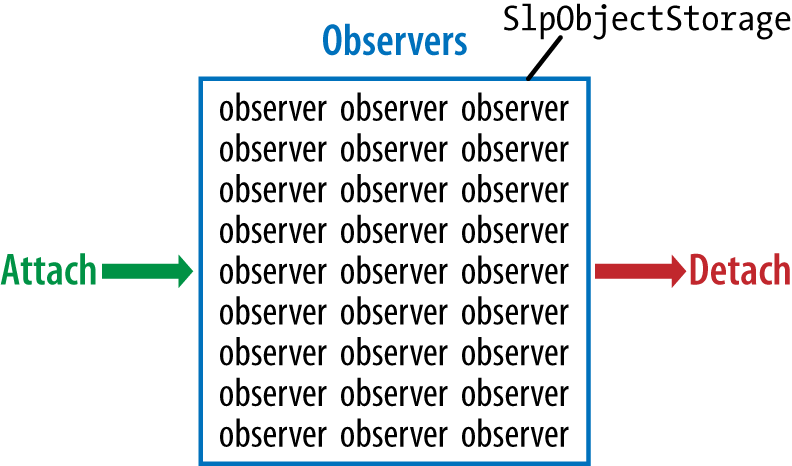
What makes the SplObjectStorage
valuable is its built-in attach() and
detach() methods, which make it easy
to program which observer instances will “subscribe” and “unsubscribe”
to update notifications:
<?
class ConcreteSubject implements SplSubject
{
    private $observers;
    private $data;

    public function setObservers()
    {
        $this->observers=new SplObjectStorage();
    }

    public function attach(SplObserver $observer)
    {
        $this->observers->attach($observer);
    }

    public function detach(SplObserver $observer)
    {
        $this->observers->detach($observer);
    }

    public function notify()
    {
        foreach ($this->observers as $observer) {

            $observer->update($this);
        }
    }

    public function setData($dataNow)
    {
       $this->data=$dataNow;
    }

    public function getData()
    {
        return $this->data;
    }
}
?>
Getter and setter methods are not part of the SplSubject interface, but they are part of the
design pattern and so need to be added. The setter method, setData(), includes a parameter for any kind
of data to be added. The getter method, getData(), stores the current subject state
and is used by the concrete observer to update observer data.
The setObservers() method is
added as well. Rather than setting the SplObjectStorage() instance in a constructor
function that would require a new instance of the ConcreteSubject class or placing it inside the
setData() method, the separate
setObservers() method provides a
looser coupling and allows for the possibility of more than one set of
observers.
The concrete observer is both simple and possibly complex. In this
example, it fulfills the single function of updating attached observer
instances. The update() method is
implemented with code hinting using the SplSubject interface as a method parameter.
This forces the developer to include an SplSubject instance in all update() calls:
<?
class ConcreteObserver implements SplObserver
{
    public function update(SplSubject $subject)
    {
       echo $subject->getData() . "<br />";
    }
}
?>
Given that concrete observers need only a single
update() method, it is not too difficult to see that
concrete observers can be made up of more robust classes or even parts
of other design patterns. Further on in this chapter, while developing a
CMS using an Observer pattern, you will see far more useful
observers.
The “SPL” Client class
is just a standard client. The client makes several requests to concrete
subjects and observers based on SPL interfaces but implements no SPL
classes or interfaces itself.
In this example, the Client
creates a single subject instance and three concrete observer instances.
Then it sets a new state using the setData() method and attaches the three
observers to the subject. Finally, it calls the concrete subject
instance notify() method to send the
current state to the subscribing observers:
<?php
//Client
function __autoload($class_name)
{
    include $class_name . '.php';
}
//
class Client
{
    public function __construct()
    {
        echo "<p>Create three new concrete observers, a new concrete subject:
              </p>";
        $ob1 = new ConcreteObserver();
        $ob2 = new ConcreteObserver();
        $ob3 = new ConcreteObserver();

        $subject = new ConcreteSubject();
        $subject->setObservers();
        $subject->setData("Here's your data!");
        $subject->attach($ob1);
        $subject->attach($ob2);
        $subject->attach($ob3);

        $subject->notify();

        echo "<p>Detach observer ob3. Now only ob1 and ob2 are notified:</p>";
        $subject->detach($ob3);
        $subject->notify();

        echo "<p>Reset data and reattach ob3 and detach ob2--only ob 1 and 3 are
              notified:</p>";
        $subject->setData("More data that only ob1 and ob3 need.");
        $subject->attach($ob3);
        $subject->detach($ob2);
        $subject->notify();
    }
}

$worker=new Client();
?>
The output from the Client is as
follows:
Create three new concrete observers, a new concrete subject:
Here's your data!
Here's your data!
Here's your data!

Detach observer ob3. Now only ob1 and ob2 are notified:

Here's your data!
Here's your data!

Reset data and reattach ob3 and detach ob2--only ob 1 and 3 are notified:

More data that only ob1 and ob3 need.
More data that only ob1 and ob3 need.
One possible source of confusion may
exist in differentiating the ConcreteSubject->attach()
and ConcreteSubject->detach()
methods from the SplObjectStorage->attach()
and SplObjectStorage->detach()
methods. The ConcreteSubject
class wraps the SplObjectStorage
attach() and detach()
methods in its own attach() and
detach() methods. The following
pseudocode shows a class version of how the ConcreteSubject created its attach/detach
methods:
public function attach(SplObserver $observer)
    {
        SplObjectStorage->attach($observer);
    }

    public function detach(SplObserver $observer)
    {
        SplObjectStorage->detach($observer);
    }
Changing the concrete subject class attach/detach methods to some
other name would probably be equally confusing, so just understand that
built-in SPL attach/detach methods are used to create ConcreteSubject attach/detach
methods.
Moving now from some of the few SPL interfaces in PHP designed specifically for a design pattern to using non-SPL participants, you can get an alternative view of the Observer closer to the original structure as shown in Figure 14-1. The main differences are the following:
The
Subjectparticipant is an abstract class instead of an interface.The
notify()method is implemented in theSubjectinstead of in the concrete subject.The concrete subject uses an array object instead of an
SplObjectStorageobject to store observer instances.
The observer participants are virtually identical to the SPL ones
except that the Subject is an abstract class (instead of an interface)
that includes a concrete notify()
method. Only slight implementation differences, such as including a
$currentState property in the concrete
observer, are found.
Unlike the SPL implementation where the Subject
participant is an interface and all methods are abstract, this
implementation is close to the original by GoF and employs implemented
attach/detach methods. The attach/detach methods include an Observer interface as a parameter that is
structurally the same as using the SplObserver as a parameter in the SPL
example:
<?php
//Subject.php
abstract class Subject
{
    protected $stateNow;
    protected $observers=array();

    public function attachObser(Observer $obser)
    {
        array_push($this->observers,$obser);
    }

    public function detachObser(Observer $obser)
    {
        $position=0;
        foreach($this->observers as $viewer)
        {
            ++$position;
            if($viewer==$obser)
            {
                array_splice($this->observers,($position),1);
            }
        }
    }

    protected function notify()
    {
        foreach($this->observers as $viewer)
        {
            $viewer->update($this);
        }
    }
}
?>
The notify() method is concrete
as well, and is inherited and used by the Subject child classes. As a result, the
concrete subject does not have to implement attachObser(), detachObser(), or notify(), but it uses the methods without any
additional code in the ConcreteSubject:
<?php
//ConcreteSubject.php
class ConcreteSubject extends Subject
{
    public function setState($stateSet)
    {
        $this->stateNow=$stateSet;
        $this->notify();
    }

    public function getState()
    {
        return $this->stateNow;
    }
}
?>
As you can see in the detachObser() method, multiple observers must
be notified by iterating through the $observers array. Of course, you can use the
SplObjectStorage class even though
you’re not using the SPL subject and observer. In that way, you could
use a SplObjectStorage object for
holding the attached observers instead of an array. In addition, you
could also use the attach/detach methods built into the SplObjectStorage class.
Up to this point, a single concrete observer has been used with an observer interface. In this implementation, the Observer pattern uses more than a single observer type. In the most rudimentary way, the multiple concrete observers represent displays that will be shown on a desktop computer, an Internet-connected tablet, and a smartphone. The subject generates a single graphic URL, and the different observers use that data to generate the graphic provided in the same subject state.
The Observer is an interface
with a single method, update(). It is
virtually identical to the SplObserver:
<?php
//Observer.php
interface Observer
{
    function update(Subject $subject);
}
?>
The abstract method update()
awaits the child classes to provide it with a specific implementation.
In the following implementations of the concrete observer, the
differences are minor but important for development, now and
later.
<?php
//ConcreteObserverDT.php
class ConcreteObserverDT implements Observer
{
    private $currentState;

    public function update(Subject $subject)
    {
        $this->currentState=$subject->getState();
        echo "<img src='desktop/$this->currentState'><br />";
    }
}
?><?php
//ConcreteObserverTablet.php
class ConcreteObserverTablet implements Observer
{
private $currentState;
public function update(Subject $subject)
{
$this->currentState=$subject->getState();
echo "<img src='tablet/$this->currentState'><br />";
}
}
?><?php
//ConcreteObserverPhone.php
class ConcreteObserverPhone implements Observer
{
private $currentState;
public function update(Subject $subject)
{
$this->currentState=$subject->getState();
echo "<img src='phone/$this->currentState'><br />";
}
}
?>As you can see, the differences lie in the directory where the image can be found. For example, the table implementation uses the following line:
echo "<img src='tablet/$this->currentState'><br />";
The others use directories named after the particular type of
device that’s in use because whatever message the subscribed-to
subject generates as a current state is going to be the same to all
subscribers. In this particular implementation, the current state of
the ConcreteSubject is an image
URL, and the wrapper for the image is an HTML line using the <img> tag.
The Client in this context is most
likely to come from a source that recognizes a device as one of three
types: desktop, tablet, or phone. For the purposes of illustration, the
following client calls up all three to illustrate how they would appear
in different sizes:
<?php
//Client.php
function __autoload($class_name)
{
    include $class_name . '.php';
}
class Client
{
    public function __construct()
    {
        $sub=new ConcreteSubject();

        $ob1=new ConcreteObserverPhone();
        $ob2=new ConcreteObserverTablet();
        $ob3=new ConcreteObserverDT();

        $sub->attachObser($ob1);
        $sub->attachObser($ob2);
        $sub->attachObser($ob3);
        $sub->setState("decoCar.png");
    }
}
$worker=new Client();
?>
A single concrete subject and three instances of three different
concrete observers make up the set of instances. All three observer
instances use the same subject source for data. Using the concrete
subject’s setState() method, the
Client sets the current state that
will be used by all observers. Figure 14-5 shows the results
in a tablet device.
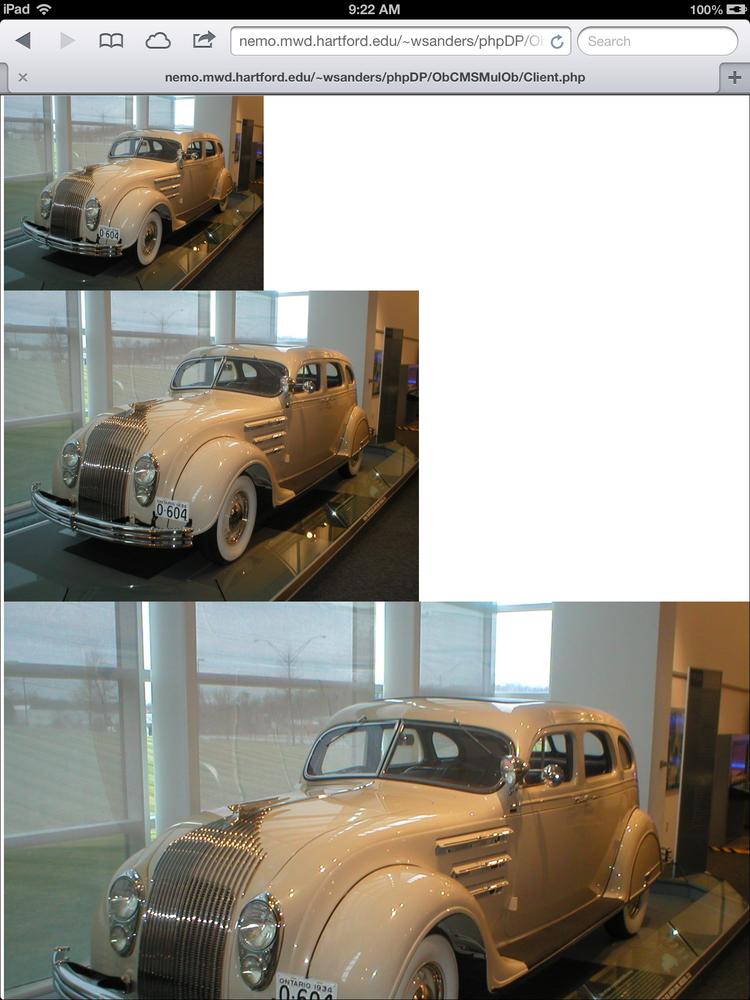
Figure 14-5. Different concrete observers generate different sized images from the same concrete subject state
As the gradations in mobile and desktop devices become finer, a good site may need more sets of bitmap graphics to optimize user experience. Likewise, more CSS files may be required to optimize text viewing on an array of devices. However, by having a single data source and multiple subscribers, keeping track of the current desired state is much easier using a single concrete subject with multiple subscribers.
The “CMS” being built will use a MySQL database to store data used for a simple database. A summary of the design pattern is stored in a MySQL text field, and finally, the URL to a graphic is to be stored in a third field. The table will also include an automatically generated field for a unique numbered record stored as an integer.
The Observer pattern will be used to get the information from the table and send it to selected observers. The single data set stored in an array goes out to observers viewed by a desktop computer, a tablet, or a smartphone. An HTML selection form provides the user with selections of available patterns generated as web pages through PHP. The phone viewing uses jQuery Mobile to optimize viewer experience. The tablet view and desktop view are in two columns, while the phone view is a single column.
To get started, create a MySQL table and a module to enter and update the data for the web pages. First, create the table using the connection utility interface and class that has been employed throughout the book. They are listed first.
<?php
//Filename: IConnectInfo.php
interface IConnectInfo
{
    const HOST ="localhost";
    const UNAME ="uname";
    const PW ="password";
    const DBNAME = "dataBase";

    public function doConnect();
}

?>
The output to alert the user to a successful connection is commented out, since this same connection class is used with other MySQL connections that make up the program:
<?php
include_once('IConnectInfo.php');

class UniversalConnect implements IConnectInfo
{
    private static $server=IConnectInfo::HOST;
    private static $currentDB= IConnectInfo::DBNAME;
    private static $user= IConnectInfo::UNAME;
    private static $pass= IConnectInfo::PW;
    private static $hookup;

    public function doConnect()
    {
        self::$hookup=mysqli_connect(self::$server, self::$user, self::$pass,
                      self::$currentDB);
        if(self::$hookup)
        {
            //comments for debugging
        }
        elseif (mysqli_connect_error(self::$hookup))
        {
            echo('Here is why it failed: '  . mysqli_connect_error());
        }
        return self::$hookup;
    }
}
?
The following code creates the table:
<?php
include_once('UniversalConnect.php');
class CreateTable
{
    private $tableMaster;
    private $hookup;

    public function __construct()
    {
        $this->tableMaster="cms";
        $this->hookup=UniversalConnect::doConnect();

        $drop = "DROP TABLE IF EXISTS $this->tableMaster";

        if($this->hookup->query($drop) === true)
        {
            printf("Old table %s has been dropped.<br/>",$this->tableMaster);
        }

        $sql = "CREATE TABLE $this->tableMaster (
            id           SERIAL,
            dpHeader     NVARCHAR(50),
            textBlock    TEXT,
            imageURL     NVARCHAR(60),
                         PRIMARY KEY (id))";

        if($this->hookup->query($sql) === true)
        {
            printf("Table $this->tableMaster has been created successfully.
                    <br/>");
        }
        $this->hookup->close();
    }
}
$worker=new CreateTable();
?>
Once the table is in place, you will need to add data to it that will be used in the little design pattern web pages.
The CMS table stores the required data used for the web pages. The UI, Admin.html, is a simple HTML document calling up PHP classes to enter and update the text write-ups:
<!doctype html> <!-- Admin.html --> <html> <head> <meta charset="UTF-8"> <link rel="stylesheet" type="text/css" href="desktop.css"> <title>CMS Admin Module</title> </head> <body> <h1>CMS Administrative Module</h1> <h2>Data Entry</h2> <form action="DataEntry.php" method="post"> <input type="text" name="dpHeader"> Design pattern name<br /> Write up for design pattern:<br /> <textarea name="textBlock" cols="48" rows="16"></textarea> <p /> <input type="text" name="imageURL"> Graphic URL <p /> <input type="submit" name="entry" value="Enter Page Data"> </form> <h2>Data Update</h2> <form action="DataUpdate.php" method="post"> <input type="text" name="dpUpdate"> Design pattern name to update<br /> New write-up for design pattern:<br /> <textarea name="newData" cols="48" rows="16"></textarea> <p /> <input type="submit" name="update" value="Update Page Data"> </form> </body> </html>
The data input simply enters the appropriate data into the three fields where the header, body text, and image go in each page.
<?php
//DataEntry.php
include_once('UniversalConnect.php');
class DataEntry
{
    private $tableMaster;
    private $hookup;
    private $sql;

    public function __construct()
    {
        $this->tableMaster="cms";
        $this->hookup=UniversalConnect::doConnect();

        if ( $_POST['dpHeader'] )
        $dpHeader=$this->hookup->real_escape_string($_POST['dpHeader']);
        if ( $_POST['textBlock'] )
        $textBlock=$this->hookup->real_escape_string($_POST['textBlock']);
        if ( $_POST['imageURL'] )
        $imageURL=$this->hookup->real_escape_string($_POST['imageURL']);

        $this->sql = "INSERT INTO $this->tableMaster
            (dpHeader,textBlock,imageURL) VALUES
            ('$dpHeader','$textBlock','$imageURL')";

        if($this->hookup->query($this->sql))
        {
            printf("Successful data entry for table: $this->tableMaster <br/>");
        }
        elseif ( ($result = $this->hookup->query($this->sql))===false )
        {
              printf("Invalid query: %s <br/> Whole query: %s <br/>",
                      $this->hookup->error, $this->sql);
              exit();
        }
        $this->hookup->close();
    }
}
$worker=new DataEntry();
?>
The second administrative tool for the CMS is an update for the content write-up about a design pattern. One of the problems users encounter with long, detailed write-ups is space. Even with a single column, the write-ups seem to always need tweaking, and so this tool allows for all the tweaking a web administrator could want.
<?php
//DataUpdate.php
include_once('UniversalConnect.php');
class DataUpdate
{
    private $tableMaster;
    private $hookup;
    private $sql;

    public function __construct()
    {
        $this->tableMaster="cms";
        $this->hookup=UniversalConnect::doConnect();

        if ( isset($_POST['dpUpdate'] ))
        $dpHeader=$this->hookup->real_escape_string($_POST['dpUpdate']);
        if ( $_POST['newData'] )
        $newData=$this->hookup->real_escape_string($_POST['newData']);

        $changeField="textBlock";
        $this->sql = "UPDATE $this->tableMaster SET $changeField='$newData'
                      WHERE dpHeader='$dpHeader'";

        if ($result = $this->hookup->query($this->sql))
        {
            echo "$changeField changed to:<br /> $newData";
        }
        else
        {
            echo "Change failed: " . $hookup->error;
        }
    }
}
$worker=new DataUpdate();
?>
Finally, the CSS for viewers using desktop computers is set for two columns—one for the graphic and one for the write-up—but it works well for the single-column administrative UI as well:
//CSS
@charset "UTF-8";
/* desktop.css */
/* CSS Document */
/* 595241,B8AE9C,FFFFFF,ACCFCC,8A0917 */
body
{
    font-family:Verdana, Geneva, sans-serif;
    background-color:#ffffff;
    color:#595241;
    padding-right:10px;
}

h1
{
    font-family:"Arial Black", Gadget, sans-serif;
    text-align:center;
    color:#8A0917;
    background-color:#ACCFCC;
}

img
{
    padding-right:10px;
    float:left;
}
The CSS file, desktop.css, is also used with requests recognized as nonmobile, so future references should use the same file.
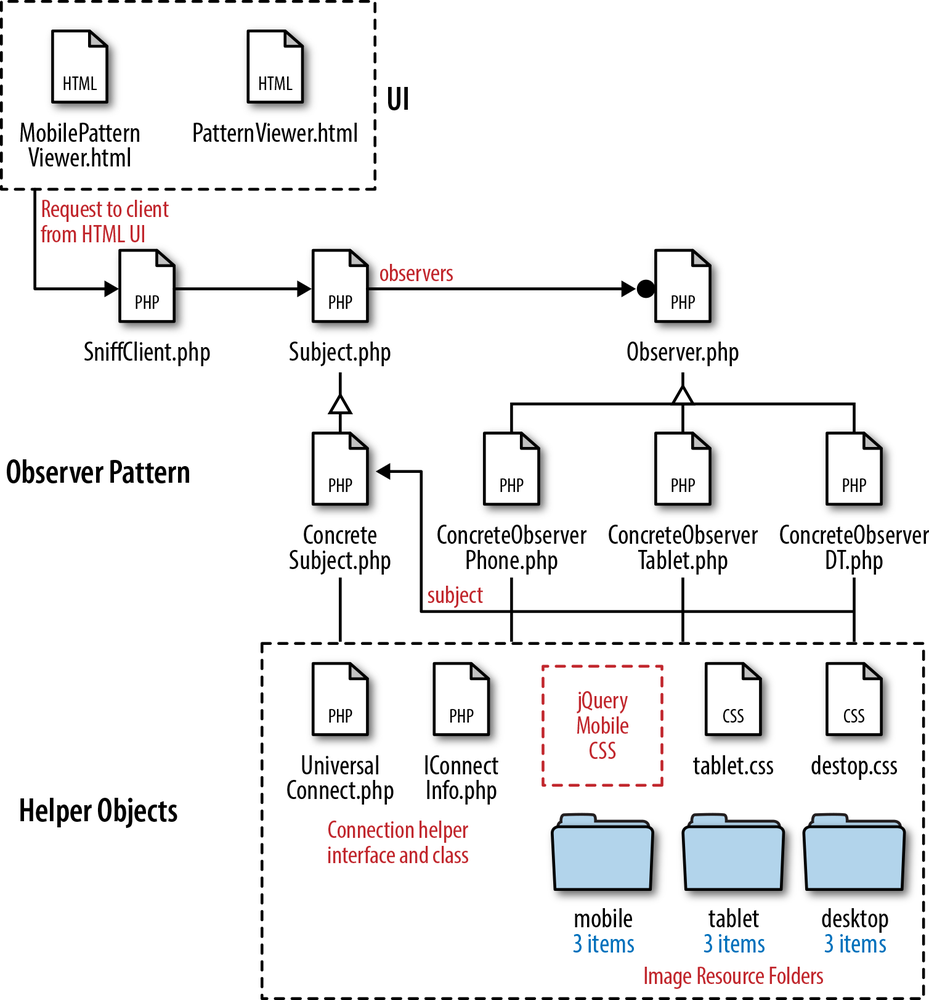
From the previous examples in this chapter, you should be familiar with the basic structure of the Observer pattern. Given that the CMS portion of the plan stores and updates data for web pages, this part of the project retrieves the data and places them on those pages configured for different viewing devices: smartphone, tablet, or desktop. In order to get an overview of the entire project and the role of the Observer design pattern, Figure 14-6 shows a file diagram with all of the different objects and related parts.
The project is divided into three groups: the HTML UI, the PHP Observer pattern, and Helper objects. The rest of this section explains how the parts work together. The following shows the sequence of the object communications:
User requests web page through HTML UI.
Request is forwarded to
SniffClient, which determines the viewer device.Concrete observer instance is created based on viewer device.
Concrete subject instance attaches observer (determined by device).
Current state from MySQL data is set by page selected by user by the
ConcreteSubjectclass.Subscribing (attached) observers receive data from concrete subject.
The concrete observer takes the state information from the concrete subject and displays page on screen.
Of course, all of the requests are transparent to the user.
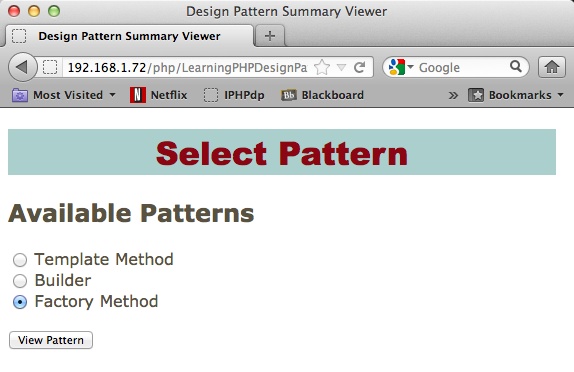
In order to avoid typing errors in requesting a page (a design pattern), the design patterns are selected using radio buttons:
<!doctype html>
<html>
<head>
<meta charset="UTF-8">
<link rel="stylesheet" type="text/css" href="desktop.css">
<title>Design Pattern Summary Viewer</title>
</head>
<body>
<h1>Select Pattern</h1>
<h2>Available Patterns</h2>
<form action="SniffClient.php" method="post">
  <input type="radio" name="dp" id="tm" value="Template Method"  />
  <label for="tm">Template Method</label>
  <br/>
  <input type="radio" name="dp" id="bld" value="Builder"  />
  <label for="bld">Builder</label>
  <br/>
  <input type="radio" name="dp" id="fm" value="Factory Method"  />
  <label for="fm">Factory Method</label>
  <p/>
  <input type="submit" value="View Pattern">
</form>
</body>
</html>
Figure 14-7 shows the UI.
Because reading the choices and making a selection on a mobile device was difficult using the general UI shown in Figure 14-7, a second UI was developed for mobile devices. Fortunately, a whole set of mobile device formats is available from jQuery Mobile, and they were incorporated into a second UI for phone-size devices:
<!DOCTYPE html>
<html>
<head>
<title>Mobile Viewer</title>
<meta name="viewport" content="width=device-width, initial-scale=1">
<link rel="stylesheet" href="http://code.jquery.com/mobile/1.2.0
/jquery.mobile-1.2.0.min.css" />
<script src="http://code.jquery.com/jquery-1.8.2.min.js"></script>
<script src="http://code.jquery.com/mobile/1.2.0/jquery.mobile-1.2.0.min.js">
</script>
</head>
<body>
<div data-role="page">
<div data-role="header">
<h1>Design Patterns</h1>
</div>
<form action="SniffClient.php" method="post">
<fieldset data-role="controlgroup">
<legend> Select Pattern:</legend>
<input type="radio" name="dp" id="tm" value="Template Method" />
<label for="tm">Template Method</label>
<input type="radio" name="dp" id="bld" value="Builder" />
<label for="bld">Builder</label>
<input type="radio" name="dp" id="fm" value="Factory Method" />
<label for="fm">Factory Method</label>
</fieldset>
<input type="submit" data-theme="e" value="View Pattern">
</form>
<div data-role="footer"> PHP Patterns</div>
</div>
</body>
</html>Figure 14-8 shows how the mobile UI appears on an iPhone.
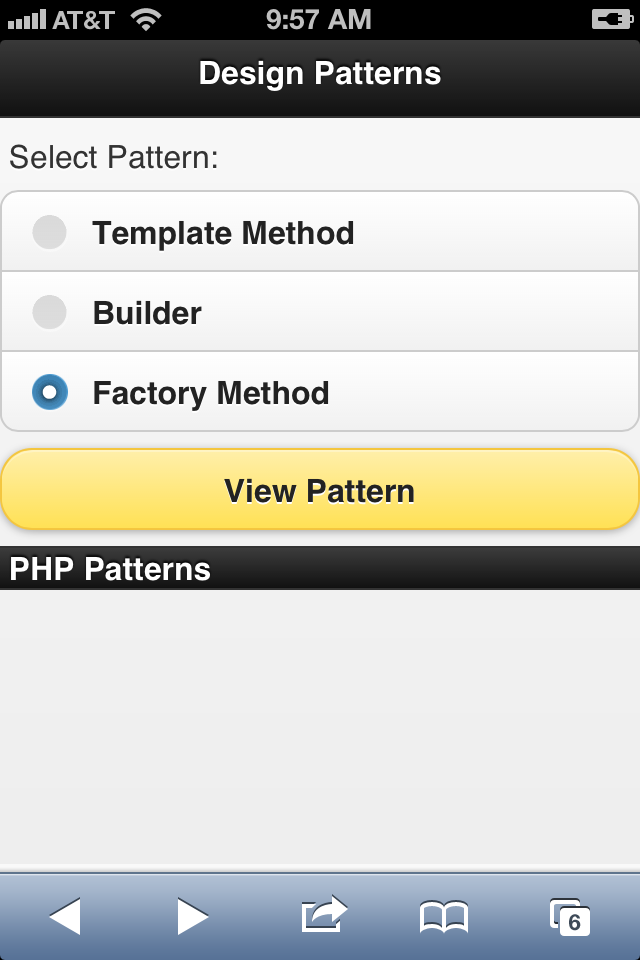
Both UIs work the same. The user selects a pattern to view and then taps a button that generates the page. Unfortunately, the UI is not automatically selected as the viewing pages are.
Because the request is optimized on the basis of the user’s
device, the first job of the client is to determine which device is in
use. The SniffClient class selects
from a small subset of mobile devices with a default value of a
desktop device:
<?php
//User agent as property of object
function __autoload($class_name)
{
    include $class_name . '.php';
}
class SniffClient
{
    private $userAgent;
    private $mobile=false;
    private $deviceObserver;
    private $dpNow;
    private $sub;

    public function __construct()
    {
        if (isset($_POST['dp'] ))
            $this->dpNow=$_POST['dp'];
        $this->sub=new ConcreteSubject();
        $this->userAgent=$_SERVER['HTTP_USER_AGENT'];
        if(stripos($this->userAgent,'iphone'))
        {
            $this->mobile=true;
            $this->deviceObserver=new ConcreteObserverPhone();
        }
        if(stripos($this->userAgent,'android'))
        {
            $this->mobile=true;
            $this->deviceObserver=new ConcreteObserverPhone();
        }
        if(stripos($this->userAgent,'blackberry'))
        {
            $this->mobile=true;
            $this->deviceObserver=new ConcreteObserverPhone();
        }
        if(stripos($this->userAgent,'ipad'))
        {
            $this->mobile=true;
            $this->deviceObserver=new ConcreteObserverTablet();
        }
        if(stripos($this->userAgent,'trident'))
        {
            $this->mobile=true;
            $this->deviceObserver=new ConcreteObserverTablet();
        }
        if(stripos($this->userAgent,'kindle fire'))
        {
            $this->mobile=true;
            $this->deviceObserver=new ConcreteObserverTablet();
        }
        if(stripos($this->userAgent,'silk'))
        {
            $this->mobile=true;
            $this->deviceObserver=new ConcreteObserverTablet();
        }

        if(!$this->mobile)
        {
            $this->deviceObserver=new ConcreteObserverDT();
        }
        $this->sub->attachObser($this->deviceObserver);
        $this->sub->setState($this->dpNow);
    }
}

$worker=new SniffClient();

?>
The client is simple and could be cast as a Chain of Responsibility pattern with new handlers added as needed. However, to show how an Observer pattern can be used with a simple CMS and device-sensitive functionality, this client demonstrates the important capabilities.
The interface for this Observer implementation uses an abstract
class but with concrete methods for attaching and detaching observers.
Likewise, the notify() method is
fully implemented and will be used by the ConcreteSubject class:
<?php
//Subject.php
abstract class Subject
{
    protected $observers=array();

    public function attachObser(Observer $obser)
    {
        array_push($this->observers,$obser);
    }

    public function detachObser(Observer $obser)
    {
        $position=0;
        foreach($this->observers as $viewer)
        {
            ++$position;
            if($viewer==$obser)
            {
                array_splice($this->observers,($position),1);
            }
        }
    }

    protected function notify()
    {
        foreach($this->observers as $viewer)
        {
            $viewer->update($this);
        }
    }
}
?>
The ConcreteSubject class in
this application connects to the cms table to get the data required to meet
the request from the user. The attach/detach methods are the same as
used in prior examples, but the setState() method is quite different than in
previous examples:
<?php
//ConcreteSubject.php
class ConcreteSubject extends Subject
{
    private $hookup;
    private $tableMaster;
    private $designPattern;
    private $stateSet=array();

    public function setState($dpNow)
    {
        $this->designPattern=strtolower($dpNow);
        $this->tableMaster="cms";
        $this->hookup=UniversalConnect::doConnect();

        //Create Query Statement
        $sql = "SELECT * FROM $this->tableMaster WHERE dpheader=
                '$this->designPattern'";
        //Add appropriate data from MySQL table to $stateSet array
        if ($result = $this->hookup->query($sql))
        {
            while($row=$result->fetch_assoc())
            {
                    $this->stateSet[0]=$row["dpHeader"];
                    $this->stateSet[1]=$row["textBlock"];
                    $this->stateSet[2]=$row["imageURL"];
            }
            $result->close();
        }
    $this->hookup->close();
    //The update() method is part of notify()
    //implemented in Subject as concrete method.
    $this->notify();
    }

    public function getState()
    {
        return $this->stateSet;
    }
}
?>
All of the required data is placed into an array ($stateSet) and then made available through
the getState() method to attached
observers.
The Observer interface is unchanged from previous examples:
<?php
//Observer.php
interface Observer
{
    function update(Subject $subject);
}
?>
The update() method expects a
Subject instance as an argument, but otherwise no other methods are
declared.
The implementation of the Observer interface is another story. Each of
the concrete observers uses the same data from the subject, but they
create very different pages.
The greatest problem with generating pages for mobile phones
is the size of the text and graphics. Using CSS and JavaScript, it
is possible to create dynamically sized text and buttons that have a
viable phone web page. However, by using jQuery Mobile, a lot of the
work has been done. So the ConcreteObserverPhone class uses the
prebuilt jQuery Mobile for phone formatting, as shown in the following:
<?php
//ConcreteObserverPhone.php
class ConcreteObserverPhone implements Observer
{
private $currentState=array();
private $dpHeader;
private $bodytext;
private $imageURL;
public function update(Subject $subject)
{
$this->currentState=$subject->getState();
$this->dpHeader=$this->currentState[0];
$this->bodytext=$this->currentState[1];
$this->imageURL=$this->currentState[2];
$this->doMobile();
}
private function doMobile()
{
$showPage = <<<MOBILE
<html>
<head>
<title>Mobile Page</title>
<meta name="viewport" content="width=device-width, initial-scale=1">
<link rel="stylesheet" href="http://code.jquery.com/mobile/1.2.0/
jquery.mobile-1.2.0.min.css" />
<script src="http://code.jquery.com/jquery-1.8.2.min.js"></script>
<script src="http://code.jquery.com/mobile/1.2.0/
jquery.mobile-1.2.0.min.js"></script>
</head>
<body>
<div data-role="page">
<div data-role="header">
<h1>$this->dpHeader</h1>
</div>
<div data-role="content">
<p>$this->bodytext</p>
<img src="mobile/$this->imageURL" alt="image urls" width="100%">
</div>
</div>
</body>
</html>
MOBILE;
echo $showPage;
}
}
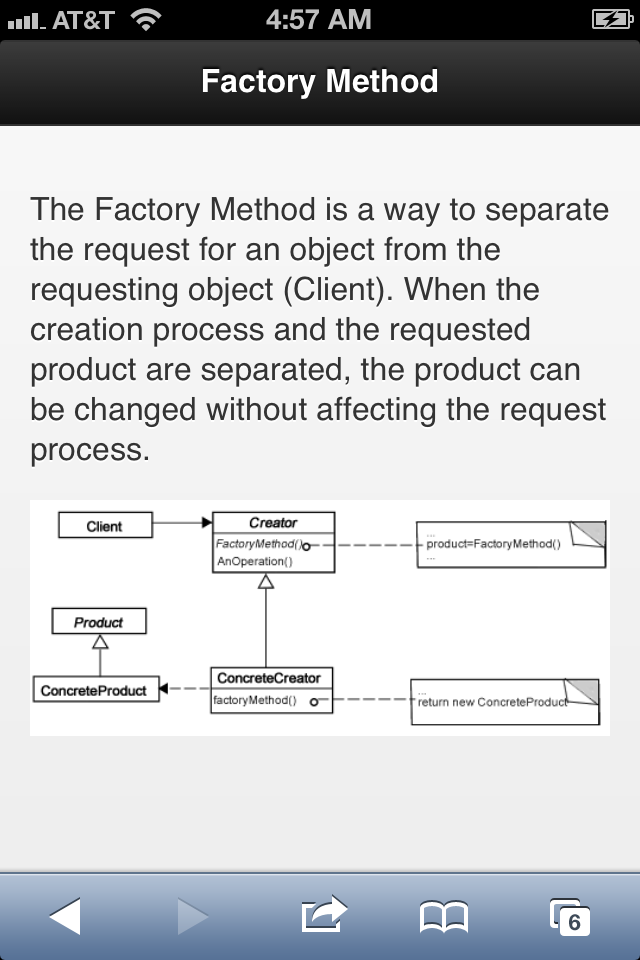
?>Figure 14-9 shows a page formatted for a mobile phone in an iPhone. As you can see, the text is sufficiently large to easily read without having to adjust the size.
A useful tool for formatting any HTML page within a PHP file
uses the heredoc (here document)
formatting. Basically, the code within a heredoc container accepts all formatting,
including double and single quotation marks and PHP variables. It
has the following format:
$stringVar = <<<CATCHER
<html>
  <body>
   <h1>Header</h1>
   Text that has dangerous "quotes" and outrageous ideas, even $variables.
 </body>
</html>
CATCHER;
echo $stringVar;
The heredoc <<<
operator is used only at the beginning of the container. The
$stringVar is assigned the
literals within the CATCHER
container, making it very easy to dynamically generate code that
contains a lot of text or code.
The ConcreteObserverTablet
implementation of the Observer interface is similar to the ConcreteObserverPhone class except that it
does not use jQuery Mobile. It has its own CSS with a two-column
format:
<?php
//ConcreteObserverTablet.php
class ConcreteObserverTablet implements Observer
{
private $currentState=array();
private $dpHeader;
private $bodytext;
private $imageURL;
public function update(Subject $subject)
{
$this->currentState=$subject->getState();
$this->dpHeader=$this->currentState[0];
$this->bodytext=$this->currentState[1];
$this->imageURL=$this->currentState[2];
$this->doTablet();
}
private function doTablet()
{
//Heredoc syntax
$showPage = <<<TABLET
<!DOCTYPE html>
<html>
<head>
<meta charset="UTF-8">
<link rel="stylesheet" type="text/css" href="tablet.css">
<title>Tablet Page</title>
</head>
<body>
<article>
<header>
<h1>$this->dpHeader</h1>
</header>
<section>
<img src="tablet/$this->imageURL" alt="image urls" >
<p>$this->bodytext</p>
</section>
</article>
</body>
</html>
//End of Heredoc text must not have margin
TABLET;
echo $showPage;
}
}
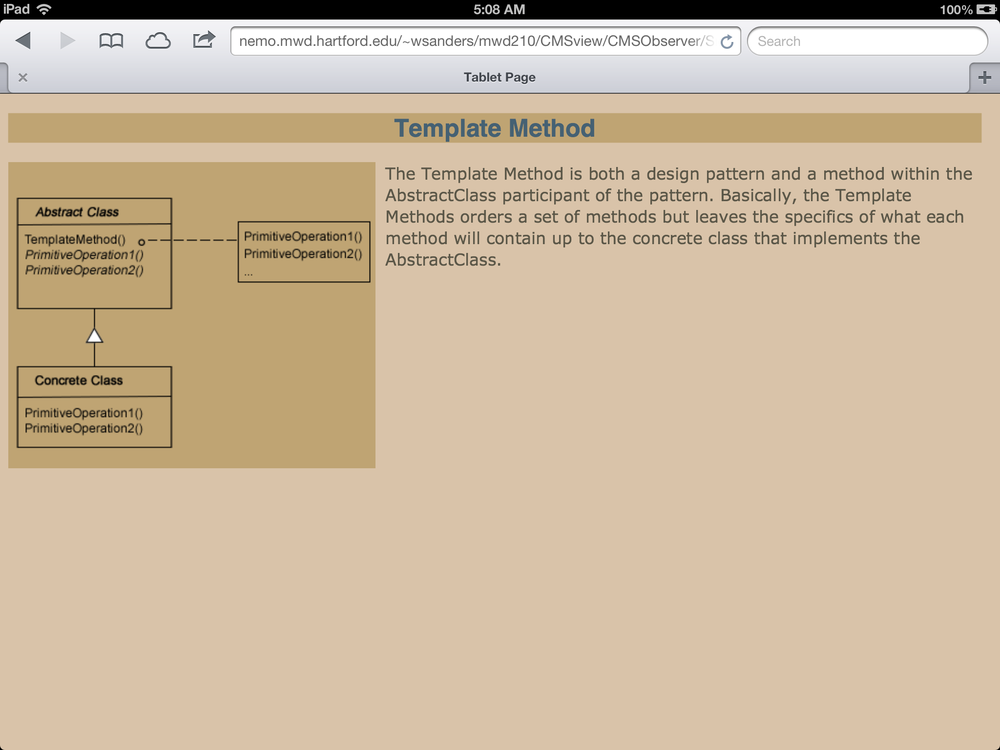
?>Figure 14-10 shows a page viewed in an iPad.
Both views share the same data but use a different CSS source.
At one time, the only view of a web page was from a desktop or
laptop computer. However, it is now one view of many. The following
code for the ConcreteObserverDT is similar to the
previous first two:
<?php
//ConcreteObserverDT.php
class ConcreteObserverDT implements Observer
{
    private $currentState=array();
    private $dpHeader;
    private $bodytext;
    private $imageURL;

    public function update(Subject $subject)
    {
        $this->currentState=$subject->getState();
        $this->dpHeader=$this->currentState[0];
        $this->bodytext=$this->currentState[1];
        $this->imageURL=$this->currentState[2];
        $this->doDesktop();
    }

    private function doDesktop()
    {
$showPage = <<<DESKTOP
    <!DOCTYPE html>
    <html>
        <head>
            <meta charset="UTF-8">
            <link rel="stylesheet" type="text/css" href="desktop.css">
            <title>Desk Top Page</title>
        </head>
    <body>
    <article>
        <header>
            <h1>$this->dpHeader</h1>
        </header>

        <section>
            <img src="desktop/$this->imageURL" alt="image urls" >
            <p>$this->bodytext</p>

        </section>
        </article>
    </body>
    </html>
DESKTOP;
    echo $showPage;
    }
}
?>
The desktop view is very similar to the tablet view, as can be seen in Figure 14-11.
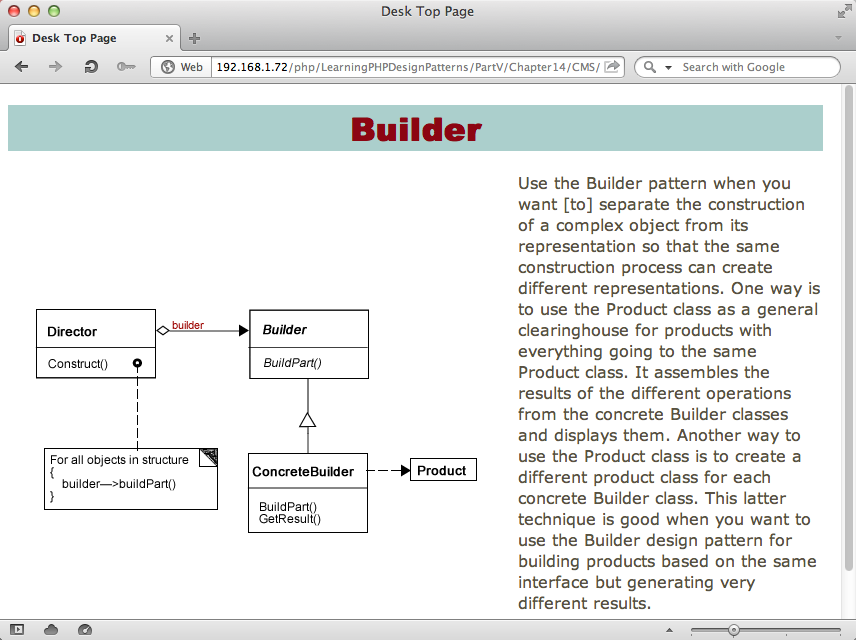
The graphics for the three different device ranges are
different as well. The desktop graphics are all configured in a 500
× 500 pixel frame; the table graphics all have a dark tan
background; and the phone graphics are set for single-column viewing
(reducing the need for added space, or gutters, between columns).
However, all can be displayed from the single set of data provided
by the Subject. Observers call
different graphics with the same names stored in folders
(directories) with uniquely named folders—mobile, tablet, and desktop.
One of the special features of the Observer design pattern
in PHP lies in the built-in Standard PHP Library
(SPL) interfaces designed specifically for the Observer pattern—SplSubject and SplObserver. In no small way, these library
interfaces show unequivocal support for design patterns and OOP in the PHP
community. At the same time, though, they do not insist that one must
incorporate library supplied interfaces when developing an Observer
pattern; you can use an abstract class instead of an interface for a
Subject participant, as was done in the CMS example.
However, like a lot of the built-in features in PHP 5, many of them
go unused or are used outside of an OOP framework or mindset. A lot of the
interplay between HTML and PHP in the same file is often done outside of
an OOP design, but as was seen using the heredoc operator and formatting, HTML can easily
be incorporated into a PHP object.
An important lesson about the Observer pattern used in this last
example is that it can be changed and improved. As noted, a Chain of
Responsibility pattern could be used for the SniffClient to determine the type of device in
use. OOP and design patterns were developed specifically for improving the
development process. By thinking in terms of loosely coupled objects
carrying out specific tasks and communicating with one another, the
development process is much faster and easier to reuse. In the OOP
learning process, design patterns are guides to how objects can be
arranged to communicate with one another to solve different types of
problems.
A further improvement to the CMS example involves adding buttons to the selection menus as new design patterns are added through the CMS. In the current form, it’s easy to add new design patterns—a header, a graphic, and a write-up. Each new pattern does not generate a new radio button in the menu to make the selection. The menu has to be rewritten with each new addition. How would one go about adding modules to the current CMS to update the menus as well as the content web pages that the menu document links to? Think in terms of what objects to create and how to communicate with or alter existing objects. Loose coupling should make that task less onerous.
Intermediate and advanced programmers would not hesitate to use a loop structure in PHP to complete a programming task that requires recurrent operations. However, like a design pattern, a loop structure is nothing more than a general solution to a common programming task. Design patterns are the same thing: general solutions to programming tasks. Yes, they are more advanced, but so are more familiar structures such as a loop or a function in comparison to a strict sequence structure. Once you get used to OOP and design patterns, you may wonder how you programmed for so long without them, just as you see the inevitable necessity of loops to ease the task of programming.