Chapter 10. WordPress REST API
In version 4.4 of WordPress, the REST API was introduced to the project, making WordPress more extensible than ever. The WordPress REST API makes it possible for developers to push and pull data to and from WordPress from outside WordPress. This allows you to create all kinds of cool and useful software applications that may not necessarily use the traditional WordPress UI but are powered by or integrated with WordPress. It allows you to communicate with other software applications regardless of the application programming language. Before we dig into the specifics of using the WordPress REST API, let’s quickly describe what we mean generally by “REST API.”
Note
This chapter covers much of the same content as WordPress’s detailed handbook on using the REST API. In some parts, we go into more detail or use examples that make more sense in the context of this book. Note that some things we cover briefly here are covered in more detail in the WordPress handbook.
What Is a REST API?
You might already know what a REST API is and even be surprised that one wasn’t built in to WordPress sooner. Let’s try to break it down Barney style—you know, that annoying big purple dinosaur that kids were once obsessed with, and that made parents want to gouge out their eyes and ears.
Note
Some refer to the WordPress REST API as the JSON REST API. We will leave off the “WordPress” in this chapter and just write REST API.
Let’s cover some of the basics.
API
An application programming interface (API) is a collection of functions and tools built in to a software application used by developers to interact with that software application either internally or externally, usually via the internet between web applications. Depending on how the API was set up, you could use it to push and pull content and data into or out of another application, thus effectively integrating two or more applications.
The REST API allows you to interact with the WordPress database from outside of your WordPress website.
REST
REST (for representational state transfer) is an architectural style for defining HTTP-based communications between web applications. There are guiding principles for building a REST API, and an interface must meet each of the following constraints for it to be RESTful.
-
Client-server
-
Stateless
-
Cacheable
-
Uniform interface
-
Layered system
-
Code on demand
JSON
JSON, as we’ve mentioned previously, is an open standard text format for sending readable text in data objects like arrays and name-value pairs. The response from a REST API HTTP Request should be in JSON format. You should be able to parse the JSON in an HTTP Response and use that data within your application.
HTTP
HTTP is a standard for requests and responses to and from a client and a server. Every time you visit a website in your web browser you make an HTTP Request and receive the HTTP Response or the web page your browser loaded. Pushing and pulling data to and from WordPress via the REST API happens over the same protocol, but instead of returning the web page, the response is the raw data in JSON format. With a default WordPress installation, you can make HTTP requests to access public content such as posts and pages, in JSON format, if you type the appropriate URL or API route directly into your browser.
There are four main types of HTTP request methods for working with RESTful APIs like WordPress.
-
POST -
GET -
PUT -
DELETE
People may also refer to these as CRUD (Create, Read, Update, and Delete) actions. Whatever you call these self-explanatory verbs, they are used via HTTP requests to perform their particular actions and then return the results of those actions in the HTTP Response.
Try appending /wp-json/wp/v2/posts to the end of your WordPress website domain, and you should be looking at your posts in JSON format. This is an example of an HTTP GET request method, and its response. The process of sending an HTTP request and retrieving an HTTP response is known as passing HTTP messages.
There are three parts to every HTTP message: the request, the headers, and the message body.
Request
The request (or request line) is sent from the client to the server and includes the request method, a request URL, and the HTTP version:
- Request method
-
GET,POST,PUT,DELETE - Request URL
-
The URL of the API route
- HTTP version
-
The version of HTTP
These combine as seen in the following:
GET URL HTTP/1.1
The status line is returned from the request in the response, and includes the HTTP version and a status code:
HTTP/1.1 200 OK
Note
If you Google “HTTP status codes and what they mean” you can research all available HTTP status codes that can be returned in an HTTP response. To really understand HTTP, check out HTTP: The Definitive Guide (O’Reilly), by Brian Totty, David Gourley, Marjorie Sayer, Anshu Aggarwal, Sailu Reddy.
Figure 10-1 shows a request going to a server and a response going to the client.

Figure 10-1. The request line
Headers
The HTTP header sent in an HTTP message includes metadata that can be passed into the HTTP request and received from the HTTP response. There are various standard request and response fields that can be used in the header, including your own custom header fields. The headers are generally used to pass information (like authentication and permissions) back and forth from the client to the server. Wikipedia has a full list of standard request and response header fields.
In Chrome and other WebKit browsers, you can view the headers for the current page or any API calls made by opening the Developer Tools and then clicking the Network tab. On the list on the left, click the document or Ajax call and then click the Headers subtab. Here are the headers for that Wikipedia page to which we just linked, as shown in Figure 10-2.
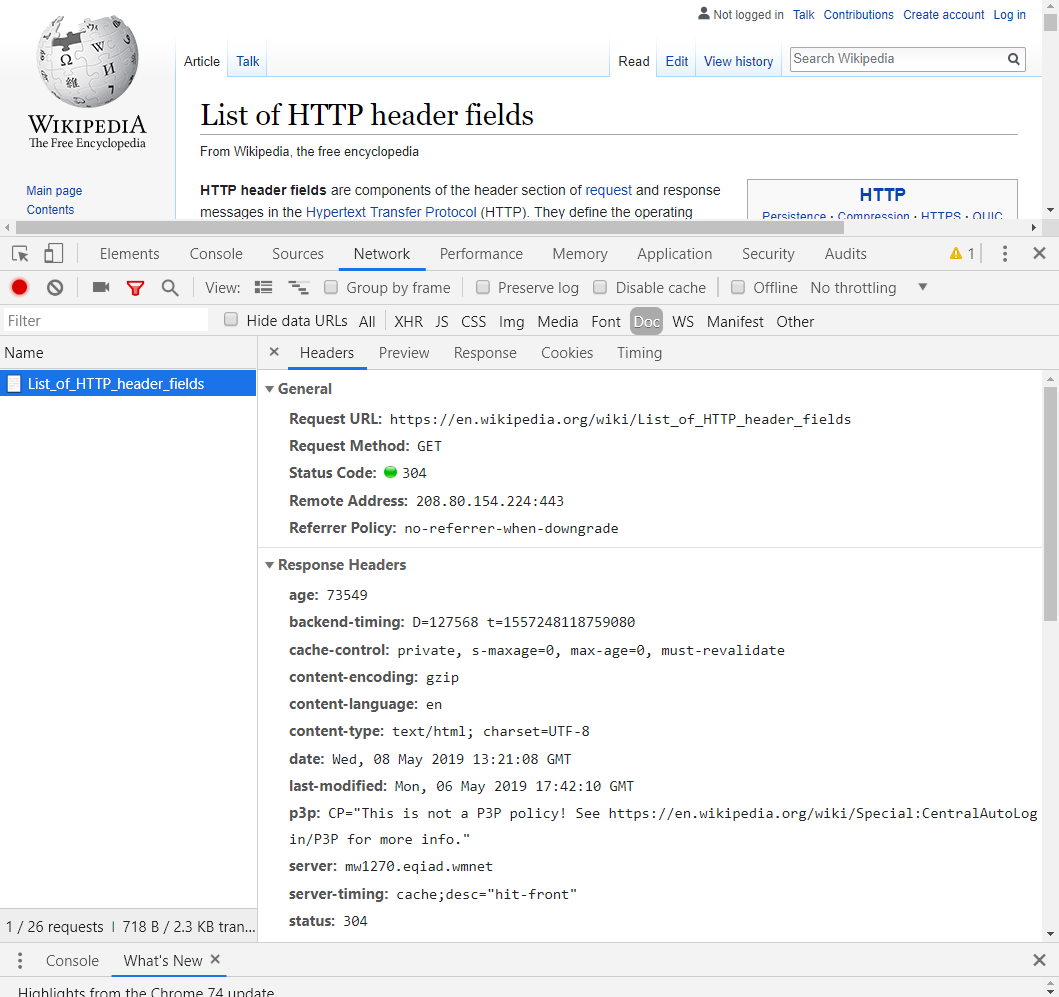
Figure 10-2. Using Chrome Developer Tools to view the headers for a web page
Note
The Status Code header is one you will be looking at a lot. A typical web page that loads with no errors shows status 200 “OK.” The Wikipedia page in Figure 10-2 shows status 304 “Not Modified.” Wikipedia is using a browser caching scheme that won’t waste resources transmitting a page you refreshed unless the page has been modified. In Chapter 14 we discuss how to set up browser caching with the W3 Total Cache plugin.
Message body
The message body isn’t always required but can be passed with a request or response. The REST API typically returns JSON in the message body containing the WordPress data you queried in your HTTP request. Depending on your request method you may not receive a message body in your response.
Why Use the WordPress REST API?
Well, with the REST API you can do just about anything you might need to do from within the traditional WordPress dashboard, but from anywhere, and it’s also a standard and secure way to do so. Following are examples of what you might use the REST API for:
- Allowing public access to WordPress data
-
The API is on by default in the latest versions of WordPress, allowing anyone to easily grab any of your public content such as posts, pages, media, and comments. Although not public by default, you can make any CPT and any of its data publicly available via the REST API as well. You can also create custom endpoints that are open to the public to retrieve whatever data you specify.
- Allowing CRUD access to manage WordPress data
-
Precisely the opposite of what we just discussed. If you want a third-party app to be able to manage WordPress data, you need to have the authorization to do so. The REST API allows you to authenticate a few different ways so you can create, read, update, and delete on a WordPress user’s behalf. Once you’ve properly authenticated, you can manage all your WordPress data from outside WordPress. We cover the current authentication methods later in this chapter.
- Exchanging data between WordPress websites
-
This is a pretty typical use case; imagine the possibilities of easily exchanging data between two or more WordPress websites.
- Headless WordPress websites
-
The term headless just means that you aren’t using the WordPress frontend at all but instead are using the backend. You may want to set up a headless WordPress installation strictly to store data you will use in another application via the REST API.
- WordPress-powered mobile apps
-
At AppPresser we do this all day every day. Utilizing the REST API, you can build mobile apps that use WordPress as the data source. If you are building a standalone app and don’t need a website, you could use a headless WordPress installation to power your app. If you have an existing website, you can build a mobile app to complement it and share its data. We cover building mobile apps with WordPress in more detail in Chapter 16.
- Asynchronous data synchs
-
Developers commonly run into issues when they’re building new WordPress websites from snapshots of Production WordPress databases (usually done to preserve all original content, and also to give developers real data to work with while building the site). Content like posts, comments, and users could be created on the Production website while the new site is still being developed. This can be a real pain when it’s time to launch the new website. Depending on the project, you might want to do a content freeze on the Production website and import any new data into the Development website, which then will become the Production website. Or maybe it makes sense to move any new data on the Development database, like settings or new post-type posts and meta, into the Production website. If you’ve done many new WordPress site launches from existing WordPress sites, you probably know where we’re going. By the time you’re ready to launch the new website, you might have data that you need in both the Production and Development websites. Now you are stuck writing custom scripts that cherry-pick the data that you need from either environment. Hmmm, maybe use the REST API to update the Development website with any new or updated data in real time as it happens on the Production website. A solution like this could save you lots of time manually synching your data prior to launching a new website.
- Virtual reality and gaming
-
Imagine immersive VR environments with custom content delivered via the REST API. For example, say you’re building a race car game and you want the billboards on the road to display custom content.
- Alexa and Google Home
-
Alexa, make me a sandwich.1 We’re sure it’s possible using the REST API. ;)
Using the WordPress REST API V2
Now that you understand why you might want to use the REST API and more about some of the technologies behind APIs in general, let’s go into using the REST API specifically.
Discovery
In current versions of WordPress, the REST API is enabled by default, but you will still want check to make sure that it is actually enabled and also check what content you will have access to. The easiest way to see what you are working with is to add /wp-json/ or /?rest_route=/2 on the end of any WordPress domain in a web browser or Postman—for example, localhost/wordpress/wp-json/.
You should be looking at a JSON response of the schema returned by all the API endpoints registered on the site.
Authentication
Authentication is important if you want to use the REST API for more than just pulling public content from a WordPress website. The REST API provides options for authentication that can be utilized depending on what you are building.
Cookie authentication
Cookie authentication is the default and, as of this writing, the only authentication method built in to core WordPress. You can also use other authentication methods via third-party plugins or build your own if you choose or need to.
For cookie-based authentication, a user just needs to be logged in to WordPress. When any API requests are made, they are governed by what actions that logged-in user can perform.
The REST API also uses nonces to address cross-site request forgery (CSRF). Because of this, someone trying to be malicious can’t just use your cookie to do whatever they want; they would also need a valid nonce. The recommended method for using the REST API for custom themes and plugins is to use the built-in JavaScript API in which the nonces are automatically created for you. You can also make manual requests, but you would need to pass the nonce with each request that you make.
Cookie authentication makes it super easy to build cool features and functionality into the frontend of your website via a theme or plugin so your users can interact with WordPress data without going to the backend.
As an example, this is how the built-in JavaScript client creates the nonce:
wp_localize_script('wp-api','apiSettings',array('root'=>esc_url_raw(rest_url()),'nonce'=>wp_create_nonce('wp_rest')));
This code places into the HTML header a JavaScript object that can be used in Ajax calls to an API endpoint. Pass the nonce with your Ajax call and it will be used to authenticate your API calls. The nonce will also protect your site from CSRF attacks. We cover nonces and related security concerns in detail in Chapter 8.
Following is an example Ajax call using jQuery:
$.ajax({url:apiSettings.root+'wp/v2/posts/1',method:'POST',beforeSend:function(xhr){xhr.setRequestHeader('X-WP-Nonce',apiSettings.nonce);},data:{'title':'Hello World'}}).done(function(response){console.log(response);});
The code here updates the title of a post with ID 1. The nonce is passed in the request header X-WP-Nonce. If you create custom endpoints, you will not need to validate the nonce; the API will validate it for you.
Basic Authentication
Basic Authentication is a quick-and-dirty solution for developing apps for external clients that integrate with WordPress data. First things first, though; you don’t want to use this method of authentication in a production environment or any WordPress website you wouldn’t want to get hacked (which should be all of them). Basic Authentication should only be used for development purposes, because it requires a base64-encoded username and password be sent through the header of every REST API request. Base64-encoded strings can be intercepted and decoded, so you see the problem this could cause you.
To quickly be able to test the REST API with an external-to-WordPress application you are building, you should check out the WP-API Basic-Auth plugin.
If your website is set up to serve page requests only over HTTPS and the API end point you are accessing is also set up to serve requests only over HTTPS, this makes Basic Authentication more secure. The same encrypted string will still be sent with every request, but if your password is sufficiently strong (see Chapter 8), it should be uncrackable.
You can also alter the Basic Authentication code to only work for specific endpoints. This means you can allow Basic Authentication for one of your endpoints without enabling it for your entire WordPress site. The WP SSO plugin we introduce later in this chapter uses Basic Authentication this way. Even so, you should consider other authentication methods before using Basic Authentication for your app’s APIs.
Here is an example of a REST API request using Basic Authentication:
$.ajax({url:'localhost/wp-json/wp/v2/posts/1',method:'POST',beforeSend:function(xhr){xhr.setRequestHeader('Authorization','Basic '+btoa(username+':'+password));},data:{'title':'Hello World'}}).done(function(response){console.log(response);});
JSON Web Tokens
JSON Web Tokens (JWT) is a JSON-based open standard for creating access tokens that can be used to authenticate API access to a web service. This is a secure way to share information between a web service and a client-side application. A JWT is just a JSON object made up of a header, a payload, and a signature. The JWT creation process starts when a user signs in to an authentication service (think wp-admin login) and a JWT is created for them to use in a third-party application. When the web service (think REST API) receives a JWT from a third-party application, it checks that it’s valid and, if authenticated, the client can use the API to perform any CRUD actions that token’s corresponding user would have access to make.
In our opinion, probably the quickest and easiest way to start using the REST API securely is to use the JWT Authentication for WP REST API Plugin. This plugin extends the REST API to use JWTs as an API authentication method. Configuring the plugin is pretty straightforward; try this if you’re looking for the quickest way to securely use the REST API.
OAuth authentication
Open Authorization (OAuth), released in 2007, is an open standard for token-based authentication and authorization. OAuth is the preferred method for developing apps for external clients that integrate with WordPress data. OAuth basically acts as a middle man between the user and WordPress. It allows a user to authenticate without ever exposing their password in any requests. An OAuth Flow is the process of obtaining a token that is then used to authorize specific account information for a user to be shared with an application.
Currently there are two versions of OAuth, 1.0 and 2.0. The major difference between the two versions is that 2.0 requires that API requests are authorized via HTTPS or SSL/Transport Layer Security (TLS). There are also two OAuth WordPress plugins that the REST API Team has developed to work with each version of OAuth.
- https://github.com/WP-API/OAuth1
-
This plugin actually uses OAuth 1.0a because it does not require SSL for any endpoints, while OAuth 1.0 does require SSL for some. Because WordPress does not require SSL or that your website be HTTPS, this is currently the more developed and popular plugin to use.
- https://github.com/WP-API/OAuth2
-
This plugin may also be an option for you, but please note that it is still an early beta version.
You could always build your own from scratch or leverage an existing library, but why on earth would you want to spend all that time reinventing the wheel? Both of these OAuth plugins use what is referred to as three-legged authentication, where each leg is a separate role that is involved with the authentication process:
- Client
-
The third-party application you want to communicate with WordPress.
- Server
-
The WordPress installation that the third-party application will make API requests on.
- Resource owner
-
The end user that has a login to the WordPress install and is using the third-party application.
OAuth uses token credentials that are issued by the server, when the resource owner authenticates using their credentials. These tokens are used by the client to gain access to the server. These token credentials can be revoked by the server at any time by the resource owner, but will also eventually expire, which will require the resource owner to reauthenticate.
What follows is a detailed outline of the OAuth flow:
-
The client sends a signed request to the server to obtain a request token, also known as temporary credentials. This request is sent to the Temporary Credentials endpoint URI, and it contains the following:
-
oauth_consumer_key: provided by the server -
oauth_timestamp -
oauth_nonce -
oauth_signature -
oauth_signature_method -
oath_callback -
oauth_version(optional)
-
-
The server verifies the request, and if it’s valid, grants a request token that contains the following:
-
oauth_token -
oauth_token_secret -
oauth_callback_confirmed
-
-
The client then sends the resource owner (the user) to the server to authorize the request. This is done by constructing a request URI by adding
oauth_token(obtained in the previous step) to the Resource Owner Authorization endpoint URI. -
The resource owner (the user) authorizes at the server by providing credentials.
-
If the
oauth_callbackURI was provided in the first step, the server redirects the client to that URI and appends the following as query strings:-
oauth_tokenobtained in the second step -
oauth_verifierused to ensure that the resource owner who granted access is the same returned to the client
-
-
If the
oauth_callbackURI was not provided in the first step, then the server displays the value of theoauth_verifierso that the resource owner can inform the client manually. -
After receiving
oauth_verifier, the client requests the server for token credentials by sending a request to the Token Request endpoint URI. This request contains the following:-
oauth_tokenobtained in the second step -
oauth_verifierobtained in the previous step -
oauth_consumer_keyprovided by the resource provider (the server), before starting the OAuth handshake -
oauth_signature -
oauth_signature_method -
oauth_nonce -
oauth_version
-
-
The server verifies the request and grants the following, known as token credentials:
-
oauth_token -
oauth_token_secret
-
-
The client then uses the provided token credentials to access whatever data it needs on the server.
If you are new to OAuth, you may be looking at the process here and thinking that setting up OAuth will take a bunch of work. Because we are using a WordPress plugin developed by the REST API team, this process is streamlined into a few easy steps. So don’t worry about fully understanding the entire OAuth flow process. If you are interested in understanding the entire process in detail, go ahead and dissect the plugin. Ah, the beauty of open source!
You can download this OAuth1 plugin directly from the WordPress plugin repository. Let’s get this plugin set up on your Dev site. Go ahead and install, then activate, this plugin like you would any other WordPress plugin.
Routes and Endpoints
In Chapter 9, we learned how to use the /wp-admin/admin-ajax.php URL to access our Ajax services. When using the REST API, each API method has its own URL including a route and endpoint.
What is an endpoint?
Endpoints call or trigger a particular method or function when you request a particular route. Each route can have multiple different endpoints.
An example of requesting a route using different endpoints:
GET /wp/post/1-
This route could have a method or function
get_post()that returns the requested post. POST /wp/posts/1-
This route could have a method or function
update_post()that updates the requested post.
We visit the same route /wp/post/1, but the CRUD operation determines what method or function to run and that is the endpoint.
What is a namespace?
A namespace is a “prefix” to your API routes that identify and protect the endpoints from collisions.
The core namespace is wp. This namespace is reserved and should not be used in creating custom endpoints. If another plugin or theme registered the same route after you registered a route, it would make the previously registered route void.
Requests
Internally, when you request an API endpoint the API utilizes WP_REST_Request, a core class used to implement a REST request object.
This request object contains many useful methods to process the request. Using the method get_posts() seen in the example that follows the list of parameters, you might visit /wp/posts?hello=world. The get_params() method would list the hello parameter in its array with the value world.
The following methods are available:
add_header-
Appends a header value for the given header.
canonicalize_header_name-
Ensures header names are in the standard format.
from_url-
Retrieves a
WP_REST_Requestobject from a full URL. get_attributes-
Retrieves the attributes for the request.
get_body-
Retrieves the request body content.
get_body_params-
Retrieves parameters from the body.
get_content_type-
Retrieves the content-type of the request.
get_default_params-
Retrieves the default parameters.
get_file_params-
Retrieves multipart file parameters from the body.
get_header-
Retrieves the given header from the request.
get_header_as_array-
Retrieves header values from the request.
get_headers-
Retrieves all headers from the request.
get_json_params-
Retrieves the parameters from a JSON-formatted body.
get_method-
Retrieves the HTTP method for the request.
get_param-
Retrieves a parameter from the request.
get_parameter_order-
Retrieves the parameter priority order.
get_params-
Retrieves merged parameters from the request.
get_query_params-
Retrieves parameters from the query string.
get_route-
Retrieves the route that matched the request.
get_url_params-
Retrieves parameters from the route itself.
has_valid_params-
Checks whether this request is valid according to its attributes.
offsetExists-
Checks whether a parameter is set.
offsetGet-
Retrieves a parameter from the request.
offsetSet-
Sets a parameter on the request.
offsetUnset-
Removes a parameter from the request.
parse_body_params-
Parses the request body parameters.
parse_json_params-
Parses the JSON parameters.
remove_header-
Removes all values for a header.
sanitize_params-
Sanitizes (where possible) the params on the request.
set_attributes-
Sets the attributes for the request.
set_body-
Sets body content.
set_body_params-
Sets parameters from the body.
set_default_params-
Sets default parameters.
set_file_params-
Sets multipart file parameters from the body.
set_header-
Sets the header on request.
set_headers-
Sets headers on the request.
set_method-
Sets HTTP method for the request.
set_param-
Sets a parameter on the request.
set_query_params-
Sets parameters from the query string.
set_route-
Sets the route that matched the request.
set_url_params-
Sets parameters from the route.
Responses
The sibling of WP_REST_Request is WP_REST_Response, a core class used to implement a REST response object.
This class is used to prepare your response data, HTTP status code, and any response headers:
add_link-
Adds a link to the response.
add_links-
Adds multiple links to the response.
as_error-
Retrieves a
WP_Errorobject from the response. get_curies-
Retrieves the CURIEs (compact URIs) used for relations.
get_links-
Retrieves links for the response.
get_matched_handler-
Retrieves the handler that was used to generate the response.
get_matched_route-
Retrieves the route that was used.
is_error-
Checks whether the response is an error; that is, a response code >=400.
link_header-
Sets a single link header.
remove_link-
Removes a link from the response.
set_matched_handler-
Sets the handler that was responsible for generating the response.
set_matched_route-
Sets the route (regular expression for path) that caused the response.
Adding Your Own Routes and Endpoints
Using the built-in REST API routes and endpoints is powerful, but things get really fun when you build your own routes and endpoints. New endpoints can be used to expose CPTs and other custom data your application uses to third-party services or to JavaScript your application is running in the frontend.
During the writing of this book, we built a plugin called WP Single Sign-On to demonstrate some features of the REST API, including adding your own. Single Sign-On (SSO) means allowing multiple separate sites to be accessed using the same login credentials. There are many methods of doing SSO in general, and other plugins and third-party services to do it with WordPress in particular. The solution we came up with was meant to be simple and straightforward, making it easier to teach with and use for reference. The same plugin shows how to create a custom REST API route and how to use a custom REST API route.
register_rest_route( $namespace, $route, $args, $override );
The function to register new REST API routes is register_rest_route(). This function must be called during the rest_api_init action hook.
$namespace-
A URL segment that comes between the core prefix3 and the route you are adding. This string should be unique to your plugin or app.
$route-
A string for the base URL of the route you are adding.
$args-
An array of options for the endpoint. You can also pass an array of arrays if adding multiple methods for this endpoint. The most common arguments you will pass in are
methodsto specify the HTTP methods to enable for this endpoint,callbackto specify the callback function to handle requests to the endpoint, andargsto define query parameters that can be passed into the endpoint. $override-
Should this new route override existing routes with the same name? If
true, the new route will override the existing route. Iffalse, the routes will be merged together, with the newer options taking precedence. Defaults tofalse.
To demonstrate how to add your own route, we dig in to the WP Single Sign-On plugin we’ve mentioned. This plugin contains both code to set up a REST API endpoint and handle requests to it as well as code to make calls to that REST API endpoint in PHP.
Setting Up the WordPress Single Sign-On Plugin
To test the WP Single Sign-On plugin in action, download and activate it on two separate WordPress sites. Go to Settings → WP SSO on each site. Set up one site as the host and the other as the client. You will need to copy the Host URL from the host site and paste it into the settings for the client site. The Host URL is the URL for a custom REST API endpoint created by the plugin!
Once the plugin is on both sites, you’ll be able to log in to the client site using a username and password from a valid user on the host site. Users (e.g., the administrators) on the client site can still log in using their existing usernames and passwords for that site as well. The plugin only checks with the host site if a login was otherwise going to fail on the client site.
Adding the /wp-sso/v1/check Route
First we need to register our new route. We will hook into the rest_api_init action and then use the register_rest_route() function to define our route.
functionwpsso_register_routes(){$options=wpsso_get_options();// Make sure host option is enabled.if(!$options['host']){return;}register_rest_route('wp-sso/v1','/check',array('methods'=>WP_REST_Server::READABLE,'callback'=>'wpsso_check_authentication_endpoint',));}add_action('rest_api_init','wpsso_register_routes');
This function first gets an array of options for the WordPress Single Sign-On plugin. If the host option is not enabled, the route is not registered. The route we’re going to add is what makes a host a host.
The namespace we’ve chosen is wp-sso/v1. We’re using the slug of the plugin and also adding another segment to the URL, v1. If we ever need to make breaking changes to our API, we can keep the old API as v1 and create new routes using a v2 prefix. This way, users of our API can opt into the new version. The endpoint we add is called check, which will be setup to check whether the username and password passed in via Basic Authentication works for a valid user on the host site.
The arguments we pass define the available methods and the callback function to handle requests to the route. The value WP_REST_Server::READABLE is an alias for GET. The callback function is wpsso_check_authentication_endpoint():
functionwpsso_check_authentication_endpoint(){global$current_user;if(!empty($current_user->user_login)){$r=array('success'=>true,'message'=>sprintf('Logged in as %s',$current_user->user_login),'user_login'=>$current_user->user_login,'user_email'=>$current_user->user_email,'first_name'=>$current_user->first_name,'last_name'=>$current_user->last_name,);}else{$r=array('success'=>false,'message'=>'Not logged in.','user_email'=>null,'user_login'=>$current_user->user_login,'first_name'=>null,'last_name'=>null,);}$r=rest_ensure_response($r);return$r;}
The callback function here tests whether a user is logged in. If the user is logged in, we set the success value to true and pass along the username, email, first name, and last name of the user. If the user is not logged in, we set the success value to false and pass along null values for the user data.
Note that the return array in the previous example is passed through the rest_ensure_response() function. This function converts our array into a WP_REST_Response object. As you’ll see later on, when we make requests to this new endpoint, we get back JSON containing the array of values we set up in the callback function.
Bundling Basic Authentication with Our Plugin
For our $current_user checks to work, we need these API requests to be authenticated. To do that, we’ve bundled a Basic Authentication class in /includes/basic-auth.php. This authentication handler is the same as that linked to in the WordPress REST API Handbook, but we’ve 1) prefixed the function names to avoid conflicts, and 2) added the following code so Basic Authentication is enabled only for HTTPS traffic to our specific endpoint:
// Don't run if not using SSLif(!is_ssl()){return$user;}// Don't run unless using our route.if(!empty($_REQUEST['rest_route'])){$rest_route='/'.rest_get_url_prefix().$_REQUEST['rest_route'];}else{$rest_route=$_SERVER['REQUEST_URI'];}if($rest_route!='/'.rest_get_url_prefix().'/wp-sso/v1/check'){return$user;}
Using the Endpoint We Set Up to Check User Credentials
WordPress sites running our Single Sign-On plugin and configured as a host will have the REST API endpoint described earlier such that when accessed by an authenticated user, they will return an array with details about that user. Client sites will access this API endpoint during login to check whether a user trying to log in exists on the host site. Let’s see what that code looks like.
In the main wp-sso.php file there is a function wpsso_authenticate() that hooks into the wp_authenticate action hook. The wpsso_authenticate() function checks to make sure both a username and password have been entered and checks first whether those credentials will work on the local site. If they won’t work on the local site, it uses them to make a basic authenticated request to the WordPress Single Sign-On endpoint on the host site. The request looks like this:
$url=$options['host_url'];$args=array('headers'=>array('Authorization'=>'Basic '.base64_encode($username.':'.$password),),);$response=wp_remote_get($url,$args);
The host URL is taken from options. We also set up an array of headers to pass along to the GET request. The $username and $password variables that are passed into the wp_authenticate hook are encoded and included in the authorization header. Since we enabled Basic Authentication for our endpoint on the host site, the host site will attempt to authenticate the request using the username and password sent. We use the wp_remote_get() function to make the request.
If the credentials don’t work on the host site, you will get a 500 error back from your request with the message “incorrect password.”
If the credentials do work on the host site, the response will look something like this:
array(6){["headers"]=>...}["body"]=>string(162)"{"success":true,...}"["response"]=>array(2){["code"]=>int(200)["message"]=>string(2)"OK"}["cookies"]=>array(0){}["filename"]=>NULL["http_response"]=>...}
The rest of the wpsso_authenticate() function checks that the status on the response is 200 and then uses the json_decode() function on the response body to pull out the user data. If a user with the same email address exists on the local site, that user’s password is updated. If no user exists yet with that password, a new user is created.
Popular Plugins Using the WordPress REST API
Many plugins use the REST API, both to support their own user interfaces and to make the data and functionality of the plugins available to other apps. Following are some plugins that work with the WP REST API particularly well and can be used for reference.
WooCommerce
WooCommerce has a fully featured API that can do pretty much anything you would want to do with WooCommerce short of processing checkouts. You can perform CRUD operations against products, orders, coupons, and customers. You can access reports and tax rate information. Be sure to check out the detailed technical documentation for the WooCommerce REST API.
The WooCommerce REST API uses Basic Authentication over SSL. But instead of using the same username and password you would use to log in to the WordPress administrator dashboard, WooCommerce has a page in its settings to generate sets of API keys for specific users. The API keys can be limited to read, write, or read/write permissions.
The keys are labeled as a consumer key and consumer secret, but when using them in your Basic Authentication API requests, you set them as the username and password, respectively.
Example: Hide sale banners for paying customers
The Customer object returned by the WooCommerce API has a useful property called is_paying_customer. In some instances, you might want to show certain banners or ads to noncustomers only. Following is a quick example of how you could do that in JavaScript through the WooCommerce API.
First, here is the PHP code to register, localize, and enqueue our JavaScript. This is similar to the cookie authentication example shared earlier in this chapter, but now we are also passing the current user’s ID and enqueuing our JavaScript:
functionmy_hide_sale_banner_script(){global$current_user;wp_register_script('hide-sale-banner',plugins_url('js/hide-sale-banner.js',__FILE__),array('jquery'));wp_localize_script('hide-sale-banner','HSBSettings',array('root'=>esc_url_raw(rest_url()),'nonce'=>wp_create_nonce('wp_rest'),'current_user_id'=>$current_user->ID,));wp_enqueue_script('hide-sale-banner');}add_action('wp_enqueue_scripts','my_hide_sale_banner_script');
Here is the JavaScript code that will get the current customer information using the WooCommerce API; if the user is already a paying customer, remove the banner element from the page.
jQuery(document).ready(function(){jQuery.ajax({url:HSBSettings.root+'wc/v3/customers/'+HSBSettings.current_user_id,method:'GET',beforeSend:function(xhr){xhr.setRequestHeader('X-WP-Nonce',HSBSettings.nonce);},}).done(function(customer){if(customer['is_paying_customer']){jQuery('#sale-banner').remove();}});});
Pretty neat. Other users for the WooCommerce API could include generating coupons on the fly, using the sales report statistics to update a “X customers served!” banner, or updating product information on the fly as details are changed in other systems.
BuddyPress
The BuddyPress team has been working on getting full WP REST CRUD coverage for the myriad BuddyPress datatypes. As of this writing, it’s about 90% complete.4
Work on the BuddyPress REST API is being done through a feature plugin. To use the BuddyPress REST API, install and activate this plugin alongside BuddyPress. The plan is to merge the REST API support into the 5.0 version of BuddyPress.
Though the BuddyPress API is currently very much under active development, you can still do some amazing things with it in its present form. There are endpoints for Activities, Groups, XProfile Fields and Groups, Members, Notifications, Components, and more.
Most of the endpoints require authentication to return data (e.g., by using the WordPress REST API: OAuth 1.0a Server plugin).
Example: Highlight activity from specific users
By default the /wp-json/buddypress/v1/activity endpoint returns the most recent activity across all users. You can pare it down further by passing in a specific user_id as a parameter, and you can use the per_page parameter to change the number of results returned. So an authenticated request to a URL such as https://yoursite.com/wp-json/buddypress/v1/activity?user_id=1$per_page=1+ will return the one most recent activity item for the user with ID 1.
You could use code like the following, then, to grab the most recent activity item for that user and display it more prominently at the top of the page:
functionmy_highlight_admin_activity_script(){?><style>li.activity.highlighted {background-color: #FFFFCC;}</style><script>fetch( '/wp-json/buddypress/v1/activity?user_id=1&per_page=1' ).then( function( response ) {return response.json();}).then( function( activity ) {const elements = document.querySelectorAll("a[href='" + activity[0].link + "']");elements.forEach( function( element ) {const wrapping_div = element.closest( 'li.activity' );wrapping_div.classList.add( 'highlighted' );} );} );</script><?php}add_action('wp_footer','my_highlight_admin_activity_script');
Adding the preceding code to a plugin or theme’s functions.php file would add the JavaScript into the footer of all frontend pages. Typically, you would put this kind of JavaScript code into its own .js file and enqueue it, similar to this BuddyPress example. We wanted to show a few different ways of doing things.
The previous example also uses the fetch() method instead of jQuery.ajax to get the data from the BuddyPress API. We also use some vanilla JavaScript selector commands instead of the jQuery variants. This code should work on most modern browsers without your needing to load the jQuery API.
The BuddyPress REST API activity endpoint does not require authentication. So the fetch did not need to be authenticated. We simply hit the /wp-json/buddypress/v1/activity?user_id=1&per_page=1 endpoint, passing in user_id=1 to get activity for just that user and per_page=1 to limit the results to the latest activity item.
Paid Memberships Pro
Paid Memberships Pro has a simple but powerful REST API that you can use to answer a very important question: is a user a paying member?
There are other endpoints supported by Paid Memberships Pro and more in development, but the /wp-json/wp/v2/users/2/pmpro_membership_level endpoint added by the plugin is useful for connecting the member database stored within WordPress and Paid Memberships Pro to other applications.
Note
Unlike the other plugins mentioned in this section, which create their own new routes for their API, Paid Memberships Pro extends the existing /users/ route to include a new endpoint for checking a user’s membership level.
You could imagine a Zapier or If This Then That (IFTTT) recipe that would check a user’s membership using this endpoint before deciding between sending user data into different customer relationship management (CRM) silos. This one endpoint also makes it possible to manage your paying members in WordPress while controlling access to an application built on any platform that can make authenticated API calls.
Example: Check whether a certain email address has a membership
To use the pmpro_membership_level endpoint we first need to ascertain a user’s ID. To do that we can perform a search using the built-in users endpoint. We then take that ID and use it to query for the user’s membership-level data.
Note that the example here uses Basic Authentication. As of this writing, Paid Memberships Pro does not handle its own authentication. You will need to have the Basic Authentication plugin active or change this:
functionmy_check_host_site_membership(){global$current_user;// Change these values.$host_site_url='https://hostsite.com/';$restricted_post_id=2;$apiuser='apiuser';$apipassword='apipassword';// We're only blocking the specific post ID$queried_object=get_queried_object();if(empty($queried_object)||$queried_object->ID!=$restricted_post_id){return;}// If not logged in, redirect to the host siteif(!is_user_logged_in()){wp_redirect($host_site_url);exit;}// Check for membership at host site.$url=esc_url($host_site_url.'/wp-json/wp/v2/users/?search='.urlencode($current_user->user_email));$args=array('headers'=>array('Authorization'=>'Basic '.base64_encode($apiuser.':'.$apipassword),),);// Make sure our first request was successful.$response=wp_remote_get($url,$args);if(empty($response)||$response['response']['code']!='200'){wp_redirect($host_site_url);exit;}// Make sure we found a user.$response_body=json_decode($response['body']);if(empty($response_body)){wp_redirect($host_site_url);exit;}// The result from the user search is an array. Grab the first one.$host_user=$response_body[0];// Check the user's membership at the host site.$url=esc_url($host_site_url.'/wp-json/wp/v2/users/'.$host_user->id.'/pmpro_membership_level');$response=wp_remote_get($url,$args);// Make sure the second request was successful.if(empty($response)||$response['response']['code']!='200'){wp_redirect($host_site_url);exit;}// Check for a membership level$membership_level=json_decode($response['body']);if(empty($membership_level)){wp_redirect($host_site_url);exit;}/*If we get here, $membership_level will contain informationabout the user's level. We could check for a specific levelor just stop here to let users of all levels view this page.*/}add_action('template_redirect','my_check_host_site_membership');
In this example, you would change the host site URL to point to the home page of the WordPress site where Paid Memberships Pro is active with members. Users are also redirected to this URL. The $restricted_post_id is the ID of the post you want to lock down for members. You could update this example to check for post meta or an array of posts or some other factor you want to restrict. With Basic Authorization enabled on the Paid Memberships Pro site, The $apiuser and $apipassword would just need to be the username and password of a user with the edit_users capability.
The REST API is a powerful tool for enabling faster, more flexible functionality and applications to be built on top of WordPress. One example of an internal feature that relies heavily on the REST API is the new block editor, Gutenberg. We examine Gutenberg, blocks, and creating CPTs in the next chapter.