Chapter 11. Project Gutenberg, Blocks, and Custom Block Types
When the new WordPress editor was proposed in January 2017, Matt Mullenweg wrote:
The editor will endeavor to create a new page and post building experience that makes writing rich posts effortless, and has “blocks” to make it easy what today might take shortcodes, custom HTML, or “mystery meat” embed discovery.
Less than two years later, the block editor (aka the Gutenberg editor) was included in WordPress version 5.0, bringing with it a new way to edit posts and a new way to develop experiences with WordPress.
Note
The original project to build the block editor was codenamed “Gutenberg.” We now prefer the term block editor or simply WordPress editor, but many people and posts you run across will refer to the editor itself as Gutenberg.
The Gutenberg team has put together the Block Editor Handbook to help both users and developers get up to speed with using Gutenberg. The Block Editor Handbook is a tight, well-written, and evolving piece of documentation that you should read. Like, right now go read it, and then come back here. We will reference specific sections of this handbook later on.
In this chapter, we briefly cover the general features of the block editor, build a minimal block as a starting point, and then dive a bit deeper into the features most relevant to application development.
The block editor is built primarily in JavaScript (using the UI), and managed as a Node.js project. Though the Gutenberg handbook will help you code a block, it can be hard to tell what parts of the example code are JavaScript, React, or Gutenberg. Understanding how the various technologies work together will help you as you work to extend WordPress. We have tried our best to make it clear in our examples where the code comes from.
The WordPress Editor
The current WordPress editor is built around the unit of blocks. These blocks, representing paragraphs, headings, lists, images, and more complex components, are placed in a series. Some blocks, like the group and column blocks, can have other blocks nested inside them. You can drag and drop blocks within the editor to reorder them (see Figure 11-1).
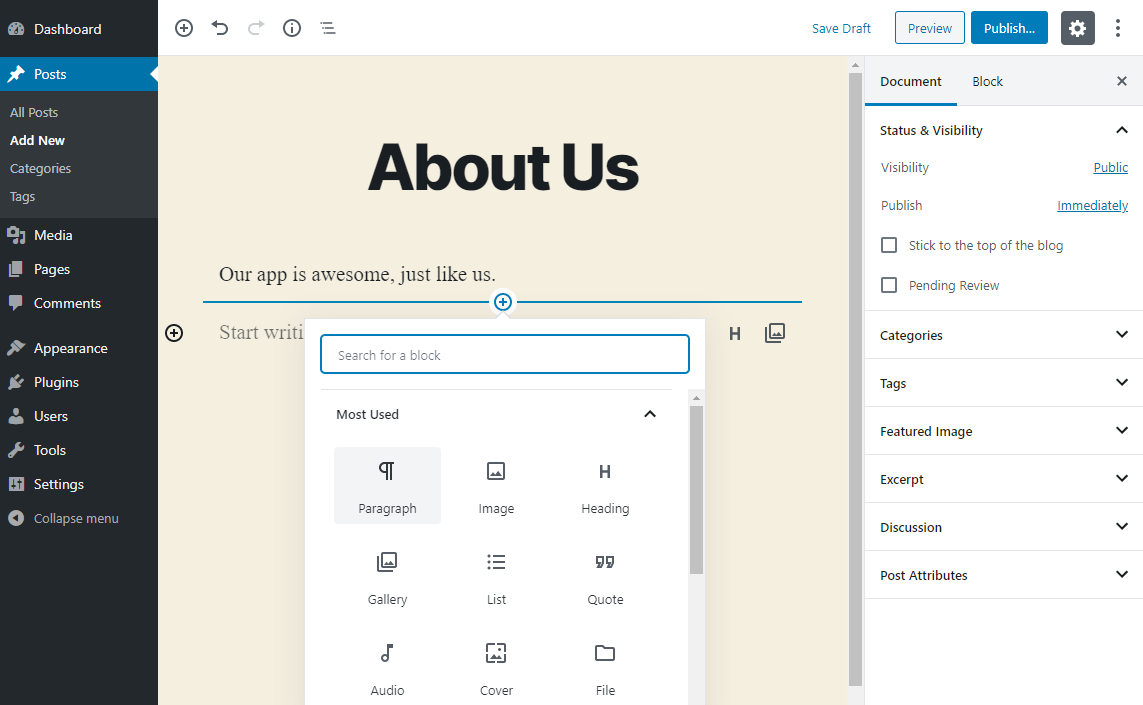
Figure 11-1. The WordPress Block Editor
Blocks can be added by clicking the + in the UI or by typing / followed by the block name within the empty space of the editor. Pressing the enter key within a paragraph block creates a new paragraph block. Some blocks will automagically appear when you type certain Markdown-based characters into an empty block. The * character will start an unordered list. The ## characters will start a secondary heading.1
One block can be edited at a time. You click on a block to bring it into focus and switch into its editor view. While in focus, the Block tab in the right sidebar contains settings specific to that block. Clicking another block or in the empty area of the editor will put the focus block into the frontend view.
The WordPress editor mirrors the frontend as much as possible. Some blocks will use placeholders or have slightly different styling to make things easier to edit, but developers are instructed to have the editor views of their blocks resemble the frontend view of their blocks as much as possible.
The Classic Editor Plugin
If you have a site with plugins or features that require the classic editor, or you are just a big fan of the old TinyMCE-based editor, you can install the Classic Editor plugin on that site. This plugin allows you to selectively or globally use the classic editor to edit any post or page. According to the README file, “Classic Editor is an official WordPress plugin, and will be fully supported and maintained until at least 2022, or as long as is necessary.”
We suggest using the Classic Editor plugin as a last resort. While the plan is for that plugin to be supported through 2022, the block editor will become an increasingly integral part of the WordPress dashboard and other plugins and themes built on top of it.
Using Blocks for Content and Design
Most blocks available are content and design focused. They help you create rich design layouts without resorting to coding. It’s outside the focus of this book to overview the currently popular divider, carousel, or gallery blocks, but, suffice it to say, there are many to choose from.
Using Blocks for Functionality
Some blocks are more tied to the functionality of your WordPress site or app. The Paid Memberships Pro plugin includes a membership block to restrict any nested blocks based on membership level. Over time, plugins with complicated frontend UIs will ship with blocks to allow you more control over how that UI is laid out and configured. You can imagine fine-tuning the directory layout in BuddyPress through blocks and block settings.
Creating Your Own Blocks
Using blocks is fun. Creating your own blocks is even funner…more fun…sometimes fun. It can be difficult, but let’s start with the smallest possible block and build up from there.
Minimal Block Example
The bare minimum required to add a block to the editor is to make a call to wp.blocks.registerBlockType() in some JavaScript run on the editor page:
wp.blocks.registerBlockType('bwawwp/minimal',{title:'Minimal Block Example',category:'common',edit(){return'Minimal block editor content.';},save(){return'Minimal block frontend content.';},});
The full docs and list of options can be found in the Block Registration section of the Block Editor Handbook.
Our minimal block passes in the name of the block and an array of arguments. Names must be unique and should be prefixed with the namespace or slug of the plugin loading the block. Names must start with a letter and can contain only lowercase letters, numbers, and dashes.
Our minimal block also passes in a title and category. The title can be any descriptive string, to help users find it in the block list. Later, we will cover how to add a new category to group related blocks. The categories included in core WordPress are common, formatting, layout, widgets, and embed.
The workhorses of the registerBlockType attributes are the edit and save attributes, for which we pass in functions to compute and return the structure of your block. You’ll use the edit function when the block is rendered in the editor (see Figure 11-2). The save function is used when the post is saved, before blocks are serialized into the post_content.
In the minimal block example, we just return a simple string. Note that any HTML included in these strings is going to be sanitized and converted into HTML entities. To generate markup with your blocks, you are going to have to use the wp.element.createElement() function.
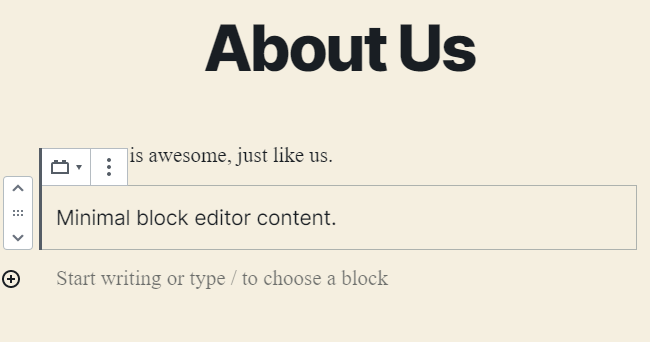
Figure 11-2. Minimal block in the editor
We can build a plugin with just one folder, and two files to load our block:
-
block.js
-
minimal-block-example.php
Here is code for minimal-block-example.php that will enqueue this block.js file:
/*** Plugin Name: Minimal Block Example*/functionenqueue_min_block(){wp_enqueue_script('minimal-block',plugins_url('block.js',__FILE__),array('wp-blocks'));}add_action('enqueue_block_editor_assets','enqueue_min_block');
This is similar to how we enqueued other JavaScript in Chapter 9. In this case, we are hooking into the enqueue_block_editor_assets action instead of the regular wp_enqueue_scripts action. Note also that our block JavaScript has wp-blocks as a dependency. As we add functionality to our blocks, we will need to include other Gutenberg-related packages here.
Note
This example demonstrates the minimum requirements for a plugin as well. The only value you need in your header is the “Plugin Name.” The rest are optional. Some are highly recommended, as we cover in Chapter 3.
From here, return to the docs at WordPress.org and go through the “Writing Your First Block Type” tutorial. This covers adding styles, using editable fields, adding toolbars and settings, and creating dynamic blocks that update on the fly.
Using Custom Blocks to Build App Experiences
Imagine our SchoolPress teachers want to be able to create new homework assignments. They could use Microsoft Word or Adobe Acrobat, or just type things up in a regular WordPress post. But we want something that integrates with the rest of the app we are building and will store assignment responses into a database for reporting and other functionality.
We could build a form with custom PHP. We could build something more dynamic in React that stores data into WordPress through the WordPress REST API. We could use the Advanced Custom Fields plugin along with your homework CPT to lay out the data needed. As with many tasks in WordPress development, or development in general, there are many reasonable options.
One option that makes some sense is to create a homework CPT and custom blocks and block templates. By building on the block editor, we start with a UI that is already familiar to our users. We can code our custom blocks and block templates so that homework assignments will always include data in the structured format our WordPress-based app will need.
Enabling the Block Editor in Your CPTs
As of WordPress 5.3, CPTs will default to using the Classic Editor. At some point, all CPTs may be forced into using the new block editor. For now, to enable the block editor in your CPTs, say so explicitly when registering your CPT.
Here is the homework CPT example again, this time with the settings to use the block editor:
register_post_type('homework',array('labels'=>array('name'=>__('Homework'),'singular_name'=>__('Homework')),'public'=>true,'has_archive'=>true,'supports'=>array('title','editor'),// New'show_in_rest'=>true,// New));
The property 'supports' => array( 'title', 'editor' ) adds support for the title field and the block editor. Since the block editor uses the REST API to update posts, we need to also add REST API support by adding 'show_in_rest' => true.
Block Categories
When you’re adding multiple related blocks, it is helpful to put them into the same category so they will appear together in the block list. Setting the category of a block is as simple as changing the category attribute in the registerBlockType() arguments in your block JavaScript. WordPress needs to know about the new block category, though. To do that, use the block_categories filter:
// Add a Homework block category.functionmy_block_categories($categories,$post){returnarray_merge($categories,array(array('slug'=>'homework','title'=>'Homework',),));}add_filter('block_categories','my_block_categories'),10,2);
Each category in the array of $categories is an array with two keys: slug and title (see Figure 11-3).
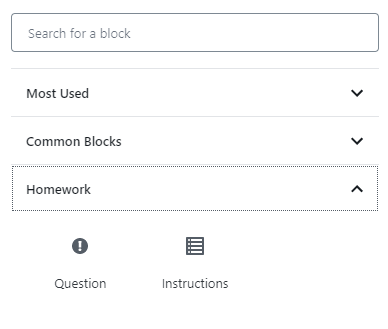
Figure 11-3. The Homework Block Category with the Homework and Instructions blocks
The Homework Blocks
To support our homework app, we add a couple of blocks. The homework/instructions block will go at the top of our homework and include a due date set via block settings. Multiple homework/question blocks will go below. Each question block has a RichText field to enter the question and a question type set via the block settings. The question types could be true/false, multiple choice, or essay.
The full code for these blocks can be found in the Chapter 11 folder of this book’s GitHub repository.
Limiting Blocks to Specific CPTs
We want our instructions and question blocks to be used only on posts with the homework post type. To accomplish this, we can add some code to check the post type of the current post being edited and unregister our post types if it’s not a homework post.
At the bottom of your block.js file, add the following code:
// Deregister instructions on non-homework posts.wp.domReady(function(){if(wp.data.select('core/editor').getCurrentPostType()!='homework'){wp.blocks.unregisterBlockType('homework/instructions');}});
The wp.domReady() function is similar to jQuery’s document.ready() function, waiting until the full page has loaded before running the code within it. We need to do this because the post type of the current post being edited won’t be available until then. This is why you need to unregister the block instead of checking the post type before registered. To use the wp.domReady() function, make sure your block JavaScript is enqueued with wp-dom-ready as a dependency.
The current post type is pulled out of the WordPress data module using the command wp.data.select('core/editor').getCurrentPostType(). To do this, make sure your block JavaScript is enqueued with wp-edit-post as a dependency.
Tons of useful information is available using similar methods listed in the Data Module Reference. For more on how the data module is built and how to set up your own data stores, check out the data package documentation.
Limiting CPTs to Specific Blocks
Earlier, we showed how to keep our blocks from being used in other post types. WordPress also provides a allowed_block_types filter. This can be used to allow only select block types across your whole site or network. Or you can check the post_type on the $post parameter passed in and allow only select block types when editing posts of that type.
The following code limits homework posts to using a select few core blocks along with our instructions and question blocks:
// Only allow certain blocks on homework posts.functionmy_allowed_block_types($allowed_blocks,$post){if($post->post_type=='homework'){$allowed_blocks=array('core/block','core/image','core/paragraph','core/heading','core/list','homework/instructions','homework/question',);}return$allowed_blocks;}add_filter('allowed_block_types','my_allowed_block_types',10,2);
By default $allowed_blocks is null, telling WordPress to allow all blocks. Since blocks are added in JavaScript, after all PHP has loaded, the filter can’t know what custom blocks will be added. But if you set a list of allowable blocks using code like that shown in the previous example, it will make sure only blocks in those list get loaded.
Block Templates
When you register a CPT, you can pass a template attribute that will specify a group of blocks to be added to new posts of that type by default. Here is a version of our callback to register the homework post type that defaults to an instructions block up top, followed by one true/false question and one essay question:
// Register the homework CPT.register_homework_post_type('homework',array('labels'=>array('name'=>__('Homework'),'singular_name'=>__('Homework')),'public'=>true,'has_archive'=>true,'supports'=>array('title','editor'),'show_in_rest'=>true,'template'=>array(array('homework/instructions'),array('homework/question',array('content'=>'True/false 1.','question_type'=>'true_false')),array('homework/question',array('content'=>'Essay question.','question_type'=>'essay')),)));
With the above code in place, new homework posts will use our template and start with the instructions block and a few question blocks already in place. You can click on each block to edit their content (Figure 11-4).
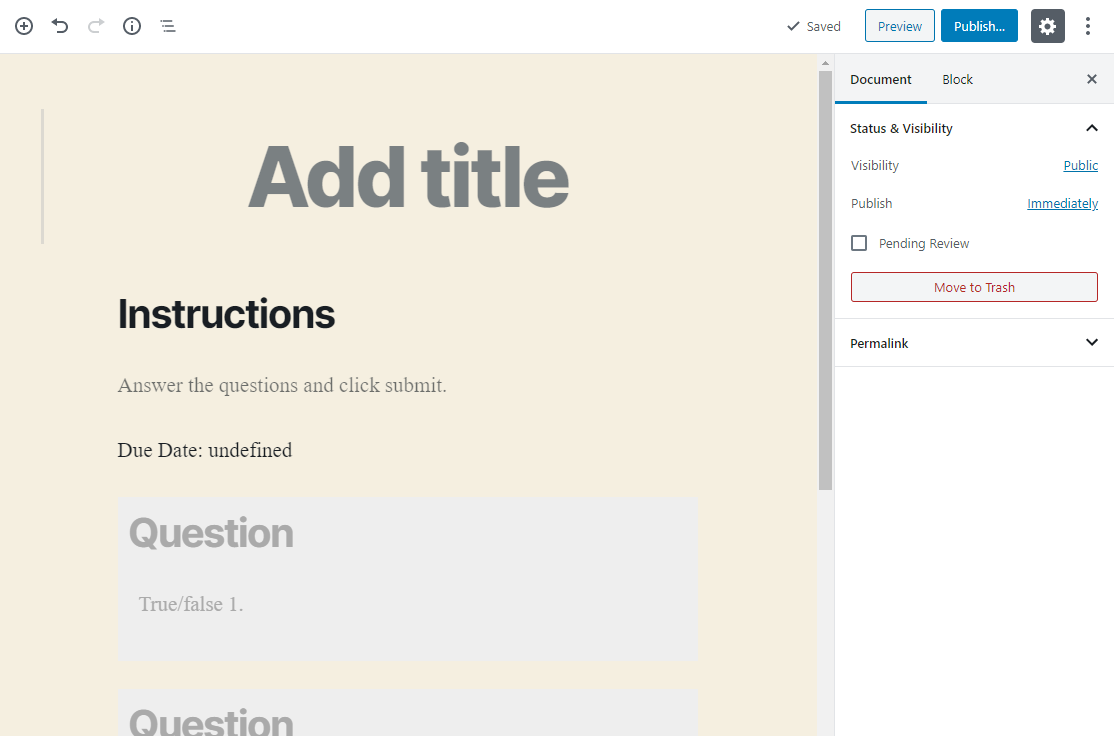
Figure 11-4. Default template for new homework posts
You can also add templates to core post types or other CPTs after they are registered, add templates in your block JavaScript, lock templates so they cannot be rearranged or deleted, and next templates. Read about this and more in the Block Templates section of the Block Editor Handbook.
Saving Block Data to Post Meta
By default, attributes on blocks are stored inside of specially formatted HTML comments in the post_content body. The instructions block looks something like this before being converted for the frontend:
<!-- wp:homework/instructions --><pclass="wp-block-homework-instructions-content">Email me your answers.</p><pclass="wp-block-homework-instructions-due_date">Due Date: 2020-11-01</p><!-- /wp:homework/instructions -->
If our block is configured correctly, the content and due date are editable from the block editor and settings panel for those blocks. And things will then show up on the frontend of the website.
However, we might want to be able to sort homework assignments by due date or develop other reports around data set in our blocks. This is the kind of thing that would be possible if that data were stored in post meta.
To link block attributes to post meta, we need to register our post meta fields. We don’t always register post meta. You can just call the update_post_meta() function directly and add any data you want. However, when manipulating post meta through the REST API, we need to register it:
register_post_meta('homework','_homework_due_date',array('show_in_rest'=>true,'single'=>true,'type'=>'string','auth_callback'=>function(){returncurrent_user_can('edit_posts');}));
Now we can simply set the source in the block attribute to link to our post meta:
wp.blocks.registerBlockType('homework/instructions',{// ...attributes:{content:{type:'array',source:'children',selector:'p',},due_date:{type:'string',meta:'_homework_due_date',source:'meta',default:'',}},// ...}
You can find more details on how to edit post meta through blocks in the “Store Post Meta with a Block” tutorial in the Block Editor Handbook.
Tips
Gutenberg development is complicated, fast-changing, and worthy of a book of its own. We have covered the basics here and a few techniques that should be useful to app developers working with Gutenberg. Here are some general tips that will help and some areas for further reading.
Enable WP_SCRIPT_DEBUG
By default, WordPress will use minimized JavaScript and bundle all of its JavaScript into one file. This makes JavaScript errors in the console largely unusable. While doing any kind of JavaScript development, but especially when working with Gutenberg, you will want to enable WP_SCRIPT_DEBUG.
Adding define( 'WP_SCRIPT_DEBUG', true ); to your wp-config.php file tells WordPress to use unminimized versions of scripts and load all JavaScript files individually. This way, errors in the debug bar console will point to useful filenames and line numbers that you can cross-reference in your codebase.
Use filemtime() for the Script Version
When you enqueue JavaScript, you can set a version. Because browsers will aggressively cache JavaScript files, you can update the version of the script to break that cache. When working on your JavaScript files, you are going to be editing and updating them a lot. Setting the version to the last modified date of the underlying file is one way to keep your browser from caching that JavaScript file while working on it.
Here is a version of the code to enqueue the question blocks that uses the filemtime() function for the script version:
wp_register_script('homework-question',BWAWWP_URL.'homework-cpt/blocks/question/blocks.js',array('wp-blocks','wp-element','wp-editor','wp-components','wp-dom-ready','wp-edit-post',),filemtime(BWAWWP_DIR.'homework-cpt/blocks/question/blocks.js'));
Before you deploy this code in the form of a plugin, you’ll want to update the version of the script to be the version number of the plugin or a specific version number for the script.
More Tips
Zac Gordon’s “31 Tips for Gutenberg Development” includes some great tips and also direction into advanced topics in block development.
Learn JavaScript, Node.js, and React More Deeply
Learning vanilla JavaScript, Node.js, and React more deeply will help you with your WordPress block development. At the very least, take some time to read up on, experiment with, and gain a general understanding of how each of these technologies works. You’ll find that debugging issues with Gutenberg development is much easier if you can better tell which layer of your stack the issue is coming from:
- JavaScript
-
We cover JavaScript and its history with WordPress in Chapter 9. The stronger your JavaScript skills, the easier you will find it to develop blocks. JavaScript: The Definitive Guide, by David Flanagan, and JavaScript: The Good Parts, by Douglas Crockford, are two great books for learning JavaScript. You can browse them to pick up the basics and use them for reference or dive into them to “learn JavaScript deeply.”
- Node.js*
-
Node.js is a JavaScript runtime that will run in your server environment. Several Node.js-based tools are used in the typical Gutenberg build setup, including webpack, Babel, and the Node Package Manager (npm). Webpack is used to compile all your JavaScript into a single bundle to be deployed to the browser. Babel is used to convert ESNext and JSX code into JavaScript that will run across the widest range of browsers. The npm is used to install JavaScript packages and manage the dependencies between them. Both webpack and Babel are typically installed as node modules. You may also want to use additional node libraries in the JavaScript code for your blocks. You can install and manage those via npm. The “JavaScript Build Setup” section of the Block Editor Handbook will walk you through installing node and npm, then installing the @wordpress/scripts package, which includes the recommended default configurations for webpack and Babel.
- React
-
We give a full description of React in Chapter 9. In summary, React is a JavaScript library for building interactive UIs that is used extensively in the block editor screens. A WordPress block can be viewed as a collection of React UI components designed to serve a common editor or content style use case. WordPress has its own library of React components specific for building blocks. These can be combined with other React components or custom developed components. Experimenting with React outside the context of building a Gutenberg block will help you to get familiar with React in general. When you run into issues building WordPress blocks, you will be better equipped to know if those issues are React issues or WordPress issues, which will help you to know where to go for help. If you’d like to dive deep into React, check out the book Learning React, by Alex Banks and Eve Porcello. Just going through the official tutorial on the React website or one of the other examples there will be very useful as well.
1 A full list of formatting shortcuts and other useful shortcut keys can be found on the WordPress site.