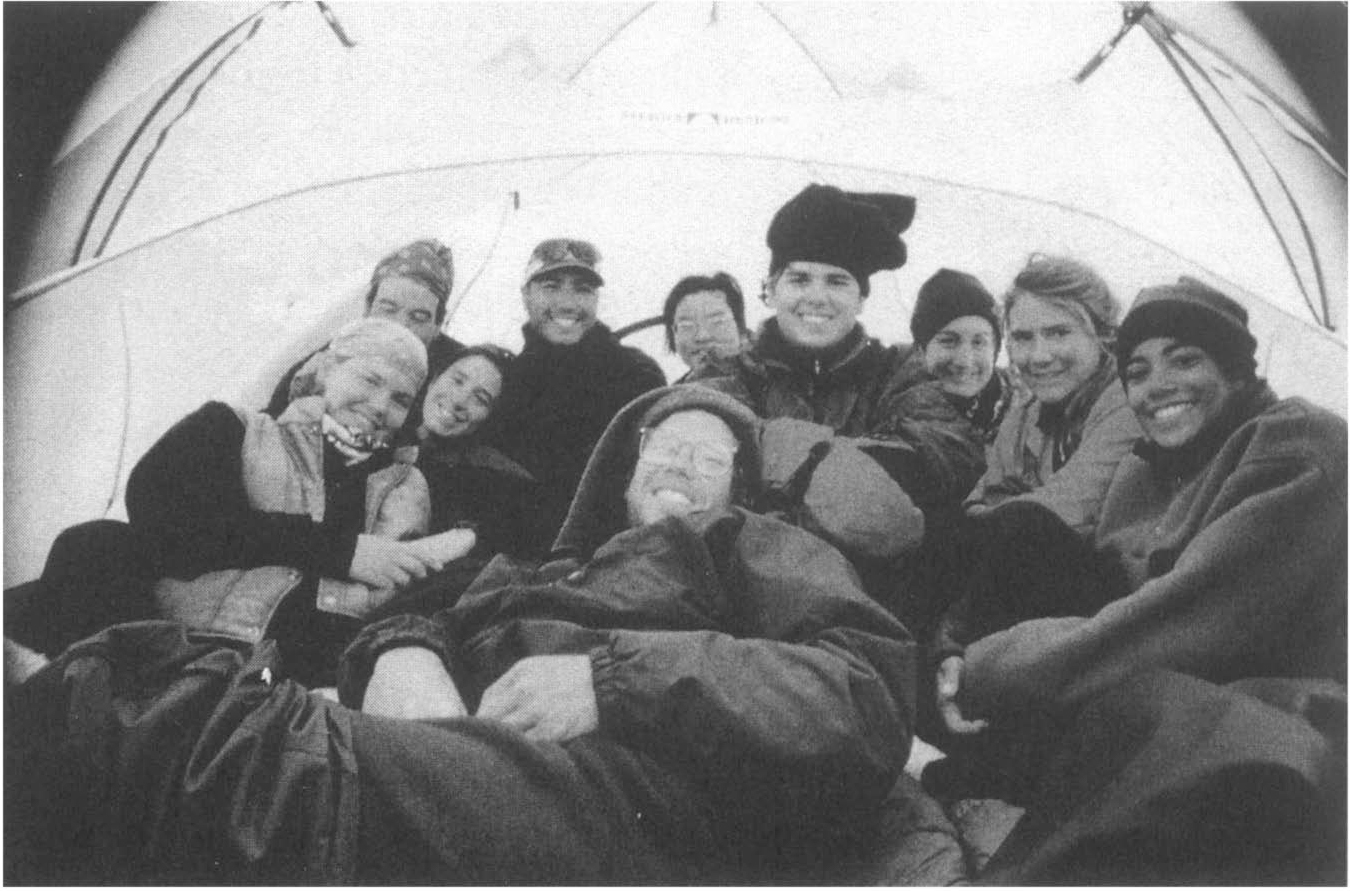
Choosing compatible teammates is one of the important decisions in expedition planning. A NOLS course in the northern Talkeetna Mountains of Alaska. Fredrik Norrsell
When the directors of the NOLS Patagonia branch plan a seventy-day semester, their decisions involve kayaks, horses, planes, boats, trucks, thousands of pounds of food, high expectations, unknown terrain, glaciers, devilish Patagonia weather, and even a tactfully written letter to the Chilean navy. The logistics for these trips are formidable, but the principles for planning them are the same principles you or I can use to plan a three-day trip to the Smoky Mountains.
The celebrated adventurer Bill Tilman once said, “Any worthwhile expedition can be planned on the back of an envelope.” Expedition planning needn’t be overly complex or metaphysical. Part of the fun of the outdoors comes in spontaneous trips when you call a few friends, throw some things in a pack, and head for the hills. But paradoxically, the people most successful at “spontaneous” trips are those with the practical experience to bring the right gear, some maps, and enough fuel, and the leadership experience to choose the right people for the venture—even if they leave for the wilds on the spur of the moment.
In the summer of 1998, Neal Beidleman, a guide credited with saving many lives on the ill-fated 1996 Mount Everest expedition, gave a lecture at the International Design Conference in Aspen, Colorado, about “designing” an expedition. The gist of Beidleman’s lecture was that any design—whether for a product, a building, or an expedition—depends on leadership, common group objectives, good equipment, teamwork, and a balance between the flexibility to improvise and a rigid plan to fall back on in the event of a crisis. Beidleman went on to say that the weaknesses in the design of the Everest expedition were exposed by the harsh conditions. What struck me most about Beidleman’s lecture was his portrayal of an expedition as a living, breathing entity wherein every part of the design—the equipment, the people, the leadership, and the objectives—all act on each other to form either a successful trip or a failed trip.
Some people seem to have a knack for planning good expeditions. Every year, fellow NOLS instructor and friend Dave Glenn organizes an odd assortment of rednecks, government land managers, and green tree huggers, throws them all together on three or four rubber rafts, floats them through a rough river, and has them finish the adventure making deep political concessions to each other just from the joy of completing a well-designed trip. Dave succeeds at making these impossibly unlikely combinations of people work partly from having a knack with people but also from years of experience, mastery of the planning fundamentals, and surely the experiential benefit of some failures.
In this chapter you will learn a simple outline of variables to consider in designing your own trip. Every trip in the outback involves five main elements: team and leadership; expedition goals; route planning; contingency plans; and ration planning. All these elements, while considered separately for the sake of this chapter, are interconnected and interdependent. The people you bring on your trip will determine the expedition goals; good rations will help keep your group healthy enough to achieve its goals; a well-planned route will help morale. The relationships between these five elements of your plan are endless but the point here is simple: The well-designed trip comes of good planning. Every trip is different, but this outline will help you plan every time.
• Team and leadership
• Expedition goals
• Route planning
• Contingency plans
• Ration planning
Before you go, make an honest appraisal of your abilities and experience. This is not the time to pad your résumé, but a time to evaluate your skills, physical condition, and background with some modesty so you will not choose a trip beyond your competence.
Perhaps you are a raw beginner with little or no outdoor experience but a strong athlete and tough as leather. Maybe you have Woody Allen’s physique and his affinity for the outdoors as well. Perhaps you have camped a dozen times in the last two years but always with an organized program. Maybe you have a technical background in rock climbing but have never traveled in the Arizona desert, where you are planning to go for your next adventure.
Everyone has certain strengths, be they athletic abilities, mental resilience, or extraordinary patience; and everyone has certain liabilities—fear of heights or poor orientation, for instance. Every year, inexperienced hikers get injured or lost or killed because they attempt trips beyond their abilities. This is not meant to scare you but to raise your awareness. When planning your trip ask yourself these questions:
• What is the sum total and nature of my outdoor experience?
• Would I be able to handle an emergency such as a seriously injured or lost party member, or a situation in which I myself was injured?
• Do I have the physical conditioning and psychological mindset to complete this trip?
The most important decision you make in planning your trip is who gets to go with you. Your teammates are your best resource in the day-to-day routine and in an emergency. Having good people along—people you enjoy and trust—is the foundation of a good expedition.
After taking stock of your own abilities, consider the abilities and personalities of your teammates. You want a group with matching abilities, compatible personalities, and good judgment. It’s certainly fine to bring people of varying skills, but those going should know in advance and agree to be flexible enough to accommodate weaker or less experienced teammates or, when traveling with those who have superior skills, be in a learning role. If you invite a friend with a penchant for long grueling days on the trail, along with a friend who fancies lazy reverie under a banyan tree, you may be asking for a quarrel. Invite a couple intent on consummating their nuptials at every spare moment, and you’ll chafe the lone ascetic in the group. Members invited on your trip should know what the pace and style of the trip will be. Perhaps you want to complete a challenging route and do dozens of peak ascents. Perhaps you all just want to get out, relax, fish, and cook lots of good meals. The important thing is that everyone in the group knows what to expect.
If possible, sample your friends on a day hike before you invite them to join you on a long expedition. Even a day of hiking together will give you some idea of their fitness, their attitudes, their moods, and their quirks.
Here are some questions to ask yourself when choosing your teammates:
• Do they have common sense and good judgment? Would you trust the prospective teammate to get you out of the backcountry if you became incapacitated?
• Are they of your ability? Will you be comfortable traveling with someone who is much more conservative in judgment than you are, or, conversely, with someone who is much more aggressive?
• Will you enjoy each other’s company?
Small groups are mobile and involve simple logistics. With a small group you don’t have to convene an assembly for every decision about where to hike or what meals to bring. When I go on trips where I want to cover a lot of terrain or climb peaks, I much prefer to travel with a small team. There is less to go wrong and fewer opinions to sway.
Four is often cited at NOLS as a minimum number of people for an expedition. In the event of an injury, one person can stay with the injured party while two people go for help. While traveling in a group of four may be safer than, say, traveling with just one buddy, you should not always feel obligated to travel with three other people. However, you must consider that a smaller group’s advantages mean diminished resources (people) in the event of an emergency.
Large groups are raucous good fun but require more formal organization, logistics, and leadership. I love to go on a river trip with four boats and 20 people given one condition: Someone else organizes everything. If the small group can float like a butterfly and sting like a bee, the large group moves like a well-meaning jellyfish.
In a large group you have more personalities, which adds to the fun, but can also slow down the whole decision-making process. Ever try to pick a restaurant with 15 relatives hovering about? With a large group, you have more chances of someone getting injured, simply because of the statistics, but also more resources and options available.
Large groups obviously require more room to camp, and can have a tougher impact on the environment just by sheer volume. If you travel in a large group, you have to work harder to minimize your impact on the environment.
Traveling solo in the backcountry is at once liberating, free, and lonely. The solitude may be just what your soul needs. Alone you will likely see more wildlife, have more flexibility in everything from choosing a campsite to cooking a meal, and perhaps find focus and clarity. But those new to solo travel need to be prepared for the sense of isolation in a vast space. If you travel alone you are in a sense climbing without a rope, and as such, you have less room for error. When traveling solo, you need to be more conservative in nearly everything you do. The river you might cross with a group of friends on hand may be too risky as a lone traveler. An off-trail shortcut you’d take with even one more person might not be wise when alone.
If you do decide to travel solo, learn the art in increments. Start with a single night or two and work your way up to traversing the Pacific Crest Trail. Since you will have no one in the immediate area to watch over you unless there are nearby travelers, you should leave an itinerary with a trusted friend or relative. The itinerary should include the following:
• A detailed route plan.
• Where your car will be parked if you drive to the roadhead. Usually the first thing a search and rescue team will check is whether your car is still parked at the roadhead.
• A generous but well-defined overdue date. If you plan to go for three days, you might tell your contact person you plan to be back on day three but not to send the cavalry until day four or five. The “freak time” should be clearly defined so there is no ambiguity and your friend doesn’t call for help either too early or too late.
• Specific medical problems you have (e.g., diabetes, heart problems, epilepsy, etc.).
Choosing compatible teammates is one of the important decisions in expedition planning. A NOLS course in the northern Talkeetna Mountains of Alaska. Fredrik Norrsell
• A list of the gear, food, and fuel you are carrying. It is useful for rescue teams to know whether you have a light summer sleeping bag or a heavy bag, a high-quality tent or a sheet of plastic, and food enough for two days or four.
• Whom to call if you do not arrive on time. Typically this would be the local sheriff or search and rescue team.
• A description of what you plan to do in an emergency situation (e.g., use a cell phone, a radio, a signal mirror, or a signal fire).
Chapter 7 discusses leadership in depth, but the matter of leadership and how decisions will be made once out on the trail should be part of your expedition planning. Many people who go out on a trip don’t assign formal leadership roles. They make decisions through informal discussions and if there is a leader, he or she arrives at the position through some sort of organic process, not by a conscious and spoken group choice. That style may work well for teams that have traveled together before and have proven to work well together as a team. But when you travel in a large group or when your trip becomes more involved—remote, big mountain expeditions, for instance—you are better off designating a leader. It is arguably better to designate a leader even for trips of small consequence. The leader needn’t make all the group’s decisions in an autocratic way, but in a crunch, such as a medical emergency, having an official leader could mean faster action. The leader’s role may include deciding whether or not to complete a route, planning an evacuation, moderating disputes, and boosting morale. The leader does not necessarily have to be the most experienced in the group, but he or she should be respected by all the members and have excellent judgment.
It may be a little awkward, but if you discuss how day-to-day decisions are going to be made before you leave for the wilds, you will likely have a more successful trip. On all but the most fortunate expeditions, there comes a time when two or more group members don’t agree on a matter large or small. If you agree in advance that the person leading that day will resolve the conflict or, on the other hand, that the decision will be made through consensus, you will save yourself the headache of coming up with an ad hoc plan out on the trail.
A trip with every minute and every decision mapped out in advance would be too rigid and would feel like a forced march; some flexibility is necessary to adjust to the mood, health, and desires of the group members. But a leader and a plan should be chosen in advance to deal with the less forgiving circumstances.
It is a joy to travel with committed people. Such types troubleshoot sputtering stoves, make coffee on the miserable mornings, and catch meaty trout. Alas, those not committed spend lots of time in the tent (and take up lots of space as well), show pouty faces when the trail gets steep, and have little nice to say about someone’s cooking. If you are going to commit good money and dear time to an expedition, better to know your companions feel the same sense of commitment. My friend Phil Powers, a NOLS instructor and highly accomplished mountaineer, suggests assigning planning tasks prior to leaving as a way to test commitment in the group. If, for example, you are traveling to the mountains for four days, have one member organize maps, another rations, and another transportation. If the person responsible for maps doesn’t lift a finger as the departure date nears, ask him directly if he wants to go on the trip. Here are a few ways you may want to divide the tasks:
• Ration planning: This person organizes and buys all the food. He or she should poll the other members on likes, dislikes, and allergies. This is a big job so it might take two people.
• Maps, routes, and regulations: This person buys all the maps, researches regulations, and plans the route. As she plans, she can stay in contact with the rest of the group to pose options and solicit ideas.
• Transportation: If your trip is simple—a two-day backpack in the backyard wilderness—this job may not be necessary. But if you do something exotic, say a trek in Peru, the transportation planning may take phone calls, foreign language skills, trips to the travel agent, and other intricate and time-consuming tasks.
• Equipment planning and revision: This job entails the organization and revision of major group gear including the tent, stove, kitchen utensils, and first aid kit.
Camping needn’t be expensive but there are always costs—gas, food, maps, gear, etc. Find an equitable way to share the costs. If your buddy drives his rig, you pay for the gas. If your buddy brings his new tent, stove, and fishing gear, you spring for the maps. Keep it simple and agree upon it in advance.
Hiking long miles with a heavy pack is strenuous. Climbing the hills takes strong legs, and balancing the pack weight over tricky stretches on the trail takes a strong back. The men and women who spend their waking hours teaching outdoor education or tackling high mountains fairly ripple with muscle and sinew, the author notwithstanding. All things being equal, the stronger you come into your trip, the more fun you’ll have, the more you’ll achieve, and the safer you’ll be.
A detailed plan is beyond the scope of this book, but the basics are worth mentioning. You don’t have to train with the intensity of a marathoner before your trip but try to train for a few weeks prior to leaving. Your regimen should include three components: flexibility training, resistance training, and cardiovascular training.
Developing flexibility before you go will reduce the chances of injury and will add to your agility. Find three or four stretches for the legs, and three or four for the trunk and arms. You can stretch just about anywhere—at the gym, in front of the TV, or at your desk. Out on the trail you may want to do a few stretches every morning as well, especially if you wake up sore and tight.
Resistance training builds muscle mass, which will give you more power and help prevent injuries. You want resistance training that strengthens the entire body. You can do resistance training with weight machines or using your own body weight. Double knee bends (not beyond 90 degrees, please), one-legged knee bends, push-ups, sit-ups, chin-ups, trunk lifts, and weight lifting are all good forms of resistance training.
There are many ways to build your cardiovascular level depending on where you live, your preferences, and how much free time you have. The most obvious and perhaps most logical activity to train for hiking trips is, well, hiking. If you live in a big city, this training may be impossible, but if you have access to the mountains on weekends or during the week, simply get out there and hike the most varied terrain you can find. Walking uphill will build leg strength on top of the cardiovascular conditioning. Walking downhill develops balance and leg strength as well. If you’re going to be carrying a heavy pack on your actual trip, you may as well carry a pack in your training. If you are out of shape, start very light—say with ten pounds—and then add five pounds per week until you reach the approximate weight you plan to carry on your trip. Bicycling, running, and swimming are other good forms of exercise for developing your heart and lungs.
In 1939, seven Americans set out to climb K2, considered by many to be the most difficult mountain in the world.I K2 had never been climbed before. The expedition was led and organized by Fritz Wiessner, a formidable mountaineer already famous for his first ascents on the southeast face of the Fleish-bank of the Austrian Tyrol and the north face of the Furchetta in the Dolomites. Wiessner’s team consisted of some of the most qualified American mountaineers.
Some two months after the Americans began the climb, three members of the expedition were dead, several others were injured or sick, no one had reached the summit, and certain members of the party parted mortal enemies. It would be unfair to cast harsh judgment on the brave attempt and the competent men who nearly summited K2 in 1939, but we do have the hindsight to see that their disparate expedition objectives and philosophies likely contributed to the harrowing results.
One of the main problems cited by observers among the American alpine community was the difference in climbing philosophy and leadership style between Wiessner and the rest of the team. Wiessner, a German immigrant, “. . . had been reared in the school of absolute obedience to authority that characterizes much of the teutonic ethos: the leader leads and the troops obey, whatever the situation.”II His American team, by contrast, was used to more democratic methods of making decisions. As a result, Wiessner did not perfectly understand his team, nor they him. What seemed open communication to the Americans seemed like insubordination to Wiessner. What seemed unreasonably dangerous to the Americans, Wiessner considered a necessary risk in extreme mountaineering.
Ultimately, Wiessner and a teammate named Dudley Wolfe became separated from the rest of the Americans by several camps and several thousand vertical feet. Only Sherpas, who did not speak English, bridged the gap between Wiessner and Wolfe above, and the rest of the team below. Late in the expedition when the team below lost contact with Wiessner for a full eight days, they assumed he had perished. They decided to dismantle the intermediate camps. This would prove fatal for Wolfe and nearly fatal for Wiessner, who later accused the others of attempted murder.
One might think that climbing a big mountain like K2 would simply and automatically define the expedition goals. But as the story shows, expedition goals and philosophy can be more subtle and complex. An expedition goal is not just getting from point A to point B or climbing peak X. Expedition goals include where you go but also how you go and even why you go. It’s important that everyone on your trip be included in defining the expedition goals. When a person contributes his thoughts and ideas on what direction a trip should take, he will feel more ownership for the outcome and will likely take more responsibility in ensuring that the goals are achieved.
A few years ago, when I climbed Argentina’s Aconcagua with a couple of friends, we determined that our expedition goals centered around having some fun, traveling safely, eating well, and maintaining our friendships. Our inventory of gear included ropes and ice axes but also a three-pound spice kit and three books each: The summit was an important goal to us but not at all costs. Our route up Aconcagua was too modest even to be mentioned on the same page as Wiessner’s feats, but no matter how modest the route, the three of us left Argentina with a good, worthwhile experience behind us, due in part to our shared objectives and philosophies. Having traveled and worked together before we started the trip, we already knew that our philosophies jibed.
It’s quite possible that your gang will start a trip with what you think are common objectives and philosophies, only to discover that you don’t see eye to eye. A friend of mine tells the story of a trip she made to the then Soviet Union to do a joint American-Soviet expedition in Kazakhstan. The purpose of the trip was to share scientific expertise, share cultures, and enjoy the mountains. Friction between the two groups developed immediately when members of the American group set out to climb a small peak near the first camp. The Soviets did not like the idea of any travel, no matter how small the trip, without the express permission of the Soviet trip leader. The independent-minded Americans bristled at the infringement on their freedom. Ultimately, the Americans realized that they had to live with the Soviet rules, and the group settled into the business of making a successful expedition.
Common objectives and philosophies do not guarantee a smooth, happy trip. But they certainly increase your odds. It’s possible that your group will start with the same objectives but during the trip, time and circumstances will change individuals’ aims. When that becomes apparent, it’s time to sit down, hash it out, and possibly redefine the what, how, and why of your trip.
Good route planning is an art born of lots of experience, a bit of diligence on the planner’s part, and a little luck. It’s one thing to march from point A to point B on a superhighway trail described in a dozen guidebooks. It’s quite another to creatively link various river valleys and mountain passes into an interesting loop. If you take the time to study the area you’re visiting before your trip, you may avoid unpleasant surprises—trail closures, poor fishing, snowdrifts that stop your horse resupply or your car en route to the trailhead, etc.—and might even learn something that improves your trip.
Once you have chosen the area, find a huge table or a clear floor space, arrange your maps, and do some finger walking across your route. Every seasoned camper has calibrated some bodily part to trace distance, whether it’s a finger or a few knuckles. Trace out your first day’s mileage—whether it’s five miles or 15 miles—and see where that puts you for a camp. Is there a water source? Does the terrain look flat enough to camp comfortably? Where would you camp if you didn’t make it to that camp? Taking a mental hike over the maps in front of you, while trying to consider mileage, difficulty of terrain, possible vistas, rest days, fishing holes, shortcuts, evacuation routes, etc., is the best way to plan your route. Bring a fellow traveler in at this stage: Two heads are better than one.
Nearly all public lands have regulations that will affect your trip. In a dry year, land managers may ban open fires. In heavily used areas, managers may prohibit camping in places with delicate or recovering vegetation. If you’re camping in bear country, you may be required to “bear camp” (see Chapter 5) as prescribed by the agency. Many places have restrictions on group size.
The best place to call to get information on these regulations is the local office of the very agency in charge of the land where you plan to travel. If you plan to hike in Colorado National Monument, for instance, call the National Park Service in Fruita, Colorado. If you plan to hike in the Maroon Bells-Snowmass Wilderness Area, call the White River National Forest supervisor.
After deciding where to go, you need to collect all the maps that your route crosses as well as the maps adjacent to your route. We will talk about maps in depth in Chapter 8. Generally the best maps for hiking in the United States are 7.5 minute series United States Geological Survey (USGS) topographical maps. These maps are of such a scale to give you lots of detail on the terrain. The disadvantage of maps of this scale is that you have to spread out several together to get a bigger picture of the whole route. If you’re doing a trip of any consequence—let’s say more than 50 miles of travel—bring a map that shows the bigger picture as well as 7.5 minute series maps. The USGS and private companies like Trails Illustrated (see sidebar on the following page) make maps drawn to a scale of 1:250,000.
How many sets of maps you bring depends on the number of people in your group, but having two sets makes sense with three or more people. On a rest day, you may decide to climb a peak while your friends descend a valley to go fishing. The extra maps give you the flexibility to do just that. What’s more, in the event of an emergency, one set of maps can go with the party going for help while the other set remains with the party that stays with the injured.
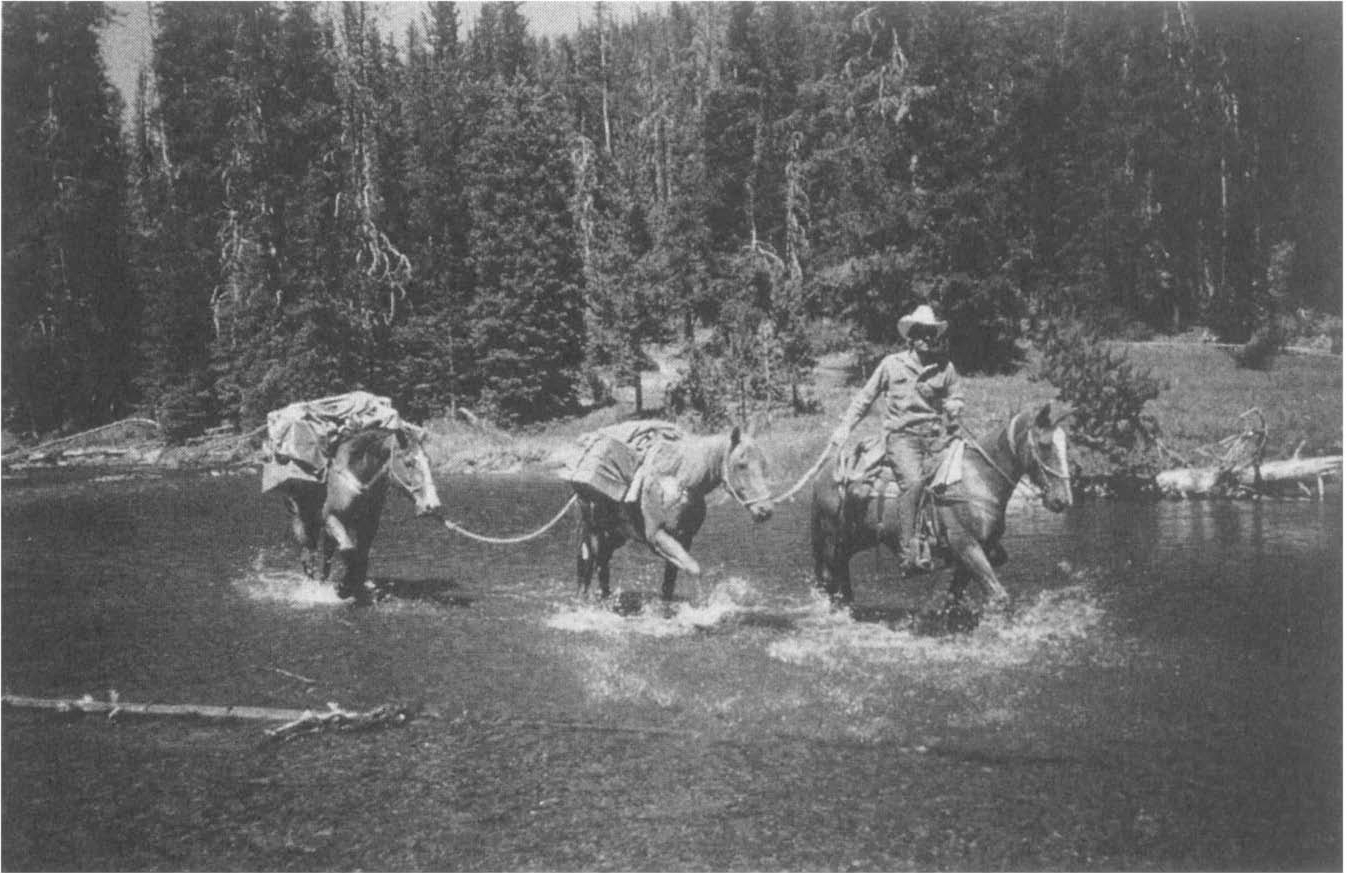
On trips longer than eight or nine days, you’ll need a way to resupply your food. Horsepackers are a good option in certain western states because they can bring your rations to you deep in the backcountry. Mark Harvey
If you plan to travel for more than a week, you will probably need to resupply food, fuel, and perhaps first aid supplies. Seven to ten days of food and fuel seems to be the limit for most backs to carry. You can use your resupplies to bring in other things too. For example, you may do a route that involves just hiking on the first half and then rock climbing on the second half. Rather than carry all your climbing gear the entire trip, you can arrange to have it carried in on a resupply.
What means you choose to resupply your trip depends, of course, on where you go. If your trip takes you through areas with accessible roads, you might simply have a friend drive supplies to an agreed-upon trailhead. In Alaska you might need a boat or plane. In Chile, NOLS has even used ox carts.
Quick and Easy Ways to Resupply Your Trip
• Mail your food via general delivery to a post office that intersects or is adjacent to your route. Mark a to-be-picked-up-by date in case you don’t make it that far in your trip.
• Have a friend meet you at an agreed-upon trailhead.
• Make a loop that returns you to your own car or a second car down the trail.
Resupplying Using Horses
If you’re camping in the West, your best bet for a resupply may be with a horse. Horsepackers can handle the oddest loads—from lawn chairs to hay bales—and the sheer size, strength, and agility of a horse gives you the flexibility to haul your food and gear deep into the wilderness. Consult with the packers and they can tell you how they want you to package your supplies. If you have odd-shaped, fragile, or pointy items such as ice axes, photography gear, or weather balloons, tell your packer in advance.
Some horsepackers will buy your fresh produce for you so it doesn’t have to sit around wilting for a week. If that’s not possible, check to see if they have refrigeration at their barn.
While horses can cross nearly any terrain that a person on foot can handle, keep the following in mind when choosing your resupply site:
• Horses have difficulty crossing steep snow slopes or partially melted snowfields. If you are traveling in the late spring or early summer and don’t know the snow conditions, either plan your resupply for lower elevations or plan a contingency site in case there is too much snow at the original site.
• Your best option may be to let the packer select the resupply site. If he has a regular spot that works with your route, you may save money on the trip. The other advantage to letting the packer choose the site is that he will choose a site that can accommodate his string of horses.
Resupplying Using Aircraft
In the wilds of Alaska’s Brooks Range, British Columbia, or Chile’s Patagonia, you may choose a route that has no road crossings or nearby horse ranches. When that’s the case, your only option for a resupply may be by plane or helicopter. Remember that in most wilderness areas, using motorized aircraft is illegal except with special permission in emergency evacuations.
A Piper Super Cub airplane costs about $150 per hour, but it can only carry about 200 to 300 pounds, depending on the condition of the airstrip, the weather, and the travel time from the hangar to the ration site.
Helicopters can fly nearly anywhere for a price—yes, for a very hefty price indeed. But if there’s no airstrip or the visibility is poor, that may be your only option. Since helicopters can usually handle a bigger payload than a small plane, they are sometimes more cost effective than planes. Helicopters can handle worse weather than their fixed-wing counterparts and land in tighter spots. In short, they are more versatile than fixed-wing airplanes. Depending on the make of the helicopter and the company, you will pay between $400 and $600 per hour.
If you hire a helicopter to do your resupply, keep in mind that the helicopter pilot may choose his landing site only once he sees the area for himself. The site you choose for him may not be the best site so be prepared to move in a hurry.
Regardless of whether you use a helicopter or a fixed-wing plane, the weather will ultimately determine whether or not your pilot can deliver your groceries. Bush pilots have a deserved reputation for their courage in flying in bad weather and in tight spaces. But have a contingency plan in case the weather makes it impossible for your pilot to land. Several friends of mine have waited three days or longer for a break in the Alaska weather so the plane could deliver the groceries.
No matter the method you choose to resupply your trip, you want a site you can comfortably reach on the scheduled day. For instance, if you plan to re-ration on the seventh day of your trip and have scheduled 100 miles of hiking to that site, you might miss your re-ration or run out of food before you get there.
If you do use a third party to resupply your trip and have arranged to meet at an agreed-upon location, be sure to give your resupplier instructions as to where he should leave your supplies if you do not arrive on time.
If you have a computer, a modem, and Internet access, you can find lots of valuable information to help you plan your route, purchase equipment, and even seek advice on the area where you’re going. Several government agencies, equipment manufacturers, and outdoor clubs have helpful Web sites. For instance, the Army Corps of Engineers, the Bureau of Land Management, the Bureau of Reclamation, the Fish and Wildlife Service, the Forest Service, and the National Park Service have joined together to create a site called “Recreation.gov” (http://www.recreation.gov), which offers all sorts of information about specific recreation sites, phone numbers, weather, and overview maps. I live in Colorado so, for the hell of it, I went to the Recreation.gov site and did a search on the Alamosa area. The site offered a description and pictures of the Alamosa National Wildlife Refuge, up-to-the-hour weather information, and several “hyperlinks,” which, for those of you new to the Internet, are connections to related sites. One of the hyperlinks for the Alamosa National Wildlife Refuge is the “Avian Page,” which lists the bird migration there and tells me that they recently sighted a golden-winged warbler near Alamosa for the first time ever, not to mention three double-crested cormorants!
Another useful site is the one maintained by the National Weather Service (http://iwin.nws.noaa.gov), which offers local, national, and international forecasts. They of course have hyperlinks, one of which is a weather glossary. Did you know that the word “scud” means “small, ragged, low cloud fragments that are unattached to a larger cloud base and are often seen with and behind cold fronts and thunderstorm gust fronts”? You’ll find that term and others on the National Weather Service weather glossary.
If you wanted to hike the Pacific Crest Trail and needed a partner to do it, you could check out http://saffron.hack.net/lists/, a Web page dedicated to national scenic trails. On that page, I found people looking for partners to do various sections of the trail, tips on equipment, route suggestions—if the Baden-Powell section is too snowy, take the Manzanita Trail—and querulous essays disparaging certain government agencies managing sections of the Pacific Crest Trail.
If you’re interested in taking a NOLS course, visit the NOLS Web site at http://www.nols.edu. The site lists dates and descriptions of the various NOLS courses, a list of NOLS publications, and information on how to contact the school.
There are millions of Web pages on the Internet, some of them extremely useful, some perfectly useless, and some merely amusing. But if you learn to focus your searches with Boolean commands (talk to your computer geek friend about that), you can use your computer and modem as a powerful tool to plan your expedition.
When NASA planned the Apollo missions to the moon in the sixties, they had to make contingency plans based on the unknown. No one had ever landed a spaceship on another planet and there was no way of knowing for sure what might go wrong. All the scientists could do was imagine what might fail and plan backup systems based on their educated guesses. Drawing a parallel between your trip to the backcountry and a trip to the moon may be labored, but there are some useful analogies. When you go to the backcountry, you leave a very organized system that you know backward and forward for a system with less infrastructure and more of the unfamiliar. You can make educated guesses about what might go wrong in the wilds, but there are many unknowns, which you simply can’t anticipate with any consistency, especially if you’re going to a new area. But that’s no reason to throw your hands up in despair and say, “We’ll just deal with the problems when they arise.” You can make sound contingency plans for your expedition by considering both the typical ways in which people get in trouble in the back-country and the particular vulnerabilities of your group.
Contingency planning is an exercise in imagining the unimaginable. You can start by asking yourself what you would do if one of your party members became sick or injured. Types of injuries you might expect in the outdoors include sprains, broken bones, dislocations, lacerations, frostbite, hypothermia, and hyperthermia. Illnesses include gastrointestinal sickness caused by bacteria or viruses as well as diseases caused by bites or stings from local fauna. It is unlikely that someone on your trip through the Green Mountains of Vermont will break his femur, but it’s not impossible. It is unlikely that someone on your trip to the mountains of Baja California will get bit by a rattlesnake, but also not impossible. To be prepared for contingencies, then, you should know at least rudimentary, and, preferably, advanced first aid.
A good contingency plan also calls for knowing when and how to evacuate a person in the event of a serious injury or illness and what outside assistance is available. These skills require training not just in first aid, but in wilderness first aid. Understanding the communication systems in the area where you take your trip is also an important element in a contingency plan. By communication systems, I mean everything from trails, roads, and locations of pay phones that can be used by an evacuation team, to electronic devices such as cell phones and radios. When you spread out your maps to plan your route, take note of the surrounding areas, geographical features, roads, and townships. You may plan a simple route that takes you up to a lake and back over a period of five days. Were someone to be seriously injured at the lake, the shortest route for help might be in the opposite direction from where you came. Perhaps you see the symbol for a building on your map fewer than five miles from the lake. In your planning it’s worth finding out if that building is the remains of a ghost town or an active ranch. Making a few phone calls to land management agencies, the local sheriff, search and rescue groups, outfitters, and local clubs and talking to local sports shops can really help you to understand the available communication systems and thereby make a better contingency plan. It’s worth bringing along the maps that show you alternative routes out of the backcountry.
Radios, cell phones, and other electronic communication devices can be very useful in the case of emergencies. NOLS courses around the world utilize a wide variety of electronic communication devices, including many different types of radios and cell phones. If you wish to use these tools, it is important to understand their limitations, which may include weight, expense, range, battery life, licensing regulations, and durability. The danger with carrying a phone or a radio is that it can give people a false sense of security and cause them to forget the remote setting and the complicated logistics of an evacuation. Climbers and backpackers armed with cell phones have called mountain shops for directions from the backcountry. Parties have called 911 for help with problems that they obviously should have been prepared for. In these cases, the phones and radios acted as a crutch that kept the parties from relying on themselves and planning their expeditions with more care. If you do carry a radio, it’s important that you not let it prevent you from being self-sufficient and safe.
Don’t assume that your cell phone or radio will work everywhere in the world. Remember that to make a connection with a cell phone you need to be within range of a “cell site” and there are lots of “holes” over the wilderness areas. If you bring a ground-to-air radio to a place where there are no overhead flights—parts of Alaska, for instance—it will be no more useful than trying to communicate with your hands cupped around your mouth and bellowing for help.
The choice of whether to bring a radio or not is a personal one. If you are traveling with a large group in an institutional setting, the argument for bringing a radio is strong—even if only for liability concerns. In small private groups, a radio may help cut a day off an evacuation. If you decide to carry a radio, know how to use it, when to use it, and its limitations.
The only thing certain in ration planning is that if you don’t bring enough food, you’ll likely find yourself eating something disgusting when the rations run out. NOLS instructor Andy Cline tells of the time he ran out of food deep in the southern Andes on a month-long hiking trip. He and his friends had the good fortune to find a remote farm and a farmer willing to sell them a lamb. They lived off the best parts of the lamb for a few days—the loins and the ribs—but soon they were into the less appealing parts—the brains, intestines, liver, and gonads. Competent mountaineers all, but sorely lacking in the study of nutrition, they devoured the liver with the result that their skins turned a ghastly orange from the near-toxic concentrations of vitamin A. Finally, they made brain soup. If the story has no moral instruction, it is nevertheless scientific proof that eating the brains of another animal does very little to improve the human intellect.
The movies always depict the lost traveler eating rich meals off the land— pheasant eggs, fresh salmon, ripe blackberries—when they run out of food, but unless you’ve really learned how to scavenge, you’ll go hungry.
When you plan your rations for the outdoors, you can either take staples such as pasta, flour, dried beans, rice, sugar, etc., or you can take specially prepared camping food like freeze-dried meals or boil packets. In general, we recommend staple food for a few reasons:
• It’s much cheaper. A freeze-dried dinner listed as a meal for two costs between five and seven dollars. In my experience these meals really feed only one person. And for that money, you could easily pay for an entire day’s worth of staple food.
• It’s easier to find. Whether you’re traveling in the United States or in Bolivia, it’s easier to find something like pasta or potatoes than it is to find high-quality freeze-dried food.
• It allows you more flexibility. With staple food you can mix and match ingredients to your heart’s desire and, with a little effort, cook delicious meals. With prepackaged food, you are limited to the company’s choice of meals—a sort of carte fixe.
Let’s not dismiss freeze-dried meals out of hand. The truth is freeze-dried meals have their place in your quiver of tricks. They weigh less than staple food. If you need to travel great distances and can’t arrange a resupply or cache, you can carry freeze-dried meals. What’s more, they are convenient. To prepare most freeze-dried meals, you simply add hot water. On demanding routes, easy-to-prepare meals make it that much easier to concentrate on the tasks at hand. If you’re climbing a major mountain, for instance, you may not want to think about cooking. You may have enough to concentrate on with the weather, the altitude, and the long days. Perhaps you’re not the type who likes to cook. Perhaps you’re eighty years old and limited to a small pack weight. What’s more, some companies have developed tasty freeze-dried meals.
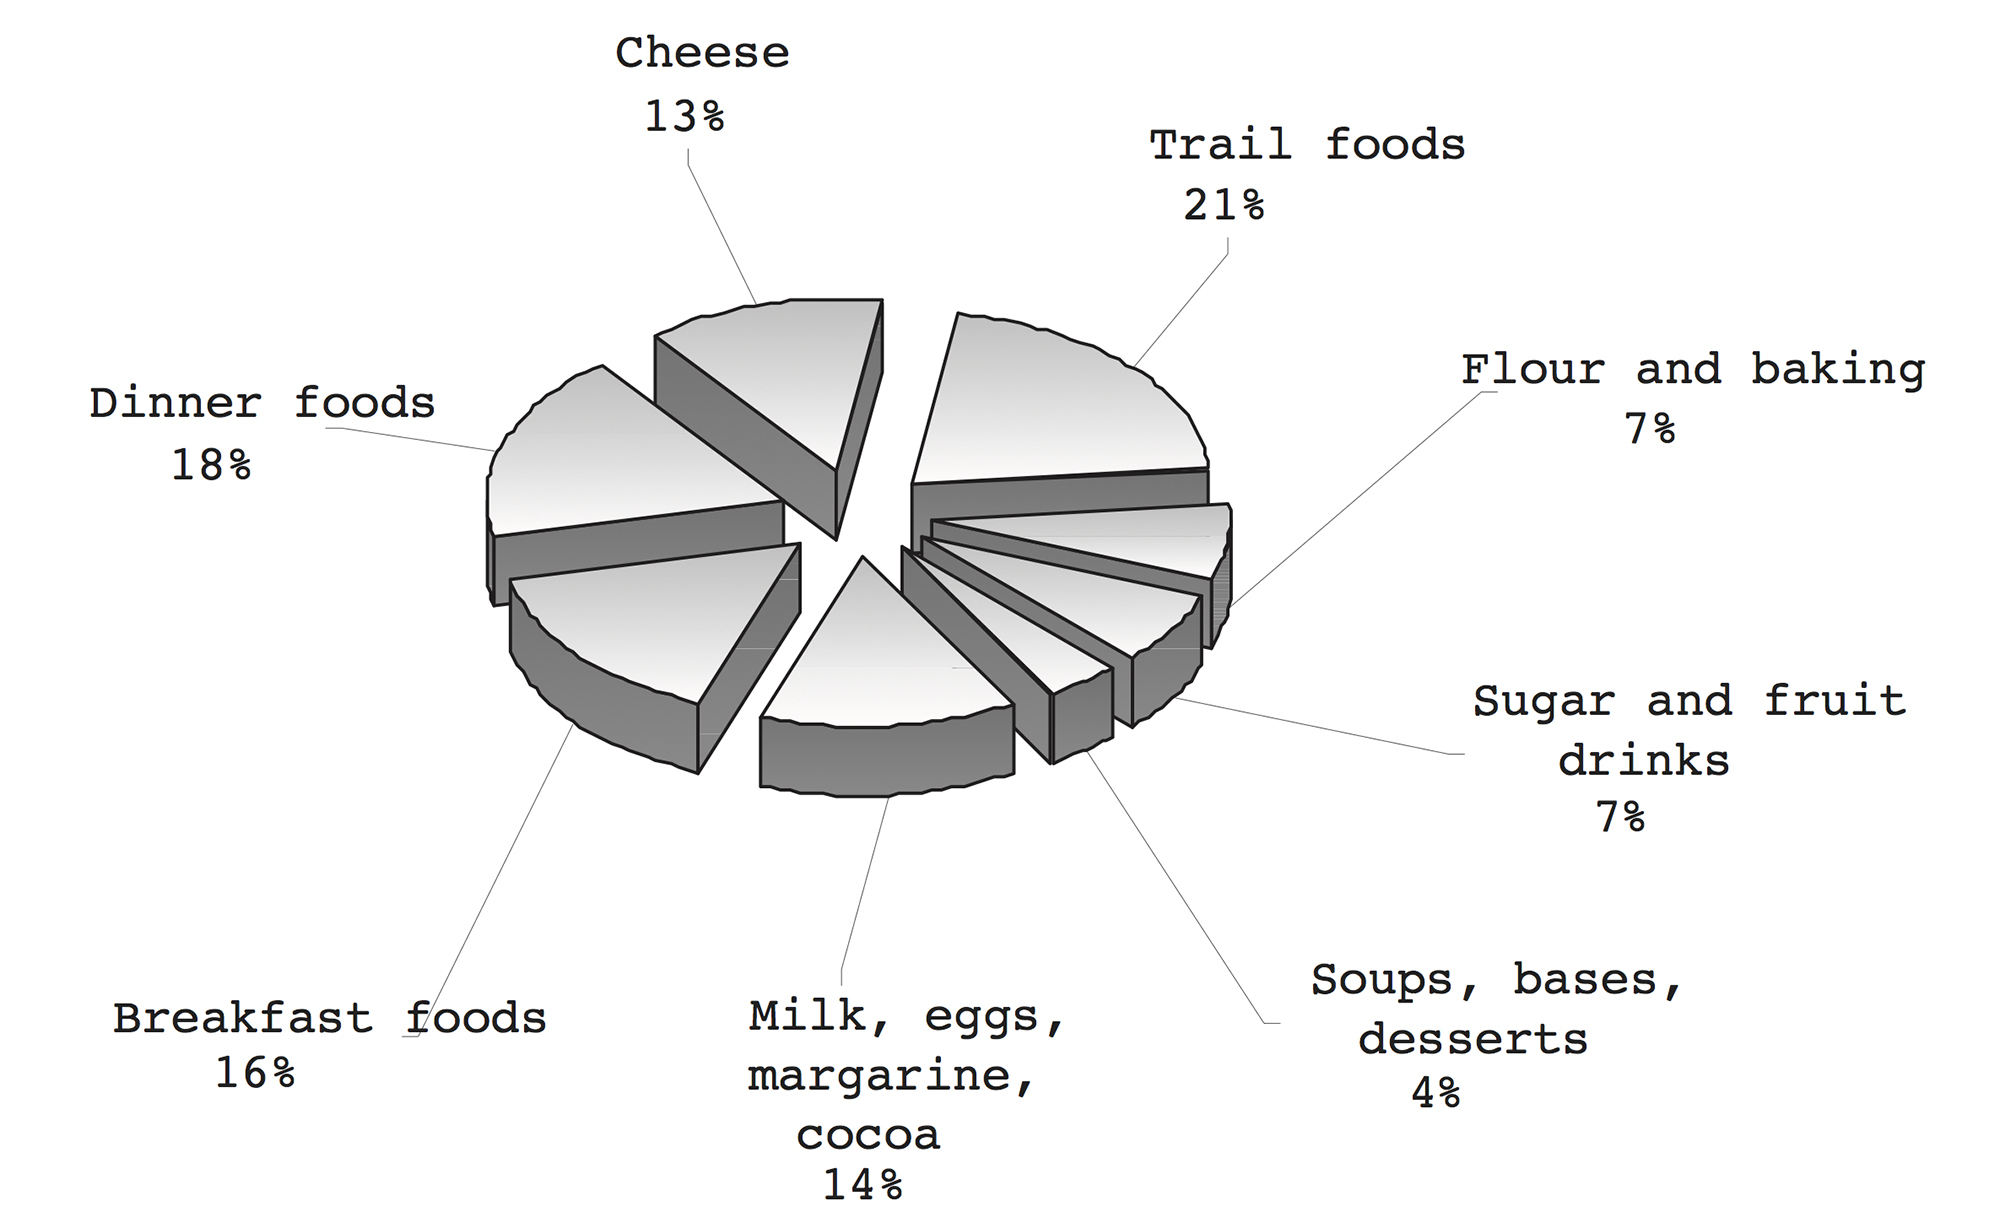
Trail Foods
Nuts and Seeds. Nuts such as peanuts, almonds, cashews, Brazil nuts, and walnuts, and seeds such as sunflower seeds and sesame seeds are high in energy, fat, and protein, make good trail food, and add nice texture and flavor to things like pancakes, dinner dishes, and breads. Buy the shelled nuts so you don’t have to pack out more garbage.
Dried Fruit. Dried peaches, apples, apricots, plums, pineapples, and raisins are high in carbohydrates and fiber. They make a good snack but can also be soaked in warm water and rehydrated to use in dessert dishes such as cobblers or dinner dishes such as curries. The sulphured fruits last longer than the fruits processed naturally.
Energy Bars and Fruit Bars. Several companies such as Power Bar and Cliff Bar make high-energy snacks loaded with complex carbohydrates, vitamins, and minerals. They’re expensive but simple snacks that give a great deal of energy. Drink lots of water with these so they digest properly. Halvah bars and pemmican bars are other good options for high-energy blasts.
Breadstuffs. On short trips or if eaten early on long trips, it’s nice to bring hearty breads such as bagels or pita bread. They go well with cheese or peanut butter, can be fried with cheese for a breakfast, or eaten as a side with dinner. Bagels and pita bread will withstand the rigors of backpacking better than regular bread. Rye crisp, melba toasts, bagel chips, pretzels, zwiebacks, and the like are also durable and good with cheese.
Trail Mixes. You can buy or make your own trail mixes from a wide variety of snacks. Try nuts, raisins, M&Ms, dried fruit, crackers, banana chips, and whatever else suits your fancy.
Jerky and Salami. I like to make my own elk and beef jerky for the trail. It’s a nice source of protein and, if prepared properly, will last on long trips. See Chapter 11 for how to make jerky. Salami lasts several days on the trail, though you should try to keep it cool.
Fruit Leathers. You can buy fruit leather commercially or make your own using a dehydrator. High in energy, it’s a good alternative to sweets.
Dinner Foods
Pasta. Pasta is rich in complex carbohydrates, easy to prepare, can be made into any one of several delicious dishes, is inexpensive, travels well, and is almost universally liked. In short, it’s one of the best dinner staples you can bring—the uber-food. If you’re going on a long trip, bring a variety of styles—spaghetti, macaroni, and penne—and a few flavors—white, wheat, and spinach. Pasta makes a good breakfast too.
Rice. Like pasta, rice can be used as the base of several recipes. It’s a good source of carbohydrates and, prepared with beans, makes a complete protein. Except for the instant variety, rice takes longer to cook than pasta.
Other Grains. Couscous, a Middle Eastern staple food, cooks quickly and can be prepared with some of the same recipes you use to prepare pasta. Cooked with brown sugar and cinnamon, it makes a nice breakfast. Bulgur is a wheat product with a lot of fiber and texture. Use it in place of rice for some variety. Falafel, another Middle Eastern food, is made from ground chickpeas, yellow split peas, and lots of spices. It can be made into patties and fried for a savory dinner.
Legumes. Beans are the basis for lots of Mexican recipes, go well with rice, and are easy to cook. Bring the quick-cooking beans unless you have a pressure cooker or are willing to take the trouble to soak them. Lentils make nice soups but need soaking and lots of time to cook.
Potatoes. There are a few forms of dried potatoes: flakes, pearls, and dehydrated hash browns. With the flakes and pearls you can make an instant meal simply by adding hot water and something like a powdered soup base to flavor it. At the end of a hard day when you don’t have energy to cook, potato pearls and flakes may be just what you need for dinner. The dehydrated hash browns take a little longer to cook but can be enjoyed for breakfast or dinner.
Cheese. Cheese, if not left out in the sun too often, lasts a surprisingly long time out on a camping trip. Low-fat and hard cheeses last even longer. It is good for pizza, Mexican meals, breads, and more. It also makes a nice snack on the trail. Cheese is high in protein and fat.
Meats. If your packs aren’t too heavy, bring along a can of chicken or tuna as a nice addition to pasta, rice, bulgur, beans, or couscous. Once opened, however, the meat should be consumed immediately so you don’t have problems with food-borne illnesses.
Soups and Bases. Miso, ramen, powdered soups, and bouillon don’t weigh much, and are inexpensive and very nice on a cold evening. They also make easy bases for sauces or good flavorings for a main dish. If someone on the trip has an upset stomach from the altitude or bacteria, a simple soup may be the best solution.
Breakfast Foods
Cold cereals like granola, Grape-Nuts, and Cracklin’ Oat Bran can be eaten for a quick breakfast or as a snack out on the trail.
Hot Cereals. Oatmeal, cream of wheat, and seven-grain cereals define the word hearty. They make a good breakfast for a long day and are simple to prepare. Buy the instant versions so you don’t have to spend too much time cooking in the morning. You can add rehydrated dried fruit, nuts, cinnamon, and brown sugar to make these cereals a little more interesting.
Pancakes. If you have a little extra time—perhaps on a rest day—and plenty of stove fuel, pancakes add a certain civility to any outdoor breakfast. You can buy the ready-to-cook mixes, or make your own from flour, baking powder, milk, and salt. Make your syrup with a little melted butter and some brown sugar.
Baking Materials
Flour, both white and whole wheat, can be used to make bread, pancakes, pizza crusts, and cinnamon rolls. White flour is good for making gravy or white sauces, as well as for dredging your trout.
Cornmeal is, of course, the base for corn bread, but also for tortillas, chapatis, and the hot cereal, polenta. Fresh trout dredged in cornmeal, salt, and pepper, then fried in margarine is delicious.
Baking mix, such as Bisquick or your own homemade version, simplifies making pancakes, pizza crusts, and biscuits.
Beverages
Fruit crystals (good for flavoring water)
Coffee and tea
Instant cocoa
Apple cider mix
Powdered milk for cold cereals, baking, casseroles, or for a warm mug of milk before bed
Unless you have a good way to keep your food cool (below 40° F), bringing along fresh foods such as meat, poultry, fish, and dairy products is a bad idea because of the danger of spoilage. These types of fresh foods, if not stored properly, make perfect breeding grounds for wretched bacteria such as Campylobacter and salmonella, which can make you seriously ill. But if weight is not an issue, it’s nice to bring an onion, a few potatoes, or some other hardy vegetable that doesn’t spoil easily.
Herbs and Spices
Bringing along a few herbs and spices and knowing how to use them is the basis for good backcountry cooking. Finding the right combination and the right proportions of herbs and spices comes with brave experimentation and close study of the master chefs in your expedition. Begin by mastering a few simple combinations such as oregano, garlic, and basil. Here is a list of versatile herbs and spices for your trip. Pick and choose the ones that suit your fancy.
• Basil is a green, leafy herb (green flakes in its dried form) that smells somewhat like licorice and mint. It goes well with tomato sauces, Italian dishes, and any kind of fresh trout.
• Black pepper is the most versatile of the spices (in the Middle Ages, a pound of black pepper would buy a serf’s freedom) and can be put in any dish to pep it up. Some people even put a pinch of pepper in a fruit cobbler to bring out the cinnamon. For the brave ones, put a tiny bit in your hot chocolate. You’ll be surprised.
• Cayenne powder, which looks like paprika, is made from the thin red peppers and is very hot—between 30,000 and 50,000 Scoville heat units (the Scoville system is a way for pepper growers to measure how hot chili peppers are; the banana pepper is rated at 0 Scoville units and the habañero is rated at 300,000 units). It only takes a pinch.
• Cinnamon (made from the bark of the evergreen laurel tree) is brilliant in sweet rolls, pancakes, cobblers, Mexican dishes, curries, hot cider, and tea.
• Cumin has a pungent, smoky flavor and goes well with curry, cinnamon, and cayenne. It is the basis for many Mexican dishes and a good addition to rice and soups. Cumin is also nice in corn bread. A little goes a long way.
• Curry is an Indian spice (actually made from a combination of as many as 20 different spices) with a bright yellow color. Curry dishes can be made with rice, bulgur, lentils, and soups. Hot peppers and dried fruit such as raisins or apricots go well with curry.
• Dill is a member of the same family that includes caraway, cumin, and coriander. The name dill comes from the Norse word dilla, which means to lull. Dill does indeed have a mild sedative effect. Dill goes well in breads, with fish, pasta, and soups. The more you cook dill, the less flavor it has, so add it toward the end.
• Garlic comes in powder, flakes, and of course in fresh cloves. This herb makes an Italian dish Italian or a Mexican dish Mexican. Fresh garlic in the backcountry adds a refined touch to your meals. Simmer it in oil to bring out the flavor.
• Mustard can be hydrated and used in salad dressings for the fresh greens you pick along the trail, with casseroles, beans, or pasta. If the mustard is too strong for your taste, try hydrating it with a little vinegar for a milder mix.
• Salt. If your meal tastes flat, it is probably lacking in salt, the Viagra of spices.
• Soy sauce, a salty product of fermented soybeans, goes well with rice dishes, pasta, and soups.
• Vanilla, a member of the orchid family, was used by the Aztec Indians to flavor their chocolate. Vanilla is still good in hot chocolate, pancakes, puddings, and dessert cakes.
• Vinegar adds a pungent taste to sweet and sour dishes and makes a nice salad dressing (with some oil).
It’s not easy to hit your food quantities dead on for long trips in the mountains, but unfortunately you don’t have a lot of room for error. If you bring too much, you have to hump a huge pack up the trail. If you don’t bring enough you may find yourself eating sheep brains. Our discussion here deals with staple food, not freeze-dried meals.
Over the years, the better minds who plan rations at NOLS have learned that the average person eats between 1.5 and 2.5 pounds of food per person per day out in the mountains, or between 2,500 and 4,500 calories. There is a 60 percent difference between 1.5 pounds and 2.5 pounds so the weights bear discussion. Consider what sort of eaters you have in your group. An adolescent requires near hourly feeding. Some people eat lightly regardless of size, while others seem to consume their body weight in food. If you’re camping with new people, be wary of those who say, “Don’t bring much for me, I eat like a bird.” Perhaps they eat like a bird in the city but out in the hills, humping their pack over the miles, they probably eat like a ravenous emu. Besides, some birds eat their body weight in food every day.
How much food you eat also depends on how strenuous a trip you plan. You’ll eat less food while hiking light days in the summer than you will ski mountaineering in January. You’ll eat more food on a climbing trip than you will on a fishing trip. The table below can help you to decide how much food to ration.
If you’re going for a short trip of five days or less, it’s easiest to just plan your ration meal by meal. Once you have put together your menu for the trip, it’s a good idea to weigh all the food and divide the total poundage by the total number of person-days to make sure your quantities are within reason. For instance, on a five-day trip with four people, you have a total of 20 person-days. If your crew is going on a typical backpacking trip, based on the table below, you would want to bring between 30 and 40 pounds of staple food. If your total poundage is over or under that number, you know you need to rethink your menu.
On longer trips, it may be too complicated to plan out every single meal. Claudia Pearson, author of NOLS Cookery and rations manager at the NOLS Rocky Mountain branch, plans rations for literally thousands of people per year. She does her planning by calculating the number of person-days, multiplying that number by the pounds per day (1.5-2.5 pounds), and then breaking down that number into specific food groups based on the pie chart on page 60. For instance, 4 people traveling for 10 days would need 80 pounds of food (assuming they decide to bring 2 pounds per person per day). Based on the pie chart, their menu would include 12.8 pounds of breakfast food, 17 pounds of trail food, 14.4 pounds of dinner food, 10.1 pounds of cheese, 5.33 pounds of sugar and fruit drinks, 5.9 pounds of flour and baking mix, 3.2 pounds of soups, bases, and desserts, and 11.2 pounds of milk, eggs, margarine, and cocoa.
|
Average Wilderness Activities (Backpacking or Kayaking) |
Strenuous Wilderness Activities (Snowcamping) |
Very Strenuous Activities (Extreme Mountaineering) |
Pounds per person per day |
1.5-2 |
2-2.25 |
2.25-2.5 |
Calories per person per day |
2,500-3,000 |
3,000-3,700 |
3,700-4,500 |
*Source: NOLS Cookery |
|||
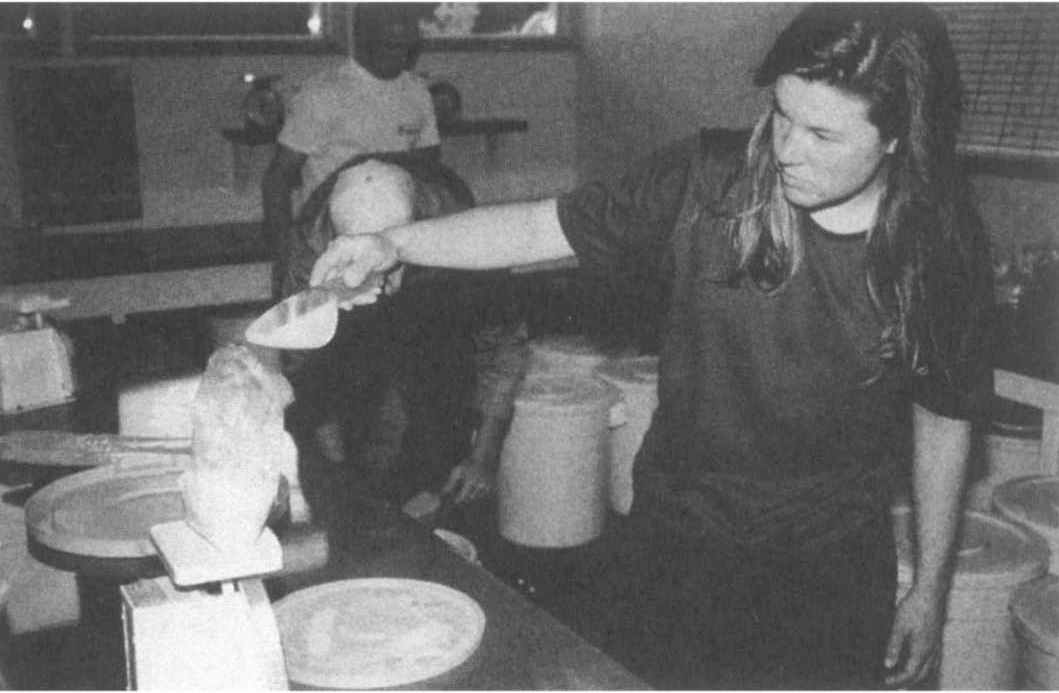
Weighing staples. On long expeditions getting the ration weights just right keeps the group well fed without being overburdened by extra weight. NOLS groups use food scales to make sure they bring the right amount of staple food. Theo Singelis
Rarely do you bring just the right amount of food. Chances are, you’ll come back with a little extra food, which isn’t a bad thing. You won’t have a refined sense of ration planning until you get some experience with it. If you camp often, you should make some notes on how much food you bring each trip and how that food fared. Did you stuff yourself every day and still come back with 10 pounds of extra food? Next time lop a few points off your equation. Did you finish your ration two days before the end of your trip and spend the last twenty miles on a spiritual fast that you neither wanted nor enjoyed? Next time jack up your ration calculation. Did you arrive at the road-head with but one dried apple in your pack, content and well fed? Bravo!
There’s no sense bringing all the paper, cardboard, and plastic packaging that most foods come in—it’s extra weight and often ends up as backcountry litter—so once you’ve bought all your rations, it’s best to repackage it in two-ply plastic bags. If you bring something that has special instructions for its preparation, clip it out and put it in the plastic bag. Be sure your plastic bags are of at least two-ply strength or you’ll likely have powdered milk or some such spill all over your belongings. Tie the bags with a loose overhand knot (who wants to fiddle with a tightly clenched knot on a cold day?) and, if you like, mark the difficult-to-identify ingredients with an indelible marker to identify the contents. For liquids like soy sauce, cooking oil, and vinegar, the plastic nalgene bottles with the screw-tops work well. The wide-mouthed nalgene tubs are best for things like peanut butter and margarine.
Finally, let me give you one of NOLS’s best trade secrets—nylon zip bags. Since you have to get at your food every day, you want a bag that gives you easy access. Nylon zip bags allow you to see and get at your victuals with ease.
Calculate the quantity of fuel to bring as part of your ration planning. You should check the stove manufacturers’ recommendations, but, typically, three people using one camp stove in the summer will burn about half a quart of fuel per day. Put another way, you should ration about one-sixth of a quart of fuel per person per day for summer trips.
That equation changes dramatically if you plan to camp on a glacier for your entire trip. In that scenario, you will need to melt liters and liters of snow for both cooking and drinking. You might have your stove running for two hours in the morning and two hours at night just melting snow. Double the fuel ration to about one-third of a quart of fuel per person per day for trips that require melting snow for water.
If you like to bake or if you drink lots of hot drinks, tea and the like, you need to bring extra fuel too. Baking, especially, can drain a fuel bottle quickly.
If you assess your own abilities, choose your teammates well, define the objectives of your trip, study and plan your route, calculate rations and fuel, and get yourself into good physical shape, you have prepared well for your trip.
• Team and Leadership. Assess yourself and your teammates. Put together a group of people you trust. Aim for a group that wants to achieve the same goals on the trip. Choose a person with excellent judgment who is respected by the whole group to be your leader.
• Expedition Goals. Discuss the goals of the trip with your teammates before you go. Discuss the what, where, why, and how. If objectives change during the trip, sit down and discuss new objectives.
• Route Planning. Study your route and discuss it with your teammates over a full set of maps. Learn the regulations where you will be traveling. For longer trips, decide on the best form of resupply given the remoteness of the area you’re traveling in, and then select the best site with the pilot, horsepacker, or friend who will do the resupply.
• Contingency Plans. Try to imagine the unimaginable before you go and then ask yourself how you would manage an emergency situation. Learn the communication systems—trails, roads, and nearby phones— of the area.
• Ration Planning. Staples are less expensive than freeze-dried foods and allow more flexibility and creativity in your meals. Freeze-dried foods are lighter than staple foods and easier to prepare. Bring freeze-dried foods if you need to go super-light or need the convenience. On short trips, you can plan your rations on a per-meal basis. On long trips, it’s easier to ration between 1.5 and 2.5 pounds per person per day, depending on the difficulty of your route and the nature of travel.
I. For a good treatment of the 1939 K2 expedition, see Andrew J. Kauffman and William L. Putnam, K2: The 1939 Tragedy, Mountaineers Books, 1993.
II. K2: The 1939 Tragedy; p. 33.